background image

EPSON Stylus Pro 4400/4450/4800/4880/4880C

Revision C

Product Description

Operating Panel

52

1.4.4.8  Roll Paper Margin

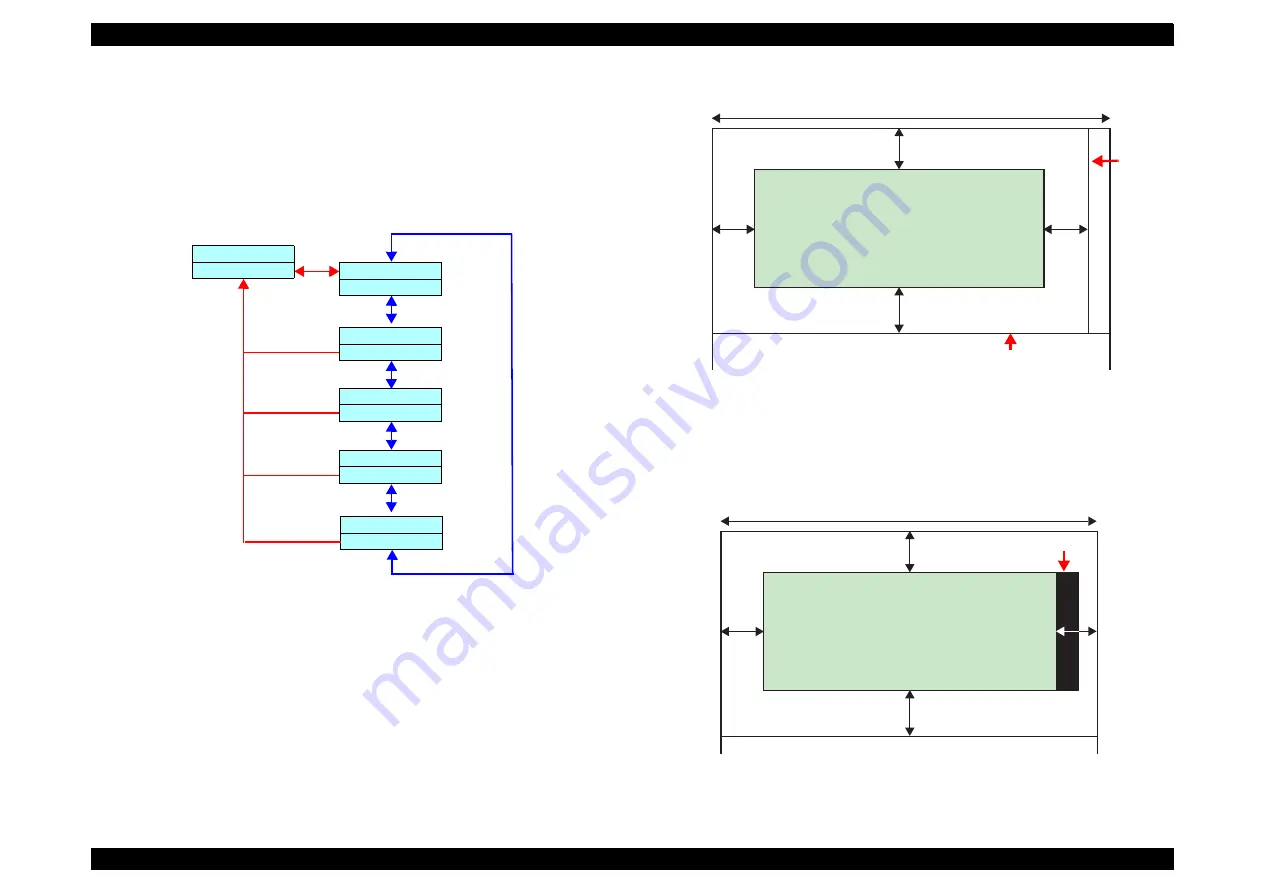
Setting this panel allows switching roll paper margin, all sides 3mm / all sides 
15mm / top and bottom 15mm, right and left 3mm / top and bottom 25mm, right 
and left 3mm. This setting is only valid for roll paper. It's not valid for cut sheet. 
This setting changes only margin, and doesn't change image size.

†

Level structure for roll paper margin setting

†

If margin=3mm is set
Printing positions of vertical line and horizontal line are same as paper 
size.

†

If margin=15mm, or Top/Bottom15mm is set
Printing positions of vertical line and horizontal line are positions widened 
12mm from all sides or top and bottom. 

†

If margin=25mm is set
Printing positions of vertical line and horizontal line are positions widened 
22mm from top and bottom. 

(Refer to Figure 1-10)

Figure 1-10. Roll Paper Margin


(1)

If printable area is more than X=15mm from right edge of paper, the portion is 
clipped. 
Vertical line is not printed. 

(Refer to Figure 1-11)

Figure 1-11. Roll Paper Margin (2)

[

 / 

]

[

< / >

]

[

<

]

PRINTER SETUP

PAPER MARGIN

PAPER MARGIN

DEFAULT

PAPER MARGIN

T/B25mm

PAPER MARGIN

15mm

[

 / 

]

[

 / 

]

[

<

]

[

 / 

]

PAPER MARGIN

T/B15mm

[

<

]

PAPER MARGIN

3mm

[

<

]

[

 / 

]

Roll Paper Width X

Printable Area

X (*)

X

X

X

Vertical 

Line

Cut Position or Border

Roll Paper Width X

Printable Area

X (*)

X

X

X

Clipped Area

Содержание Stylus Pro 4800 Portrait Edition

Страница 1: ...EPSONStylusPro 4400 4450 4800 4880 4880C Color Large Format Inkjet Printer SERVICE MANUAL SEIJ04008 ...

Страница 2: ...his manual However should any errors be detected SEIKO EPSON would greatly appreciate being informed of them The above not withstanding SEIKO EPSON CORPORATION can assume no responsibility for any errors in this manual or the consequences thereof EPSON is a registered trademark of SEIKO EPSON CORPORATION General Notice Other product names used herein are for identification purpose only and may be ...

Страница 3: ...E POWER SUPPLY CABLE MUST BE CONNECTED USE EXTREME CAUTION IN WORKING ON POWER SUPPLY AND OTHER ELECTRONIC COMPONENTS WARNING 1 REPAIRS ON EPSON PRODUCT SHOULD BE PERFORMED ONLY BY AN EPSON CERTIFIED REPAIR TECHNICIAN 2 MAKE CERTAIN THAT THE SOURCE VOLTAGES IS THE SAME AS THE RATED VOLTAGE LISTED ON THE SERIAL NUMBER RATING PLATE IF THE EPSON PRODUCT HAS A PRIMARY AC RATING DIFFERENT FROM AVAILABL...

Страница 4: ... reference Connector pin assignments Electrical circuit boards schematics Exploded diagram Parts List Symbols Used in this Manual Various symbols are used throughout this manual either to provide additional information on a specific topic or to warn of possible danger present during a procedure or an action Be aware of all symbols when they are used and always read NOTE CAUTION or WARNING messages...

Страница 5: ...y p 163 was changed Chapter 5 Procedures were partially changed in 5 1 4 Adjustment Items classified by Part Unit p 368 5 8 Installing Firmware for SP 4400 4 color model after replacing Main Board with New one p 445 was added C September 12 2007 Revised Contents All chapters Information on Stylus 4450 4880 4880C has been added ...

Страница 6: ...formation 39 1 4 4 Panel Setting 40 1 4 5 Maintenance Mode 1 83 1 4 6 Maintenance Mode 2 90 1 4 7 MIB Function 102 1 4 8 Function to Prevent Irregular Printing 103 1 4 9 Initialization 104 1 4 10 Default Setup Values 104 1 5 Controller 105 1 6 Interface 106 1 6 1 USB interface 106 1 6 2 IEEE1394 Interface 107 1 6 3 Optional Interface 108 1 6 4 Supplements 110 1 7 Optional Units and Consumables 111...

Страница 7: ...1 1 Cautions 367 5 1 2 Advance of Adjustment 367 5 1 3 The Part Unit that Requires Adjustment 367 5 1 4 Adjustment Items classified by Part Unit 368 5 1 5 Adjustment Item 371 5 1 6 Adjustment Tools 374 5 1 7 Adjustment Program Basic Operation 375 5 2 Mechanical Adjustment 376 5 2 1 CR Timing Belt Tension Adjustment 376 5 2 2 PF Timing Belt Tension Adjustment 378 5 2 3 Paper Thickness Sensor Adjust...

Страница 8: ...on Switching PG Switching Counter 441 5 6 2 Reset PF Motor Counter 441 5 6 3 Reset ASF Counter 442 5 6 4 Reset When CR Unit Change 442 5 6 5 Reset When Cleaning Unit Change 443 5 6 6 Reset When Printhead Change 443 5 7 Installing Firmware 444 5 8 Installing Firmware for SP 4400 4 color model after replacing Main Board with New one 445 5 9 Device ID Setting 446 5 10 Writing MAC Address 447 Chapter ...

Страница 9: ...C H A P T E R 1 PRODUCTDESCRIPTION ...

Страница 10: ...odel MK C M Y MK C M Y 4 Calibration function Colorimetric Calibration Corrects the amount of dot generation based on the individual difference between the following parts Printhead MAIN Board Power Supply Board Head ID Corrects the amount of dot generation based on the individual difference between the following part Printhead Calibration accuracy is improved by taking electrical variable factor ...

Страница 11: ...min High Quality Super On VSD3 1440 x 720 7 3 min Glossy Photo Paper Quality VSD2 720 x 720 5 0 min High Quality VSD3 720 x 720 7 5 min High Quality Super On VSD3 1440 x 720 10 5 min Table 1 3 Throughput Stylus Pro 4450 4880 4880C Ink type EPSON media Quality Dot size Resolution dpi Throughput A2 printing time print only 8 color Plain Paper Economy VSD1 360 x 360 1 5 min Speed VSD1 360 x 360 2 4 m...

Страница 12: ...er Handling Support various media Automatic roll paper cutter manual cutter Automatic cut sheet loading ASF Rear manual feed Front manual feed thick paper only Borderless print for 4 sides ASF support Compatibility with Other LFPs Commands are upper compatible with following models Stylus Pro 4400 4800 Stylus Pro 4000 7000 7500 7600 9000 9500 9600 10000 10000CF 10000 Dye 10600CF 10600UC Stylus Pro...

Страница 13: ...mal mode is 425 8 mm 16 7 inch Table 1 4 Nozzle configuration Model Name Ink Nozzles Stylus Pro 4800 Black MK or PK 180 Light Black 180 Light Light Black 180 Cyan 180 Magenta 180 Light Cyan 180 Light Magenta 180 Yellow 180 Stylus Pro 4880 Stylus Pro 4880C Black MK or PK 180 Light Black 180 Light Light Black 180 Cyan 180 Vivid Magenta 180 Light Cyan 180 Vivid Light Magenta 180 Yellow 180 Stylus Pro...

Страница 14: ...ng Friction feed Line spacing 1 6 inch or programmable at 1440 inch Note Paper feed resolution is 0 002936758 mm Paper path Roll paper Manual front back Automatic sheet feeder Feed speed 6 35 mm paper feed 215 10 msec except front rush back rush and hold time 1 2 5 Paper Feeder Specification ASF Feeds paper automatically by Automatic Sheet Feeder Rear Manual Feed Loads automatically from rear manu...

Страница 15: ...cycle paper BORDERLESS PRINT WIDTH Borderless print for right and left is assured with following paper width roll paper Borderless Print Width But following types are not recommended for borderless printing Single Weight Matte Paper Enhanced Matte Paper Textured Fine Art Paper Ultra Smooth Fine Art Paper NOTE 1 Paper should have no wrinkles or tears and the surface should be smooth 2 The force to ...

Страница 16: ...Paper p16 Thickness 0 08 0 11 mm Weight 64 130 gf m2 Type Plain paper Recycle paper NOTE 1 Paper should be placed in portrait orientation 2 Paper should have no wrinkles tears or stains and the surface should be smooth 3 It is used under normal condition temperature 15ºC 25ºC humidity 40 60 RH BORDERLESS PRINT WIDTH Borderless print for right and left is assured with following paper width But foll...

Страница 17: ...600 A2 US C Name 203x279 210x297 216x279 229x305 254x364 279x356 297x420 279x432 305x457 329x483 400x600 420x594 432x559 Premium Ink Jet Plain Paper Xerox 4024 1 5 Premium Ink Jet Plain Paper Genuine 1 5 Bright White Inkjet Paper 1 5 EPSON Photo Quality Inkjet Paper 1 5 EPSON Enhanced Archival Matte Paper 1 2 Watercolor Paper Radiant White 1 2 EPSON Premium Glossy Photo Paper 0 7 EPSON Premium Sem...

Страница 18: ... 210 254 300 305 329 356 400 406 420 431 6 Bright White Inkjet Paper 2 1 5 A Single Weight Matte Paper Roll 2 1 2 A Enhanced Matte Paper Roll 3 1 2 A Photo Glossy Paper Roll 2 0 7 A Photo Semigloss Paper Roll 2 0 7 A Premium Glossy Photo Paper 250 Roll 3 0 7 A Premium Semigloss Photo Paper 250 Roll 3 0 7 A Premium Semimatte Photo Paper 250 Roll 3 0 7 A Premium Luster Photo Paper 250 Roll 3 0 7 A U...

Страница 19: ...ght and left surplus printable area is maximum 3mm on the home position side and maximum 5mm on the other side distance from paper edge to platen sponge width is less than 3mm the maximum surplus print quantity not on platen 0mm 3mm is printable area Conditions for separating into multiple pages for printing cut sheet 1 For thick paper print until the bottom edge reaches to 14mm Remaining data is ...

Страница 20: ...ting Starting of JOB take minimum cut length for margin and cut while printing While JOB new page has no margin cut at image border position in continuing print End of JOB cut at the bottom of the image 4 sides borderless 2 cut You can set 4 sides margins to zero Use the following method for cutting At the front edge page take refresh margin length for margin cut while printing At the end of the p...

Страница 21: ... is admitted cut the paper using the following method by setting panel setting to roll paper automatic cut Mechanic condition Distance between the cutting position and paper setting position L0 205 43mm Distance between the cutting position and cutter mark L1 27 6 mm Minimum cut length L2 130 mm default value Note User need to remove the strip of paper that remains between eject roller and nip rol...

Страница 22: ...uch as cloth Rigidity is extremely high paper such as Vinyl Outdoor type or Fine Art type 1 2 8 Electrical Specification Rated voltage AC 100 240V Input voltage range AC 90 264V Rated frequency range 50 60Hz Input frequency range 49 61Hz Rated current 100 240V ac 50 60Hz and 1 0 0 5A Power consumption operation status Stylus Pro 4400 4800 Less than 59 W Stylus Pro 4450 4880 4880C Less than 55 W Le...

Страница 23: ... of life when the number of the pump rotation exceeds 160 000 times 1 2 10 Environmental Conditions 1 2 10 1 Temperature Humidity Note 1 Within one month for 40ºC within 120 hours for 60ºC 2 No condensation These values are applicable only within the range as shown below Print quality is assured only within a temperature of 15 to 25 degrees C and a humidity of 40 to 60 Figure 1 2 Environmental Con...

Страница 24: ...dge is attached switch the power ON Switch the power OFF when capping is completed 4 Left out in condition of temperature under 15 C the ink in the printhead and ink cartridge freezes It takes about 3 hours for the frozen ink to be usable under the condition of 25 C 1 2 10 4 Surrounding Space Provide the printer with an enough surrounding space to ensure proper installation of accessories and repl...

Страница 25: ...s than 8 minutes until initial ink charge is finished after the ink lever is lowered MTBF MEAN TIME BETWEEN FAILURES 20 000 hours with power on except when electronic parts and fans have any malfunction 1 2 12 Overall Dimensions Figure 1 4 Overall Dimensions of Stylus Pro 4400 4450 4800 4880 4880C Dimensions of Unit Weight 8 color model Approx 40 2kg ink cartridge and paper is not included 4 color...

Страница 26: ...tenance Tank C12C890191 Special Consumables Ink cartridge 8 color Stylus Pro 4800 Stylus Pro 4880 4880C Table 1 18 Ink Cartridge Stylus Pro 4800 Ink cartridge Model Number 110 ml 220 ml Photo Black C13T564100 C13T565100 Matte Black C13T543800 C13T544800 Cyan C13T564200 C13T565200 Magenta C13T564300 C13T565300 Yellow C13T564400 C13T565400 Light Cyan C13T564500 C13T565500 Light Magenta C13T564600 C1...

Страница 27: ...ed Int Print Server C12C824052 Stylus Pro 4400 4800 only Borderless Print Spacer for 420 mm and 8 inch Roll Paper C12C811201 Auto Cutter Spare Blade C12C815291 Note The asterisk is a substitute for the last digit of the product code which varies by location Table 1 20 Ink Cartridge Stylus Pro 4400 Ink cartridge Model Number 110 ml 220 ml Matte Black C13T543800 C13T544800 Cyan C13T543200 C13T544200...

Страница 28: ... 1 5 External View and Parts Names Stylus Pro 4400 4800 NOTE 4 color model is equipped with a cover instead of the ink cartridge box right Type B Interface Printer Cover Spindle Paper Set Lever Control Panel Ink Cartridge Box Right side ASF Cassette Maintenance Tank Ink Cartridge Box Left side Paper Cover IEEE1394 Interface AC Inlet USB Interface Paper Guide Center Unit Rear cover ...

Страница 29: ...igure 1 6 External View and Parts Names Stylus Pro 4450 4880 4880C 4 color model is equipped with a cover instead of the ink cartridge box right Printer Cover Spindle Paper Set Lever Control Panel Ink Cartridge Box Right side ASF Cassette Maintenance Tank Ink Cartridge Box Left side Paper Cover Network Interface AC Inlet USB Interface ...

Страница 30: ...lity for Paper Type Roll Paper selection Available rate of Maintenance Tank Refer to 1 4 2 4 Ink Remaining Indicator Display p38 Panel Display Refer to 1 4 2 Panel Display p33 Remaining Ink Cartridge Refer to 1 4 2 4 Ink Remaining Indicator Display p38 Shifts to Setting Item Selection Menu Table 1 22 LED LED Color Display Printer Status Paper check Red On Indicates that the paper is not printable ...

Страница 31: ...ion execution Setting fixed Memory Select paper type Paper Cut Paper type select 4 Not in operation when printing Not in operation when the paper is picked up by ASF 1 Roll paper cut ON 2 Roll paper cut OFF 3 Cut sheet Indicate 1 2 3 1 by turns Paper cut or paper feed 5 Not in operation when printing Roll paper cut ON Move to cut operation after 3 sec Roll paper cut OFF Not operated Cut sheet is n...

Страница 32: ...cps paper feed if pressed for a further 2 seconds Maximum reverse feeding is 37cm with one press of the button 7 5cps paper feeding for 2 seconds after the button is pressed 52cps paper feed if pressed for a further 2 seconds 8 Can be switched when roll paper remaining detection is on or cut sheet remaining detection is on in Maintenance Mode 2 While the detection is stopped the printer stops the ...

Страница 33: ...S 4 YES YES 1 YES YES Data processing Printing PRINTING OFF Blink NO NO YES 6 YES 1 YES YES Data processing Printing 23 PRINTING xx xm OFF Blink NO NO YES 6 YES 1 YES YES Unable to print 14 UNABLE TO PRINT ON 2 Unable to execute UNABLE TO EXECUTE ON 2 Maintenance tank near 7 MNT TK NEAR FULL Blink 2 Ink low 8 INK LOW Blink 2 Maintenance request MNT REQ nnnn 5 Paper near end PAPER LOW Blink 2 Ink d...

Страница 34: ... YES ASF paper out PAPER OUT ON OFF YES 17 NO YES NO YES 11 Disable to borderless printing error RELOAD PAPER Blink OFF NO YES 17 NO NO NO YES 15 NO BORDERLESS WITH THIS SIZE Paper recognition error RELOAD PAPER Blink OFF NO NO NO NO YES Cut sheet set by manual insertion error RELOAD PAPER INSERT DEEPLY Blink ON NO NO NO NO YES Cut sheet loading error 10 NOT STRAIGHT RELOAD Blink ON NO NO NO YES Y...

Страница 35: ...9 YES Conversion cartridge life near end 8 TIMES REMAINING OFF ON ON NO NO NO Release YES Conversion cartridge life error 8 REPLACE CNVRSION CRTG OFF OFF ON NO NO NO NO YES Wrong PK MK 8 INVALID INK CRTG OFF ON ON NO NO NO Release YES K ink replacement conformation 25 BK INK CHANGE N EXEC Y OFF OFF ON NO 3 NO NO 3 NO NO YES Ink out 8 INK OUT OFF OFF ON NO YES 12 NO NO YES Wrong Ink cartridge 8 INV...

Страница 36: ...aper jam CR 9 RELEASE LEVER REMOVE PAPER JAM Blink OFF NO NO NO NO NO YES Reboot request 9 TURN PRINTER PWR OFF AND THEN ON NO NO NO NO NO NO No maintenance tank NO MNT TNK OFF OFF ON NO NO NO NO YES Rear cover open REAR COVER OPEN OFF OFF NO NO NO NO YES Reset RESET ON ON ON NO NO NO NO NO NO F W updating F W UPDATING OFF OFF OFF NO NO NO NO NO NO F W update completed UPDATE COMPLETE OFF OFF OFF ...

Страница 37: ... adjustment pattern etc It returns to the display before performing after 3 seconds 15 Only using ASF paper eject operation is performed by reset 16 A displayed unit is the second It is displayed while counting down each 1 second from maximum time 17 After cut sheet error occurred paper eject operation would be performed by pressing down the Paper Feed Switch and then it will occur ASF paper out e...

Страница 38: ...Adjustment and Indicator Display Users can adjust paper suction to set paper easily only when paper set lever is released and paper is detected with paper sensor rear or PE sensor At that time followings are displayed on the LCD panel LCD Display Suction indicator 3 levels 14th character counting from left of lower line Up down mark 15th character counting from left of lower line Paper type LCD Ro...

Страница 39: ...b information 0 10 xx2 Saving No 0 9 xx3 xx4 ID No 0 65535 0 is not available xx5 Using I F 01 Parallel 1 02 USB 03 Option I F1 04 Option I F 2 05 IEEE1394 FF When I F is not used Printable Information saving Printing Cancel Normal end Information saving Count Start JS Count End JE Cancel Count End JE Complete xx6 Job status 01 Pending 02 Printing 03 Complete 04 Cancel 05 Abort xx7 xx8 Character s...

Страница 40: ...the lower line one after another by pushing Paper Feed buttons in the setting value select mode if the setting value can be changed The at left side of the setting value represents the current setup value 5 When the Menu Cleaning button is pushed at the setting value select mode the displayed setting value is entered and registered as the current setting value If it has a corresponded operation ex...

Страница 41: ...T PRINT PRINTER STATUS CUSTOM PAPER MAINTENANCE HEAD ALIGNMENT PRINTER SETUP PLATEN GAP TEST PRINT NOZZLE CHECK PRINTER STATUS VERSION CUSTOM PAPER PAPER NUMBER MAINTENANCE CUTTER REPL HEAD ALIGNMENT PAPER THKNS CUTTER REPLACE CUTTER REPLACE EXEC PRINTER SETUP PRINTER SETUP ROLL COUNTER PRINTER SETUP PLATEN GAP PRINTER SETUP PAGE LINE PRINTER SETUP INTERFACE PRINTER SETUP CODE PAGE PRINTER SETUP P...

Страница 42: ...T TEST PRINT NOZZLE CHECK TEST PRINT STATUS CHECK TEST PRINT JOB INFO TEST PRINT CUSTOM PAPER PRINTER STATUS PRINTER STATUS VERSION PRINTER STATUS PRINTABLE PG PRINTER STATUS INK LEFT PRINTER STATUS MAINT TANK PRINTER STATUS USAGE COUNT PRINTER STATUS USE COUNT CLR PRINTER STATUS JOB HISTORY PRINTER STATUS JOB HSTRY CLR PRINTER STATUS TOTAL PRINTS PRINTER STATUS SERVICE LIFE ...

Страница 43: ...USTOM PAPER PAPER NUMBER CUSTOM PAPER PLATEN GAP CUSTOM PAPER THICKNESS PAT CUSTOM PAPER THICKNESS NUM CUSTOM PAPER CUT METHOD CUSTOM PAPER PPR FEED ADJ CUSTOM PAPER EJECT ROLLER CUSTOM PAPER DRYING TIME CUSTOM PAPER SUCTION CUSTOM PAPER M W ADJ MAINTENANCE MAINTENANCE CUTTER REPL MAINTENANCE BK INK CHANGE MAINTENANCE PWR CLEANING MAINTENANCE CLOCK SETTING HEAD ALIGNMENT HEAD ALIGNMENT PAPER THKNS...

Страница 44: ...gin PAPER MARGN DEFAULT T B 15mm T B 25mm 15mm 3mm p 52 Detect Paper Width PPR SIZE CHK ON OFF p 53 Detect Skew Error PPR ALIGN CHK ON OFF p 54 Job Time out Setting TIME OUT OFF 30sec 60sec 180sec 300sec p 54 Cutter Position Adjustment CUTTER ADJ EXEC p 55 Auto Margin Refresh REFRESH MRGN ON OFF p 55 Cut Sheet Size Error SHEET SIZE CK ON OFF p 56 Auto Nozzle Check for Each Job AUTO NZL CK OFF ON p...

Страница 45: ... E F E F E F E F E F 5th row LK XXXXXXX 0 nn E F E F E F E F E F 6th row LC XXXXXXX 0 nn E F E F E F E F E F 7th row LM XXXXXXX 0 nn E F E F E F E F E F 8th row LLK XXXXXXX 0 nn E F E F E F E F E F Maintenance Tank Count MAINT TANK 0 nn E F E F E F E F E F p 69 Consumption Counter Ink counter USAGE COUNT INK xxxxx x ml p 69 Paper counter PPR xxxxx x cm Clear consumption counter Ink counter clear U...

Страница 46: ...K SLOW p 74 Paper feed adjustment PPR FEED ADJ 0 70 0 0 70 p 74 Eject paper roller setting EJECT ROLLER AUTO SHEET ROLL CURLED ROLL NORMAL p 74 Ink drying time Pass delay DRYING TIME 0 0sec 10 0sec p 74 Paper suction SUCTION STANDARD 1 2 3 4 p 74 MW print adjustment M W ADJ STANDARD 1 2 p 74 Maintenance menu MAINTENANCE Cutter Blade Replacement Execute sequence CUTTER REPL EXEC p 79 Cover open OPE...

Страница 47: ... 1 5 9 3 C 1 5 9 3 LLK 1 5 9 BI D BLACK 1 MK 1 5 9 2 MK 1 5 9 3 MK 1 5 9 BI D ALL 1 MK 1 5 9 1 LK 1 5 9 2 MK 1 5 9 2 LK 1 5 9 3 MK 1 5 9 3 LK 1 5 9 Table 1 26 Panel Setting Menu Item Top menu Panel display Item menu Panel display Setup value Underline Default Ref Basic row 8 color 4 color Stylus Pro 4800 Stylus Pro 4880 4880C Stylus Pro 4400 4450C 1st row MK or PK MK or PK C 2nd row C C C 2 3rd ro...

Страница 48: ...ength can be changed on 10m basis by holding down the up down key The near end value can be set on 1m basis within 1 to15m 2 If the unit length is changed in Maintenance Mode all the value of roll paper length near end and remaining paper display are returned to the initial settings Level structure of remaining cut sheet menu Note The number of cut sheet can be set on 10 sheets basis within 10 to ...

Страница 49: ... width Use Muximum 2 6mm For thick paper Big 2 1mm Reduce the smearing on the printed image of thin paper Middle 1 5mm For certain easy rubbed thin paper Small 1 2mm For thin paper Default Minimum 0 7mm For thin film Film glossy media PRINTER SETUP PLATEN GAP PLATEN GAP NARROW PLATEN GAP STANDARD PLATEN GAP WIDE PLATEN GAP WIDER Table 1 28 Relationships of PG Setting Values Paper thickness sensor ...

Страница 50: ...e line is a black solid line with 1 dot width Level structure of page line menu More than 0 3mm Less than 0 8mm 00H 08H Narrow Minimum Small Small Small Middle Small Big Middle Muximum Big Standard Muximum Small Small Small Middle Middle Big Big Muximum Muximum Wider Minimum Small Small Middle Middle Big Big Muximum Muximum Muximum Widest Minimum Middle Small Big Middle Muximum Big Muximum Muximum...

Страница 51: ... structure of I F switching Stylus Pro 4400 4800 Stylus Pro 4450 4880 4880C 1 4 4 7 Code Page Switching Selecting this mode allows the code page switch between PC437 and PC850 Level structure of Code Page switching PRINTER SETUP INTERFACE INTERFACE AUTO INTERFACE USB INTERFACE IEEE1394 INTERFACE OPTION PRINTER SETUP INTERFACE INTERFACE AUTO INTERFACE USB INTERFACE OPTION PRINTER SETUP CODE PAGE CO...

Страница 52: ... If margin 15mm or Top Bottom15mm is set Printing positions of vertical line and horizontal line are positions widened 12mm from all sides or top and bottom If margin 25mm is set Printing positions of vertical line and horizontal line are positions widened 22mm from top and bottom Refer to Figure 1 10 Figure 1 10 Roll Paper Margin 1 If printable area is more than X 15mm from right edge of paper th...

Страница 53: ...r initializing or print starting for distance between grid roller and 1 nozzle paper is fed unconditionally The print starts from the position No back feed with other sequences Although the paper that is under grid roller will be wasteful place emphasis on printing even for low reflection paper Cut sheets and auto loading have same specification The above paper width detection OFF sequence is just...

Страница 54: ... when roll paper is selected in the printer setting menu Paper width detection is carried out when paper width detection is ON even if Skew error is set to OFF Level structure of detect skew error menu 1 4 4 11 Job Time out Setting When print data is interrupted more than setting time although data receiving is available the print job is regarded as an end and the printer runs paper feeding operat...

Страница 55: ...tion adjustment pattern 4 Select the best adjustment pattern number and enter the number NOTE When 1 cut is selected in panel it will not operate Cutter position adjustment pattern Output paper size A4 Font Built in font Print all in alphanumeric characters Print sample See following picture Figure 1 12 Cutter position adjustment pattern NOTE The shift amount among the pattern numbers is 1 360dpi ...

Страница 56: ...ing receiving data cut sheet size error never occurs Level structure of cut sheet size error menu 1 4 4 15 Auto Nozzle Check for Each Job This setting is valid only when Cleaning setting at nozzle check is ON By turning this setting on auto nozzle check can be performed before printing upon receiving data from PC Trigger for receiving data from PC is when receiving remote command JS If JS command ...

Страница 57: ...e of cleaning setting for nozzle check menu 1 4 4 17 Super Low Speed Cut Mode When this setting is set to ON normal cut operation is performed at 20CPS to reduce a noise and paper dust The default is set to OFF However when top edge is cut at Top Bottom borderless printing setting including top margin at 1 cut setting this setting is not reflected to prevent irregular color by reducing cut speed L...

Страница 58: ... initialization Remaining Paper detection Remaining roll paper 20m Remaining roll paper warning 2Çç Remaining cut sheet 100PG Remaining cut sheet warning 10PG PG setting STANDARD Page line ON I F switching AUTO Code page switching PC437 Roll paper margin setting T B 15mm Paper width detection ON Paper skew detection ON Job timeout setting OFF Cutter position adjustment Manufacture setting Auto mar...

Страница 59: ... Yellow 2 Each parameter indicates the following Z 0 xxxx Firmware version y yy Network Firmware version Stylus Pro 4450 4880 4880C only I Number of colors four or eight used for printing B Business system setting C Custom version setting zzz Maintenance tank available quantity aaaaa a Total ink counter just before print the last nozzle check pattern 5 1 figures bbbbb b Total ink counter just befo...

Страница 60: ...C437 Use Paper xxxxxx xcm Margin T B15mm Mainte Tank E F Paper Size Chk On Cutter Life E F Paper Align Chk On CR Motor E F Time Out 30sec PF Motor E F Refresh Margin On Head E F Sheet Size Chk On Cleaner E F Auto Nozzle Chk Off Auto Cleaning On Quiet Cut Off Ink Cartridge Manufacture EPSON GENUINE INK EPSON GENUINE INK EPSON GENUINE INK Ink Type Pigment Pigment Pigment Ink Color Matte Black Cyan M...

Страница 61: ...2 03 Expire Date 03 10 03 10 03 10 Ink Life 06 months 06 months 06 months Passed 02 months 02 months 02 months Printable Sheet 120 pages 120 pages 120 pages Manufacture EPSON GENUINE INK EPSON GENUINE INK Ink Type Pigment Pigment Ink Color Vivid Light Magenta Light Light Black Ink Capacity 110ml 110ml Ink Left E F E F Production Date 02 03 02 03 Expire Date 03 10 03 10 Ink Life 06 months 06 months...

Страница 62: ...ate 03 10 Ink Life 06 months Passed 02 months Printable Sheet 120 pages Type B Whether optional Type B I F is mounted or not Current Setting Setting content of PRINTER SETUP menu in Panel Setting mode Printer Status Version Stylus Pro 4400 4800 Installed firmware version Stylus Pro 4450 4880 4880C Installed firmware version and network firmware version Total Print Total number of printed sheets Us...

Страница 63: ...rinter Max 10 Job Definition of job is followings Adjustment patterns and test patterns Gap adjustment Nozzle check pattern Status print Cutter position Paper thickness detection Print data from host Job information print It prints job information print pattern with following specifications Print paper size A4 Font Built in font Print all in alphanumeric characters NOTE 2 byte characters in user n...

Страница 64: ...Ink Used PK xxx xxml C xxx xxml M xxx xxml Y xxx xxml LK xxx xxml LC xxx xxml LM xxx xxml LLK xxx xxml Job No 9 User Name XXXXXXXXXXXXXXXX Host Name XXXXXXXXXXXXXXXX Doc Name XXXXXXXXXXXXXXXXXXXXXXXXXXXXXXXX I F Type Unknown Job State Processing Start 00 00 00 00 00 00 End 00 00 00 00 00 00 Paper Used W xxxxxmm H xxxxxmm Page Count xxxxx Ink Used PK xxx xxml C xxx xxml M xxx xxml Y xxx xxml LK xxx...

Страница 65: ...rd Cut Method ThickPaperFast Eject Roller RollCurled M W Adj Standard Ppr Thick 0 2mm Ppr Feed Adj 0 70 Paper No 5 Custom Name XXXXXXXXXXXXXXXXXXXXXXXXXXXXXX Platen Gap Standard Drying Time 10 0 sec Suction Standard Cut Method ThickPaperFast Eject Roller RollCurled M W Adj Standard Ppr Thick 0 2mm Ppr Feed Adj 0 70 Paper No 6 Custom Name XXXXXXXXXXXXXXXXXXXXXXXXXXXXXX Platen Gap Standard Drying Ti...

Страница 66: ...s 1 or more with Credit function ON bit3 Reserved 5 Displays a custom number when custom action is specified in special setting and displays 0 when custom action is not specified 1 2 3 4 5 No Description 1 Assigns special specification version A0 is normally displayed 2 Firmware version 4 letters 3 Network firmware version 4 Displays the following When the printer is Stylus Pro 4880 4880C 8 When t...

Страница 67: ...int ink used Note 1 Printable pages within IR command range are calculated and displayed 2 When there is no value to be displayed the panel displays Level structure of printable pages per ink cartridge menu Note Displays only for 4 cartridges MK CM Y for 4 color model PRINTER STATUS PRINTERBLE PG PRINTABLE PG MK xxxxxxPG PRINTABLE PG C xxxxxxPG PRINTABLE PG M xxxxxxPG PRINTABLE PG Y xxxxxxPG PRINT...

Страница 68: ...ach ink cartridge is displayed as 100 Ink use count is started at that time Level structure of remaining ink display Note 4Displays only for 4 cartridges MK CM Y for 4 color model Table 1 31 Ink Remaining Ink remaining Panel display Ink check LED 100 81 remaining E F OFF 80 61 remaining E F OFF 60 41 remaining E F OFF 40 21 remaining E F OFF 20 just before near end E F OFF After near end just befo...

Страница 69: ...ys 1 4 4 28 Clear consumption counter Clear ink usage counter Reset Ink usage counter to 0 Clear paper usage counter Reset Paper usage counter to 0 1 4 4 29 Job History Display Job No It is a Job number saved in the printer The latest job is No 0 Paper usage Paper usage vertical x horizontal m2 of each job is displayed NOTE Paper usage is counted and displayed within JS command to JE command Ink u...

Страница 70: ...e Therefore it is indicated by supply tube life Supply tube life is defined by amount of to and fro so it is calculated by accumulation of CR to and fro times Display Life Maintenance call Life is less than 4 Fatal error Considering tube damage when life reaches to 0 service call occurs Counter clear It is cleared by executing CR Motor life accumulation counter CR Motor initialization in special s...

Страница 71: ...ate method It is calculated by accumulating amount of injection shots of each color amount of assured injection shots per nozzle x 180 nozzles and finally calculated as amount of maximum accumulative shots within each color Accumulate value of 220 shots per page print Display Life Maintenance call Does not occur Fatal error Does not occur as head unit Counter clear It is cleared by executing Head ...

Страница 72: ...el Setting 1 Select user paper setting menu from the panel 2 Select the paper number STD 1 10 3 Enter PG position 4 Print the paper thickness detection pattern Does not print when STD is selected 5 Check the printed patterns and select the number of the pattern with the least displacement 6 Select cutting method 7 Enter paper feed adjustment value 8 Select eject paper roller 9 Enter the ink drying...

Страница 73: ...he setting PG position is prioritized and PG settings made using commands or printer setting menu are ignored At this time the PG settings are not displayed on the panel Paper setup Operation Standard When each setting item values are set by commands it follows the command settings 1 10 User defined paper is used and even if settings are set by commands user setting value is used ...

Страница 74: ...tems Setting Operation Setting value PG setting Enter any PG position SN m1 01h Wider m2 01h PG Big 2 1mm Standardm2 03h PG Little 1 2mm Widestm2 05h PG Maximum 2 6mm Wide m2 02h PG Middle 1 5mm Narrowm2 04h PG Minimum 0 7mm Cutting method Cutting method is selected when cutting paper SN m1 80h Standardm2 03h 1m2 65h Thick paper Fastm2 01hm2 7Eh SN m1 81h Thin paperm2 02hm2 49h Thick paper Slowm2 ...

Страница 75: ...0 8 720 360 0 01h 00h 720x360 VSD2 2 FOL 36POL 720x360 Standard 1 2 70 8 720 360 0 01h 10h 720x720 VSD2 2 FOL 21POL 720x720 1 80 8 720 720 0 01h 00h 720x720 VSD2 2 FOL 48POL 720x720 0 3 Standard 81 8 720 720 1 01h 20h 720x720 VSD2 2 FOL 46POL 720x720 0 5 2 82 8 720 720 2 01h 00h 1440x720 VSD3_N 2 FOL 11POL 1440x720 Standard 90 8 1440 720 0 01h 10h 1440x720 VSD3_N 2 FOL 28POL 1440x720 1 91 8 1440 7...

Страница 76: ...rawing Standard 1 2 51 4 360 720 1 01h 10h 720x360 VSD2 2 FOL 117POL 720x360 1 70 4 720 360 0 01h 00h 720x360 VSD2 2 FD 720x360 Default setting for recovering from color banding Standard 71 4 720 360 1 01h 20h 720x360 VSD2 2 FD 72POL 720x360 Setting for responding to claims 2 72 4 720 360 2 01h 10h 720x720 VSD2 2 FOL 72POL 720x720 1 80 4 720 720 0 01h 20h 720x720 VSD2 2 FOL 146POL 720x720 0 4 2 81...

Страница 77: ...ICKNESS PAT PRINT THICKNESS NUM 1 CUT METHOD STANDARD PPR FEED ADJ 0 EJECT ROLLER AUTO DRYING TIME 0 0sec SUCTION STANDARD M W ADJ STANDARD PLATEN GAP STANDARD THICKNESS PAT PRINT THICKNESS NUM 1 CUT METHOD STANDARD PPR FEED ADJ 0 EJECT ROLLER AUTO DRYING TIME 0 0sec SUCTION STANDARD M W ADJ STANDARD Set each item after setting paper number NARROW STANDARD WIDE WIDER 1 15 STANDARD THIN PAPER THICK...

Страница 78: ...Example If paper thickness is 0 2mm for gap adjustment Head speed 240 cps Pattern height 64 dots Dot size VSD2 Large Color Black Print direction Uni D Pattern interval Upper patterns Equal intervals Lower patterns Centered on base position for gap adjustment value and displaced by an equal distance left and right Details are described in next clause Others When printing starts from the edge of a m...

Страница 79: ...er operation is accompanied in order to execute chalk cleaning 1 4 4 37 Date Setting Selecting this mode allows setting the current time Absolute control time offered by RTC power source in inner printer controls time difference set here relatively It is a function that covers time differences of each destination This time set by this setting will be shown by Job Information Print 1 4 4 38 Gap Adj...

Страница 80: ... set as 2 6mm if paper thickness setting is more than 0 7mm 3 When paper thickness sensor detects thick paper more than 0 8mm PG is set as 2 6mm regardless of PG setting and paper thickness setting Note 1 It is saved into saving place for paper thickness 0 0mm 2 It is saved into saving place for paper thickness 0 3mm 3 Paper thickness is saved to adjust paper thickness by 0 1mm unit for paper thic...

Страница 81: ...BI D ALL ALIGNMENT MANUAL UNI D ALIGNMENT MANUAL BI D 2COLOR ALIGNMENT MANUAL BI D ALL UNI D 1 C 5 UNI D 4 LLK 5 ALIGNMENT AUTO 1 ALIGNMENT AUTO 2 ALIGNMENT AUTO 3 PRINTING PRINTING Adjustment Value Up BI D 2COLOR 1 MK 5 BI D 2COLOR 4 LLK 5 BI D ALL 1 MK 5 BI D ALL 4 LLK 5 Shifts to item for corresponding adjustment value after adjustment pattern print Adjustment Value Items STD 0 1mm 1 5mm Adjust...

Страница 82: ...it feeds 100mm for roll paper 50mm for sheet and starts printing Table 1 35 Each adjustment item Adjusting item Adjusting type Parameter Head speed CPS Dot size Bi D 1 320 VSD1 Bar Large Block Small 2 240 VSD2 Bar Large Block Large 3 240 VSD3 Bar Large Block Large Uni D 1 320 VSD1 Large 2 240 VSD2 Large 3 240 VSD3 Large Print pattern 9 patterns per 1 set Print direction Bar Going back and forth ev...

Страница 83: ... value can be changed The represents the current setup value 5 When the Menu Cleaning button is pushed in the setting value select mode the displayed setting value is entered as the current setting value and registered If it has a corresponded operation it is started No operation occurs if is already displayed 6 It returns to the setting item select menu by pushing Paper Source button in the setti...

Страница 84: ...T INCH Cut pressure CUT PRESSURE 0 100 150 SSCL SSCL EXEC PAPERFEED SETTING ROLL PPR FEED ON OFF Panel Setting Initialization DEFAULT PANEL EXEC Ink information menu CRTG INFO MENU Ink information MK CARTRIDGE or PK CARTRIDGE Manufacture logo MANUFACT MK EPSON Ink color CARTRIDGE MK Matte Black Ink type INK TYPE MK PIGMENT DYE Ink capacity INK CAP MK 110ml 220ml Ink remaining INK LEFT MK E F E F E...

Страница 85: ...M MM Month Table 1 36 Maintenance Mode 1 Setup Items Top menu Panel display Item menu 1 Panel display Item menu 2 Panel display Setup value Ink information menu CRTG INFO MENU Ink information Y CARTRIDGE Manufacture logo MANUFACT Y EPSON Ink color CARTRIDGE Y Yellow Ink type INK TYPE Y PIGMENT DYE Ink capacity INK CAP Y 110ml 220ml Ink remaining INK LEFT Y E F E F E F E F E F E F Product date PROD...

Страница 86: ...k capacity INK CAP Lc 110ml 220ml Ink remaining INK LEFT Lc E F E F E F E F E F E F Product date PROD DATE Lc YY MM Expire date EXPIR DATE Lc YY MM Ink life after open INK LIFE Lc MM Month Passed time after open AGE Lc MM Month Ink information LM CARTRIDGE Manufacture logo MANUFACT Lm EPSON Ink color CARTRIDGE Lm Light Magenta Ink type INK TYPE Lm PIGMENT DYE Ink capacity INK CAP Lm 110ml 220ml In...

Страница 87: ... Users can execute supersonic cleaning using this mode If the number of times that this cleaning is performed exceedes 250 times however the printer runs CL3 instead Note This number will be reset by executing Reset when printhead change after replacing printhead PAPER FEED SETTING This mode allows users to set a certain amount of paper not to be fed when turning the printer on with cutter setting...

Страница 88: ...idge is displayed Ink type Ink type information dye pigment saved in CSIC of each ink cartridge is displayed Ink capacity Ink capacity information saved in CSIC of each ink cartridge is displayed Ink remaining Ink remaining of each ink cartridge is displayed Product date Product date information saved in CSIC of each ink cartridge is displayed with YY MM form Expire date Ink expire date informatio...

Страница 89: ...C CARTRIDGE CRTG INFO MENU M CARTRIDGE CRTG INFO MENU Y CARTRIDGE CRTG INFO MENU LK CARTRIDGE CRTG INFO MENU LC CARTRIDGE CRTG INFO MENU LM CARTRIDGE CRTG INFO MENU LLK CARTRIDGE MANUFACT MK EPSON CARTRIDGE MK MATTE BLACK INK TYPE MK PIGMENT INK CAP MK 110ml INK LEFT MK E F PROD DATE MK xx xx EXPIR DATE MK xx xx INK LIFE MK xx MONTH Ink Information Items Shifts to each Ink Information Item ...

Страница 90: ...s displayed one after another by pushing Paper Feed buttons once in the setting item select mode It is shifted to setting value select mode of the setting item by pushing Menu Cleaning button Setting item is displayed in the upper line and Setting value is displayed in the lower line The represents the current setup value 4 Setting value is displayed in the lower line one after another by pushing ...

Страница 91: ...t is included discharging many ink Reason for this menu is as common as other products all displayed items include unusable items Table 1 39 Self Testing Menu List Top Menu 1st hierarchy 2nd hierarchy 3rd hierarchy Panel Display Item Panel Display Item Panel Display Item Panel Display Item TEST Test Version Version F W Firmware version display 8K Main NVRAMversion 8k Main 8K Mecha NVRAMversion 8k ...

Страница 92: ... RearAD Rear AD Head Temp Head temperature Drv Temp Driver temperature Encoder Encoder CR CR encoder PF PF encoder Fan Fan Paper ALL All paper suction fan Paper1 Paper suction fan1 Paper2 Paper suction fan2 Head Drv Head driver Elec Electric Maintenance Counter display WasteInk Waste ink Wiper Wiper Rubing Rubbing Lever Paper lever Cover Paper cover InkLever Ink lever Table 1 39 Self Testing Menu ...

Страница 93: ...s Fire C C row discharging times Fire D D row discharging times Fire E E row discharging times Fire F F row discharging times Fire G G row discharging times Fire H H row discharging times Cut Cutting times Cut Sole Cutter solenoid Error Register occurred error Error0 Error0 Error1 Error1 Error2 Error2 Error3 Error3 Error4 Error4 Error5 Error5 Error6 Error6 Table 1 39 Self Testing Menu List Top Men...

Страница 94: ...uator2 Cutter Sol Cutter solenoid Pump Motor Pump motor Adjustment Adjustment Cut Adj Cutter adjustment PG Adj PG adjustment RearAD Rear AD adjustment Edge Sns Lv1 Edge sensor level Check Nozzle Nozzle check pattern print Check Skew Confirm paper skew Print Print Check Ptn Check pattern Adj Varable Adjustment parameter Table 1 39 Self Testing Menu List Top Menu 1st hierarchy 2nd hierarchy 3rd hier...

Страница 95: ...witch Displays the DIP switch status Panel The following panel operation can be checked To exit the panel key check press the Pause key twice Key operation check Displays question marks as shown below in the initial condition While holding down a key the key name is displayed LCD check The LCD lights all over for dot missing check LED check Lights pause green Ink check red paper check red in that ...

Страница 96: ...an The operation of each fan is can be checked Printable End is displayed in the second row on the panel during execution This menu is ended by pressing the Pause key NOTE Facing the printer Fan1 is on the home position side and fan2 is on the other side Table 1 40 Sensor Sensor Name Remark CR home position Paper thickness sensor Paper slide sensor Head slide sensor Roll 1 sensor Roll 2 sensor Pum...

Страница 97: ...o 7 maintenance items recorded as history can be checked CPU error is not recorded Actuator Fatal errors of up to 7 maintenance items recorded as history can be checked CPU error is not recorded Fatal errors of up to 7 maintenance items recorded as history can be checked CPU error is not recorded Actuator2 Fatal errors of up to 7 maintenance items recorded as history can be checked CPU error is no...

Страница 98: ... measurement value Maximum value detection position Threshold value at paper detection Paper presence at paper detection Paper absence at paper detection D A value used at paper detection OK NG Nozzle check pattern print The ink eject from the head nozzle can be checked from the printed pattern If the ink is not ejected properly a cleaning is performed The items printed on the pattern are as follo...

Страница 99: ...se perform the paper skew check again after removing the cause s The paper width has been changed by 3mm at one of the paper edges compared with the previous paper width detection The paper is loaded too close to the home position side The lever is pulled up or the cover is opened during paper feed 3 The panel keys are invalid during paper skew check 4 For the indicated value indicates the home po...

Страница 100: ...x xx xx xx xx xx xx xx xx xx xx xx xx xx xx Bi D PG 1 5mm xx xx xx xx xx xx xx xx xx xx xx xx xx xx xx xx Bi D PG 2 1mm xx xx xx xx xx xx xx xx xx xx xx xx xx xx xx xx Bi D PG 2 6mm xx xx xx xx xx xx xx xx xx xx xx xx xx xx xx xx Uni D xx xx xx xx xx xx xx xx xx xx xx xx xx xx xx xx VSD3 C C2 Y Y2 M M2 MK MK2 C C2 Y Y2 M M2 MK MK2 Bi D PG 0 7mm xx xx xx xx xx xx xx xx xx xx xx xx xx xx xx xx Bi D ...

Страница 101: ...nter display CR motor life cumulative counter value is counted every CR reciprocating It is not initialized by carriage related information counter clear PF MOTOR LIFE COUNTER VALUE DISPLAY Display PF motor life counter value PF motor counter life counter value counts PF feed amount HEAD UNIT LIFE COUNTER VALUE DISPLAY Display life counter of each nozzle from A row to H row Head unit life counter ...

Страница 102: ...er value The Paper Eject Switching Counter counts each time the paper eject switching movement occurs PG SWITCHING COUNTER VALUE DISPLAY Display PG switching counter value The PG Switching Counter counts each time the PG switching movement occurs 1 4 7 MIB Function The printer corresponds to the following MIB you can receive printer information specification status commodity job information etc fr...

Страница 103: ...ut Refer to 1 4 4 11 Job Time out Setting p 54 Preventing the remaining data from being printed on the second cut sheet If the print data size is larger than the maximum data size that can be printed on a single sheet manual feed ASF the remaining data that cannot be printed on the first sheet is not printed on the second sheet The remaining print data graphic data is ignored and the next new prin...

Страница 104: ...alization This printer is initialized when pushing the Pause button for more than 3 seconds or printer recognized the INIT signal Initialization operation Eject a paper For roll paper paper is cut by skipping print part when Paper Source Auto Cut in panel setting paper is not cut when Paper Source Cutter Off Cap the printhead Clears input data buffer Clears print buffer Sets default values 1 4 10 ...

Страница 105: ...iption Controller 105 1 5 Controller CPU SH7709S 100MHz Code ROM 2MB Font ROM None RAM 64MB Interface Stylus Pro 4400 4800 USB HS FS IEEE 1394 Type B interface Stylus Pro 4450 4880 4880C USB HS FS Network Interface Operating System Hitachi HI7700 µITRON 3 0 compatible ...

Страница 106: ...C MDL 8 color model Stylus Pro 4800 or Stylus Pro 4880 or Stylus Pro 4880C 4 color model Stylus Pro 4400 or Stylus Pro 4450 CLS PRINTER DES EPSON SP T Stylus Pro 4800 8 color model EPSON SP T Stylus Pro 4880 8 color model EPSON SP T Stylus Pro 4880C 8 color model EPSON SP T Stylus Pro 4400 4 color model EPSON SP T Stylus Pro 4450 4 color model SP space code SIGNAL ASSIGNMENT AND SIGNAL DEFINITION ...

Страница 107: ...oding Encode Decode DS Link bit level encoding Connector IEEE 1394 1995 compliant plug 6 contacts SIGNAL ASSIGNMENT AND SIGNAL DEFINITION OF INPUT CONNECTOR PIN PROTOCOL SB 2 ANSI NCITS 325 1998 compliant EP PPDT Based on IEEE 1394 3 specification C H E C K P O I N T Stylus Pro 4400 4800 only Table 1 49 Signal assignment and signal definition of input connector pin Contact number Signal name Comme...

Страница 108: ... Type ESCPL2 00 Entity Type EPSONLQ2J REPLY FOR OPTION COMMAND Table 1 50 Reply List Option command number Command name Reply A Reply B 00h No operation Accept None 01h Start Hardware Reset Accept Execute OK 02h Start Software Reset Reject 03h Send Main System Type Accept 04h Send Name Data Reject 05h Inquire Name Data Accept 06h Send Product Name Accept 07h Send Software Emulation Type Accept 08h...

Страница 109: ...is non Type B Level 3 correspondence is inserted Type B sends error Supported Channel Assigning Service and Channel applies the chart below Table 1 51 Supported Main Command and Sending Timing Main command number Command name Sending timing 01h Start Software Reset Init signal on the std parallel Type B I F Option command 01h Panel Reset Cold start 04h Send Name Data Type B I F Option command 05h ...

Страница 110: ...t mounted and the network interface is assigned as the optional interface Automatic Selection Select an interface that the printer first received data after power was ON If it passes period of time 10 seconds after interruption of data receiving it will be in idle status any interface is not selected and will select an interface which the printer next receives data first NOTE This status is not im...

Страница 111: ...e temperature 5 85 without freezing Storage temperature Life 2 years Total time of before and after of installing printer Insured date of printing quality Pigment 6 month After printer is installed C H E C K P O I N T When installing the pigment ink cartridges shake them horizontally after unpacking them for about five seconds beforehand to ensure the designed print quality To avoid wrong insertio...

Страница 112: ...te ink Dimension 102 5mm W x 235mm D x 79 5mm H Capacity Approx 1000ml Waste ink permitted limit 650ml excluding amount of evaporation Operation environment Operating 10 35 C 20 80 Storing 20 40 C 20 80 Transporting 20 60 C 5 85 Time limit of storing or transporting at 40 C is one month At 60 C it is within 120 hours C H E C K P O I N T The cleaning cartridge is the same as the 110ml ink cartridge...

Страница 113: ...C H A P T E R 2 OPERATINGPRINCIPLES ...

Страница 114: ...0 4880 4880C The explanation is composed as follows 2 2 Printer Mechanism Components p 115 2 2 1 Printing Mechanism Print Head p 116 2 2 2 Ink Supply Mechanism p 118 2 2 4 Carriage CR Mechanism p 125 2 2 5 Paper Feed Mechanism p 131 2 2 6 Paper Eject Release Mechanism p 140 2 2 7 Multi Sensor p 145 2 2 8 Others p 151 2 3 Outline of Control Circuit Board p 152 2 4 Outline of Power Supply Circuit Bo...

Страница 115: ...ission type photo interrupter p 130 Cutter Solenoid 24V DC solenoid p 131 Paper Feed Mechanism p 131 PF Motor 42V DC motor p 133 Suction Fan 24V DC blower fan p 133 PF Encoder Sensor 5V Linear encoder 360LPI p 133 PE sensor 3 3V Reflection type photo interrupter p 133 P_THICK_0 3 Sensor Paper thickness pressure lever 3 3V Transmission type photo interrupter p 133 P_THICK Sensor Paper thickness pre...

Страница 116: ...h Color 4 Colors Stylus Pro 4400 Stylus Pro 4450 Matte Black x 2 Cyan x 2 Magenta x 2 Yellow x 2 360 8 Colors Stylus Pro 4800 Matte Black Photo Black Light Black Cyan Magenta Yellow Light Cyan Light Magenta Light Light Black 180 Stylus Pro 4880 Stylus Pro 4880C Matte Black Photo Black Light Black Cyan Vivid Magenta Yellow Light Cyan Vivid Light Magenta Light Light Black 180 Table 2 3 Relationship ...

Страница 117: ...nting Modes Drive Waveforms Waveform Name Drive Frequency Print Resolution CR Speed VSD1 11 52 KHz 7 H360 x V360 H360 x V720 H720 x V360 320 CPS VSD1d 11 52 KHz 7 H360 x V360 H360 x V720 H720 x V360 320 CPS VSD2 8 64 KHz 7 H720 x V360 H720 x V720 240 CPS VSD2d 8 64 KHz 7 H720 x V360 H720 x V720 240 CPS VSD3 8 64 KHz 7 H720 x V720 H1440 x V720 240 CPS VSD3_HR 8 64 KHz 7 H2880 x V1440 240 CPS ...

Страница 118: ...ridge is installed and removed Figure 2 2 Valve Mechanism The ink flow is as shown below Each color s ink cartridge Each color s I H Ink Holder Each color s ink tube Each color s head dumper Carriage Print Head NOTE Below is a drawing of Stylus Pro 4800 4880 4880C Stylus Pro 4400 4450 has no ink holder on the left Figure 2 3 Ink Supply Mechanism CSIC Memory chip information for each color ink cart...

Страница 119: ...ad Numbers though in the figure explain the ink flow sequence inside the dumper Figure 2 4 Ink Route inside of Dumper 1 Figure 2 5 Ink Route inside of Dumper 2 I H lever sensor The left I H and right I H each have 1 I H Lever Sensor located on the side This sensor uses a reverse tension switch mechanical contact to detect whether the ink cartridge is set or released by the ink lever Figure 2 6 I H...

Страница 120: ... located at the right side of the printer Waste ink from the cleaning components is sent through a tube to the Waste Ink Absorber Maintenance Tank at the bottom right Main cleaning mechanism components and their functions are explained in the following sections Figure 2 7 Cleaning Mechanism Components Pump Unit Head Cleaner Cap Assembly Flushing Box Maintenance Tank ...

Страница 121: ...e 2 10 Cleaning Mechanism Drive Components ASF Pump Motor Planetary Lever Spur Gear 15 2 Combination Gear 15 2 25 6 Spur Gear 19 2 Combination Gear 13 6 28 8 Pump Unit ASF Pump Motor Planetary Lever Spur Gear 15 2 Spur Gear 19 2 Combination Gear 13 6 28 8 Combination Gear 15 2 25 6 Pump Unit ASF Pump Motor Planetary Lever Spur Gear 15 2 Spur Gear 19 2 Combination Gear 15 2 25 6 Combination Gear 13...

Страница 122: ...tates in the clockwise direction the Planetary Lever inside the DE mechanism descends toward the Combination Gear 15 2 25 6 and the Planetary Lever s Spur Gear 15 2 engages with the Combination Gear 15 2 25 6 4 The DE Lock Lever fixes the Planetary Lever in place when the Carriage Unit moves the required step number to the left from the Carriage Shaft right end Figure 2 12 Switching Drive Transmis...

Страница 123: ...lt is used By wiping rubbing ink and dirt adhering to the head nozzle surface is brushed off Cap Assembly When not printing the Print Head should rest on the Cap Assembly to ensure that the nozzles don t clog Also the Print Head is in the capped position during ink charging cleaning and so on Flushing Box This receives ink ejected during flushing dummy printing The flushed ink flows through the pi...

Страница 124: ...g continuous printing during paper Eject during paper cutting etc Wiping Operation The Carriage Unit is moved from right to left along the rubber side of the wiper the right half of the Wiper Blade incorporated in the Pump Unit so that the head surface is rubbed with the rubber of the wiper Purpose Before ink suction removes the ink and other substances adhering to the head surface Ensures close c...

Страница 125: ...ism is formed of the following components Carriage Unit Carriage Shaft front and rear CR Motor PG PO Motor CR_HP Sensor CR Encoder Sensor Multi Sensor PG Phase Sensor Cutter Solenoid CR Lock This section describes the following items Carriage Unit movement components Platen Gap adjustment components Cutter Solenoid CR Lock Mechanism Figure 2 14 Carriage Mechanism Components PG PO Motor Carriage Un...

Страница 126: ...orting the carriage The main structural components of the carriage movement mechanism and the functions of these components are described below CARRIAGE MECHANISM DRIVE Figure 2 15 Drive Transmission Path Figure 2 16 Carriage Mechanism Drive Components C A U T I O N Do not remove the screws securing the Carriage Shafts They are adjusted assembled at the factory in 1 100mm increments Carriage Unit ...

Страница 127: ...Sensor Carriage home position This is a transmissive photosensor installed at the printer right side Insertion of the flag a protrusion on the Carriage Unit is detected as the carriage movement origin home position Sensor outputs are OFF in the HP range and ON outside the HP range CR Encoder Sensor Linear encoder Installed on the back of the Carriage Unit this is uses pulse output 2 channels corre...

Страница 128: ...M DRIVE Figure 2 18 Drive Transmission Path Figure 2 19 Platen Gap Mechanism Drive Layout Figure 2 20 Platen Gap Mechanism Drive Components Spur Gear 16 PG PO Motor Combination Gear 56 8 8 Combination Gear 40 20 Carriage Shaft rear Spur Gear 36 CR Shaft Pulley rear Timing Belt CR Shaft Pulley front Carriage Shaft front Planetary Holder Spur Gear 20 Planetary Planetary Holder Spur Gear 16 Planetary...

Страница 129: ...Motor Pinion Gear side 3 When the PG PO Motor rotates in the clockwise direction the Planetary Holder raises up in the direction of the Combination gear 56 8 8 and the Planetary Holder Spur gear 16 engages with the Combination gear 56 8 8 4 The planetary Lock Lever fixes the Planetary Holder in place when the Carriage Unit moves the required step number to the left from the Carriage Shaft right en...

Страница 130: ...used in the platen gap adjustment components are described below PG Phase Sensor This is a transmissive sensor installed on the left side of the printer that detects the PG position height of head from paper surface and machine home position home at the time of adjustment movements A reflective sensor is used to detect the flag position of the shield plate attached to the right side of the front C...

Страница 131: ... Kicker kicks the CR Lock and then the CR Lock is released The printer is also equipped with the mechanism to lock the Carriage Lock to prevent the Kicker from moving vertically during transportation to release the CR Lock NOTE Refer to 1 2 7 4 Cut Specification p 21 Figure 2 24 Carriage Components Cutter Solenoid 2 2 5 Paper Feed Mechanism This printer uses friction feed to carry out highly preci...

Страница 132: ...ve Belt Paper Eject Roller Belt Paper Eject Roller Pulley Paper Eject Roller PF Roller Sub Roller Unit Sub Roller Drive Pulley Sub Roller Drive Belt Sub Roller Drive PF Pulley Speed Reduction Pulley PF Roller Paper Eject Roller Belt Paper Eject Roller PF Timing Belt PF Motor Sub Roller Unit Sub Roller Drive Pulley Paper Eject Roller Pulley PF Timing Belt PF Motor Paper Eject Roller PF Roller Sub R...

Страница 133: ...r formation of the PTS Print Timing Signal Resolution is 1 360 inch PE Sensor This reflective photosensor is mounted at the right side rear surface of the printer This triggers the no paper condition when the paper trailing edge is detected and triggers paper setting start operations start of suction fans etc when the leading edge is detected during paper setting Paper Lever P_THICK Sensor P_THICK...

Страница 134: ...paper being fed from the manual insertion slot Figure 2 30 Paper Feed Mechanism Sensors 2 2 5 1 ASF Paper Feed Mechanism This printer is equipped with an ASF Unit for feeding cut sheet paper Operating principles of the ASF Unit are described below Figure 2 31 ASF Paper Feed Mechanism P_THICK_0 8 Sensor P_THICK_0 3 Sensor Rear Manual Insertion Sensor PE Sensor PF Encoder Sensor ASF Paper Sensor ASF...

Страница 135: ...ry Lever Spur Gear 15 2 Combination Gear 12 22 4 Combination Gear 12 8 36 Spur Gear 33 6 ASF Unit Spur Gear 44 8 Combination Gear 16 8 24 Spur Gear 25 6 Combination Gear 16 8 24 ASF Pump Motor Planetary Lever Spur Gear 15 2 Combination Gear 12 22 4 Spur Gear 25 6 Combination Gear 12 8 36 Spur Gear 33 6 ASF Unit Spur Gear 44 8 Planetary Lever Spur Gear 15 2 ASF Pump Motor Combination Gear 16 8 24 C...

Страница 136: ...ion of the ASF Pump Motor in the counterclockwise direction the Planetary Lever inside the DE mechanism raises in the direction of the Combination Gear 12 22 4 and the Spur Gear 15 2 of the Planetary Lever engages with the Combination Gear 12 22 4 4 The DE Lock Lever fixes the Planetary Lever in place when the Carriage Unit moves the required step number to the left from the Carriage Shaft right F...

Страница 137: ...is mounted at the center lower side of the printer The sensor detects paper being fed from the ASF Unit ASF Phase Sensor This transmissive photosensor is mounted at the right lower side of the printer The Detector Wheel at the left side of the LD Roller and LD Roller Shaft is rotated by paper feed movement from the ASF Unit There is a notch on the Detector Wheel and the LD Roller position is detec...

Страница 138: ...the paper return movement the Release Hopper Lever rotates counterclockwise with the LD Roller When the Edge Guide Fixing Lever releases the hook being pressed by the Release Hopper Lever the tension of the Compression Spring is released and raises the Hopper 3 The LD Roller rotates in the counterclockwise direction and picks up paper Skew Correction Mode 1 1 Feeds the paper leading edge by 3 5mm ...

Страница 139: ... Skew is corrected by the LD Roller pushing forward the unfed paper 4 After feeding the paper the LD Roller rotates in the counterclockwise direction and returns to the standby position 5 The LD Roller in standby position then rotates in the clockwise direction by the required step number to return paper remaining between the LD Roller and Separation Pad to the tray Then the roller returns to the ...

Страница 140: ... Spur Gear 44 8 Eject Transmission Frame Shaft Spur Gear 16 Frame Transmission Switching Rib Spur Gear 15 2 Combination Gear 24 36 Eject Switch Lever R Spur Gear 44 8 Eject Switching Rib Spur Gear 15 2 Planetary Holder Spur Gear 20 Planetary Planetary Holder Spur Gear 16 Planetary Spur Gear 20 Spur Gear 16 PG PO Motor Combination Gear 13 6 20 8 Combination Gear 11 2 24 Spur Gear 21 6 Release Paper...

Страница 141: ...nion Gear side 3 By rotation of the PG PO Motor in the counterclockwise direction the Planetary Holder descends in the direction of the Combination Gear 36 8 8 and the Spur Gear 16 of the Planetary Holder engages with the Combination Gear 36 8 8 4 The Planetary Lock Lever fixes the Planetary Holder in place when the Carriage Unit moves the required step number to the left from the Carriage Shaft r...

Страница 142: ...d at the inner side of the right frame storing the I H Holder left The sensor detects the condition of the Paper Eject Unit Paper Eject Release Sensor This reverse tension switch sensor mechanical contact is mounted at the inner side of the left frame storing the I H Holder right When foreign objects enter the paper path under the Paper Eject Unit and lift the Paper Eject Unit the sensor detects t...

Страница 143: ... Unit Spur Gear 16 Release Release Shaft Under PG PO Motor Spur Gear 16 Planetary Holder Spur Gear 20 Planetary Planetary Holder Spur Gear 16 Planetary Spur Gear 20 Combination Gear 36 8 8 Spur Gear 21 6 Release Release Planetary Unit Spur Gear 22 Release Gate Roller Release Shaft Under Intermittent Gear Transmission Release Combination Gear 13 6 20 8 Combination Gear 11 2 24 Combination Gear 22 1...

Страница 144: ...e Paper Release When the PG PO Motor rotates in the clockwise direction the Intermediate Roller Shaft Release Lower rotates in the clockwise direction The Gate Roller is lowered by the rotation of the Intermediate Roller and the Gate Roller and Sub Roller are separated Paper Pressure When the PG PO Motor rotates in the counterclockwise direction the Intermediate Roller rotates in the counterclockw...

Страница 145: ...ion Detection Top Edge Detection Checking Paper Cutting Paper Width Detection Paper Edge L R Detection Dot Missing Detection Auto Uni D Adjustment Auto Bi D Adjustment Light Receivers The light receiver side has the following 2 elements for corresponding uses PW1 direct reflection light receiver Detects paper white or platen black specifying the edge of the paper PW2 diffused light receiver Prints...

Страница 146: ...o standby over the paper The sensor LED emits light the paper is reverse fed at 40CPS from the condition being detected for the paper and then the position at which the platen is detected is set as the approximate top edge of the paper Next the paper is forward fed at 5CPS from the condition at which the sensor is detecting the platen and this detects the paper top edge The process continues by de...

Страница 147: ...ng This printer detects the paper edges with every pass and by making immediate adjustments the amount forced out is reduced to 1 1mm from the paper edge and the quantity of scattered ink is reduced By executing every pass detection printing can be performed while following skew of the paper when the paper has skewed within the manufacturer s permitted range for skew and the amount forced out is m...

Страница 148: ...ion If the standard lines and adjustment lines overlap the collected A D value light quantity becomes higher because the width detecting the paper is wide The location detected with the most raised A D values is determined to be the acceptable level of Uni D alignment Figure 2 55 Automatic Uni D Adjustment 1 2 3 4 5 6 7 8 9 10 11 12 13 14 15 16 17 18 19 20 21 22 23 24 25 26 27 28 29 30 31 32 33 34...

Страница 149: ... printed in a 51 block adjustment pattern shifted by 1 720 in the main scan direction as a standard for ruled line blocks Detection light quantity is also maximized to further increase the paper margin area where sections have the most overlapping standard line blocks and adjustment line blocks The maximized position for this detection light quantity becomes the set adjustment position for the rou...

Страница 150: ...40 step for each color The location detected with the most raised A D values and the 2 locations detected with the most lowered A D values are averaged and the averaged values of the 3 patterns are calculated again with the resulting value set as the correction value Correction Value A1 B2 C3 3 A2 B2 C2 3 A3 B3 C3 3 3 Figure 2 59 Fine Adjustment Pattern Detection A D Value Scanning Position Most A...

Страница 151: ...SOR This sensor is mounted at the printer right rear side to detect the removed installed condition of the Paper Guide Unit Detecting installed uninstalled status of the unit causes the CR Motor and PF Motor circuits to stop operate the motors CIRCUIT BOARD LAYOUT A Panel Unit is mounted to the printer front right surface and an AC Inlet Power Supply Circuit Board and MAIN Circuit Board are mounte...

Страница 152: ... SH 7709S IC15 32bit RISC CPU Operational frequency Internal 96MHz External 48MHz E09A54RA IC17 18 Custom ASIC Head drive voltage waveform generation control RTC9824SA IC16 Real Time Clock Sets year month day by F W MAIN PCB reset signal formation E05C25BB IC19 Custom ASIC 1 Print data processing Rasterizer Head drive control 2 Mechanism control motors and solenoids 3 Sensor control TSB43AA82A IC4...

Страница 153: ...d Circuit Block Diagram PF motor driver ASF pump motor PG PO motor driver Real Time Clock Custom ASIC Custom ASIC CR motor PF motor ASF pump motor PG PO motor Custom ASIC Head FFC Lithium battery BAT1 RTC9824SA IC16 E05C25BB IC19 A3958SLBTR T IC5 A3958SLBTR IC6 A6628SEDTR T IC7 IC12 IC15 IC2 IC23 E09A54RA IC17 E09A54RA IC18 CR motor driver ...

Страница 154: ...on the printer Table 2 15 Operational Descriptions Signal Name Function REM_ON MAIN Power Supply Operating Turned ON OFF by BOARD ASSY MAIN When these terminals are shorted the drive system power supplies 28 VDC and 42 VDC are active OFF When these terminals are open L the drive system power supplies 28 VDC and 42 VDC are 0 VDC The 5 VDC power is not controlled with these terminals AC_OFF MAIN Pow...

Страница 155: ...rn with a completed product and mesuring the color of the pattern using a calibrator 2 Writing the correction value Write the correction value that was calculated from the value obtained by color mesurement to the NVRAM on the main board 3 Reflecting the correction value The printer driver reads the correction value stored in the NVRAM during printing and correct the dot generation amount for each...

Страница 156: ...C H A P T E R 3 TROUBLESHOOTING ...

Страница 157: ...r in the printer mechanism should have no uneven wear or be overly worn and the combinations should be correct 7 Each type of rubber roller in the printer mechanism should be cleaned and it should be ascertained whether the cause of the trouble is because of dirt or due to some other cause 8 Each type of rubber roller in the printer mechanism should not be unevenly worn or excessively worn and the...

Страница 158: ... tank near Blink p 162 INK LOW Ink low 1 Blink p 162 MNT REQ nnnn Maintenance request 2 p 162 PAPER LOW Paper near end 3 Blink p 164 REMOVE PAPER Cleaning unavailable ON p 165 NOZZLES STILL CLOGGED Cleaning failure Blink ON Blink p 165 CHANGE PAPER TYPE Multi Sensor SN gain error Blink p 165 Multi Sensor paper recognition error Blink p 165 WRONG PAPER SIZE Cut sheet size error Blink ON p 165 REMOV...

Страница 159: ...tination 1 ON p 170 WRONG INK CRTG Unavailable Ink cartridge 1 ON p 169 INVALID INK CRTG Wrong logo error 1 ON p 170 SET INK CRTG Ink Cartridge failure CSIC contact error 1 ON p 170 NO INK CRTG No Ink Cartridge 1 ON p 170 MNT TNK FULL Maintenance Tank full ON p 170 LOWER INK LEVERS Releasing left and right ink lever p 170 LOWER L INK LVR Releasing left ink lever p 170 LOWER R INK LVR Releasing rig...

Страница 160: ... Received data is initialized without initializing mechanisms including completion of forced cleaning even if panel reset has been done 7 Displalys the request below when the rear sensor detects no paper after the paper is removed TURN PRINTER PWR OFF AND THEN ON REAR COVER OPEN Rear Cover open p 173 OPTION I F ERROR Type B Option I F Card Error Blink Blink Blink p 173 UNLOCK PRINT HEAD CR lock un...

Страница 161: ... Unidentified NMI p 188 0001002A CR ASIC ECU error p 188 0001002B PF ASIC ECU error p 188 0001002D Cleaning Unit work life error p 189 0001002F 360 DPI writing time out error p 189 00010030 Multi Sensor failure p 189 00010031 ASF phase detection error p 189 00010032 ASF drive switch error p 189 00010033 Eject phase detection error p 190 00010034 Eject movement error p 190 00010035 Pump phase detec...

Страница 162: ...an error related to a lithium battery for RTC backup has occurred Item Description LCD Panel message MNT TK NEAR FULL LED display Ink check LED Blink Explanation Generated when capacity of the Maintenance Tank has reached less than 5 Recovery Replace the Ink Cartridge with new one Item Description LCD Panel message INK LOW LED display Ink check LED Blink Explanation Caused when remaining ink quant...

Страница 163: ...ng Unit Change using Reset Counters in adjustment program 0080 Date is not set Turn on the printer in Maintenance Mode 2 and execute RTC USB ID IEEE1394 ID to set the date using basic adjustment in adjustment program 0088 RTC backup battery is not installed Install RTC battery turn on the printer in Maintenance Mode 2 and execute RTC USB ID IEEE1394 ID to set the date using basic adjustment in adj...

Страница 164: ...ile the remaining paper detection is on with roll paper or cut paper loaded Recovery Execute one of the following Set the near end setting value so that it is more than the current remaining paper counter value using roll or cut paper menu of the remaining paper detection in the printer setting menu See Remaining paper detection p 48 Reload paper Item Description LCD Panel message TIMES REMAINING ...

Страница 165: ...greater than 0 9mm is set at power ON or execution of cleaning Release Paper Lever remove paper and pull down the lever LCD Explanation Recovery CHANGE PAPER TYPE Required amount of reflection not obtained after automatic adjustment pattern print Generated with blurred paper Release Paper Lever reload the paper and pull down the lever LCD Explanation Recovery CHANGE PAPER TYPE Gain for Multi Senso...

Страница 166: ... from the rear manual feed opening LCD Explanation Recovery PAPER OUT No paper is set with panel settings in condition other than ASF Release Paper Lever reload the paper and pull down the lever Press Paper Source key to switch to Cut Sheet Trailing end of cut sheet or roll paper is detected and printing was terminated midway through job Release Paper Lever reload the paper and pull down the lever...

Страница 167: ...AD Generated when skew of 0 43mm or more is detected during cut sheet paper loading However error generation occurs after cut sheet paper loading sequence is complete Because this error can occur frequently when using manual insertion printing it is possible to resume printing by allowing the Pause LED to turn light and then cancelling the pause when the error occurs Release Paper Lever remove pap...

Страница 168: ...rom Ink Cartridge installed in the printer Install the correct Ink Cartridge displayed on the Panel LCD and pull down the Ink Lever DRIVER INK SET SETTING IS WRONG LCD Explanation Recovery LOAD ROLL PAPER Different paper source is selected on panel from the paper source that is selected by Remote command The path sent by command takes priority and a message based on the command designated path is ...

Страница 169: ...hange the type of K ink stored in the printer LCD Explanation Recovery INK OUT Ink is over consumed within Ink Cartridge The error is cleared by inserting Ink Cartridge new Ink Cartridge which the panel LCD displays and pulling down the Ink Lever LCD Explanation Recovery INVALID INK CRTG This error occurs when a Ink Cartridge whose information is different form CSIC information is inserted except ...

Страница 170: ...er Ink Cartridge which the panel displays and pulling down the Ink Lever Check CSIC contact terminals of Ink Cartridge Holder for damage deformity If CSIC contact terminals are not normal replace I H Left Unit or I H Right Unit LCD Explanation Recovery NO INK CRTG There is no Ink Cartridge installed Open I H Cover and properly install the Ink Cartridge indicated by the LCD panel Or insert a new In...

Страница 171: ...feed movement are completed When cover was open during paper eject Paper eject error p 166 occurs after clearing this error When cover was open during paper feed movement Paper recognition error p 167 occurs after clearing this error When cover was open during paper cut movement Paper cut error p 168 occurs after clearing this error When cover was open while power was OFF power will turn OFF after...

Страница 172: ...opped In this case release the Paper Lever again and remove the paper and then lower the lever to clear the error When only the PE Sensor turns ON at paper feed print eject movements of ASF or rear manual insertion Paper eject error p 166 occurs after clearing this error LCD Explanation Recovery RELEASE LEVER REMOVE PAPER JAM The ASF Paper Sensor is ON at ASF paper feed movement but the PE Sensor ...

Страница 173: ...ding paper eject movement after installation of the Paper Guide Unit Paper end roll paper end p 166 occurs When Paper Guide Unit is removed during paper feeding Paper jam ASF p 172 occurs When Paper Guide Unit is removed during roll paper cutting Paper cut error p 168 occurs If error is not cleared after installation of the Paper Guide Unit check the cover sensor operation p 91 by Self Testing Men...

Страница 174: ...f fatal error Occurrence of any error from which the user can not recover the printer If cleared by turning power OFF and then ON again continue using printer intermittently in that condition If the same code for the fatal error is generated again specify the cause of the problem and replace corresponding failed part causing the problem Life expiration of a long life part which can cause secondary...

Страница 175: ...rough cracks in Ink Tube Poor movement of Carriage Unit due to CR Motor internal wear Remedy 1 Check the number of times that the CR Motor has shuttled at VIEW COUNTER from Maintenance Mode 2 look for the measured number on the chart and replace the corresponding parts Refer to 1 4 6 Maintenance Mode 2 p 90 Ο Replacement required Δ Check the part Χ No arrangement requried C A U T I O N If service ...

Страница 176: ...normal noise when carriage unit moves bearings are worn Check for accumulation of paper dust or dust to paper feed route If there is paper dust or dirt refer to 6 1 2 Important Maintenance Items During Service Operations p 450 and carry out a cleaning Refer to Chapter6 Maintenance p 448 check the lubrication points and lubricate them if they are dry 3 Clear the CR Motor Life Counter Refer to 5 6 4...

Страница 177: ...n power supply fuse for the PF motor driver on the Main Board Points to be checked 1 The PF Encoder Sensor and the PF Loop Scale must be free from dust and dirt or any other foreign matters 2 Execute encoder checking by the 1 4 6 1 Self Testing Menu SELF TESTING p 91 in Maintenance Mode 2 3 The PF Timing Belt must be free from any defects and the belt must be in proper tension 4 The PF Roller must...

Страница 178: ...RD ASSY MAIN at the same time 6 All the harness must be connected properly and free from short circuit or broken wire Remedy 1 Check for dirt paper dust or damage to the Loop Scale 2 Perform the PF Timing Belt Tension Adjustment p 378 3 Replace the PF Encoder Sensor p 357 4 Replace the Motor Assy PF p 349 5 Replace the C593 MAIN Board p 226 SERVICE REQ 00010002 Error meaning PF Motor over current ...

Страница 179: ...er check error Explanation During initial operation at power on or during CR Motor operation there may be a case where the encoder pulse signal is not input at specified intervals In such a case this message is displayed and the printer stops operating Cause of trouble Disconnected FFC for the CR Encoder Sensor Disconnected connector for the CR Motor Broken wire for the CR Motor Encoder Sensor Inv...

Страница 180: ...rly and free from short circuit or broken wire Remedy 1 Check to see if the CR Scale for detection of the encoder pulse is removed 2 Check for dirt paper dust or damage to the CR Scale 3 Perform the CR Timing Belt Tension Adjustment p 376 4 Replace the CR Encoder Sensor p 280 5 Replace the CR_HP Sensor p 276 6 Replace the Motor Assy CR p 270 7 Replace the C593 MAIN Board p 226 8 Replace the Cutter...

Страница 181: ... 3 10 Ω 7 All the harness must be connected properly and free from short circuit or broken wire Remedy 1 Check to see if the CR Scale for detection of the encoder pulse is removed 2 Check for dirt paper dust or damage to the CR Scale 3 Perform the CR Timing Belt Tension Adjustment p 376 4 Replace the CR Encoder Sensor p 280 5 Replace the CR_HP Sensor p 276 6 Replace the Motor Assy CR p 270 7 Repla...

Страница 182: ...can not be detected In such a case this message is displayed and the printer stops operating Cause of trouble Disconnected connector for the PG Phase Sensor Disconnected connector for the PG Motor Broken wire for the PG Motor Defective PG Phase Sensor Defective PG Motor Damage to wheel linkage of PG drive gears Power supply fuse for PG PO Motor driver is broken on the MAIN Board Points to be check...

Страница 183: ...worn bearing of the Carriage Unit Flaws in the CR Rail caused by roller running Tension of the CR timing belt 2 Replace the Motor Assy CR p 270 If the CR Motor is found in short mode replace the C593 MAIN Board at the same time 3 Replace the C593 MAIN Board p 226 SERVICE REQ 00010010 Error meaning PF Motor PWM output faulty Explanation There may be a case where a current exceeding the specified va...

Страница 184: ... to or wear in the CR Driven Pulley Damaged or worn bearing of the Carriage Unit Flaws in the CR Rail caused by roller running Tension of the CR timing belt 2 Replace the Motor Assy CR p 270 3 Replace the C593 MAIN Board p 226 SERVICE REQ 00010013 Error meaning PF overload high sensitivity error Explanation PWM has been being output for a certain period of time This can be made when load on the PF...

Страница 185: ...R servo parameter error Explanation There may be a case where a voltage exceeding the specified value is about to be applied to the CR Motor In such a case this message is displayed and the printer stops operating Points to be checked 1 The CR Encoder Sensor and the CR Scale must be free from dust and dirt or any other foreign matters 2 Execute encoder checking by the 1 4 6 1 Self Testing Menu SEL...

Страница 186: ... 304 3 Replace the PF Encoder Sensor p 290 4 Replace the Motor Assy PF p 349 5 Replace the C593 MAIN Board p 226 SERVICE REQ 00010020 Error meaning CSIC reed write error Explanation This message is displayed and the printer is stopped when information from the Ink Cartridge CSIC cannot be obtained or the latest ink information for the CSIC cannot be written when turning the power ON OFF opening cl...

Страница 187: ...lithium battery with a new one After replacement be sure to execute RTC setting in one of the methods above Replace the C593 MAIN Board p 226 SERVICE REQ 00010025 Error meaning CSIC ROM communication error Explanation There may be a case where an error occurs in communication with the CSIC and BOARD ASSY MAIN In such a case this message is displayed and the printer stops operating Cause of trouble...

Страница 188: ... the the adjustment program SERVICE REQ 00010028 Error meaning Head error Explanation Print Head has been damaged or undefined NMI was detected at CPU Remedy Replace the Printhead p 285 SERVICE REQ 00010029 Error meaning Unidentified NMI Explanation CPU has detected undefined NMI Remedy If this error is not cleared even when the power is turned off once and on again replace the C593 MAIN Board p 2...

Страница 189: ...erference etc Remedy Recover by turning power OFF and back ON SERVICE REQ 00010030 Error meaning Multi Sensor Failure Cause of trouble Multi Sensor is damaged Remedy 1 Check if the connection between the Multi Sensor and BOARD ASSY MAIN and correct it if abnormal 2 Replace the Multi Sensor p 277 SERVICE REQ 00010031 Error meaning ASF phase detection error Cause of trouble ASF home position cannot ...

Страница 190: ...e Sensor is damaged Or power supply fuse for ASF Pump Motor driver is broken on the MAIN Board Remedy Check whether or not recovery can be done by turning power OFF and back ON If error recurs replace the Pump Phase Sensor p 323 Or replace the C593 MAIN Board p 226 SERVICE REQ 00010036 Error meaning Type B Board installation error Cause of trouble Type B Board lower than Level 2 is installed Remed...

Страница 191: ...e C593 MAIN Board p 226 SERVICE REQ 0001003B Error meaning Cutter installation error 1 Cause of trouble CR lock cannot be released by PG2 6 after cutter replacement The cutter or cutter pusher is not properly set Remedy 1 Turn off the printer power 2 Check the cutter installation condition and correct it if abnormal SERVICE REQ 0001003C Error meaning Cutter installation error 2 Cause of trouble CR...

Страница 192: ... bit error is detected In such a case this message is displayed and the printer stops operating Cause of trouble SDRAM Read Write error Remedy Replace the C593 MAIN Board p 226 SERVICE REQ 00020003 Error meaning BOOT program SUM error Explanation There may be a case where the boot program of firmware is broken In such a case this message is displayed and the printer stops operating Only at power o...

Страница 193: ...t agree or decoding of a command is impossible Then the work area is consumed up thus memory runs short In such a case this message is displayed and the printer stops operating Cause of trouble Program problem Remedy 1 Check I F mode 2 Installing Firmware p 444 3 Replace the C593 MAIN Board p 226 SERVICE REQ 100000E0 Error meaning CPU address error load misalignment Cause of trouble Defective circ...

Страница 194: ...rouble Generation error Remedy 1 Installing Firmware p 444 2 Replace the C593 MAIN Board p 226 SERVICE REQ 100001C0 Error meaning AC disruption Cause of trouble Power outage Instant blackout Unplugged from electric outlet Power Supply Board failure MAIN Board failure Remedy 1 Turn the power OFF remove and insert the grounded electrical outlet firmly and turn the power back ON again 2 Replace the P...

Страница 195: ...fective Flash memory Faulty ASIC soldering Faulty CPU soldering Program trouble Generation error Remedy 1 Installing Firmware p 444 2 Replace the C593 MAIN Board p 226 SERVICE REQ 0EXXXXXX Error meaning RTC timer off error Explanation This error occurs when attempting unsuccessfully to communicate with RTC chip on the MAIN Board 0Exxyyzz xx Compare error location 00 LTMR1 01 LTMR0 02 MIN counter y...

Страница 196: ...e Printhead has failed If the fuse on the Main Board has blew Head FFC contact failure If the trouble occurs with a specific ink color Head Cleaner is dirty Abnormal connections between the Ink Cartridge Ink Holder Tube Damper Print Head Fastening nuts loose or the O ring deformed or damaged causing ink to leak etc could occur Print Head failure Execute power cleaning again If the trouble still oc...

Страница 197: ...ustments replace the following parts Printhead p 285 Printer Mechanism SP p 242 SMUDGED OR MARRED PRINTOUT FRONT SIDE If smudging or marring occurs due to rubbing by the head etc on the paper s printed surface check the following items 1 If smudging is occurring at the front end of the roll paper or at the rear end widen the margins at the front end and rear end Set the PAPER MARGIN front end and ...

Страница 198: ...nk WHITE OR BLACK BANDING IN THE CARRIAGE RUNNING DIRECTION If white or black banding uneven density in parallel with the Carriage Unit running direction appears on your printout check the following points 1 Nozzle Check Pattern Printing p 59 Execute Nozzle Check Pattern printing in the panel setting menu If dot missing is found perform the head cleaning or initial ink charge by following method C...

Страница 199: ...r feed direction is found on the print perform the following adjustment Bi D adjustment The Bi D adjustment can be executed by any of the following methods HEAD ALIGNMENT in the Panel setting menu Printer Driver Adjustment Program If the adjustment above does not work to improve the print quality you may improve it by adjusting the THICKNESS NUM setting value 0 1 0 2mm in CUSTOM PAPER of the panel...

Страница 200: ...C H A P T E R 4 DISASSEMBLY ASSEMBLY ...

Страница 201: ...assembly assembly that is unique to 4 color model instructions are given as CHECK POINT When disassembling assembling the 4 color model refer to Difference Between 8 color And 4 color Models In Disassembly Assembly p205 to make sure the difference between them W A R N I N G CR and PF motors are stopped by the cover sensor when the Cover Printer or Paper Guide Inner Unit is open removed For safety ...

Страница 202: ...or where the product is set up C A U T I O N To prevent static electric damage when handling a circuit board do not touch elements on board with bare hands If handling with bare hands is unavoidable perform work by using required measures such as wearing a grounding strap Carefully confirm the connection ends directions of electric part connectors when reassembling after disassembly This printer u...

Страница 203: ...ver 1 Commercial Tool Phillips screwdriver 2 Commercial Tool Shaft length of 250mm or more is preferred Flathead screwdriver Commercial Tool Needle nose pliers Commercial Tool Tweezers Commercial Tool Torque wrench 1 25 1 75 1277142 For coupling screws Hex wrench Commercial Tool For roll paper feeder Ink cartridge ICxx24 Maintenance Tank PXMT2 HEAD EXCHANGE SUPPORT TOOL 1294672 Used in Print Head ...

Страница 204: ... outside toothed lock washers Shaft Installation CR Silver Special screw C B S 3x8 Silver Bind S tight C B S 3x10 Silver Bind S tight C B P 3x6 Silver Bind P tight C B 3x4 Silver Bind C B P P2 3x8 Silver Bind P tight with plane washers 2 C P P 2 6x8 Silver Crosshead Pan P tight C B P 3x12 Silver Bind P tight Installation Plate Shaft CR Silver Special screw C B S P2 3x6 Silver Bind S tight with pla...

Страница 205: ...uipped 4 color model is not equipped with the I H right unit on the right side I H Right Unit I H Lever Sensor Right p305 The 4 color model is equipped with the Cover Front Right 4 Color on the location where the 8 color model would be equipped with the I H Right Unit Cover Front Right 4 Color 4 color Model p365 Routing of Tube Supply Ink While the Tube Supply Ink of the 8 color model is connected...

Страница 206: ... units disassembly of the frame and defined components is prohibited Disassembly reassembly is limited to parts whose part numbers are shown in the Parts List of Chapter 7 Disassembly of parts other than those listed could result in problems that cannot be repaired except at the factory Disassembly reassembly operations for parts units not listed in this Disassembly Reassembly section cannot be pe...

Страница 207: ...etaining Lever green located on the left side of the Carriage Unit to release the locked condition of the Carriage Unit Refer to Figure 4 3 3 Close Cover Printer Figure 4 2 Open Cover Printer Figure 4 3 Print Head Lock Release Be sure to engage the Transport Retaining Lever to lock the Carriage Unit and install protective equipment the next time the printer is transported Cover Printer Transport R...

Страница 208: ...Method CARRIAGE UNIT LOCK RELEASE 1 Open Cover Printer 2 Push in Holder Solenoid to release carriage lock Refer to Figure 4 4 CARRIAGE UNIT LOCK SET 1 Move Carriage Unit to the right until you hear a clicking sound to lock the Carriage Unit Refer to Figure 4 5 Figure 4 4 Carriage Unit Lock Release Figure 4 5 Carriage Unit Lock Set Holder Solenoid ...

Страница 209: ...artridges from the eight Cartridge Slots Refer to Figure 4 7 Figure 4 6 Ink Cartridge Lock Release Figure 4 7 Ink Cartridge Removal C A U T I O N Do not touch ink cartridge PCB IC chip Doing so could disrupt normal operation printing Do not touch ink filler because ink could leak from the ink filler of the ink cartridge C H E C K P O I N T To avoid wrong insertion the shapes of ink cartridges of S...

Страница 210: ...e Tank and pull while pressing against the lower part of the ink cartridge storage box with your right thumb 2 With attention not to tilt the Maintenance Tank in any direction remove the Maintenance Tank while supporting with your left hand Figure 4 8 Maintenance Tank Removal C A U T I O N Do not touch the IC chip while performing the following steps Doing so could disrupt normal operation printin...

Страница 211: ...Printer 4 Press down on the Cutter Assembly tab and turn the Holder Solenoid in the clockwise direction Refer to Figure 4 9 5 Remove the Cutter Assembly from the Carriage Unit Refer to Figure 4 10 Figure 4 9 Cutter Assembly Removal_1 Figure 4 10 Cutter Assembly Removal_2 C A U T I O N When pressing the Cutter Assembly tab in the following steps press it lightly because the cutter blade could scrat...

Страница 212: ...ly Assembly Disassembly Procedures 212 4 2 2 4 ASF Cassette 1 Remove the ASF Cassette from the printer Figure 4 11 ASF Cassette Removal C H E C K P O I N T The disassembly steps described on the following pages require prior removal of the ASF Cassette ASF Cassette ...

Страница 213: ...lange Left black along with Adapter from the Spindle 3 Release hooks 4 each 8 total securing each Adapter outward and remove the corresponding Adapter from Flange Left and Flange Right gray Figure 4 12 Spindle Removal Figure 4 13 Spindle Disassembly Align the marks of the flanges with the marks of the adapters 1 2 Cover Roll Paper Spindle Step 2 Step 3 1 Step 3 1 Step 3 2 Step 3 2 Adapters Flange ...

Страница 214: ...3 1 Holder Roller Unit 1 Remove Spindle p213 2 Remove the four decorative screws securing the Holder Roller Unit to the main unit Refer to Figure 4 14 Decorative screw 4 pcs 3 Slide the Holder Roller Unit upward from the printer rear surface and remove it outward Refer to Figure 4 15 Figure 4 14 Screws Securing Holder Roller Unit Figure 4 15 Holder Roller Unit Removal Screws Holder Roller Unit ...

Страница 215: ...Assembly Disassembly Procedures 215 4 2 3 2 Paper Guide Assy M SP 1 Pull the left and right levers that secures the Paper Guide Assy M SP inward and then pull out the Paper Guide Assy M SP Figure 4 16 Paper Guide Assy M SP Removal Paper Guice Assy M SP Securing Lever ...

Страница 216: ...ews securing Cover Side Left C B S 3x6 2 pcs C B S 3x8 1 pc C C P 4x10 1 pc 5 While slightly lifting the upper part of Cover Side Left remove the Cover Side Left toward left side of the main unit Figure 4 17 Cover Side Left Removal C H E C K P O I N T Slightly lifting the upper part of Cover Side Left allows the cover to be removed without interfering with the upper part of the printer C B S 3x8 C...

Страница 217: ...aintenance Tank Porous Pad Assy Ink Eject p210 2 Remove Holder Roller Unit p214 3 Remove Paper Guide Assy M SP p215 4 Move Paper Lever until two screws can be seen and hold the lever in the place 5 Remove the two screws securing Paper Lever and then remove Paper Lever C B P 3x8 2 pcs Figure 4 18 Paper Lever Removal C B P 3x8 Paper Lever ...

Страница 218: ...of the main unit Figure 4 19 Cover Side Right Removal C H E C K P O I N T Slightly lifting the upper part of Cover Side Right allows the cover to be removed without interfering with the upper part of the printer C A U T I O N When removing the Cover Side Right ink may leak or splatter So have cleaning rags ready and prevent ink from getting on the work area Install the Maintenance Tank beforhand w...

Страница 219: ... 3x6 8 pcs C B S O 3x8 1 pc 5 Release Panel Front dowel from positioning hole in frame Refer to Figure 4 20 6 Remove Panel Front toward you Figure 4 20 Harness Panel Connection Status Figure 4 21 Panel Front Removal Align Panel Front dowel with positioning hole in frame Refer to Figure 4 20 Install Panel Front to printer by tightening screws in the order shown by number in Figure 4 21 Step 3 Panel...

Страница 220: ...Revision C Disassembly Assembly Disassembly Procedures 220 7 Remove the three screws securing the Panel Unit and remove the Panel Unit from Panel Front Refer to Figure 4 22 C B S O 3x6 3 pcs Figure 4 22 Panel Unit Removal Panel Unit C B S O 3x6 ...

Страница 221: ...th your hand C B S 3x6 2 pcs Figure 4 23 Plate P Cover Left Removal Follow the steps below when installing Plate P Cover Left 1 Insert Plate P Cover Left into gap between Cover Rear and main frame 2 Insert shaft socket hole of Plate P Cover Left to Cover Printer shaft left 3 Align Plate P Cover Left dowel with main frame positioning hole 4 Secure with the two screws C B S 3x6 2 pcs Shaft of Cover ...

Страница 222: ...bly Disassembly Procedures 222 3 Remove Cover Printer upward by sliding to left side Figure 4 24 Cover Printer Removal Insert the right shaft of Cover Printer into the shaft hole on Plate P Cover Right Shaft of Cover Printer Shaft Hole Plate P Cover Right 1 2 Cover Printer ...

Страница 223: ...2 Remove Cover Side Right p217 3 Remove the three screws securing Cover Rear and remove Cover Rear upward Shaft Installation CR 2 pcs C B S 3x6 1 pc Figure 4 25 Cover Rear Removal Align the two ribs of the Cover Rear with the two positioning holes on the Release Unit Ribs and Positioning Holes Release Unit Cover Rear Shaft Installation CR C B S 3x6 ...

Страница 224: ...res 224 4 2 3 8 P Cover Open Sensor 1 Remove Panel Front Panel Unit p219 2 Release the two tabs securing P Cover Open Sensor and then release the P Cover Open Sensor 3 Disconnect the connector from the P Cover Open Sensor Figure 4 26 P Cover Open Sensor Removal Tabs P Cover Open Sensor Connector ...

Страница 225: ... Rear Cover Sensor Unit to the printer frame and remove Rear Cover Sensor Unit Refer to Figure 4 27 4 Disconnect the connector from the Rear Cover Sensor Refer to Figure 4 28 5 Release the two tabs securing the Rear Cover Sensor to the holder and then remove the Rear Cover Sensor Refer to Figure 4 29 Figure 4 27 Removing the Rear Cover Sensor Unit Figure 4 28 Connector Connecting Status Figure 4 2...

Страница 226: ...arness notch and remove the Cover Harness Refer to Figure 4 31 Figure 4 30 Screws Securing the Cover Harness Figure 4 31 Cover Harness Removal C H E C K P O I N T The board used for Stylus 4400 4800 is C593 MAIN Board and CA00 MAIN Board is used for Stylus Pro 4450 4880 4880C The explanation in this section is based on Stylus Pro 4400 4800 C A U T I O N Be sure to insert and unplug FFCs vertically...

Страница 227: ...the PCB Unit toward you C B S 3x6 4 pcs Figure 4 32 Pulling Out the PCB Unit C A U T I O N Be careful not to pull the PCB Unit too hard and stretch the harness when performing the following steps Align the left and right ribs of the PBC Unit with the position locators of the frame C B S 3x6 C B S 3x6 PCB Unit Rib and Position Locator Rib and Position Locator ...

Страница 228: ...ction Socket 1 CN48 17 C511_SUB B Board CN102 2 CN51 30 C511_SUB B Board CN101 3 CN54 30 C511_SUB B Board CN100 4 CN9 30 C593_SUB D Board CN3 5 CN7 31 C593_SUB D Board CN1 6 CN8 31 C593_SUB D Board CN2 7 CN53 28 C593_SUB C Board CN201 8 CN52 15 C593_SUB C Board CN200 9 CN18 Red 4 PG PO Motor 10 CN16 White 4 ASF Pump Motor Relay connector route 11 CN19 Black 2 Suction Fan Right relay connector rout...

Страница 229: ...onnector numbers with the ones on the board with the number printed side of the FFCs facing toward the printer rear The wires should be bundled with acetate tapes in three places as shown in the figure below to prevent them from getting onto the guide rail for the Type B Board If the wires are not bundled they may be broken or cut off when installing the Type B Board Connector Numbers Acetate Tape...

Страница 230: ...d then remove Cover Connector Upper B Refer to Figure 4 34 C B S 3x10 2 pcs 10 Remove the two screws securing Cover I F and Grounding Board I F and then remove Cover I F and Grounding Board I F Refer to Figure 4 35 C B S 3x6 1 pc Figure 4 34 Cover Connector Upper B Removal Figure 4 35 Cover I F and Grounding Board I F Removal Step 9 C B S 3X10 Step 8 C P 3X6 Cover Connector Upper B USB Connector G...

Страница 231: ...the two screws securing the Bracket and remove the Bracket Refer to Figure 4 37 C B S 3x8 2 pcs Figure 4 36 Guide Rail Removal Figure 4 37 Bracket Removal Secure the two Guide Rail hooks to the two C593 MAIN Board installation holes Install while aligning the two Bracket dowels with the two C593 MAIN Board positioning holes Hooks Installation Holes Dowels Positioning Holes 1 2 3 Guide Rail C B S 3...

Страница 232: ... U T I O N Do not place the circuit board solder side directly on a conductive surface Circuit boards supplied as service parts have been equipped with lithium battery Do not place the circuit board solder side directly on a conductive surface or let conductive material come in contact with the circuit To do so may cause short out A D J U S T M E N T R E Q U I R E D Be sure to refer to Chapter 5 A...

Страница 233: ... pcs 5 Remove the five screws securing the Power Supply Board and remove the Power Supply Board C B S 3x8 5 pcs Figure 4 39 Power Supply Cooling Fan Removal Figure 4 40 Power Supply Board Removal W A R N I N G When removing the Power Supply Board wait 5 minutes after unplugging the AC power cord before starting work to allow discharge of residual charge in the electrolytic capacitors For your safe...

Страница 234: ...p208 3 Remove the three screws securing the Carriage Cover and remove the Carriage Cover upward Refer to Figure 4 42 C B P 3x8 3 pc Figure 4 41 Moving the Carriage Unit Figure 4 42 Carriage Cover Removal C A U T I O N When performing the following steps remove protective equipment if it is installed and make sure to release the Carridge Unit lock with the Transport Retaining Lever Refer to 4 2 1 1...

Страница 235: ...B Board Refer to Figure 4 43 C B P 3x8 1 pc Figure 4 43 C593_SUB Board Removal Table 4 6 Connectors Harnesses Connected to C593_SUB Board Connector No Color Number of Pins Connection Socket CN1 30 C593_SUB D Board CN4 CN2 White 2 Cutter Solenoid CN3 White 5 Multi Sensor CN4 5 CR Encoder Board Be sure to fasten both the grounding plate and the C593_SUB Board together with screws Grounding Plate C B...

Страница 236: ...nection Socket 1 CN103 17 Panel Unit CN1 2 CN46 7 Porous Pad Assy Ink Eject 3 CN39 LK 7 CSIC_R1 Board Light Black 4 CN42 LC 7 CSIC_R2 Board Light Cyan 5 CN43 LM 7 CSIC_R3 Board Light Magenta 6 CN45 LLK 7 CSIC_R4 Board Light Light Black 7 CN22 Blue 2 P Cover Open Sensor 8 CN36 White 2 I H Lever Sensor Right 9 CN26 Black 2 Paper Eject Release Sensor 10 CN25 Red 2 ASF Paper Sensor 11 CN27 Yellow 2 Re...

Страница 237: ... 4450 4800 4880 4880C Revision C Disassembly Assembly Disassembly Procedures 237 3 Remove the four screws securing C511_SUB B Board and remove C511_SUB B Board C B P 3x6 4 pcs Figure 4 45 C511_SUB B Board Removal C B P 3x6 ...

Страница 238: ...onnectors Harnesses Connected to C593_SUB C Board Connection Order Connector No Color Mark Number of Pins Connection Socket 1 CN38 MB 7 CSIC_L1 Board Matte Black 2 CN40 C 7 CSIC_L2 Board Cyan 3 CN41 M 7 CSIC_L3 Board Magenta 4 CN44 Y 7 CSIC_L4 Board Yellow 5 CN201 28 C593 MAIN Board CN53 6 CN200 15 C593 MAIN Board CN52 7 CN24 White 4 PF Linear Encoder Sensor 8 CN37 Black 2 I H Lever Sensor Left 9 ...

Страница 239: ...00 4450 4800 4880 4880C Revision C Disassembly Assembly Disassembly Procedures 239 4 Remove the three screws securing C593_SUB C Board and remove C593_SUB C Board C B S 3x6 3 pcs Figure 4 48 SUB C Board Removal C B S 3x6 ...

Страница 240: ...593_SUB D Board and remove C593_SUB D Board C B P 3x6 4 pcs Figure 4 49 C593_SUB D Board Connector Positions Figure 4 50 C593_SUB D Board Removal Table 4 9 Connectors Harnesses Connected to C593_SUB D Board Connection Order Connector No Color Mark Number of Pins Connection Socket 1 CN1 31 C593 MAIN Board CN7 2 CN2 31 C593 MAIN Board CN8 3 CN3 30 C593 MAIN Board CN9 4 CN4 30 C593 SUB Board CN1 5 CN...

Страница 241: ...e following reasons replaceable parts are limited to defined components Therefore removal or replacement of parts that cannot be supplied as components defined in this manual or parts supplied as Service Parts is prohibited If this is not followed it could result in problems that cannot be repaired except at the factory 1 Repair support is required on site 2 Components have been assembled in facto...

Страница 242: ...art name Code Ink cartridge Ink cartridge Maintenance tank Maintenance tank Spindle Spindle Board box 1 Board box Cover I H left 8 color 1299011 Cover I H left C593 1305013 Label caution transport 1400736 Cover I H right 8 color 1299007 Cover front right 4 color 1299017 Label chalk cleaning 1400729 Label chalk cleaning B 1400730 Cover printer C593 1305014 Knob pressure lever C593 2 1305026 Knob I ...

Страница 243: ...he parameter file 5 Enter Maintenance Mode 2 Panel display SELF TESTING Power OFF Press Paper Select Paper Feed Δ Paper Feed Power ON 6 Click the Write button and the parameter writing begins 7 End the NVRAM Backup Utility when the writing is completed 8 Set a destinaton using one adjustment program Refer to 5 4 3 Destination Setting p434 9 Turn the printer power off 10 Turn the printer power on 1...

Страница 244: ...s 2 Release relay harness connected to Fan Blower right from acetate tapes and clamp Refer to Figure 4 52 3 Disconnect the two rellay connectors as shown in Figure 4 52 Refer to Figure 4 52 Figure 4 51 Paper Guide Eject Stacker Removal Figure 4 52 Releasing Relay Harness Insert the two tabs of the Paper Guide Eject Stacker into the two positioning holes on the Frame Fan Unit Positioning Holes Fram...

Страница 245: ... unit 5 Remove the two screws securing Frame Fan Unit and remove Frame Fan Unit by pulling it toward you C B S 3x6 2 pcs Figure 4 53 Frame Fan Unit Removal Align the two main frame dowels with the two positioning holes on the Frame Fan Unit Refer to Figure 4 53 C B S 3X6 C B S 3X6 Frame Fan Unit Acetate Tape Dowel and Positioning Hole Dowel and Positioning Hole Dowel and Positioning Hole ...

Страница 246: ...e Cover Side Left p216 2 Remove Cover Side Right p217 3 Remove Cover Motor PF and disconnect the connector from the ASF phase sensor Refer to 4 2 6 4 ASF Phase Sensor p263 C A U T I O N This section explains the working procedure using the ASF EXCHANGE SUPPORT TOOL Always prepare the tool before performing work because performing work without the specified tool may cause damage to the printer or r...

Страница 247: ...dures 247 4 Insert the tab of the Joint Plate to the slit of the Base Left 5 Insert the Base Left with the Joint Plate set in the Step 4 under the left bottom of the main unit until the notches hit the rubber feet of the printer Figure 4 54 Joint Plate Attachment Figure 4 55 Base Left Setting ...

Страница 248: ...y Assembly Disassembly Procedures 248 6 Insert the Base Right under the right bottom of the main unit until the noches hit the rubber feet of the printer Figure 4 56 Base Right Setting C H E C K P O I N T After the Base Left Base Right and the Joint Plate are set up ...

Страница 249: ...I O N When lifting the printer in the steps given below pay attention to the followings Hold the front panel section of the printer Holding other section could cause the malfunction of the printer This printer is heavy approximately 40 kg Hold the front panel section at the front of the printer securely and make sure that the grip is solid before lifting the printer Dropping the printer may cause ...

Страница 250: ...into the foot receiver at the upper end of the Stand 8 2 Fit the lower end of the Stand into the protrusion of the Base Left Be sure that the concave portion of the Stand matches the convex portion of the Base Left 9 Tilt the printer upward a little the same amount of the spring stroke of the left stand as holding the front panel section of the printer and set the Stand in both the rubber foot on ...

Страница 251: ...he two screws that secure Duct Air C Assy C B S 3x6 4 pcs 11 Remove the two screws that secure the ASF Unit while keeping the Duct Air C Assy separated C B S 3x6 2 pcs Figure 4 59 Screws Securing ASF Unit C A U T I O N When performing the following work do not keep the Duct Air C Assy too far from the printer because harnesses are connected between them Step 11 C B S 3x6 Step 10 C B S 3x6 ...

Страница 252: ...4880C Revision C Disassembly Assembly Disassembly Procedures 252 12 While holding the ASF Unit remove the three screws that secure the ASF Unit on the left side of the printer C B S 3x6 3 pcs Figure 4 60 Screws Securing ASF Unit C B S 3x6 ...

Страница 253: ...it Removal When installing the ASF Unit to the printer do not let the connector of the ASF Phase Sensor located at the left side of the ASF Unit contact with the cutout of the frame of the main unit A D J U S T M E N T R E Q U I R E D Be sure to refer to Chapter 5 Adjustment p 366 and perform specified adjustments after replacing the ASF Unit ASF Phase Sensor ASF Unit ...

Страница 254: ...d Lever Hopper Release from the Shaft Roller LD Figure 4 62 Gear 44 47 and Lever Hopper Release Removal When installing the Gear 44 74 and Lever Hopper Release to the Shaft Roller LD face the surfaces with the longer ribs of both the Gear 44 74 and the Lever Hopper Release toward the ASF Unit side and match the respective ribs of the shaft holes with the grooves of the Shaft Roller LD Lever Hopper...

Страница 255: ... Push down and release the tab that secures the Wheel Detector using a precision driver or a similar tool and then remove the Wheel Detector Refer to Figure 4 65 Figure 4 63 Screws Securing Frame ASF Right Figure 4 64 Frame ASF Right Removal Figure 4 65 Wheel Detector Removal When installing the Frame ASF Right make sure that both the grooves of the Cover Roller LD Left and the Cover Roller LD Rig...

Страница 256: ...4 from the Shaft Roller LD The Ground Spring ASF will be released at the same time Figure 4 66 Bushing Lock 11 4 Removal When installing the Ground Spring ASF install the Bushing Lock 11 4 first insert the both ends of the Ground Spring ASF into the right and left holes on the bottom of the Bushing Lock 11 4 and then hitch the other side of the Ground Spring 11 4 to the tab located on the bottom o...

Страница 257: ... Left to the Cover Roller LD Left and then remove the Holder Edge Guide Left to the right Refer to Figure 4 67 7 Release the tab that secures the Roller Assy LD Left to the Cover Roller LD Left then remove the Roller Assy LD Left sliding it rightward Refer to Figure 4 68 Figure 4 67 Holder Edge Guide Left Removal Figure 4 68 Roller Assy LD Left Removal Holder Edge Guide Left Holder Edge Guide Left...

Страница 258: ... Right Figure 4 69 Roller Assy LD Left and Roller Assy LD Right Removal All the parts shown in Figure 4 69 are released when drawing the Shaft Roller LD Install the parts to the Shaft Roller LD in the correct order and direction refering the Figure 4 69 Roller Assy LD Right Compression Spring 0 407 Holder Edge Guide Left Roller Assy LD Left Shaft Roller LD E ring Drawing Direction of Shaft Compres...

Страница 259: ...ly Assembly Disassembly Procedures 259 4 2 6 3 Mount Assy Plate Motor ASF SP 1 Remove Box Assy Flushing Pump Unit p316 2 Detach E ring and then remove Spur Gear 16 Refer to Figure 4 70 Figure 4 70 Spur Gear 16 Removal E ring Spur Gear 16 Screwdriver insertion hole ...

Страница 260: ...Spur Gear 16 removed in Step 2 and remove the screw securing Mount Assy Plate Motor ASF SP C B 3x8 1 pc 4 Remove the two screws securing Mount Assy Plate Motor ASF SP and then remove Mount Assy Plate Motor ASF SP C B S 3x6 1 pc Figure 4 71 Mount Assy Plate Motor ASF SP Removal Step 3 C B 3x8 Step 4 C B S 3x6 Step 4 C B S 3x6 Mount Assy Plate Motor ASF SP ...

Страница 261: ...y install the gear as shown below 2 Install Mount Assy Plate Motor ASF SP in a way that avoids interference between Combination Gear 12 22 4 and Spur Gear 18 Combination Gear 12 22 4 Spur Gear 18 Location of Interference 3 Insert shaft of frame while aligning it with installation hole of Mount Assy Plate Motor ASF SP 4 Confirm that Spur Gear 19 2 and Combination Gear 13 6 28 8 are engaged Shaft In...

Страница 262: ...ions listed below Between frame and Heat Dissipation Plate Motor ASF Between frame and Mount Assy Plate Motor ASF SP A D J U S T M E N T R E Q U I R E D Be sure to refer to Chapter 5 Adjustment p 366 and perform specified adjustments after replacing the Mount Assy Plate Motor ASF SP C B S 3x6 Confirm close fit of components Heat Dissipation Plate Motor ASF ...

Страница 263: ...in the upward direction while avoiding the Roller PF Refer to Figure 4 72 C B S 3x6 4 pcs 3 Rotate Lever Hopper Release with hand and align the Wheel Detector notch with the ASF Phase Sensor detection section Refer to Figure 4 73 Figure 4 72 Cover Motor PF Removal Figure 4 73 Wheel Detector Removal Position 1 2 Cover Motor PF Roller PF C B S 3x6 C B S 3x6 ASF Phase Sensor Notch and Detection Secti...

Страница 264: ...ase the hook securing the Wheel Detector and remove the Wheel Detector Refer to Figure 4 74 5 Disconnect the connector from the ASF Phase Sensor Refer to Figure 4 75 6 Release the two tabs securing the ASF Phase Sensor and remove the ASF Phase Sensor Refer to Figure 4 75 Figure 4 74 Wheel Detector Removal Figure 4 75 ASF Phase Sensor Removal Hook 1 2 2 1 1 Connector Tabs ...

Страница 265: ...per Sensor 1 Remove PCB Unit Refer to 4 2 4 1 C593 MAIN Board p226 2 Release ASF Paper Sensor harness from clamp 3 Release the two tabs securing ASF Paper Sensor and then release ASF Paper Sensor 4 Disconnect connector from ASF Paper Sensor Figure 4 76 ASF Paper Sensor Removal Clamp Harness ASF Paper Sensor Connector ...

Страница 266: ...efer to Figure 4 78 Figure 4 77 Screws Securing Ink Tube Unit Figure 4 78 Releasing Tabs on the Bottom of Ink Tube Unit C H E C K P O I N T This section explains the working procedure using the CR SUS PLATE SUPPORT TOOL shown in the figure below The CR SUS PLATE SUPPORT TOOL is a tool that holds and fixes the SUS plate which is on the CR guide shaft to prevent it being deformed or damaged by the b...

Страница 267: ...wo red lines marked on the reverse side of the belt If the belt is sandwiched at the right position a bending will appear between the two red lines Do not get harnesses sandwiched between the Ink Tube Unit and the Carriage Unit Securely hitch the three tabs of the Ink Tube Unit to the installation holes of the Carriage Unit Red lines Match the two positioning holes and the two dowels of the Ink Tu...

Страница 268: ...it to the Carriage Unit Refer to Figure 4 80 C B P P2 3x12 1 pc 8 Release the harness from the tab shown in Figure 4 80 and move the Carriage Unit toward you 9 Lift the Head Unit together with the Ink Tube Unit to remove from the CarriageUnit Refer to Figure 4 81 Figure 4 79 Lever Inclination Removal Figure 4 80 Removal of Screw Securing Head Unit Figure 4 81 Head Unit Removal C B P P2 3x12 Extens...

Страница 269: ...d you and compress it to the Shaft Front to make the bearings that are attached on the rear of the Carrigage Unit apart from the Shaft Rear 11 2 Lift the rear of the Carriage Unit upward to release it from the Shaft Front lift the front of the Carriage Unit so that it is released from the Shaft Front and then remove the Carriage Unit Figure 4 82 Carriage Unit Removal C A U T I O N Be sure to insta...

Страница 270: ...Tension Installation screw and release the tension of Belt CR 6 Release Belt CR from the pinion gear of Motor Assy CR Figure 4 83 Disconnecting the CR Motor Connector Figure 4 84 Releasing Tension of Belt CR C H E C K P O I N T When performing the following steps note the position set on the scale of Holder Pulley Returning to this same position when installing the Belt CR will reduce the time nee...

Страница 271: ...two screws securing the Motor Assy CR and remove the Motor Assy CR Refer to Figure 4 85 C C 3x6 2 pcs Figure 4 85 Motor Assy CR Removal A D J U S T M E N T R E Q U I R E D Be sure to refer to Chapter 5 Adjustment p 366 and perform specified adjustments after installing or replacing the Motor Assy CR C C 3x6 Belt CR ...

Страница 272: ...e the harness Refer to 4 2 4 1 C593 MAIN Board p226 3 Release the Motor Assy CR harness from the Paper Guide Lower tab and the two channels Refer to Figure 4 86 4 Peel two pieces of acetate tape and release Motor Assy CR harness and then pull it out through the hole of the frame Refer to Figure 4 87 5 Cut the tying band and release the Motor Assy CR harness Refer to Figure 4 87 Figure 4 86 Releasi...

Страница 273: ... Assy CR harness from the four cramps four pieces of acetate tape and the tab on the frame Refer to Figure 4 88 7 Disconnect the connector from Motor Assy CR and remove Harness CR Refer to Figure 4 83 Figure 4 88 Releasing the Harness_3 Acetate Tape x3 Clamps Tab Acetate Tape Motor Assy CR Fasten tube to motor end surface ...

Страница 274: ...efer to Figure 4 90 4 Remove the acetate tape securing the harness and release Harness CSIC and Motor Assy PG harness from Duct Air C hook Refer to Figure 4 90 5 Release Motor Assy PG harness and Mount Assy Plate Motor ASF SP harness from the U shaped cutout of the Frame Base Side Right Refer to Figure 4 90 6 Peel acetate tape and release PG Motor harness Refer to Figure 4 90 Figure 4 89 Sheet Ink...

Страница 275: ...tor Assy PG inward while passing the pinion gear through the relief hole Refer to Figure 4 91 Figure 4 91 Motor Assy PG Removal C A U T I O N When performing the following steps be careful not to scratch the frame with Motor Assy PG pinion gear Install PG Motor with the circuit board facing downward A D J U S T M E N T R E Q U I R E D Be sure to refer to Chapter 5 Adjustment p 366 and perform spec...

Страница 276: ...to 4 2 4 3 C593_SUB Board p234 3 Release CR_HP Sensor harness from clamp 4 Unfasten the two upper hooks securing CR_HP Sensor release the lower tab and then release CR_HP Sensor 5 Disconnect the connector from CR_HP Sensor Figure 4 92 CR_HP Sensor Removal After installing the CR_HP Sensor wrap the harness around the outside as shown in Figure 4 92 Wrap around 1 1 2 Clamp Connectoror CR_HP Sensor T...

Страница 277: ...ove the Carriage Unit to the left end of the printer keeping clear of the platen 5 Remove the Multi Sensor from the Carriage Unit in the downward direction Refer to Figure 4 94 6 Disconnect the connector connected to the Multi Sensor and remove the Multi Sensor Refer to Figure 4 95 Figure 4 93 Screws Securing Multi Sensor Figure 4 94 Multi Sensor Removal Figure 4 95 Connecting Status of Multi Sens...

Страница 278: ...at the PG Lock Lever enter the groove at the extream end of the PG Cam as shown in Figure 4 96 Doing so releases the shield plate from the PG Phase Sensor Refer to Figure 4 96 Figure 4 96 Rotating the Shield Plate C H E C K P O I N T As the PG Cam Bush Shaft Rear and PG Detection Shield Plate operate simultaneously the shield plate can be rotated by rotating the PG Cam PG Cam PG Lock Lever Detecti...

Страница 279: ...nstallation Plate Detector HP Refer to Figure 4 97 5 Disconnect the connector from the PG Phase Sensor Refer to Figure 4 98 6 Release the tabs securing the PG Phase Sensor and remove the PG Phase Sensor Refer to Figure 4 98 Figure 4 97 Extension Spring 2 58 Removal Figure 4 98 PG Phase Sensor Removal Extension Spring 2 58 Installation Plate Detector HP Tabs Hooks Connector ...

Страница 280: ... Encoder Sensor to the Carriage Unit and remove CR Encoder Sensor C P P 2 6x6 1 pc Figure 4 99 CR Encoder Sensor Removal C A U T I O N Do not touch Scale CR when removing CR Encoder Sensor Align the two dowels on the CR Encorder Sensor with the two positioning holes on the Ink Tube Unit A D J U S T M E N T R E Q U I R E D Be sure to refer to Chapter 5 Adjustment p 366 and perform specified adjustm...

Страница 281: ...hitched to the tab on the printer frame and the Scale CR 5 At the right side of the printer remove the Scale CR from the tab on the printer frame Figure 4 100 Scale CR Removal C A U T I O N A damage to the detection pattern on the surface of the Scale CR may cause malfunction of the CR encorder Take care not to touch the surface of the Scale CR with bare hands or contaminate it with ink or contact...

Страница 282: ...res the Shaft Pulley on the left back of the printer and then remove the plain washer Refer to Figure 4 101 3 While pressing the Lever Rock PG loosen the CR tension attachment screw until its tip gets behind the Pulley Tension CR Refer to Figure 4 102 Figure 4 101 E ring and Plain Washer Removal Figure 4 102 Loosening CR Tension E ring Plain washer Lever Rock PG Attachment Screw Pulley Tension CR ...

Страница 283: ...Pulley Driven 6 Draw out the Shaft Pulley from the Pulley Driven to remove the two polysliders Refer to Figure 4 104 7 Remove the ball bearings from the Pulley Driven Refer to Figure 4 104 Figure 4 103 Shaft Pulley Removal Figure 4 104 Pulley Driven and Shaft Pulley Removal Install the Pulley Driven and Shaft Pulley with the grooved end of the Shaft Pulley facing the rear of the printer Belt CR 1 ...

Страница 284: ...e Solenoid CR and then remove the Solenoid CR from the Carriage Unit C B P P2 3x8 plain washer 4 3x0 8x8 1 pc Figure 4 105 Solenoid CR Removal C H E C K P O I N T The Cutter Cover which covers the cutter blade projecting upward from the bottom of the Carriage prevents injury during the work Route the harnesses of the Solenoid CR on the Carriage Unit properly as shown in Figure 4 105 A D J U S T M ...

Страница 285: ... K P O I N T Figures below shows the required tools in replacing the Printhead CUTTER CAP 1401456 HEAD EXCHANGE SUPPORT TOOL 1294672 HEAD EXCHANGE SUPPORT TOOL Adjust Plate 1294672 CR SUS PLATE SUPPORT TOOL 1400023 C H E C K P O I N T Be sure to install the Adjust Plate to the rear of the HEAD EXCHANGE SUPPORT TOOL before removing the Printhead ...

Страница 286: ... PLATE SUPPORT TOOL on both sides of the Carriage Unit as shown in Figure 4 82 Refer to Figure 4 106 For the setting of the CR SUS PLATE SUPPORT TOOL refer to Figure 4 82 in 4 2 7 1 Carriage Unit p266 4 Release the tension of the Belt CR to remove the Belt CR from the pinion gear of the Motor Assy CR Refer to 4 2 7 2 Motor Assy CR p270 Refer to Figure 4 107 Figure 4 106 CR SUS PLATE SUPPORT TOOL S...

Страница 287: ...en remove the Carriage Unit 6 Temporarily place the Carriage Unit that is removed in Step 5 on both the Shaft Front and the Shaft Rear Refer to Figure 4 109 7 Set the HEAD EXCHANGE SUPPORT TOOL on the printer at the position as shown in Figure 4 109 Set the HEAD EXCHANGE SUPPORT TOOL with its front holes macthing with the screw positions of the printer Refer to Figure 4 109 Figure 4 108 Carriage U...

Страница 288: ...ews Securing Carriage C C H E C K P O I N T When setting the Carriage Unit on the HEAD EXCHANGE SUPPORT TOOL take care not to bend the Tube Supply Ink If it get bend replace with a new one Make sure the Carriage Unit is installed to the HEAD EXCHANGE SUPPORT TOOL securely Make sure that the Carriage Unit is completely set into the position with its bottom is parallel to the tool as seen from the s...

Страница 289: ...to Figure 4 112 Figure 4 111 Carriage C Removal Figure 4 112 Separation from Carriage B C A U T I O N When performing the following work do not keep the Carriage C too far because harnesses are connected to the Carriage C Make sure that the mounting plate of the Carriage Unit is in contact with the one of the Carriage C after installing the Carriage C Carriage C Carriage B Carriage C Printhead Hea...

Страница 290: ...rinthead form the Carriage C reattach the Absorber CR to the Carriage C as shown in the figure bilow Harness Head should be connected with its circle marked surface facing downward the nozzle surface Upper side 2 circles Lower side 1 circle A D J U S T M E N T R E Q U I R E D Be sure to refer to Chapter 5 Adjustment p 366 and perform specified adjustments after replacing or removing the Printhead ...

Страница 291: ...Removal A D J U S T M E N T R E Q U I R E D When performing the following work remove ink out of the ink route before removing the Valve Assy Head Refer to Chapter 5 Adjustment p 366 to know how to remove ink C A U T I O N When performing the following steps pay attention to the followings Prepare pieces of cloth in case the ink leaks or spatters around the printer Do not allow dust or foreign mat...

Страница 292: ...socket before attaching the Tube Supply Ink Attach the Tube supply Ink from the left in the order below and route it referring to the figure below LK Y LM M LC C PK MK MK C M Y Insert the Tube Supply Ink all the way seated then tighten the Coupling Screw M7 Approximately 2mm O ring coupling M7 LK Y LM M LC C PK MK MK C M Y M To prevent from both ink leak and damage on the joint screw be sure to ti...

Страница 293: ...hich connects Tube Supply Ink to remove the joint section 6 2 Release the tab and remove the Valve Assy Head in the direction of an allow Figure 4 116 Plate Damper Drawing Figure 4 117 Valve Assy Head Removal C A U T I O N When performing the following work pay attention to the followings Do not hold the film area of the Valve Assy Head Do not damage or deform the joint section on the Valve Assy H...

Страница 294: ... Ink to the left move it downward and then remove it to the left side Refer to Figure 4 119 Figure 4 118 Duct Air D Removal Figure 4 119 Duct Air A and Gutter Waste Ink Removal C A U T I O N When removing the Gutter Ink prepare pieces of cloth in case the waste ink leaks or splatter inside the printer Make sure that the ink is not ejected from the ink ejection route during the work Insert the shaf...

Страница 295: ... to Figure 4 121 7 1 Slide Gutter Ink to left side 7 2 Move Gutter Ink right side downward 7 3 Pull out Gutter Ink left lower side toward you Figure 4 120 Screw Securing Gutter Ink Figure 4 121 Gutter Ink Removal Make sure that Push Spring Absorbent Pad Gutter is attached to Gutter Ink If it has removed install it as shown in the figure below Push Spring Absorbent Pad Gutter Assembly Catch Assembl...

Страница 296: ... Lock Lever Knob Left and then remove the I C Lock Lever Knob Left Refer to Figure 4 123 C B P 3x6 1 pc Figure 4 122 Cover I H Left Removal Figure 4 123 I C Lock Lever Knob Left Removal C A U T I O N When performing the following work remove ink out of the the ink path before removing the IH Left Unit Refer to Chapter 5 Adjustment p 366 to know how to remove ink The I C Lock Lever Knob Left has up...

Страница 297: ...ulling forward Refer to Figure 4 124 C B S 3x6 4 pcs 6 Remove the screw securing Installation Plate I H Guide A and remove Installation Plate I H Guide A Refer to Figure 4 125 C B S 3x6 1pc Figure 4 124 Guide I H Left Removal Figure 4 125 Installation Plate I H Guide A Removal Guide I H Left C B S 3x6 C B S 3x6 Installation Plate I H Guide A Dowels and Positioning Holes C B S 3x6 ...

Страница 298: ...ation Plate I H Guide C Removal The shapes of Installation Plate I H Guide A and Installation Plate I H Guide C differ so be careful when installing them Align Installation Plate I H Guide A and Installation Plate I H Guide C dowels 2 each with frame positioning holes 2 each Refer to Figure 4 125 and 4 126 Installation Plate I H Guide A Installation Plate I H Guide C Installation Plate I H Guide C...

Страница 299: ...When performing the following step be careful not to bend the Tube Supply Ink or scratch it with the edge of the frame C A U T I O N The width of the frame notch allows passage of one tube at a time Be sure to release each tube in order When installing Tube Supply Ink to the frame secure it with acetate tape The Tube Supply Ink should be slackened to the direction center of the printer as shown in...

Страница 300: ...tate tape that secures the front side of the I H Left Unit 13 Remove the four screws securing rear side of I H Left Unit Refer to Figure 4 130 C B S 3x6 4 pcs Figure 4 129 I H Left Unit Front Side_2 Figure 4 130 Screws Securing Rear Side of I H Left Unit Harnesses are routed through the area of screws as shown by the arrows in Figure 4 130 When installing the unit install it without pinching harne...

Страница 301: ...93_SUB C Board p238 15 Peel two pieces of acetate tape and release the four Harness CSIC s and I H Lever Sensor Left s harness Refer to Figure 4 131 16 Pull the I H Left Unit forward from the printer while pulling the four Harness CSIC and I H Lever Sensor Left harness from the hole of the frame Figure 4 131 Releasing the Harnesses Figure 4 132 I H Left Unit Removal Acetate Tapes Harness CSIC I H ...

Страница 302: ... the rear side screw stop tabs stay under the Cover Motor PF The four grounding springs on the top of the I H Left Unit make contact with the printer frame so install the I H Left Unit while lightly holding down the grounding springs so as not to deform them Cover Motor PF Screw Stop Tabs Grounding Springs ...

Страница 303: ...er to Figure 4 134 C B S 3x6 2pcs Figure 4 133 I H Lever Sensor Left Removal Figure 4 134 Cover Holder IC Left Removal When the Ink Lever is installed against the angle set location as shown in the illustration confirm that the two holes of Fan Gear 34 form a line parallel to the bottom of Frame Holder IC Align the two dowels on holder side with the two positioning holes on the Cover Holder IC Ref...

Страница 304: ... H Left Unit Refer to 4 2 11 1 I H Left Unit I H Lever Sensor Left 4 color model p362 when disassembling the 4 color model Stylus Pro 4400 Confirm that O Ring Coupling M7 has been installed The Tube Supply Ink has been marked with its color Install while confirming that the mark matches the receptacle Use the following order to install the Tube Supply Ink while routing it to the installation locat...

Страница 305: ... P 3x6 1 pc Figure 4 136 Cover I H Right Removal Figure 4 137 I C Lock Lever Knob Right Removal C A U T I O N When performing the following work remove ink out of the ink path before removing the IH Right Unit Refer to Chapter 5 Adjustment p 366 to know how to remove ink C H E C K P O I N T The 4 color model is not equipped with this unit Refer to 4 2 11 2 Cover Front Right 4 Color 4 color Model p...

Страница 306: ...forward Refer to Figure 4 138 C B S 3x6 4 pcs 6 Remove the screw securing Installation Plate I H Guide B and then remove Installation Plate I H Guide B Refer to Figure 4 139 C B S 3x6 2 pcs Figure 4 138 Screws Securing Guide I H Right Figure 4 139 Installation Plate I H Guide B Removal Guide I H Right C B S 3x6 C B S 3x6 Installation Plate I H Guide B Dowels and Positioning Holes C B S 3x6 ...

Страница 307: ...ation Plate I H Guide C Removal The shapes of Installation Plate I H Guide B and Installation Plate I H Guide C differ so be careful when installing them Align Installation Plate I H Guide B and Installation Plate I H Guide C dowels 2 each with frame positioning holes 2 each Refer to Figure 4 139 and 4 140 Installation Plate I H Guide C Installation Plate I H Guide B Dowels and Positioning Holes I...

Страница 308: ...Figure 4 141 Figure 4 141 Releasing the Tube Supply Ink C A U T I O N When performing the following step be careful not to bend the Tube Supply Ink or scratch it with the edge of the frame Secure Tube Supply Ink to the frame with acetate tape The Tube Supply Ink should be slackened to the direction center of the printer as shown in Figure 4 141 Tube Supply Ink Notch Slack Direction Acetate Tape ...

Страница 309: ...connectors CN39 CN42 CN43 CN45 CN461 and I H Lever Sensor Right harness CN36 white 2 pin from C511_SUB B Board Refer to 4 2 4 4 C511_SUB B Board p236 10 Peel off four pieces of acetate tape shown in Figure 4 142 and 4 143 Figure 4 142 Releasing Harnesses_1 Figure 4 143 Releasing Harnesses_2 Step 10 Acetate Tape Step 10 Acetate Tape ...

Страница 310: ...at the same time 12 Release both the FFC and the harnesses from the tabs of the printer Refer to Figure 4 145 Figure 4 144 Releasing Harnesses_3 Figure 4 145 Releasing Harnesses_4 Sheet Ink Stopper D should be attached to the printer frame with the three tabs of the clamps inside the printer as shown in Figure 4 144 Secured together with Sheet Ink Stopper D Sheet Ink Stopper D Clamps Tabs ...

Страница 311: ...etate tape binding the FFC to release the FFC Refer to Figure 4 146 14 Release the four Harness CSIC s and the I H Lever Sensor Left harness from the two clamps and the acetate tape Refer to Figure 4 147 Figure 4 146 Releasing Harnesses_5 Figure 4 147 Releasing Harnesses_6 Step 13 Acetate Tape Clamps Step 14 Acetate Tape ...

Страница 312: ...d p234 16 Remove the two screws securing rear side of I H Right Unit Refer to Figure 4 148 C B S 3x6 2 pcs 17 Remove the two screws securing the front side of I H Right Unit Refer to Figure 4 149 C B S 3x12 2pcs Figure 4 148 Screws Securing Rear Side of I H Right Unit Figure 4 149 Screws Securing Front Side of I H Right Unit C B S 3x6 I H Right Unit C B S 3x12 I H Right Unit ...

Страница 313: ... H Right Unit forward from the printer 19 Pick up and release the two hooks securing the I H Lever Sensor Right and then remove the I H Lever Sensor Right Refer to Figure 4 151 20 Disconnect connector from I H Lever Sensor Right Refer to Figure 4 151 Figure 4 150 I H Right Unit Removal Figure 4 151 I H Lever Sensor Right Removal The four grounding springs on the top of the I H Right Unit make cont...

Страница 314: ...ight Removal When the Ink Lever is installed against the angle set location as shown in the illustration confirm that the two holes of Fan Gear 34 form a line parallel to the bottom of Frame Holder IC Align the two dowels on holder side with the two positioning holes on the Cover Holder IC Right Refer to Figure 4 152 Ink Lever Holes Parallel Alignment Angle Set Location Fan Gear 34 Frame Holder IC...

Страница 315: ...rm that O Ring Coupling M7 has been installed The Tube Supply Ink has been marked with its color Install while confirming that the mark matches the receptacle Use the following order to install the Tube Supply Ink while routing it to the installation location LM M LC C PK MK LK Y Refer to Figure 4 153 and properly route Tube Supply Ink Firmly insert Tube Supply Ink into receptacles and tighten Cou...

Страница 316: ... pipe upward to pull it out then remove the Box Assy Flushing while tilting it forward to avoid interference with the printer frame Figure 4 154 Box Assy Flushing Removal C A U T I O N When removing the Box Assy Flushing and Pump Unit ink may leak from the Box Assy Flushing ink discharge port or the Pump Unit waste ink tube Have cleaning rags ready and prevent ink from getting on the surrounding w...

Страница 317: ...ame Refer to Figure 4 155 C B S 3x6 2 pcs Figure 4 155 Shaft Transmission PG Unit Removal C A U T I O N Be careful not to scratch the Shaft Transmission PG Unit gear by bumping it against the frame Align Shaft Transmission PG Unit positioning hole with dowel on frame Refer to Figure 4 155 Make sure that the Pump Phase Sensor harness is routed over the Shaft Transmission PG Unit shaft Refer to Figu...

Страница 318: ...xtension Spring 0 262 Removal Figure 4 157 Lever Lock Planetary Removal C A U T I O N When performing the following steps be careful of the points below Do not lose Extension Spring 0 262 Use care not to pull Extension Spring 0 262 too much or it may loose the spring force Do not touch the Cleaner Head or allow it to contact other parts This could lower print quality due to not wiping ink normally...

Страница 319: ...wing the steps below Refer to Figure 4 158 9 1 Slide it to the right 9 2 Bend it toward the center 9 3 Remove the left end from the installation hole 9 4 Remove Lever Lock DE while extracting the flag at the right end from the hole in the frame Figure 4 158 Lever Lock DE Removal Installation Hole Step 9 1 Step 9 3 Step 9 2 Flag Step 9 4 ...

Страница 320: ... Remove the four screws securing the Pump Unit Refer to Figure 4 160 C B S 3x6 3 pcs C B S 3x8 1 pc 13 Shift the Pump Unit to the right side and disconnect the linkage with Combination Gear 13 6 28 8 Refer to Figure 4 161 14 Remove Pump Unit toward rear Refer to Figure 4 161 Figure 4 159 Disconnecting the Pump Phase Sensor Connector Figure 4 160 Screws Securing Pump Unit Figure 4 161 Pump Unit Rem...

Страница 321: ...ue to poor pumping Align the five ribs and front side dowel of the Pump Unit with the six frame positioning holes Slip the Pump Unit frame under the Guide Waste Ink The sheet should be on the rear side of the printer frame Pump Unit Frame Position Sheet Position A D J U S T M E N T R E Q U I R E D Be sure to refer to Chapter 5 Adjustment p 366 and perform specified adjustments after replacing the ...

Страница 322: ...ushing Pump Unit p316 2 Remove the Guide Waste Ink by following the steps below 2 1 Push up the Guide Waste Ink from the printer bottom surface to free the dowel from the frame 2 2 Release the two tabs by pulling toward the rear of printer and then remove the Guide Waste Ink Figure 4 162 Guide Waste Ink Removal Dowel Tabs Step 2 1 Step 2 2 Guide Waste Ink Rearward Forward ...

Страница 323: ... Remove Pump Unit Refer to 4 2 8 6 Box Assy Flushing Pump Unit p316 2 Remove the two screws securing the Pump Cover Refer to Figure 4 163 C B P 3x8 2 pcs 3 Remove the Pump Cover in the direction of the arrows Refer to Figure 4 164 Figure 4 163 Screws Securing the Pump Cover Figure 4 164 Pump Cover Removal Pump Cover C B P 3x8 1 2 ...

Страница 324: ...ate tape 5 Release tabs securing Pump Phase Sensor and then remove Pump Phase Sensor Figure 4 165 Pump Phase Sensor Removal The Shield Plate inside the Pump Cover may come off when removing the Pump Cover If it comes off install it as shown in the illustration below Shield Plate Tab Tabs Acetate Tape Pump Phase Sensor ...

Страница 325: ...he two Harness Head s and the Harness Head Intermit with your fingers to make their central parts bowed and release them from the upper and lower tabs of the Holder FFC Figure 4 166 Holder FFC Figure 4 167 Holder FFC Removal Holder FFC to be removed Carriage Unit position A B Home position C E Left end C A U T I O N To prevent the Harness Head s and Harness Head Intermit from being bent bow the Ha...

Страница 326: ...Disassembly Procedures 326 3 Release the top and bottom tabs of the Holder FFC and open the Holder FFC Figure 4 168 Holder FFC Tabs Release 4 Release the top tab of the Holder FFC from the Guide Plate Tube and remove the Holder FFC backward Figure 4 169 Holder FFC Removal 2 1 ...

Страница 327: ...its prescribed space of the Holder FFC Move the Carriage Unit with hand to make sure that the Harness Head does not come off Move the Holder FFC B from side to side to make sure it moves smoothly A reinstallation is needed if the Harness Head moves together with the Holder FFC Harness Head x2 Harness Head Intermit Tube Supply Ink Sheet SUS Guide Plate Tube Sheet Tube Y M C MK K PK or MK LC LM LLK ...

Страница 328: ...nd lower end of the two Harness Head s and the Harness Head Intermit with your fingers to make their central parts bowed and release them from the upper and lower tabs of the Holder FFC B Figure 4 170 Holder FFC B Figure 4 171 Holder FFC B Removal Holder FFC B to be removed Carriage Unit position A B Home position C E Left end C A U T I O N Bend the Harness Head s and Harness Head Intermit slowly ...

Страница 329: ... Disassembly Procedures 329 3 Release the top tab of the Holder FFC B to open the Holder FFC B Figure 4 172 Holder FFC B Tab Release 4 Release the top tab of the Holder FFC B from the Guide Plate Tube and remove the Holder FFC B backward Figure 4 173 Holder FFC B Removal 2 1 ...

Страница 330: ...ts prescribed space of the Holder FFC B Move the Carriage Unit with hand to make sure that the Harness Head does not come off Move the Holder FFC B from side to side to make sure it moves smoothly A reinstallation is needed if the Harness Head moves together with the Holder FFC B Harness Head x2 Harness Head Intermit Tube Supply Ink Sheet SUS Guide Plate Tube Sheet Tube Y M C MK K PK or MK LC LM L...

Страница 331: ...Refer to 4 2 4 6 C593_SUB D Board p240 CN4 Harness Head C CN5 Harness Head A CN6 Harness Head B 3 Remove the clamp that attaches the FFC to the printer frame at the front of the printer Refer to Figure 4 174 4 Release the FFC from the tabs of the Cover Tube and draw out the FFC from the hole on the front frame of the printer Refer to Figure 4 175 5 Release the FFC from the tabs of the Cover Tube R...

Страница 332: ... of the Holeder FFC CR slide the Holeder FFC CR frontward to remove it Refer to Figure 4 177 9 Disconnect the Harness Head C from the connector on the C593_SUB Board Refer to Figure 4 177 Figure 4 177 Holder FFC CR Removal Figure 4 178 Harness Head C Removal When reassembling the Holder FFC CR match the dowels with the positioning holes of the Carriage Unit and install the Holder FFC CR then secur...

Страница 333: ... of acetate tape that bundle the FFCs then remove the Harness Head C Refer to Figure 4 179 11 Release the Harness Head from the Printhead Refer to 4 2 8 1 Printhead p285 12 Draw out the Harness Head s from the Carriage Unit Refer to Figure 4 180 Figure 4 179 FFC Release Figure 4 180 Harness Head Removal Acetate Tapes Carriage Unit ...

Страница 334: ...e Harness Head Intermit s from the following connectors on the C593_SUB D Board Refer to 4 2 4 6 C593_SUB D Board p240 CN7 Harness Head Intermit CN8 Harness Head Intermit B CN9 Harness Head Intermit A 4 Remove the ten clamps shown in Figure 4 181 remove the Ferrite Core and then release the FFC along the left side of the printer 5 Draw out the FFC from the hole on the left frame Refer to Figure 4 ...

Страница 335: ... 184 Tube Supply Ink Release C A U T I O N When performing the following work remove ink out of ink path before removing the Tube Supply Ink Refer to Chapter 5 Adjustment p 366 to know how to remove ink Some amount of ink remains inside the Tube Supply Ink even after the ink removal Prepare pieces of cloth in advance and put a sheet of paper on the work area in case the ink spatters inside and aro...

Страница 336: ...older FFC s Holder FFC B Refer to p325 and p328 8 Remove C593_SUB Board p234 9 Remove the Ink Tube Unit from the Carriage Unit Refer to 4 2 7 1 Carriage Unit p266 10 Remove the screw that secures both the Holder Tube A and Holder Tube B and separate the Holder Tube A from the Holder Tube B C B P 3x8 1 pc Figure 4 185 Coupling Screw M7 Removal Figure 4 186 Separation Holder Tube A from Holder Tube ...

Страница 337: ...ews that secures the Cover Tube to the printer frame lift it upward release the three upper tabs and then remove the Cover Tube C B P 3x8 3 pcs Figure 4 187 Tube Supply Ink Release Figure 4 188 Cover Tube Removal Hitch the three tabs on the Cover Tube to the Guide Tube CR before tightening the screws Tighten the screws in the order shown in Figure 4 188 Tabs 1 2 3 Tabs Cover Tube C B P 3x8 ...

Страница 338: ... 4400 4450 4800 4880 4880C Revision C Disassembly Assembly Disassembly Procedures 338 13 Draw out the Tube Supply Ink to remove it from the front side of the printer Figure 4 189 Tube Supply Ink Removal Tube Supply Ink ...

Страница 339: ...191 Figure 4 191 Tube Supply Ink Release C A U T I O N When performing the following work remove ink out of the ink path befoe removing the Tube Supply Ink Refer to Chapter 5 Adjustment p 366 to know how to remove ink Some amount of ink remains inside the Tube Supply Ink even afetr the ink removal Prepare a cloth in advance and put a sheet of paper on the work area in case the ink spatters inside ...

Страница 340: ...der FFC s Holder FFC B Refer to p325 and p328 8 Remove C593_SUB Board p234 9 Remove the Ink Tube Unit from the Carriage Unit Refer to 4 2 7 1 Carriage Unit p266 10 Remove the screw that secures both the Holder Tube A and Holder Tube B and separate the Holder Tube A from the Holder Tube B C B P 3x8 1 pc Figure 4 192 Coupling Screw M7 Removal Figure 4 193 Holder Tube A and Holder Tube B Separation H...

Страница 341: ...Ink Release 12 Remove the three screws that secures the Cover Tube to the printer frame lift it upward release the three upper tabs and then remove the Cover Tube C B P 3x8 3 pcs Figure 4 195 Cover Tube Removal Tabs Hitch the three tabs on the Cover Tube to the Guide Tube CR before tightening with the screws Tighten the screws in the order shown in Figure 4 195 C B P 3x8 Cover Tube Tabs 1 2 3 ...

Страница 342: ... 4400 4450 4800 4880 4880C Revision C Disassembly Assembly Disassembly Procedures 342 13 Draw out the Tube Supply Ink to remove it form the front side of the printer Figure 4 196 Tube Supply Ink Removal Tube Supply Ink ...

Страница 343: ... 3 Slide Cover Inner Release to right side free the two ribs and remove it upward Refer to Figure 4 197 4 Remove the two screws securing Plate P Cover Right and remove Plate P Cover Right Refer to Figure 4 198 C B S 3x6 2 pcs Figure 4 197 Cover Inner Release Removal Figure 4 198 Plate P Cover Right Removal Align Plate P Cover Right dowel with main frame positioning hole Dowel Positioning Hole Cove...

Страница 344: ...pur Gear 18 Tab Rib C B S 3x6 Install the Release Lever Unit and Spur Gear 18 by following the steps below 1 Seen through the cut out hole in the Release Lever Unit to align the Spur Gear 18 positioning rib with the Lever Release Roller Driven arrow and then install Spur Gear 18 into Release Lever Unit 2 Align Spur Gear 18 rib edge with Intermittent Gear 40 positioning rib and then install Release...

Страница 345: ... 201 Figure 4 200 Intermittent Gear 40 Removal_1 Figure 4 201 Intermittent Gear 40 Removal_2 C H E C K P O I N T If Intermittent Gear 40 is difficult to remove use tweezers or a similar tool to push and remove Intermittent Gear 40 by way of the hole on the opposite side of the frame Be careful not to scratch Intermittent Gear 40 Install the Intermittent Gear 40 with its positioning rib matched wit...

Страница 346: ...Removal C A U T I O N When performing the following step be careful not to pull the PT Sensor Unit too much because a harness is connected Align the two dowels of the PT Sensor Unit and the two main frame positioning holes Refer to Figure 4 202 C A U T I O N When performing the following step be careful not to pull the Guide Roll Paper too much because a harness is connected Align the four ribs of...

Страница 347: ... pcs 13 Pull right side of Release Unit toward you completely remove the right side of Release Unit while freeing the Release Unit ribs from the printer frame cut out and then remove the Release Unit from the printer body Refer to Figure 4 204 Figure 4 204 Release Unit Removal Release Unit Dowel and Positioning Hole Dowel and Positioning Hole Step 13 Ribs C B S 3x6 C B S 3x6 Cutout ...

Страница 348: ... 4 While avoiding interference with the Holder Eject Roller Right pull out the Paper Eject Unit toward the front right side from the Holder Eject Roller Left Refer to Figure 4 206 Figure 4 205 Screws Securing the Paper Eject Unit Figure 4 206 Paper Eject Unit Removal C A U T I O N When performing the following steps be careful not to take hold of the Star Wheels of the Paper Eject Unit Align the P...

Страница 349: ...er Refer to Figure 4 207 4 Peel off the pieces of acetate tape to release Motor Assy PF harness and then pull it through the hole in the frame Refer to Figure 4 208 5 Remove the two screws securing the Guide FFC and then lower the Guide FFC along with all FFCs Refer to Figure 4 209 C B S 3x6 1 pc C B 3x4 1 pcs Figure 4 207 Releasing the Harness_1 Figure 4 208 Releasing the Harness_2 Figure 4 209 R...

Страница 350: ...timing belt from pinion gear pull pinion gear out through hole of frame and then remove Motor Assy PF Refer to Figure 4 211 Figure 4 210 Releasing Tension of Belt Motor PF Figure 4 211 Motor Assy PF Removal C A U T I O N When performing the following steps pay attention to the followings Be careful not to scratch the pinion gear of the Motor Assy PF Be careful not to deform or damage the Scale PF ...

Страница 351: ... 9 1 Release Unit p343 3 Disconnect connectors from P_THICK Sensors 4 Release the three tabs securing P_THICK Sensor and remove the P_THICK Sensors Figure 4 212 P_THICK Sensors Removal A D J U S T M E N T R E Q U I R E D Be sure to refer to Chapter 5 Adjustment p 366 and perform specified adjustments after replacing or installing a P_THICK Sensor Tabs Connector Connector P_THICK Sensor 0 8 P_THICK...

Страница 352: ...ve the screw securing Holder Detector PE Refer to Figure 4 213 C B S 3x6 1 pc 5 Slide Holder Detector PE to the rear side release the two hooks of the Holder Detector PE from the two frame notches and then remove Holder Detector PE from the frame Refer to Figure 4 214 Figure 4 213 Holder Detector PE Removal_1 Figure 4 214 Holder Detector PE Removal_2 C A U T I O N When performing the following ste...

Страница 353: ...PE Sensor and remove PE Sensor from Holder Detector PE 7 Disconnect FFC from PE Sensor Figure 4 215 PE Sensor Removal Checking front and back of FFC and connect properly A D J U S T M E N T R E Q U I R E D Be sure to refer to Chapter 5 Adjustment p 366 and perform specified adjustments after replacing the PE Sensor PE Sensor FFC Tabs ...

Страница 354: ... Insertion Sensor Refer to 4 2 9 1 Release Unit p343 5 Remove the screw securing Installation Plate Detector Rear and remove Installation Plate Detector Rear Refer to Figure 4 217 C B P 3x8 1 pc Figure 4 216 Releasing the Harness Figure 4 217 Installation Plate Detector Rear Removal Align the two dowels of holder with the two frame positioning holes Refer to Figure 4 217 Do not let the harness sli...

Страница 355: ...tion Plate Detector Rear Refer to Figure 4 218 7 Disconnect the connector from Rear Manual Insertion Sensor Refer to Figure 4 219 Figure 4 218 Installation Plate Detector Rear Removal Figure 4 219 Rear Manual Insertion Sensor Removal Route Rear Manual Insertion Sensor harness as shown in Figure 4 219 Release the harness tube from the Installation Plate Detector Rear Tabs Rear Manual Insertion Sens...

Страница 356: ...lease Sensor 1 Pull out I H Right Unit from printer Refer to 4 2 8 5 I H Right Unit I H Lever Sensor Right p305 2 Release the two tabs securing Paper Eject Release Sensor and remove Paper Eject Release Sensor 3 Disconnect the connector from Paper Eject Release Sensor Figure 4 220 Paper Eject Phase Sensor Removal Figure 4 221 Paper Eject Release Sensor Removal Confirm that acetate tape securing the...

Страница 357: ...rm or damage the Scale PF attached to the Pulley Roller PF Align the two dowels of the PF Encoder Sensor with the two positioning holes on the Holder Sensor Do not bend condenser Refer to Figure 4 222 After installing the PF Encoder Sensor confirm that the PF Scale is surely inserted into the sensor slit Confirm that the PF Scale is not contacting the sensor Dowels Positioning Holes A D J U S T M ...

Страница 358: ...to the corresponding diassembly assembly procedures 4 2 10 1 Harnesses on Left Side of Printer PG Sensor Harness Should be secured with the parts below Clamp 1 pc Acetate tape 1 pc Figure 4 223 PG Sensor Harness CSIC IH Lever Sensor Harness Should be connected to the C593_SUB C Board through under the sheet as shown in the figure below Should be secured with the parts below Acetate tape 2 pcs Figu...

Страница 359: ...nd Harness R2 are connected to the C593_SUB C Board and there get the Harness R1 and Harness R2 through under the two Harness Head s and the Harness Head Intermit Figure 4 225 Head FFC Intermit FFC_1 Secure one end of the sheet to the Guide FFC with two sided tape Figure 4 226 Head FFC Intermit FFC_2 Should be secured with the parts below Clamp 6 pcs Figure 4 227 Head FFC Intermit FFC_3 Harness He...

Страница 360: ...ssembly Assembly Disassembly Procedures 360 4 2 10 2 Harnesses on Right Side of Printer Routing on the right frame Should be secured with the parts below Clamp 4 pcs Acetate tape 6 pcs Figure 4 228 Routing on the Right Frame Acetate tapes Acetate tapes Clamps ...

Страница 361: ...bs on the Duct Air C Figure 4 229 Routing on Duct Air C_1 Bundle the harnesses and secure them to the shaft shown in the figure below with a cable tie Secure the harnesses with the clamp on the Duct Air C Figure 4 230 Routing on Duct Air C_2 Tabs Tabs C A U T I O N Be careful not to damage or cut the harnesses when cutting the cable tie off Cable tie Clamp ...

Страница 362: ...31 Joint Supply Ink Removal_1 C A U T I O N When performing the following steps be careful of the points below As ink may leak or splatter have cleaning rags ready and prevent ink from getting on the surrounding work area Prevent dust and dirt from getting inside the Tube Supply Ink Confirm that O Ring Coupling M7 has been installed The Tube Supply Ink has been marked with its color Install while ...

Страница 363: ...pling M7 has been installed The Tube Supply Ink has been marked with its color Install while confirming that the mark matches the receptacle Firmly insert Tube Supply Ink into receptacles and tighten Coupling Screw M7 To prevent from both ink leak and damage on the joint screw be sure to tighten the Coupring Screw M7 with the prescribed torque and the tool specified below Tool Torque Wrench 1 25 1...

Страница 364: ... mark matches the receptacle Use the following order to install the Tube Supply Ink while routing it to the installation location M C MK Y Refer to Figure 4 233 and properly route Tube Supply Ink Firmly insert Tube Supply Ink into receptacles and tighten Coupling Screw M7 To prevent from both ink leak and damage on the joint screw be sure to tighten the Coupring Screw M7 with the prescribed torque...

Страница 365: ...el Unit p219 2 Remove the four screws that secure the Cover Front Right 4 Color and remove the Cover Front Right 4 Color C B S 3x6 4pcs Figure 4 234 Cover Front Right 4 Color Removal When installing the the Cover Front Right 4 Color tighten the screws in the order shown in Figure 4 234 Match the four dowels with the four positioning holes 1 2 3 4 Dowels and Positioning Holes ...

Страница 366: ...C H A P T E R 5 ADJUSTMENT ...

Страница 367: ...ly check the cautions shown for the explanation section of each adjustment item Product operations and functions can be adversely effected if the adjustment operations are performed improperly No adjustments necessary 5 3 Basic Adjustment p387 5 5 Check Results p436 5 6 Reset Counters p441 5 7 Installing Firmware p444 Refer to the required adjustment items and adjustment order presented in Table 5...

Страница 368: ...r P 390 17 T B S Cut Sheet P 391 18 Platen Position Adjustment P 405 19 Multi Sensor Adjustment for Auto Nozzle Check P 402 20 Auto Uni d Adjustment P 401 Main Board Stylus Pro 4800 4880 4880C Backup NG 21 Auto Bi d Adjustment P 430 21 Manual Bi D P 431 22 Image Adjustment P 439 23 Cutter Pressure Adjustment P 392 24 Writing MAC Address P 447 Main Board Stylus Pro 4400 4450 Backup NG 1 Erasing Fir...

Страница 369: ...ef Damper 1 Ink Discharge P 411 2 CR Timing Belt Tension Adjustment P 376 3 CR Encoder Sensor Position Adjustment P 382 4 Initial Ink Charge P 412 5 Head Rank ID P 388 6 Check Nozzle P 436 7 Check Alignment P 437 8 Nozzle Bi D Adjustment P 393 9 Print Head Slant Adjustment PF P 394 10 PG Adjustment P 383 11 Nozzle Bi D Adjustment P 393 12 Printhead Slant Adjustment PF P 394 13 Printhead Slant Adju...

Страница 370: ...ckness Sensor 1 Paper Thickness Sensor Adjustment P 380 Multi Sensor 1 Multi Sensor Position Adjustment P 385 2 Multi Sensor Level Adjustment P 389 3 T B S Roll Paper P 390 4 T B S Cut Sheet P 391 5 Platen Position Adjustment P 405 6 Multi Sensor Adjustment for Auto Nozzle Check P 402 7 Auto Uni d Adjustment P 401 8 Auto Bi d Adjustment P G 1 2 P 430 CR Encoder Sensor 1 CR Encoder Sensor Position ...

Страница 371: ...on Adjustment Adjusts the installation position of the Multi Sensor so the distance between the Multi Sensor and the platen will be acceptable P 385 Table 5 4 Standard Adjustment Adjustment Item Description Method Ref AU 1 M2 2 AT 3 RTC USB ID IEEE1394 ID Initializes the RTC and writes both the USB ID and the IEEE 1394 ID P 387 Head Rank ID Writes the Head Rank ID P 388 Multi Sensor Level Adjustme...

Страница 372: ...scharges the ink in the internal ink route P 411 Initial Ink Charge Performs initial charging P 412 Cleaning Performs cleaning P 412 Rear Sensor AD Adjustment Obtains an AD value that is required as a basis for reading a new rear sensor and saves the value on the Main Board P 413 Colorimetric Calibration Color ID Adjusts the amount of ink droplets P 414 Writing MAC Address Writes MAC address to th...

Страница 373: ...e quality Check Cutting Cuts roll paper and checks for cutter adjustment and wear P 440 Print Image Prints out images to verify the image quality P 439 Table 5 7 Reset Counters Adjustment Item Description Method Ref AU 1 M2 2 AT 3 Reset Paper Ejection Switching Counter Reset PG Switching Counter Resets the Paper Ejection Switching Counter and the PG Switching Counter P 441 Reset PF Motor Counter R...

Страница 374: ...uge 0 65 1400027 CR Lock Tool 1284893 Tension Gauge 10N 1401952 Color Banding Sample 1288094 Ink cartridge x8 3 Refer to Table 5 9 Consumable Maintenance Tank 3 C12C890191 Option Proofing Paper Semimatte Roll 4 5 Genuine Paper Premium Semimatte Photo Paper 250 Roll 4 5 Genuine Paper Premium Glossy Photo Paper 250 Roll 4 5 Genuine Paper EPSON Proofing Paper Semimatte Commercial 4 5 Genuine Paper En...

Страница 375: ...ce or to execute each adjustment individually Individual 3 Click Start Figure 5 1 Adjustment Program Startup Screen Sequential Mode This is a guide mode for executing the required adjustments in a set order when a replaced part or unit is selected 1 Select the replaced part or unit from the left column and click Add 2 Click the OK button Figure 5 2 Sequential Mode Screen Individual Adjustment Mode...

Страница 376: ... 4 Input the following belt information into the tension measurement tool z Weight 1 2 z Width 8 0 z Spam 635 5 Bring the measurement microphone of the tension meter close to the center of the Timing Belt 6 Press the MEASURE button on the tension measurement tool and measure by plucking the timing belt with a tool such as tweezers Figure 5 4 Setting the Tension Measurement Tool C H E C K P O I N T...

Страница 377: ...ment 377 7 Turn the CR tension installation screw to adjust tension until the measurement value reaches the standard value 8 After adjustment is complete check the results by repeating the measurement 3 times Figure 5 5 CR Timing Belt Tension Adjustment CR Tension Installation screw ...

Страница 378: ...hone of the tension meter close to the center of the timing belt between the Motor Assy PF pinion gear and the PF roller pulley 3 Press the MEASURE button on the tension measurement tool and measure by plucking the timing belt with a tool such as tweezers Figure 5 6 Setting the Tension Measurement Tool C A U T I O N Pay attention not to deform or damage the Scale PF attached to the Pulley Roller P...

Страница 379: ... fixing Plate Motor PF by the amount shown below and then adjust the timing belt tension by sliding Plate Motor PF z Bind S tight with plane washers 2 3x8 F Zn 1 4 2 4 turn z Shaft Installation Plate CR 1 8 turn 6 After completing adjustment tighten the 2 screws and measure tension again 7 After the measurement value has reached the standard value check the results by repeating the measurement 3 t...

Страница 380: ... is other than 00 To Adjustment Procedure 7 Raise Paper Lever set 0 4 adjustment tool as shown in Figure 5 8 and then lower Paper Lever Confirm that Sen Paper 01 is displayed in the panel Perform adjustment if the displayed value is other than 01 To Adjustment Procedure 8 Raise Paper Lever set 0 8 adjustment tool as shown in Figure 5 8 and then lower Paper Lever Confirm that Sen Paper 01 is displa...

Страница 381: ...d with no adjustment tool 1 Loosen the screw fixing Paper Thickness Sensor Holder 2 Slide the Paper Thickness Sensor Holder up down while checking the panel display Keep the Paper Thickness Sensor Holder at the place just after the panel display changes 3 Tighten the screws to fix the Paper Thickness Sensor Holder Figure 5 9 Paper Thickness Sensor Adjustment C H E C K P O I N T Adjust by raising t...

Страница 382: ...es left end center right end Visually confirm uniform distance of the arrows shown in the figure 2 When space is NG loosen the screw of Holder Linear Scale or Holder Sensor HP and move the Lever Scale CR Then adjust the position of Scale CR and tighten the screw 3 After adjusting check the 3 places again left end center right end Figure 5 10 CR Encoder Sensor Position Adjustment_1 Figure 5 11 CR E...

Страница 383: ...n 3 Select SELF TESTING to enter Self Testing menu Menu 4 Select SELF TESTING Adjustment Paper Feed x1 Menu 5 Select Adj PG Adj Paper Feed x1 Menu 6 Loosen the two screws that secure Bushing Shaft Rear 7 Press Menu to change the panel display Enter Start 8 Press Menu again to move the PG to initial position and change the panel display PG Offset xx00 9 Attach the Thickness Gauge T 0 65 onto the ri...

Страница 384: ...kness Gauge T 0 75 13 Move the Carriage Unit and make sure it hits the thickness gauge 14 Add 3 to the current number displayed on the panel Paper Feed Δ x3 15 Press Menu 16 Rotate the Bushing Shaft Rear so that the Lever Rock PG gets into the extreme right notch of the Bushing Shaft Rear and tighten the Bushing Shaft Rear with the two screws which have been loosened in Procedure 6 17 Turn the pri...

Страница 385: ...e furthest right notch of Bushing Shaft Rear 2 Place position tool 3 0 on Paper Guide Assy Paper Eject Front Right at the position shown by Figure 5 15 3 Move the Carriage Unit to the position where the Multi Sensor Holder touches the position tool Figure 5 14 Multi Sensor Position Adjustment_1 Figure 5 15 Setting the Position Tool C A U T I O N When moving the Carriage Unit do not let the Print H...

Страница 386: ...tion of the Multi Sensor Holder in rear direction and then downward direction Then tighten the two screws 7 Set the position tool 2 9 and move the Carriage Unit confirming that the Multi Sensor Holder does not contact it 8 Set the position tool 3 1 and move the Carriage Unit confirming that the Multi Sensor Holder contacts it Figure 5 16 Setting the CR Lock Tool_1 Figure 5 17 Setting the CR Lock T...

Страница 387: ...f the main unit The USB ID will be generated 6 Enter the ID number that is taken down in Procedure 1 to the IEEE 1394 ID 7 Click Write to start writing the RTC USB ID and IEEE1394 ID to the NVRAM on the Main Board 8 Click Next 9 Click Check to display the information written to the Main Board confirm the contents and click OK 10 Click Finish Figure 5 19 IEEE 1394 ID Label Figure 5 20 RTC USB ID IE...

Страница 388: ...d on an ID label 5 Click the Write button 6 Click Finish Procedure for Writing When applying the Head Rank ID information file txt of the print head to be installed 1 Turn the printer power on 2 Start up the adjusting program and select Head Rank ID 3 Click the File Open button and select the Head Rank ID information file txt 4 Click the Write button 5 Click Finish Procedure for saving the Head Ra...

Страница 389: ...values for B E A Shows results of light received from either PW1 or PW2 light receiver when PG 1 2 B Automatically switches to 1 or 0 according to amount of reflected light acquired LED light quantity control is switched according to the numerical value C Shows the LED light emission level The standard value differs according to the light quantity control set at B zAt I O 1 80 or higher zAt I O 0 ...

Страница 390: ...Side margin Measure the distance as shown in Figure 5 25 4 Input each of the following value into its corresponding edit boxes The values measured in Procedure 3 Top margin Bottom margin Side margin The values printed in the pattern lower part Multi sensor left Multi sensor right 5 Click the Write button and then click the Print button again to print the adjustment pattern 6 Repeat Procedure 3 and...

Страница 391: ...tom margin Side margin 4 Input the values measured in Procedure 3 to its corresponding edit box Top margin Bottom margin Side margin 5 Click the Write button and then click the Print button again to print the adjustment pattern 6 Repeat Procedure 3 and Procedure 4 and click Write 7 If the specification values are satisfied click Finish If not satisfied repeat Procedure 3 through Procedure 5 until ...

Страница 392: ...Exec Key Up and lower the cutter 9 With the cutter kept lowered measure the value five times in a row as pulling up the Holder Solenoid of the Tension Gauge and take down the results Average value of the three measured figures except minimum and maximum values is considered to be the measurement result 10 If the result is below standard press Menu to raise the cutter press Paper Feed Δ Paper Feed ...

Страница 393: ...art adjustment program and select Nozzle Bi D Adjustment 3 Click the Print button to print the nozzle check pattern The check pattern with the current setup values will be printed out 4 Find the column where Bi D is best aligned and input the number into the edit box 5 Click the Write button to print the check pattern again and check it Figure 5 29 Nozzle Bi D Adjustment Screen Figure 5 30 Nozzle ...

Страница 394: ...ment PF Screen 1 4 Seeing the pattern in the direction shown in Figure 5 32 check the clearance gap between the second and the third blocks from the right See figure 5 32 Measure the two intervals between the two blocks which are located one line lower upper than the two continued lines with a magnifying glass with a scale z The gap is parallel to the both blocks Pattern 2 Click Next and click Fin...

Страница 395: ...t head z If the upper side of the gap is wider Pattern 1 Lower the Cam Inclination R z If the bottom side of the gap is wider Pattern 3 Raise the Cam Inclination R 8 Tighten the four screws that are loosened in Procedure 6 in the order below A B C D Move the Carriage Unit to the home position and close the top cover 9 Click Back to go back to the previous screen and perform Procedure 3 through 8 r...

Страница 396: ...EPSON Stylus Pro 4400 4450 4800 4880 4880C Revision C Adjustment Basic Adjustment 396 Figure 5 34 Head Fixing Screws and the Cam Inclination R 3 D Cam Inclination R A B C Head Fixing Screws ...

Страница 397: ... select Print Head Slant Adjustment CR and click Print to print the adjustment pattern After the printing is finished the Carriage Unit moves to the center of the printer adjustment position 3 Click Next Proceed to Screen 2 Figure 5 35 Screens shift for Print Head Slant Adjustment CR To print out the adjustment pattern The Carriage Unit moves to the home position and the paper is reeled off End of...

Страница 398: ...magenta and magenta for both right and left columns of the third ninth and fifteenth blocks from the right z No gap on both sides No adjustment required Click Next two times proceed to Screen 4 and click Finish to finish the adjustment z Gap on any of the sides Adjustment required Proceed to Procedure 5 5 Click Next Proceed to Screen 3 Figure 5 36 Adjustment Pattern Paper Feed Direction ...

Страница 399: ... adjustment pattern Once the printing is finished the Carriage Unit moves to the center of the printer adjustment position 12 Click Next Proceed to Screen 2 13 Seeing the pattern in the direction shown in Figure 5 36 check the clearance gap between the light magenta and magenta for both right and left columns of the third ninth and fifteenth blocks from the right z No gap on both sides No adjustme...

Страница 400: ...ch nozzle line are positioned as shown in Figure 5 38 15 Click Next twice to go back to Screen4 then click Run The Carriage Unit moves to its home position and the paper is reeled off Click Finish to finish the adjustment Figure 5 38 Checking the Dots Position Cyan Light Cyan Cyan 1 3 1 3 1 3 Paper feed direction ...

Страница 401: ...tically copied for other PG settings Paper Used Size 17 Type Enhanced Matte Roll Paper Procedure 1 Turn the printer on 2 Start adjustment program and select Auto Uni d Adjustment 3 Click the Run button to print the adjustment pattern 4 As the pattern is printed the printer automatically scans the pattern and makes corrections This is not necessary when making special adjustments manually 5 Click t...

Страница 402: ...secondary scan direction is adjusted After that the dot missing pattern and the no dot missing pattern are printed and the automatic dot missing function is checked Paper Used Size 17 Type Enhanced Matte Roll Paper Procedure 1 Turn the printer on 2 Start the adjustment program and select Multi Sensor Adjustment for Auto Nozzle Check 3 Selecting Sensor Adjustment and clicking the Run button will pr...

Страница 403: ...2 0 0 9 3 0 0 5 12 0 0 1 21 0 0 9 21 0 0 0 0 0 0 0 0 0 0 0 0 0 0 0 0 0 0 0 0 0 0 0 0 0 0 0 0 0 0 0 0 0 0 0 0 0 0 1 2 1 21 9 2 9 21 1 3 0 0 9 3 0 0 5 12 0 0 5 13 0 0 1 2 9 2 5 12 1 21 9 21 0 0 1 2 9 2 5 12 5 13 1 21 9 21 1 2 9 2 5 12 5 13 1 21 9 21 C M Y Y 1 2 0 0 9 2 0 0 9 3 0 0 5 12 0 0 1 21 0 0 9 21 0 0 Lk Lc Lm Lm 0 0 0 0 0 0 0 0 0 0 0 0 1 2 9 2 5 12 5 13 1 21 9 21 LLK PG 1 2 Count MK 8 Positio...

Страница 404: ...ent program and select Skew Check 3 When the Run button is clicked the paper will be ejected and the paper skew amount will be measured by the Multi Sensor 4 After the skew check value is displayed click the OK button 5 Click the Finish button and properly set the paper Figure 5 45 Skew Check Screen C A U T I O N Approximately 1m of paper will be ejected so be aware of the space needed for paper e...

Страница 405: ...d adjustment line at the right side as seen from the front of the printer and the platen tab If there is no slip click the Next button to check with Check Procedure on the next page If the position has slipped measure the distance between the adjustment line and the platen tab and enter the measured value into the edit box z When adjustment line is to the left of the platen tab measurement value z...

Страница 406: ...n to print the check pattern 2 Refer to Figure 5 49 and check the positions of the printed adjustment line and the platen tab If there is no slip click the Finish button If the position has slipped click the Back button to perform adjustment again Figure 5 48 Platen Position Adjustment Screen 2 Figure 5 49 Check Pattern OK NG ...

Страница 407: ...Click the Print button and the adjustment pattern will be printed 4 Use a ruler 1000mm and scale stopper to measure the distance shown by Figure 5 51 5 Input the measured value into 1000mm Feed and click the Write button 6 Click the Finish button Figure 5 50 1000mm Feed Adjustment Screen Figure 5 51 1000mm Feed Adjustment Pattern C H E C K P O I N T The ruled line in the center of the adjustment p...

Страница 408: ...harge flag ON OFF Procedure 1 Enter Maintenance Mode 2 Power off Press Paper Source Paper Feed Δ Paper Feed Power on 2 Start the adjustment program and select Initial Ink chrge flag ON OFF 3 Select ON or OFF and click the Run button 4 Click the Finish button Figure 5 52 Initial Ink Chrge Flag ON OFF Screen ...

Страница 409: ...tton to save by writing the files 7 Turn off the printer power and replace the Main Board Write Procedure 1 Remove all the ink cartridges 2 Remove the maintenance tank 3 Pull up the Paper Lever 4 Enter Maintenance Mode 2 Power off Press Paper Source Paper Feed Δ Paper Feed Power on 5 Start up the adjustment program and select NVRAM Back Up and Write 6 Click the Run button and NVRAM Backup Utility ...

Страница 410: ...heck Platen Gap 3 Select PG0 7 and click the Run button Check that Lever Lock PG is in the first notch from the right of Bushing Shaft Rear 4 Select PG1 5 and click the Run button Check that Lever Lock PG is in the third notch from the right of Bushing Shaft Rear 5 Select PG2 1 and click the Run button Check that Lever Lock PG is in the fourth notch from the right of Bushing Shaft Rear 6 Select PG...

Страница 411: ...k levers 7 Press Menu to change the display to Dischg Washfluid The ink discharge begins at this time 8 The display turns to Set Cleaning I C when the ink discharge is finished Pull up the ink levers on both sides to install the ink cartridges 9 Press Menu to display Set Lever L R and lower the ink levers 10 Press Menu to start the head cleaning The display changes to Head Cleaning 11 The display ...

Страница 412: ...ustment program and select Cleaning 3 Press F1 F4 key to start cleaning 4 When cleaning is completed click the Finish button Figure 5 58 Cleaning C A U T I O N Check the amount of ink remaining before starting Initial Ink Charge If the remaining ink is less than 50 replace the ink cartridge with a new one and then start the procedure Key Cleaning Ink consumption amount Processing time F1 CL1 Appro...

Страница 413: ...AD Paper Feed x 2 5 Raise Paper Lever 6 Insert Microtrace from rear paper feed slot and set it in the position shown by Figure 5 59 and then lower the Paper Lever 7 Press Menu 2 times and the panel display will change as shown below Enter Start Exc 8 Start acquisition of AD value by pressing Menu RearAD will be shown in the display approximately 15 seconds later 9 Confirm that RearAD is displayed ...

Страница 414: ... ensures stable color quality Difference in color among individual products or each mode is reduced Refer to 2 5 Colorimetric Calibration Color ID Overview p155 PRINCIPLE The calibration is performed by measuring a printed correction pattern with a calibrator ID information that is calculated based on the acquired color values L a b is transmitted to the printer driver and the printer driver corre...

Страница 415: ...Paper A4 For nozzle check and printing surface protection Plain Paper A3 For alignment check EPSON Enhanced Archival Matte Paper A4 For printing charts Computer Following drivers should be installed beforehand Printer driver for this product USB driver for the calibrator GretagMacbeth eye one i1 Calibrator With UV filter Calibration plate White plate Accessory provided with the calibrator Scanning...

Страница 416: ...t 6 Select the connected printer from the printer list and check if the LCD panel backlight of the printer flashes by clicking Confirming flashing of the backlight 7 Click Next then the message that prompt you to agitate the ink inside the cartridges will be displayed 8 Click OK to start the cleaning Figure 5 61 Colorimetric Calibration ID Startup Screen C H E C K P O I N T If the printer has not ...

Страница 417: ...Next to perform the alignment check 11 Check the alignment pattern If there is any defect click Cleaning to execute cleaning If the check pattern is appropriate click Next 12 Load an A4 sized Archival Matte Paper vertically on the paper tray and click Next to print the calibration chart Figure 5 62 Entire Process Screen C H E C K P O I N T Clicking the Skip alignment check button will let you proc...

Страница 418: ... the calibrator remain set on the base plate hold down the button on the side of the calibrator until it beeps Once the calibration completed normally following screen appears Figure 5 63 i1Calibrator Figure 5 64 Entire process screen 18 Make sure that the date and time printed in the second line on the upper left of the chart measurable time and date is within the range displayed under the headin...

Страница 419: ...39 GMT 2005 04 18 05 39 S N 0000000000 OS Win BlackInk Matte Printer EPSON PX 6500 Nozzle check pattern Calibration patch 2005 04 11 14 44 GMT 2005 04 11 05 44 2005 04 18 14 39 GMT 2005 04 18 05 39 S N 0000000000 OS Win BlackInk Matte Printer EPSON Stylus Pro 4800 Printed date and time Main unit serial number Measurable date and time Product name OS type Black ink type Set the scanning ruler with ...

Страница 420: ...n the screen 21 Once all the lines 8 lines are measured click OK Figure 5 67 Color Measuring Screen Measured lines Currently measured line Unmeasured lines C A U T I O N When measuring colors pay attention to the instructions below Take more than 10 seconds to measure one line Keep the scan speed constant as possible Measure each of the lines twice Measure the line as instructed on the program scr...

Страница 421: ...e Calibrator Measuring Position Figure 5 69 Color Measuring Screen Figure 5 70 Color Measuring Order Start position in the color measuring End position in the color measuring 2005 04 11 14 44 GMT 2005 04 11 05 44 2005 04 18 14 39 GMT 2005 04 18 05 39 S N 0000000000 OS Win BlackInk Matte Printer EPSON PX 6500 ...

Страница 422: ...Adjustment Basic Adjustment 422 22 Make sure that the READY message is displayed on the printer LCD panel and click Next to write the Color ID to the printer main unit 23 When the writing is complete click the Next button Figure 5 71 Entire Process Screen ...

Страница 423: ... defect click Print Verify Chart Again The verify chart will be printed again after performing cleaning If there are no missing dots let the chart stand for five minutes until it dries out paying attention not to touch the chart 27 When the verify chart dries out after five minutes click Next 28 Connect the calibrator to the computer and click Measure 29 Place the calibrator on the calibration bas...

Страница 424: ... Refer to Figure 5 73 lay the chart on the black paper or sheet with the upper part of the chart facing left side and set the scanning ruller onto the bottommost patch line Figure 5 73 Setting the Chart and the Scanning Ruler Figure 5 74 Measurable Date and Time Check Sheet number Sheet2 S N 0000000000 2005 04 07 12 38 GMT 2005 04 07 03 38 2005 04 14 12 33 GMT 2005 04 14 03 33 Sheet2 S N 000000000...

Страница 425: ...he patch along the scanning ruller to measuring end position gray part 4 Once the measuring is complete release the button 5 Repeat Step 1 through 4 twice for the same patch line 6 Repeat Step 1 through 5 to measure the bottommost line to the top line The line which needs to be measured is displayed on the screen 34 Once all the lines 5 lines are measured click OK 35 Measure Sheet 2 by following S...

Страница 426: ...ON Stylus Pro 4400 4450 4800 4880 4880C Revision C Adjustment Basic Adjustment 426 36 Click Save to save the result under a new file name txt file 37 Click the End button Figure 5 78 Entire Process Screen ...

Страница 427: ...lick Print Calibration Chart 5 Perform Step 5 through 12 of Adjustment Procedure Entire Process Workflow to print the Calibration chart 6 Lay one plain paper on the print surface of the Calibration chart put them in a clear file together with the alignment check pattern and send them to a place where the color measuring is carried out Figure 5 79 Printing Calibration Chart C A U T I O N The printe...

Страница 428: ...ackInk pull down menu and click Next 5 Perform Step 5 through 12 of Adjustment Procedure Entire Process Workflow to print the calibration chart 6 Enter the 10 digit serial numbers that are printed on the calibration chart and click Next 7 Click Save make sure that the file name is equilvalent to the main unit serial number and save the color ID data dat format 8 Click End 9 Send the color ID data ...

Страница 429: ...tep 5 to 6 of Adjustment Procedure Entire Process Workflow to check the connection status to the printer 5 Select File from Input Method 6 Click Specify the file select the color ID data file dat format and click Next 7 Make sure that the S N shown in the input data is the same as that of the connected printer and that it should be the same as the product number of the printer Click Next 8 When th...

Страница 430: ...i d Adjustment 3 Click the Run button to print the adjustment pattern 4 As the pattern is printed the printer automatically scans the pattern and makes corrections This is not necessary when making special adjustments manually 5 Click the Finish button Figure 5 82 Auto Bi D Adjustment Screen Figure 5 83 Adjustment Pattern PG 0 7 VSD1 Rough 4 VSD1 Fine E 0 0 0 0 F 0 0 0 0 D 0 0 0 0 G 0 0 0 0 A 0 0 ...

Страница 431: ...ows VSD1 VSD2 and VSD3 6 Examine the printout patterns for each of the three modes select the value for the group of most closely aligned vertical lines for each mode and calculate the average values Input the average values of each mode in the edit boxes 7 After clicking Write make sure that the writing to the printer is finished normally and then click OK 8 Click Next Figure 5 84 Manual Bi D Adj...

Страница 432: ...ustment Pattern PK MK 8 0 1 Bi D VSD 1 PG 1 2 Step 2 PK MK 8 0 PK MK 8 0 1 Bi D VSD 1 PG 1 2 Step 2 PK MK 8 0 PK MK 8 0 2 Bi D VSD 1 PG 1 2 Step 2 PK MK 6 0 PK MK 8 0 3 Bi D VSD 1 PG 1 2 Step 2 PK MK 8 0 Print Mode Indicates the value of the center pattern Center Pattern direction direction VSD 1 VSD 2 VSD 3 ...

Страница 433: ...ue for the group of most closely aligned blocks for each mode Input the selected value in the edit boxes 11 After clicking Write make sure that the writing to the printer is finished normally and then click OK 12 Click Finish Figure 5 86 Manual Bi D Adjustment Screen 2 Figure 5 87 Color Adjustment Pattern C H E C K P O I N T The printed pattern is numbered on every other line however you can enter...

Страница 434: ...ct Change Model Name 3 Select the Others and click the Run button to set the destination to the NVRAM 4 Click the Next button 5 Click the Check button and current setting model name will be displayed Click the OK button after confirming the set model name 6 Click the Finish button Figure 5 88 Destination Setting Screen 1 Figure 5 89 Destination Setting Figure 5 90 Confirming Model Name ...

Страница 435: ...s the calibration values that are currently applied to Paper Feed Amount and Microweave Initialization of the set values Resets the calibration values applied to Paper Feed Amount and Microweave to the factory default Procedure 1 Turn the printer power on 2 Start the adjustment program and select PF Micro Feed Adjustment Bi D 3 Click Run to start the Paper Feed Adjuster 4 Using the Paper Feed Adju...

Страница 436: ...r Used Size 17 Type Enhanced Matte Roll Paper Procedure 1 Turn the printer on 2 Start the adjustment program and select Check Nozzle 3 Click the Run button and print the nozzle check pattern 4 Check that there is no dot missing on the pattern 5 If there is no dot missing click the Finish button to finish the check nozzle If there is dot missing execute cleaning and then print the check pattern and...

Страница 437: ...per Procedure 1 Turn the printer on 2 Start the adjustment program and select Check Alignment 3 Select the printing mode and click Print button to print the nozzle check pattern 4 Check that there is no alignment slip 5 If there is no alignment slip click the Finish button to finish the check alignment If there is alignment slip execute cleaning and then print the check pattern and check it again ...

Страница 438: ...t Variables and then click the Print button and the following patterns will be printed z Print All Pattern All the adjustment patterns and the adjustment parameters will be printed z Print Variables The adjustment parameters stored in the printer will be printed 4 Check the printed patterns and click the Finish button Figure 5 97 Print Adjustment Check Pattern Screen C A U T I O N Approximately 3 ...

Страница 439: ...de the folder adjwiz2 that stores adjustment program data 3 Select the media from the Media type pull down menu 4 Click Print to print the image 5 Check the image quality and click End Figure 5 98 Image Printing Screen C A U T I O N When performing printing in the following procedure specify the paper size from the printer print setting Single Weight Matte Paper should be used when printing with S...

Страница 440: ...nt and cutter wear Paper Used Size 17 Type Enhanced Matte Roll Paper Procedure 1 Turn the printer on 2 Start the adjustment program and select Cut Check 3 Input the number of times to execute the test cut into the edit box and then click the Run button 4 Check the cut area of the ejected paper and click the Finish button Figure 5 99 Check Cutting Screen ...

Страница 441: ... Ejection Switching PG Switching Counter 3 Click Run to clear the Paper Ejection Switching PG Switching Counter 4 Click Finish Figure 5 100 Reset Paper Ejection Switching PG Switching Counter Screen 5 6 2 Reset PF Motor Counter Procedure 1 Turn the printer power on 2 Start the adjustment program and select Reset PF Motor Counter 3 Click the Run button to clear the PF Motor life counter 4 Click the...

Страница 442: ...elect Reset ASF Counter 3 Click Run to clear the ASF Counter 4 Click Finish Figure 5 102 Reset ASF Counter Screen 5 6 4 Reset When CR Unit Change Procedure 1 Turn the printer power on 2 Start the adjustment program and select Reset When CR Unit Change 3 Click the Run button to clear the Motor Assy CR life counter 4 Click the Finish button Figure 5 103 Reset When CR Unit Change Screen ...

Страница 443: ...ng Unit Change 3 Click the Run button to clear the Cleaning Unit change counter 4 Click the Finish button Figure 5 104 Reset When Cleaning Unit Change 5 6 6 Reset When Printhead Change Procedure 1 Turn the printer power on 2 Start the adjustment program and select Reset When Printhead Change 3 Click the Run button to clear the Printhead change counter 4 Click the Finish button Figure 5 105 Reset W...

Страница 444: ...e computer power on and then turn the printer on 3 Start the Firmware Update Tool 4 Select the port Choose a port and the firmware data Choose a FW data file UPG format 5 Click Send to transmit the firmware data 6 The Complete message is displayed in a pop up window when the data transmission is finished then click OK 7 Upon completion of the update the printer automatically reboots Figure 5 106 F...

Страница 445: ...date Tool 4 Transmit the ErasePro upg 5 When Pro Area Erase appears on the control panel press the Menu button Flash ROM ERASE appears and the data in the Flash ROM is deleted 6 Turn off the printer after End Success appears on the control panel 7 Turn on the printer The printer turns on in firmware update mode 8 Start the Firmware Update Tool 9 Transmit the firmware data 10 When the following mes...

Страница 446: ...he window 4 Select Port Check on Connected Printer 5 The pop up screen to confirm the port is displayed Click Yes 6 Click Start Figure 5 108 Select Printer Name Screen Figure 5 109 Port Check on Connected Printer Screen C H E C K P O I N T Stylus Pro 4450 4880 4880C only C H E C K P O I N T If a connection error occurs verify the connection between the computer and the printer one more time and ma...

Страница 447: ...r 2 Start the adjustment program and select Set MAC address 3 Key in the MAC address and press Enter 4 Press Next 5 Press Confirm and check that the same MAC address is displayed as the one you just keyed in 6 Press Finish Figure 5 110 Location of the Label with MAC Address Figure 5 111 Set MAC address Window Figure 5 112 Confirmation Window of Set MAC address C H E C K P O I N T The label on whic...

Страница 448: ...C H A P T E R 6 MAINTENANCE ...

Страница 449: ... from any metal Do not install the battery in the wrong direction This may cause burning or explosion Do not heat the battery or put it into fire Do not set the C593 MAIN board directly on top of any object which is conductive Be careful not to let ink get into your eyes or your skin If ink gets in your eye rinse them immediately with water and see a doctor if any trouble C A U T I O N Ensure adeq...

Страница 450: ...bjects such as metal printer parts If the printer that has already been installed needs to be packed and transported again first make certain that the print head has been capped properly with the power to the printer turned off Then remove all the ink cartridges and install all the packing materials as referred to in the Start Up Guide or Assembly and Setup Guide supplied with the printer Name Mai...

Страница 451: ...Note that the Stylus Pro 4400 4450 4800 4880 4880C and the Stylus Pro 4000 have the same points to be lubricated but is specified to use different types of lubricants Stylus Pro 4400 4450 4800 4880 4880C G 74 Stylus Pro 4000 G 46 C H E C K P O I N T As G 74 is quick drying lubricant it is only necessary for the lubricated points to be slightly coated with lubrication To prevent G 74 from being coa...

Страница 452: ...rib of Slider CR Lock Lubrication Type G 74 Remarks Use a brush or cotton swab for application Applies along the rim indicated in yellow Applies along the part indicated in red Applies on the part indicated in red Lubrication Point Ribs on the front and back sides of Slider CR Lock 4 places Lubrication Type G 74 Remarks Use a brush or cotton swab for application Lubrication Point Ribs on front and...

Страница 453: ...ation Type G 26 Lubrication Amount 1 Φ1mm x approximately 5mm 2 Φ1mm x approximately 7mm 3 Φ1mm x approximately 1mm Applies from the outside of the frame Remarks Use a syringe needle JIS 17 or equivalent for application 2 1 3 Lubrication Point E shaft of Frame Sub Right and pinion gear part of Motor Assy PG Lubrication Type G 26 Lubrication Amount 1 Φ1mm x 5mm approximately 1mm inside from groove ...

Страница 454: ...application Lubrication Point LEVER CHANGE PAPER EJECT R B and contact sits and back of LEVER CHANGE PAPER EJECT R Lubrication Type G 26 Lubrication Amount Φ1mm x 10mm 3 places Remarks Use a syringe needle JIS 17 or equivalent for application Spur Gear 44 74 Combination Gear 16 74 24 Spur Gear 25 6 Combination Gear 12 8 36 Back of dot line part Contact sites 2 places Lubrication Point Shaft part o...

Страница 455: ...ion Lubrication Point Both side surfaces of Shaft Connection 2 places and Carriage A B Right Side 5 places Lubrication Type G 26 Lubrication Amount 1 Φ1mm x 1mm 2places 2 Φ1mm x 2mm 2places 3 Φ1mm x 2mm 4 Φ1mm 5 Φ1mm Remarks Use a syringe needle JIS 17 or equivalent for application 3 2 1 Applys on both side surfaces of the holder 4 5 Applys on both side surfaces of the holder 5 4 3 1 2 Lubrication...

Страница 456: ...on Amount Φ1mm x approximately 3mm Remarks Use a syringe needle JIS 17 or equivalent for application Wipe out lubricant with a dry cloth to make the end part slightly coated with lubricant Lubrication Point Lever hole and shaft parts of Mount Plate Motor ASF Unit Lubrication Type G 26 Lubrication Amount 1 Φ1mm x 2mm 2 Φ1mm x 1perimeter 3 Φ1mm x 15mm Remarks Use a syringe needle JIS 17 or equivalen...

Страница 457: ...C H A P T E R 7 APPENDIX ...

Страница 458: ...593_SUB C Board CN200 FFC CN53 28 C593_SUB C Board CN201 FFC CN54 30 C511_SUB B Board CN100 FFC CN56 2 Blue Rear Cover Sensor CN57 2 White Power Supply cooling fan Table 7 2 C699 Main Board Connectors List CN No Pins Color Connected to Remarks CN1 14 White P S board CN7 31 C593_SUB D Board CN1 CN8 31 C593_SUB D Board CN2 FFC CN9 30 C593_SUB D Board CN3 FFC CN12 4 USB 2 0 CN13 36 Optin card TYPE_B ...

Страница 459: ...B D Board CN4 FFC CN2 2 White C_SOL CN3 5 White MULTI_SENSE CN4 5 CR_ENC Table 7 6 C511_SUB B Board Connectors List CN No Pins Color Connected to Remarks CN22 2 Blue P_COVER_SW CN25 2 Red ASF Paper Sensor CN26 2 Blue Paper Eject Cancel Sensor CN27 2 Yellow R_INSERT CN29 4 PE_DET CN31 3 Yellow PE_DET CN33 3 White P_THICK_0 3 CN34 3 Black P_THICK_0 8 CN36 2 White IH_LEVER_R CN39 7 CSIC_R1 Board Phot...

Страница 460: ...32 3 Red PG_PHASE CN37 2 Black IH_LEVER_L CN38 7 CSIC_L1 Board Matte Black FFC CN40 7 CSIC_L2 Board Cyan FFC CN41 7 CSIC_L2 Board Magenta FFC CN44 7 CSIC_L4 Board Yellow FFC CN200 30 Board Assy Main CN52 FFC CN201 30 Board Assy Main CN53 FFC Table 7 8 C593_SUB D Board Connectors List CN No Pins Color Connected to Remarks CN1 31 Board Assy Main CN7 FFC CN2 31 Board Assy Main CN8 FFC CN3 31 Board As...

Страница 461: ...enta Yellow I H Lever Sensor Left I H Lever Sensor Right PF Encoder Paper Thickness Sensor 0 8 Paper Thickness Sensor 0 3 CR_HP Sensor PE Sensor P Cover Open Sensor Rear Hand Insertion Sensor Light Cyan Light Magenta Light Black Maintenance Tank PG PO Motor Suction Fan Right Suction Fan Left Rear Cover Sensor CR Motor PF Motor C593_SUB D Board C593_SUB Board CN13 Option Type B CN9 Relay FFC CN7 Re...

Страница 462: ... Magenta Yellow I H Lever Sensor Left I H Lever Sensor Right PF Encoder Paper Thickness Sensor 0 8 Paper Thickness Sensor 0 3 CR_HP Sensor PE Sensor P Cover Open Sensor Rear Hand Insertion Sensor Light Cyan Light Magenta Light Black Maintenance Tank PG PO Motor Suction Fan Right Suction Fan Left Rear Cover Sensor CR Motor PF Motor C593_SUB D Board C593_SUB Board CN9 Relay FFC CN7 Relay FFC CN8 Rel...

Страница 463: ...EPSON Stylus Pro 4400 4450 4800 4880 4880C Revision C Appendix Exploded Diagrams 463 7 2 Exploded Diagrams ...

Страница 464: ...PS ON S TYLUS PR O 4400 No 1 R ev 01 C593 CAS E 011C4 105 100 108 108 101 103 106 107 118 104 116 for JPN 108 108 114 115 109 112 117 102 103 111 113 111 111 110 129 121 123 119 122 124 127 125 128 126 120 130 131 ...

Страница 465: ... TYLUS PR O 4800 No 1 R ev 01 C593 CAS E 011C8 134 116 for JPN 105 100 108 108 101 103 106 107 118 104 108 108 114 115 109 112 117 102 103 111 113 111 111 110 129 124 127 128 126 120 121 123 131 119 122 130 133 132 130 ...

Страница 466: ...PX 6200S 6500 E PS ON S TYLUS PR O 4400 4800 No 2 R ev 01 C593 CAS E 021 152 153 154 155 150 151 G 166 163 162 163 162 161 157 159 159 158 157 160 156 165 165 165 165 164 164 ...

Страница 467: ...PX 6200S E PS ON S TYLUS PR O 4400 No 3 R ev 01 C593 E LE C 011 300 302 301 200 Q2 R I G P AH1 Q1 AK2 AJ2 AE 1 AF1 AD1 AL2 AG1 D N ...

Страница 468: ...PX 6200S E PS ON S TYLUS PR O 4400 No 4 R ev 01 C593 ME CH 011C4 516 A2 518 520 507 505 500 513 501 511 508 512 514 517 519 ...

Страница 469: ...PX 6500 E PS ON S TYLUS PR O 4800 No 4 R ev 01 C593 ME CH 011C8 A2 518 520 507 505 513 501 511 508 512 514 517 519 500 ...

Страница 470: ...573 582 581 560 555 567 568 569 557 568 556 552 564 565 565 565 563 AB X5 X6 X7 X8 578 577 578 561 561 569 554 557 554 568 569 568 569 552 552 552 554 557 559 566 554 550 558 557 578 578 578 578 572 553 553 553 553 551 578x3 577x3 585 586 578x3 577x3 587 578x3 577x3 591 592 578x3 577x3 589 590 X3 Y1 Y4 Y2 Y3 X2 X4 X3 X2 X1 X4 X1 571 588 ...

Страница 471: ...5 567 568 569 557 568 556 552 564 565 565 565 563 585 595 560 567 555 563 552 565 552 586 553 565 552 553 565 552 558 554 556 557 590 594 589 593 587 577 577 578 579 588 559 566 591 571 Y8 Y6 Y5 Y7 AC AB X5 X6 X7 X8 578 577 578 561 561 569 554 557 554 568 569 568 569 552 552 552 554 557 557 559 566 558 554 568 568 569 554 569 569 557 554 569 568 561 557 550 578 578 578 578 578 578 578 578 553 553 ...

Страница 472: ...US PR O 4400 4800 No 6 R ev 01 C593 ME CH 031 608 609 606 607 635 636 632 633 AH2 AG2 AG1 AH1 AE 1 AE 2 AD1 AD2 634 AF1 AF2 638 638 638 639 616 619 620 614 611 610 612 617 618 631 626 624 623 621 622 627 630 628 629 625 Z2 AC 613 ...

Страница 473: ... 674 676 677 678 682 681 683 684 670 W X5 T AD2 AE 2 O AF2 Z2 H K A2 AC AI2 B2 L S J C2 AB M AH2 AG2 R P AI2 AI1 AI1 O N X8 X7 X6 656 689 690 691 671 673 693 694 694 694 694 AL1 AJ1 AK1 U4 V4 V2 695 PX 6200S E PS ON S TYLUS PR O 4400 No 7 R ev 01 C593 ME CH 041 AL1 AL2 AK1 AJ1 AK2 AJ2 697 696 ...

Страница 474: ...3 723 720 723 723 723 723 722 722 723 723 722 722 718 716 736 714 712 717 U1 V2 V4 U4 703 713 731 747 739 741 735 737 746 746 746 746 746 746 746 746 730 745 V1 V1 U3 V3 V3 U2 743 742 701 705 705 703 703 703 703 703 703 703 707x4 738 PX 6200S 6500 E PS ON S TYLUS PR O 4400 4800 No 8 R ev 01 C593 ME CH 051 Y1 Y4 Y2 Y3 744 744 744 734 ...

Страница 475: ...57 760 759 770 772 T S U1 U3 U2 778 774 784 782 789 789 789 789 789 786 787 788 763 791 792 792 790 A 790 B 790 C 790 D 790 E 790 A 790 B 790 C 790 D 790 E 790 A 790 B 790 C 790 D 790 E PX 6200S 6500 E PS ON S TYLUS PR O 4400 4800 No 9 R ev 01 C593 ME CH 061 ...

Страница 476: ... CH 071 810 839 814 815 842 841 842 844 816 811A 843 843 818 821 820 814 818 815 816 815 822 819 823 824 829 828 830 827 825 826 831 818 832 835 837 836 833 834 803 800 803 802 801 800 810 809 806 807 808 805 815 C2 B2 D 838 822 817 817 817 847 840 845 848 846 817 849 ...

Страница 477: ...4 858 860 859 857 856 855 854 851 850 865 865 865 865 865 865 861 863 862 873 892 893 852 866 J L M I H K 862 863 867 871 890 PX 6200S 6500 E PS ON S TYLUS PR O 4400 4800 No 11 R ev 01 C593 ME CH 081 888 895 ...

Страница 478: ...918 919 920 917 916 915 914 913 912 911 922 906x16 908 903 902 900 W 904 905 909 910 924 924 924 925 924 924 927 926 928 929 930 923 924 923 923 923 923 923 PX 6200S 6500 E PS ON S TYLUS PR O 4400 4800 No 12 R ev 01 C593 ME CH 091 ...

Страница 479: ...5 956 957 958 989 988 991 983 979 974 973 968 967 966 965 977 974 976 977 982 975 987 990 985 986 952 979 978 975 970 963 963 971 950 953 962 964 962 987 992 PX 6200S 6500 E PS ON S TYLUS PR O 4400 4800 No 13 R ev 01 C593 ME CH 101 ...

Страница 480: ...02 05 11 14 17 17 16 16 18 15 12 12 13 13 03 10 09 01 04 04 06 07 08 08 08 08 04 04 13 13 13 13 13 13 PX 6200S 6500 E PS ON S TYLUS PR O 4400 4800 No 14 R ev 01 C593 PACK 11 ...

Страница 481: ...EVER C593 131 LABEL CAUTION TRANSPORT 132 GUIDE I H RIGHT 8C 133 LABEL INK COLOR RIGHT 134 COVER I H RIGHT 8C 150 FAN MOTOR FRAME SHIELD 151 COVER HARNESS B 152 FILTER FAN ASSY 153 COVER CONECTER UPPER B 154 COVER I F 155 GROUND PLATE IF 156 PAD AIR SEAL D 157 FAN BLOWER C593 158 COVER FAN LEFT 159 PAD FAN 160 COVER FAN RIGHT 161 PAPER GUIDE MIDDLE ASSY C593 ESL ASP 162 COMPRESSION SPRING 3 47 163...

Страница 482: ...CSIC Y 585 HOLDER ASSY IC RIGHT Table 7 9 Stylus Pro 4400 Figure Part Name 586 MOUNT PLATE BASE IH RIGHT 587 TUBE SUPPLY INK LLK 588 TUBE SUPPLY INK LC 589 TUBE SUPPLY INK LM 590 TUBE SUPPLY INK ALK 591 HARNESS CSIC BK 592 HARNESS CSIC LC 593 HARNESS CSIC LM 594 HARNESS CSIC LK 595 HARNESS I S R 607 GUTTER ASSY INK EJECT 608 SPACER FRAME PAPER GUIDE FRONT 609 INDUCTION DUCT 610 POROUS PAD BOX FL U...

Страница 483: ...5 DUCT AIR B 687 PAD DUCT E 688 GROUND SPRING PAPER GUIDE MIDDLE LEFT Table 7 9 Stylus Pro 4400 Figure Part Name 689 DETECTOR LEAF B2 690 COVER DETECTOR PAPER GUIDE MIDDLE 691 HARNESS DETECTOR PAPER GUIDE CENTER C593 693 POROUS PAD FRAME SUB RIGHT 694 CASE FEET CP 30 FF 4A BLACK 695 BOARD ASSY SUB 696 HARNESS HEAD INTERMIT A 697 HARNESS HEAD INTERMIT B 700 PRINT HEAD 701 CARRIAGE B B 702 PLATE DAM...

Страница 484: ... E 772 BELT PG 773 HARNESS DETECTOR PG 774 DETECTOR HP E Table 7 9 Stylus Pro 4400 Figure Part Name 778 BOARD ASSY ENCODER 779 HOLDER TUBE B C593 780 PAD TUBE 781 HOLDER TUBE A C593 782 BOARD ASSY SUB 783 HARNESS ENCODER 784 COVER TUBE C593 785 GUIDE TUBE CR C593 786 SHEET TUBE 787 GUIDE PLATE TUBE 788 SHEET SUS 789 HOLDER FFC C593 790 A SPACER MIDDLE 0 05 790 B SPACER MIDDLE 0 1 790 C SPACER MIDD...

Страница 485: ...DER 851 HARNESS ENCODER PF 852 HOLDER SENSOR 854 PULLEY BELT TENSION Table 7 9 Stylus Pro 4400 Figure Part Name 855 EXTENSION SPRING 15 98 856 INTERMITTENT GEAR 40 857 SPUR GEAR 18 858 LEVER RELEASE ROLLER DRIVEN 859 TORSION SPRING 615 860 FRAME ASSY LEVER RELEASE 861 HARNESS PAPER THICKNESS 1 862 HOLDER DETECTOR PAPER THICKNESS 863 DETECTOR HP E 864 HARNESS PAPER THICKNESS 2 865 EXTENSION SPRING ...

Страница 486: ...OLLER ASSY LD LEFT 966 COVER ROLLER LD LEFT 967 COVER ROLLER LD RIGHT 968 ROLLER ASSY LD RIGHT 970 LEVER PAD RELEASE LEFT 971 ROD SPRING HOLDER PAD Table 7 9 Stylus Pro 4400 Figure Part Name 973 LEVER PAD RELEASE RIGHT 974 EXTENSION SPRING 0 62 975 COMPRESSION SPRING 1 47 976 LEVER PAPER RETURN LEFT 977 EXTENSION SPRING 0 294 978 HOLDER ROLLER LD SUPPORT LEFT 979 ROLLER LD SUPPORT 982 LEVER PAPER ...

Страница 487: ... TOOL NON FIG CR SHAFT PASS UN PASS TOOL NON FIG CR SHAFT PARALLELISM WEIGHT NON FIG CUTTER HEIGHT ADJUSTMENT TOOL NON FIG CUTTER PRESS DOWN TOOL NON FIG PLATEN HEIGHT ADGUSTMENT TOOL NON FIG CR SHAFT HEIGHT ADGUSTMENT TOOL NON FIG CR SHAFT HEIGHT CHECK TOOL NON FIG PF ROLLER HEIGHT ADJ TOOL NON FIG PLATEN RUBBER SETTING TOOL NON FIG ALLEN WRENCH 3mm NON FIG CR ASSY HOLD TOOL NON FIG CUTTER CAP NO...

Страница 488: ...TRANSPORT 132 GUIDE I H RIGHT 8C 133 LABEL INK COLOR RIGHT 134 COVER I H RIGHT 8C 150 FAN MOTOR FRAME SHIELD 151 COVER HARNESS B 152 FILTER FAN ASSY 153 COVER CONECTER UPPER B 154 COVER I F 155 GROUND PLATE IF 156 PAD AIR SEAL D 157 FAN BLOWER C593 158 COVER FAN LEFT 159 PAD FAN 160 COVER FAN RIGHT 161 PAPER GUIDE MIDDLE ASSY C593 ESL ASP 162 COMPRESSION SPRING 3 47 163 LEVER LOCK PAPER GUIDE MIDD...

Страница 489: ...PLATE BASE IH RIGHT 587 TUBE SUPPLY INK LLK Table 7 10 Stylus Pro 4800 Figure Part Name 588 TUBE SUPPLY INK LC 589 TUBE SUPPLY INK LM 590 TUBE SUPPLY INK ALK 591 HARNESS CSIC BK 592 HARNESS CSIC LC 593 HARNESS CSIC LM 594 HARNESS CSIC LK 595 HARNESS I S R 607 GUTTER ASSY INK EJECT 608 SPACER FRAME PAPER GUIDE FRONT 609 INDUCTION DUCT 610 POROUS PAD BOX FL UPPER 611 POROUS PAD BOX FL LOWER 612 BOX ...

Страница 490: ...PAPER GUIDE MIDDLE LEFT 689 DETECTOR LEAF B2 690 COVER DETECTOR PAPER GUIDE MIDDLE Table 7 10 Stylus Pro 4800 Figure Part Name 691 HARNESS DETECTOR PAPER GUIDE CENTER C593 693 POROUS PAD FRAME SUB RIGHT 694 CASE FEET CP 30 FF 4A BLACK 695 BOARD ASSY SUB 696 HARNESS HEAD INTERMIT A 697 HARNESS HEAD INTERMIT B 700 PRINT HEAD 701 CARRIAGE B B 702 PLATE DAMPER 703 VALVE ASSY HEAD C 704 GROUND PLATE A ...

Страница 491: ...OR HP E 778 BOARD ASSY ENCODER 779 HOLDER TUBE B C593 Table 7 10 Stylus Pro 4800 Figure Part Name 780 PAD TUBE 781 HOLDER TUBE A C593 782 BOARD ASSY SUB 783 HARNESS ENCODER 784 COVER TUBE C593 785 GUIDE TUBE CR C593 786 SHEET TUBE 787 GUIDE PLATE TUBE 788 SHEET SUS 789 HOLDER FFC C593 790 A SPACER MIDDLE 0 05 790 B SPACER MIDDLE 0 1 790 C SPACER MIDDLE 0 2 790 D SPACER MIDDLE 0 5 790 E SPACER MIDD...

Страница 492: ...NSION 855 EXTENSION SPRING 15 98 856 INTERMITTENT GEAR 40 Table 7 10 Stylus Pro 4800 Figure Part Name 857 SPUR GEAR 18 858 LEVER RELEASE ROLLER DRIVEN 859 TORSION SPRING 615 860 FRAME ASSY LEVER RELEASE 861 HARNESS PAPER THICKNESS 1 862 HOLDER DETECTOR PAPER THICKNESS 863 DETECTOR HP E 864 HARNESS PAPER THICKNESS 2 865 EXTENSION SPRING 8 08 866 LEVER DETECTOR PAPER THICKNESS A 867 LEVER DETECTOR P...

Страница 493: ...ROLLER ASSY LD RIGHT 970 LEVER PAD RELEASE LEFT 971 ROD SPRING HOLDER PAD 973 LEVER PAD RELEASE RIGHT 974 EXTENSION SPRING 0 62 Table 7 10 Stylus Pro 4800 Figure Part Name 975 COMPRESSION SPRING 1 47 976 LEVER PAPER RETURN LEFT 977 EXTENSION SPRING 0 294 978 HOLDER ROLLER LD SUPPORT LEFT 979 ROLLER LD SUPPORT 982 LEVER PAPER RETURN RIGHT 983 HOLDER ROLLER LD SUPPORT RIGHT 985 BUSHING LOCK 11 4 986...

Страница 494: ...TOOL NON FIG CR SHAFT PARALLELISM WEIGHT NON FIG CUTTER HEIGHT ADJUSTMENT TOOL NON FIG CUTTER PRESS DOWN TOOL NON FIG PLATEN HEIGHT ADGUSTMENT TOOL NON FIG CR SHAFT HEIGHT ADGUSTMENT TOOL NON FIG CR SHAFT HEIGHT CHECK TOOL NON FIG PF ROLLER HEIGHT ADJ TOOL NON FIG PLATEN RUBBER SETTING TOOL NON FIG ALLEN WRENCH 3mm NON FIG CR ASSY HOLD TOOL NON FIG CUTTER CAP NON FIG PRESS TOOL FOR CUTTER PLATE NO...

Страница 495: ...OVER I C 150 FAN MOTOR FRAME SHIELD 151 COVER HARNESS B 152 FILTER FAN ASSY 154 COVER IF CA00 156 PAD AIR SEAL D 157 FAN BLOWER C593 158 COVER FAN LEFT 159 PAD FAN 160 COVER FAN RIGHT 161 PAPER GUIDE MIDDLE ASSY C593 ESL ASP 162 COMPRESSION SPRING 3 47 163 LEVER LOCK PAPER GUIDE MIDDLE C593 164 PAPER GUIDE PAPER EJECT STACK 165 SHEET PAPER GUIDE PAPER EJECT STACK 166 GROUND SPRING PAPER GUIDE MIDD...

Страница 496: ...CTION DUCT 610 POROUS PAD BOX FL UPPER Table 7 11 Stylus Pro 4450 Figure Part Name 611 POROUS PAD BOX FL LOWER 612A BOX ASSY FLUSHING ASSY ESL ASP 613 HARNESS PUMP PHASE DETECTION 614 CLEANER HEAD A ASP 616 JOINT BOX FLUSHING 617 PUMP CAP ASSY ESL ASP 618 SHEET INK STOPPER C 619 TAPE INK STOPPER C 620 POROUS PAD INK STOPPER C 621 LEAF SPRING LOCK 622 GUIDE RAIL INK EJECT BOX UPPER 623 POROUS PAD G...

Страница 497: ...PRINT HEAD 701 CARRIAGE B B 702 PLATE DAMPER 703 VALVE ASSY HEAD C ESL ASP 704 GROUND PLATE A B 705 POROUS PAD CR Table 7 11 Stylus Pro 4450 Figure Part Name 706 CARRIAGE C C593 707 ORING CONECTOR M7 708 CONNECTING SCREW M7 709 JOINT 3 710 JOINT 3 L 711 COVER CR C593 712 BOARD ASSY MULTISENSOR 713 HARNESS MULTISENSOR 714 LABEL CUT POSITION 715 HOLDER MULTISENSOR 716 PLATE BEARING R B 717 CAM INCLI...

Страница 498: ...9 HOLDER FFC C593 Table 7 11 Stylus Pro 4450 Figure Part Name 790 A SPACER MIDDLE 0 05 790 B SPACER MIDDLE 0 1 790 C SPACER MIDDLE 0 2 790 D SPACER MIDDLE 0 5 790 E SPACER MIDDLE 0 08 791 HARNESS DETECTOR HP 792 BALL BEARING B210151490 793 WEIGHT SCALE CR 795 PLATE LINEAR FRONT B 796 PLATE LINEAR REAR A 797 PLATE LINEAR FRONT A 798 PULLEY SHAFT CR 800 DETECTOR LEAF B2 801 HARNESS PAPER EJECT PHASE...

Страница 499: ...S PAPER THICKNESS 2 865 EXTENSION SPRING 8 08 Table 7 11 Stylus Pro 4450 Figure Part Name 866 LEVER DETECTOR PAPER THICKNESS A 867 LEVER DETECTOR PAPER THICKNESS B 871 EXTENSION SPRING 0 22 873 MOTOR ASSY CR 876 SHAFT RELEASE ROLLER DRIVEN 881 HARNESS HAND INSERTION REAR 882 DETECTOR PE 888 RELEASE ASSY C593 ESL ASP 890 HOLDER DETECTOR PE 892 BOARD ASSY PW 893 HARNESS DETECTOR PE 895 HARNESS MOTOR...

Страница 500: ...D RIGHT 970 LEVER PAD RELEASE LEFT 971 ROD SPRING HOLDER PAD 973 LEVER PAD RELEASE RIGHT 974 EXTENSION SPRING 0 62 975 COMPRESSION SPRING 1 47 976 LEVER PAPER RETURN LEFT 977 EXTENSION SPRING 0 294 978 HOLDER ROLLER LD SUPPORT LEFT 979 ROLLER LD SUPPORT 982 LEVER PAPER RETURN RIGHT 983 HOLDER ROLLER LD SUPPORT RIGHT 985 BUSHING LOCK 11 4 Table 7 11 Stylus Pro 4450 Figure Part Name 986 GROUND SPRIN...

Страница 501: ...GUIDE I H RIGHT 8C 133 LABEL INK COLOR RIGHT 134 COVER I H RIGHT 8C 136 MIN SIDE LOCK 091Y 150 FAN MOTOR FRAME SHIELD 151 COVER HARNESS B 152 FILTER FAN ASSY 154 COVER IF CA00 156 PAD AIR SEAL D 157 FAN BLOWER C593 158 COVER FAN LEFT 159 PAD FAN 160 COVER FAN RIGHT 161 PAPER GUIDE MIDDLE ASSY C593 ESL ASP 162 COMPRESSION SPRING 3 47 163 LEVER LOCK PAPER GUIDE MIDDLE C593 164 PAPER GUIDE PAPER EJEC...

Страница 502: ... 12 Stylus Pro 4480 4480C Figure Part Name 593 HARNESS CSIC LM 594 HARNESS CSIC LK 595 HARNESS I S R 596 HOLDER ASSY IC RIGHT CA00 ESL ASP 607 GUTTER ASSY INK EJECT ESL ASP 608 SPACER FRAME PAPER GUIDE FRONT 609 INDUCTION DUCT 610 POROUS PAD BOX FL UPPER 611 POROUS PAD BOX FL LOWER 612A BOX ASSY FLUSHING ASSY ESL ASP 613 HARNESS PUMP PHASE DETECTION 614 CLEANER HEAD A ASP 616 JOINT BOX FLUSHING 61...

Страница 503: ...PER GUIDE CENTER C593 693 POROUS PAD FRAME SUB RIGHT 694 CASE FEET CP 30 FF 4A BLACK 695 BOARD ASSY SUB Table 7 12 Stylus Pro 4480 4480C Figure Part Name 696 HARNESS HEAD INTERMIT A 697 HARNESS HEAD INTERMIT B 700 PRINT HEAD 701 CARRIAGE B B 702 PLATE DAMPER 703 VALVE ASSY HEAD C ESL ASP 704 GROUND PLATE A B 705 POROUS PAD CR 706 CARRIAGE C C593 707 ORING CONECTOR M7 708 CONNECTING SCREW M7 709 JO...

Страница 504: ...3 780 PAD TUBE 781 HOLDER TUBE A C593 Table 7 12 Stylus Pro 4480 4480C Figure Part Name 782 BOARD ASSY SUB 783 HARNESS ENCODER 784 COVER TUBE C593 785 GUIDE TUBE CR C593 786 SHEET TUBE 787 GUIDE PLATE TUBE B ASP ESL 788 SHEET SUS 789 HOLDER FFC C593 790 A SPACER MIDDLE 0 05 790 B SPACER MIDDLE 0 1 790 C SPACER MIDDLE 0 2 790 D SPACER MIDDLE 0 5 790 E SPACER MIDDLE 0 08 791 HARNESS DETECTOR HP 792 ...

Страница 505: ...ON 855 EXTENSION SPRING 15 98 856 INTERMITTENT GEAR 40 Table 7 12 Stylus Pro 4480 4480C Figure Part Name 857 SPUR GEAR 18 858 LEVER RELEASE ROLLER DRIVEN 859 TORSION SPRING 615 861 HARNESS PAPER THICKNESS 1 862 HOLDER DETECTOR PAPER THICKNESS 863 DETECTOR HP E 864 HARNESS PAPER THICKNESS 2 865 EXTENSION SPRING 8 08 866 LEVER DETECTOR PAPER THICKNESS A 867 LEVER DETECTOR PAPER THICKNESS B 871 EXTEN...

Страница 506: ...71 ROD SPRING HOLDER PAD 973 LEVER PAD RELEASE RIGHT 974 EXTENSION SPRING 0 62 Table 7 12 Stylus Pro 4480 4480C Figure Part Name 975 COMPRESSION SPRING 1 47 976 LEVER PAPER RETURN LEFT 977 EXTENSION SPRING 0 294 978 HOLDER ROLLER LD SUPPORT LEFT 979 ROLLER LD SUPPORT 982 LEVER PAPER RETURN RIGHT 983 HOLDER ROLLER LD SUPPORT RIGHT 985 BUSHING LOCK 11 4 986 GROUND SPRING ASF 987 LEVER HOPPER RELEASE...

Отзывы: