


Accessing Images to Print
9
English
Saving your photos to an external
device
1.
Make sure the printer is turned on and the
memory card you want to back up is inserted in
the printer.
2.
Plug your storage device into an electrical outlet
if required.
3.
Connect a USB cable from your storage drive to
the
EXT. I/F
USB port on the front of the printer
(see page 8).
4.
Press the
F
[
Setup
] button on the printer.
5.
Press the
l
or
r
button to highlight
Backup
Memory Card
, then press the
OK
button.
6.
Press the
u
or
d
button to select
Memory Card
Backup
, then press the
OK
button.
7.
Press the
OK
button. When you see the
Start
backup?
message, press the
OK
button again to
start the backup procedure. You may have to
follow additional instructions on the printer
screen. All the photos on your card are copied to
your storage device. Depending on how many
photos there are, this may take several minutes.
Note:
❏
Do not perform backup while printing from the computer to the
printer.
❏
Do not connect the storage device while the computer is
accessing the memory card in the printer.
❏
The format for writing to CD-R is Multisession (Mode 1) and the
file system is ISO 9660. Due to the ISO 9660 file system, the
contents of a memory card that has 8 or more folder levels cannot
be backed up to CD-R.
❏
The characters that can be used for folder and file names on the
CD-R are capitals and the underscore (_). Other characters are
changed to underscores when backing up to CD-R.
Printing photos from a storage
device
Note:
You may not be able to print photos in the storage device that were
saved by using a product other than this printer.
1.
Make sure the printer is turned on.
2.
Plug your storage device into an electrical outlet
if required.
3.
Connect a USB cable from your storage device to
the
EXT. I/F
USB port on the front of the printer
(see page 8).
Note:
Remove any memory cards from the printer. The printer does
not recognize peripheral devices when a memory card is
inserted.
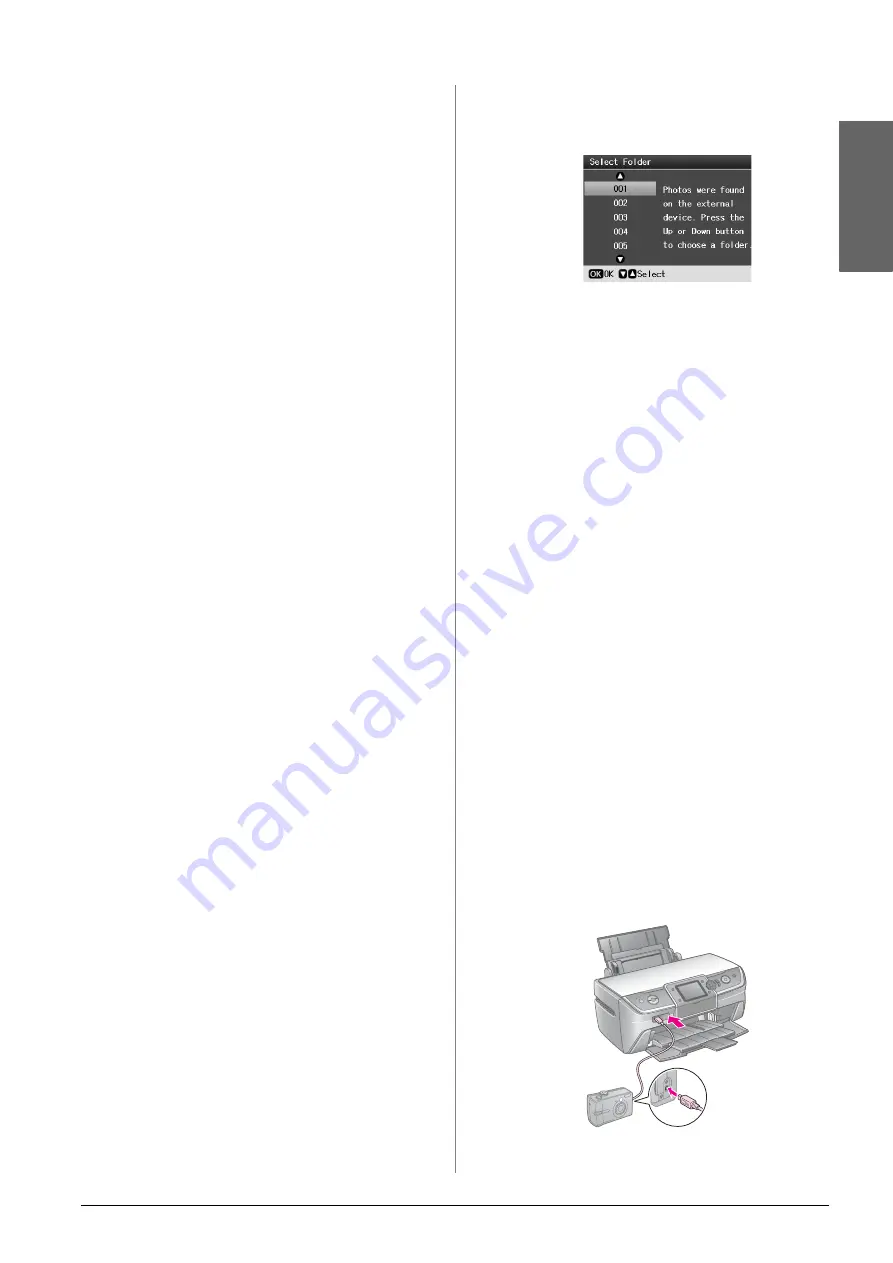
4.
When you see this screen, use the
u
or
d
button
to select which folder to print from, then press the
OK
button.
5.
Follow the same steps as you would to print from
your camera’s memory card (see page 11).
Printing from a Digital
Camera/Mobile Phone/PDA
Using PictBridge or USB
DIRECT-PRINT
PictBridge and USB DIRECT-PRINT lets you print
your photos by connecting your digital camera
directly to the printer.
1.
Make sure your printer is not printing from a
computer.
2.
Make sure that no memory card is loaded.
3.
Turn the printer and load the type of paper you
want to use. (see page 5)
4.
Press the
F
[
Setup
] button.
5.
Press the
l
or
r
button to highlight
PictBridge
Settings
, then press the
OK
button.
6.
Use the LCD screen to select the print settings. (see
page 19)
7.
When you finish selecting your print settings,
press the
OK
button.
8.
Turn the digital camera, then connect the printer
and the digital camera with a USB cable.
Содержание Stylus Photo R360
Страница 36: ...Printed in XXXXXX XX XX XX XXX ...


