Epson Stylus Color 300 Скачать руководство пользователя страница 8

EPSON Stylus COLOR 300

8 -


EPSON Stylus COLOR 300

5/98

*

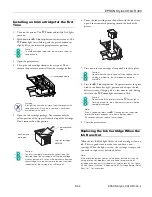
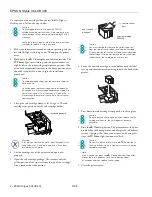
Load envelopes top edge first with the flap side down. 

** To load multiple sheets, place up to 30 sheets in the sheet feeder 

and set the minimum top margin to 1.2 inches (30 mm). You must load 

A6 size sheets one at a time.

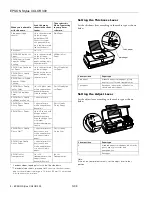
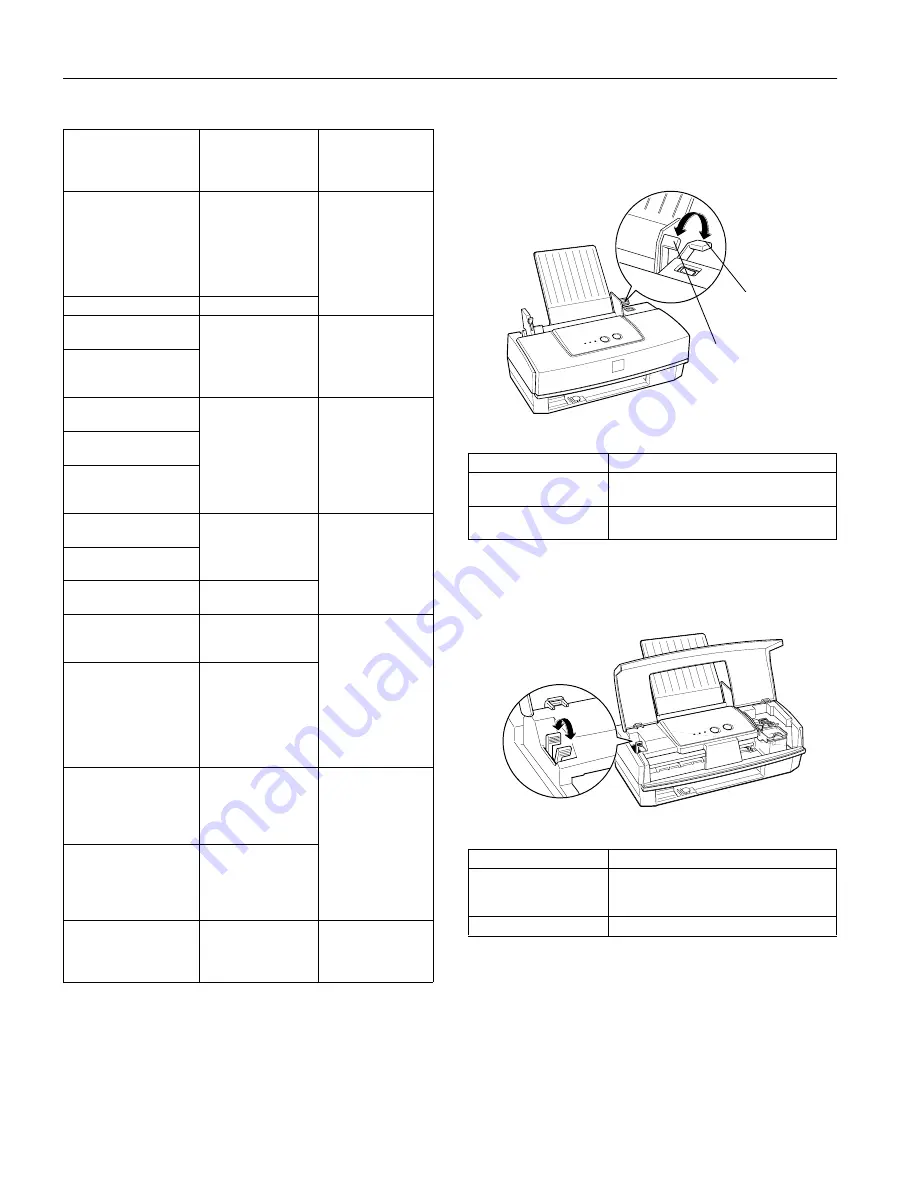
Setting the Thickness Lever 

Set the thickness lever according to the media type as shown 
below.

Setting the Adjust Lever

Set the adjust lever according to the media type as shown 
below.

Note: 
If the ink on your printout smears, set the adjust lever to the + 
position.

When you load media 
with this name. . .

Load this many 
sheets in the sheet 
feeder. . .

Then select this 
Media Type setting 
in your printer 
software. . .

Plain paper (single 
sheets)

Up to the arrow mark 
on the left edge 
guide (about 100 
sheets); for Legal 
size paper, halfway 
up to the arrow mark 
(about 50 sheets)

Plain Paper

Envelopes*

Up to 10

EPSON 360 dpi Ink Jet 
Paper

Up to the arrow mark 
on the left edge 
guide; for Legal size 
paper, halfway up to 
the arrow mark

360 dpi Ink Jet 
Paper

EPSON Special Coated 
Paper for 360 dpi 
Printing

EPSON High Quality Ink 
Jet Paper

Up to the arrow mark 
on the left edge 
guide; for Legal size 
paper, halfway up to 
the arrow mark 

Photo Quality Ink 
Jet Paper

EPSON Photo Quality 
Ink Jet Paper

EPSON Special Coated 
Paper for 720 dpi 
Printing

EPSON Photo Quality 
Ink Jet Cards

Up to 30 index cards 
with a support sheet 
beneath the cards
Load short edge first

Photo Quality Ink 
Jet Paper

EPSON 720 dpi Index 
Cards

EPSON Photo Quality 
Self Adhesive Sheets

1 sheet at a time

EPSON Photo Quality 
Glossy Paper

1 sheet at a time 
with a support sheet 
beneath it

Photo Quality 
Glossy Paper

EPSON Photo Paper

Up to 20 sheets with 
a support sheet 
beneath the stack
Load short edge first 
with larger 
perforated margin at 
the top

EPSON Photo Quality 
Glossy Film

**

1 sheet at a time for 
best results; use 
with a support sheet 
or a sheet of plain 
paper

Photo Quality 
Glossy Film

EPSON High Quality 
Glossy Paper

1 sheet at a time for 
best results; use 
with a support sheet 
or a sheet of plain 
paper

EPSON Ink Jet 
Transparencies

Up to 30 
transparencies with a 
support sheet 
beneath the stack

Ink Jet 
Transparencies

Lever position

Paper type

Plain paper

Standard paper, coated paper, glossy 
paper, glossy film, and transparencies

Thick paper

Envelopes, index cards, self adhesive 
sheets, and photo paper

Lever position

Paper type

0

Standard paper, coated paper, index cards, 
glossy paper, glossy film, and 
transparencies

+

Envelopes

plain paper

thick paper

Содержание Stylus Color 300

Страница 1: ... Paper support Paper support 1022997 Printer cover Printer cover 1035802 Logo Logo plate 1036165 edge guides control panel paper support power switch printer cover sheet feeder load eject button power light ink cartridge clamp paper out light ink out light cleaning button adjust lever paper thickness lever left edge guidelock lever Cartridge Part number Color ink cartridge CMYK S020138 Media name ...

Страница 2: ...hesive Sheets should be stored under these conditions Temperature 59 to 86 F 15 to 30 C Humidity 20 to 60 RH Printable areas Single sheets transparencies index cards and self adhesive sheets A The minimum top margin is 0 12 inch 3 0 mm When loading multiple sheets of EPSON Photo Quality Glossy Film the minimum top margin is 1 2 inches 30 mm B L The minimum left margin is 0 12 inch 3 0 mm B R The m...

Страница 3: ...ge Environmental Temperature Operation 50 to 95 F 10 to 35 C Storage 4 to 140 F 20 to 60 C stored in shipping container 1 month at 104 F 40 C 120 hours at 140 F 60 C Humidity Operation 20 to 80 RH Storage 5 to 85 RH in shipping container without condensation Safety Approvals Safety standards UL 1950 with D3 CSA C22 2 950 with D3 EMC FCC part 15 subpart B class B CSA C108 8 class B Parallel Interfa...

Страница 4: ...pressed for 3 seconds when the V Ink Out light is off Load Eject E Loads or ejects paper if pressed and released within 2 seconds Resumes printing if pressed after a paper out error Power P The P Power light is on when the printer is on When the P Power light flashes the printer is receiving data or you are replacing the ink cartridge charging the ink supply system or cleaning the print head It ma...

Страница 5: ...back of the printer 7 Press down the ink cartridge clamp until it locks in place Caution Do not open the clamp again until you replace the ink cartridge otherwise the cartridge may become unusable 8 Press the R Cleaning button The printer moves the print head to the home far right position and charges the ink delivery system Charging takes a few minutes and during this time the P Power light conti...

Страница 6: ...ghly with soap and water If ink gets in your eyes flush them immediately with water 4 Lift the cartridge out of the printer and dispose of it properly 5 Open the ink cartridge package Next remove only the yellow portion of the tape seal from the top of the cartridge Don t remove the white portion Caution You must completely remove the yellow tape seal from the top of the cartridge installing the c...

Страница 7: ...dge package and remove only the yellow portion of the tape seal from the top of the cartridge Don t remove the white portion Caution You must completely remove the yellow tape seal from the top of the cartridge installing the cartridge with any portion of it still on will permanently damage the cartridge Also do not remove the clear seal from the bottom of the cartridge ink will leak out 6 Lower t...

Страница 8: ... size paper halfway up to the arrow mark Photo Quality Ink Jet Paper EPSON Photo Quality Ink Jet Paper EPSON Special Coated Paper for 720 dpi Printing EPSON Photo Quality Ink Jet Cards Up to 30 index cards with a support sheet beneath the cards Load short edge first Photo Quality Ink Jet Paper EPSON 720 dpi Index Cards EPSON Photo Quality Self Adhesive Sheets 1 sheet at a time EPSON Photo Quality ...

Страница 9: ... image is unexpectedly light or faint or dots are missing from the image you may need to clean the print head This unclogs the nozzles so they can deliver ink properly Cleaning the print head uses ink so clean it only if print quality declines You can use either of the following The Head Cleaning utility in your printer software when the printer is connected directly to the computer The printer s ...

Страница 10: ...ns on examining the nozzle check pattern 4 If your print quality has not improved repeat the steps above You may need to do this two or three times Examining the Nozzle Check Pattern Examine the nozzle check pattern you print It should look something like this with the right side of the pattern colored cyan magenta and yellow Each staggered horizontal and straight vertical line should be complete ...

Отзывы: