background image

EPSON Stylus C82

10

 -

 EPSON Stylus C82

10/02

Aligning the Print Head

If your printouts contain misaligned vertical lines, you may 
need to align the print head. Your printer must be connected 
to a local port, not on a network, to use the Print Head 
Alignment utility. Follow these steps:

1. Make sure the printer is on but not printing, and letter-size 

plain paper is loaded.

2.

Windows:

 Right-click the 

 printer icon on the 

Windows taskbar, and then click 

Print Head Alignment

.

Macintosh 8.6 to 9.x:

 Choose 

Print

 from your application’s 

File menu. Then click the 

 Utility button. On the 

Utility menu, click the 

Print Head Alignment 

button.

Macintosh OS X:

 Open your 

Applications

 folder and 

double-click 

EPSON Printer Utility

. Select 

C82 Series

 in 

the printer list and click 

OK

. Then click 

Print Head 

Alignment

.

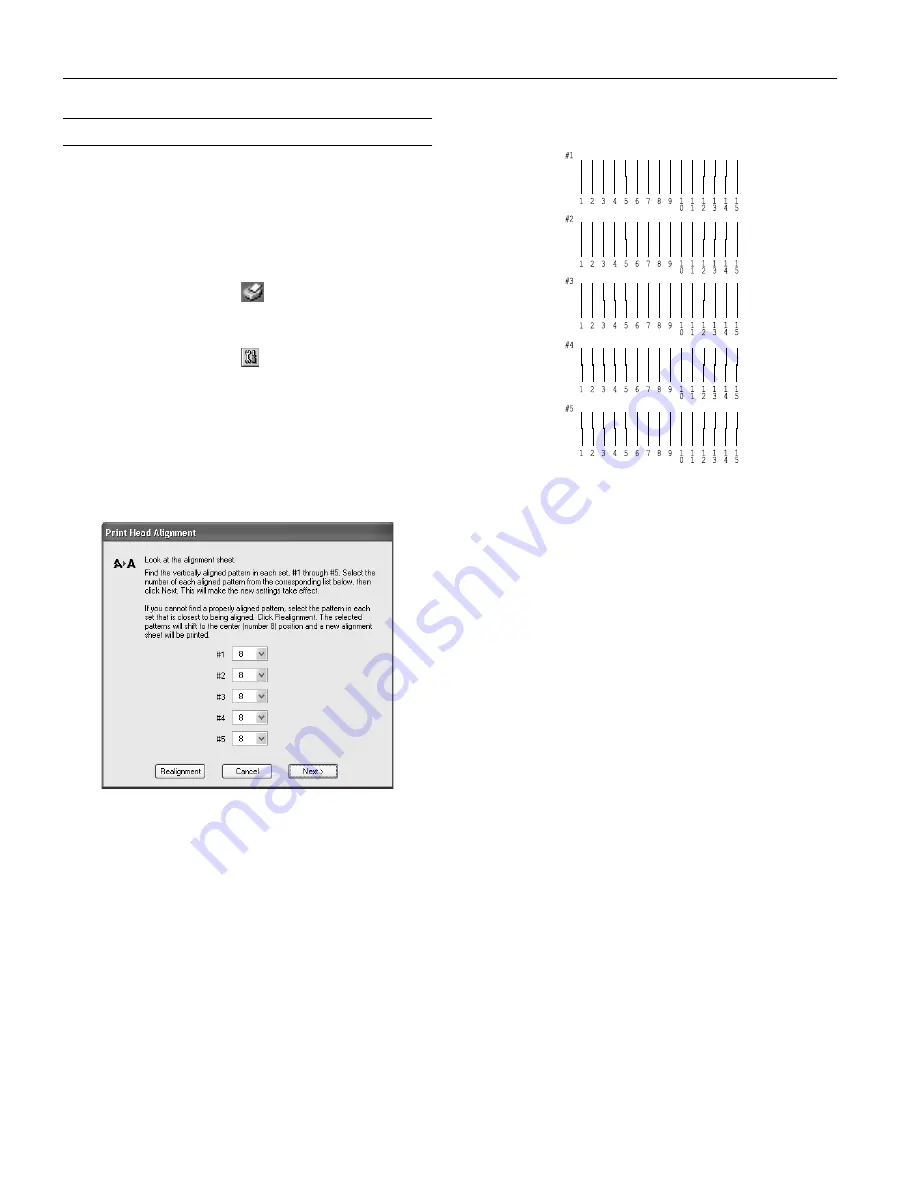
3. Follow the instructions on the screen to print a black 

vertical alignment test page. You see this window:

4. Look at the five rows of patterns in your printout:

5. For each row, find the pattern with the two vertical lines 

most precisely printed on top of each other and select its 
number in the corresponding box on the screen.

If you find a perfectly aligned pattern for each row, click 

Next

. If any of the rows do not have a perfectly aligned 

pattern, select the best pattern and click 

Realignment

Repeat this step until you find a perfectly aligned pattern for 
each row.

6. Click 

Print

 to print the color vertical alignment sheet.

7. Look at the four rows of patterns in your printout. For each 

row, find the pattern with the two vertical lines most 
precisely printed on top of each other and select its number 
in the corresponding box on the screen.

If you find a perfectly aligned pattern for each row, click 

Next

. If any of the rows do not have a perfectly aligned 

pattern, select the best pattern and click 

Realignment

Repeat this step until you find a perfectly aligned pattern for 
each row.

Содержание Stylus C82

Страница 1: ...SON paper name Size Part number Premium Bright White Paper Letter S041586 Photo Quality Ink Jet Paper Letter A4 Legal S041062 S041061 S041067 Glossy Photo Paper Photo Paper Letter A4 4 6 inches perforated edge S041141 20 S041649 50 S041271 100 S041272 500 S041140 S041134 20 S041671 50 Photo Quality Ink Jet Cards A6 S041054 Ink Jet Transparencies Letter S041064 Matte Paper Heavyweight Letter S04125...

Страница 2: ...rint capacity of the initial cartridge even though it contains the standard amount of ink Ink thaws and is usable after approximately 3 hours at 77 F 25 C Caution To ensure good results use genuine EPSON cartridges and do not refill them Other products may cause damage to the printer not covered by EPSON s warranty Don t use an ink cartridge if the date on the package has expired Specification 120...

Страница 3: ...ize Paper types Thickness Weight Single sheets Letter 8 5 11 inches Legal 8 5 14 inches Half letter statement 5 5 8 5 inches Executive 7 5 10 inches A4 210 297 mm A5 148 210 mm A6 105 148 mm Plain bond paper 0 003 to 0 004 inch 0 08 to 0 11 mm 17 to 24 lb 64 to 90 g m2 Transparencies Letter 8 5 11 inches Transparencies distributed by EPSON Heavyweight Matte Paper Double Sided Matte Paper Enhanced ...

Страница 4: ... cover and remove any paper inside including torn pieces Then load a new stack of paper and press the paper button to resume printing H is flashing One of the ink cartridges is low on ink Check your ink levels to find out which cartridge is low see your Printer Basics book for details Make sure you have a replacement cartridge When the H ink out light stops flashing and remains on the cartridge is...

Страница 5: ... Replacing an Ink Cartridge When the red H ink out light is flashing one of your ink cartridges is low on ink When the H ink out light stays on an ink cartridge is empty and you need to replace it Caution You cannot print if any of the ink cartridges are empty Leave the empty cartridge installed in the printer until you have obtained a replacement otherwise the ink remaining in the print head nozz...

Страница 6: ... and open the printer cover 3 Press the H ink button The print head moves to the left and the cartridge that needs to be replaced stops under the _ mark The P power light also begins to flash Warning To avoid damaging the printer never move the print head by hand 4 Press the H ink button again If more than one ink cartridge is empty the next cartridge moves under the _ mark This happens after you ...

Страница 7: ...he H ink out light goes on or begins to flash 1 Load letter size paper and print a nozzle check pattern to determine which cartridge needs to be replaced 2 Windows Right click the printer icon on the Windows taskbar and then click Nozzle Check Macintosh 8 6 to 9 x Choose Print from your application s File menu Then click the Utility button On the Utility menu click the Nozzle Check button Macintos...

Страница 8: ...tive sheets between the sheets of paper or film be sure to remove the protective sheets before printing Some special media have a cut corner that you need to position on the upper right You can load the following number of sheets of EPSON special media Note If you experience paper feeding problems try loading just one sheet at a time For this paper name Select this paper Type or Media Type setting...

Страница 9: ...control panel for three seconds when the red H ink out light is off Note When you don t turn on your printer for a long time the print quality can decline It s a good idea to turn on your printer at least once a month to maintain good print quality 1 Make sure the printer is turned on but not printing The P power light should be on but not flashing Neither of the other lights should be flashing or...

Страница 10: ...t a black vertical alignment test page You see this window 4 Look at the five rows of patterns in your printout 5 For each row find the pattern with the two vertical lines most precisely printed on top of each other and select its number in the corresponding box on the screen If you find a perfectly aligned pattern for each row click Next If any of the rows do not have a perfectly aligned pattern ...

Страница 11: ...ou should clean it several times a year Follow these steps 1 Turn off the printer and wait for the green Ppower light to go out 2 Unplug the power cord and disconnect the printer cable 3 Remove all the paper from the sheet feeder 4 Clean the exterior of the printer with a soft damp cloth Keep the printer cover closed to prevent water from getting inside 5 If ink leaks inside the printer carefully ...

Страница 12: ...er to the printer with tape as shown then close the printer cover 6 Push in the output tray extensions and close the tray 7 Repack the printer and attachments in the original box using the protective materials that came with them See your Start Here sheet Keep the printer level as you transport it After transporting the printer remove the tape securing the print head and test your printer If you n...

Отзывы: