background image

16

Printing From a Memory Card, Camera, or Other Device

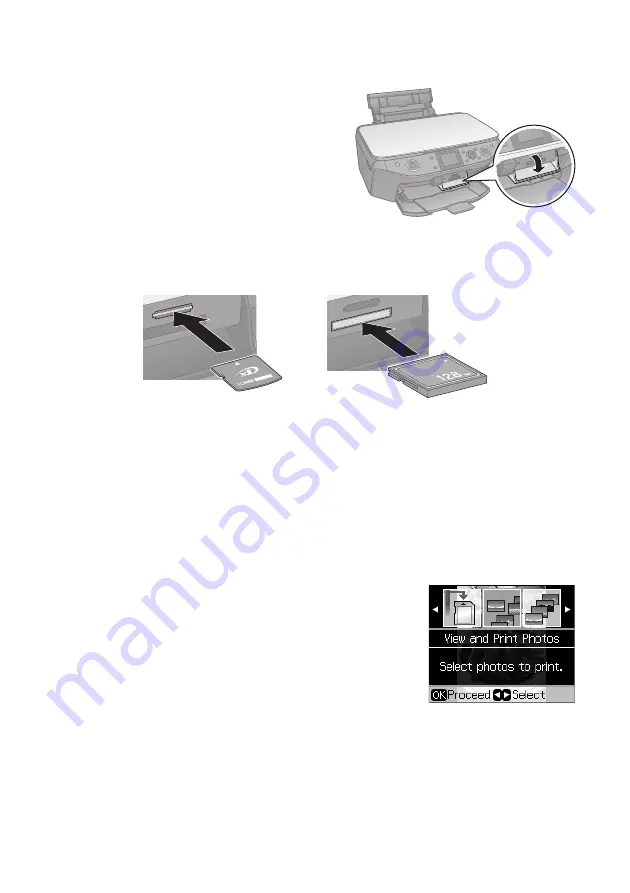
Inserting the Card

1. Make sure the RX595 Series is turned on. 

2. Open the memory card door.

3. Insert your card into the correct slot (see 

page 15)

The memory card access light flashes, 
then stays on.

When you want to remove the card, make sure the memory card access light is not 
flashing, then pull the card straight out of its slot.

Caution: 

Do not remove the card or turn off the RX595 Series while the memory card access 
light is flashing; you may lose data on the card.

Selecting Photos From the Screen

1. Load Epson photo paper. See page 7 for a list.

2. Press the 

Memory Card

 button.

3. Press 

l

 or 

r

 to select 

View and Print Photos.

4. Press 

OK

.

Note: 

To print all the photos on your card, select 

Print All Photos

. To print while viewing 

a slide show of your photos, select 

Slide Show

. For details, see the on-screen 

User’s Guide

. To print photos by the date they were taken, see page 17.

5. Press 

l

 or 

r

 to move through your photos and display the one that you want 

to print.

6. Press 

+

 to select the number of copies you want of that photo.

Insert just one card at a time. The card won’t go in all the way.

Top slot

Bottom slot

Содержание RX595 - Stylus Photo Color Inkjet

Страница 1: ...Quick Guide Basic Copying Printing and Scanning Maintaining Your All in One Solving Problems ...

Страница 2: ... 14 Printing From a Memory Card 14 Printing From a Digital Camera 19 Printing From Your Computer 21 Printing in Windows 21 Printing With a Macintosh 23 Selecting the Correct Paper Type 25 Scanning a Photo or Document 26 Basic Scanning 26 Restoring and Correcting Photos 27 Maintaining Your All in One 28 Checking the Print Head Nozzles 28 Cleaning the Print Head 29 Checking the Ink Cartridge Status ...

Страница 3: ...3 Solving Problems 35 Checking for Software Updates 35 Display Screen Messages 35 Problems and Solutions 37 Where To Get Help 39 Notices 40 ...

Страница 4: ...int photos by the date they were taken or print from a camera using red eye reduction and other features See this Quick Guide for the basics See the on screen User s Guide for details Printing custom photo greeting cards print a photo on a greeting card template add your custom message and print cards See this Quick Guide Printing a label design directly on a CD DVD and creating a disc jacket prin...

Страница 5: ... for printing on paper or printing a label design on a CD or DVD Scanning to a memory card or other device scan a photo or document and store it on a memory card or USB storage device without a computer See the on screen User s Guide Performing routine maintenance and solving problems keep your all in one in top shape See this Quick Guide for the basics See the on screen User s Guide for details F...

Страница 6: ... 1 Open the paper support and front cover then pull out the output tray extensions 2 Insert the paper glossy or printable side up short edge first against the right side Then slide the edge guide against the paper Always load paper short edge first even for landscape printing Load letterhead or pre printed paper top edge first Note For details on paper and instructions on loading envelopes see you...

Страница 7: ...Photo Paper Glossy Borderless 4 6 inches S041934 S042181 S042174 50 60 100 Borderless 5 7 inches S041945 20 Borderless 8 10 inches S041946 20 Letter 8 5 11 inches S041935 S042175 S042182 20 25 50 Epson Ultra Premium Photo Paper Luster Letter 8 5 11 inches S041405 50 Epson Premium Photo Paper Glossy Borderless 4 6 inches S041808 S041727 40 100 Borderless 5 7 inches S041464 20 Borderless 8 10 inches...

Страница 8: ...42180 50 100 Epson Premium Presentation Paper Matte Double sided Letter 8 5 11 inches S041568 50 Epson Presentation Paper Matte Letter 8 5 x 11 inches S041062 100 Legal 8 5 x 14 inches S041067 100 Epson Photo Quality Self adhesive Sheets A4 8 3 11 7 inches S041106 10 Epson Iron on Cool Peel Transfer Paper Letter 8 5 x 11 inches S041153 10 Paper name Size Part number Sheet count ...

Страница 9: ...CDs or DVDs see the on screen User s Guide Placing an Original on the Scanner Glass Caution Do not place anything on top of the all in one or use the document cover as writing surface If necessary clean the cover only with a soft non abrasive microfiber cloth 1 Open the document cover and place your original face down on the scanner glass with the top against the back left corner 2 Close the cover...

Страница 10: ... text or graphics or for printing photos on plain paper To print photos on photo paper see page 11 7 To change the layout of your document on the paper select Layout and press r See page 11 for available layouts not all layouts are appropriate for documents 8 To copy at 100 size on letter size plain paper press x Start To change your paper type or size or any of the other copy settings press x Men...

Страница 11: ...anner glass see page 9 and close the cover 3 Press the Copy button 4 Press or to select the number of copies you want 5 Press l or r to select Color or B W black and white copies 6 Press d then press r to change the document type to Photo 7 To copy borderless photos on 4 6 inch Epson Premium Photo Paper Glossy or Semi gloss press x Start To change any of the copy settings go to the next step 8 Pre...

Страница 12: ...ain Paper 10 When you re ready to copy press x Start If you need to cancel copying press y Stop Clear Settings Note Do not pull out paper as it is printing it ejects automatically Restore Crop or Copy Multiple Photos You can copy up to two 4 6 inch photos onto 4 6 inch 5 7 inch 8 10 inch letter size or A4 size photo paper for instant photo reprints You can also restore colors in faded photos conve...

Страница 13: ... press the arrow buttons To check the zoomed image press OK then press OK to save the crop or press y Back to change the crop area Press r to preview the next photo and repeat this step to crop it if necessary 9 To copy borderless photos on 4 6 inch Epson Premium Photo Paper Glossy or Semi gloss press x Start To change your paper type or any of the other copy settings press x Menu Select your sett...

Страница 14: ...structions Printing From a Memory Card Your RX595 Series can print photos directly from your digital camera s memory card just insert it into the correct memory card slot and you re ready to print See these sections Compatible Cards and Image Formats on page 15 Inserting the Card on page 16 Selecting Photos From the Screen on page 16 Printing Custom Photo Greeting Cards on page 18 For instructions...

Страница 15: ...ard Image size 80 80 pixels to 9200 9200 pixels Number of files Up to 999 Top slot Memory card access light Adapter required Slot Type of card Top slot SDTM SDHC miniSDTM miniSDHC microSD microSDHC MultiMediaCard Memory StickTM Memory Stick DuoTM Memory Stick PROTM Memory Stick Pro DuoTM MagicGateTM Memory Stick MagicGate Memory Stick Duo xD Picture Card xD Picture Card Type H xD Picture Card Type...

Страница 16: ...s flashing you may lose data on the card Selecting Photos From the Screen 1 Load Epson photo paper See page 7 for a list 2 Press the Memory Card button 3 Press l or r to select View and Print Photos 4 Press OK Note To print all the photos on your card select Print All Photos To print while viewing a slide show of your photos select Slide Show For details see the on screen User s Guide To print pho...

Страница 17: ...ry adjusts the brightness contrast and saturation PhotoEnhance uses a sophisticated face recognition technology to optimize photos that include faces For this to work both eyes and the nose must be visible in the subject s face If your photo includes a face with an intentional color cast such as a bronze statue you may want to turn off PhotoEnhance to retain the special color effects 10 Press x St...

Страница 18: ... printing press y Stop Clear Settings Printing Custom Photo Greeting Cards You can create custom greeting cards using photos on your memory card or a USB flash drive and add your own handwritten or printed text First you select a photo and print a greeting card template on plain paper Then you fill out the template add your message and print three cards on each letter size sheet of Epson Premium P...

Страница 19: ...rom Template Then press OK 13 Press x Start to start scanning and printing If you need to cancel printing press y Stop Clear Settings When you finish printing cut the greeting cards apart Printing From a Digital Camera You can connect a digital camera to the RX595 Series and print your photos directly from the camera Check your camera manual to see if it supports PictBridge printing Also make sure...

Страница 20: ... features and press OK See the on screen User s Guide for detailed instructions Note For the best quality printing make sure the Enhance setting is set to PhotoEnhance also known as Auto Photo Correction This automatically analyzes your photos and if necessary adjusts the brightness contrast and saturation PhotoEnhance uses a sophisticated face recognition technology to optimize photos that includ...

Страница 21: ...s See the on screen User s Guide for details Tip It s a good idea to check for updates to your Epson Stylus Photo RX595 Series software See Checking for Software Updates on page 35 for instructions Printing in Windows 1 Open a photo or document in a printing program open the File menu and select Print 2 Select EPSON Stylus Photo RX595 Series and click the Preferences or Properties button Note If y...

Страница 22: ... visible in the subject s face If your photo includes a face with an intentional color cast such as a bronze statue you may want to turn off PhotoEnhance to retain the special color effects 4 To reduce or enlarge your printout or print double sided click the Page Layout tab and select settings as necessary 5 For more printing options click the Advanced tab Note For more information about print set...

Страница 23: ...open the File menu and select Page Setup 2 Select the basic page settings For borderless photos choose a Paper Size setting with a Sheet Feeder Borderless option 3 Click OK 4 Open the File menu and select Print Cancel printing Pause or resume printing Check ink cartridge status Select Stylus Photo RX595 Select your Paper Size Select your document or image orientation ...

Страница 24: ...on 6 Choose any other printing options you may need from the pop up menu See the on screen User s Guide for details 7 Click Print 8 To monitor your print job click the printer icon in the dock or click the Print Center icon and double click SP RX595 Series on the next screen Select your Media Type see page 25 Select Color or Grayscale output Select higher quality or faster printing if available Se...

Страница 25: ...um Photo Paper Glossy Epson Premium Photo Paper Glossy Premium Photo Paper Glossy Epson Photo Paper Glossy Photo Paper Glossy Epson Presentation Paper Matte Presentation Paper Matte Epson Premium Photo Paper Semi gloss Premium Photo Paper Semi gloss Epson Ultra Premium Photo Paper Luster Ultra Premium Photo Paper Luster Epson Premium Presentation Paper Matte Epson Premium Presentation Paper Matte ...

Страница 26: ...led scanning instructions or instructions on scanning a photo or document to a memory card or USB storage device see the on screen User s Guide Basic Scanning You can scan from any TWAIN compliant application such as ArcSoft PhotoImpression using Epson Scan Or you can start Epson Scan directly from your computer and save your image to a file 1 Open the document cover place your original face down ...

Страница 27: ...or badly exposed color photo into one with true to life color and sharpness as you scan Use the Color Restoration and Dust Removal options in Epson Scan s Full Auto Mode In Home and Professional Mode you can also select Backlight Correction to remove shadows from images with too much background light Note For detailed instructions see the on screen User s Guide You can also click Help on the Epson...

Страница 28: ...align the print head if necessary see your on screen User s Guide Note You can also check clean and align the print head using utilities on your computer See the on screen User s Guide for instructions Checking the Print Head Nozzles If your printouts are faint or have gaps in them the print head nozzles may be clogged or ink may be running low in an ink cartridge Follow these steps to check the p...

Страница 29: ...nk so clean it only if necessary Note You cannot clean the print head if an ink cartridge is low or expended You must replace the cartridge first see page 32 1 Load letter or A4 size plain paper in the sheet feeder 2 Press the Setup button 3 Select Maintenance and press OK 4 Select Head Cleaning and press OK 5 Press x Start Cleaning lasts around 1 minute When it s finished you see a message on the...

Страница 30: ...idges are not expended Replace any expended cartridges before printing or copying To check ink cartridge status from the display screen anytime follow these steps 1 Press the Setup button 2 Select Ink Levels and press OK 3 A cartridge marked with a is getting low on ink See page 32 to replace the cartridge if necessary A window may appear on your computer screen when you try to print when ink is l...

Страница 31: ... affect your print quality and could result in printer damage Yields vary considerably based on images printed print settings paper type frequency of use and temperature For print quality a small amount of ink remains in the cartridge after the replace cartridge indicator comes on The printer ships with full cartridges and part of the ink from the first cartridges is used for priming the printer F...

Страница 32: ...before replacing ink cartridges see page 5 1 Turn on the RX595 Series If a cartridge is low or expended you see a message on the display screen Note which cartridges need to be replaced and press OK If you re replacing a cartridge before you see a message on the display screen press the Setup button select Maintenance and press OK Then select Change Ink Cartridge and press OK 2 Open the scanner th...

Страница 33: ... tape from the bottom of the ink cartridge Caution Do not remove any other labels or seals or ink will leak 6 Insert the new ink cartridge into the holder and push it down until it clicks into place 7 Once you replace all the cartridges that need replacing close the cartridge cover and push it down until it clicks into place 8 Close the scanner ...

Страница 34: ...ge on the display screen ink charging is finished Caution To conserve ink never turn off the RX595 Series while ink is charging If you see an ink replacement message on the display screen press OK and press down all the cartridges securely If you remove a low or expended ink cartridge you cannot reinstall and use the cartridge ...

Страница 35: ...he Maintenance tab in the printer settings window You can also click Start or select Programs or All Programs select EPSON and click EPSON Stylus Photo RX595 Series Driver Update Also select EPSON Scan and click EPSON Stylus Photo RX595 Series Scanner Driver Update Display Screen Messages Follow the instructions on the display screen to solve the most common problems Check this table to solve prob...

Страница 36: ... with the card Remove it and check the card Cannot recognize the device The memory card is not inserted correctly see page 16 or another device is not connected correctly or there is a problem with the card or media in the device Remove the card or device and check it Cannot create a folder on the memory card or disc Operation canceled Insert a new memory card see page 16 or another storage medium...

Страница 37: ...bove the arrow mark inside the guide Make sure the paper size settings are correct for the paper you loaded Paper Feeding Problems If paper doesn t feed remove it and flip through the stack to separate the sheets Reload paper against the right side and slide the edge guide against it Do not load too many sheets at once Load up to 20 sheets of photo paper 80 sheets of Epson Bright White paper 100 s...

Страница 38: ...r type settings on the control panel see page 10 or in your printer software see page 25 For the best print quality use Epson papers see page 7 and genuine Epson ink cartridges see page 32 If you notice light or dark bands across your printouts or they are too faint you may need to clean the print head This unclogs the nozzles so they can deliver ink properly Run a nozzle check see page 28 to see ...

Страница 39: ...the label in back Proof of purchase such as a store receipt and date of purchase Computer configuration Description of the problem Then call U S 562 276 4382 6 AM to 6 PM Pacific Time Monday through Friday Canada 905 709 3839 6 AM to 6 PM Pacific Time Monday through Friday Toll or long distance charges may apply Purchase Supplies and Accessories You can purchase genuine Epson ink and paper at Epso...

Страница 40: ...rolled by a wall switch or timer Do not let the power cord become damaged or frayed If you use an extension cord with the RX595 Series make sure the total ampere rating of the devices plugged into the extension cord does not exceed the cord s ampere rating Also make sure the total ampere rating of all devices plugged into the wall outlet does not exceed the wall outlet s ampere rating Avoid locati...

Страница 41: ...ink supply port If ink gets on your skin wash it off with soap and water If it gets in your eyes flush them immediately with water Do not put your hand inside the RX595 Series or touch any cartridges during printing Install a new ink cartridge immediately after removing an expended one Leaving cartridges uninstalled can dry out the print head and may prevent the RX595 Series from printing If you r...

Страница 42: ...er to Epson or its authorized service center where the printer will be fixed and sent back to you You are responsible for packing the printer and for all costs to and from the Epson authorized service center When warranty service involves the exchange of the printer or a part the item replaced becomes Epson property The replacement printer or part may be new or refurbished to the Epson standard of...

Страница 43: ...MADE BY ANY OTHER PERSON OR FIRM ARE VOID EXCEPT AS PROVIDED IN THIS WRITTEN WARRANTY NEITHER EPSON AMERICA INC NOR ITS AFFILIATES SHALL BE LIABLE FOR ANY LOSS INCONVENIENCE OR DAMAGE INCLUDING DIRECT SPECIAL INCIDENTAL OR CONSEQUENTIAL DAMAGES RESULTING FROM THE USE OR INABILITY TO USE THE EPSON PRODUCT WHETHER RESULTING FROM BREACH OF WARRANTY OR ANY OTHER LEGAL THEORY In Canada warranties inclu...

Страница 44: ...ass B digital device Each product marketed is identical to the representative unit tested and found to be compliant with the standards Records maintained continue to reflect the equipment being produced can be expected to be within the variation accepted due to quantity production and testing on a statistical basis as required by 47CFR 2 909 Operation is subject to the following two conditions 1 t...

Страница 45: ...e following measures Reorient or relocate the receiving antenna Increase the separation between the equipment and receiver Connect the equipment into an outlet on a circuit different from that to which the receiver is connected Consult the dealer or an experienced radio TV technician for help WARNING The connection of a non shielded equipment interface cable to this equipment will invalidate the F...

Страница 46: ...uctions Seiko Epson Corporation shall not be liable for any damages or problems arising from the use of any options or any consumable products other than those designated as Original Epson Products or Epson Approved Products by Seiko Epson Corporation Responsible Use of Copyrighted Materials Epson encourages each user to be responsible and respectful of the copyright laws when using any Epson prod...

Страница 47: ...Copyright Notice 47 ...

Страница 48: ...CPD 23918 Printed in XXXXXX XX XX XX XXX ...

Отзывы: