background image

36

Printing From Start to Finish

6. To curve a single line of text, click the text in the main window and drag the 

red “handle” up or down. Then adjust it using the other handles that appear.

7. When you’re finished, choose 

Save as

 from the File menu to save your file.

Note: 

For additional help with Epson Print CD, open the Help menu in Epson Print CD and 
select 

EPSON Print CD Help

.

Printing on a CD or DVD

After you have created your design and loaded a CD or DVD, you’re ready
to print.

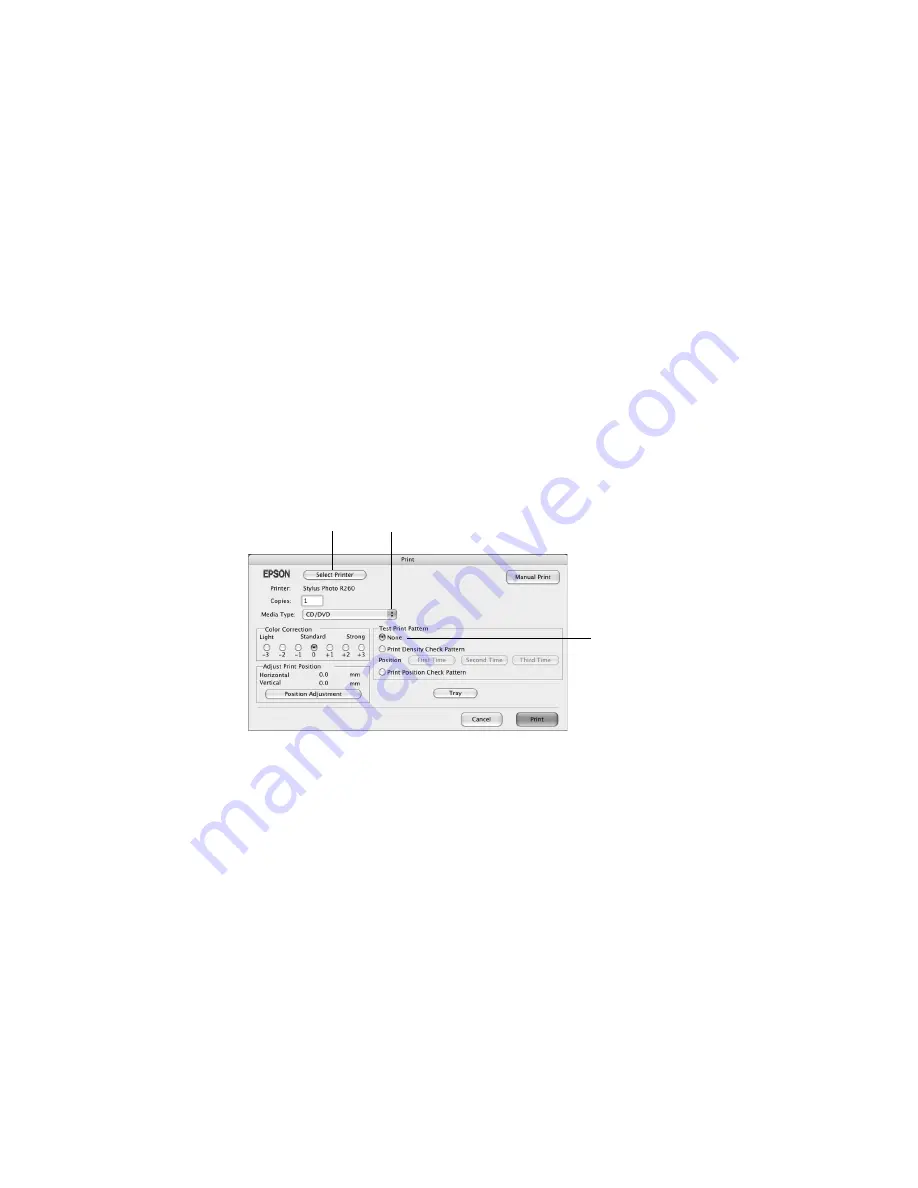
1. Open the File menu and select 

Print

.

2. Make sure 

Stylus Photo R260 

is selected, then click 

Print

.

Note: 

You can only print on one CD or DVD at a time. When the copies setting is set to 2 or 
more, remove each CD or DVD from the tray after it has been printed, and then place 
the next CD or DVD on the tray (see “Inserting a CD or DVD” on page 27 for loading 
instructions). Then press the

)

paper button to resume printing.

After you print, handle the CD or DVD carefully. To allow the ink to dry, wait at least 24 
hours before playing the disc or inserting it in a drive. Keep printed discs away from 
moisture and direct sunlight.

If you need to adjust the print position or color, see “Adjusting the Print Position” 
on page 37 o
r “Adjusting the Print Density” on page 38.

Click here and select 

Stylus Photo R260

Select your CD or 
DVD type

Click 

None

Содержание R260 - Stylus Photo Color Inkjet Printer

Страница 1: ...Printer Basics ...

Страница 2: ...or any consumable products other than those designated as Original Epson Products or Epson Approved Products by Seiko Epson Corporation Responsible Use of Copyrighted Materials Digital cameras scanners and ink jet printers like conventional photocopiers and cameras can be misused by improper copying or printing of copyrighted material While some countries laws permit limited copying of copyrighted...

Страница 3: ...h 25 Printing on CDs and DVDs 26 Cleaning the Rollers 27 Inserting a CD or DVD 27 Designing and Printing in Windows 29 Designing and Printing on a Macintosh 34 Direct Printing from a Digital Camera or Mobile Phone 39 Connecting and Printing 39 Maintaining Your Printer 41 Cleaning the Print Head 41 Checking the Print Head Nozzles 41 Running the Head Cleaning Utility 42 Replacing an Ink Cartridge 44...

Страница 4: ...aper or CD DVD Tray Feeding 62 CD DVD Printing Problems 63 Miscellaneous Printout Problems 64 Uninstalling Printer Software 65 Windows 65 Macintosh 66 Where To Get Help 66 Epson Technical Support 66 Purchase Supplies and Accessories 67 Requirements and Notices 69 Windows System Requirements 69 Macintosh System Requirements 69 Important Safety Instructions 70 Ink Cartridge Safety Instructions 71 FC...

Страница 5: ...MicroPiezo print head and DX5 technology Printing on ink jet printable CDs and DVDs True BorderFree frame ready prints on select 4 6 5 7 8 10 and letter size papers PictBridge printing directly from your digital camera or mobile phone Exif Print The Exif Exchangeable Image File Print format includes information about your digital camera settings in JPEG TIFF files so your printer and application c...

Страница 6: ...igital camera or mobile phone maintaining your printer and solving basic problems For more information about your printer double click the Stylus Photo R260 User s Guide icon on your desktop Please follow these guidelines throughout Warning Warnings must be followed carefully to avoid bodily injury Caution Cautions must be observed to avoid damage to your equipment Note Notes contain important inf...

Страница 7: ...aper is fine For the best results you ll want to use one of Epson s special ink jet papers designed for your printer For example your photos will look great printed on Epson Ultra Premium Photo Paper Glossy See Selecting the Correct Paper Type on page 19 for more information Follow these steps to load paper in your printer 1 Open the paper support and slide out its extension 2 Open the front cover...

Страница 8: ... is not extended Do not touch the front tray when you move the tray lever Do not move the tray lever while the printer is printing 4 Insert paper printable side up against the right edge guide and behind the tab You can load up to 120 sheets of plain paper or up to 20 sheets of photo paper See page 10 for capacity guidelines on other paper types 8 10 inch or Letter size paper 4 6 inch or 5 7 inch ...

Страница 9: ...k on the left edge guide Load the printable side face up It s often brighter or whiter than the other side Always load the short edge first even when printing in landscape mode Load letterhead or preprinted paper into the printer top edge first If you experience paper feeding problems try loading fewer sheets If you re using special paper follow the instructions that came with it 8 10 inch or Lett...

Страница 10: ... Photo Paper Epson Premium Photo Paper Glossy Epson Premium Glossy Photo Paper Epson Premium Photo Paper Semigloss Epson Premium Semigloss Photo Paper Epson Photo Paper Glossy Epson Glossy Photo Paper Epson Premium Presentation Paper Matte Epson Matte Paper Heavyweight Epson Premium Presentation Paper Matte Double Sided Epson Double Sided Matte Paper Epson Ultra Premium Photo Paper Luster Epson Pr...

Страница 11: ... For instructions on printing with Advanced print settings see your on screen User s Guide 1 From the File menu click Print 2 Make sure EPSON Stylus Photo R260 Series is selected 3 Click the Properties or Preferences button If you see a Setup Printer or Options button click it Then click Properties or Preferences on the next screen Select your printer here Click here to open your printer software ...

Страница 12: ...nd graphics with good quality and speed Best Photo For photos or graphics with high print quality 5 Make sure the paper Type and Size settings match the paper you ve loaded in the printer See Selecting the Correct Paper Type on page 19 6 Select Portrait or Landscape for the Orientation setting Select the type of document you re printing Select your paper Type Click here for more options Select you...

Страница 13: ...a group so you can reuse them later click the Help button or click the button and then click on the area you need help with 8 If you want to change the layout settings click the Page Layout tab and select settings as necessary 9 Click OK to confirm your settings then click OK or Print to start printing Click here if you want to see this Advanced screen each time you access your print settings Sele...

Страница 14: ...ur printer settings only apply to the program that you re currently using If you want you can change the Windows default printer settings for all your programs 1 Right click the printer icon in the lower right corner of your screen taskbar 2 Select Printer Settings You see the window shown on page 12 3 Select the default settings you want for all your applications then click OK You can still chang...

Страница 15: ... to the Printer Setup Utility or Print Center as described on the Start Here sheet 1 From the File menu select Page Setup You see the Page Setup window 2 Select Stylus Photo R260 from the Format for pop up menu 3 Select your Paper Size and Orientation 4 Click OK to close the Page Setup window 5 From the File menu select Print You see a window like this one 6 Select Stylus Photo R260 from the Print...

Страница 16: ... OS 10 4 x click the PDF button instead Scheduler Schedule your print job to print at a later time Paper Handling Select page printing options such as Reverse print order Cover Page Mac OS X 10 4 x only Print a cover page before your document or photo ColorSync or Color Management Select ColorSync or adjust the color controls or gamma setting or turn off color adjustments in the printer software E...

Страница 17: ...ed or Mirror Image settings Note For the highest quality on selected papers you can select Photo RPM 5760 1440 from the Print Quality pop up menu When you select Photo RPM printing will take longer 11 Click Print to start printing 12 To monitor the progress of your print job click the printer icon when it appears in the dock on the bottom of your desktop If you re using Mac OS X 10 2 x click the P...

Страница 18: ...ary you can click the print job to select it then use these buttons to cancel pause or resume printing Tip You can also cancel printing by pressing the paper button on your printer 13 When you re finished close the printer window or Print Center Select the print job Cancel printing Pause printing Resume printing ...

Страница 19: ...Epson Premium Photo Paper Glossy Epson Premium Glossy Photo Paper Premium Photo Paper Glossy Epson Premium Photo Paper Semigloss Epson Premium Semigloss Photo Paper Premium Photo Paper Semi Gloss Epson Photo Paper Glossy Epson Glossy Photo Paper Photo Paper Glossy Epson Premium Presentation Paper Matte Epson Matte Paper Heavyweight Epson Premium Presentation Paper Matte Double Sided Epson Double S...

Страница 20: ...pson Premium Glossy Photo Paper 4 6 inches 5 7 inches 8 10 inches Letter 8 5 11 inches Premium Photo Paper Glossy Epson Premium Photo Paper Semigloss Epson Premium Semigloss Photo Paper 4 6 inches Letter 8 5 11 inches Premium Photo Paper Semi Gloss Epson Photo Paper Glossy Epson Glossy Photo Paper 4 6 inches Letter 8 5 11 inches Photo Paper Glossy Epson Premium Presentation Paper Matte Epson Matte...

Страница 21: ...ts that are properly displayed or stored For best results always use Epson papers As with traditional photos Epson recommends proper care that will minimize color changes and lengthen display life Frame prints under glass or a protective plastic sleeve to protect them from atmospheric contaminants like humidity smoke and high levels of ozone As with all photographs keep your prints away from direc...

Страница 22: ...Locate the photo you want to print on your computer 2 Right click the photo highlight Open With and select Windows Picture and Fax Viewer 3 Click the Print icon at the bottom of the screen 4 Click Next You see a Picture Selection window Print icon ...

Страница 23: ...ndow 6 Make sure EPSON Stylus Photo R260 Series is selected then click Printing Preferences You see the following window 7 Select Photo as the Quality Option setting Select EPSON Stylus Photo R260 Series Click Printing Preferences Select Photo Click here for more settings Click here for photos without white borders ...

Страница 24: ...ure which Type to select see the table on page 20 9 Click the Borderless check box Read the message and click OK Note If you need to adjust the amount of image expansion necessary for borderless printing click the Page Layout tab and adjust the Expansion slider 10 Select your paper Size setting 11 Select your photo orientation 12 Click OK 13 At the Photo Printing Wizard screen click Next You see a...

Страница 25: ...ge Setup window 3 Select Stylus Photo R260 from the Format for pop up menu 4 Select a borderless Paper Size 5 Select your photo orientation 6 Click OK to close the Page Setup window 7 From the File menu select Print 8 Select Stylus Photo R260 in the Printer pop up menu Select Stylus Photo R260 Select Stylus Photo R260 Select Print Settings ...

Страница 26: ...n slider 12 Click Print to start printing Printing on CDs and DVDs Your printer includes a special tray that lets you print customized text graphics and photos directly on any ink jet printable CD or DVD The Epson Print CD software makes it easy to import your own photos add text and modify your designs with a variety of special effects You can print on both regular 12 cm and 8 cm mini CDs and DVD...

Страница 27: ...ore you print Otherwise dirt or scratches on the surface may cause errors when you burn the data Before you insert a CD or DVD make sure the printer is turned on Otherwise the disc may not be positioned correctly Then follow these steps 1 Open the front cover then set the front tray to the CD DVD position by pulling the tray lever down Caution Before you move the tray lever make sure no paper or o...

Страница 28: ...D DVD tray there may be a gap in the print position and printing may not be performed properly To print on a small CD or DVD 8 cm place the small CD DVD adapter on the tray first then place the CD or DVD inside the adapter Caution Make sure you always use the small CD DVD adapter when you print on 8 cm CDs or DVDs and that the CD or DVD and adapter lie flat on the tray otherwise the printer may be...

Страница 29: ...printer is printing otherwise your printer may be damaged or the surface of the CD or DVD may become dirty or scratched 4 Follow the instructions in Designing and Printing in Windows below or Designing and Printing on a Macintosh on page 34 to design and print with Epson Print CD Designing and Printing in Windows You can use Epson Print CD to create and print a disc design with images graphics and...

Страница 30: ...kground image click the background icon You see a window like this Note If you have already chosen a background you see a different screen Click Select Image 3 To select one of your own images click the File tab click Browse to locate the folder your images are stored in then click OK You see thumbnail images of all the files in the folder 4 Select your image and click OK ...

Страница 31: ...ag the red handle up or down Then adjust it using the other handles that appear 7 When you re finished choose Save as from the File menu to save your file Note For additional help with Epson Print CD open the Help menu in Epson Print CD and select Help Topics Printing on a CD or DVD After you have created your design and loaded a CD or DVD you re ready to print 1 Open the File menu and select Prin...

Страница 32: ...D carefully To allow the ink to dry wait at least 24 hours before playing the disc or inserting it in a drive Keep printed discs away from moisture and direct sunlight If you need to adjust the print position or color see Adjusting the Print Position below or Adjusting the Print Density on page 34 Adjusting the Print Position If your printed images and text are not centered or positioned the way y...

Страница 33: ...ance from the edge of the hole to the small cross marks labeled Top and Right You ll need a metric ruler with millimeters for accurate measurements 7 Open the File menu select Print then select Adjust Print Position You see a screen like this 8 Click Enter Values then input the Top distance from your measurement in the Height Top box Enter the Right distance from your measurement in the Width Righ...

Страница 34: ...ted examine the print If you need to adjust the color open the File menu select Print and make the Print Color Correction setting lighter or darker as necessary Then repeat steps 3 through 6 but select either Second or Third in the Print Confirmation Pattern section depending on whether you re printing your second or third pattern on the disc Note You can print three density patterns on one disc E...

Страница 35: ...following window 3 To select one of your own images click Select Background locate the folder your images are stored in select the one you want then click Open 4 Click OK in the Adjust Background window 5 To add text click the button In the Text Settings window type your text then use any of the options in the window to format it You can also use options in the Color Settings and Object Settings w...

Страница 36: ...lected then click Print Note You can only print on one CD or DVD at a time When the copies setting is set to 2 or more remove each CD or DVD from the tray after it has been printed and then place the next CD or DVD on the tray see Inserting a CD or DVD on page 27 for loading instructions Then press the paper button to resume printing After you print handle the CD or DVD carefully To allow the ink ...

Страница 37: ...VD on the CD DVD tray and insert it into the printer as described on page 27 2 Start Epson Print CD 3 Select Print from the File menu 4 Make sure Stylus Photo R260 is selected then click Print Position Check Pattern 5 Click Print The confirmation pattern is printed on the CD or DVD 6 Remove the CD or DVD and measure the distance from the edge of the hole to the small cross marks labeled Top and Ri...

Страница 38: ...ted CDs or DVDs you may need to adjust the color saturation or ink density CDs and DVDs from different manufacturers may absorb ink differently so you may need to adjust the density for each type of disc Follow these instructions to print a color saturation check pattern and then make adjustments as necessary 1 Start Epson Print CD 2 Open the File menu and select Print 3 Insert a test CD or DVD fo...

Страница 39: ...in Note You can also use the Brightness and Contrast settings in Epson Print CD to adjust color saturation For additional information open the Help menu in Epson Print CD and select EPSON Print CD Help Direct Printing from a Digital Camera or Mobile Phone Your digital camera must be compatible with PictBridge or USB DIRECT PRINT If it isn t the red H ink and paper lights flash alternately when you...

Страница 40: ... your camera or phone to the external interface port on the front of the printer 4 Turn your camera or phone on 5 Use your camera or phone to select the photos you want to print adjust any necessary settings and print your photos See your camera or phone manual for details ...

Страница 41: ...nes for example if you see lines in your printout or colors are incorrect or missing Before you clean the print head check the print head nozzles first to confirm that the print head needs to be cleaned This saves ink For more information see Checking the Print Head Nozzles below Caution When you don t turn on your printer for a long time print quality can decline so turn it on and print a few pag...

Страница 42: ... page 43 to clean the nozzles Running the Head Cleaning Utility 1 Make sure the printer is turned on but not printing and the red H ink light is off If the red H ink light is flashing or on you need to replace a cartridge see page 44 for details 2 Do one of the following Windows Right click the printer icon on your taskbar in the lower right corner of your screen Select Head Cleaning Print head do...

Страница 43: ...inished 4 When the green Ppower light stops flashing make sure paper is loaded in the printer then do one of the following Windows Click Print nozzle check pattern then click Print Macintosh OS X Click Confirmation then click Next The nozzle check pattern prints 5 If the nozzle check pattern has no white lines or gaps as shown below click Finish If the pattern has white lines or gaps as shown belo...

Страница 44: ... which cartridge is low or expended When a cartridge is more than six months old you may need to replace it if printouts don t look their best If the quality doesn t improve after cleaning and aligning the print head you can replace the cartridge even if the red H ink light is off Checking the Ink Supply To check the ink supply do one of the following Windows Double click the printer icon on your ...

Страница 45: ...ur printer click Information Macintosh OS X Open the Applications folder and select EPSON Printer Utility2 Select SP R260 Series in the printer list click OK then select EPSON StatusMonitor You see a window like this one Click a cartridge image to display information about the cartridge Note To update the ink cartridge status click Update ...

Страница 46: ... not covered by Epson s warranty You can purchase genuine Epson ink and paper from an authorized Epson reseller To find the nearest reseller please call 800 GO EPSON 800 463 7766 Or you can purchase online at http www epsonstore com U S sales or http www epson ca Canadian sales Ink Cartridge Precautions Warning The ink cartridges are designed to contain any excess ink and prevent leakage Careful h...

Страница 47: ... ink cartridge is expended Leave the expended cartridge installed in the printer until you have obtained a replacement Otherwise the ink remaining in the print head nozzles may dry out This printer uses ink cartridges equipped with IC chips that monitor the amount of ink used by each cartridge Cartridges are usable even if they are removed and reinserted Some ink is consumed each time cartridges a...

Страница 48: ...ing the print head moves to the left and the cartridge that needs to be replaced stops under the _ mark The green Ppower light begins to flash Go to step 4 Note Don t hold down the H ink button for more than 3 seconds or the printer will start to clean the print head 4 Press the H ink button again If more than one cartridge is low or expended the next cartridge moves under the _ mark If all the lo...

Страница 49: ...horoughly with soap and water If ink gets in your eyes flush them immediately with water If discomfort or vision problems continue after a thorough flushing see a doctor immediately 7 Unwrap the new ink cartridge Caution Be careful not to break the hooks on the side of the ink cartridge when you remove it from the package Always install an ink cartridge immediately after removing the old cartridge...

Страница 50: ...n ink cartridge without removing the yellow tape take the cartridge out of the printer remove the yellow tape and then reinstall it Do not remove the transparent seal from the bottom of the cartridge otherwise the cartridge may become unusable Do not remove or tear the label on the cartridge otherwise ink will leak 9 Lower the cartridge into the holder with the green circuit board facing the front...

Страница 51: ... light is flashing unless the printer hasn t moved or made noise for more than 5 minutes Do not insert the CD DVD tray until ink charging is complete Note If the red H ink light flashes after the print head moves to its home far right position the ink cartridge may not be installed properly Press the H ink button two or more times until the print head moves to the ink cartridge replacement positio...

Страница 52: ...n the Applications folder and select EPSON Printer Utility2 Select SP R260 Series in the printer list click OK then select Print Head Alignment 5 Follow the instructions on the screen to print the alignment pattern You see a window like this one 6 Look at the four sets of patterns in your printout For each set look at the printed squares to determine which one in each set is the most even with no ...

Страница 53: ...t Keep the printer cover closed to prevent water from getting inside 4 If ink accidentally gets inside the printer wipe it off with a damp cloth in the area shown below Warning Don t touch the gears or any other parts inside the printer Caution Never use a hard or abrasive brush or benzine alcohol or paint thinner for cleaning they can damage the printer components and case Don t get water on the ...

Страница 54: ...on then close the printer cover 2 Turn off the printer and unplug its power cord Then disconnect the power cord and USB cable from the printer 3 Open the printer cover Secure the print head with tape as shown below then close the printer cover 4 Remove any paper from the printer then push down the paper support extension and close the paper support 5 Repack the printer and its attachments in the o...

Страница 55: ...d press the paper button to resume printing If you re printing on a CD or DVD the CD DVD tray is not inserted Follow the instructions beginning on page 27 to insert the tray then press the paper button Red paper out light and green P power light flash If you re printing on paper it is jammed in the printer Press the paper button to eject the paper If that doesn t work turn off the printer open the...

Страница 56: ... Turn off the printer then open the cover and remove any jammed paper or other foreign objects Turn the printer back on again If the lights are still on contact Epson as described in Where To Get Help on page 66 Green P power light flashes red paper out and H ink lights flash rapidly The front tray is not in the correct position Before you turn on the printer or print on paper push the tray lever ...

Страница 57: ...If the test page prints the problem probably lies in your software settings USB cable or computer or your software may not be installed correctly If the test page doesn t print you may have a problem with your printer Try the suggestions in Problems and Solutions below If nothing works contact Epson as described in Where To Get Help on page 66 6 Turn off the printer reconnect the USB cable then tu...

Страница 58: ... the installation instructions on the Start Here sheet Do not connect your printer to the computer until you are instructed to do so When connecting your printer make sure the USB cable is connected securely to the printer and the computer Also make sure your system meets the requirements shown on page 69 Close your other programs including any screen savers and virus protection software and insta...

Страница 59: ...r mechanism from overheating and being damaged If this happens you can continue to print but Epson recommends that you stop and leave the printer on for about 30 minutes After 30 minutes turn the printer off and on and it should print at normal speed The printer sounds as though it is printing but nothing prints If you re using Windows make sure your printer is selected For Macintosh OS X make sur...

Страница 60: ...nnected to a hub disconnect USB devices that you re not using Note Borderless printing takes longer especially near the edges of the paper Print Quality Problems You see banding light lines The print head nozzles may need cleaning see page 41 for instructions Select a higher print quality and turn off High Speed mode see page 12 Windows or page 16 Macintosh for instructions Make sure the Type Wind...

Страница 61: ...ifications listed in the on screen User s Guide Run the Print Head Alignment utility see page 51 for instructions Remove each sheet from the output tray after printing Your printout is faint or has gaps The print head nozzles may need cleaning see page 41 for instructions The ink cartridges may be old or low on ink To replace an ink cartridge see page 44 Make sure the paper Type Windows Media Type...

Страница 62: ...rmation Your printed colors can never exactly match your on screen colors However you can use a color management system to get as close as possible You can also use your printer s color management features See your on screen User s Guide for more information After you print the colors on your printout will take some time to set as the ink dries During this time the colors may look different than y...

Страница 63: ...ted or not fed correctly when a print job is sent Reinsert the CD DVD tray correctly See page 27 If the tray is ejected when you start a print job the printer is not ready Wait until you see a message on your screen asking you to insert the tray Then reinsert the tray and press the paper button CD DVD Printing Problems Images and text are not centered on the CD DVD Adjust the Print position as des...

Страница 64: ...er is selected For Macintosh OS X make sure your printer is selected in the Page Setup and Print windows The print head nozzles may need cleaning see page 41 The margins are incorrect Make sure the paper settings are correct for your paper size Make sure the paper is positioned all the way to the right of the sheet feeder Slide the left edge guide against the paper See your software documentation ...

Страница 65: ...tiple copies Uninstalling Printer Software You may need to uninstall and then reinstall your printer driver and utilities For example this might be necessary when you upgrade your operating system You don t need to uninstall Epson Print CD PhotoImpression or your on screen User s Guide Note Do not turn off or disconnect the printer while you are uninstalling the software Windows 1 Turn off the pri...

Страница 66: ...pop up menu in the upper left and click Uninstall 7 Follow the on screen instructions to uninstall the printer software Note If the name of your printer remains in the Print Center or Printer Setup Utility select it from Printer List and click Delete 8 Restart your Macintosh then see the Start Here sheet to reinstall your software Where To Get Help Epson Technical Support Epson provides these tech...

Страница 67: ...Description of the problem Then call U S 562 276 7282 6 AM to 8 PM Pacific Time Monday through Friday and 7 AM to 4 PM Saturday Canada 905 709 2567 6 AM to 6 PM Pacific Time Monday through Friday Toll or long distance charges may apply Purchase Supplies and Accessories You can purchase genuine Epson ink and paper from an Epson authorized reseller To find the nearest reseller call 800 GO EPSON 800 ...

Страница 68: ...68 Solving Problems ...

Страница 69: ... DVD drive for installing the printer software USB connection a computer with preinstalled Windows 98SE 2000 Me or XP and a Windows compliant USB port and shielded USB AB cable Using an improperly shielded USB cable may cause the printer to malfunction Macintosh System Requirements To use your printer and its software your system should have Macintosh OS X 10 2 8 or later 256MB RAM 512MB or more r...

Страница 70: ...n extension cord with the printer make sure the total ampere rating of the devices plugged into the extension cord does not exceed the cord s ampere rating Also make sure the total ampere rating of all devices plugged into the wall outlet does not exceed the wall outlet s ampere rating Except as specifically explained in your documentation do not attempt to service the printer yourself Unplug the ...

Страница 71: ... the printer from printing Turn off and unplug the printer before cleaning Clean with a damp cloth only Do not spill liquid on the printer Ink Cartridge Safety Instructions Keep ink cartridges out of the reach of children and don t drink the ink Do not shake ink cartridges after opening their packages this can cause leakage Be careful when you handle used ink cartridges as there may be some ink re...

Страница 72: ...e pursuant to Part 15 of the FCC Rules These limits are designed to provide reasonable protection against harmful interference in a residential installation This equipment generates uses and can radiate radio frequency energy and if not installed and used in accordance with the instructions may cause harmful interference to radio or television reception However there is no guarantee that interfere...

Страница 73: ...ated at MS 3 13 3840 Kilroy Airport Way Long Beach CA 90806 2469 Telephone 562 290 5254 Declare under sole responsibility that the product identified herein complies with 47CFR Part 2 and 15 of the FCC rules as a Class B digital device Each product marketed is identical to the representative unit tested and found to be compliant with the standards Records maintained continue to reflect the equipme...

Страница 74: ...d your printer to Epson or its authorized service center where the printer will be fixed and sent back to you You are responsible for packing the printer and for all costs to and from the Epson authorized service center When warranty service involves the exchange of the printer or a part the item replaced becomes Epson property The replacement printer or part may be new or refurbished to the Epson...

Страница 75: ...ED HEREIN ANY STATEMENT OR REPRESENTATIONS MADE BY ANY OTHER PERSON OR FIRM ARE VOID EXCEPT AS PROVIDED IN THIS WRITTEN WARRANTY NEITHER EPSON AMERICA INC NOR ITS AFFILIATES SHALL BE LIABLE FOR ANY LOSS INCONVENIENCE OR DAMAGE INCLUDING DIRECT SPECIAL INCIDENTAL OR CONSEQUENTIAL DAMAGES RESULTING FROM THE USE OR INABILITY TO USE THE EPSON PRODUCT WHETHER RESULTING FROM BREACH OF WARRANTY OR ANY OT...

Страница 76: ...76 Requirements and Notices ...

Страница 77: ...justing print position Macintosh 37 to 38 adjusting print position Windows 32 to 33 designing Macintosh 35 to 36 designing Windows 30 to 31 feeding problems 63 inserting in printer 27 to 29 printing on 26 to 39 printing problems 63 to 64 Cell phone printing from 39 to 40 Characters incorrect 65 Checking printer 56 to 57 Cleaning print head 41 to 43 printer 53 rollers 27 sheets 53 Color management ...

Страница 78: ...ridge level of ink in 44 ordering 46 replacing 44 to 51 safety instructions 49 71 to 72 Ink level checking Macintosh 45 Windows 44 Installation problems 58 to 59 Inverted image 64 J Jams paper 62 L Layout problems 64 Layout settings Macintosh 16 Windows 13 M Macintosh basic printing 15 to 18 system requirements 69 uninstalling software 66 Maintaining printer 41 to 54 Marginless printing 20 to 26 M...

Страница 79: ...maintaining 41 to 54 noise 59 problems 55 to 65 transporting 54 Printing basic 11 to 18 borderless photos 20 to 26 CDs and DVDs 26 to 39 controlling Macintosh 18 controlling Windows 14 Printing slow 60 Problems CD printing 63 to 64 CD DVD feeding 63 color 62 installing software 58 to 59 miscellaneous 64 to 65 paper feeding 62 to 63 print quality 60 to 62 printer 55 to 65 Q Quality Option setting 1...

Страница 80: ...era 40 port for phone 40 Utilities Head Cleaning 42 to 43 Nozzle Check 41 to 42 Print Head Alignment 51 to 52 W Warranty 74 to 75 Windows basic printing 11 to 14 Picture and Fax Viewer 22 system requirements 69 uninstalling software 65 ...

Страница 81: ...78120 78 Cyan T078220 78 Lt Cyan T078520 Ultra Premium Photo Paper Glossy Ideal for framing and for long lasting professional quality prints It has an ultra smooth and bright white finish and is Epson s heaviest weight glossy paper for standard size printers Paper category Description Photo Papers For lab quality photos from everyday snapshots to professional portraits Available in glossy semi glo...

Страница 82: ...78120 78 Cyan T078220 78 Lt Cyan T078520 Ultra Premium Photo Paper Glossy Ideal for framing and for long lasting professional quality prints It has an ultra smooth and bright white finish and is Epson s heaviest weight glossy paper for standard size printers Paper category Description Photo Papers For lab quality photos from everyday snapshots to professional portraits Available in glossy semi glo...

Отзывы: