background image

14

Getting Started

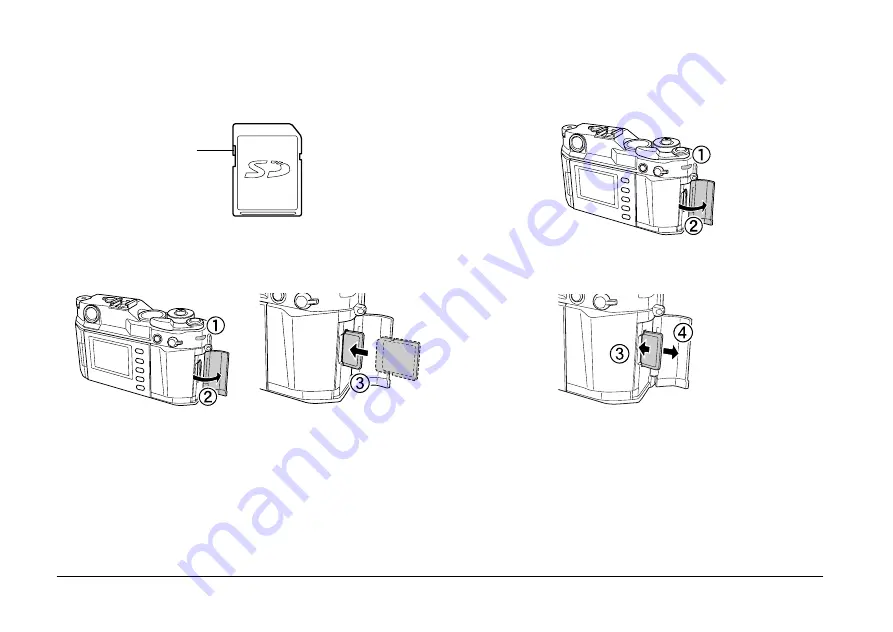
Inserting a Memory Card

1.

Make sure that the memory card is not locked. Slide the write 
protect switch to unlock the card if needed.

2.

Make sure that the memory card access light is off, then open the 
memory card slot cover. Insert the memory card all the way into 
the slot until it clicks.

3.

Close the memory card cover.

Removing the Memory Card

1.

Make sure the memory card access light is off, then open the 
memory card slot cover.

2.

Push in the memory card until it clicks, then release your finger. 
The memory card pops out.

Note:

If the memory card is not ejected, push it again. 

3.

Remove the card and close the memory card cover.

Write protect 
switch

DUMMY

DUMMY

DUMMY

Содержание R-D1s

Страница 1: ...1 User s Guide ...

Страница 2: ...nce instructions Seiko Epson Corporation shall not be liable for any damages or problems arising from the use of any options or any consumable products other than those designated as Original Epson Products or Epson Approved Products by Seiko Epson Corporation Seiko Epson Corporation shall not be held liable for any damage resulting from electromagnetic interference that occurs from the use of any...

Страница 3: ... an L mount Lens 16 Selecting the Focal Length 16 Chapter 2 Taking Photos Turning the Camera On and Off 18 Cocking the Shutter 18 Setting White Balance 19 Setting Image Quality 19 Setting ISO Sensitivity 20 Setting the Exposure 21 Setting the Shutter Speed Automatically 21 Setting the Shutter Speed Manually 22 Setting the Aperture 22 Using the Light Meter 22 Focusing 24 Releasing the Shutter 24 Ch...

Страница 4: ...ance and Troubleshooting Setting the Time and Date 39 Calibrating the Status Gauge 40 Formatting the Memory Card 40 Cleaning the Camera Body 41 Cleaning the CCD Sensor 41 Storing the Camera 42 Troubleshooting 42 Contacting Customer Support 43 For Users in Europe 43 For Users in Singapore 43 For Users in Hong Kong 43 For Users in Korea 44 Appendix Standards and Approvals 45 Camera 45 Lithium ion Ba...

Страница 5: ...temporary The lenses you own and use on a film based rangefinder camera may produce unexpected results when used with R D1s which are yours to experiment for years to come With an adapter ring L mount lenses can also be used with R D1s further enhancing its shooting potential Life size magnification The R D1s comes with a viewfinder with 1 0x magnification so what you see through the viewfinder is...

Страница 6: ...ing Started Chapter 1 Getting Started Unpacking Your Camera Make sure you have these items Camera body Lens hole cover Battery Strap Battery charger Power cord for battery charger Quick Reference Guide CD ROM ...

Страница 7: ...rame illumination window Receives light to illuminate bright line frames in the viewfinder Viewfinder window Images from this window are displayed in the viewfinder X sync contact Used to connect an external flash unit See the flash s manual for details on how to attach the flash Lens release button Used to unmount the lens See Mounting and Removing Lenses on page 15 for details on how to attach o...

Страница 8: ...See Setting the Exposure on page 21 and Setting ISO Sensitivity on page 20 for details Shutter charge lever Used to cock the shutter before taking each picture See Cocking the Shutter on page 18 for details Shutter release button Releases the shutter If pressed halfway without releasing the shutter the metered and selected shutter speeds are displayed at the bottom of the finder view Also used to ...

Страница 9: ...See Setting White Balance on page 19 and Setting Image Quality on page 19 for details Memory card access light Lights when a picture is being saved in the memory card Flashes when there is an error or battery is low Memory card slot Accepts an SD memory card of up to 2 GB capacity See Using a Memory Card on page 13 for details Memory card slot cover Protects the memory card and memory card slot Fo...

Страница 10: ...hite Balance on page 19 for details Remaining battery power Indicates the remaining battery power The current battery level is indicated onthe scale from E Empty to F Full A Auto Sunny Shade Cloudy Incandescent Fluorescent The number of remaining shots Indicates the number of remaining shots you can take up to 999 The needle points to E if there is no memory card or when an error occurs Note The a...

Страница 11: ...plastic fasteners 5 Repeat these steps to attach the other end of the strap to the other side of the camera Using the Battery cCaution Only use the Epson lithium ion battery EU 85 Do not use any other make or model of battery under any circumstances Charging the Battery The camera comes with a lithium ion battery model EU 85 Be sure to charge it before using the camera for the first time or if you...

Страница 12: ...rt the battery into the battery charger with the terminal end first The red indicator light on the charger lights up to indicate the battery is being charged 3 When the indicator light turns off the battery is fully charged Remove the battery from the charger 4 Disconnect the battery charger from the power outlet ...

Страница 13: ...y you may not be able to read from or write to the card Never insert or remove a memory card while the memory card access light is on This may cause data in the card to be lost or damaged or render the memory card unusable Keep the memory card slot cover closed except when you insert or remove the memory card This protects the memory card and the slot from dust particles and static shock otherwise...

Страница 14: ...r Insert the memory card all the way into the slot until it clicks 3 Close the memory card cover Removing the Memory Card 1 Make sure the memory card access light is off then open the memory card slot cover 2 Push in the memory card until it clicks then release your finger The memory card pops out Note If the memory card is not ejected push it again 3 Remove the card and close the memory card cove...

Страница 15: ...gulon 21 mm F4 Elmarit 28 mm F2 8 earliest model Summicron 50 mm Dual Range Summicron Collapsible lenses However collapsible lenses such as the Hektor 50 mm F2 5 or the Elmar 50 mm F3 5 can be used with the camera as long as the lens barrel is not pushed into the camera body Be very careful if using these types of lenses Lenses that have an auxiliary viewfinder lens These lenses cannot be used eff...

Страница 16: ...a as you would an M mount lens When you want to remove the lens the procedure is the same as for an M mount lens Selecting the Focal Length You need to select the focal length of the lens mounted in order to display the correct bright line frame that indicates the field of view covered by the lens The automatic parallax correction feature allows you to capture what you see in the selected bright l...

Страница 17: ...m This effectively increases the working focal length of the attached lens by 1 53x to produce the equivalent 35 mm focal length For example if you use a 50 mm lens with this camera the effective focal length would be 50 1 53 76 5 mm The focal length conversion table on the rear panel of the camera shows equivalent 35 mm focal lengths of the lenses attached to the camera DUMMY ...

Страница 18: ... for each picture taken For instructions see Setting the Time and Date on page 39 cCaution Never turn off the power while the memory card access light is on This may cause data in the card to be lost or damaged or render the memory card unusable Cocking the Shutter Before taking each picture push the shutter charge lever as far as it will go to the right to cook the shutter The shutter charge leve...

Страница 19: ...he size of the image as it will be displayed on a computer screen and the file size of image stored in a memory card Select the image quality according to how you plan to use the image data Image Format Images can be saved in either RAW or JPEG format To open or process RAW images you need to install the software on the CD ROM that came with your camera Because they are uncompressed RAW images tak...

Страница 20: ... select the desired image quality setting on the status gauge 13 MB if RAW JPEG is selected in the RAW Setting See page 34 for more information 3 Release the image quality WB lever Setting ISO Sensitivity The ISO sensitivity setting determines the camera s sensitivity to available light As ISO sensitivity is increased less light is required to expose an image which permits faster shutter speeds Th...

Страница 21: ... simply want to take point and shoot snapshots The AE feature works sufficiently most of the time but under certain conditions you can also apply exposure compensation within the range of 2 EV to 2 EV in 1 3 EV increments You may for example increase the compensation value by one notch 1 3 EV to overexpose a subject standing in a bright background Likewise if your subject is too bright for the bac...

Страница 22: ...ash unit when shooting pictures under low light conditions The syncro speed of the flash is 1 125 second Set the shutter speed dial to 125 when using a flash For more information see the documentation included with your flash Setting the Aperture Rotate the lens aperture ring to the desired value For more information see the documentation included with your lens Using the Light Meter The camera ha...

Страница 23: ...E is selected the metered shutter speed is lit If you are using exposure compensation the shutter speed flashes to indicate that it is a compensated value Locking the Exposure Setting AE lock You can lock the exposure setting at the metered value using the AE lock button This is useful for example when you create a single panoramic picture from a series of images to make sure they all have the sam...

Страница 24: ...focus ring until the lines merge into a single continuous line This usually produces sharper images as straight lines are easier to focus on Releasing the Shutter When you are ready to shoot gently press the shutter release button You should hear a clacking sound that indicates the shutter release Note If you set NR Noise Reduction to Hi High in the Film Setting screen and set the exposure at more...

Страница 25: ...or 1 Pull open the rear panel using the notch at the bottom 2 Gently rotate the panel clockwise until the LCD monitor faces outward 3 Push the panel back into place cCaution Do not pick up or handle the camera by the rear panel Do not operate the camera while the rear panel is left open DUMMY Notch DUMMY DUMMY ...

Страница 26: ...nvert the LCD monitor Image display Monitor Icons The icons displayed at the bottom of the LCD monitor indicate the following functions or operations Icon Description Indicates you can select the menu option by rotating the jog dial upper position clockwise or counterclockwise Indicates you can scroll the image horizontally by rotating the jog dial upper position Displayed only for the Magnify fea...

Страница 27: ...ps to see more photo information 1 Display an image on the LCD monitor 2 Pull up the jog dial to the upper position then rotate it to display the desired set of information about the image The following sets of information are available General information Exposure histogram Highlight Composition grid Detailed information Indicates you can magnify or shrink the image by rotating the jog dial lower...

Страница 28: ...ties of shadow and highlight areas occupied in the image Highlight Outlines and flashes highlight areas Composition Grid Shows the grid to aid composition File sequence number Image quality Indicates this image is locked Number of prints if DPOF is set Date and time this image was taken ...

Страница 29: ...ge displayed on the LCD monitor up to 16x 1 Display an image on the LCD monitor 2 Press the MENU button 3 Select Magnify using the jog dial then press the ENTER button The Magnify mode icon is displayed at the top left corner of the screen 4 Rotate the jog dial lower position to enlarge or reduce the image 5 To view different areas of the image rotate the jog dial upper position and press the ENTE...

Страница 30: ...press the ENTER button To restart press the ENTER button again To return to the Main menu press the CANCEL button Managing Images Deleting Images In playback mode you can delete the currently displayed image or all the images saved on the memory card 1 Display an image on the LCD monitor 2 Press the MENU button 3 Select Delete using the jog dial then press the ENTER button 4 Select Delete 1 image ...

Страница 31: ...ess the ENTER button You see the Lock menu 4 Select Lock Unlock 1 image Lock all images or Unlock all images using the jog dial upper position then press the ENTER button When the image is locked the lock icon is displayed at the top right of the image If you select Lock Unlock 1 image you can select an image you want to lock by rotating the jog dial lower position If you select Lock Unlock 1 imag...

Страница 32: ...r the displayed image or Set DPOF for all for all the images using the jog dial upper position then press the ENTER button Note To select another image rotate the jog dial in the lower position To view the current DPOF setting select View current DPOF 5 Specify the number of prints using the jog dial then press the ENTER button ...

Страница 33: ...jog dial then press the ENTER button Setting Items Settings Menu Setting Description Color Setting Selects whether to save images in Color or Monochrome For Monochrome you can select the Monochrome Filter by pressing the MENU button Basic Setup Displays the Basic Setup menu See Basic Setup Menu on page 34 Format SD Card Formats the memory card You can select Quick Format or Full Format See Formatt...

Страница 34: ...dscape and Film3 for night pictures Use Standard if no particular profile is required Setting Description Setting Description Time and Date Sets the current date and time year month day hours and minutes See Setting the Time and Date on page 39 Date Format Selects date display format from the following YYYY MM DD default setting MM DD YYYY DD MM YYYY Power Save Timer Selects the length of time bef...

Страница 35: ...e the battery has enough power left when using this feature You cannot execute this function with a near empty battery Quick View Displays the image on the LCD monitor i e enters the playback mode automatically when you release the shutter You can select the time period during which each image is displayed on the LCD monitor 3 sec or 10 sec Quick view is canceled and the LCD monitor is turned off ...

Страница 36: ...dows OS Microsoft Windows 98 Second Edition Me 2000 Professional XP Home Edition XP Professional Hardware PentiumIII1GHzorfaster Pentium42GHz or faster is recommended Memory 256 MB or more 1 GB or more is recommended Hard Disk 10 MB or more is required for installation 500 MB or more is required for operation Display XGA 1024 768 or higher 24 bit color or higher Macintosh OS Mac OS 10 2 or later H...

Страница 37: ...lick Uninstall EPSON RAW Plug In 1 Insert the software CD ROM into the CD ROM drive Windows The EPSON Installer Program dialog box appears automatically Note If it does not appear click the CD ROM icon and then select Open from the File menu Then double click EPSETUP EXE Macintosh Double click Install EPSON RAW Plug In icon inside the EPSON folder 2 Follow the on screen instructions until the soft...

Страница 38: ...AW Plug In For Windows 1 Start Adobe Photoshop 2 Click File and point to Open The Open dialog box is displayed 3 Select the desired RAW file then click the Open button For Macintosh Start Adobe Photoshop and open the RAW file you want to process The main window for EPSON RAW Plug In is displayed Note IftheEPSONRAWPlug Indoesnotstartautomaticallyevenif you select a RAW file select Open from the Fil...

Страница 39: ...e ENTER button 3 Use the following to set the time and or date Note If you remove the battery from the camera the date and time settings will be lost after approximately two days Jog dial Changes the value ENTER button Moves the cursor forward Pressing this button on the minutes slot applies the change and returns to the previous menu CANCEL button Moves the cursor backward Pressing this button on...

Страница 40: ... card when you want to erase all the data on the card or if the memory card has been formatted with a computer or another digital camera and you cannot save any images on the card Follow these steps 1 Press LCD then MENU to display the Main menu on the LCD monitor 2 Select Settings then Format SD Card using the jog dial then press ENTER 3 Select Quick Format or Full Format using the jog dial then ...

Страница 41: ... the pictures you take there may be dust particles on the CCD image sensor inside the camera To clean the CCD sensor you need a hand blower and a cable shutter release with a shutter lock feature cCaution Do not use blower cans that use compressed air Do not touch the sensor with your finger or a cloth Doing so may damage the sensor and may affect image quality Do not let the blower tip enter the ...

Страница 42: ...the card from the camera release the write protect switch from the lock position and try again Cannot lock The SD card is write protected The memory card is write protected Remove it from the camera release the write protect switch from the lock position and try again Cannot unlock The SD card is write protected Remove the card from the camera release the write protect switch from the lock positio...

Страница 43: ...ables Epson s Technical Support Web Site provides help with problems that cannot be solved using the troubleshooting information in your printer documentation For Users in Singapore Sources of information support and services available from Epson Singapore are World Wide Web http www epson com sg Information on product specifications drivers for download Frequently Asked Questions FAQ Sales Enquir...

Страница 44: ...cal Support Hotline You can also contact our technical staff at the following telephone and fax numbers Phone 852 2827 8911 Fax 852 2827 4383 For Users in Korea If you need help with your digital camera contact the shop where you purchased it ...

Страница 45: ...ngeable rangefinder digital camera Dimensions Height 88 5 mm 3 54 in Width 142 mm 5 68 in Depth 39 5 mm 1 58 in Weight Approx 560 g 1 2 lb Temperature Operating 5 to 35 C Storage 20 to 60 C Humidity without condensation Operating 30 to 80 Storage 10 to 80 External interfaces Memory card slot for SD memory card up to 2 GB X sync contact for external flash unit Recording format RAW JPEG File type Ex...

Страница 46: ...sation Frame coverage 85 at 3 m Shutter Electronically controlled vertically traveling focal plane shutter Shutter speed 1 2000 1 sec bulb Flash Synchronous 1 125 sec or slower Supported only in synchronized shooting Metering TTL screen surface direct actual aperture center weighted averaged metering Exposure control Automatic exposure AE with aperture priority and AE lock manual Exposure compensa...

Страница 47: ...g this procedure while the flash is off a shutter speed of 1 250 ISO of 200 image quality of N JPEG 2240 1488 pixels and WB on Sunny Shooting conditions 2 Turning on the camera and waiting 30 seconds before taking the first picture then taking nine more pictures at 30 second intervals before turning off the camera and removing the battery for 10 minutes and repeating this procedure while using the...

Страница 48: ...er 8 I icons 26 image quality 9 10 installing software 37 ISO sensitivity dial 8 J Jog dial 8 L LCD monitor 10 25 lens incompatible lens 15 mounting L mount lens 16 mounting M mount lens 15 release button 7 removing M mount lens 16 M memory card access light 9 formatting 40 inserting 14 removing 14 slot 9 slot cover 9 write protecting 14 40 O option flash 22 optional accessory 47 P power on off 18...

Отзывы: