background image

24

Turning the Watch On or Off

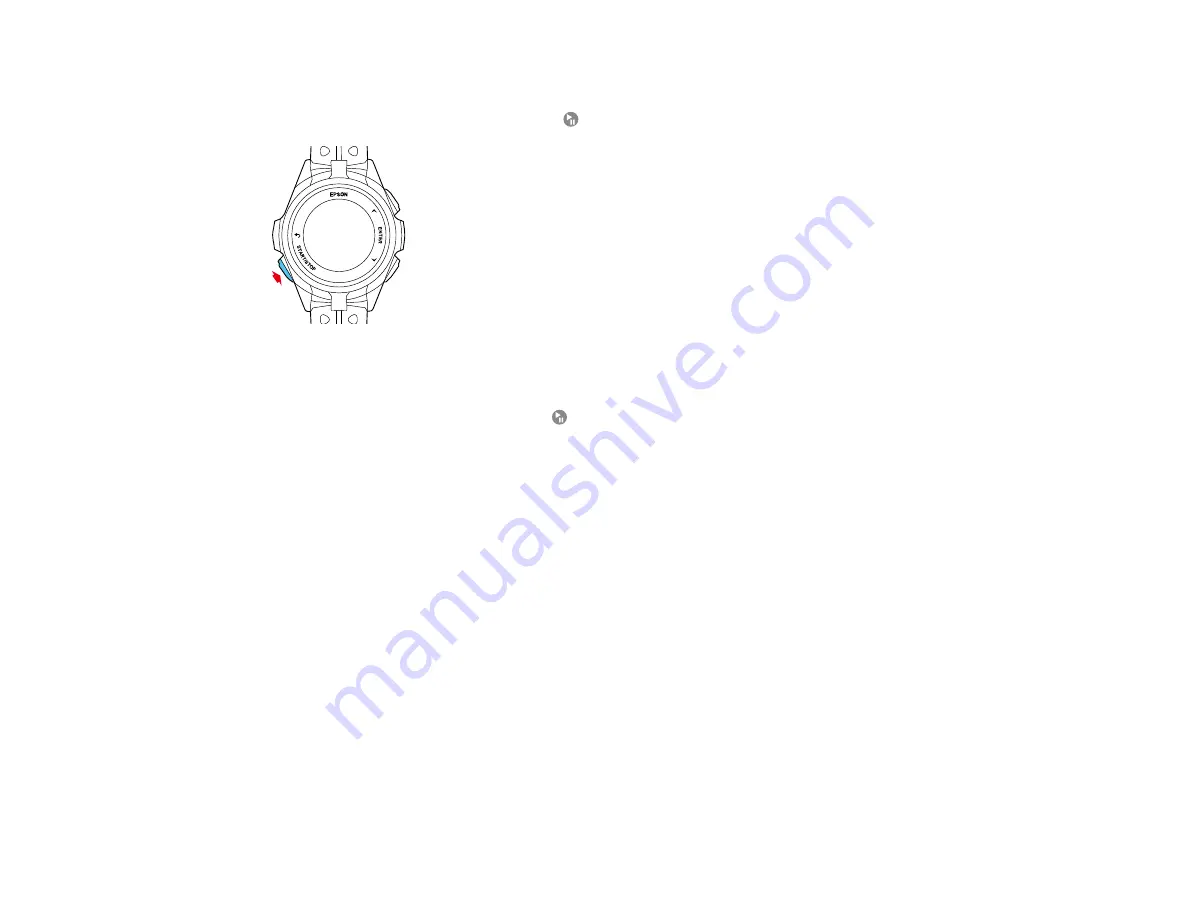
To turn on the watch, press and hold the

Start/Stop button for at least 2 seconds.

The watch also turns on automatically when you connect the USB charging clip connected to a power
source.

At the Time screen, press and hold the

Start/Stop button for at least 2 seconds and select

Yes

to turn

it off.

Parent topic:

Setting Up the Product

Configuring Your Watch

Before using your watch, you need to configure it for use by selecting basic settings. Follow the
instructions in these sections to configure your watch.

Configuring the Watch Using the Buttons
Configuring the Watch Using a Smartphone

Parent topic:

Setting Up the Product

Configuring the Watch Using the Buttons

You can configure your watch using the watch buttons.

Note:

You can change these settings after you complete initial setup from the

Settings

menu on the

My

Watch

screen in the Epson View app. For more information on using the Epson View app, see the

online

help

.

Содержание ProSense 307

Страница 1: ...ProSense 307 347 367 User s Guide ...

Страница 2: ......

Страница 3: ...4 Configuring the Watch Using the Buttons 24 Configuring the Watch Using a Smartphone 26 Acquiring a GPS Signal 28 Connecting the Device to a Smartphone Using Bluetooth 29 Measuring Your Heart Rate 30 Calculating Your Stride Length 32 Enabling Smartphone Notifications 32 Adjusting the Device Display 34 Adjusting the Watch Face and Background Settings 34 Adjusting the Backlight Settings 35 Adjustin...

Страница 4: ...iewing Workout Data 52 Viewing Workout Data History on Your Watch 52 Measuring and Reviewing Daily Activities 54 Activity Measurement and Data Collection 54 Starting Activity Measurement 54 Activity Data Displayed on Your Device 55 Activities Available for Each Heart Rate Mode 58 Configuring a Target Number of Steps 58 Configuring a Target Number of Calories to Burn 60 Reviewing Activity Data on Y...

Страница 5: ...ng the Firmware Version of Your Watch 72 Updating Your Watch s Firmware from the Epson View App 73 Updating Your Watch s Firmware from Your Computer 75 Where to Get Help 75 Technical Specifications 77 Device Specifications 77 Optional Accessory Specifications 79 Viewing Safety and Approval Specifications 79 Notices 81 Notes on Electromagnetic Waves 81 Copyright Notice 83 Binding Arbitration and Cl...

Страница 6: ......

Страница 7: ... s Guide Welcome to the ProSense 307 347 367 User s Guide If you prefer a User s Guide in a different file format go to epson com support U S or epson ca support Canada select your product and select the Manuals and Warranty tab ...

Страница 8: ...tation Product Buttons Screen Icons Heart Rate Zone Icons Smartphone Notification Icons Product Box Contents Save all the packaging in case you need to ship your product Always use the original packaging or equivalent when shipping Make sure your product box included all of these parts 1 ProSense 307 ProSense 347 or ProSense 367 watch 2 USB charging clip Parent topic Introduction to Your Product ...

Страница 9: ...del WPCLP01 part number E12E220202 Parent topic Introduction to Your Product Notations Used in the Documentation Follow the guidelines in these notations as you read your documentation Warnings must be followed carefully to avoid bodily injury Cautions must be observed to avoid damage to your equipment Notes contain important information about your product Parent topic Introduction to Your Product...

Страница 10: ...the current option Hold for 2 seconds to lock or unlock the product buttons On the Time screen press to display the Activity screen On the Measurement and Activity screens press to switch between available information screens 4 Enter button Press to select the highlighted option On the Time screen press to display the Menu screen On the Measurement screen press to record laps On the Activity scree...

Страница 11: ...en Icons The icons in the table here may appear on your device display screen Icon Description Run mode Walk mode Bike mode Treadmill mode Pool swimming mode Open water swimming mode Triathlon mode Indoor running mode Indoor biking mode Other outdoor activity mode Other indoor activity mode Stopwatch mode GPS connected watch is locating a GPS signal when the icon is flashing Searching for Bluetoot...

Страница 12: ...ate Laps Pace Pause Cadence Stride Time Sprint interval Rest interval Distance difference Time difference Triathlon transition Swim stroke rate Swim stroke time Swim stroke count Swim turns laps Swim SWOLF score lap time lap stroke count Start resume measurement Measurement failed ...

Страница 13: ... Verification Facebook or other social media notification Email notification Phone notification Calendar notification Alarm Battery level Low battery warning Charging error Buttons locked Buttons unlocked Parent topic Introduction to Your Product Heart Rate Zone Icons The icons in the table may appear on your watch screen when monitoring your heart rate during a workout ...

Страница 14: ...ensity such as walking quickly or jogging Heart Rate Zone 3 Endurance exercise intensity such as low intensity running Heart Rate Zone 4 Strengthening exercise intensity such as moderate intensity running Heart Rate Zone 5 Highest exercise intensity such as high intensity running or sprinting Parent topic Introduction to Your Product ...

Страница 15: ...is set to another language or the contact isn t saved the caller s phone number is displayed Mail Your watch displays the first 10 characters of the sender s email address and subject Text Your watch displays the first 10 characters of the sender s text message Schedule Displays a scheduled event if your watch is set up to trigger a schedule notification Facebook Your watch displays the first 10 c...

Страница 16: ...he Sound and Vibration Settings Locking and Unlocking the Watch Buttons Charging the Watch Before using your watch you need to charge its battery using the USB charging clip and either the optional AC adapter or a computer with a USB port capable of charging external devices It takes approximately 2 5 to 3 5 hours to fully charge your watch depending on your charging method Charge your watch in an...

Страница 17: ...ach the USB charging clip to your watch if either the clip or your watch are wet or dirty This may cause corrosion communication failures or other problems 2 Connect the USB charging clip to one of the following devices AC adapter Connect the USB charging clip to the USB port on the optional AC adapter and plug the AC adapter into an electrical outlet ...

Страница 18: ...ng external devices Note USB charging from a computer port may not work with all computers Do not connect the USB charging clip to a USB hub or other intermediate device Charging begins and you see a screen displaying the battery level on your watch If you connected your watch to a computer where you have already installed the Epson View Uploader software the software starts automatically on your ...

Страница 19: ...urately display the remaining level of power in the battery Note If you continue to charge the watch after the battery level reaches 100 the watch engages an overcharge prevention feature to protect your watch 4 Disconnect the USB cable from the AC adapter or your computer and unplug the AC adapter if you used it If this is the first time you have charged your watch you see the Language screen 5 P...

Страница 20: ...s Battery Life Related references Solutions to Watch Charging Problems Related topics Configuring Your Watch Battery Level Display The battery icon on your device screen displays the remaining level of power in the battery When the battery is low you see this screen Press any button to return to the Time screen When the battery is too low the screen may go blank ...

Страница 21: ...s here Note The Light setting is Off in all of the estimates shown Continuous workout time left approximate Battery icon Operating time Settings used ProSense 307 8 to 16 hours ProSense 347 367 18 to 36 hours Update Frequency Per Second Meas HR setting On ProSense 307 10 to 20 hours ProSense 347 367 21 to 42 hours Update Frequency Per Second or Wrist turn Meas HR setting On or Off ProSense 307 12 ...

Страница 22: ...tting On or Off ProSense 307 5 to 12 hours ProSense 347 367 10 to 25 hours Update Frequency Wrist turn Meas HR setting Off ProSense 307 1 5 to 3 hours ProSense 347 367 3 5 to 7 hours Update Frequency Per Second Meas HR setting On ProSense 307 2 to 4 hours ProSense 347 367 4 to 8 hours Update Frequency Per Second or Wrist turn Meas HR setting On or Off ProSense 307 2 5 to 5 hours ProSense 347 367 5...

Страница 23: ...nse 347 367 0 to 5 hours Update Frequency Wrist turn Meas HR setting Off Continuous time display left approximate Setting 30 days 7 days 5 days Daily Activity Tracking Off On Meas HR setting Auto On Meas HR setting Continuous Auto Sleep Mode On On On Auto Search Off Off Off Bluetooth Off On On Note Operation time also varies depending on the operating environment s effects on GPS reception Parent ...

Страница 24: ...Your Watch Before using your watch you need to configure it for use by selecting basic settings Follow the instructions in these sections to configure your watch Configuring the Watch Using the Buttons Configuring the Watch Using a Smartphone Parent topic Setting Up the Product Configuring the Watch Using the Buttons You can configure your watch using the watch buttons Note You can change these se...

Страница 25: ...light the options you want for the following settings and press the Enter button to select them Height Weight Gender Current date DST Daylight Savings Time Time Zone Current time Note If you need to edit any selected settings press the Back button 4 When you see this screen you can select to set the current time automatically or manually Select Set by GPS to set the time automatically ...

Страница 26: ...ettings select Completed You see the Time screen Parent topic Configuring Your Watch Related references Time Screen Menus Configuring the Watch Using a Smartphone You can configure your watch using the Epson View app on your smartphone 1 After charging your watch or resetting it you see the Language screen Select your language and press the Enter button ...

Страница 27: ...creen instructions to create an account Log in to your existing Epson View account You see the Initial Settings screen on your smartphone 5 Select your watch model from the list on your smartphone 6 Follow the on screen instructions to pair your watch and your smartphone 7 Follow the on screen instructions to configure these settings Height Weight Gender Current date Current time When you finish s...

Страница 28: ...pp on your smartphone If you keep your watch connected to your smartphone your watch automatically downloads GPS updates once an hour When positioning yourself to acquire a GPS signal avoid the following environments Inside buildings or rooms or underground areas or tunnels Near high voltage wires television towers tall buildings tall trees or overhead electrical wires for trains or buses Location...

Страница 29: ...your smartphone The Epson View app will pair your smartphone with your watch 1 At the Time screen press the Enter button You see a screen like this 2 Select Bluetooth 3 Select Pairing Your device displays a code number you will use for pairing 4 Start the Epson View app on your smartphone and select Pairing Note the code that appears on your watch 5 Select your product from the list on your smartp...

Страница 30: ... Forget Device Parent topic Setting Up the Product Related references Time Screen Menus Measuring Your Heart Rate Your watch includes a sensor on the back to detect your heart rate Caution The sensor light causes no adverse effects on your skin but you should not look directly at the light Wear the product snugly around your wrist as shown Tighten the watch if your heart rate is not measured corre...

Страница 31: ... the watch has detected your heart rate it displays your heart rate heart rate zone and the HR icon on the Time screen Note When using your watch in Pool Swim or Open Water mode it does not display your heart rate in real time You can also press the Up button to display the Heart Rate screen ...

Страница 32: ...ace data in locations with poor GPS signal reception such as indoors or in tunnels The first time you use your watch run or walk outdoors in an open area for approximately 10 minutes You can also run or walk between tall buildings or trees for at least 30 minutes This allows your watch to learn your normal stride length You should only need to perform this step once Note Do not cross your arms or ...

Страница 33: ...te On Android you need to select See here for access to notifications and allow Epson View access to your smartphone s notification data Make sure you return to the Epson View app after you change your Android system settings 6 Select any additional notifications settings in the Epson View app as necessary 7 Return to the Settings screen ...

Страница 34: ...ct Related references Time Screen Menus Adjusting the Watch Face and Background Settings You can adjust the device screen to display one of a variety of digital or analog watch faces You can also select the color of the screen background 1 At the Time screen press the Enter button 2 Select Settings You see a screen like this 3 Select Display 4 Select Watch Face 5 Select one of the available watch ...

Страница 35: ...ight turns on whenever you press a device button Default setting is on Workout Backlight turns on for the duration of your workout when you select All Time Default setting is off Note Using backlight reduces your maximum workout time by approximately 2 hours When set to off backlight may come on during workouts if you turned on backlight for other activities Backlight turns off momentarily during ...

Страница 36: ...el vibrations Sound to hear only tones Vib to feel only vibrations 1 At the Time screen press the Enter button 2 Select Settings You see a screen like this 3 Select Tones Vib 4 If you turned on the Alarm feature select Alarm to choose how you want the alarm to notify you 5 If you want to be notified by sound or vibration for any of the following events select Notifications and choose how you want ...

Страница 37: ... mode 7 If you want to turn off the tones emitted by the device when you press the device buttons select Button Tones and select off default setting is off Parent topic Setting Up the Product Locking and Unlocking the Watch Buttons You can lock the buttons on your watch to prevent it from responding if you press the buttons accidentally Press and hold the Up button for at least 2 seconds The lock ...

Страница 38: ...le Workout Measurements Starting Workout Measurement Stopping Workout Measurement and Saving the Data Recording Laps Pausing and Resuming Workout Measurement Changing Workout Type During Triathlon Measurement Monitoring Current Workout Data Customizing Workout Measurements with Epson View Estimating VO2 Max Parent topic Measuring and Reviewing Workouts Displayable Workout Measurements You can disp...

Страница 39: ...urement Maximum heart rate from the start of measurement Current stride Total distance from start of lap measurement Total time from start of lap measurement Current pace in time per mile kilometer Current target time displayed only when the Training setting is set to Target Time Estimated distance completed at the end of the configured time displayed only when the Training setting is set to Targe...

Страница 40: ...displayed only when the Training setting is set to Target Speed Swim and Open Water Mode Workout Information Modes Description Total distance from the start of measurement Total time from start of measurement Current time Current heart rate per minute Total time from start of lap measurement Total distance from start of lap measurement Current pace for 100 yards or 100 meters Target time selected ...

Страница 41: ...uts Related tasks Customizing Workout Measurements with Epson View Monitoring Current Workout Data Related topics Reviewing Workout Data Starting Workout Measurement Before using your watch to measure a workout you need to select a workout mode and locate the watch s GPS signal 1 At the Time screen press the Down button You see the Activity selection screen 2 Press the Up or Down button to select ...

Страница 42: ... the Measurement screen when it is finished except in Treadmill Pool Swim or Indoor Bike mode Note If you must start a workout before GPS location is complete press the Start Stop button Your watch continues locating and begins measuring your workout with the built in stride sensor The watch will not record some measurements that require GPS signals such as your workout route until GPS location is...

Страница 43: ...nd Saving the Data Pausing and Resuming Workout Measurement Monitoring Current Workout Data Customizing Workout Measurements with Epson View Related topics Recording Laps Reviewing Workout Data Stopping Workout Measurement and Saving the Data You can save up to 248 sessions of workout data Note You can save up to 99 hours for each lap If you exceed this time workout measurement stops 1 At the Meas...

Страница 44: ...ilable screen of workout data 5 Press the Enter button to return to the Time screen Note If you want to clear the current workout data when viewing the Stop screen select Delete Yes Parent topic Measuring Workouts Related tasks Starting Workout Measurement Pausing and Resuming Workout Measurement Related topics Reviewing Workout Data Recording Laps Follow the instructions in these sections to meas...

Страница 45: ...Run Walk or Bike mode either automatically or manually At the Measurement screen press the Enter button to begin recording a lap manually To record laps automatically select AT Lap from the Settings screen and select a time or distance at which to begin recording laps When your workout reaches that time or distance your device automatically begins recording laps When your device records a lap it d...

Страница 46: ...When your workout reaches that time or distance your device automatically begins recording laps If you need to rest during a lap simply stand in the pool to automatically switch to resting mode then either just resume swimming or press the Enter button When your device records a lap it displays the Lap screen for a few seconds Note The device may not record the lap correctly if you turn with a wea...

Страница 47: ...ing Laps Pausing and Resuming Workout Measurement During your workout you can start pause and resume workout measurements as necessary At the Measurement screen press the Start Stop button to pause workout measurement Press the Start Stop button again within 3 seconds to resume workout measurement ...

Страница 48: ...uring a workout in Triathlon mode you can switch the workout mode or start transition timing as you reach those stages in triathlon activities Note You can select your workout mode order and choose whether or not to measure triathlon time in the Epson View app At the Measurement screen hold down the Enter button to change the workout mode or transition Hold down the Enter button again to scroll th...

Страница 49: ...orkout measurement settings to suit your preferences Note For information on using the Epson View app see the online help Parent topic Measuring Workouts Estimating VO2 Max Your watch calculates the estimated maximum quantity of oxygen that your body can process called VO2 max This estimate can be an indicator of your fitness level and should increase with improved athletic performance Your watch ...

Страница 50: ...rate dropped too low for estimation Parent topic Measuring Workouts Related references Measurement Screen Menus Related tasks Measuring Your Heart Rate Controlling Music Playback You can play audio on your smartphone and control it with your watch via a Bluetooth connection Note On Android you need to leave the Epson View app running in the background on your smartphone to use the audio playback c...

Страница 51: ...n to the Time screen press and hold the Back button for at least 2 seconds Parent topic Measuring and Reviewing Workouts Using the Stopwatch You can use the stopwatch on your watch to measure time without saving any of the information as workout data 1 At the Time screen press the Down button 2 Press the Down button to highlight Stopwatch and press the Enter button 3 Press the Start Stop button Yo...

Страница 52: ...utton Parent topic Measuring and Reviewing Workouts Reviewing Workout Data Follow the instructions in these sections to review the workout data you have collected with your watch Viewing Workout Data History on Your Watch Parent topic Measuring and Reviewing Workouts Viewing Workout Data History on Your Watch You can view the history of your workout data on your watch and delete it as necessary 1 ...

Страница 53: ...s Note If you want to delete the currently displayed workout data from your watch press the Enter button select Delete and press the Enter button 5 When you finish viewing your workout data history press and hold the Back button for at least 2 seconds to return to the Time screen Note You can also view workout history data in the Epson View app For information see the online help Parent topic Revi...

Страница 54: ...ds activity data that you can then view on your watch or view using the Epson View app on your smartphone You can view activity data for the current day or a 7 day activity chart for the previous week Note Daily activity data starts at 12 01 AM each day You can also set a target number of steps and calories to burn and check your progress toward reaching the target on your watch Parent topic Measu...

Страница 55: ...very second during an activity 4 Press and hold the Back button for at least 2 seconds to return to the Time screen Activity Data Displayed on Your Device Activities Available for Each Heart Rate Mode Parent topic Measuring and Reviewing Daily Activities Activity Data Displayed on Your Device You can view the following activity data screens on your device Screen Data displayed Summary 1 Current he...

Страница 56: ...ogress toward target number of steps 2 Current number of steps 3 Estimated distance Calories burned 1 Progress toward target number of calories 2 Current calories burned Exercise 1 Current exercise time Exercise time is calculated by your device from time spent engaging in any activity ...

Страница 57: ... time 1 Estimated recovery time if less than 1 hour zero is displayed VO2max 1 Estimated VO2 max value 2 Estimated race time based on VO2 max value Automatically calculated from heart rate and activity data Note the following about sleep time calculations The device does not include naps or sleep times shorter than 1 hour as sleep time The device only calculates sleep time during the time period y...

Страница 58: ...red Heart rate measurement Every second Energy saving rate measures every second when active or for 2 minutes of every 10 minute period when inactive Maximum heart rate activity measurement 5 days 7 days Parent topic Starting Activity Measurement Configuring a Target Number of Steps You can configure a target number of steps you want to reach in a day and check your progress in reaching that targe...

Страница 59: ...rget You see this screen 3 Press the Up or Down button to select the number of steps you want to target and press the Enter button You see the Activity screen 4 Press and hold the Back button for at least 2 seconds to return to the Time screen Parent topic Measuring and Reviewing Daily Activities ...

Страница 60: ... Parent topic Measuring and Reviewing Daily Activities Reviewing Activity Data on Your Watch You can view the activity data you have collected on your watch while your activity is in progress or view a 7 day activity chart for the previous week 1 At the Time screen press the Up button You see a screen like this showing data for your current activity 2 To view a 7 day activity chart for the previou...

Страница 61: ...a Target Number of Steps Configuring a Target Number of Calories to Burn Reviewing Activity Data Using the Epson View App Reviewing Activity Data Using the Epson View App You can review the activity data you have collected using the Epson View app on your smartphone You can view activity data while your activity is in progress or view a 7 day activity chart for the previous week Note For informati...

Страница 62: ...t Screen Menus Time Screen Menus You can select these settings by pressing Enter the button on the Time screen Menu Settings Options Description Bluetooth On Off Turns Bluetooth on or off to connect with your smartphone Pairing Puts watch into pairing mode Forget Device Ends the Bluetooth connection with your smartphone ...

Страница 63: ...isplays general device information Set time sets the time manually or automatically using synchronization Reset resets all device settings to their defaults resets the stride sensor and deletes all workout and activity data Ver Info displays the device s firmware version information Alarm On Off Edit Enables disables wake up alarms and lets you configure alarm times History Displays workout histor...

Страница 64: ... you can use the Epson View app to configure training targets Target Time Target Dist Target HR Target Pace Target Speed Bike mode only Interval Race Metronome Sets your device to emit rhythmic sounds to assist in pacing your workout Meas HR Turns heart rate measuring on or off turn off heart rate measuring when you are not using the heart rate information to conserve battery life Waypoint Registe...

Страница 65: ...cond Pool length Sets the length of the pool between 20 to 150 yards meters AT Rest Automatically detects a rest during swimming and when you resume swimming so you do not have to manually pause swim workout measurement Stroke style Automatically detects the swim stroke you are using or lets you set the swim stroke manually Auto Manual The following stroke styles are available when you select Manu...

Страница 66: ...arging clip Caution During cleaning do not press on the glass or buttons too hard to avoid damaging them and causing the watch to malfunction Do not use benzine thinner alcohol harsh detergent or any other organic solvent or you may damage your product 1 After each use clean your watch by wiping it gently with water and drying it completely using a dry cloth You can also clean the watch band with ...

Страница 67: ... corrode and cause communication failures or watch malfunctions Parent topic Caring for Your Watch Battery Life The built in rechargeable battery in your watch has an average service life of four years depending on usage conditions The battery is not user replaceable If the battery does not retain a charge as long as it used to it has likely reached the end of its service life Contact Epson Suppor...

Страница 68: ...experience problems with your watch screen try the following solutions If the screen is blank the battery may be running low or exhausted or you may not have charged the battery yet Charge the battery before using your watch and whenever the battery runs low If the screen turns blue or turns off while you are using your watch try restarting your watch If the screen does not change when you press a...

Страница 69: ...reen to appear Make sure you are using a compatible USB charger or USB port If you still cannot charge your watch s battery detach the USB charging clip and contact Epson Support for help If the watch and the USB charging clip become hot during charging stop charging the watch detach the USB charging clip and contact Epson Support for help If you see an error screen indicating a charging error sto...

Страница 70: ...ake sure there are no overhead obstructions stand still and try acquiring a GPS signal again The GPS signal may be interrupted by tall buildings tall trees or mountainsides so try to move into as open an area as possible Make sure your watch is paired with your smartphone Your watch will automatically download your GPS location information from your smartphone If you still cannot acquire a signal ...

Страница 71: ...gain If your computer does not recognize your watch check the USB connection Also clean the contact points on the watch and the USB charging clip then try restarting your watch If you still have problems using Epson View app or the Epson View Uploader see the online help Parent topic Solving Problems Using Epson View Related tasks Cleaning Your Watch Charging the Watch Restarting the Watch If you ...

Страница 72: ...n View app before resetting your watch 1 Press the Enter button You see a screen like this 2 Press the Up or Down button to select Settings System Reset Yes Your watch resets When it is finished it restarts and displays the Language screen 3 Now you can configure your watch again Parent topic Solving Problems Related references Time Screen Menus Checking the Firmware Version of Your Watch You can ...

Страница 73: ...rent topic Solving Problems Related references Time Screen Menus Updating Your Watch s Firmware from the Epson View App If you experience problems with your watch you may need to update the firmware using the Epson View app Before updating the firmware you may also want to backup your workout and activity data to your smartphone using the Epson View app the firmware update may reset the data and s...

Страница 74: ... USB charging clip to the USB port on the optional AC adapter and plug the AC adapter into an electrical outlet Caution Only use the optional AC adapter that is compatible with your product to charge your watch or the watch may not charge or operate correctly Computer Connect the USB charging clip to a USB port on your computer that is capable of charging external devices ...

Страница 75: ...update may reset the data and settings stored in your watch s memory 1 To download the latest version of your watch s firmware visit epson com support U S or epson ca support Canada and select your product 2 Attach the USB charging clip to your watch and to the USB port on the computer on which you downloaded the watch firmware 3 Run the downloaded firmware file and follow the on screen instructio...

Страница 76: ...41 5789 or 562 276 4394 U S or 905 709 3839 Canada Support hours are 6 AM to 8 PM Pacific Time Monday through Friday and 7 AM to 4 PM Pacific Time Saturday Days and hours of support are subject to change without notice Toll or long distance charges may apply Before you call have the following information ready Product name Product serial number Proof of purchase such as a store receipt and date of...

Страница 77: ...nal Accessory Specifications Viewing Safety and Approval Specifications Device Specifications Device thickness ProSense 307 0 52 inch 13 4 mm ProSense 347 ProSense 367 0 62 inch 15 7 mm Weight ProSense 307 Approximately 1 8 ounces 51 g ProSense 347 Approximately 2 2 ounces 62 g ProSense 367 Approximately 2 3 ounces 64 g ...

Страница 78: ...ettings Operating time is significantly reduced when the GPS signal reception is poor such as indoors Settings that affect battery life include backlight settings Charging time Approximately 3 hours Charging method Rated voltage 5 V 5 Current 500mA 2 5 W USB port Water resistance ProSense 307 Up to 5 bars of pressure ProSense 347 ProSense 367 Up to 10 bars of pressure Communication Wireless Blueto...

Страница 79: ...inishing time 0 00 00 to 11 59 59 PM Estimated finishing distance 0 to 999 999 miles or km Parent topic Technical Specifications Optional Accessory Specifications USB Charging Clip Model number WPCLP01 part number E12E220202 Operating temperature 41 to 95 F 5 to 35 C AC Adapter Model number SFAC04 part number E12E204001 Input voltage 100 VAC 50 60 Hz Output frequency 5 VDC 1 0 A Parent topic Techn...

Страница 80: ...the Up or Down button to select Certification and press the Enter button You see your watch s certification information 3 Hold the Back button for at least 2 seconds to return to the Time screen Parent topic Technical Specifications ...

Страница 81: ...hnology This function enables wireless communication of measurement data between the device and the HR monitor or a smartphone This device has been classified as a low electronic data communication system based on Radio Law Therefore this device does not require a radio station license The following acts may be punishable by law Disassembling or remodeling the device Removing the verification or c...

Страница 82: ...y referring to Contacting us about this product to ask for advice on preventing interference such as setting up partitions 3 In addition when harmful radio wave interference occurs between the device and other radio stations and refer to Contacting us about this product to contact our service center Warning If you notice any skin irritation or other adverse reactions stop using the device immediat...

Страница 83: ...e that occurs from the use of any interface cables other than those designated as Epson approved Products by Seiko Epson Corporation This information is subject to change without notice Parent topic Notices Binding Arbitration and Class Waiver 1 DISPUTES BINDING INDIVIDUAL ARBITRATION AND WAIVER OF CLASS ACTIONS AND CLASS ARBITRATIONS 1 1 Disputes The terms of this Section 1 shall apply to all Dis...

Страница 84: ...ice Epson and you agree to act in good faith to resolve the Dispute before commencing arbitration 1 4 Small Claims Court Notwithstanding the foregoing you may bring an individual action in the small claims court of your state or municipality if the action is within that court s jurisdiction and is pending only in that court 1 5 WAIVER OF CLASS ACTIONS AND CLASS ARBITRATIONS YOU AND EPSON AGREE THA...

Страница 85: ...the amount of damages sought to be recovered You can find a copy of a Demand for Arbitration at http www jamsadr com Demand for Arbitration ii Send three copies of the Demand for Arbitration plus the appropriate filing fee to JAMS 500 North State College Blvd Suite 600 Orange CA 92868 U S A iii Send one copy of the Demand for Arbitration to the other party same address as the Dispute Notice or as ...

Страница 86: ...e notice prior to litigation 1 8 Amendments to Section 1 Notwithstanding any provision in this Agreement to the contrary you and Epson agree that if Epson makes any future amendments to the dispute resolution procedure and class action waiver provisions other than a change to Epson s address in this Agreement Epson will obtain your affirmative assent to the applicable amendment If you do not affir...

Страница 87: ...87 Parent topic Notices Copyright Attribution 2017 Epson America Inc 10 17 CPD 54160 Parent topic Notices ...

Отзывы: