background image

4109192 Rev.0


4109192 Rev.0


4109192 Rev.0

 4109192 

Rev.0

1-B C


1-B M


1-B Y

 1-B 

K

62

Aligning the Print Head

If you have moved PictureMate and print quality is not 
as good as it used to be—if your prints look fuzzy or 
have light or dark lines running through them—you 
may need to align the print head. 

1

Load paper in PictureMate so you can print the 
head alignment pattern.

2

Press 

Menu

.

3

Press

 u

 or 

d

 to highlight 

Maintenance

, then press 

OK

.

4

Press 

u

 or 

d

 to highlight 

Head Alignment

, then 

press 

OK

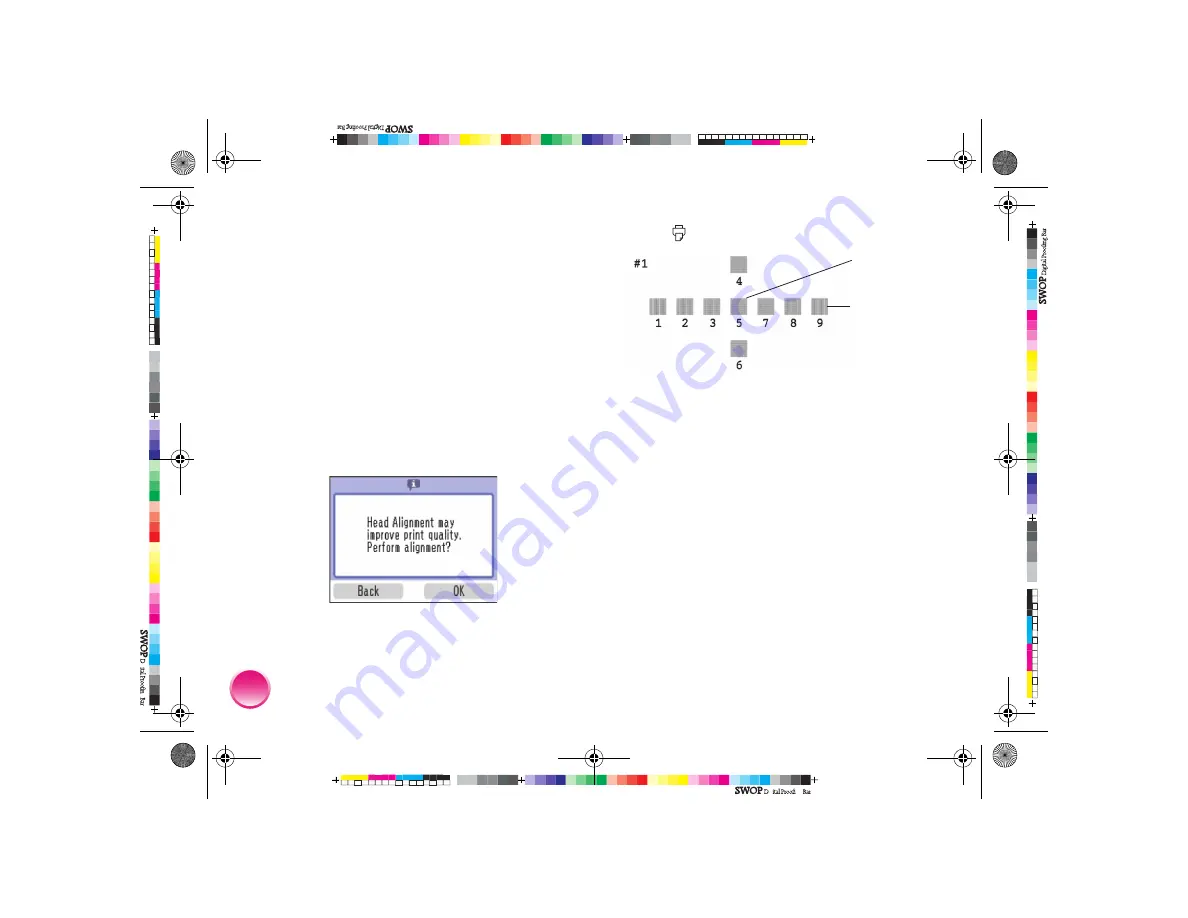
. You see a confirmation screen:

5

Press 

OK

 again to continue. 

6

Press 

Print

. The alignment pattern is printed:

7

Look at the printed squares to determine which 
one is the most even, with no streaks or white 
lines. (You may need to use a magnifying glass.) 

8

Press 

u

 or 

d

 to select the number for the best 

pattern (

1

 to 

9

) in set #1. Then press 

OK

.

9

Press 

u

 or 

d

 to highlight the number for the best 

pattern (

1

 to 

9

) in set #2. Then press 

OK

.

PictureMate aligns the print head and exits the 
Maintenance menu.

Note: 

The pattern you select becomes the middle 

pattern (#5) the next time you align the print head.

Best pattern

Misaligned 
pattern

PictureMate.book  Page 62  Thur sday, January 18, 2007  4:43 PM

Содержание PictureMate Flash PM 280

Страница 1: ...CPD 22154 Printed in XXXXXX XX XX XX XXX 410693500 410693500 Snap Print Enjoy Basics PM 280 personal photo lab PM 240 personal photo lab ...

Страница 2: ...e Photos and Print 8 Do More With Your Photos 15 Save Photos to a CD 25 Print From a Computer 27 Print From an External Device 42 Replace Print Pack 48 Take PictureMate With You 52 Set PictureMate Preferences 55 Printer Care and Troubleshooting 60 Notices 69 Index 79 PictureMate book Page 1 Thursday January 18 2007 4 43 PM ...

Страница 3: ... negatives Since you had negatives you could take them back later if you wanted reprints The digital process is simple too and it gives you complete control Just follow the basic steps shown on the right 1 Review and Delete After you finish taking your photos review them on your digital camera s screen Delete the photos you don t want 2 Print Insert your camera s memory card in PictureMate choose ...

Страница 4: ...rt the card into PictureMate it knows which photos you chose Just press Print See page 13 If you have a PictBridge or USB DP USB Direct Print enabled camera you can connect the camera to PictureMate and control printing right from your camera See page 42 You can add decorative frames including Disney character frames to your photos and see them on the PictureMate screen before you print See page 2...

Страница 5: ...e installed from the CD provides comprehensive information and instructions for using PictureMate Where to Get a Print Pack and Accessories The PictureMate 200 Series Print Pack has everything you need to print in one box photo paper and a photo cartridge You can buy a Print Pack wherever PictureMate is sold or from retailers that sell printer supplies The following Print Packs are available You c...

Страница 6: ...memory card see page 7 Note The illustrations in this manual show the PictureMate Snap but the instructions cover both PictureMate Snap and PictureMate Flash except where noted Loading Paper Caution Don t load plain paper this may damage PictureMate 1 Move the handle to the back 2 Open the paper support 3 Press the Open button to open the output tray Prepare to Print PictureMate book Page 5 Thursd...

Страница 7: ...eed more paper order a PictureMate 200 Series Print Pack See page 48 for more information Inserting Your Memory Card 1 Press the On button to turn on PictureMate 2 Press the Open button to open the output tray if necessary 3 Insert the memory card into the correct slot as shown on the next page Insert just one card at a time Note PictureMate can t read multiple cards at once 4 Push the card in car...

Страница 8: ...t of the slot Bottom slot Push in and release the card release button so it pops out Then push in the button again to eject your card and pull it straight out of the slot MicrodriveTM CompactFlash Type I and II SDTM Secure Digital and SDHCTM High Capacity miniSDTM and miniSDHC microSD and microSDHC MMCTM MultiMediaCardTM xD Picture CardTM xD Picture Card Type M and Type H Sony Memory Stick Memory ...

Страница 9: ...taken on specific dates see page 12 If your camera supports DPOF Digital Print Order Format you can use it to pre select the photos and copies you want to print PictureMate then prints the selected photos See page 13 To view a slideshow of your photos see page 13 To store and display your printed photos see page 14 Viewing Photos on PictureMate PictureMate s photo viewer screen makes it easy to se...

Страница 10: ... insert a card See page 55 Responding to a Blank Screen Power Saver If you are not using PictureMate the screen goes dark after about 13 minutes to save power Press any button to turn it back on Printing Individual Photos If you have many photos on your camera s memory card you can select just the ones you want to print 1 After inserting a card press l or r to view your photos 2 When you see a pho...

Страница 11: ...he Back button 6 Press Layout to select the layout of your photos on the paper See page 16 7 Make sure you have enough paper loaded then press Print to start printing Tip You can check the total number of prints at the top of the screen before printing Printing All Photos You can print all the photos on your camera s memory card and select the number of copies to print of each photo 1 After insert...

Страница 12: ...ss Print to start printing Note If your card has more than 20 photos you will need to reload paper while printing Load a maximum of 20 sheets at a time When you see a message that paper is out load more paper and press OK to continue printing If you need to cancel printing press Cancel Printing a Range of Photos You can choose a range or sequence of consecutive photos from your camera s memory car...

Страница 13: ...ou have a lot of photos on your memory card this makes it easier to find the ones you want 1 After inserting a card press Menu 2 Press u or d to highlight Select then press OK 3 Press u or d to highlight Select By Date then press OK You see a list of dates 4 Press u or d to highlight the date you want then press OK A checkmark appears in the box for the selected date You can select additional date...

Страница 14: ...he screen Press l or r to review your selected photos 2 Make sure you have enough paper loaded then press Print to print your pre selected photos Viewing a Slideshow of Your Photos You can have PictureMate display all the photos on your card one by one 1 After inserting a card press Menu 2 Press u or d to highlight Select then press OK 3 Press u or d to highlight Slideshow then press OK After a fe...

Страница 15: ...photos sit for 24 hours before framing After you print the colors on your photos will take some time to set as the ink dries During this time the colors may look different than you expect To reduce the drying time avoid stacking your photos on top of each other Displaying Your Photos To ensure photos will last as long as possible display them under glass or in photo albums Keep photos out of the s...

Страница 16: ...23 Rotate your photos on the screen see page 24 Note The features described in this section do not change or replace the original digital photo file they customize only the print s you make at that time Identifying Screen Icons When you make a change to your photos an icon appears on the screen next to your photo to indicate the change If necessary press Display to view one photo per screen and sh...

Страница 17: ... without borders If you want to print pictures with white borders or place several small photos on one sheet of paper you can use the Layout menu to change the layout Note The layout you choose is kept until you remove the memory card or cancel all settings To use the same layout whenever you print see page 58 1 After inserting a card press Menu 2 Press u or d to highlight Layout then press OK 3 P...

Страница 18: ...multiple copies or multiple photos For example if you want 3 mini wallet photos of one image and 4 of another select 3 copies of photo A and 4 copies of photo B Then choose Mini wallet as the layout setting Your photos will be printed on 2 sheets of paper as shown 5 Adjust any other settings you want then press Print to print your photos Cropping You can print just part of a photo cropping out the...

Страница 19: ... 1 through 7 9 Adjust any other settings you want then press Print to print your photos Red Eye Removal When you take photos of people they sometimes appear to have red eyes You can use red eye reduction to help eliminate this problem Note Red eye reduction may not correct red eyes in all photos To use red eye reduction whenever you print see page 58 1 Select a photo with the red eye problem 2 Pre...

Страница 20: ...setting takes effect Or press Cancel and select Yes to cancel all settings Your photos are automatically date stamped until you turn off the setting Printing Photos in Black and White or Sepia You can print pictures in black and white or in a sepia tone like an old fashioned photo even when the originals are in color Your original images are not changed Note The color effect you choose is kept unt...

Страница 21: ...utomatically adjusts your photos for the best results The PhotoEnhance setting improves your photos colors and increases contrast and sharpness It may correct images that are too dark too light or backlit Manual adjustments If your photos are too light or too dark you can manually adjust their brightness or control the saturation and sharpness If you want you can make manual adjustments while P I ...

Страница 22: ... Print data None Prints photos as is or bypasses P I M or Exif Print data Select this setting for the fastest printing 6 Press OK to apply the selected setting Note The setting you select applies to all photos 7 Press OK to select the current photo for printing See page 9 Or you can print all photos page 10 or a range of photos page 11 8 Adjust any other settings you want then press Print to print...

Страница 23: ...to select the current photo for printing See page 9 Or you can print all photos page 10 or a range of photos page 11 11 Adjust any other settings you want then press Print to print your photos Adding Frames to Your Photos PictureMate includes frames that you can add to your photos including a variety of Disney character frames Note Additional frames are included on the PictureMate CD that came wit...

Страница 24: ...select Crop Photo Follow the instructions on page 17 8 Press OK to select the current photo for printing See page 9 Or you can print all photos page 10 or a range of photos page 11 9 Adjust any other settings you want then press Print to start printing Decorating Photos You can add fun and festive decorations to your photos from PictureMate s built in clipart collection You can add up to four deco...

Страница 25: ...teps 6 through 8 Otherwise press OK 10 Press OK to select the current photo for printing See page 9 Or you can print all photos page 10 or a range of photos page 11 11 Adjust any other settings you want then press Print to print your photos Rotating You can rotate a photo on PictureMate s photo viewer screen This does not affect how the photo prints only how you see it on the screen 1 Select the p...

Страница 26: ...nd The following types are compatible with this printer CD R CD RW Multi CD RW High CD RW Ultra Note PictureMate supports both 650MB 74 min and 700MB 80 min capacities for each type of CD You can also have PictureMate automatically print a proof sheet of your saved photos A proof sheet provides small thumbnail images up to 56 per sheet of all the photos you ve copied 1 Make sure PictureMate Flash ...

Страница 27: ...ion screen press OK 9 When you see a message asking if you want to print a proof sheet or index of your copied photos select Yes or No If necessary make sure paper is loaded The sheet automatically prints once the backup is complete 10 Follow the instructions on the screen to complete the backup The CD is ejected automatically when the backup is finished Each time you copy photos to the same CD Pi...

Страница 28: ...n even copy files from your computer to the memory card See your on screen User s Guide for instructions Periodically it s a good idea to check Epson s support website at epson com support for free updates to your PictureMate printer software Download instructions are posted for your convenience Installing Software and Connecting PictureMate DO NOT connect PictureMate to your computer before insta...

Страница 29: ...mputer 4 Insert the PictureMate CD in your CD DVD drive 5 With Windows Vista you see this screen Click the option to run RUNEPSON exe then click Allow at the User Account Control screen 6 After a moment you see this screen Click Next 7 Read the license agreement screen and click Agree You see this screen 8 Click OK PictureMate book Page 28 Thur sday January 18 2007 4 43 PM ...

Страница 30: ... end to the USB port on the back of PictureMate The installer installs your PictureMate software Note If you see a screen like this one remove your memory card and click the X in the window to close it 10 When you see the screen below click No if you have another printer connected to your computer If PictureMate is your only printer click Yes PictureMate book Page 29 Thur sday January 18 2007 4 43...

Страница 31: ...n screen instructions to register PictureMate 15 Remove the CD and restart your computer Now you can print photos from your computer on PictureMate see page 32 Installing Software for Macintosh 1 Make sure PictureMate does NOT have a memory card inserted in it 2 Connect the USB cable to any open USB port on your Macintosh Then connect the other end to the USB port on the back of PictureMate 3 Pres...

Страница 32: ...een instructions to install the software 11 At the Install Menu click Install Printer Manual to install your on screen User s Guide 12 At the Install Menu click Install Optional Web Links and follow the on screen instructions to install the links on your desktop 13 When you return to the Optional Web Links menu click Back 14 Click Exit You see the registration screen 15 Follow the on screen instru...

Страница 33: ...g From a Computer Follow these basic printing instructions for your computer Windows below Macintosh see page 39 For instructions on printing using ArcSoft PhotoImpression see your on screen User s Guide Printing From a Windows Computer You can print photos from an imaging application the Windows Photo Gallery in Windows Vista below or the Picture and Fax Viewer in Windows XP page 35 Printing with...

Страница 34: ...op of the screen then select Print from the drop down menu that appears 4 Make sure your printer is selected then choose PictureMate Photo Paper as the Paper type setting 4 6 in is automatically selected as the Paper size setting 5 Click Options in the lower right corner of the screen and select Printer Properties Print icon Options PictureMate book Page 33 Thur sday January 18 2007 4 43 PM ...

Страница 35: ...nges don t affect your original Auto Correction improves the quality of photos that are too dark or have a color cast Sepia changes the colors to brown for an old fashioned look Black White changes color photos to black and white If your photo was taken with a digital camera select Digital Camera Correction to minimize common digital flaws Select Enhance Fine Details to bring out the fine details ...

Страница 36: ...s of your print job You can cancel pause or resume printing and view your Print Pack status Printing with the Windows XP Picture and Fax Viewer 1 Locate the photo you want to print on your computer 2 Right click the photo highlight Open With and select Windows Picture and Fax Viewer 3 Click the Print icon at the bottom of the screen 4 Click Next Cancel Pause or resume Print icon PictureMate book P...

Страница 37: ... 1 B Y 1 B K 36 5 When you see this screen select the photo s you want to print and click Next 6 When you see this screen select your EPSON PictureMate model and click Printing Preferences Printing Preferences PictureMate book Page 36 Thur sday January 18 2007 4 43 PM ...

Страница 38: ...ges don t affect your original Auto Correction improves the quality of photos that are too dark or have a color cast Sepia changes the colors to brown for an old fashioned look Black White changes a color photo to black and white If your photo was taken with a digital camera select Digital Camera Correction to minimize common digital flaws Select Enhance Fine Details to bring out the fine details ...

Страница 39: ...n you see this screen select Full page photo print and click Next During printing this window appears on your computer screen showing the progress of your print job You can cancel pause or resume printing and see your Print Pack status Full page photo print Cancel Pause or resume PictureMate book Page 38 Thur sday January 18 2007 4 43 PM ...

Страница 40: ... 4 Open the Paper Size menu and place your cursor on the 4 6 in option You see extended options Select 4 6 in Borderless to print without any borders Select 4 6 in Borders to print with white borders all around Note iPhoto expands two sides of an image to the maximum print area so you may see small borders in iPhoto prints 5 Select the direction you want your photo to print for portrait for landsc...

Страница 41: ...olor Option and see the effects on the sample photo the changes don t affect your original Sepia changes the colors to brown for an old fashioned look Black White changes a color photo to black and white Borderless prints are automatically expanded If too much of your photos edges are cut off set the Expansion slider to Min If you see a white edge on your photo select Mid or Max Note iPhoto expand...

Страница 42: ...ars in the dock If you clicked the Print Center icon double click your PictureMate model 13 From this window you can do the following To cancel printing click the print job and click Delete To pause printing click the print job and click Hold To resume printing click a print job marked Hold and click Resume If multiple print jobs are listed and you want one to print before the other s select the j...

Страница 43: ...os from your camera s memory card to the drive for safekeeping See your on screen User s Guide for instructions Printing From a Digital Camera You can connect a digital camera that supports PictBridge or USB DIRECT PRINT printing to PictureMate and use the camera to control printing Check your camera manual to see if it supports PictBridge or USB DIRECT PRINT A cable may not be included with your ...

Страница 44: ...ting Wirelessly From a Bluetooth Device You can print photos wirelessly from your Bluetooth enabled PDA cell phone or computer when you use the optional Epson Bluetooth Photo Print Adapter The adapter part C12C824383 is available from your local reseller or Epson see page 68 Note While PictureMate complies with the Bluetooth specification it is not guaranteed to work with all devices enabled with ...

Страница 45: ...mputer s Bluetooth adapter for details Macintosh Double click Bluetooth File Exchange in your Utilities folder Follow the on screen steps to choose a photo file discover PictureMate and send photos Cell phones or PDAs See your product s documentation for instructions on setting up Bluetooth file sharing and sending files Printing starts automatically If you see a Bluetooth error message on the Pic...

Страница 46: ...te to malfunction Printing From an External Drive If you saved your photos to a CD Zip disk or flash memory thumb drive you can connect the drive to the back of PictureMate and print just like you do when you insert a memory card You can also print photos from a CD that you get from a photo processing lab Images should be in JPEG or uncompressed Tiff file format Some CDs may not work 1 Make sure P...

Страница 47: ...Then choose Select Source press OK and select External Device 5 Once your photos are displayed you can view and print them just like photos on a memory card Note If there are folders on the CD or Zip disk PictureMate searches those folders and displays any photos stored in them Printing From the Built in CD Drive You can print photos from a CD using PictureMate Flash s built in CD drive Note If yo...

Страница 48: ... OK and select CD 3 Once your photos are displayed you can view and print them just like photos on a memory card See page 8 4 If you want to print a proof sheet of the photos on your CD press Menu select Layout and select CD Index 56 photo thumbnails are printed on each sheet Note In addition to printing from a CD you can also back up photos on your camera s memory card by saving them on a CD in P...

Страница 49: ...n the package Caution To ensure good results use a genuine PictureMate 200 Series photo cartridge and do not refill it Other products may cause ink spills or other damage to your printer not covered by Epson s warranty Buying a Print Pack You can buy a PictureMate 200 Series Print Pack wherever PictureMate is sold or from retailers that sell printer supplies The following Print Packs are available...

Страница 50: ...artridge you must install the new one right away Caution Before you replace the cartridge read the Photo Cartridge Safety Instructions on page 71 1 Make sure PictureMate is on but not printing 2 Open the cartridge door on the back of PictureMate 3 Slide the cartridge lever left to the Release position Caution Do not try to pull out the cartridge without moving the lever PictureMate book Page 49 Th...

Страница 51: ...r immediately Caution Do not attempt to refill the photo cartridge This could result in ink spills or other damage to PictureMate not covered by Epson s warranty 5 Remove the new photo cartridge from its package Caution Don t touch the small green circuit board Install the photo cartridge immediately If you leave a cartridge unpacked for a long time before using it normal printing may not be possi...

Страница 52: ... message 9 When it s finished charging press OK Checking Print Pack Status You can check the status of your Print Pack at any time 1 Press Menu 2 Press u or d to highlight Maintenance then press OK 3 Highlight Check Print Pack Status and press OK You see the status displayed on the photo viewer screen 4 Press OK to exit Note If the screen displays a Print Pack low message you should buy a new Pict...

Страница 53: ...nk may leak 1 Remove the CD if you have one in the CD drive PictureMate Flash only 2 Press the On button to turn PictureMate off 3 Wait until the On light goes out then unplug the power cable from the power outlet 4 Remove all paper and printed photos 5 Close the paper support and output tray 6 Unplug the power adapter and any connected USB cable or device Place the power cable and adapter in the ...

Страница 54: ... can print about 100 photos or 60 photos when printing from PictureMate Flash s built in CD drive Installing the Battery 1 Make sure PictureMate is turned off 2 Unplug the AC adapter from PictureMate 3 Release the latch and remove the battery cover from the back of the printer 4 Insert the battery as shown until it clicks into place Charging the Battery After you install the battery you need to ch...

Страница 55: ...photo viewer screen Note If you are running PictureMate with the battery the printer turns off automatically after 15 minutes if it is not being used unless PictureMate is connected to a computer and a memory card is inserted Press the On button to turn it back on Removing the Battery If there is a problem with your battery or you want to replace it with one that is already charged you need to rem...

Страница 56: ...inting see page 57 Turn on or off the sounds that alert you to various problems see page 57 Select your personal settings see page 58 Return the settings to the default defaults see page 59 Selecting Display Options You can select how many photos display on the photo viewer screen whenever you insert a card and whether a photo displays with or without the guide near the bottom of the photo You can...

Страница 57: ... button Adjusting Borderless Expansion and Cropping When you print borderless pictures your images are automatically expanded and cropped If your pictures are cut off around the edges you can adjust the amount of expansion and cropping 1 Press Menu 2 Press u or d to highlight Setup then press OK 3 Press u or d to highlight Borderless Expansion then press OK 4 Press u or d to select MIN and reduce ...

Страница 58: ... u or d to choose from the following settings then press OK Ask each time Lets you choose whether to save your selections after each print job Save settings Save your selections each time you print Clear settings Return to your personal default settings after printing Setting Audible Alerts You can turn on or off the sounds that PictureMate uses to alert you to various problems 1 Press Menu 2 Pres...

Страница 59: ...ones you usually use when printing The settings you choose will become your defaults but you will still be able to change them when you print You can personalize the following settings Layout Auto Correction Red Eye Reduction Color Effect 1 Press Menu 2 Press u or d to highlight Setup then press OK 3 Press u or d to highlight Personal Settings then press OK You see the Layout selection screen 4 Pr...

Страница 60: ...highlight Setup then press OK 3 Press u or d to highlight Reset Default Settings then press OK You see this message 4 Press OK to restore the original settings or press Back to go back to the menu without restoring the settings After you restore the default settings you see a message asking if you want to change your personal settings See page 58 for more information PictureMate book Page 59 Thur ...

Страница 61: ...roblems on page 67 Where to get help on page 67 Cleaning the Print Head If your print quality is not as good as it used to be if photos are too light are missing colors or have lines running through them PictureMate s print head nozzles may need cleaning Note If the screen displays a Print Pack low message you can t clean the print head until you replace the Print Pack Follow these steps to clean ...

Страница 62: ... check pattern 6 Check the pattern to see if there are any gaps in the lines If the pattern is okay press Yes to finish If the pattern has gaps press No to clean the print head again You may need to clean it two or three times before the nozzles are clean If you don t see any improvement after cleaning three times see Print Quality Problems on page 65 Note You can run a nozzle check before you cle...

Страница 63: ...n press OK You see a confirmation screen 5 Press OK again to continue 6 Press Print The alignment pattern is printed 7 Look at the printed squares to determine which one is the most even with no streaks or white lines You may need to use a magnifying glass 8 Press u or d to select the number for the best pattern 1 to 9 in set 1 Then press OK 9 Press u or d to highlight the number for the best patt...

Страница 64: ... components and case Don t get water on the components and don t spray lubricants or oils inside PictureMate Printing and Operation Problems The On light and photo viewer screen don t turn on Press the On button to turn on PictureMate Make sure the power cable and AC adapter are securely connected at both ends Make sure your power outlet works and is not controlled by a wall switch or timer If you...

Страница 65: ...per is not jammed and is loaded correctly and make sure the handle is not resting on the paper See page 5 Your memory card does not work correctly Insert only one card at a time Make sure you are using a compatible memory card See page 6 PictureMate recognizes and can print the first 999 photos on a memory card Photos must be in JPEG or uncompressed TIFF format and taken with a DCF compliant camer...

Страница 66: ...int head may need aligning See page 62 Your print is grainy The print head may need aligning See page 62 Your print is blurry or smeared Use PictureMate photo paper to ensure proper saturation absorption of ink and quality Be sure to print with the glossy or whiter side of the paper face up The print head may need cleaning See page 60 The print head may need aligning See page 62 Make sure your pap...

Страница 67: ...t separate the sheets slightly and reload it between the edge guides Slide the guides to the edge of the paper but don t make them too tight See page 5 If multiple pages feed at once remove the paper separate the sheets and carefully reload it If paper jams remove any sheets loaded behind the jammed paper and press OK to eject the jammed paper Don t pull out jammed paper from the top of PictureMat...

Страница 68: ...nting directly from PictureMate or page 32 if printing from a computer Where to Get Help Epson Technical Support Epson provides these technical support services Internet Support Visit Epson s support website at epson com support and select your product for solutions to common problems You can download drivers and documentation get FAQs and troubleshooting advice or e mail Epson with your questions...

Страница 69: ...ies You can purchase genuine PictureMate 200 Series Print Packs and accessories from an Epson authorized reseller To find the nearest reseller call 800 GO EPSON 800 463 7766 Or you can purchase online at www epsonstore com U S sales or www epson ca Canadian sales Other Software Technical Support ArcSoft PhotoImpression Telephone 510 440 9901 8 30 AM to 5 30 PM Pacific Time Monday through Friday Fa...

Страница 70: ...inting or cause ink to leak out Do not remove the memory card or turn off the printer while the computer and the memory card are communicating when the memory card light is flashing The methods for using memory cards vary according to card type Be sure to refer to the documentation packaged with your memory card for details Use only memory cards compatible with the printer see page 7 Place the pri...

Страница 71: ...ing outlets on the same circuit as photocopiers or air control systems that regularly switch on and off Avoid using electrical outlets controlled by wall switches or automatic timers Keep the entire computer system away from potential sources of electromagnetic interference such as loudspeakers or the base units of cordless telephones Do not use a damaged or frayed power cord or the AC adapter or ...

Страница 72: ...a long time before using it normal printing may not be possible Do not use a photo cartridge beyond the date printed on the cartridge carton otherwise it may result in reduced print quality For best results use up the photo cartridge within six months of installing it After bringing a photo cartridge inside from a cold storage site allow it to warm up at room temperature for at least three hours b...

Страница 73: ...H to charge the battery and operate the printer Do not charge or use the battery with devices other than the specified product Using the battery with other devices may damage the battery or other devices or may cause an explosion To protect against short circuits do not remove the outside case of the battery Do not handle the battery with wet hands or use it near water Do not expose the battery to...

Страница 74: ...ructions and return authorization An Epson service technician will provide telephone diagnostic service to determine whether the printer requires service If service is needed Epson will at its option exchange or repair the printer without charge for parts or labor If Epson authorizes an exchange for the defective unit Epson will ship a replacement printer to you freight prepaid so long as you use ...

Страница 75: ...ect cannot be identified or reproduced you will be held responsible for the costs incurred THE WARRANTY AND REMEDY PROVIDED ABOVE ARE EXCLUSIVE AND IN LIEU OF ALL OTHER EXPRESS OR IMPLIED WARRANTIES INCLUDING BUT NOT LIMITED TO THE IMPLIED WARRANTIES OF MERCHANTABILITY NON INFRINGEMENT OR FITNESS FOR A PARTICULAR PURPOSE SOME LAWS DO NOT ALLOW THE EXCLUSION OF IMPLIED WARRANTIES IF THESE LAWS APPL...

Страница 76: ...he 4 6 borderless size which is available from many resellers or Epsonstore com There are other photo papers available but most are not formulated to be fully compatible with the PictureMate Photo Cartridge Using other papers may result in poor color reproduction print quality problems or more fading Both a PictureMate Photo Cartridge and some PictureMate Photo Paper were included in the box with ...

Страница 77: ...re making a claim based on the number of prints you were able to make with the initial cartridge and paper which were included in the box with your PictureMate printer please submit a Fully completed PictureMate Print Pack Satisfaction Guarantee Form b Copy of Original UPC code of PictureMate printer c Copy of PictureMate printer receipt d Remaining paper which was included in the PictureMate prin...

Страница 78: ... following measures Reorient or relocate the receiving antenna Increase the separation between the equipment and receiver Connect the equipment into an outlet on a circuit different from that to which the receiver is connected Consult the dealer or an experienced radio TV technician for help WARNING The connection of a non shielded equipment interface cable to this equipment will invalidate the FC...

Страница 79: ...ight laws when using any Epson product While some countries laws permit limited copying or reuse of copyrighted material in certain circumstances those circumstances may not be as broad as some people assume Contact your legal advisor for any questions regarding copyright law Trademarks Epson and PictureMate are registered trademarks and Exceed Your Vision USB DIRECT PRINT and the USB DIRECT PRINT...

Страница 80: ...uto shutoff 9 54 63 B Banding fixing 60 to 61 65 Basic printing Macintosh 39 to 41 Windows 32 to 38 Battery charging 53 to 54 installing 3 53 removing 54 safety instructions 72 to 73 status 54 Black and white printing 19 to 20 37 40 Blank pages 67 Blank screen 9 54 63 Bluetooth connecting adapter 44 disconnecting adapter 45 printing using 3 43 to 44 Blurry prints 65 Border layout 16 to 17 37 39 pr...

Страница 81: ...tos 14 Care of PictureMate 60 to 62 Carrying PictureMate 52 Cartridge photo see Photo cartridge Case optional 52 CD ejecting 47 installing software from 27 to 32 printing from 45 to 47 saving photos to 25 to 26 selecting as source 47 types 25 CD Index layout 16 to 17 26 47 Cell phone printing from 43 to 44 Charging battery 53 to 54 photo cartridge 51 64 Checking nozzles 61 Choosing photos 8 to 13 ...

Страница 82: ...printing photos by 12 Decorations 23 to 24 Default settings 58 to 59 Digital Camera Correction setting Windows 37 Digital Size layout 16 to 17 Direct Print Settings 43 Disney character frames 3 22 to 23 Display button 9 15 18 23 24 55 to 56 Display preferences 9 55 to 56 Displaying prints 14 DOC Declaration of Conformity 76 to 77 Door cartridge 49 to 51 DPOF Digital Print Order Format 3 13 Drive b...

Страница 83: ... 45 to 46 Frames adding to photos 22 to 23 G Gaps in image 60 to 61 65 Grainy prints 65 H Half page photos 16 to 17 Help control panel 16 Epson 67 to 68 I Icons on screen 15 54 ID photos 16 to 17 Image formats 4 quality 20 to 22 quality problems 65 to 66 Incorrect colors 66 margins 56 67 Index CD 16 to 17 26 47 Ink see Photo cartridge Instructions control panel 16 Internet support 67 J Jammed pape...

Страница 84: ...basic printing 39 to 41 Bluetooth printing 44 cancelling printing 41 installing software for 30 to 32 65 Printer Setup Utility 31 to 32 Maintenance 60 to 62 Manuals 4 29 31 Margins incorrect 56 67 selecting 16 to 17 Memory card adapters 7 compatibility 7 light 6 to 7 problems 64 removing 7 27 Menu button 11 to 26 Mini wallet photos 16 to 17 Missing colors 66 N Network installation 65 Noise Picture...

Страница 85: ...y 5 52 size 6 39 storing 14 support 5 to 6 52 Passport photos 16 to 17 PDA printing from 43 to 44 Personal Settings 58 Photo choosing 8 to 13 correction 20 to 22 37 decorating 23 to 24 displaying 14 DPOF 3 13 fixing 20 to 22 37 fixing cut off 37 40 56 formats 4 frames adding 22 to 23 paper see Paper quality problems 65 to 66 quality adjusting 20 to 22 37 remove red eye 15 18 rotating 24 saving to ...

Страница 86: ...t 30 31 32 68 PictBridge camera 3 42 to 43 Picture and Fax Viewer Windows 32 to 38 PIM PRINT Image Matching 21 Portrait orientation 39 Power battery 3 53 to 54 72 to 73 problems 63 saving 9 54 turning off 52 69 turning on 6 27 30 63 Power cable 52 53 Preferences setting 55 to 59 Previewing printing 10 to 13 37 Print preview 10 to 13 37 speed increasing 64 Print head aligning 62 cleaning 60 to 61 6...

Страница 87: ...7 problems 63 to 64 range of photos 11 to 12 Windows 32 to 38 wireless 3 43 to 44 Problems border or layout 67 color 66 memory card 64 paper feeding 66 paper jam 66 photo viewer screen 63 power 63 print quality 65 to 66 printing 63 to 64 slow printing 64 software installation 65 Proof Sheet layout 16 to 17 Q Quality problems 65 to 66 Quality adjusting 20 to 22 37 R Range of photos 11 to 12 Red eye...

Страница 88: ... to 11 Sepia 19 to 20 37 40 Sequence of photos 11 to 12 Service 67 to 68 Settings default 58 to 59 personal 58 saving clearing 57 Several photos selecting 9 to 10 Sharpness adjusting 21 to 22 Size paper 6 39 Slideshow 13 Slow printing 64 Smeared prints 65 Software installing 27 to 32 65 Sound alerts 57 to 58 Source selecting 46 47 Speed increasing print 64 Stamp date 19 Start Here sheet 4 Stopping...

Страница 89: ... 52 63 69 U USB cable 27 29 to 30 43 46 52 USB DIRECT PRINT camera 3 42 to 43 User s Guide 4 29 31 W Wallet size photos 16 to 17 Warranty 73 to 74 Where to get help 67 to 68 Windows basic printing 32 to 38 Bluetooth printing 44 cancelling printing 38 installing software for 27 to 30 65 Wireless printing 3 43 to 44 Z Zip disk printing from 45 to 46 Zooming in and out 17 to 18 24 PictureMate book Pa...

Страница 90: ...ack wherever PictureMate Snap and Flash are sold or from retailers that sell printer supplies The following Print Packs are available You can also buy a Print Pack and other PictureMate accessories from an Epson authorized reseller To find the nearest reseller call 800 GO EPSON 800 463 7766 Or you can purchase online at www epsonstore com U S sales or www epson ca Canadian sales For more PictureMa...

Страница 91: ...ack wherever PictureMate Snap and Flash are sold or from retailers that sell printer supplies The following Print Packs are available You can also buy a Print Pack and other PictureMate accessories from an Epson authorized reseller To find the nearest reseller call 800 GO EPSON 800 463 7766 Or you can purchase online at www epsonstore com U S sales or www epson ca Canadian sales For more PictureMa...

Отзывы: