


- 9 -
22.
Remove two left side mount screws.
23.
Slide the module forward slightly and tip
the front portion up in order to remove it from the
printer.
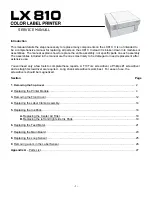
The parts shown to the right were removed and should
be reinstalled in reverse order.
Note:
Print Module is shown with metal Board Cover
removed. The new Print Module will have the Board
Cover attached. It will be necessary to remove this
cover in order to install the new module for units with
serial numbers less than 2050300000.
When replacing the print module take note of the
screw and notched pins and the corresponding screw
notch and tabs on both sides of the print module.
The
tabs should be placed into the notched pins on
both sides of the Print Module.
Screw.
Right Side Notched Pin.


