background image

30

Paper Handling

R4CC530
long.bk

Rev. E

A5 size

PAPER.fm

6/23/03

L

Proof Sign-off:
ABE J. Hashimoto, S. Yamamoto
H. Kimura
S. Halvorson

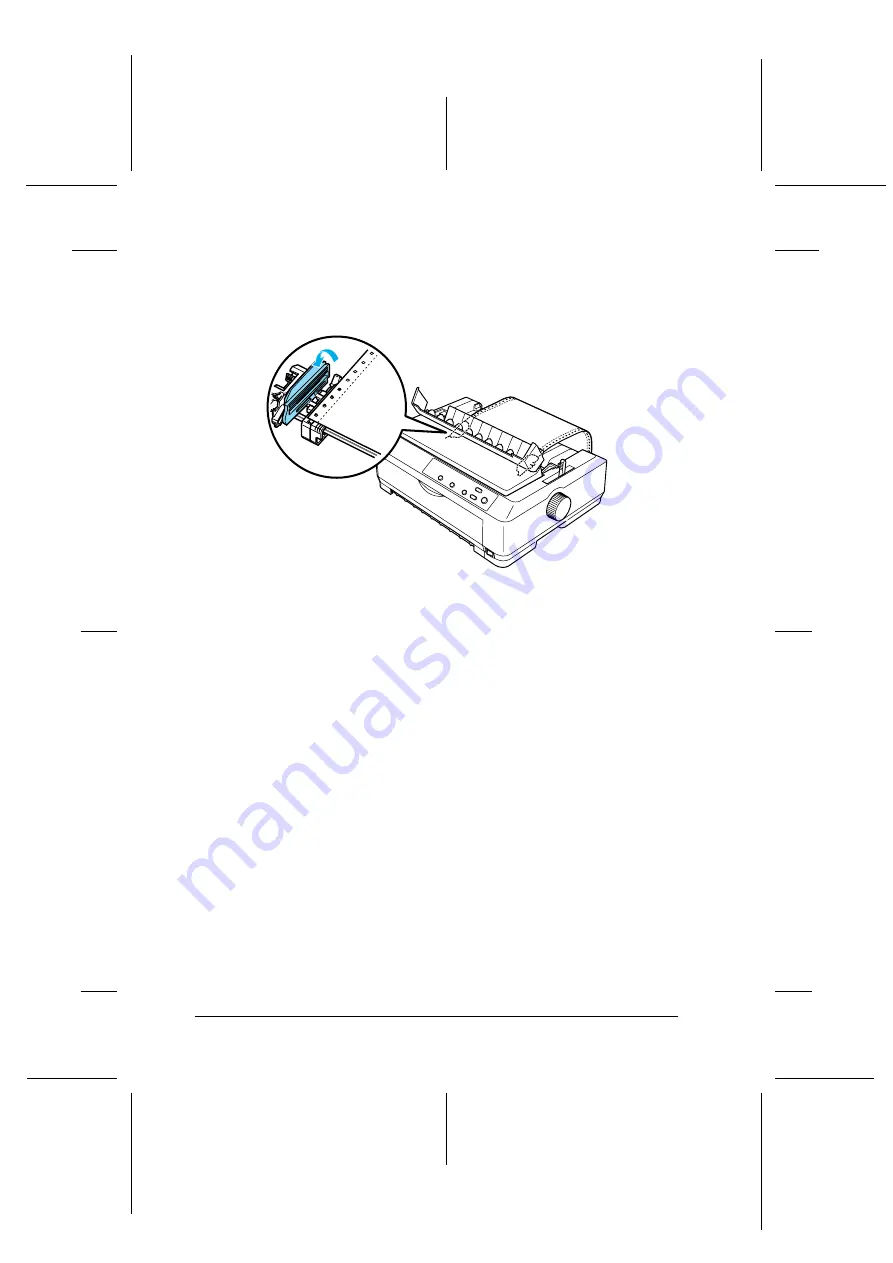
5. Make sure your paper has a clean, straight edge. Then open 

both sprocket covers and fit the first four holes of the paper, 
with the printable side down, over the tractor pins.

6. Close the sprocket covers.

7. Slide the right sprocket to remove any slack in the paper; then 

lock it in place by pushing the blue sprocket lock down.

8. Attach the paper guide and lay it flat on the printer and slide 

the edge guides to the middle of the paper guide.

Note:

For your safety, EPSON recommends operating the printer with the 
printer cover closed. The printer will function with the printer cover 
open or removed, but maximum safety and print speed are achieved 
when the cover is closed.

9. Turn on the printer. When the printer receives data, it 

automatically loads the paper and starts printing.

10. After you finish printing, follow the steps in “Removing 

continuous paper” on page 47 to remove your printed 
document.

Содержание FX 890

Страница 1: ...esult of accident misuse or abuse of this product or unauthorized modifications repairs or alterations to this product or excluding the U S failure to strictly comply with SEIKO EPSON CORPORATION s operating and maintenance instructions SEIKO EPSON CORPORATION shall not be liable for any damages or problems arising from the use of any options or any consumable products other than those designated ...

Страница 2: ...R4CC530 Reference Guide Rev E FRONT fm A5 size 6 23 03 L Proof Sign off ABE J Hashimoto S Yamamoto H Kimura S Halvorson ...

Страница 3: ...ness Lever 15 Loading Continuous Paper 17 Positioning the continuous paper supply 17 Loading continuous paper with the tractor 17 Using the Tear off Function 47 Loading Single Sheets 49 Available paper types 50 Using the paper guide 50 Loading paper in the paper guide 51 Loading Special Paper 54 Multipart forms 54 Labels 55 Envelopes 57 Cards 59 Switching Between Printing on Continuous Paper and S...

Страница 4: ...erview 78 Using EPSON Status Monitor 3 80 Setting up EPSON Status Monitor 3 81 Accessing EPSON Status Monitor 3 83 Setting Up Your Printer on a Network 84 Sharing the printer 84 Setting up your printer as a shared printer 85 Using an additional driver 87 Setting for the clients 93 Installing the printer driver from the CD ROM 101 Canceling Printing 103 Uninstalling the Printer Software 104 Uninsta...

Страница 5: ...merica 155 For users in the United Kingdom and the Republic of Ireland156 For users in Australia 157 For users in Singapore 159 For users in Malaysia 159 For users in India 160 For users in the Philippines 161 Chapter 6 Options and Consumables Ribbon Cartridge 164 Genuine EPSON ribbon cartridge 164 Replacing the ribbon cartridge 164 Cut Sheet Feeder 171 Installing the cut sheet feeder 172 Loading ...

Страница 6: ...tional Tractor Unit 201 Interface Card 202 Installing an interface card 202 Print Server 204 Appendix A Product Information Printer Parts 206 Printer Specifications 207 Mechanical 207 Electronic 210 Electrical 212 Environmental 213 Paper 213 Printable area 219 Command Lists 221 EPSON ESC P control codes 221 IBM PPDS emulation control codes 223 Standards and Approvals 224 Cleaning the Printer 225 T...

Страница 7: ...e SAFE fm 6 23 03 R Proof Sign off ABE J Hashimoto S Yamamoto H Kimura S Halvorson 1 1 1 1 1 1 1 1 1 1 1 1 Chapter 1 Safety Instructions Warnings Cautions and Notes 2 Hot Parts Caution Symbol 2 Important Safety Instructions 2 For United Kingdom users 7 ...

Страница 8: ...portant Safety Instructions Read all of these safety instructions before using the printer In addition follow all warnings and instructions marked on the printer itself When setting up the printer Do not place the printer on an unstable surface or near a radiator or heat source Place the printer on a flat surface The printer will not operate properly if it is tilted or placed at an angle K This sy...

Страница 9: ...hotocopiers or air control systems that regularly switch on and off Do not use a damaged or frayed power cord The power cord should be placed to avoid abrasions cuts fraying crimping kinking and other damage If you use an extension cord with the printer make sure the total ampere rating of all devices plugged into the extension cord does not exceed the cord s ampere rating Also make sure the total...

Страница 10: ...ding installation must be protected by a 10 or 16 amp circuit breaker When Handling the paper Never use the knob to adjust move or eject paper this may damage the printer or cause it to lose the top of form position Use the knob on the left side of the printer to clear paper jams only when the printer is off Otherwise you may damage the printer or change the top of form or tear off position Never ...

Страница 11: ...ever feed labels backward using the Load Eject or Tear Off Bin button When fed backward labels can easily peel off the backing sheet and cause a paper jam Because labels are sensitive to temperature and humidity use them only under normal operating conditions described below Do not leave labels loaded in the printer between jobs they may curl around the platen and jam when you resume printing Do n...

Страница 12: ...ore you turn off the printer Do not turn off the printer while it is printing the hex dump Always press the Pause button to stop printing and the Load Eject button to eject the printed page before you turn off the printer Do not reconnect the power cord to an electrical outlet that has the wrong voltage for your printer Never replace the print head yourself you may damage the printer Also other pa...

Страница 13: ...nners in an effort to reduce air pollution caused by power generation For United Kingdom users Use of options Epson UK Limited shall not be liable against any damages or problems arising from the use of any options or consumable products other than those designated as Original EPSON Products or EPSON Approved Products by Epson UK Limited Safety information wWarning This appliance must be earthed R...

Страница 14: ...colours of the mains lead of this appliance may not match coloured markings used to identify the terminals in a plug please proceed as follows The green and yellow wire must be connected to the terminal in the plug which is marked with the letter E or the Earth symbol G The blue wire must be connected to the terminal in the plug marked with the letter N The brown wire must be connected to the term...

Страница 15: ... Positioning the continuous paper supply 17 Loading continuous paper with the tractor 17 Using the Tear off Function 47 Loading Single Sheets 49 Available paper types 50 Using the paper guide 50 Loading paper in the paper guide 51 Loading Special Paper 54 Multipart forms 54 Labels 55 Envelopes 57 Cards 59 Switching Between Printing on Continuous Paper and Single Sheets 60 Switching to printing on ...

Страница 16: ...nuous paper printing This section helps you determine which paper paths and tractor positions are best for your continuous paper printing needs See Loading continuous paper with the tractor on page 17 for tractor installation and paper loading instructions Using the push tractor positions If you often need to tear off sheets of continuous paper for example if you are printing purchase orders or sa...

Страница 17: ...st paper jam prevention and allows you to load continuous paper fromthefront rear orbottomoftheprinter However youcannot use the tear off feature when the tractor is in the pull position Tractor position Description front push Load paper from the front slot If you print on thick paper such as multipart forms use the front paper slot because this paper path is almost straight This reduces the chanc...

Страница 18: ...r and is recommended for printing on continuous pre printed forms See Using two tractors in a push pull combination on page 44 for more information You can use the front bottom or rear paper slot with the pull tractor Paper slot Description front If you print on thick paper such as multipart forms or continuous paper with labels use the front paper slot because this paper path is nearly straight T...

Страница 19: ...t paper entry slot The optional front sheet guide C81400 for the FX 890 C81401 fortheFX 2190 andfrontpaperguide C81402 for the FX 890 C81403 for the FX 2190 are available for easy operation rear If the front or bottom paper slot is unavailable you can also load ordinary continuous paper from the rear slot Please note that loading paper from the rear slot results in a curved paper path which may af...

Страница 20: ...r on page 171 for information on the optional cut sheet feeder Setting the Paper Release Lever When you load continuous paper in the printer you need to set the paper release lever to indicate the paper source you want to use as described in the table below The table below describes each paper release lever position Paper release lever position Description Single sheet position For loading single ...

Страница 21: ...tractor installed in the rear push position Also set the lever to this position when using the rear push and pull tractors in combination Front push tractor position For loading continuous paper using the tractor installed in the front push position Also set the lever to this position when using the front push and pull tractors in combination Pull tractor position For loading continuous paper from...

Страница 22: ...e table below to select the appropriate paper thickness See the paper specifications for more information Available when using a bottom pull position or front pull position Paper type Lever position Ordinary paper Single sheets Continuous paper 0 or 1 0 Thin paper 0 Carbonless multipart forms with 2 parts original 1 copy 3 parts original 2 copies 4 parts original 3 copies 5 parts original 4 copies...

Страница 23: ... higher multipart forms with 7 parts cannot be used Loading Continuous Paper Follow the instructions in this section to load continuous paper in the printer Positioning the continuous paper supply Before using continuous paper make sure you line up your paper supply with the tractor feeder as shown below so that the paper feeds smoothly into the printer Loading continuous paper with the tractor Th...

Страница 24: ...aper with the front push tractor on page 20 and Removing the tractor from the front push position on page 24 Installing the tractor in the front push position Before installing the tractor in the front push position remove it from its current position If the tractor is in the rear push position remove the paper guide and then press the tractor s lock tabs while lifting it out If the tractor is in ...

Страница 25: ...he optional front sheet guide is installed remove it by grasping the fins on both sides and pulling the guide slightly up and away from the printer If the optional front paper guide is installed open the front cover and remove it 3 Insert the tractor into the printer s mounting slots and press down both ends of the tractor to make sure that it is firmly seated ...

Страница 26: ...the front push tractor Loading paper with the front push tractor When using the push tractor it is a good idea to set the Auto tear off function in the Default Setting mode to On See About Your Printer s Default Settings on page 116 for more information Follow these steps to load paper using the front push tractor 1 Make sure the printer is turned off 2 Open the front cover Make sure the tractor i...

Страница 27: ... 2 2 2 2 3 Set the paper release lever to the front push tractor position Also set the paper thickness lever located under the printer cover to the proper position for your paper s thickness See Adjusting the Paper Thickness Lever on page 15 for instructions 4 Release the left and right sprockets by pushing the blue sprocket lock levers backward ...

Страница 28: ... Halvorson 5 Slide the left sprocket approximately 12 mm 0 5 inch from the far left position and pull the blue lever forward to lock it in place Then slide the right sprocket to match the width of your paper but do not lock it 6 Remove the front coverbypushingitstraight down as shown below 1 0 5 0 approx 12 mm 0 5 inch ...

Страница 29: ... paper has a clean straight edge Then open both sprocket covers and fit the first four holes of the paper with printable side up over the tractor pins 8 Close the sprocket covers 9 Slide the right sprocket to remove any slack in the paper then lock it in place by pushing the sprocket lock down 10 Attach the front cover with the continuous paper positioned as shown below ...

Страница 30: ...t automatically loads the paper and starts printing 13 After you finish printing follow the steps in Removing continuous paper on page 47 to remove your printed document If the first line on your page appears too high or low you can change its position by using the Micro Adjust function as described in Adjusting the top of form position on page 64 cCaution Never use the knob to adjust the top of f...

Страница 31: ...s the tractor s lock tabs tilt the tractor up and lift it out of the printer 4 Close the front cover Using the tractor in the rear push position The tractor is installed in the rear push position when the printer is shipped If your tractor is in the rear push position skip to Loading paper with the rear push tractor on page 27 for instructions on loading paper ...

Страница 32: ...raight paper path to avoid paper jams When printing on thick continuous paper use the tractor in the front push position or the pull position Installing the tractor in the rear push position Before installing the tractor in the rear push position remove it from its currentposition Ifthe tractoris in the front push position remove it by pressing the tractor s lock tabs while lifting it out If the t...

Страница 33: ...th ends of the tractor to make sure that it is firmly seated See Loading paper with the rear push tractor on page 27 for instructions on loading continuous paper using the rear push tractor Loading paper with the rear push tractor Follow these steps to load paper using the rear push tractor 1 Make sure the printer is turned off and the tractor is installed in the rear push position Also make sure ...

Страница 34: ...A5 size PAPER fm 6 23 03 L Proof Sign off ABE J Hashimoto S Yamamoto H Kimura S Halvorson 2 Set the paper release lever to the rear push tractor position 3 Release the left and right sprockets by pulling the blue sprocket lock levers forward ...

Страница 35: ...2 2 2 2 4 Slide the left sprocket approximately 12 mm 0 5 inch from the far left position and push the blue lever back to lock it in place Then slide the right sprocket to match the width of your paper but do not lock it The triangle mark on top of the printer indicates the point furthest to the left where printing can begin approx 12 mm 0 5 inch ...

Страница 36: ...lace by pushing the blue sprocket lock down 8 Attach the paper guide and lay it flat on the printer and slide the edge guides to the middle of the paper guide Note For your safety EPSON recommends operating the printer with the printer cover closed The printer will function with the printer cover open or removed but maximum safety and print speed are achieved when the cover is closed 9 Turn on the...

Страница 37: ...he top of form position on page 64 cCaution Never use the knob to adjust the top of form position this may damage the printer or cause it to lose the top of form position Removing the tractor from the rear push position Follow these steps to remove the tractor from the rear push position 1 Make sure the printer is turned off 2 Remove any paper from the tractor as described in Removing continuous p...

Страница 38: ...tion on page 44 for more information To install the tractor in the pull position you need to remove the paper tension unit and install the tractor in its place See Installing the tractor in the pull position on page 32 for information on the installation procedure This section provides instructions on Installing the tractor in the pull position on page 32 Loading paper with the pull tractor on pag...

Страница 39: ... 23 03 R Proof Sign off ABE J Hashimoto S Yamamoto H Kimura S Halvorson 2 2 2 2 2 2 2 2 2 2 2 2 1 Makesuretheprinteris turned off Thenopenthepaperguide cover by pulling its back edge forward 2 Lift the printer cover and pull it straight up and off the printer ...

Страница 40: ...e unit up and off the printer Store the paper tension unit in a safe place Note If you plan to load paper from the rear you need to insert the paper into the paper path before installing the paper guide and tractor See Loading paper with the pull tractor on page 35 for instructions 4 Attach the paper guide if necessary slide the edge guides to the middle of the paper guide and lay it flat on the p...

Страница 41: ...ote If you plan to load paper from the rear you need to insert the paper into the paper path before installing the paper guide and tractor 5 Lower the tractor into the printer s mounting slots and press down both ends of the tractor to make sure it is firmly seated Loading paper with the pull tractor Follow these steps to load paper using the pull tractor ...

Страница 42: ...E J Hashimoto S Yamamoto H Kimura S Halvorson 1 Make sure the printer is turned off and the printer cover is removed Also make sure the tractor is installed in the pull position and the paper guide is lying flat on the printer 2 Set the paper release lever to the pull tractor position ...

Страница 43: ...the sprockets by pulling the sprocket lock levers forward 4 Slide the left sprocket approximately 12 mm 0 5 inch from the far left position and push the lever back to lock it in place Then slide the right sprocket to match the width of your paper but do not lock it 5 Make sure your paper has a clean straight edge Then open the sprocket covers approx 12 mm 0 5 inch ...

Страница 44: ...r while it is on a paper jam may occur 6 Insert the paper into the front or bottom paper slot as shown in the illustration below until it emerges between the platen and the ribbon guide Then pull up the paper until the perforation between the first and second pages is even with the top of the printer s ribbon Front slot Before you load paper in the front slot remove the front cover Then load paper...

Страница 45: ...oto H Kimura S Halvorson 2 2 2 2 2 2 2 2 2 2 2 2 Bottom slot Load paper in the bottom slot with the printable side facing up 7 Fit four holes of the paper over the tractor pins on both sprockets Then close the sprocket covers 8 Slide the right sprocket to remove any slack in the paper then lock it in place ...

Страница 46: ...per guide to the center 10 Reattach the front cover as shown below 11 Turn on the printer 12 Remove any slack in the paper by pressing the LF FF button cCaution Always remove any slack from the paper otherwise print quality may deteriorate 13 If necessary follow the steps in Adjusting the top of form position on page 64 to adjust the current position of the paper ...

Страница 47: ...nto place Then close the paper guide cover Note For your safety EPSON recommends operating the printer with the printer cover closed The printer will function with the printer cover open or removed but maximum safety and print speed are achieved when the cover is closed 15 Send a print job to the printer The printer starts printing from the top of form position After you finish printing open the p...

Страница 48: ...or Tear Off Bin button when you are using the pull tractor the paper could come off the pull tractor and jam the printer Removing the tractor from the pull position Follow these steps to remove the tractor from the pull position 1 Remove any paper loaded on the pull tractor as described in Removing paper from the pull tractor on page 41 2 Turn off the printer is turned off Then open the paper guid...

Страница 49: ...r toward you and lift it off the printer 5 Store the tractor in a safe place or install it in the front or rear push position as described in Using the tractor in the front push position on page 18 or Using the tractor in the rear push position on page 25 6 Reinstall the paper tension unit by lower it onto the printer s mounting pegs Then press down on both ends of the unit until it clicks into pl...

Страница 50: ...Installing the tractor in the front push position on page 18 or Installing the tractor in the rear push position on page 26 2 Load continuous paper using the front or rear push tractor as described in Loading paper with the front push tractor on page 20or Loading paperwith the rear push tractor on page 27 3 Set the paper release lever to the front or rear push position depending on the position of...

Страница 51: ...lever back to the position you set in step 3 9 When the printer receives data it will start printing at the current position without advancing the paper If necessary follow the steps in Adjusting the top of form position on page 64 to adjust the current position of the paper 10 Attach the printer cover Make sure the paper guide is installed and lying flat on the printer Note For your safety EPSON ...

Страница 52: ...ble below summarizes the various methods of feeding continuous paper with two tractors and shows which paper release lever setting to use for each method Tractor positions Paper release lever position Paper path Pull front push Front push tractor Pull rear push Rear push tractor Front push rear push Front push tractor Rear push tractor ...

Страница 53: ...or automatically by turning on auto tear off mode The Tear Off Bin light flashes when the paper is in the tear off position If the perforation between pages is not aligned with the tear off edge you can adjust the position of the perforation using the Micro Adjust function See Adjusting the tear off position on page 62 for more information cCaution Never usethe tear offfunctionwiththe pulltractor ...

Страница 54: ...e If your paper s perforation is not properly aligned with the tear off edge you can adjust the tear off position using the Micro Adjust function as described in Adjusting the tear off position on page 62 3 Tear off the printed document using the tear off edge of the printer cover 4 To feed the continuous paper backward out of the printer and into the standby position press the Load Eject button T...

Страница 55: ...tings on page 122 for instructions on how to change the default settings When auto tear off is on the printer automatically advances the paper to the tear off position whenever it receives a full page of data or a form feed command followed by no more data Loading Single Sheets As shown below you can load ordinary single sheets and envelopes one at atimefrom the top of the printer using the paper ...

Страница 56: ...F or lower or 35 C 95 F or higher multipart forms with 7 parts cannot be used Do not load paper that is curled or has been folded Using the paper guide Using the paper guide that comes with your printer you can load one single sheet or envelope at a time from the top of the printer Your single sheet paper can be up to 257 mm 10 1 inches wide on the FX 890 and 420 mm 16 5 inches wide on the FX 2190...

Страница 57: ... in the paper guide Follow these steps to load paper in the paper guide 1 Make sure the paper guide is in the upright position Then set the paper thickness lever located under the printer cover to 0 if you are using ordinary single sheet paper If you are using envelopes see Envelopes on page 57 for instructions on setting the paper thickness lever Also move the paper release lever to the single sh...

Страница 58: ...ze PAPER fm 6 23 03 L Proof Sign off ABE J Hashimoto S Yamamoto H Kimura S Halvorson 3 Slide the left edge guide until it locks in place next to the triangle mark on the paper guide Then adjust the right edge guide to match the width of your paper ...

Страница 59: ...he paper automatically and is ready to print Note For your safety EPSON recommends operating the printer with the printer cover closed The printer will function with the printer cover open or removed but maximum safety and print speed are achieved when the cover is closed If the first printed line on your page appears too high or low you can use the Micro Adjust function to adjust the top of form ...

Страница 60: ...ng Continuous Paper on page 17 for detailed instructions Note Be sure your multipart forms do not exceed 0 46 mm 0 018 inch in thickness Do not load paper that is curled or has been folded Thick paper such as multipart forms with five or six parts requires a straight paper path to avoid paper jams Load thick paper in the front or bottom slots Single sheet multipart forms When loading single sheet ...

Страница 61: ...to print on single sheets with labels because the printer may not feed labels on a shiny backing sheet properly Thick paper such as continuous paper with labels requires a straightoralmoststraightpaperpath Loadlabelsonlyinthefront push tractor or pull tractor or bottom pull tractor paper slot however for best results use the tractor in the pull position and load paper in the front or bottom paper ...

Страница 62: ...and humidity use them only under normal operating conditions described below Do not leave labels loaded in the printer between jobs they may curl around the platen and jam when you resume printing Do not load continuous paper with labels from the rear paper slot Because the paper path from the rear slot is curved labels may come off their backing sheets inside the printer and cause a paper jam Do ...

Страница 63: ... labels backward using the Load Eject or Tear Off Bin button When fed backward labels can easily come off the backing sheet and cause a paper jam Envelopes You can feed envelopes one at a time using the paper guide or you can load multiple envelopes using the optional high capacity cut sheet feeder bin 1 of the double bin cut sheet feeder Before loading envelopes set the paper thickness lever to a...

Страница 64: ...side down and push them completely into the feed slot Note Be sure to place the envelope printable side down and insert the top edge of the envelope into the printer first The print head must not print past the left or right edge of the envelope or other thick paper Make sure your application program prints entirely within the printable area of your envelope See Printable area on page 219 for more...

Страница 65: ...cards set the paper thickness lever to position 2 and set the paper release lever to the single sheet position The cards can be loaded only in the front or rear paper slot To load single card follow the instructions in Loading paper in the paper guide on page 51 To loadmultiple cards see Loading paper in the high capacity cut sheet feeder on page 180 Note When you are loading postcards long edge f...

Страница 66: ...printing on single sheets Follow the steps below to switch from printing on continuous paper from a push tractor to printing on single sheets Note If continuous labels are loaded in the printer remove them before switching to single sheet printing See Removing continuous paper with labels on page 56 for more information If the tractor is in the pull position remove any continuous paper from it bef...

Страница 67: ...a paper jam 2 Press the Load Eject button to feed the continuous paper backward to the standby position The paper is still attached to the push tractor but is no longer in the paper path 3 Move the paper guide to the upright position 4 Set the paper release lever to the single sheet position 5 Load single sheets as described in Loading Single Sheets on page 49 Switching to printing on continuous p...

Страница 68: ...rear push position and that continuous paper is loaded on it as described in Loading continuous paper with the tractor on page 17 3 Set the paper release lever to the front or rear push position depending on the tractor position you are using Your printer loads the continuous paper automatically when you begin printing Using the Micro Adjust Function The Micro Adjust function allows you to move th...

Страница 69: ...he printer or cause it to lose the tear off position Note Your tear off position setting remains in effect until you change it even if you turn off the printer 1 Make sure the Tear Off Bin light is flashing the paper is at the current tear off position You may need to press the Tear Off Bin button to advance the paper to the tear off position 2 Hold down the Pause button for about three seconds Th...

Страница 70: ...f you try to adjust the tear off position beyond these limits the printer beeps and stops moving the paper 4 Tear off the printed pages 5 Press the Pause button to turn off Micro Adjust mode When you resume printing the printer automatically feeds the paper back to the top of form position and begins printing Adjusting the top of form position The top of form position is the position on the page w...

Страница 71: ...it even if you turn off the printer The top margin setting made in some application software overrides the top of form position setting you make with the Micro Adjust function If necessary adjust the top of form position in your software 1 Make sure the printer is turned on 2 Load paper If the tractor is in a push position press the Load Eject button to advance continuous paper to the current top ...

Страница 72: ...these limits the printer beeps and stops moving the paper When the paper reaches the default top of form position the printer also beeps and stops moving the paper briefly You can use the default setting as a reference point when adjusting the top of form position 5 Afteryou setthetop of form position press thePause button to exit the Micro Adjust mode Note For your safety EPSON recommends operati...

Страница 73: ... XP 2000 and NT 4 0 72 Accessing the printer driver from Windows applications 73 Accessing the printer driver from the Start menu 75 Changing the printer driver settings 77 Printer Driver Settings Overview 78 Using EPSON Status Monitor 3 80 Setting up EPSON Status Monitor 3 81 Accessing EPSON Status Monitor 3 83 Setting Up Your Printer on a Network 84 Sharing the printer 84 Setting up your printer...

Страница 74: ...des you with troubleshooting tips Status Monitor 3 is automatically installed when you install the printer driver Note Before proceeding make sure you have installed the printer driver on your computer as described in the Setup Sheet Using the Printer Driver with Windows Me 98 and 95 You can access the printer driver from your Windows applications or from the Start menu When you access the printer...

Страница 75: ...odel name in the examples The instructions are the same for both models While many Windows applications override the settings made with the printer driver some do not so you must verify that the printer driver settings match your requirements Accessing the printer driver from Windows applications Follow these steps to access the printer driver from a Windows application 1 Select Print Setup or Pri...

Страница 76: ...rs and you see the Paper Graphics and Device Options menu These menus contain theprinter driver settings 3 To view a menu click the corresponding tab at the top of the window See Changing the printer driver settings on page 71 for information on how to change the settings Accessing the printer driver from the Start menu Follow these steps to access the printer driver from the Start menu 1 Click th...

Страница 77: ...s These menus display the printer driver settings 4 To view a menu click the corresponding tab at the top of the window See Changing the printer driver settings on page 71 for information on how to change the settings Changing the printer driver settings Your printer driver has four menus Paper Graphics Device Options and Utility For an overview of the available settings see Printer Driver Setting...

Страница 78: ...u make apply only to the application you are using See Accessing the printer driver from Windows applications on page 73 for more information When you access the printer driver from the Start menu the printer driver settings you make apply to all your applications See Accessing the printer driver from the Start menu on page 75 for more information To check and change printer driver settings see Ch...

Страница 79: ...ss the printer driver from a Windows application Note The examples in the following section are from the Windows 2000 operating system They may vary in appearance from what actually appears on your screen however the instructions are the same 1 Select Print Setup or Print from the File menu of your application software In the Print or Print Setup dialog box displayed make sure that your printer is...

Страница 80: ...f ABE J Hashimoto S Yamamoto H Kimura S Halvorson 2 Click Printer Setup Properties or Options You may need to click a combination of these buttons The Document Properties window appears and you see the Layout and Paper Quality menus These menus contain the printer driver settings ...

Страница 81: ... printer driver settings on page 77 to change the settings Accessing the printer driver from the Start menu Follow these steps to access the printer driver from the Start menu Note The screen shots used in this procedure are from the Windows 2000 operating system They may vary in appearance from what actually appears on your screen however the instructions are the same 1 Click the Start button and...

Страница 82: ...oto H Kimura S Halvorson 3 Right click your printer icon and click Printing Preferences in Windows XP or 2000 or Document Defaults in Windows NT 4 0 The screen displays the Default Document Properties window which contains the Layout and Paper Quality menus These menus display the printer driver settings ...

Страница 83: ...click the corresponding tab at the top of the window See Printer Driver Settings Overview on page 78 for information on how to change the settings Changing the printer driver settings Your printer driver has two menus from which you can change the printer driver settings Layout and Paper Quality You can also change settings on the Utility menu in the printer software For an overview of the availab...

Страница 84: ...rinter driver settings click OK to apply the settings or click Cancel to cancel your changes Once you have checked your printer driver settings and changed them if necessary you are ready to print Printer Driver Settings Overview The following tables show the Windows printer driver settings Note that not every setting is available in all versions of Windows ...

Страница 85: ...ering pattern depending on the kind of printout you want Intensity Intensity Control Move the slider to make your printout lighter or darker Print quality Select a print quality option from the Print quality list If you turn on Hi speed you will enter bidirectional printing mode and printing speed will increase Turning Hi speed off will return the printer to unidirectional printing mode Printing s...

Страница 86: ...box Printer Fonts Support Selecta character table group to use You can select one of three character table groups Standard Expanded and None Bit Image printing When Standard or Expanded is selected the printer uses the device fonts Expanded includes more fonts than Standard When None is selected the printer uses bit map images instead of the device fonts For details on the fonts which are included...

Страница 87: ...ver using Add Printer in the Printers folder or using the Point and Print method EPSON Status Monitor 3 may not functionproperly Ifyouwantto use EPSON StatusMonitor3 reinstall the driver as described in the Setup Sheet Before using EPSON Status Monitor 3 be sure to read the README file on the printer software CD ROM This file contains the latest information on the utility Setting up EPSON Status M...

Страница 88: ... the error item check box ON OFF status Turn on this check box to display the selected error notification Select Shortcut Icon The selectedicon is displayedinthe system tray on the taskbar on the computer screen The setting s example is shown on the rightwindow By clicking the shortcut icon you can access the Monitoring Preferences dialog box easily Receive error notification for shared printers E...

Страница 89: ...ortcut icon to the taskbar go to the Utility menu and follow the instructions Open the Utility menu then click the EPSON Status Monitor 3 icon To find out how to open the Utility menu See Using the Printer Driver with Windows Me 98 and 95 on page 68 or Using the Printer Driver with Windows XP 2000 and NT 4 0 on page 72 When you access EPSON Status Monitor 3 as described above the following printer...

Страница 90: ... the clients which need permission to share the printer with the printer server The clients share the printer via the printer server According to the versions of Windows OS and your access rights on the network perform the appropriate settings of the printer server and clients Setting the printer server For Windows Me 98 or 95 see Setting up your printer as a shared printer on page 85 For Windows ...

Страница 91: ...lled Then on the server and clients make sure that the IPX SPX compatible Protocol or the TCP IP Protocol is installed The printer server and clients should be set on the same network system and they should be under the same network management beforehand The on screen displays on the following pages may differ depending on the version of Windows OS Setting up your printer as a shared printer When ...

Страница 92: ...See For users restarting the computer on page 86 For users restarting the computer 1 Double click the Printers icon on the control panel 2 Right click your printer icon and click Sharing in the menu that appears 3 Select Shared As type the name in the Share Name box and click OK Type a Comment and Password if needed Note Do not use spaces or hyphens for the share name or an error may occur When sh...

Страница 93: ...l drivers are for client computers that have different OS from the server Follow these steps to set a Windows XP 2000 or Windows NT 4 0 as a printer server and install the additional drivers Note You must access Windows XP 2000 or Windows NT 4 0 as the Administrators of the local machine If the Printer server s OS is Windows NT 4 0 the Additional driver can be used only on Service Pack 4 or later ...

Страница 94: ...lowing menu appears click either Network Setup Wizard or If you understand the security risks but want to share printers without running the wizard click here In either case follow the on screen instructions 3 For a Windows 2000 or NT 4 0 printer server select Shared for Windows 2000 orShared as forWindows NT 4 0 then type the name in the Share Name box ...

Страница 95: ... 3 3 For a Windows XP printer server select Share this printer then type the name in the Share name box Note Do not use spaces or hyphens for the share name or an error may occur 4 Select the additional drivers Note If the computers of the server and clients use the same OS you do not have to install the additional drivers Just click OK after step3 ...

Страница 96: ... being used for clients For example select Windows 95 to install the additional driver for the Windows Me 98 or 95 clients Then click OK Note You do not have to select Windows NT 4 0x86 because that driver has been already installed Do not select additional drivers other than Windows 95 The other additional drivers are not available On the Windows XP or 2000 printer server 1 2 ...

Страница 97: ...lvorson 3 3 3 3 3 3 3 3 3 3 3 3 Click Additional Drivers Select Windows being used for clients then click OK For Windows Me 98 or 95 clients Select Intel Windows 95 or 98 and Me For Windows NT 4 0 clients Select Intel Windows NT 4 0 or 2000 For Windows XP or 2000 clients Intel Windows XP or 2000 may been already selected ...

Страница 98: ...a prompt appears insert the CD ROM that comes with your printer in your CD ROM drive then click OK 6 According to the message type the appropriate drive and folder names in which the printer driver for clients is located then click OK Depending on the client s OS the displayed message may differ The folder name differs depending on the OS being used When installing drivers in Windows XP or 2000 Di...

Страница 99: ...or the shared printer access right for clients Clients can not use the shared printer without right For details see Windows help You need to set the client computers so that they can use the printer on a Network See the following pages for details With Windows Me 98 or 95 on page 94 With Windows XP or 2000 on page 96 With Windows NT 4 0 on page 99 Setting for the clients This section describes how...

Страница 100: ...om Network Neighborhood or My Network on the Windows desktop You cannot use the Additional driver on server system OS When you want to use the EPSON Status Monitor 3 at clients you have to install both of the printer driver and the EPSON Status Monitor 3 in each client from the CD ROM With Windows Me 98 or 95 Follow these steps to set Windows Me 98 or 95 clients 1 Click Start point to Settings and...

Страница 101: ...he administrator of the network 6 Click Next Note If the printer driver is installed in the client beforehand you need to select the new printer driver or the current printer driver When the prompt to select the printer driver appears select the printer driver according to the message If the printer server s OS is Windows Me 98 or 95 or the additional driver for Windows Me 98 or 95 is installed in...

Страница 102: ... 0 printer server the additional driver for Windows XP or 2000 clients is the Windows NT 4 0 x86 driver which is installed beforehand as the printer driver for Windows NT 4 0 When installing the printer driver in the Windows XP or 2000 clients from Windows NT 4 0 printer server the driver for Windows NT 4 0 is installed You can not install the printer driver for Windows XP or 2000 as the additiona...

Страница 103: ...For Windows XP click the Add a printer in the Printer Tasks menu 3 Select Network printer for Windows 2000 or A network printer or a printer attached to another computer for Windows XP then click Next 4 For Windows 2000 type the name of the shared printer then click Next Note You can also type the name of the computer that is locally connected to the shared printer the shared printer s name in Net...

Страница 104: ...ed printer For Windows XP select Browse for a printer 5 Click the icon of the computer or server that is connected to the shared printer and the name of the shared printer Then click OK Note The name of the shared printer may be changed by the computer or server that is connected to the shared printer To make sure of the name of the shared printer ask the administrator of the network ...

Страница 105: ...elect the printer driver for Windows XP or 2000 as the current printer driver instead of the alternative driver in the Windows NT 4 0 server If the additional driver for Windows XP or 2000 NT 4 0 is installed in the Windows XP 2000 or NT 4 0 printer server go to the next step If the additional driver is not installed in the Windows NT 4 0 printer server or the printer server s OS is Windows Me 98 ...

Страница 106: ...the Add Printer icon 3 Select Network printer server then click Next 4 Click the icon of the computer or server that is connected to the shared printer and the name of the shared printer Then click OK Note You can also type the name of the computer that is locally connected to the shared printer the shared printer s name in Network path or queue name The name of the shared printer may be changed b...

Страница 107: ...rinter server or the printer server s OS is Windows Me 98 or 95 go to Installing the printer driver from the CD ROM on page 101 5 Select whether to use the printer as the default printer or not then click OK 6 Click Finish Installing the printer driver from the CD ROM This section describes how to install the printer driver in the clients when setting the network system as follows The additional d...

Страница 108: ... CD ROM then the EPSON Installation Program dialog box appears Cancel the dialog box by clicking Cancel then type the appropriate drive and folder names in which the printer driver for clients is located then click OK When installing drivers in Windows XP or 2000 Digital Signature is not found may appear Click Yes for Windows 2000 or Continue Anyway for Windows XP and continue installing The folde...

Страница 109: ...the taskbar follow the instructions below to cancel printing 1 Double click the printer icon on the task bar then click Purge Print Documents on the Printer menu 2 When canceling all printing documents select Purge Print Documents For Windows Me 98 or 95 or Cancel All Documents For Windows XP 2000 or NT 4 0 on the Printer menu When canceling a specified document select a document you want to cance...

Страница 110: ...ninstalling the Printer Software When you wish to reinstall or upgrade the printer driver uninstall the printer driver that has been installed already Uninstalling the printer driver and EPSON Status Monitor 3 1 Quit all applications 2 Click Start point to Settings and click Control Panel 3 Double click the Add Remove Programs icon ...

Страница 111: ...f ABE J Hashimoto S Yamamoto H Kimura S Halvorson 3 3 3 3 3 3 3 3 3 3 3 3 4 Select EPSON Printer Software and click the Add Remove Note When using the Windows XP or Windows 2000 computer click Change or Remove Programs select the EPSON Printer Software then click Change Remove 1 2 ...

Страница 112: ...rinters utility of EPSON Status Monitor 3 When the utility is uninstalled you cannot change the setting of Monitored Printers from EPSON Status Monitor 3 7 If you uninstall EPSON Status Monitor 3 click Yes in the displayed dialog box 8 Follow the on screen instructions Uninstalling the USB device driver When you connect the printer to your computer with a USB interface cable the USB device driver ...

Страница 113: ...ing the USB device driver Once you uninstalled the USB device driver you cannot access any other EPSON printers connected with a USB interface cable 1 Follow steps 1 through 3 of Uninstalling the Printer Software on page 104 2 Select EPSON USB Printer Devices and click Add Remove Note EPSON USB Printer Devices appears only when the printer is connected to Windows Me or 98 with a USB interface cabl...

Страница 114: ... correctly EPSON USB Printer Devices may not appear Follow these steps to run the Epusbun exe file in the CD ROM that comes with your printer 3 Follow the on screen instructions To reinstall a printer driver see the Setup Sheet 1 Insert the CD ROM in your computer s CD ROM drive 2 Access the CD ROM drive 3 Double click the Win9x folder 4 Double click the Epusbun exe icon ...

Страница 115: ...S Halvorson 4 4 4 4 4 4 4 4 4 4 4 4 Chapter 4 Control Panel Buttons and Lights 110 Selecting a Font and Pitch 114 About Your Printer s Default Settings 116 Understanding default settings 116 Changing default settings 122 Lock Out Mode 123 Turning on or off the lock out mode 124 Changing the lock out mode setting 124 ...

Страница 116: ...imura S Halvorson Buttons and Lights 1 Font button Selects one of the fonts To select a font see Selecting a Font and Pitch on page 114 Font lights Indicate which font is selected 2 Reset When you press both the Font and Pitch buttons simultaneously the printer clears buffer and returns to its default settings ...

Страница 117: ...ettings To select a pitch see Selecting a Font and Pitch on page 114 Pitch lights Indicate which pitch is selected 4 Item Item buttons When you press the Pitch and Tear Off Bin buttons at the same time the printer enters the default setting mode In this mode you can press the Font and Pitch buttons to move the setting item which is currently selected See Changing default settings on page 122 ...

Страница 118: ...sition and both of the lights are off when continuous paper is not in the tear off position The left light is on when Card mode is selected Both the lights are off when bin 1 of the optional cut sheet feeder is selected The right light is on when bin 2 of the optional cut sheet feeder is selected 6 Menu When you press the Pitch and Tear Off Bin buttons at the same time the printer enters the defau...

Страница 119: ...osition if a sheet is loaded 9 Micro adjust When you hold down the Pause button for three seconds the printer enters the micro adjust mode In this mode you can press the LF FF and Load Eject buttons to adjust the top of form or tear off position See Using the Micro Adjust Function on page 62 10 LF FF button Feeds paper line by line when pressing shortly Ejects a single sheet or advances continuous...

Страница 120: ...t results use your application to select a font and make other settings The available pitch depends onthe fontyouselect See the table below for more information 12 Pause button Stops printing temporarily and resumes printing when pressed again When held down for three seconds enters the Micro Adjust mode When pressed again exits the Micro Adjust mode 13 Paper Out light On when no paper is loaded i...

Страница 121: ...r is not printing If it is press the Pause button to stop printing 2 Press the Font button until the three Font lights indicate the desired font as shown below O On N Off 3 Press the Pitch button until the Three Pitch lights indicate the desired pitch as shown below Roman 10 12 15 17 20 PS Sans Serif 10 12 15 17 20 PS N N O USD N O N HSD N O O Draft O N N Roman O N O Sans Serif ...

Страница 122: ... to change a default setting from the printer s control panel using the default setting mode For a detailed description of the settings you can change in the default setting mode see Understanding default settings on page 116 For instructions on changing the settings see Changing default settings on page 122 Understanding default settings This section describes the settings and options available i...

Страница 123: ... On Auto line feed Off On Print direction Bi D Uni D Software ESC P IBM PPDS I F interface mode Auto Parallel USB Option Auto I F interface wait time 10 seconds 30 seconds Parallel I F bidirectional mode Off On Packet mode Off Auto 0 slash 0 the zero character with a slash Buzzer Off On Auto CR carriage return Off On IBM character table Table 2 Table1 Page length for front tractor Length in inches...

Страница 124: ...se this setting only if you cannot set your top and bottom margins using your application Character table Standard model italic PC 437 PC 850 PC 860 PC 863 PC 865 PC 861 BRASCII Abicomp Roman 8 ISO Latin 1 PC858 ISO8859 15 All other models Italic PC 437 PC 850 PC 437 Greek PC 853 PC855 PC 852 PC 857 PC 866 PC 869 MAZOWIA Code MJK ISO 8859 7 ISO Latin 1T Bulgaria PC 774 Estonia ISO 8859 2 PC 866 LA...

Страница 125: ... auto tear off is off and you are using continuous paper with the front or rear push tractor you need to move the perforation to the tear off position manually by pressing the Tear Off Bin button See Using the Tear off Function on page 47 for more information Auto line feed When auto line feed is on the printer accompanies each carriage return CR code received with a line feed LF code Print direct...

Страница 126: ...ption depending on which interface your computer uses Auto I F interface wait time When the printer is in the auto interface mode and it receives no data from the currently selected interface for the amount of time specified with this setting it determines which interface is receiving data and switches to that interface You can specify either 10 seconds or 30 seconds for the auto interface wait ti...

Страница 127: ... on each line feed LF code or ESC J code is accompanied by a carriage return CR code so the printer moves the next printing position to the left margin When this setting is off you must send a CR code after the line feed code to move the printing position to the left margin IBM character table This setting is available only in IBM PPDS emulation mode When you select Table 1 hex codes 00H to 1FH an...

Страница 128: ...ting needs Manual feed wait time This setting allows you to set the amount of wait time between when paper is inserted into the paper guide and it is fed If the paper feeds before you can adjust its position properly you should increase the wait time Changing default settings Follow these steps to enter the default setting mode and change the printer s default settings Note To print the language s...

Страница 129: ...he Set Tear Off Bin button to print the default setting mode instructions three pages in the language you selected The printed instructions list the settings you can change describe how to change them and show you how the control panel lights help you make settings Use these instructions to change the printer s default settings from the control panel 5 When you finish making settings press the Men...

Страница 130: ...he printer 2 Turn on the printer while holding down both the Load Eject and Pause buttons The printer beeps twice indicating that the lock out mode has been turned on When the lock out mode is on the Pause and Paper Out lights flash simultaneously when the locked buttons are pushed To turn off the lock out mode repeat steps 1 and 2 The printer beeps once indicating that the lock out mode has been ...

Страница 131: ...out mode setting 1 Make sure paper is loaded and the printer is turned off cCaution Whenever you turn off the printer wait at least five seconds before turning it back on otherwise you may damage the printer 2 Turn on the printer while holding down both the LF FF and Pause buttons The printer enters the lock out setting mode and prints the instructions 3 Make desired changes to the setting accordi...

Страница 132: ...126 Control Panel R4CC530 long bk Rev E A5 size CP fm 6 23 03 L Proof Sign off ABE J Hashimoto S Yamamoto H Kimura S Halvorson ...

Страница 133: ... Power supply problems 135 Paper loading or feeding problems 136 Printing position problems 139 Printing or printout quality problems 141 Network problems 147 Correcting USB Problems 147 Clearing Paper Jams 151 Aligning Vertical Lines in Your Printout 152 Canceling Printing 153 Contacting Customer Support 154 For users in North America 155 For users in the United Kingdom and the Republic of Irelan...

Страница 134: ...hen apply likely solutions until the problem is fixed The information that you need to diagnose and solve most common problems is provided by the printer s control panel EPSON Status Monitor 3 or by printing a self test or Hex Dump Refer to the appropriate section below If you have a specific problem relating to print quality a printout problem not related to print quality or a paper feeding probl...

Страница 135: ...ion O Paper Out O Pause No paper is loaded in the selected paper source Load paper in the printer or select a different paper source the Paper Out light goes off Then press the Pause button the Pause light goes off and the printer starts printing The paper is not loaded correctly Remove your paper and reload it correctly See Loading Continuous Paper on page 17 or Loading Single Sheets on page 49 f...

Страница 136: ...ted Press the Load Eject button to eject the sheet Continuous paper is not fed to the standby position Tear off the printed page at the perforation then press the Load Eject button The printer feeds the paper to the standby position Paper is jammed in the printer To clear the paper jam see Clearing Paper Jams on page 151 F Pause The print head is overheated Wait for a few minutes the printer resum...

Страница 137: ...mputer or interface cable Be sure to use a shielded interface cable If the self test does not print properly there is a problem with the printer See Problems and Solutions on page 134 for possible causes and solutions to the problem You can print the self test using either single sheets or continuous paper See Loading Continuous Paper on page 17 for instructions on loading continuous paper or Load...

Страница 138: ...ter loads the paper automatically and begins printing the self test A series of characters is printed Note To temporarily stop the self test press the Pause button To resume the test press the Pause button again 3 To end the self test press the Pause button to stop printing If paper remains in the printer press the Load Eject button to eject the printed page Then turn off the printer cCaution Do n...

Страница 139: ...is turned off cCaution Whenever you turn off the printer wait at least five seconds before turning it back on otherwise you may damage the printer 2 To enter hex dump mode turn on the printer while holding down the LF FF and Load Eject buttons 3 Open a software program and send a print job to the printer Your printer prints all the codes it receives in hexadecimal format By comparing the character...

Страница 140: ...nd solution to printer problems that occur Determine the type of problem that occurred and see the appropriate section below You can also use the self test to determine whether the printer or the computer is causing the problem See Printing a Self Test on page 131 for instructions on printing a self test To pinpoint communication problems experienced users may want to use the printer s hex dump mo...

Страница 141: ...ge rating does not match the voltage of your electrical outlet Check the printer and the outlet voltage ratings If the voltages do not match unplug the printer immediately and contact your dealer The printer does not work and the control panel lights are off even when you turn on the printer Cause What to do Thepowercordisnotproperly plugged into the electrical outlet or your printer Turn off the ...

Страница 142: ...eris setto a tractor position Set the paper release lever to the single sheet position The paper on the paper guide is positioned too far to the left orrightfortheprintertodetect that it is there Move the paper and the edge guides a little to the left or right Single sheet paper is not loaded properly See Loading Single Sheets on page 49 for instructions on loading single sheet paper The paper thi...

Страница 143: ...in Installingthe cut sheet feeder on page 172 Too many sheets are loaded in the cut sheet feeder You cannot load more than 150 sheets of paper in the high capacity cut sheet feeder Load less than 150 sheets of paper See Cut Sheet Feeder on page 171 for more information The edge guides of the cut sheet feeder are not positioned correctly Align the left edge guide with the arrow mark then move the r...

Страница 144: ...inuous paper with the tractor you want to use The paper thickness lever is not set correctly Set the paper thickness lever to match the thickness of your paper See Adjusting the Paper Thickness Lever on page 15 for instructions The printer does not feed continuous paper to the standby position Cause What to do You have not torn off the printed pages before pressing the Load Eject button Tear off t...

Страница 145: ... Check and adjust the margin or top of form position settings in your application software See the printable areaspecificationsin Printablearea on page 219 You can also adjust the top of form position using the Micro Adjust function However settings made in Windows applications override settings made in the Micro Adjust mode See Adjusting the top of form position on page 64 The printer driversetti...

Страница 146: ...ved the paper using the knob while the printer was on Adjust the tear off position using the Micro Adjust function See Adjusting the top of form position on page 64 The printer you want to use is not selected in your software Choose the correct printer from the Windowsdesktoporinyourapplication before printing The paper size setting in your application or printer driver does not match the size of ...

Страница 147: ...oes not print correctly due to the combination of these devices Makesure that the printer works correctly when it is connected to your computer without these devices The printer driver is not installed correctly Check that the printer driver is installed properly If necessary reinstall the printer driver Paper is jammed or the ribbon or guard mechanism is stuck Turn the printer off open the printe...

Страница 148: ...r See Electronic on page 210 and your computer documentation Your software is not properly set up for your printer Select your printer from the Windows desktop or in your application If necessary install or reinstall the printer driver software as described in the Setup Sheet The printer makes noise but nothing prints or printing stops abruptly Cause What to do The paper thickness lever is set inc...

Страница 149: ...ed is set to Ultra high speed draft USD Change the printing speed setting as describedin SelectingaFontandPitch on page 114 The ribbon is worn out Replace the ribbon cartridge as described in Replacing the ribbon cartridge on page 164 The printout is faint Cause What to do The paper thickness lever is set incorrectly for your paper Move the paper thickness lever to a lower setting See Adjusting th...

Страница 150: ... Replacing the ribbon cartridge on page 164 Lines of dots are missing in the printout Cause What to do The print head is damaged Stop printing and contact your dealer to have the print head replaced cCaution Never replace the print head yourself you may damage the printer Also other parts of the printer must be checked when the print head is replaced All the text is printed on the same line Cause ...

Страница 151: ...use What to do Yourprinterandcomputerare not communicating correctly Make sure that you use the correct interface cable and that the communications protocol is correct See Electronic on page 210 and your computer documentation The wrong character table is selected in your software Select the correct character table using your software or the default setting mode Thecharactertablesettinginyour soft...

Страница 152: ... of alignment Use the printer s bidirectional adjustment mode to correct this problem See Aligning Vertical Lines in Your Printout on page 151 The printer does not print when using a network Cause What to do The network setting is wrong Check whether or not print jobs from other computers are being printed through the network When the print job is executed the printer or your computer may have a p...

Страница 153: ...computer which is not equipped with a USB port or which has been upgraded from Windows 95 to Windows Me 98 XP or 2000 For details about your computer contact your dealer Make sure that EPSON USB Printer Devices appears on the Device Manager menu for Windows Me and 98 only If you canceled the plug and play driver installation before the procedure was complete either the USB printer device driver or...

Страница 154: ...appear on the Device Manager menu If EPSON USB Printer Devices does not appear on the Device Manager menu click the plus sign beside Other devices to view the installed devices If USB Printer appears under Other devices the USB printer device driver is not installed correctly If EPSON FX 890 for the FX 890 users or EPSON FX 2190 for the FX 2190 users appears the printer driver is not installed cor...

Страница 155: ...f USB Printer or EPSON FX 890 for the FX 890 users or EPSONFX 2190 fortheFX 2190users doesnotappearunder Other devices click Refresh or unplug the USB cable from the printer then plug it into the printer again 4 Under Other devices select USB Printer or EPSON FX 890 for the FX 890 users or EPSON FX 2190 for the FX 2190 users and click Remove Then click OK ...

Страница 156: ...one or more of these solutions Make sure that the cable you are using is a standard shielded USB cable If you are using a USB hub connect the printer to the first tier of the hub or connect the printer directly to the computer s USB port For Windows98 tryreinstallingthe USBprinterdevicedriver and the printer software First uninstall EPSON Printer Software using the Add Remove Programs utility in t...

Страница 157: ... printer away from you to remove the paper in the printer Remove any remaining pieces of paper If the paper is stuck where the printer ejects it gently pull the paper out of the printer cCaution Use the knob on the left side of the printer to clear paper jams only when the printer is off Otherwise you may damage the printer or change the top of form or tear off position 5 Close the printer cover a...

Страница 158: ... sheet from the paper guide Follow these steps to perform the bidirectional adjustment 1 Make sure paper is loaded then turn off the printer cCaution Whenever you turn off the printer wait at least five seconds before turning it back on otherwise you may damage the printer 2 While holding down the Pause button turn on the printer The printer enters the bidirectional adjustment mode and then prints...

Страница 159: ...o cancel printing You can cancel printing from your computer by using the printer driver or from the printer s control panel Using the printer driver To cancel a print job before it is sent from your computer see Canceling Printing on page 103 Using the printer s control panel Pressing the Font and Pitch buttons at the same time stops printing clears the print job being received from the active in...

Страница 160: ... customer support for your area is not listed below contact the dealer where you purchased your product Customer support will be able to help you much more quickly if you give them the following information Product serial number The serial number label is usually on the back of the product Product model Product software version Click About Version Info or similar button in the product software Bra...

Страница 161: ...umber located on the back of the printer Service Access World Wide Web From the Internet you can reach EPSON Support at http support epson com At this site you can download drivers and other files look at documentation such as product brochures and user manuals and access troubleshooting information EPSON Internet FTP Site If you have Internet FTP capability use your Web browser or other software ...

Страница 162: ...ies from EPSON at 800 873 7766 or visit ourwebsite atwww epsonstore com U S sales only In Canada please call 800 873 7766 for dealer referral For users in the United Kingdom and the Republic of Ireland If you purchased your product in the UK or the Republic of Ireland EPSON UK LTD provides a range of customer services and technical support Support Via the World Wide Web For information on the late...

Страница 163: ...d within the warranty period Pre Sales Enquiry Desk Our Enquiry Desk team can be contacted by calling 0800 220546 in the UK or 1 800 409132 from the Republic of Ireland by faxing 01442 227271 in the UK or 0044 1442 227271 from the Republic of Ireland and via e mail at info epson co uk They can provide the following information Pre sales information and literature on new EPSON products also availab...

Страница 164: ...ON contact points new product information and technical support e mail EPSON Faxback service EPSON Faxback service will fax you the latest specifications for most EPSON products offered in Australia Phone 02 9903 9075 and the system will guide you through a number of choices before faxing the information to your fax machine EPSON Helpdesk EPSON Helpdesk is provided as a final backup to make sure o...

Страница 165: ...ams and any information you feel is required For users in Singapore Sources of information support and services available from Epson Singapore are World Wide Web www epson com sg Information on product specifications drivers for download Frequently Asked Questions FAQ Sales Enquiries and Technical Support via e mail are available Epson HelpDesk Phone 065 5863111 Our HelpDesk team can help you with...

Страница 166: ...ons drivers for download Frequently Asked Questions FAQ and Email Enquiries are available Epson Trading Shah Alam Head Office For users in India Contacts for information support and services are World Wide Web www epson co in Information on product specifications drivers for download Frequently Asked Questions FAQ Products Enquiry and Technical Query are available Phone 03 5191366 Fax 03 5191281 ...

Страница 167: ...her after sales services users are welcome to contact the EPSON Philippines Representative Office at the telephone and fax numbers below Phone 5321 266 70 Fax 5581799 5321095 Help Desk Phone 5321 625 Mumbai Phone 8261516 17 Fax 8257287 Help Desk Phone 8261515 Delhi Phone 3352051 53 Fax 3352054 Help Desk Phone 3706222 Chennai Phone 8203940 41 Fax 8272463 Help Desk Phone 8218659 Kolkata Phone 287135...

Страница 168: ...162 Problem Solver R4CC530 long bk Rev E A5 size TROUB fm 6 23 03 L Proof Sign off ABE J Hashimoto S Yamamoto H Kimura S Halvorson ...

Страница 169: ...in cut sheet feeder 175 Loading paper in the high capacity cut sheet feeder 180 Assembling the double bin cut sheet feeder 185 Selecting the paper path bin 1 or bin 2 187 Front Sheet Guide and Front Paper Guide 188 Installing the front sheet guide or front paper guide 189 Loading paper in the front sheet guide or front paper guide191 Roll Paper Holder 195 Assembling the roll paper holder 195 Insta...

Страница 170: ...tured to work properly with your EPSON printer They ensure proper operation and long life of the print head and other printer parts Your printer uses the following ribbon cartridge Replacing the ribbon cartridge Follow these steps to replace the ribbon cartridge wWarning You need to move the print head by hand to replace the ribbon cartridge If you have just used the printer the print head may be ...

Страница 171: ...imoto S Yamamoto H Kimura S Halvorson 6 6 6 6 6 6 6 6 6 6 6 6 1 Make sure the printer is turned off The printer is off when the power switch is pressed down to the N side 2 Iftheprinterisconnectedtoanelectricaloutlet unplugitfrom the outlet 3 Open the paper guide cover by pulling its back edge toward ...

Страница 172: ...L Proof Sign off ABE J Hashimoto S Yamamoto H Kimura S Halvorson 4 Open the printer cover to the upright position then pull it up to remove it 5 Press the tabs on each side of the paper tension unit upward then lift the front of the unit and pull it up and out of the printer ...

Страница 173: ...6 6 6 6 6 6 6 6 6 6 Make sure that the print head is not hot if it is let it cool for a few minutes before touching it Then slide the print head to the middle of the printer by hand cCaution Never move the print head while the printer is turned on this can damage the printer 7 Grasp the ribbon guide and pull it until it is out of the print head ...

Страница 174: ...8 Grasp the used cartridge by its handle and pull it up and out of the printer 9 Hold both sides of the ribbon guide and pull it until it is out of the cartridge 10 Insert the ribbon cartridge into the printer at an angle as shown below then press firmly on both sides of the cartridge to fit the plastic hooks into the slots on the printer ...

Страница 175: ...A5 size OPT fm 6 23 03 R Proof Sign off ABE J Hashimoto S Yamamoto H Kimura S Halvorson 6 6 6 6 6 6 6 6 6 6 6 6 11 Slide the ribbon guide into the print head until it clicks in place cCaution When inserting the ribbon guide press firmly until it clicks ...

Страница 176: ... S Yamamoto H Kimura S Halvorson 12 Turn the ribbon tightening knob to help feed the ribbon into place cCaution The ribbon should not be twisted or creased 13 Reinstall the paper tension unit by lowering it onto the printer s mounting pegs Then press down on both ends of the unit until it clicks into place ...

Страница 177: ...types of optional cut sheet feeders are available for use with your printer as shown below You can use either one of these separately or you can use both feeders together as a double bin cut sheet feeder to automatically load two different types of single sheet paper The single bin cut sheet feeder holds up to 50 single sheets The high capacity cut sheet feeder holds up to 150 single sheets or up ...

Страница 178: ... in the high capacity cut sheet feeder on page 180 Note Youcannotinstall andusetheoptionalcut sheetfeeders whenthetractor unit is installed in the pull position See Removing the tractor from the pull position on page 42 for instructions on removing the tractor from the pull position Installing the cut sheet feeder The installation procedure is the same for the single bin high capacity and double b...

Страница 179: ...tion and pulling it straight up Lift the printer cover by its back edge and then pull it straight up and off the printer 3 Holding the cut sheet feeder in both hands press down on the latch levers and fit the notches over the printer s mounting posts as shown below Release the latch levers to lock the feeder in place If you are installing the high capacity or double bin cut sheet feeder see the fo...

Страница 180: ...174 Options and Consumables R4CC530 long bk Rev E A5 size OPT fm 6 23 03 L Proof Sign off ABE J Hashimoto S Yamamoto H Kimura S Halvorson single bin cut sheet feeder high capacity cut sheet feeder ...

Страница 181: ...e information You are now ready to load paper in your single bin high capacity or double bin cut sheet feeder For instructions see Loading paper in the single bin cut sheet feeder on page 175 or Loading paper in the high capacity cut sheet feeder on page 180 Loading paper in the single bin cut sheet feeder The single bin cut sheet feeder holds up to 50 sheets of paper When it is installed you stil...

Страница 182: ...oof Sign off ABE J Hashimoto S Yamamoto H Kimura S Halvorson 1 Make sure the paper guide is removed and set the paper release lever to the single sheet position Also make sure the paper thickness lever located under the printer cover is set to 0 and the paper guide cover is open ...

Страница 183: ...o S Yamamoto H Kimura S Halvorson 6 6 6 6 6 6 6 6 6 6 6 6 2 Slide the leftpaper guide of the cut sheet feeder so it is aligned with the triangle mark Next slide the right paper guide to roughly match the width of your paper Slide the paper support midway between the paper guides Paper guides Paper support ...

Страница 184: ... S Halvorson 3 Pull both paper set levers forward until the paper guides retract and lock open to allow paper loading 4 Take a stack of paper up to 50 sheets and fan it Next tap the side and bottom edges of the paper on a flat surface to even up the stack 5 Insert the paper stack printable side down along the left paper guide ...

Страница 185: ...son 6 6 6 6 6 6 6 6 6 6 6 6 6 Adjust the right paper guide so that it matches your paper s width Make sure the position of the guide allows the paper to move up and down freely 7 Push back the paper set levers to clamp the paper against the guide rollers 8 Attach the stacker support wires to the paper guide as shown below if necessary ...

Страница 186: ... the edge guides to the middle of your paper The cut sheet feeder automatically loads paper when the printer receives data If the first line on your page appears too high or low you can adjust its position using the Micro Adjust function See Adjusting the top of form position on page 64 Loading paper in the high capacity cut sheet feeder The high capacity cut sheet feeder holds up to 150 sheets of...

Страница 187: ... forms carbon paper or labels in the high capacity cut sheet feeder 1 Set the paper release lever to the single sheet position Also make sure the paper thickness lever located under the printer cover is set to 0 if you are using ordinary single sheet paper If you are using envelopes see Envelopes on page 57 for instructions on setting the paper thickness lever Then open the paper guide cover ...

Страница 188: ...lvorson 2 Pull the lock levers on the edge guides forward to release them 3 Slide the left paper guide until it is aligned with the triangle mark then lock it in place by pushing back its lock lever Next slide the right paper guide to roughly match the width of your paper Slide the paper support to midway between the paper guides ...

Страница 189: ...6 6 6 6 6 6 6 6 6 6 6 6 4 Pull both paper set levers forward until the paper guides retract and lock open to allow paper loading 5 Take a stack of paper up to 150 sheets and fan it Next tap the side and bottom edges of the paper on a flat surface to even up the stack 6 Insert the paper stack printable side down along the left paper guide ...

Страница 190: ... allows the paper to move up and down freely If you are loading envelopes push back the envelope levers as shown below 8 Pushbackthe papersetlevers toclampthepaperorenvelopes against the guide rollers The cut sheet feeder automatically loads paper when the printer receives data If the first line on your page appears too high or low you can adjust its position using the Micro Adjust function See Ad...

Страница 191: ...of single sheet paper in the printer at the same time and easily switch between them Before you install the double bin cut sheet feeder you need to connect the single bin cut sheet feeder C80637 C80639 to the high capacity cut sheet feeder C80638 C80640 Follow these steps to assemble the double bin cut sheet feeder 1 Remove the gear cover from the back of the high capacity cut sheet feeder by pres...

Страница 192: ...single bin cut sheet feeder in both hands Fit the notches in the single bin cut sheet feeder over the mounting posts on the back of the high capacity cut sheet feeder 3 Lock the two cut sheet feeders together by pushing firmly on the tab locks To install the double bin cut sheet feeder on your printer see Installing the cut sheet feeder on page 172 ...

Страница 193: ...BE J Hashimoto S Yamamoto H Kimura S Halvorson 6 6 6 6 6 6 6 6 6 6 6 6 Selecting the paper path bin 1 or bin 2 When the double bin cut sheet feeder is installed the high capacity cut sheet feeder becomes bin 1 and the single bin cut sheet feeder becomes bin 2 for paper path selection purposes ...

Страница 194: ... Binbutton until the light indicates the bin you want as shown below O On N Off F Flashing Thecut sheetfeederyou selectedautomaticallyloadspaperwhen the printer receives data Front Sheet Guide and Front Paper Guide The optional front sheet guide C81400 C80401 and front paperguide C81402 C80403 fitinside the frontofthe printer These options allow you to load single sheets and carbonless single shee...

Страница 195: ...ow apply to both the front paper guide and the front sheet guide Separate illustrations are provided where necessary refer to the appropriate illustrations when installing and using these options Installing the front sheet guide or front paper guide Follow these steps to install the front sheet guide or front paper guide 1 Open the front cover If you are installing the front sheet guide remove the...

Страница 196: ...190 Options and Consumables R4CC530 long bk Rev E A5 size OPT fm 6 23 03 L Proof Sign off ABE J Hashimoto S Yamamoto H Kimura S Halvorson front sheet guide front paper guide ...

Страница 197: ...nt paper guide See Loading paper in the front sheet guide or front paper guide on page 191 for instructions Loading paper in the front sheet guide or front paper guide You can load single sheets or multipart forms one at a time in the front sheet guide or front paper guide Follow these steps cCaution Do not load labels or envelopes in the front sheet guide or front paper guide 1 Make sure the pape...

Страница 198: ... single sheet multipart form set the paper thickness lever to the proper position as shown in the table below 3 Turn on the printer if necessary 4 Slide the left edge guide to the triangle mark on the front paper or front sheet guide Then adjust the right edge guide to match the width of your paper Multipart form type Paper thickness lever position 2 parts original 1 copy 1 3 parts original 2 copi...

Страница 199: ... 6 Note You can slide the left edge guide to the left in 1 10 inch increments to increase the left margin on your printout 5 Slide the paper printable side up between the edge guides until it meets resistance The printer loads the paper automatically Note When feeding paper place your hand flat on the paper and push it to completely into the feed slot 5 10 15 ...

Страница 200: ...3 03 L Proof Sign off ABE J Hashimoto S Yamamoto H Kimura S Halvorson front sheet guide front paper guide If the first line on your page appears too high or low you can adjust its position using the Micro Adjust function See Adjusting the top of form position on page 64 ...

Страница 201: ...r holder allows you to use 8 5 inch roll paper like that used with telex machines This provides an inexpensive alternative to using continuous paper for applications requiring variable paper lengths Before you install and use the roll paper holder you need to assemble it Assembling the roll paper holder Follow these steps to assemble the roll paper holder 1 Fit the arc bearings into the stand as s...

Страница 202: ...spacing clips Make sure you orient the stand and base plate as shown below 3 Hook the tension lever onto both ends of the stand as shown below While pulling up on the tension lever fit the wire ends of the tension lever into the holes in the stand The roll paper holder is assembled Installing the roll paper holder Follow these steps to install the roll paper holder on your printer 1 Make sure the ...

Страница 203: ...l or rear push position Reinstall the paper tension unit if necessary 3 Position the roll paper holder underneath the printer as shown below Fit the two positioning pegs on the bottom of the printer into the two holes in the base plate cCaution The roll paper holder is not fastened to the printer only the printer s weight and the two positioning pegs hold it in place If you pick up the printer be ...

Страница 204: ...inter is turned off and the paper guide is removed Also make sure the tractor is not installed in the pull or rear push position and the paper tension unit is installed 2 Set the paper release lever to the single sheet position Also set the paper thickness lever to the proper position for the thickness of your roll paper 3 Cut the leading edge of the roll paper straight across 4 Insert the roll pa...

Страница 205: ...orson 6 6 6 6 6 6 6 6 6 6 6 6 5 Place the shaft and paper roll on the roll paper holder so the paper feeds from the bottom of the roll Then turn on the printer 6 Bring the leading edge of the paper up over the rear of the printer and insert it into the printer until it meets resistance The printer loads the roll paper automatically ...

Страница 206: ...nstall the paper guide over the roll paper to separate the printout from the unused paper Slide the edge guides to the middle of the paper guide You are now ready to print When you finish printing press the LF FF button to advance the paper then tear off the paper using the tear off edge of the tractor unit pull it toward you for a clean cut ...

Страница 207: ... behind where it feeds into the printer then press the Load Eject button to eject the remaining paper Additional Tractor Unit You can install the optional additional tractor unit C80020 for the FX 890 C80021 for the FX 2190 and use two tractors at the same time By using two tractors at the same time the paper jams are reduced and continuous paper feeding is improved Fordetails on installing the ad...

Страница 208: ...nal interface adapter C82525 to the interface card If you are not sure whether you need an optional interface or would like to know more about interfaces contact your dealer Installing an interface card Follow these steps to install an optional interface card Model number Card type C82305 C82306 Serial interface C82307 C82308 32 KB intelligent serial interface C82312 LocalTalk interface C82313 32 ...

Страница 209: ...the printer s power cord and disconnect the interface cable 2 Remove the screws securing the shield plate to the back of the printer and remove the plate 3 Slide the interface card along the slots on both sides of the interface compartment Firmly push in the card to make sure the connector at the back of the card is fully inserted into the printer s internal socket Then replace the screws and tigh...

Страница 210: ...ing a print server in the printer s parallel interface port See the Administrator s Manual packaged with this option for instructions on installation and use The following Printer Servers can be used EpsonNet 10 Base 2 T Int Print Server C82362 EpsonNet 10 100 Base Tx Int Print Server C82363 C82364 EpsonNet 10 100 Base Tx Int Print Server C82384 EpsonNet 10 100 Base Int Print Server 2 C82391 Epson...

Страница 211: ...A A A A A A A Appendix A Product Information Printer Parts 206 Printer Specifications 207 Mechanical 207 Electronic 210 Electrical 212 Environmental 213 Paper 213 Printable area 219 Command Lists 221 EPSON ESC P control codes 221 IBM PPDS emulation control codes 223 Standards and Approvals 224 Cleaning the Printer 225 Transporting the Printer 226 ...

Страница 212: ...oto H Kimura S Halvorson Printer Parts tractor unit parts paper guide edge guides control panel paper release lever power switch front cover paper guide cover printer cover ribbon cartridge paper tension unit paper thickness lever AC inlet knob USB interface parallel interface optional interface cover sprockets ...

Страница 213: ...raft 559 cps at 10 cpi 627 cps at 12 cpi Draft 419 cps at 10 cpi 503 cps at 12 cpi Draft emphasized 209 cps at 10 cpi Near letter quality 104 cps at 10 cpi 125 cps at 12 cpi Printing direction Bidirectional logic seeking for text and graphics printing Unidirectional text or graphics printing can be selected using software commands Line spacing 1 6 inch or programmable in 1 216 inch increments Prin...

Страница 214: ...cond Intermittent 62 msec line at 1 6 inch line spacing Paper capacity Single bin cut sheet feeder up to 50 sheets of 82 g m 22 lb paper Note The total thickness of the paper stack can be up to 5 mm 0 20 inch High capacity cut sheet feeder up to 150 sheets of 82 g m 22 lb paper up to 25 plain or bond envelopes up to 30 airmail envelopes Note The total thickness of the paper stack can be up to 15 m...

Страница 215: ...de and paper release lever Weight approx 7 6 kg 16 8 lb FX 2190 Height 167 5 mm 6 6 inches Width 589 mm 23 2 inches Depth 350 mm 13 8 inches not including the knob paper guide and paper release lever Weight approx 9 6 kg 21 7 lb Ribbon Black ribbon cartridge S015329 for FX 890 S015327 for FX 2190 Ribbon life approx 7 5 million characters Draft 10 cpi 14 dots character for FX 890 approx 12 million ...

Страница 216: ...tandard bidirectional 8 bit parallel interface with IEEE 1284 nibble mode support one USB ver 1 1 interface and one optional Type B interface slot Buffer 128KB Fonts Bitmap fonts EPSON Draft 10 12 15 cpi EPSON Roman 10 12 15 cpi proportional EPSON Sans Serif 10 12 15 cpi proportional Bar code fonts EAN 13 EAN 8 Interleaved2of5 UPC A UPC E Code 39 Code 128 POSTNET ...

Страница 217: ... italic and 38 graphics character tables Italic table PC 437 US Standard Europe PC 850 Multilingual PC 860 Portuguese PC 861 Icelandic PC 865 Nordic PC 863 Canadian French BRASCII Abicomp ISO Latin 1 Roman 8 PC 858 ISO 8859 15 PC 437 Greek PC 852 Eastern Europe PC 853 Turkish PC 855 Cyrillic PC 857 Turkish PC 866 Russian PC 869 Greek MAZOWIA Poland Code MJK CSFR ISO 8859 7 Latin Greek ISO Latin 1T...

Страница 218: ...ny UK Denmark I Sweden Italy Spain I Japan Norway Denmark II Spain II Latin America 120 V Model 220 to 240 V Model Universal UPS Model Rated voltage range 120 V 220 to 240 V 100 to 240 V Input voltage range 103 5 to 132 V 198 to 264 V 90 to 264 V Rated frequency range 50 to 60 Hz Input frequency range 49 5 to 60 5 Hz Rated current 1 1 A maximum 2 5 A depending on the character type 0 6 A maximum 1...

Страница 219: ...s envelopes androllpaper only under normal temperature and humidity conditions described below Do not load paper that is curled folded or crumpled Temperature Humidity without condensation Operation plain paper 5 to 35 C 41 to 95 F 10 to 80 RH Operation recycled paper envelope label or roll paper 15 to 25 C 59 to 77 F 30 to 60 RH Storage 30 to 60 C 22 to 140 F 0 to 85 Temperature 15 to 25 C 59 to ...

Страница 220: ...t sheet feeder 64 to 90 g m 18 to 24 lb for the optional cut sheet feeder Single sheet multipart forms for the optional front sheet or front paper guide only Front entry Rear entry Minimum Maximum Minimum Maximum Width FX 890 FX 2190 FX 890 FX 2190 mm inch 100 3 9 257 10 1 420 16 5 100 3 9 257 10 1 420 16 5 Length mm inch 100 3 9 364 14 3 100 3 9 364 14 3 Thickness mm inch 0 065 0 0025 0 14 0 0055...

Страница 221: ...0 46 0 018 Weight per sheet of multipart g m lb 40 12 58 15 Quality Carbonless multipart forms with a line of glue at the top side of the form Front entry Rear entry Minimum Maximum Minimum Maximum Width mm inch 100 3 9 148 5 8 100 3 9 148 5 8 Length FX 890 FX 2190 mm inch 148 5 8 100 3 9 148 5 8 100 3 9 148 5 8 Thickness mm inch 0 22 0 0087 Weight g m lb 192 51 Quality Plain paper and recycled pa...

Страница 222: ...on should be between 3 1 and 5 1 The thickness of the perforation part when extended should be 1mm or less The perforation between pages should not extend all the way to the edges of the paper Uncut length on the edges should be 1mm or more Minimum Maximum Width FX 890 FX 2190 mm inch 101 6 4 0 254 0 10 0 406 4 16 0 Length one page mm inch 101 6 4 0 558 8 22 0 Copies 1 original 5 copies Total thic...

Страница 223: ... bottom entry only Note Use only labels mounted on continuous backing sheets A 2 5 inches 63 5 mm min Minimum Maximum Label size See the figure below Width backing sheet FX 890 FX 2190 mm inch 101 6 4 0 254 0 10 0 406 4 16 0 Length backing sheet mm inch 101 6 4 0 558 8 22 0 Thickness backing sheet mm inch 0 07 0 0028 0 09 0 0035 Total thickness mm inch 0 16 0 0063 0 19 0 0075 Label weight g m lb 6...

Страница 224: ...nal roll paper holder only Minimum Maximum Envelope size No 6 Width mm inch 165 6 5 Length mm inch 92 3 6 Envelope size No10 Width mm inch 241 9 5 Length mm inch 105 4 1 Total thickness mm inch 0 16 0 0063 0 52 0 0205 Differences in thickness within the printable area must be less than 0 25 mm 0 0098 inch Weight g m lb 45 12 90 24 Quality Bond envelopes plain envelopes and airmail envelopes withou...

Страница 225: ...eets A The minimum top and bottom margins are 4 2 mm 0 2 inch B FX 890 The minimum left and right margins are 3 mm 0 1 inch The maximum printable width is 203 2 mm 8 0 inches For paper wider than 209 2 mm 8 2 inches the side margins increase to match the width of the paper FX 2190 The minimum left and right margins are 3 mm 0 1 inch The maximum printable width is 345 44 mm 13 6 inches For paper wi...

Страница 226: ...0 51 inch The maximum printable width is 203 2 mm 8 0 inches For paper wider than 229 2 mm 9 0 inches the side margins increase to match the width of the paper FX 2190 The minimum left and right margins are 13 mm 0 51 inch The maximum printable width is 351 8 mm 13 9 inches For paper wider than 377 8 mm 14 9 inches the side margins increase to match the width of the paper Envelopes A The minimum t...

Страница 227: ... emulation control codes For more information about the commands contact EPSON Customer Services See Contacting Customer Support on page 154 for details EPSON ESC P control codes Selecting an EPSON ESC P printer in your software allows you to use advanced fonts and graphics Roll paper A The minimum top and bottom margins are 4 2 mm 0 17 inch B The minimum left and right margins are 3 mm 0 12 inch ...

Страница 228: ...CR Page format ESC C ESC C ESC C 0 ESC Q ESC l ESC c ESC N ESC O ESC U Print position motion ESC ESC ESC D HT ESC B VT ESC J Font selection ESC k ESC x ESC y ESC P ESC M ESC g ESC p ESC 4 ESC 5 ESC E ESC F ESC Font enhancement ESC W DC4 SO DC2 SI ESC w ESC G ESC H ESC T ESC S ESC Spacing ESC Space Character handling ESC t ESC t ESC R ESC ESC ESC ESC 6 ESC 7 ESC I Bit image ESC K ESC L ESC Y ESC Z ...

Страница 229: ... NUL DC3 ESC j BEL CAN DC1 ESC Q ESC K ESC U ESC F Paper feeding FF LF ESC 5 ESC A ESC 0 ESC 1 ESC 2 ESC 3 CR ESC Page format ESC C ESC C0 ESC X ESC N ESC O ESC 4 Print position motion ESC d ESC R ESC D HT ESC B VT ESC J Font selection DC2 ESC P ESC ESC E ESC F ESC I ESC d ESC I Font enhancement DC4 SO ESC SO ESC W ESC SI ESC SI ESC G ESC H ESC T ESC S ESC ESC _ Spacing BS SP Character handling ES...

Страница 230: ...dards and Approvals U S model European model Universal UPS model Download ESC draft mode only Safety UL60950 CSA C22 2 No 60950 EMC FCC part 15 subpart B class B CSA C108 8 class B Low Voltage Directive 73 23 EEC EMC Directive 89 336 EEC EN 60950 EN 55022 Class B EN 55024 EN 61000 3 2 EN 61000 3 3 Safety UL60950 CSA C22 2 No 60950 EN 60950 ...

Страница 231: ... and turn off the printer 2 Remove the paper guide If an optional cut sheet feeder is installed remove it 3 Use a soft brush to carefully brush away all dust and dirt from the outer case and paper guide 4 If the outer case and the paper guide are still dirty or dusty clean them with a soft clean cloth dampened with mild detergent dissolved in water Keep the printer cover and front cover closed to ...

Страница 232: ... Transporting the Printer If you need to transport your printer some distance carefully repack it using the original box and packing materials Follow these steps to repack the printer in its original packing materials wWarning You need to move the print head by hand to remove the ribbon cartridge If you have just used the printer the print head may be hot let it cool for a few minutes before touch...

Страница 233: ...rinter in the Setup Sheet 5 Make sure that the paper tension unit is installed and the tractor is installed in the rear push position See Installing the tractor in the rear push position on page 26 for instructions on installation procedure Also make sure that the printer cover and front cover are closed 6 Repack the printer paper guide ribbon cartridge and power cord if necessary in their origina...

Страница 234: ...228 Product Information R4CC530 long bk Rev E A5 size APSPE fm 6 23 03 L Proof Sign off ABE J Hashimoto S Yamamoto H Kimura S Halvorson ...

Страница 235: ...aracters per inch cpi The number of characters that can fit in one inch of a text line determined by the size of the characters See also pitch continuous paper Paper that has sprocket feed holes on both long edges is perforated between pages and is supplied in a folded stack Also called fanfold paper control codes Special codes used to control printer functions such as a carriage return or line fe...

Страница 236: ... Sans Serif form feed FF A control panel button and control code that advances the paper to the next top of form position halftoning A method of using dot patterns to represent an image Halftoning makes it possible to produce varying shades of gray using only black dots or a nearly infinite array of colors using only a few colors of dots See also dithering hex dump A troubleshooting method that he...

Страница 237: ...etters or documents See also landscape printer driver A software program that sends commands for using the functions of a particular printer resolution A measure of the amount of detail that can be represented Resolution of printed images is measured by using the number of dots per inch dpi self test A method for checking the operation of the printer When you run the self test an internally stored...

Страница 238: ... S Halvorson unidirectional printing Printing in which the print head prints in one direction only Unidirectional printing is useful for printing graphics because it provides precise vertical alignment You can select unidirectional printing using the printer s default setting mode See also bidirectional printing ...

Страница 239: ...110 Buzzer beep pattern 129 Buzzer beeper setting 121 C Canceling printing 103 Cancelling printing 153 Cards 59 Clients with Windows Me 98 or 95 94 with Windows NT 4 0 99 with Windows XP or 2000 96 Contacting EPSON 154 Continuous paper loading 17 problems 136 removing 47 switching from 60 switching to 61 Control panel buttons and lights 110 Customer support 154 Cut sheet feeder assembling the doub...

Страница 240: ... Micro Adjust function 62 tear off position 62 top of form position 64 Multipart forms continuous 54 single sheet 54 O Option cut sheet feeder 171 front paper guide 188 front sheet guide 188 interface card 202 roll paper holder 195 P Packet mode 120 Page length for tractor 118 Paper jam clearing 151 Paper release lever 14 Paper source selecting 10 Paper specifications 214 Paper thickness lever 15 ...

Страница 241: ...ons built in fonts 210 command lists ESC P 221 IBM PPDS emulation 221 environmental 213 standards and approvals 224 Status Monitor 3 80 130 T Tear Off Bin button 110 Tear off function 47 Technical support 154 Troubleshooting network problems 146 paper loading or feeding problems 136 power supply problems 135 printing or printout quality problems 141 printing position problems 138 USB problems 147 ...

Страница 242: ...236 Index R4CC530 long bk Rev E A5 size LONG IX 6 23 03 L Proof Sign off ABE J Hashimoto S Yamamoto H Kimura S Halvorson ...

Отзывы: