


Testing and Connecting the Printer
35
Printing a status sheet
1. Turn the power switch at the front of the printer on. The lights
and the display messages are changed in the following order:
All lights come on once and then turn off. The display shows
ROM CHECK
.
The display shows
RAM CHECK XXXMB
, including the
actual memory size of standard and optional memory
modules displayed in place of
XXX
.
The display shows
SelfTest
, and then shows
Warming Up
. The
On Line
light comes on.
After about 65 seconds, the display shows
Ready
.
2. Press the
Enter
button. The display shows
Status Sheet
.
3. Press the
Enter
button again. The message on the display
starts flashing and the printer starts printing the status sheet.
4. Check the following points in the printed status sheet:
❏
The printer can print the status sheet clearly.
❏
The information on the options installed to the printer is
printed correctly. If you can find the installed option’s
name under
Hardware Configurations
, it means that the
printer can recognize the installed option properly.
Note:
If you installed an optional memory module,
Installed Memory
shows the total size including both default 16 MB and the optional
module’s size. However, if you installed one 256 MB-DIMM, the
status sheet shows 256 MB because the maximum memory size for
this printer is 256 MB.
If the installed option’s name is not listed on the status sheet, make
sure the options are connected securely to the printer.
Содержание EPL-N2050
Страница 1: ......
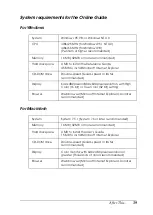
Страница 54: ...48 Index System Requirements 39 T Testing the printer 34 ...
Страница 55: ......