background image

Other Options 

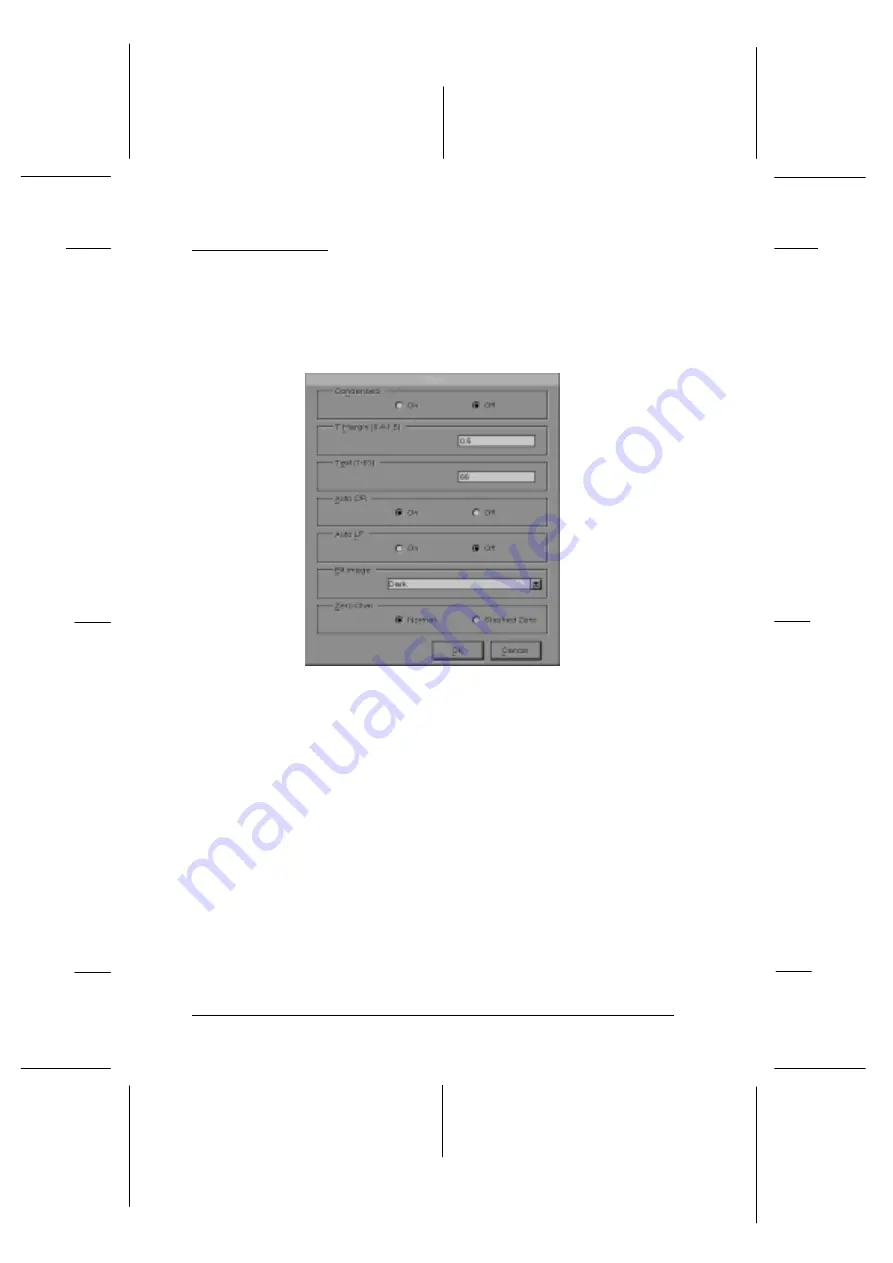
Clicking the 

Other

 button brings up the following dialog box.

This menu is available only in ESC/P 2, FX, or I239X emulation
modes.

Condensed (ESCP2, FX only)

Use this option to change the character spacing. Condensed
printing is useful for spreadsheets and other applications that
need to fit a large amount of information on each line.
However, 15-cpi characters cannot be condensed.

T.Margin

Use this option to specify the distance from the top of the sheet
to the baseline of the first printable line. This is measured in
0.05 inch increments. 

no10aa

L

Skylark

 Rev.c

Reference Guide

A5 size

Chapter 5

’96/05/15

DR, pass 2

5-14      

Remote Control Panel Utility 

Содержание EPL-N1200

Страница 1: ...onnector printer cover latch LocalTalk Serial interface connector option Type B interface connector option Parallel B interface connector cover 1n printer cover fuser grooves for imaging cartridge paper stopper control panel front cover power switch cover 2 BF Skylark Rev c A5 size cover 96 05 15 pass 1 ...

Страница 2: ...hall not be liable against any damages or problems arising from the use of any options or any consumable products other than those designated as Original Epson Products or Epson Approved Products by Seiko Epson Corporation EPSON and EPSON ESC P are registered trademarks and EPSON ESC P 2 is a trademark of Seiko Epson Corporation Speedo Fontware FaceLift Swiss and Dutch are trademarks of Bitstream ...

Страница 3: ...ncklaan 5 1183 AT Amstelveen The Netherlands Declares that the Product Product Name Laser Printer Type Name EPL N1200 Model L250A Conforms to the following Directive s and Norm s Directive 89 336 EEC EN 55022 Class B EN 50082 1 IEC 801 2 IEC 801 3 IEC 801 4 EN 61000 3 2 EN 61000 3 3 Directive 73 23 EEC EN 60950 August 1996 M Hamamoto President of EPSON EUROPE B V L Skylark Rev c A5 size Front 96 0...

Страница 4: ... Ozone safety 1 11 Laser Printer Precautions 1 12 Important Safety Instructions 1 15 For United Kingdom Users 1 16 Warnings Cautions and Notes 1 18 Chapter 1 Paper Handling Introduction 1 2 Loading Paper 1 2 Loading paper for automatic feeding in the MP Multi Purpose Tray 1 2 Manually loading paper 1 4 Selecting the paper size 1 6 Choosing Paper 1 7 Labels 1 8 Envelopes 1 8 Colored paper 1 8 Trans...

Страница 5: ...ettings 3 5 Getting help from the printer driver 3 6 Exiting the printer driver 3 6 Accessing the Font Manager window 3 6 Accessing the Softtray Manager window 3 6 Accessing the Overlay Manager window 3 7 Driver Setting Descriptions 3 7 Printer Settings menu 3 7 Paper menu 3 10 Adding a new size to the Paper Size list 3 12 Printer SelecType menu 3 13 Printer Options menu 3 15 Font Manager Window 3...

Страница 6: ...es 4 12 Installing the LocalTalk Serial module 4 13 Installing an optional interface card 4 15 Using the Serial Interface 4 17 Using the serial interface utility 4 19 Chapter 5 Remote Control Panel Utility Remote Control Panel Utility Overview 5 2 When to use the Remote Control Panel utility 5 2 Installing the Remote Control Panel utility 5 3 Accessing the Remote Control Panel 5 3 LaserJet 4 Epson...

Страница 7: ... 18 LJ4 menu 6 18 Using the OneTouch Modes 6 20 Using Other Emulations 6 22 ESC P 2 or FX Mode 6 22 I239X Mode 6 26 EPSON GL 2 Mode 6 27 Before printing in the EPSON GL 2 mode 6 28 Chapter 7 Troubleshooting and Maintenance Introduction 7 2 Paper Jam and Feeding Problems 7 2 Preventing paper feed and paper jam problems 7 5 Print Quality Problems 7 9 Memory Problems 7 14 Option Problems 7 14 Status ...

Страница 8: ...ing the Printer 7 32 Appendix A Technical Specifications Paper A 2 Specifications A 2 Printer A 3 General A 3 Environmental A 4 Mechanical A 4 Electrical A 5 Interface A 5 Parallel B interface A 5 Parallel C interface A 7 Using the ECP mode in Windows 95 A 12 Serial Interface A 13 Options and Consumables A 16 500 Sheet Lower Paper Cassette A 16 Imaging cartridge S051016 A 16 R Skylark Rev c A5 siz...

Страница 9: ...B 24 Appendix C Command Summary LaserJet 4 LJ4 Emulation Commands C 3 GL 2 context commands C 7 ESC P 2 and FX Commands C 9 ESC P 2 mode C 9 FX mode C 12 PJL Commands C 15 EJL Mode C 16 I239X Emulation Commands C 20 Page format C 20 Text C 22 Auxiliary Functions C 23 AGM Mode C 23 Appendix D Working with Fonts Printer and Screen Fonts D 2 Available Fonts D 3 Adding More Fonts D 6 Downloading fonts...

Страница 10: ...Appendix E Map of SelecType Menus Switching between SelecType Menus E 2 Glossary Index R Skylark Rev c A5 size Front 96 05 15 pass 2 ix ...

Страница 11: ... printer see the Getting Ready guide Chapter 1 Paper Handling contains information on loading paper Also consult this chapter when you need information about printing on special paper Chapter 2 Understanding Your Printer describes how to use the printer s control panel Chapter 3 Making Printer Driver Settings describes the features of the Windows printer driver packed with your printer If you need...

Страница 12: ...ain your printer Appendix A Technical Specifications contains the technical specifications about the printer Appendix B Symbol Sets lists the symbol sets available in each emulation mode with the tables of the characters for each set Appendix C Command Summary lists the commands that can be embedded in print jobs to control the printer This appendix is intended for advanced users only Appendix D W...

Страница 13: ...to install and use You simply set up the printer connect it to your computer and install the printer driver as described in the Getting Ready guide The printer supports ECP mode in Windows 95 ECP mode is useful for high speed data transfer and bidirectional communication with your computer Features The printer comes with a full set of features that contributes to ease of use and consistent high qu...

Страница 14: ...lso install an additional Type B serial coax or twinax interface The 500 Sheet Lower Paper Cassette C81262 A4 C81263 Letter automatically feeds up to 500 A4 or letter size sheets without reloading Using two lower paper cassettes the maximum you can preload up to 1 250 sheets of paper with the MP Tray 250 sheets See Chapter 4 for more information on printer options ENERGY STAR Compliance As an Inte...

Страница 15: ...eed through the Windows printer driver or DOS application use SelecType OneTouch modes or Remote Control Panel utility The OneTouch modes are part of SelecType Printer Driver Use the printer driver to easily and conveniently make new printer settings Most users may never need to use anything besides their application software and the printer driver to make printer settings You can access the print...

Страница 16: ... modes but may be slower depending on the settings you make See Using SelecType Chapter 6 for more information Remote Control Panel utility Use the Remote Control Panel utility when the printer is not easily accessible and you want to make SelecType settings This utility allows you to make SelecType settings from your computer It only works in DOS See Using the Remote Control Panel Utility Chapter...

Страница 17: ... completely confined within protective housings the laser beam cannot escape from the machine during any phase of user operation w Warning Use of controls or adjustments or performance of procedures other than those specified in this guide may result in hazardous radiation exposure This is a semiconductor laser The maximum power of the laser diode is 5 0 10 4 W and the wavelength is 780 20 nm Denm...

Страница 18: ... kan användaren utsättas för osynlig laserstrålning som överskrider gränsen för laser klass 1 LUOKAN 1 LASERLAITE KLASS 1 LASER APPARAT Kirjoittimen taakse kuvan osoitamiin paikkoihin on kiinnitetty tarrat jotka osoittavat että kirjoitin on B S 7192 ja IEC 825 määräysten mukainen luokan 1 laserlaite Jos kirjoittimen kuori poistetaan näkyviin tulee kolmas alla oleva tarra Norway Advarsel Dersom app...

Страница 19: ...RH regulations and must be attached to laser products marketed in the United States Laser safety labels w Warning Use of controls adjustments or performance of procedures other than those specified in this guide may result in hazardous radiation exposure Your printer is a Class 1 laser product as defined in IEC 825 specifications The label shown below is attached in countries where required int 2 ...

Страница 20: ...The printer head unit is NOT A FIELD SERVICE ITEM Therefore the printer head unit should not be opened under any circumstances For Denmark Finland Sweden and Norway users An additional laser warning label is affixed to the inside of the printer as shown below int 4n L Skylark Rev c Reference Guide A5 size Introduction 96 05 15 pass 1 10 Getting Started ...

Страница 21: ...dering a closed room of approximately 1000 cu ft 8 10 12 Minimize the risk To minimize the risk of exposure to ozone you should avoid the following conditions Use of multiple laser printers in a confined area see above Operation in conditions of extremely low humidity Poor room ventilation Long continuous printing together with any of the above Printer location The printer should be located so tha...

Страница 22: ...ucted to do so in this guide Never force the printer s components into place Although the printer is designed to be sturdy rough handling can damage it Be sure not to scratch the surface of the drum When you remove the imaging cartridge from the printer always set the unit on a clean smooth surface Also avoid touching the drum since oils from your skin can permanently damage its surface and may af...

Страница 23: ...e printed page and reduce the service life of the drum When handling the cartridge always set it on a clean smooth surface Do not attempt to modify or take apart the cartridge It cannot be refilled Try not to touch the toner and avoid all contact with your eyes Do not use a cartridge for at least one hour after moving it from a cool to a warm environment int 6new R Skylark Rev c Reference Guide A5...

Страница 24: ...temperature or humidity Also be sure to keep the consumable components out of the reach of children Hinweis Die Geräteanschlußleitung muß den einshlägigen Normen genügen Es muß eine dreiadrige Leitung verwendet werden Die Anshlußleitung darf nicht leichter als H05VV F order H05VVH2 F sein Maschinenlärminformations Verordnung 3 GSGV 18 01 1991 Der arbeitsplatzbezogene schalldruckpegel beträgt 70 dB...

Страница 25: ...ated on the label If you are not sure of the type of power available consult your dealer or local power company If you are unable to insert the plug into the outlet contact your electrician to replace your obsolete outlet Do not put your printer where the cord will be walked on If you use an extension cord make sure that the total of the ampere ratings on the products plugged into the extension co...

Страница 26: ... operating instructions are followed Adjust only those controls that are covered by the operating instructions since improper adjustment of other controls may result in damage and will often require extensive work by a qualified technician to restore the product to normal operation E If it has been dropped or the cabinet has been damaged F If it exhibits a distinct change in performance indicating...

Страница 27: ... coloured markings used to identify the terminals in a plug please proceed as follows The green and yellow wire must be connected to the terminal in the plug which is marked with the letter E or the Earth symbol G The blue wire must be connected to the terminal in the plug marked with the letter N The brown wire must be connected to the terminal in the plug marked with the letter L If damage occur...

Страница 28: ...ully to avoid bodily injury cCautions must be observed to avoid damage to your equipment Notes contain important information and useful tips on the operation of your printer L Skylark Rev c Reference Guide A5 size Introduction 96 05 15 pass 1 18 Getting Started ...

Страница 29: ... 2 Loading Paper 1 2 Loading paper for automatic feeding in the MP Multi Purpose Tray 1 2 Manually loading paper 1 4 Selecting the paper size 1 6 Choosing Paper 1 7 Labels 1 8 Envelopes 1 8 Colored paper 1 8 Transparencies 1 8 1 R Skylark Rev c A5 size Chapter 1 96 05 15 Pass 1 Paper Handling 1 1 ...

Страница 30: ...w you load regular paper using the MP Tray To load paper in an optional lower paper cassette see page 4 5 Note If the weight of your paper is not between 60 to 90 g m2 16 to 24 lb decrease the number of sheets you load Loading paper for automatic feeding in the MP Multi Purpose Tray This section describes loading a stack of regular paper For instructions on loading paper one sheet at a time see Ma...

Страница 31: ...o even it up 3 Adjust the paper guides to match the size of your paper Load the stack of paper into the MP Tray with the printable side up 4 Close the front cover 5 Slide the paper stopper to match the size of your paper 1 1 1 2 R Skylark Rev c A5 size Chapter 1 96 05 15 Pass 1 Paper Handling 1 3 ...

Страница 32: ...e MP Tray send print data to print the first page and press the On Line button to print each following page To load paper manually follow the steps below 1 Access the printer driver menus in one of the following ways Note If you have not installed the printer driver see your Getting Ready guide for installation instructions For access through your application software click the Print or Printer Se...

Страница 33: ...ual feed 3 Click the Paper tab to see the Paper menu Click the arrow next to the Paper Size box to see the list of available paper sizes Scroll through this list and click on the paper size that matches the paper you will load in the printer 4 Open the front cover Remove any paper remaining in the MP Tray 5 Adjust the paper guides to match the paper size you are using Insert a sheet into the MP Tr...

Страница 34: ...thods Using the printer driver Choose the paper size in the Print Settings tab or the Paper tab For more information on using the printer driver see Chapter 3 Using the Remote Control Panel utility Bring up the Remote Control Panel by typing EPRCPO at the DOS prompt Select the appropriate emulation from the main Remote Control Panel window and click the Page Setup button Then choose the paper size...

Страница 35: ... of paper stock before purchasing large quantities or printing large jobs You can use many kinds of media including stock paper envelopes labels and overhead projector transparencies The printer feeds most types of media automatically from the MP Tray This section describes the paper feed and delivery choices and how to select and load paper The type of paper you use in your printer can affect the...

Страница 36: ... envelopes may be irregular because different parts of an envelope have different thicknesses If the printing is too light adjust the print density with the printer driver the Remote Control Panel utility or SelecType Colored paper You can use colored paper as long as it meets the weight limits shown in the paper specifications Do not however use coated paper paper to which a clear or colored coat...

Страница 37: ...r Printer Proof Sign off Nishi _______ Norum _______ Grady _______ 2 The Control Panel 2 2 Overview 2 2 Display 2 3 Indicator lights 2 4 Buttons 2 5 R Skylark Rev c A5 size Chapter 2 96 05 15 pass 1 Understanding Your Printer 2 1 ...

Страница 38: ...ries and options It can be used as a guide whenever you use SelecType The Control Panel Overview The printer control panel gives you easy control over most common printer operations The panel is made up of three elements a liquid crystal display indicator lights and buttons The display and indicator lights tell you the current status of the printer and you can use the buttons to select printer set...

Страница 39: ... conditions you need to correct SelecType options such as Emulation allow you to control printer mode font selection paper handling and several other printer functions For solutions to error messages and maintenance information see Chapter 7 For full information on SelecType see Chapter 6 display buttons lights lights 2 1 R Skylark Rev c A5 size Chapter 2 96 05 15 pass 1 Understanding Your Printer...

Страница 40: ... section of memory reserved for receiving data this light is off Continue Flashes when an error is detected or a maintenance procedure must be performed At the same time an error or maintenance message appears on the display OneTouch mode 1 On when the printer is in OneTouch mode 1 For details on the OneTouch modes see page 6 20 OneTouch mode 2 On when the printer is in OneTouch mode 2 For details...

Страница 41: ...g this button while in SelecType mode returns the printer to on line status See Chapter 6 for more information ALT Menu Item Value or Enter Advances the parameter or setting shown to the next value in each group If used in combination with the ALT button in SelecType mode it returns the parameter or setting shown to its previous value On Line Enter SelecType Menu Item Value Form Feed Continue Rese...

Страница 42: ... the corresponding OneTouch mode option listed above this button or accepts the setting currently shown on the display as a new setting when in SelecType mode Press this button two times when the printer is on line to print the status sheet Form Feed When the printer is off line and data remains in the printer s memory prints out the data and clears the buffer Continue Reset Enables the printer to...

Страница 43: ...R Skylark Rev c A5 size Chapter 2 96 05 15 pass 1 Understanding Your Printer 2 7 ...

Страница 44: ... Accessing the Softtray Manager window 3 6 Accessing the Overlay Manager window 3 7 Driver Setting Descriptions 3 7 Printer Settings menu 3 7 Paper menu 3 10 Adding a new size to the Paper Size list 3 12 Printer SelecType menu 3 13 Printer Options menu 3 15 Font Manager Window 3 17 Adding fonts 3 20 Deleting fonts 3 22 Changing a font name 3 23 Copying and moving fonts to another printer port 3 23...

Страница 45: ...he graphic resolution orientation copies and other features of the document you are printing Using the Printer Driver Printer driver settings are divided among four menus that are identified by the tabs on the tops of the menus Print Settings Paper Printer SelecType and Printer Options Each menu has a variety of settings that affect printing as described in Driver Setting Descriptions on page 3 7 ...

Страница 46: ... horizontal and vertical dots per inch dpi The higher the numbers the more detailed the printout Halftone Sets the pattern or method your printer uses to print graphics This is also called grayscale Paper Format Indicates the size of the paper to be printed Paper Source Tells the printer which tray to take paper from Orientation Sets the direction of printing on the page portrait or landscape This...

Страница 47: ...the Setup button For direct access through Windows 95 click Start point to Settings and click Printers Next right click the Epson EPL N1200 icon and click Properties in the menu that appears Be sure to right click the printer icon Select the Details tab at the top of the window and then click the Setup button When you access the Driver Settings window the Print Settings menu appears To bring anoth...

Страница 48: ...want to save your new settings after making the choices you want type a unique name for the new settings in the Default box on the Print Settings menu and click OK Then when you are ready to print open the Default drop down list by clicking the arrow next to the Default box and select the name of the settings you want to make Deleting settings If you decide you want to delete your settings select ...

Страница 49: ...w to save all the settings you made and exit the printer driver Click the Cancel button to ignore all the current changes you made and exit the printer driver Accessing the Font Manager window Click the Fonts button at the bottom of the Driver Settings window to access the Font Manager window See page 3 17 for more detailed information about the Font Manager Accessing the Softtray Manager window C...

Страница 50: ... 3 27 for more information about the Overlay Manager Driver Setting Descriptions This section describes the settings you can make with the printer driver and provides a general overview of each menu Printer Settings menu Use this menu to select general print settings When you access the Driver Settings window the Print Settings menu appears by default no1 R Skylark Rev c A5 size Chapter 3 5 15 96 ...

Страница 51: ...a halftoning method when printing graphics The following settings are available in this list Dithering This method uses the standard Windows dithering patterns and is the one you should normally select Screening default This method controls color intensity by using variable dot sizes It is similar to the rastering method used to produce newspaper images You should use this method for scanned image...

Страница 52: ...r Envelope DL Commercial 10 Monarch C5 6 36 9 02 inches US half Government Legal Government Letter F4 Paper Source Use this drop down list to select the paper source The usual selections available in this list are Multi Purpose Tray default Manual feed and Auto However if you install the optional lower paper cassette and select Lower paper cassette or 2 Lower paper cassettes in the Feeder drop dow...

Страница 53: ...arrows or click the text box and enter a number using your keyboard to specify the number of copies you want You can enter from 1 to 999 Paper menu Use this menu to select duplex double sided printing paper size and printable area no2 L Skylark Rev c A5 size Chapter 3 5 15 96 DR pass 2 3 10 Making Printer Driver Settings ...

Страница 54: ...that are automatically listed by the printer driver or you can edit the list to create your own selection of paper sizes For more information on how to create your own selection see Adding a new size to the Paper Size list on page 3 12 Remove Click this button to delete the paper size that is selected in the Paper Size list You can use this button to shorten the list to contain only the paper size...

Страница 55: ... own and add it to the Paper Size list 1 In the Driver Settings window click the Paper tab 2 Move the cursor over the Paper Size box click once and input the name of the paper size 3 Use the Measurement Unit drop down list to specify the unit of measurement you want to use 4 Click on the dimension boxes in the Size block and input values for the horizontal and vertical dimensions of the paper you ...

Страница 56: ...ble in this list are Raster internal Fonts EPSON GL 2 and Pure Raster Device Resolution Use this drop down list to select device resolution The available settings are High 600 dpi default and Low 300 dpi For information on how these settings affect your printout see Graphics Resolution on page 3 8 no3 R Skylark Rev c A5 size Chapter 3 5 15 96 DR pass 2 Making Printer Driver Settings 3 13 ...

Страница 57: ...printer s internal fonts will not be displayed in the font list BiDi Mode Use this drop down list to enable the bidirectional interface to send printer status back to the PC Leave the default value set to Bidi OFF if your system hangs when you try to print Time out Use this drop down list to specify how long the printer should wait for data before terminating the current print job You can specify ...

Страница 58: ...hen continues printing after a wait of five seconds When Auto Continue is off you must press the button on the printer control panel to resume printing In most cases leave Auto Continue off so you are aware of the error messages and can make the necessary corrections You might want to set Auto Continue on when printing long jobs or when you are away from the printer for long periods Printer Option...

Страница 59: ...low you to print complex jobs Page Protect usually works best if set to Auto You will need to increase your printer s memory if memory errors continue to occur Note Changing the Page Protect setting reconfigures the printer s memory which causes any downloaded fonts to be erased Image Optimum Use this drop down list to reduce the amount of graphics data when the data reaches the memory limit allow...

Страница 60: ...The Font Manager window handles the installation and all administration of printer fonts Fonts of various formats can be added deleted and copied using this window You can also specify whether the font being installed is temporary or permanent no5 R Skylark Rev c A5 size Chapter 3 5 15 96 DR pass 2 Making Printer Driver Settings 3 17 ...

Страница 61: ...currently available for installation Each font name includes an icon or abbreviation that indicates the format of that font Whenever you select a font by highlighting its name in this list the font s format character set name and other information appear in the status line Delete Click this button to delete de install the font whose name is highlighted in the Installed Fonts list Edit Font Click t...

Страница 62: ...irectory that contains the fonts you want to add click OK to return to the Font Manager window The names of the fonts contained in the directory you selected will appear in the Available Fonts list You can also exit the Add Fonts window by clicking Cancel This returns you to the Font Manager window Copy Port Click this button to open the Copy Port window Use this window to copy or move installed f...

Страница 63: ...you selected in addition to the drive names 4 Choose the name of the directory that contains the fonts you want to add and highlight its name in the list To open a directory double click on the directory name or highlight the directory name and then click OK The directory name followed by on the list indicates the previous directory By selecting you can backstep through the directories 5 After you...

Страница 64: ...ay in printer memory until you switch power off Select a font name in the Installed Fonts list by highlighting its name and click on the Permanent radio button Note You must specify permanent fonts one by one If you select more than one font name in the Installed Fonts list the Temporary and Permanent radio buttons will become dimmed on the display which indicates they cannot be used If you want t...

Страница 65: ...elete A message appears asking if you want to delete the selected font from your computer s hard disk 4 Click Yes to delete the selected font from both printer memory and your computer s hard disk Selecting No deletes the selected font from printer memory but leaves it on the hard disk The font name will not appear in any menus but the font will continue to take up hard disk space 5 After you fini...

Страница 66: ...ppears 5 After typing in the new name click OK The new name appears in the Font Manager s Installed Fonts list and in all Windows applications 6 After you finish renaming the font click Exit to return to the Driver Settings window Copying and moving fonts to another printer port Use the following procedure to copy or move installed fonts to another printer port when you are using more than one EPS...

Страница 67: ...ighlighting their names in the Installed Fonts list 6 After selecting the fonts click Move or Copy Clicking Move causes the fonts to be moved to the list on the right for the port you selected The move operation deletes the fonts from the Installed Fonts list Clicking Copy causes the fonts to be copied to the list on the right for the port you selected The copy operation leaves the fonts in the In...

Страница 68: ...ges of the document The button functions for this window are described below Note If your application software has a Header Footer function use that instead of Softtray Manager and Overlay Manager Manage Overlays Click this button to switch to the Overlay Manager window Zoom Click this button to show a full page preview of the selected page no6 R Skylark Rev c A5 size Chapter 3 5 15 96 DR pass 2 M...

Страница 69: ...print on a range of pages click on the Options tab and then enter the desired values in the Start with page or Page range from 1 to option boxes 3 Click the Overlay tab From the list of available overlays above the page icons select the overlay you want 4 Open the Active Softtray list by clicking the arrow next to it 5 Choose a softtray from this list or assign a unique name to the softtray by ent...

Страница 70: ...make it possible to include company logos forms and other types of overlays in a printed document You can assign previously defined overlays to specific pages with the Softtray Manager The Overlay Manager also lets you assign one overlay to different softtrays no7 R Skylark Rev c A5 size Chapter 3 5 15 96 DR pass 2 Making Printer Driver Settings 3 27 ...

Страница 71: ...ory click Cancel and then input the entire path to the directory in the Description box Make sure the Capture Printout radio button is checked Next click Create 6 In the dialog box that appears click OK The next file you send to the printer from an application program such as Windows Write or Notepad will be saved as the overlay using the name you entered earlier If you want to stop the procedure ...

Страница 72: ...he overlay that you want to delete 3 Click Delete 4 Click Yes in the dialog box that appears to delete the highlighted overlay Note If you check the Delete Overlays from disk radio box and you click the Delete button the highlighted overlay will be deleted from your hard disk R Skylark Rev c A5 size Chapter 3 5 15 96 DR pass 2 Making Printer Driver Settings 3 29 ...

Страница 73: ...L Skylark Rev c A5 size Chapter 3 5 15 96 DR pass 2 3 30 Making Printer Driver Settings ...

Страница 74: ...00 sheet lower paper cassette 4 5 Memory Modules 4 7 Installing a memory module 4 7 Removing a memory module 4 11 ROM Module 4 11 Optional Interfaces 4 12 Installing the LocalTalk Serial module 4 13 Installing an optional interface card 4 15 Using the Serial Interface 4 17 Using the serial interface utility 4 19 4 R Skylark Rev c Reference Guide A5 size Chapter 4 96 05 15 DR pass 2 Options 4 1 ...

Страница 75: ...varies by country EpsonScript Level 2 ROM module C83219 generates crisp PostScript output See page 4 11 Optional memory modules expand your printer s memory See page 4 7 Optional interface cards and modules provide a link that enables you to use the EPL N1200 with a Macintosh LocalTalk network IBM mainframe and so on See page 4 12 If you purchased your printer and options at the same time first se...

Страница 76: ... Installing the lower paper cassette 1 Turn off the printer 2 Unplug the printer s power cord from the electrical outlet and from the printer 3 Remove all interface cables from the interface connectors 4 Lift the printer Make sure the printer and cassette are facing the same way Align the pins on the cassette with the holes on the bottom of the printer and then lower the printer until it rests sec...

Страница 77: ...ed off and then plug the power cord into the printer and into an electrical outlet 7 Turn on the printer To confirm that the lower paper cassette is installed correctly print a status sheet If the cassette is not listed on the status sheet try reinstalling it Be sure to select the paper source in your application program Since the selection method varies from application to application see your so...

Страница 78: ...t lower paper cassette 1 Pull out the paper tray from the paper cassette 2 Press down the plate in the paper tray until it locks into position 4 2n 4 2a R Skylark Rev c Reference Guide A5 size Chapter 4 96 05 15 DR pass 2 Options 4 5 ...

Страница 79: ... to even the edges Insert the paper face up into the tray 4 Replace the paper tray in the paper cassette You are now ready to print using the lower paper cassette 4 3n 4 4n L Skylark Rev c Reference Guide A5 size Chapter 4 96 05 15 DR pass 2 4 6 Options ...

Страница 80: ...us vendors Be sure the SIMM you purchase meets the following requirements 72 pin type Capacity of 1 2 4 8 16 or 32 MB Access speed of 70ns or less Dimensions within 108 mm 4 25 inches 39 mm 1 53 inches with a thickness of 10 mm 0 4 inch Installing a memory module 1 Turn off the printer w Warning To avoid electrical shock do not attempt to install a SIMM unless the printer is turned off 2 Unplug th...

Страница 81: ...t to release the controller board as shown below w Warning Avoid touching the electrical components that are exposed They may be very hot if the printer has been used recently 5 Place the controller board on a clean stable surface 4 5n 4 6 L Skylark Rev c Reference Guide A5 size Chapter 4 96 05 15 DR pass 2 4 8 Options ...

Страница 82: ...sure the pin numbers of the slot and the SIMM match either 1 or 72 Note You can insert the SIMM module in either RAM slot 8 Press the module in firmly until it clicks into place Do not apply too much force ROM SLOT RAM SLOT 4 7n 4 8n R Skylark Rev c Reference Guide A5 size Chapter 4 96 05 15 DR pass 2 Options 4 9 ...

Страница 83: ...both sides of the bracket to lock the board into place If the controller board does not fit smoothly into the printer do not force it Remove it and make sure the edges fit properly into the grooves inside the slot 11 Secure the interface bracket with the four retaining screws that you removed earlier 4 9 4 10n L Skylark Rev c Reference Guide A5 size Chapter 4 96 05 15 DR pass 2 4 10 Options ...

Страница 84: ...s shown above 4 Follow steps 9 through 12 in the previous section to complete the procedure ROM Module You can install the EpsonScript Level 2 module C83219 using the same basic steps as those used to install the memory module See Installing a memory module for installation instructions However this must be installed in the ROM SLOT rather than in the RAM SLOT 4 aa 4 bb R Skylark Rev c Reference G...

Страница 85: ...terface Since the printer s built in parallel interface remains active this gives you three parallel interfaces and a coax or twinax interface Print jobs can be sent to any connection and the printer automatically switches between the active ports The twinax interface is compatible with the following IBM systems AS 400 System 36 5251 model 12 System 34 System 38 and 5294 When equipped with an EPSO...

Страница 86: ...e it is receiving data through the AppleTalk Interface Card you need to turn the printer off and then on again before it can communicate properly To add a direct connection to your GPIB network use the GPIB Interface Card C82323 Installing the LocalTalk Serial module 1 Perform steps 1 to 5 in Installing a memory module page 4 7 to access the printer s SIMM SLOT 2 Remove the connector cover as show...

Страница 87: ...erface settings change the jumper and the two slide switches to the serial interface positions as shown below Note Make sure both slide switches are set to the same position otherwise the printer will not operate correctly 4 Position the module as shown below then carefully insert its connector into printer connector CN4 Secure the module with the two screws that come with it 4 2new 4 13n L Skylar...

Страница 88: ...er w Warning High voltages are present inside the printer when the power is on Do not attempt to install the card unless the printer is turned off 2 Unplug the power cable from the electrical outlet 3 Turn the printer so its back faces you 4 Remove the two screws that secure the Type B slot cover and remove the cover 4 14n R Skylark Rev c Reference Guide A5 size Chapter 4 96 05 15 DR pass 2 Option...

Страница 89: ...e grooves in the interface slot as shown below Push it in firmly to lock the card into place 6 Secure the interface card with the two retaining screws You can verify the interface is correctly installed by printing a status sheet 4 15n 4 16n L Skylark Rev c Reference Guide A5 size Chapter 4 96 05 15 DR pass 2 4 16 Options ...

Страница 90: ...B 25 pin computer for RS 232C for direct printer to computer connection Current Loop Cable C836141 0 4 m from mini DIN printer to D SUB 25 pin interface cable for both RS 232C and Current loop a cable extension for printer to interface cable connection If you installed a serial interface you need to ensure that the printer and the computer are using the same serial settings If the serial settings ...

Страница 91: ...N You also need to change the port setting of your computer if it is not already set to the serial port The following procedures describe how to change the port setting in Windows 3 1 and 95 To change the setting using non Windows software see your software manual For Windows 3 1 1 In the Main window double click the Control Panel icon 2 Double click the Printers icon 3 In the Printers dialog box ...

Страница 92: ...specify the port and the baud rate of your computer for the serial interface connection This utility is included in the Remote Control Panel utility For details on installation of the Remote Control Panel utility see Chapter 5 Your printer supports the following serial interface baud rates 300 600 1200 2400 4800 9600 19200 38400 and 57600 If you want to use your printer with a higher baud rate tha...

Страница 93: ...from the list and type the following C HSERIAL P n B m n parameter for the port selection m parameter for the baud rate selection For example if you would like to use the COM1 port with the 57600 baud rate type the following C HSERIAL P 1 B 576 If you need help type the following C HSERIAL L Skylark Rev c Reference Guide A5 size Chapter 4 96 05 15 DR pass 2 4 20 Options ...

Страница 94: ...y 5 2 Installing the Remote Control Panel utility 5 3 Accessing the Remote Control Panel 5 3 LaserJet 4 EpsonScript Level 2 Mode 5 4 ESCP2 Mode 5 5 FX Mode 5 5 I239X Mode 5 6 Page Setup Options 5 6 Type Options 5 9 Printer Setup Options 5 11 Other Options 5 14 More Options 5 17 5 R Skylark Rev c Reference Guide A5 size Chapter 5 96 05 15 DR pass 2 Remote Control Panel Utility 5 1 ...

Страница 95: ...ol Panel However if you are not able to change printer settings from your software program or if you are running DOS the Remote Control Panel will allow you to specify the size of paper loaded in the paper tray turn the Toner Save Mode on and off change the density setting or RITech setting change the emulation mode turn the Standby mode on and off specify the Top Offset and Left Offset Note When ...

Страница 96: ... the instructions on the screen to install the utility Accessing the Remote Control Panel To start the Remote Control Panel type the following at the DOS prompt and press Enter If you changed the default directory during installation type that directory instead C EPSONRCP EPRCPO The main Remote Control Panel menu appears no1aa R Skylark Rev c Reference Guide A5 size Chapter 5 96 05 15 DR pass 2 Re...

Страница 97: ...mode The buttons on the left open dialog boxes so you can change the settings listed under Printer Status Print ERR SHEET for EpsonScript Turn this setting on if you want a printed record of EpsonScript Level 2 errors When an error is detected the printer prints a sheet listing the type of error Available only when the EpsonScript Level 2 option is installed no2aa L Skylark Rev c Reference Guide A...

Страница 98: ...ESCP2 Mode FX Mode no3aa no4aa R Skylark Rev c Reference Guide A5 size Chapter 5 96 05 15 DR pass 2 Remote Control Panel Utility 5 5 ...

Страница 99: ... Setup Options Clicking the Page Setup button on the Remote Control Panel menu opens the following menu no5aa no7aa L Skylark Rev c Reference Guide A5 size Chapter 5 96 05 15 DR pass 2 5 6 Remote Control Panel Utility ...

Страница 100: ...f your paper size is not listed below you can define a new size using the Custom setting Use the following settings when defining a custom page size 92 to 216 mm 148 5 to 356 mm The Page Size options are as follows LT Letter A4 A5 B5 HLT Half letter LGL Legal GLT Government letter GLG Government legal EXE Executive F4 MON Monarch C10 Commercial 10 DL C5 IB5 International B5 C6 Custom R Skylark Rev...

Страница 101: ...nted in portrait default or landscape orientation The pages in this manual are printed in portrait orientation Paper Feed Allows you to select how paper is fed into the printer or where paper is fed from Your choices are Automatic paper is fed from whichever tray has the correct paper size Manual you must manually feed paper in the MP Tray MP Tray Lower Cassette 1 if installed and Lower cassette 2...

Страница 102: ...rom your software program make the settings on this menu as follows Typeface Specifies the typeface to use Pitch Point Size Specifies the point size for proportional and scalable fonts The range of point sizes is 4 00 to 999 75 It also specifies the pitch for fixed pitch fonts The range of pitch is 0 44 to 99 99 no8aa R Skylark Rev c Reference Guide A5 size Chapter 5 96 05 15 DR pass 2 Remote Cont...

Страница 103: ...MsPublishing VeMath DeskTop Math 8 WiE Europe PcTk437 Windows PsText IBM US IBM DN VeInternational PcMultilingual PiFont VeUS Other PcE Europe WiAnsi Note The following symbol sets cannot be selected with the Swiss 721 SWM and Dutch 801 SWM fonts PsMath MsPublishing VeMath Math 8 and PiFont The characters 9Bh to 9Fh in the VeInternational and VeUS symbol sets cannot be printed when either the Swis...

Страница 104: ...u opens the following menu If you are unable to make the settings that are available on the Printer Setup menu from your software program make the settings on this menu as follows no9aa R Skylark Rev c Reference Guide A5 size Chapter 5 96 05 15 DR pass 2 Remote Control Panel Utility 5 11 ...

Страница 105: ...ry errors continue to occur Note Changing the Page Protect setting reconfigures the printer s memory which causes any downloaded fonts to be erased Resolution Selects the resolution you want to use for printing The available settings are 600 dpi default and 300 dpi RITech Allows you to adjust the RITech Resolution Improvement Technology setting or turn it off See Optimizing Print Quality on page 7...

Страница 106: ...e away from the printer for long periods Toner Save Mode Turns the Toner Save mode on When turned on the printer saves toner by substituting a gray shade for the black inside of characters The characters are outlined in full black on the right and lower edges Note You can also make the Toner Save setting item directly from OneTouch Mode 2 Image Optimum Reduces the amount of graphics data when the ...

Страница 107: ...ting is useful for spreadsheets and other applications that need to fit a large amount of information on each line However 15 cpi characters cannot be condensed T Margin Use this option to specify the distance from the top of the sheet to the baseline of the first printable line This is measured in 0 05 inch increments no10aa L Skylark Rev c Reference Guide A5 size Chapter 5 96 05 15 DR pass 2 5 1...

Страница 108: ...F command with each carriage return CR When you set AutoLF to On the printer adds a line feed to each carriage return it receives If your text lines overprint each other set AutoLF to On BitImage With BitImage set to Dark or Light your printer can correctly emulate the graphics densities set with the printer commands If you select Dark the bit image density is high If you select Light the bit imag...

Страница 109: ...o when printing documents such as program lists Alt Graphics I239X only Turns the Alternate Graphics option on or off The default setting is OFF Character Set I239X only Selects the character table 1 or 2 Next I239X only Turn to the next page Prev I239X only Turn to the previous page L Skylark Rev c Reference Guide A5 size Chapter 5 96 05 15 DR pass 2 5 16 Remote Control Panel Utility ...

Страница 110: ...ram make the settings on this menu as follows Source Symbol Set LJ4 only Available only when an optional font ROM is installed while in the LJ4 emulation mode Destination Symbol Set LJ4 only Available only when an optional font ROM is installed while in the LJ4 emulation mode no11aa R Skylark Rev c Reference Guide A5 size Chapter 5 96 05 15 DR pass 2 Remote Control Panel Utility 5 17 ...

Страница 111: ... it warms up and is ready to print in about 60 seconds When Standby is disabled the printer stays warmed up and ready to print Timeout Sets the length of time the printer waits before looking for the next print job If the printer is online and receives no new data for the number of seconds specified the printer automatically switches to the next channel that receives data Paper Size Ignore Selects...

Страница 112: ...different languages The printer prints text based on the selected character table Code Page I239X only Selects the character tables Character tables contain the characters and symbols used in different languages The printer prints text based on the selected character table R Skylark Rev c Reference Guide A5 size Chapter 5 96 05 15 DR pass 2 Remote Control Panel Utility 5 19 ...

Страница 113: ...L Skylark Rev c Reference Guide A5 size Chapter 5 96 05 15 DR pass 2 5 20 Remote Control Panel Utility ...

Страница 114: ... 6 8 Emulation menu 6 9 Printing menu 6 9 Tray Size menu 6 11 Config menu 6 12 Setup menu 6 14 Parallel B menu Parallel C menu 6 16 Serial menu 6 16 L T menu AUX menu 6 18 LJ4 menu 6 18 Using the OneTouch Modes 6 20 Using Other Emulations 6 22 ESC P 2 or FX Mode 6 22 I239X Mode 6 26 EPSON GL 2 Mode 6 27 Before printing in the EPSON GL 2 mode 6 28 6 R Skylark Rev c A5 size Chapter 6 96 05 15 Pass 1...

Страница 115: ... mind the following points when using SelecType settings A number of SelecType settings can also be made using the OneTouch modes printer driver and Remote Control Panel utility Application programs may send commands to the printer that override SelecType settings If you are not getting the results you expect check your application software settings To see the current SelecType settings print a st...

Страница 116: ...ntrol panel buttons on the printer change when in SelecType mode Using SelecType Note You can directly access certain menu items using the OneTouch modes For more information see Using the OneTouch Modes on page 6 20 1 To enter SelecType mode press Menu while the printer is on line 6 1 R Skylark Rev c A5 size Chapter 6 96 05 15 Pass 1 DR SelecType 6 3 ...

Страница 117: ...cription of the menus in SelecType and lists the settings available on each menu For more detailed descriptions of the settings see Understanding SelecType Settings on page 6 8 Test Menu These settings select and perform the printer s internal test printing You can obtain information on the printer s current settings available fonts and a brief summary of features Also see page 6 8 Status Sheet LJ...

Страница 118: ...ride the Printing Menu settings Also see page 6 9 Paper Source Page Size Orientation Copies Manual Feed Resolution Tray Size Menu These settings display the paper size loaded in each paper tray This may be different from the size set in Page Size which specifies the size of the image the printer produces internally Also see page 6 11 MP Tray Size LC1 Size LC2 Size Config Menu These settings affect...

Страница 119: ...essary for correct communication between the printer and the computer Also see page 6 16 Word Length Baud Rate Parity Stop Bit XOn XOff DTR Buffer Size Available only when the LocalTalk Serial module is installed and the SelecType Emulation menu is set to Serial See Chapter 4 Options for more information L T AUX Menu This setting controls the optional interface settings Also see page 6 18 Buffer S...

Страница 120: ... 2 is installed For more information refer to the EpsonScript Level 2 manual ESCP2 Menu These settings are available only when the printer is in ESC P 2 mode Also see page 6 22 FX Menu These settings are available only when the printer is in FX mode Also see page 6 22 I239X Menu These settings are available only when the printer is in I239X mode Also see page 6 26 R Skylark Rev c A5 size Chapter 6...

Страница 121: ... printed Status Sheet PS Status Sheet Prints a sample printout describing the current printer features Use this option to check whether your printer is working correctly LJ4 Font Sample ESCP2 Font Sample FX Font Sample I239X Font Sample PS Font Sample Prints a sample of the fonts available for your selected printer emulation Available only when Epson Script Level 2 is installed EXT PRINT INFO Prin...

Страница 122: ...ng may change depending on which option is installed Print a status sheet to confirm the current default settings Printing menu The settings in the Printing Menu can be set from within your software The settings you make in your software override SelecType settings All items in the Printing Menu except Resolution can be accessed directly with the OneTouch Modes See Using the OneTouch Modes later i...

Страница 123: ...9 Manual Feed This item selects manual feed mode for the MP Tray For details on manual feed mode see Chapter 1 Resolution Switches the resolution between 300 and 600 dpi Setting Parameter Paper Source Auto MP LC1 LC2 Page Size A4 A5 B5 LT HLT LGL GLT GLG EXE F4 MON C10 DL C5 C6 IB5 CTM Orientation Port Land Copies 1 999 Manual Feed Off On Resolution 600 300 L Skylark Rev c A5 size Chapter 6 96 05 ...

Страница 124: ...eTouch Mode 2 LC1 Size Displays the actual paper size loaded in the optional Lower Paper Cassette 1 Note LC1 Size and LC2 Size only display the currently loaded paper size You cannot change this parameter it is set automatically LC2 Size Displays the actual paper size loaded in the optional Lower Paper Cassette 2 Setting Parameter MP Tray Size A4 A5 B5 LT HLT LGL GLT GLG EXE F4 MON C10 DL C5 C6 IB...

Страница 125: ...turned on the printer saves toner by substituting a gray shade for the black inside of characters The characters are outlined in full black on the right and lower edges Note You can also make the Toner Save setting item directly from OneTouch Mode 2 Density Use this option to adjust the print density if your print is too light or too dark Note Increasing the print density increases toner consumpti...

Страница 126: ...e Selects whether a paper size error is ignored Turning this item on causes the printer to print even if the image size exceeds the printable area for the specified size of paper This may cause smudges because of toner that is not transferred onto the paper properly When this item is off the printer stops printing if a paper size error occurs Auto Cont Permits the printer to automatically continue...

Страница 127: ...to increase your printer s memory if memory errors continue to occur Note Changing the Page Protect setting reconfigures the printer s memory which causes any downloaded fonts to be erased Image Optimum Reduces the amount of graphics data when the data reaches the memory limit allowing complex documents to be printed When this mode is on graphics quality is reduced Setup menu Interface Specifies w...

Страница 128: ...e control panel and printed on the status sheet Toner Displays the amount of toner left in the imaging cartridge E F 100 75 E F 75 50 E F 50 25 E F 25 0 E F 0 Toner Count Clear Resets the toner counter when you replace the imaging cartridge Page Count Displays the total number of sheets printed by this printer SelecType Init Erases all the SelecType settings you have changed and resets them to the...

Страница 129: ... and printing data If set to Maximum more memory is allocated for receiving data If set to Minimum more memory is allocated for printing data The factory default setting is Normal Serial menu Word Length You can select an 8 bit or 7 bit word length See your computer manual and software documentation for the proper setting The factory setting is 8 bit Baud Rate Use this option to set the data trans...

Страница 130: ... can use XOn XOff protocol in combination with the DTR option setting If set to Robust the printer sends an XOn signal when the printer is available to receive data DTR Use DTR Data Terminal Ready to turn the printer s DTR communications protocol on or off You can use DTR protocol in combination with the XOn XOff option setting Buffer Size Determines the amount of memory to be used for receiving d...

Страница 131: ...settings using your software The software settings always override the LJ4 menu options FontSource Selects the default font source Font Number Selects the default font number from the default font source Pitch Specifies the default font pitch if the font is scalable and fixed pitch You can select from 0 44 to 99 99 CPI in increments of 0 01 CPI Height Specifies the default font height if the font ...

Страница 132: ... Source SymSet Available only when an optional font ROM is installed Dest SymSet Available only when an optional font ROM is installed Setting Parameter FontSource Resident SIMM Download Font Number 0 65535 Pitch 0 44 99 99 cpi Height 4 00 999 75 pt SymSet Roman 8 ECM94 1 8859 2 ISO 8859 9 ISO IBM US IBM DN PcMultiling PcE Europe PcTk437 Wiansi WiE Europe WiTurkish DeskTop PsText VeInternati VeUS ...

Страница 133: ...e Orientation OneTouch mode 1 To enter OneTouch mode 2 press the SelecType button repeatedly if necessary until the indicator light next to RITech comes on indicating the printer is now in OneTouch mode 2 The current OneTouch mode 2 settings for RITech Copies MP Tray Size and Toner Save are shown on the display above the corresponding setting For example On or Off is shown above Toner Save OneTouc...

Страница 134: ...e Land orientation RITech Allows you to make the RITech setting Dark Medium Light Off RITech produces smoother and crisper lines text and graphics If you change this setting you can check the print quality by printing a status sheet from the SelecType Test Menu Copies Selects the number of copies to be printed up to 999 MP Tray Size Allows you to set paper size for the MP Tray Toner Save Turns the...

Страница 135: ...depending on the received data The available emulation modes are LJ4 GL2 I239X ESC P 2 and FX To enable intelligent emulation switching select Auto on the Emulation Menu using the printer driver the Remote Control Panel utility or the SelecType mode ESC P 2 or FX Mode This section lists the ESCP2 menu and FX menu options Unless specifically mentioned the same items are available for either mode Fo...

Страница 136: ...r this option is a 1 6 inch line If you change the Orientation Page Size or T Margin settings the page length setting automatically returns to the default setting for each paper size CG Table Use the character generator table option to select the graphics character table or the italics table The graphics table contains graphic characters for printing lines corners shaded areas international charac...

Страница 137: ...ark or Light your printer can correctly emulate the graphics densities set with the printer commands When you select Dark the bit image density is high When you select Light the bit image density is low The BarCode setting converts bit images to bar codes by automatically filling in any vertical gaps between dots This produces unbroken vertical lines that can be read by a bar code reader BarCode i...

Страница 138: ...12 cpi 15 cpi Prop Condensed Off On T Margin 0 40 1 50 inch Text 1 81 Lines CG Table PcUSA Italic PcMultilin PcPortugue PcCanFrenc PcNordic PcTurkish2 PcE Europe BpBRASII BpAbicomp Country USA France Germany UK Denmark Sweden Italy Spain1 Japan Norway Denmark2 Spain2 LatinAmeric Korea Legal Auto CR On Off Auto LF Off On Bit Image Dark Light BarCode ZeroChar 0 0 Available only in ESC P 2 mode R Sky...

Страница 139: ...n 0 30 1 50 inch Text 1 81 Lines Auto CR Off On Auto LF Off On Alt Graphics Off On BitImage Dark Light ZeroChar 0 0 Character Set 1 2 Code Page I239X only Selects the character tables Character tables contain the characters and symbols used in different languages The printer prints text based on the selected character table Alt Graphics I239X only Turns the Alternate Graphics option on or off The ...

Страница 140: ...n LJ4 emulation mode see Appendix C Command HP GL 2 mode EPSON GL 2 mode Orientation Printer setting Landscape only Plotter unit 1 1016 inch 1 1021 inch Picture frame Same as LaserJet 4 mode Depends on the hard clip limit Default position of P1 and P2 Lower left and lower right corners respectively of picture frame inside of picture frame Undefined commands First character is ignored First two cha...

Страница 141: ...settings Paper size Printer s paper size setting Driver plotter selection HP GL 2 or HP GL plotters If you need to configure the printer settings first switch the emulation and then change the settings using the printer driver the Remote Control Panel utility or SelecType c Caution Settings or data saved in printer RAM such as download fonts may be erased when you switch emulation L Skylark Rev c ...

Страница 142: ... 14 Option Problems 7 14 Status and Error Messages 7 17 Hex Dump Mode 7 23 Replacing the Imaging Cartridge 7 24 Optimizing Print Quality 7 27 Adjusting RITech 7 27 The RITech setting 7 27 Adjusting print density 7 28 Resetting the Printer 7 29 Cleaning the Printer 7 30 Removing spilled toner 7 31 Cleaning the printer case 7 32 Transporting the Printer 7 32 R Skylark Rev c A5 size Chapter 7 96 05 1...

Страница 143: ...cluded is a complete description of the status error and warning messages shown on the printer s control panel display Paper Jam and Feeding Problems The printer stops and the Feed Jam message appears 1 Open the front cover Carefully remove all the paper in the MP tray along with any sheets that have fed part way into the printer 7 1 L Skylark Rev c A5 size Chapter 7 96 05 15 Pass 1 DR 7 2 Trouble...

Страница 144: ...ge 3 Close the printer cover Tap the edges of the paper stack on a flat surface and carefully reload it into the paper bin Do not reload curled or wrinkled sheets Close the front cover 4 The jammed page s print data is automatically reprinted The printer stops and the Paper Jam message appears 1 Open the printer cover and remove the imaging cartridge w Warning Opening the printer cover exposes the...

Страница 145: ... may come off on your hands when you remove the paper If you spill toner on your clothing rinse it off with cold water Using hot water may leave a permanent stain 3 Reinstall the imaging cartridge Then close the printer cover 4 After a paper jam the jammed page s print data is automatically reprinted 7 2 L Skylark Rev c A5 size Chapter 7 96 05 15 Pass 1 DR 7 4 Troubleshooting and Maintenance ...

Страница 146: ... the printer Try turning over the stack of paper in the tray Most packages of paper indicate the best side with an arrow on the end of the package Make sure the best side is loaded face up The display panel stays blank when you turn the printer on Turn off the printer and check the power cable connections between the printer and the electrical outlet then turn the printer back on If the electrical...

Страница 147: ...terface set the baud rate protocol data bit and related settings See your computer manual for the correct settings and interface requirements If you are using the parallel interface set the Speed setting on either the Parallel B or C menu to match the value the computer requires Make sure that your software is properly set up for your printer The imaging cartridge may be empty Replace it as descri...

Страница 148: ...lel B no longer than 30 feet in length for Parallel C If you are using an optional serial interface set the parity baud rate number of data bits and number of stop bits to match the computer The Image Optimum setting may be set to Auto or On If it is fonts other than you expect may be printed to increase the printing speed Turn the Image Optimum setting off in the printer driver the Remote Control...

Страница 149: ... of memory see Memory Problems in this chapter for more help The Remote Control Panel utility does not function as expected Your settings may have been changed by your software program which overrides the Remote Control Panel utility Initialize the printer as described later in this chapter SelecType does not function as expected Software programs override SelecType settings Use software settings ...

Страница 150: ... Quality Problems Dark or dirty background Lighten the Density setting using the Remote Control Panel utility the printer driver or the SelecType Config Menu Clean the paper path inside the printer with a clean dry cloth Clean internal printer components by printing three pages with only one character per page There may be a problem with the imaging cartridge Remove the cartridge shake it from sid...

Страница 151: ...einsert the imaging cartridge in the printer and close the printer cover If the problem persists install a new imaging cartridge as described later in this chapter and print several pages to check the print quality Horizontal black or white bands or a black page Install a new imaging cartridge as described later in this chapter 7 3 L Skylark Rev c A5 size Chapter 7 96 05 15 Pass 1 DR 7 10 Troubles...

Страница 152: ...everal pages to check the print quality Toner smudges Remove the imaging cartridge shake it from side to side to distribute the toner and wipe the bottom of it with a clean dry cloth Clean the paper path inside the printer using a clean dry cloth Clean internal printer components by printing three pages with only one character per page If the problem remains replace the imaging cartridge as descri...

Страница 153: ... after checking the SelecType Toner option in the Setup Menu the Toner message indicates that the amount of toner is low E F read Replacing the Imaging Cartridge starting on page 7 24 Check that the imaging cartridge is installed as described in the Getting Ready booklet or in Replacing the Imaging Cartridge later in this chapter The problem may be with your software program or interface cable Pri...

Страница 154: ...ntrol Panel utility OneTouch mode 2 or SelecType Image is too dark The Density setting may be incorrect Change the print density using the printer driver the Remote Control Panel utility or the SelecType Config Menu If the problem persists replace the imaging cartridge as described at the end of this chapter Non printed side of the page is dirty Toner may have spilled in the paper feed path Remove...

Страница 155: ...rinting Check to see if the printout is acceptable If not add more memory for a permanent solution or set Device Resolution to Low 300 dpi and Page Protect to OFF temporarily in the printer driver Option Problems The message Illegal AUX I F Card or Illegal I F Module appears The message Illegal AUX I F Card means that the printer cannot read the installed optional interface card Turn off the print...

Страница 156: ...cted the proper paper tray in your software There may be no paper in the lower paper cassette Load it with paper Be sure that the lower paper cassette is properly installed and that you have not tried to load it with too many sheets of paper The cassette can hold a maximum of 500 sheets of 75g m2 20 lb paper The lower paper cassette may not be installed properly See Chapter 4 for instructions on i...

Страница 157: ...ing sure the paper is evenly aligned and rests below the maximum paper mark 4 Make sure you are using the correct paper size Your cassette can contain only A4 A4 size cassette or letter size LT size cassette paper Also make sure you are using paper that meets the specifications for this printer 5 Press the Continue button The jammed page s print data is automatically reprinted 7 4 L Skylark Rev c ...

Страница 158: ...ar in the control panel display Check Paper Size The paper size setting is different from the size loaded in the printer Check to see if the correct size of paper is loaded in the tray then press the Continue button to clear the message If you turn on Size Ignore on the SelecType Config menu this error does not occur Feed Jam Paper is not feeding into the printer from the specified feeder or casse...

Страница 159: ... the module Image Optimum The printer cannot print at the requested quality level because of insufficient memory and the printer reduces the quality automatically so that the printer can continue printing Check to see if the printout is acceptable If not add more memory for a permanent solution or set Device Resolution to Low 300 dpi and Page Protect to OFF temporarily in the driver Manual Feed XX...

Страница 160: ...ber or size of graphics lower the resolution or add more memory to the printer Paper Jam Paper is jammed in the paper path Open the printer cover and clear the jammed paper as described on page 7 2 or 7 15 After the jam is cleared the jammed page s print data is automatically reprinted w Warning Opening the printer cover exposes the fuser which is marked by a CAUTION HOT SURFACE label Be careful n...

Страница 161: ...nue to resume printing If this message appears again change the Page Protect setting in SelecType Config Menu Printer Open The printer cover is open Close the printer cover to continue printing Ready The printer is ready to receive data or print Reset The printer s current interface has been reset and the buffer is cleared However other interfaces are still active and retain their settings and dat...

Страница 162: ...he following 1 exit SelecType by pressing Continue or On Line the new setting is activated after the current print job is finished or 2 reset the printer by pressing ALT and Reset at the same time Self Test The printer is performing its internal check cycle It finishes soon ROM Check The printer is checking the ROM RAM check The printer is checking the RAM R Skylark Rev c A5 size Chapter 7 96 05 1...

Страница 163: ...ntact a qualified service person Standby The printer is in its low power state however it is still on line if the On Line light is on Toner Low The printer is almost out of toner You should prepare a new imaging cartridge the toner will be out soon Toner Out You must replace the imaging cartridge Replace it as described later in this chapter Press Continue to print one more page Warming Up The pri...

Страница 164: ... the Form Feed button while you turn on the printer Make sure you hold the button down until you see the message HEX Dump on the display 3 Run any program that causes the printer to print Your printer prints out all the codes it receives in hexadecimal format 4 To turn off the hex dump mode turn off the printer or reset it by pressing and holding the ALT and Continue buttons at the same time When ...

Страница 165: ... to replace the imaging cartridge When replacing a cartridge be sure to use the S051016 imaging cartridge Even if you have a cartridge labeled S051011 do not use it order the S051016 cartridge that is specially designed for your high quality 600 dpi printer w Warning Do not touch the fuser which is marked with a CAUTION HOT SURFACE label 1 Make sure the printer is turned on 2 Gently open the print...

Страница 166: ... the imaging cartridge on a clean flat surface Firmly grip the tab on the left side of the imaging cartridge Pull the clear seal all the way out with firm even pressure as shown 6 Hold the imaging cartridge and gently shake the cartridge from front to back r3 21 r3 22 r3 23 R Skylark Rev c A5 size Chapter 7 96 05 15 Pass 1 DR Troubleshooting and Maintenance 7 25 ...

Страница 167: ...stops 8 Gently press down on the printer cover until it clicks into the closed position c Caution Never transport the printer with the imaging cartridge installed Note Be sure to select Toner Count Clear on the SelecType Setup menu when installing or replacing a new imaging cartridge 7 8 L Skylark Rev c A5 size Chapter 7 96 05 15 Pass 1 DR 7 26 Troubleshooting and Maintenance ...

Страница 168: ...mple you may want to change the setting after you replace an imaging cartridge or if you notice that your printing is not as smooth and crisp as it should be Before adjusting the RITech setting print a status sheet for a RITech test pattern to help you in determining which setting is best for you Note Before printing a status sheet turn the Toner Save Mode off with the Windows driver the Remote Co...

Страница 169: ...button then change the RITech setting Using SelecType For information on using SelecType see Chapter 6 If the pattern still needs to be improved you may have to change the print density setting For a darker RITech setting make the print density lighter and vice versa See the next section for more information Adjusting print density Do not change the print density unless it is necessary Changing th...

Страница 170: ...Resetting the Printer There are two ways to reset return to a fixed set of conditions the printer Reset Reset the settings for the emulation mode and interface you are using now by holding down Alt and Reset until Reset appears on the display You can reset the printer anytime a printout is not being sent on the interface you are using Reset all Reset the settings for all emulation modes and interf...

Страница 171: ...steps below to clean the inside of the printer and the paper feeder 1 Make sure the printer is turned off 2 Open the printer cover w Warning Opening the printer exposes the fuser which is marked by a caution label If you have used the printer recently the fuser may be hot be careful not to touch it Let the printer cool before you clean the inside 3 Remove the imaging cartridge from the printer 4 R...

Страница 172: ... the printer with a dry cloth 2 If a large amount of toner is present use a small vacuum cleaner available from computer supply stores to remove it c Caution Toner or any other fine powder can damage some vacuum cleaners Be sure to read the instructions for your vacuum cleaner before you use it on spilled toner Note If you spill toner on your clothing rinse it off with cold water Do not use hot wa...

Страница 173: ...rt your printer some distance carefully repack it using the original box and packaging materials as follows 1 Turn off the printer 2 Open the printer cover and remove the Imaging cartridge 3 Unplug the power cord from the electrical outlet then disconnect the interface cable from the printer 4 Remove the optional lower paper cassette if installed 5 Attach the protective materials to the printer th...

Страница 174: ...3 Environmental A 4 Mechanical A 4 Electrical A 5 Interface A 5 Parallel B interface A 5 Parallel C interface A 7 Using the ECP mode in Windows 95 A 12 Serial Interface A 13 Options and Consumables A 16 500 Sheet Lower Paper Cassette A 16 Imaging cartridge S051016 A 16 R SkylarkRev c A5 size Appendix A 96 05 15 pass 1 Technical Specifications A 1 ...

Страница 175: ...se recycled paper under normal temperature and humidity conditions only Poor quality paper may reduce print quality cause paper jams and other problems Paper weight Plain paper 60 to 90 g m2 16 to 24 lb Card stock 90 to 157 g m2 24 to 42 lb Paper size Paper A4 210 mm 297 mm A5 148 mm 210 mm B5 182 mm 257 mm Letter 8 5 11 inches Half Letter 5 5 8 5 inches Legal 8 5 14 inches Government Letter 8 5 1...

Страница 176: ...raphic process Resolution 600 ö 600 dpi Printing speed Up to 12 pages per minute depending on the font and quantity of data First print Less than 16 seconds with A4 letter Warm up time About 60 seconds at normal temperature Paper feed Automatic or manual feed Paper feed alignment Center alignment for all sizes Input paper supply 75g m2 paper Up to 250 sheets in the MP Tray Up to 500 sheets per opt...

Страница 177: ...nt in LJ4 mode RAM 2 MB expandable up to 64 MB Environmental Temperature Operation 10 to 35ºC 50 to 95ºF Storage 0 to 35ºC 32 to 95ºF Humidity Operation 15 to 85 RH Storage 15 to 85 RH Altitude 2 500 meters 8200 feet maximum Mechanical Dimensions and weight Height 265 mm 10 4 inches Width 411 mm 16 2 inches Depth 484 mm 19 0 inches Weight Approx 15 kg 33 1 lb including the imaging cartridge Durabi...

Страница 178: ...ck the label on the back of the printer for the voltage of your printer Interface Parallel B interface The parallel B IEEE 1284 I compliant interface connector pin assignments are shown in the table below Pin No Direction IEEE 1284 B connector Compatibility Nibble 1 IN nStorbe HostClk 2 IN DATA1 3 IN DATA2 4 IN DATA3 5 IN DATA4 6 IN DATA5 7 IN DATA6 8 IN DATA7 9 IN DATA8 10 OUT nACK PtrClk 11 OUT ...

Страница 179: ...y 15 NC 16 GND 17 CG 18 OUT PeripheralLogic High 19 30 GND 31 IN nlnit 32 OUT nFault nDataAvail 33 GND 34 NC 35 OUT 5V 36 IN nSelectln IEEE1284active Note The column heading Direction refers to the direction of signal flow as viewed from the printer L SkylarkRev c A5 size Appendix A 96 05 15 pass 1 A 6 Technical Specifications ...

Страница 180: ...ail nPeriphRequest 5 OUT PError AckDataReq nAckReverse 6 IN OUT DATA1 7 IN OUT DATA2 8 IN OUT DATA3 9 IN OUT DATA4 10 IN OUT DATA5 11 IN OUT DATA6 12 IN OUT DATA7 13 IN OUT DATA8 14 IN nlnit nReverseRequest 15 IN nStrobe HostClk 16 IN nSelectln IEEE1284active 17 IN nAutoFd HostBusy HostAck 18 IN HostLogicHigh 19 35 GND 36 OUT PeripheralLogic High Note The column heading Direction refers to the dir...

Страница 181: ...ty mode Acknowledgment low pulse in order to indicate that data was transferred from the host negotiation phase Low signal indicates IEEE 1284 is supported set to high afterwards to indicate that the Xflag and data available flag are valid reverse data transfer phase In nibble mode a low signal indicates that the nibble data is valid reverse idle phase When switched from low to high generates an i...

Страница 182: ...rms with nDataAvail nFault reverse data transfer phase In nibble mode this signal serves as nibble data bit 2 and then 6 reverse idle phase High until the host requests a data transfer Afterwards this signal conforms with nDataAvail nFault ECP mode Low signal authorizes nReverseRequest The host looks at this signal in order to determine whether or not it has permission to drive the data signals Se...

Страница 183: ...nal is set high at the same time that IEEE 1284active nSelectln is set low the IEEE 1284 idle phase is aborted and the interface returns to compatibility mode ECP mode Used for reverse direction flow control Also used for handshaking via PeriphClk nAck NC Not used PeripheralLogicHigh Parallel B NC Parallel C Pull up to 5V with 3 9 KΩ nlnit nReverseRequest Compatibility mode When a low signal is de...

Страница 184: ...with the host Valid in both forward and reverse direction nSelectln IEEE1284active Compatibility mode Always low negotiation phase This signal is set high at the same time that HostBusy is low in order to request 1284 mode reverse data transfer phase This signal is set high to indicate that the bus direction is from the printer to the host This signal is set low to terminate 1284 mode setting the ...

Страница 185: ... program see your computer s manual 2 Click the Start button point to Settings and then click Control Panel 3 Right click the System icon and click Open in the menu that appears 4 Select the Device Manager tab 5 Select the ECP Printer Port under Ports COM LPT then click the Properties button 6 Select the Resources tab 7 Make the appropriate setting in the Resource settings dialog box This setting ...

Страница 186: ... 4800 9600 19200 38400 57600 Note When using the serial interface as RS 232C the availability of baud rates over 38400 depends on your computer s hardware reliability including the interface cable When using the serial interface as Current loop the availability of baud rates over 2400 depends on your computer s hardware reliability including the interface cable EPSON does not recommend or guarante...

Страница 187: ...eive data Error handling A character is printed if a parity error framing error or overrun error is detected Pin assignments The serial interface connector pin assignments and a description of the interface signals are shown in the table below The direction of signals is given as viewed from the printer Signal pin RS 232C Current loop Direction Description 2 TXD OUT Transmits data This pin transmi...

Страница 188: ...DTR signal goes LOW the host computer must stop sending data within 256 characters This function can be set on or off with the default setting mode of the printer 23 TTY RXD Return Received data This pin transmits serial data from the computer to the printer 24 TTY RXD Return Transmits data This pin transmits serial data from the printer to the computer 25 TTY RXD IN Received data This pin transmi...

Страница 189: ... inches Width 405 mm 15 9 inches Depth 477 mm 18 9 inches including the cassette Weight 4 0 kg 8 8 lb including the cassette Imaging cartridge S051016 Storage temperature 0 to 35 C 32 to 95 F Storage humidity 35 to 85 RH Shelf life 18 months after production Life Up to 6000 pages under the following conditions Letter or A4 size paper continuous printing and 5 print ratio The number of pages you ca...

Страница 190: ...bol Sets B 2 In LJ4 Emulation Mode B 3 International Set for ISO sets B 18 In ESC P 2 or FX Modes B 19 International Character Sets B 23 Characters available with the ESC command B 24 In I239X Emulation Mode B 24 In EPSON GL 2 Mode B 24 R Skylark Rev c A5 size Appendix B 96 05 15 pass 1 Symbol Sets B 1 ...

Страница 191: ... the printer s settings If you are writing your own printer control programs or if you are using older software that cannot control fonts refer to the following sections for symbol set details When you are considering which font to use you should also consider which symbol set to combine with the font Available symbol sets vary depending on which emulation mode you use and which font you choose L ...

Страница 192: ...79L 43 typefaces bitmap bitmap 43 typefaces bitmap 43 typefaces bitmap 43 typefaces bitmap 35 typefaces 43 typefaces bitmap 43 typefaces 35 typefaces 35 typefaces 43 typefaces 35 typefaces 43 typefaces 43 typefaces 43 typefaces 43 typefaces 43 typefaces bitmap 43 typefaces bitmap 43 typefaces 43 typefaces bitmap 43 typefaces 43 typefaces 35 typefaces 43 typefaces Symbol Set SWA 43 typefaces More W...

Страница 193: ...ndon Condensed SWC Ribbon 131 SWC Original Garamond SWC Audrey Two SWC Zapf Humanist 601 SWC Swiss 742 Condensed SWC N N N N N N N N N N N N N N N N Swiss 721 SWM Dutch 801 SWM N N Courier SWC Letter Gothic SWC Dutch 801 SWC Swiss 742 SWC N N N N N N N N L Skylark Rev c A5 size Appendix B 96 05 15 pass 1 B 4 Symbol Sets ...

Страница 194: ...Roman 8 8U ECM94 1 0N Romon 8 ECM94 1 R Skylark Rev c A5 size Appendix B 96 05 15 pass 1 Symbol Sets B 5 ...

Страница 195: ...Legal 1U 8859 2 ISO 2N LIGAL 8859 2 L Skylark Rev c A5 size Appendix B 96 05 15 pass 1 B 6 Symbol Sets ...

Страница 196: ...PsMath 5M 8859 9 ISO 5N PsMath 8859 9 R Skylark Rev c A5 size Appendix B 96 05 15 pass 1 Symbol Sets B 7 ...

Страница 197: ...WiTurkish 5T MsPublishing 6J WiTurkish MsPublishing L Skylark Rev c A5 size Appendix B 96 05 15 pass 1 B 8 Symbol Sets ...

Страница 198: ...VeMath 6M DeskTop 7J VeMath DeskTop R Skylark Rev c A5 size Appendix B 96 05 15 pass 1 Symbol Sets B 9 ...

Страница 199: ...Math 8M WiE Europe 9E Math 8 WiE Europe L Skylark Rev c A5 size Appendix B 96 05 15 pass 1 B 10 Symbol Sets ...

Страница 200: ...PcTk437 9T Windows 9U PcTk437 Windows R Skylark Rev c A5 size Appendix B 96 05 15 pass 1 Symbol Sets B 11 ...

Страница 201: ...PsText 10J IBM US 10U PsText IBM US L Skylark Rev c A5 size Appendix B 96 05 15 pass 1 B 12 Symbol Sets ...

Страница 202: ...IBM DN 11U McText 12J IBM DN McText R Skylark Rev c A5 size Appendix B 96 05 15 pass 1 Symbol Sets B 13 ...

Страница 203: ...PcMultilingual 12U VeInternational 13J PcMulti Velnter L Skylark Rev c A5 size Appendix B 96 05 15 pass 1 B 14 Symbol Sets ...

Страница 204: ...VeUS 14J PiFont 15U VeUS PiFont R Skylark Rev c A5 size Appendix B 96 05 15 pass 1 Symbol Sets B 15 ...

Страница 205: ...PcE Europe 17U Symbol 19M Pce Europe Symbol L Skylark Rev c A5 size Appendix B 96 05 15 pass 1 B 16 Symbol Sets ...

Страница 206: ...WiAnsi 19U Wingdings 579L WiAnsi Wingdings R Skylark Rev c A5 size Appendix B 96 05 15 pass 1 Symbol Sets B 17 ...

Страница 207: ...low Iso set ASCII code hex 23 24 40 5B 5C 5D 5E 60 7B 7C 7D 7E ANSI ASCII 0U Norweg 1 0D French 0F HP German 0G Italian 0l JlS ASCII 0K Swedis 2 0S Norweg 2 1D UK 1E French 2 1F German 1G HP Spanish 1S Chinese 2K Spanish 2S IRV 2U Swedish 3S Portuguese 4S IBM Portuguese 5S IBM Spanish 6S L Skylark Rev c A5 size Appendix B 96 05 15 pass 1 B 18 Symbol Sets ...

Страница 208: ... EPSON Roman N Courier SWC N N EPSON Sans serif N EPSON Prestige N EPSON Script N Letter Gothic SWC N N Swiss 721 SWM N N Dutch 801 SWM N N OCR B N Available only in ESC P 2 mode PC437 U S Standard Europe PC437 R Skylark Rev c A5 size Appendix B 96 05 15 pass 1 Symbol Sets B 19 ...

Страница 209: ...PC850 Multilingual PC860 Portuguese PC863 Canadian French PC865 Norwegian PC850 860 PC863 865 L Skylark Rev c A5 size Appendix B 96 05 15 pass 1 B 20 Symbol Sets ...

Страница 210: ...PC857 PcTurk2 PC852 East Europe BRASCII Abicomp PC857 852 BRA Abi R Skylark Rev c A5 size Appendix B 96 05 15 pass 1 Symbol Sets B 21 ...

Страница 211: ...Italic No characters are available for hex code 15 in the italic character table Italic L Skylark Rev c A5 size Appendix B 96 05 15 pass 1 B 22 Symbol Sets ...

Страница 212: ...nce in SelecType the characters in the France row in the table below are used in the italic character table Country ASCII code hex 23 24 40 5B 5C 5D 5E 60 7B 7C 7D 7E USA France Germany UK Denmark Sweden Italy Spain Japan Norway DenmarkII Spain II Latin America Korea Legal Available for ESC P 2 emulation only R Skylark Rev c A5 size Appendix B 96 05 15 pass 1 Symbol Sets B 23 ...

Страница 213: ...C865 Refer to ESC P 2 or FX modes in the previous section Available fonts are EPSON Sans Serif Courier SWC EPSON Prestige EPSON Gothic EPSON Presentor EPSON Orator and EPSON Script In EPSON GL 2 Mode Available symbol sets in EPSON GL 2 mode are the same as those in LaserJet 4 emulation mode Refer to the section on LaserJet 4 mode L Skylark Rev c A5 size Appendix B 96 05 15 pass 1 B 24 Symbol Sets ...

Страница 214: ...mulation Commands C 3 GL 2 context commands C 7 ESC P 2 and FX Commands C 9 ESC P 2 mode C 9 FX mode C 12 PJL Commands C 15 EJL Mode C 16 I239X Emulation Commands C 20 Page format C 20 Text C 22 Auxiliary Functions C 23 AGM Mode C 23 R Skylark Rev c A5 size Appendix C 96 05 15 pass 1 Command Summary C 1 ...

Страница 215: ...ands closely emulate the original printer or the control language however some have operational differences because the printers use different technologies Additional information is provided in the descriptions of control commands with these differences For more information on emulation modes refer to the following sections Changing the emulation mode Chapter 6 Available symbol sets or character t...

Страница 216: ...registration ESC l U Short edge right offset registration ESC l Z Unit of measure ESC u D Page control Paper source ESC l H Page size ESC l A Page length ESC l P Orientation ESC l O Print direction ESC a P Top margin ESC l E Text length ESC l F Left margin ESC a L Right margin ESC a M Clear horizontal margins ESC 9 Perforation skip ESC l L Horizontal Motion Index HMI ESC k H Vertical Motion Index ...

Страница 217: ...pitch ESC s H Secondary pitch ESC s H Set pitch mode ESC k S Primary height ESC s V Secondary height ESC s V Primary style ESC s S Secondary style ESC s S Primary font stroke weight ESC s B Secondary font stroke weight ESC s B Primary typeface family ESC s T Secondary typeface family ESC s T Primary font default ESC 3 Secondary font default ESC 3 Enable underline ESC d D Disable underline ESC d Tr...

Страница 218: ... Start raster graphics ESC r A Raster Y offset ESC b Y Set raster compression mode ESC b M Transfer raster data by row ESC b W data End raster graphics version B ESC rB End raster graphics version C ESC rC Raster height ESC r T Raster width ESC r S Print model Select current pattern ESC v T Select source transparency mode ESC v N Select pattern transparency mode ESC v O Rectangle width PCL unit ES...

Страница 219: ...ck entity ESC s I Flush all pages ESC r F Free memory space ESC s1M Echo ESC s X Programming hints End of line wrap ESC s C Enable display functions ESC Y Disable display functions ESC Z PCL vector graphics switching set up picture frame Enter PCL mode ESC A Enter GL 2 mode ESC B GL 2 plot horizontal size ESC c K GL 2 plot vertical size ESC c L Set picture frame anchor point ESC c0T Picture frame ...

Страница 220: ...lative AR Absolute arc three point AT Bezier absolute BZ Bezier relative BR Plot absolute PA Plot relative PR Pen down PD Pen up PU Relative arc three point RT Polyline encoded PE Polygon Group Circle CI Fill rectangle absolute RA Fill rectangle relative RR Edge rectangle absolute EA Edge rectangle relative ER Fill wedge WG Edge wedge EW Polygon mode PM Fill polygon FP Edge polygon EP R Skylark Re...

Страница 221: ...DT Character plot CP Transparent data TD Define variable text path DV Line and fill attribute group Line type LT Line attribute LA Pen width PW Pen width unit selection WU Select pen SP Symbol mode SM Fill type FT Anchor corner AC Raster fill definition RF User defined line type UL Configuration and status group Scale SC Input window IW Input P1 and P2 IP Input relative P1 and P2 IR Default values...

Страница 222: ... spacing ESC 0 Select 1 6 inch line spacing ESC 2 Set n 180 inch line spacing ESC 3 n Set n 360 inch line spacing ESC n Page format Set page format ESC c nn Set page length in defined units ESC C nn Set page length in lines ESC C n Set page length in inches ESC C 0 n Set bottom margin for continuous paper ESC N n Cancel top bottom margin for continuous paper ESC O Set left margin ESC l n Set right...

Страница 223: ...nch ESC J n Reverse paper n 180 inch ESC j n Font selection Select typeface ESC k n Select font by pitch and point ESC X nn Select 10 5 point 10 cpi ESC P Select 10 5 point 12 cpi ESC M Select 10 5 point 15 cpi ESC g Turn proportional mode on off ESC p 1 0 Select LQ or draft ESC x n Select italic font ESC 4 Cancel italic font ESC 5 Select bold font ESC E Cancel bold font ESC F Master select ESC n ...

Страница 224: ...core ESC nn Turn underline on off ESC 1 0 Select character style ESC q n Spacing Set intercharacter space ESC SP n Define unit ESC U nn Character handling Assign character table ESC t nn Select character table ESC t n Select an international character set ESC R n Define download character ESC nn Copy ROM to RAM ESC 0 n 0 Select user defined set ESC n Enable printing of upper control codes ESC 6 En...

Страница 225: ... n Set skip over perforation ESC N n Cancel skip over perforation ESC O Line feed LF Select 1 8 inch line spacing ESC 0 Select 7 72 inch line spacing ESC 1 Select 1 6 inch line spacing ESC 2 Select n 216 inch line spacing ESC 3 n Perform n 216 inch line spacing ESC J Tab vertically VT Set vertical tabs ESC B nn Note Your printer will not print characters beyond one page length set with the ESC C o...

Страница 226: ... speed cannot be changed even if you send the ESC x command Select typeface family ESC k n Master select ESC n Print size and character width Select 10 cpi ESC P Select 12 cpi ESC M Turn proportional mode on off ESC p 1 0 Select condensed mode SI Cancel condensed mode DC2 Select double width mode one line SO Cancel double width mode one line DC4 Turn double width mode on off ESC W 1 0 Turn double ...

Страница 227: ...processing Set intercharacter space ESC SP n Select character tables ESC t n Assign character tables ESC t nn Select international character set ESC R n Printable code area expansion ESC 6 Enable upper control codes ESC 7 User Defined Characters Define user defined characters ESC nn Note The appearance of characters defined using ESC may differ slightly from an actual FX printer Copy ROM to RAM ES...

Страница 228: ...Words CR LF ENTER PJL ENTER LANGUAGE CR LF EOJ PJL EOJ NAME CR LF INFO PJL INFO read only variable CR LF INITIALIZE PJL INITIALIZE CR LF INQUIRE PJL INQUIRE LPARM variable CR LF JOB PJL JOB NAME START END CR LF OPMSG PJL OPMSG DISPLAY CR LF RDYMSG PJL RDYMSG DISPLAY CR LF RESET PJL RESET CR LF SET PJL SET LPARM variable value CR LF STMSG PJL STMSG DISPLAY CR LF UEL ESC 12345X USTATUS PJL USTATUS v...

Страница 229: ...d Universal exit language ESC SOH Enter printer emulation EJL WS ENTER WS LANGUAGE WS WS LANGUAGE CR LF LANGUAGE LJ4 EPSONGL2 PS ESCP2 FX I239X Available only when the appropriate option module is installed Comment EJL WS COMMENT WS comment strings CR LF Inquire name EJL WS INQUIRE WS NAME CR LF ID EJL WS ID WS CR LF Select language EJL WS SELECT WS Option WS WS Value WS CR LF Set option EJL WS SE...

Страница 230: ...ter emulation mode If the printer emulation you attempt to switch to is not available the printer switches to the currently selected printer emulation mode Note If the emulation setting is set to Auto the printer switches automatically between emulation modes depending on the recieved data If a specific emulation setting is selected the printer switches to that mode EJL command summary ESC SOH Des...

Страница 231: ... ESCP2 FX I239X Description Specify the available language under EJL mode EJL WS SET WS Option WS WS Value WS CR LF Description Specify the setting Option Value TOPOFFSET 9 to 99 0 LEFTOFFSET 9 to 99 0 PAGESIZE LT LGL A4 EXE MON C5 DL A5 B5 HLT GLT GLG F4 C6 COM10 IB5 CTM PRINTERMODE LJ4 EPSONGL2 AUTO PS I239X ESCP2 FX AUTOCONTINUE OFF ON PANELLOCK OFF ON PAPERUNIT 1 to 15 AUTO SIZEIGNORE OFF ON O...

Страница 232: ...MAL SLASHEDZERO Available only in ESC P 2 mode I239X ALTGRAPHICS OFF AUTOCR OFF ON AUTOLF OFF ON BITIMAGE DARK LIGHT CODEPAGE 437 850 860 863 865 FONT COURIER GOTHIC ORATOR PRESENTOR PRESTIGE SANS SCRIPT PITCH 10 12 15 17 20 24 PROP TEXT 1 to 81 TMARGIN 0 3 0 35 to 1 5 ZERO NORMAL SLASHEDZERO EJL WS DEFAULT WS Option WS WS Value WS CR LF Description Save the setting in EEPROM as the default of the...

Страница 233: ...rinter commands supported in the I239X emulation mode For more information on these commands see IBM s 2390 2391 reference manual Page format Printable area Set page length in lines ESC C n Set page length in inches ESC C NUL n Set skip perforation ESC N n Cancel skip perforation ESC O Set horizontal margins ESC X Line spacing Set line space to 1 8 inch ESC 0 Set line space to 7 72 inch ESC 1 Acti...

Страница 234: ...ing print position motion Carriage return CR Line feed LF Form feed FF Move paper vertically n 180 n 216 or n 360 inch ESC J Automatic line feed ESC 5 Reverse line feed ESC Back space BS Space SP Horizontal tab HT Vertical tab VT Move current print position 1 120 inch ESC d Set top of form ESC 4 R Skylark Rev c A5 size Appendix C 96 05 15 pass 1 Command Summary C 21 ...

Страница 235: ...rscore ESC_ Continuous underline ESC Score select ESC Select print type style ESC Begin double width printing by line SO Begin double width printing by line ESC SO End double width printing by line DC4 Double width printing ESC W Begin empahsized bold print ESC E End empahsized bold print ESC F Begin double strike print ESC G End double strike print ESC H Bit image Normal density bit image graphic...

Страница 236: ... CAN Auxiliary function Select paper tray ESC F AGM Mode Line spacing Set line spacing for graphics n 180 n 216 or n 360 inch ESC 3 Set line spacing for text n 60 inch ESC A Paper feeding print position motion Move paper vertically n 180 n 216 or n 360 inch ESC J Line feed LF R Skylark Rev c A5 size Appendix C 96 05 15 pass 1 Command Summary C 23 ...

Страница 237: ...e density bit image graphics half speed ESC L Double density bit image graphics normal speed ESC Y High density bit image graphics ESC Z Graphic print mode ESC g Select graphic mode ESC L Skylark Rev c A5 size Appendix C 96 05 15 pass 1 C 24 Command Summary ...

Страница 238: ...ign off Nishi _______ Norum _______ Grady _______ Printer and Screen Fonts D 2 Available Fonts D 3 Adding More Fonts D 6 Downloading fonts D 6 Selecting Fonts D 6 D R Skylark Rev c A5 size Appendix d 96 05 15 pass 0 Working with Fonts D 1 ...

Страница 239: ...lled on both the printer and the computer The printer fonts which reside in printer memory are used by the printer to print text Screen fonts which are stored on your computer s media are used to display text on screen to represent the fonts that will print Two separate sets of fonts are needed because the monitor and printer have different requirements for producing fonts The monitor normally use...

Страница 240: ...re using a different driver all of these fonts may not be available The fonts provided with the printer are shown in the following table LJ4 GL2 mode Font name Scalable font HP equivalent Dutch 801 SWC Roman Bold Italic Bold Italic CG Times Zapf Humanist 601 SWC Demi Bold Demi Italic Bold Italic CG Omega Ribbon 131 SWC Coronet Clarendon Condensed SWC Claredon Condensed Swiss 742 SWC Medium Bold It...

Страница 241: ... Italic Bold Italic Courier Letter Gothic SWC Roman Bold Italic Letter Gothic Font name Bitmap font HP equivalent Line Printer Line Printer When selecting fonts in your software program choose the font name listed in the HP equivalent column ESC P 2 and FX modes Font name Scalable font EPSON Roman EPSON Sans serif Courier SWC Medium Bold EPSON Prestige EPSON Script Swiss 721 SWM Roman Bold Dutch 8...

Страница 242: ...SON Orator EPSON Script Font name Bitmap font OCR B To see the font samples use the Test Menu in SelecType 1 Make sure that paper is loaded 2 Press Menu while the printer is on line 3 Press Item until the font sample you want appears 4 Press Enter a Font Sample sheet is printed R Skylark Rev c A5 size Appendix d 96 05 15 pass 0 Working with Fonts D 5 ...

Страница 243: ... you can also install fonts by clicking on the Fonts icon in the Control Panel Once installed the fonts are available in all your Windows applications Selecting Fonts Whenever possible select fonts from the font list in your software application See your software documentation for instructions If you are sending unformatted text to the printer directly from DOS or if you are using a simple softwar...

Страница 244: ...Appendix E Map of SelecType Menus Proof Sign off Nishi _______ Norum _______ Grady _______ E R Skylark Rev c A5 size Appendix E 96 05 15 A5 size pass 1 Map of SelecType Menus E 1 ...

Страница 245: ...sible menus and options in SelecType KEY Pressing the Menu button displays the next menu Pressing the Alt Menu buttons displays the prior menu This is only available with option data 1a L Skylark Rev c A5 size Appendix E 96 05 15 A5 size pass 1 E 2 Map of SelecType Menus ...

Страница 246: ...data 2a R Skylark Rev c A5 size Appendix E 96 05 15 A5 size pass 1 Map of SelecType Menus E 3 ...

Страница 247: ...L Skylark Rev c A5 size Appendix E 96 05 15 A5 size pass 1 E 4 Map of SelecType Menus ...

Страница 248: ...r language cpi characters per inch A measure of the size of fixed width text characters default A value or setting that takes effect when the printer is turned on reset or initialized dots per inch dpi The number of dots per inch is a measure of printer resolution The higher the number of dots the higher the resolution download To transfer information from the computer to the printer download font...

Страница 249: ...es imaging cartridge The imaging cartridge contains a photosensitive print drum and a supply of toner initialization The act of returning the printer to its defaults fixed set of conditions interface The connection between the printer and the computer A parallel interface transmits data one character or code at a time and a serial interface transmits data one bit at a time landscape Printing that ...

Страница 250: ...of measure equivalent to 1 72 of an inch portrait Printing that is oriented upright on the page as opposed to landscape in which printing is oriented sideways on the page This is the standard orientation for printing letters or documents printer driver See driver printer emulation A set of operating commands that determines how data sent from the computer is interpreted and acted upon Printer emul...

Страница 251: ...lacking serifs scalable font See outline font SelecType A feature of the printer that allow you to set printer values and control most of the printer s function from the control panel serif The small decorative strokes that come off the main lines of a character status sheet A report that lists the printer settings and other printer information symbol set A collection of symbols and special charac...

Страница 252: ...3 Density 3 14 5 12 6 12 DOS 5 2 E ECP mode A 12 EJL mode C 16 Emulation Menu 6 9 Emulation Modes ESCP2 6 22 FX 6 22 I239X 6 26 LJ4 6 18 Envelops 1 8 Error messages 7 17 ESCP2 Menu 6 22 F Feed Jam 7 2 7 17 Font available D 3 downloading D 6 printer D 2 samples 6 8 D 5 screen D 2 selecting D 6 Form Feed 2 6 FX Menu 6 22 G GL 2 emulation mode 6 27 context commands C 7 Graphic Resolution 3 8 H Halfto...

Страница 253: ...erial module 4 13 Lower Paper Cassette 4 3 L T Menu 6 18 M Manual Feed 6 20 Mem Overflow error 7 14 7 19 Memory Module 4 7 Mode EJL C 16 LJ4 B 3 PJL C 15 MP Tray Size 6 20 O OneTouch Modes 6 20 On Line 2 5 Orientation 3 10 5 8 6 20 P Page Size 3 11 5 7 6 20 Paper choosing 1 7 jam problems 7 2 7 19 loading 1 2 loading manually 1 4 size 1 6 specifications A 2 Paper feed 5 8 Paper Format 3 9 Paper Ja...

Страница 254: ... 3 Serial interface utility 4 19 Serial Menu 6 16 Setup Menu 6 14 Status sheet 2 6 6 8 Symbol Sets B 2 T Test Menu 6 8 Toner 7 24 Toner Count Clear 6 15 7 26 Toner Low 7 22 Transparencies 1 8 Transporting the Printer 7 32 Troubleshooting error messages 7 17 paper jam 7 2 7 19 print quality 7 9 U Utility Remote Control Panel 5 2 serial interface 4 19 W Weight A 4 R Skylark Ref Rev c A5 size Index 0...

Страница 255: ...L Skylark Ref Rev c A5 size Index 05 15 96 DR pass 0 IN 4 ...

Страница 256: ...No 1 Temasek Avenue 36 00 Millenia Tower Singapore 039192 Phone 065 33 77 911 Fax 065 33 41 185 EPSON HONG KONG LTD Rooms 4706 10 47 F China Resources Bldg 26 Harbour Road Wanchai Hong Kong Phone 2585 4300 Fax 2827 7083 EPSON TAIWAN TECHNOLOGY TRADING LTD 10F No 287 Nanking E Road Sec 3 Taipei Taiwan R O C Phone 02 717 7360 Fax 02 712 9164 EPSON ITALIA S p A V le F lli Casiraghi 427 20099 Sesto S ...

Отзывы: