Changing aspect ratio
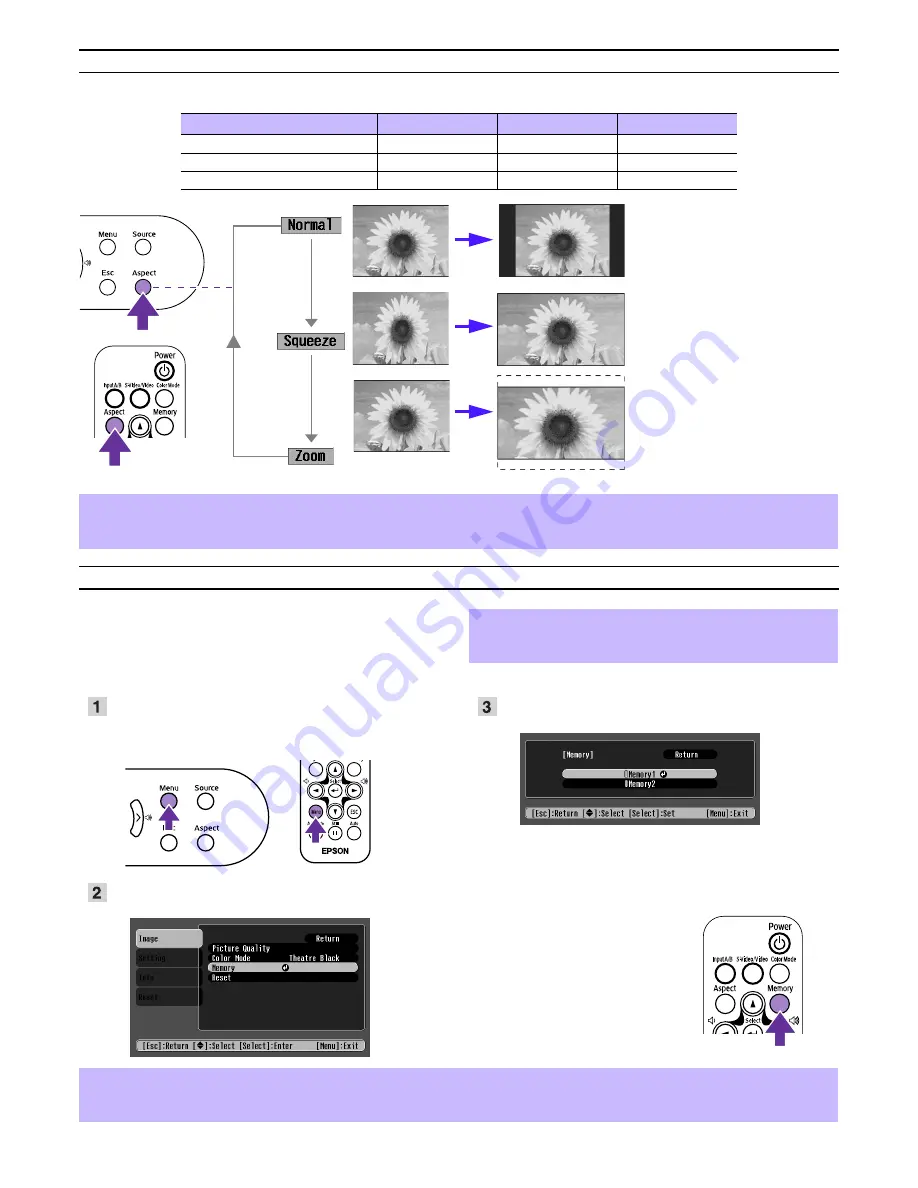
Three aspect ratio settings can be selected and applied to the projected image. However, the aspect ratio settings which can
be used differ according to the signal being input.
The aspect ratio changes in the following order each time you press the [Aspect] button.
Saving your preferred image settings (Memory)
You can save a maximum of 8 configuration menu
adjustment values to memory - 2 memories for each of the
four image sources (Input A: Component, Input A: RGB-
Video, Input B and Video/S-Video).
f
Saving Settings to Memory
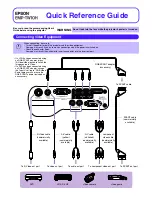
Press the [Menu] button.
Set the adjustment values in the configuration menu as you
want them to be saved.
Select
"
Memory
"
from the
"
Image
"
menu and press the
[
e
] button.
Select the Memory number (1 or 2) you want to save to
using the [
u
] [
d
] buttons, then press the [
e
] button.
f
Recalling Memory
When the image source you want
to recall the settings for is active,
press the [Memory] button on the
remote control to recall the saved
memory settings.
Video signal
Normal
Squeeze
Zoom
SDTV (525i/p, 625i/p)
X
X
X
TV (NTSC, PAL, SECAM)
X
X
X
HDTV (750p, 1125i)
X
-
-
p
• You can control Zoom settings in the configuration menus. "Setting"
→
"Screen"
→
"Zoom Caption"
s
"Setting menu"
User's Guide
• If you project an image that is compressed, enlarged or separated using the aspect function in public places such as a store or hotel
for the purposes of profit-making or public display, it may result in infringing on the author's right that is protected by copyright law.
Images are projected preserving the
original aspect ratio.
If squeeze mode has also been set
on the connected equipment, such
as a DVD player, images are
projected in 16:9 (widescreen).
Images formatted to 4:3 will be
elongated in this mode.
Images output in 4:3 format are cut
at the top and bottom by a set
amount and resized to 16:9
(widescreen).
p
The adjustment values which can be saved to memory are
Picture Quality (except for Tracking and Sync.), Color Mode,
and Aspect.
p
• If nothing has been saved to either memory 1 or 2, the message “No Entry” will be displayed.
• If you want to revise settings you have made, set the adjustment values as desired, then perform “Saving Settings to Memory”.
• When clearing the memory, the settings saved for all image sources will be reset. “Reset”
→
“Memory Reset”
Printed in China
04.XX-XA (G04)
404951701 (E)


