background image

EPSON PowerLite 505c/715c Projector

1/01

EPSON PowerLite 505c/715c Projector 

- 5

If you’re using a PowerBook:

You may need to set up your system to display on the 
projector screen as well as the LCD screen. Follow these steps:

1. From the Apple

®

 menu, select 

Control Panels,

 then click


Monitors and Sound

.

2. Click the 

Arrange

 icon.

3. Drag one monitor icon on top of the other. 

If this option isn’t available, you may need to select one of the 
Simulscan resolution settings:

1. Click the 

Monitor

 icon. 

2. Select a 

Simulscan

 resolution. (Allow a few seconds for the 

projector to sync up after making the selection.)

If you’re using a PC laptop:

Hold down the

 Fn

 key and press the function key that lets 

you display on an external monitor. It may have an icon such 
as 

 or it may be labelled 

CRT/LCD.

 Allow a few 

seconds for the projector to sync up after pressing it. Check 
your laptop’s manual or online help for details. 

On most systems, the 

 key lets you toggle between the 

LCD screen and the projector, or display on both at the 
same time. 

Depending on your computer’s video card, you might need 
to use the Display utility in the Control Panel to make sure 
that both the LCD screen and external monitor port are 
enabled. See your computer’s documentation or online help 
for details.

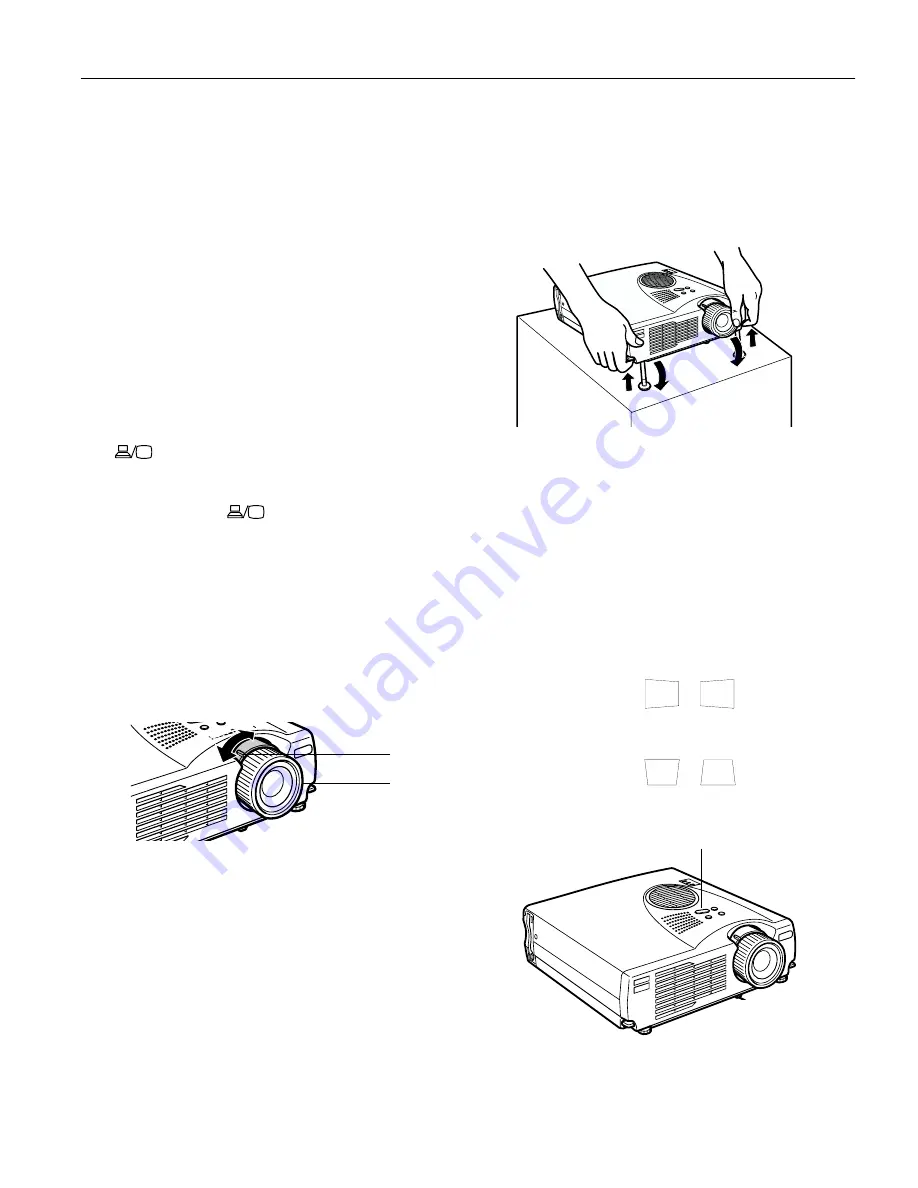
Focusing and Zooming Your Image

Rotate the focus ring to sharpen the image.

Use the tab to rotate the lens ring and reduce or enlarge the 
image.

You can also change the image size by moving the projector 
closer to or farther away from the screen. You can use the 

E-Zoom

 button on the remote control to zoom in on a portion 

of the image. See the 

User’s Guide

 for instructions. 

Adjusting the Height of Your Image

If the image is too low, you can raise it by extending the 
projector’s feet. 

1. Stand behind the projector. Pull up the blue foot release 

levers and lift the front of the projector. This unlocks the 
feet.

Caution:

 Do not hold the projector by the lens; this can 

damage it.

2. Once the image is positioned where you want it, release the 

levers to lock the feet in position.

3. To fine-tune the height of the image, rotate the thumb 

wheels attached to the projector’s feet.

If the image is no longer square after raising it, see the next 
section.

Adjusting the Image Shape

If the projected image isn’t square or has a “keystone” shape, 
try the following:

If your image looks like 

 or 

, you’ve placed the 

projector off to one side of the screen, at an angle. Move it 
directly in front of the center of the screen, facing the screen 
squarely.

If your image looks like 

 or 

, press the 

+

 or 


side of the 

Keystone

 button to correct the shape of the 

image. After correction, your image will be slightly smaller.

focus ring

lens ring 
tab

Keystone button

Содержание EMP-715 - XGA LCD Projector

Страница 1: ...ernal sound system 1 W monaural Optical aspect ratio 4 3 horizontal vertical Zoom ratio 1 1 2 Noise level 42 dB Keystone correction angle 15 maximum Card slot PCMCIA Type II Card Supports CFA specification CompactFlash SmartMedia Memory Stick ATA Flash both 3 3 V and 5 V and Microdrive Projection Lamp Type UHE Ultra High Efficiency Power consumption 150 W Lamp life About 1000 hours Part number ELP...

Страница 2: ...lay correctly see your computer s documentation for details 1 The image is resized so that it displays using one of the projector s native formats PowerLite 505c only 2 The image is resized so that it displays using one of the projector s native formats PowerLite 505c and 715c 3 Not supported on the PowerLite 505c Mode Refresh Rate Hz Resolution VGAEGA 70 640 x 350 VGA60 VGA72 VGA75 VGA85 VGA Text...

Страница 3: ...ow to determine the proper distance Starting Up the Projector Follow these steps to start up the projector 1 Connect one end of the power cord to the projector s power inlet 2 Connect the other end to a grounded electrical outlet The power light on top of the projector turns orange indicating that the projector is receiving power but not yet turned on Input pin Computer connector signals 1 Red vid...

Страница 4: ...ld see your computer display projected If you see an EasyMP screen or presentation instead press the Source button on top of the projector to switch to the computer Windows only If you see a message saying that it has found a plug and play monitor click Cancel If you re projecting a video press the Source button on top of the projector to switch to your video source and press the Play button on yo...

Страница 5: ...e help for details Focusing and Zooming Your Image Rotate the focus ring to sharpen the image Use the tab to rotate the lens ring and reduce or enlarge the image You can also change the image size by moving the projector closer to or farther away from the screen You can use the E Zoom button on the remote control to zoom in on a portion of the image See the User s Guide for instructions Adjusting ...

Страница 6: ...a protective case Projector Status Lights The lights on top of the projector indicate the projector s status and let you know when a problem occurs Light Status Description and action orange The projector is in sleep mode You can unplug it or press the Power button to turn it on flashing green The projector is warming up Wait for the image to appear green The projector is operating normally flashi...

Страница 7: ...reduces the image size from 1x to 4x in 24 steps Pressing the right side of the button enlarges the image pressing the left side of the button reduces the image To display a portion of an enlarged image which is outside the display area press the Enter button and scroll the image to the desired location R C ON OFF Turns the remote control on or off Button 1 Places a pointer or cursor stamp on the ...

Страница 8: ...card is released and you can remove it from the slot in the projector Caution Press the button carefully to avoid breaking it Make sure the button is pressed in before you store the projector in a carrying case or box 3 Press the button to insert it in the slot 4 Insert the card in your computer s PCMCIA slot or card reader See your computer documentation if you need instructions 5 Create your sce...

Страница 9: ...ne thinner or other chemical detergents These can cause the projector s plastic case to warp Cleaning the Air Filter Clean the air filter after every 100 hours of use or if the temperature warning light on top of the projector turns red If the filter is not cleaned periodically it can become clogged with dust preventing proper ventilation This can cause overheating and damage the projector Follow ...

Страница 10: ... or call EPSON at 800 873 7766 in the United States and Canada for a replacement lamp Request part number ELPLP14 Follow these steps to replace the lamp 1 Turn off the projector then unplug the power cord 2 Allow the projector to cool down for at least half an hour if it has been on Warning If the lamp breaks handle the shards carefully to avoid injury 3 Turn the projector upside down to access th...

Страница 11: ...rying cases Samsonite wheeled soft case Slimline soft shoulder bag Notebook projector soft shoulder bag ATA molded hard shell case ELPKS35 ELPKS31 ELPKS32 ELPKS30 Ceiling mount ELPMB34 Suspension adapter for ceiling mount 1 inch pipe ELPMBAPS Suspension adapter for ceiling mount 1 5 inch pipe ELPMBAST Kensington MicroSaver security lock ELPSL01 Portable projection screens 50 inch screen 60 inch In...

Страница 12: ...EPSON PowerLite 505c 715c Projector 12 EPSON PowerLite 505c 715c Projector 1 01 ...

Отзывы: