Epson EH-TW8100 Скачать руководство пользователя страница 49

Useful Functions

48

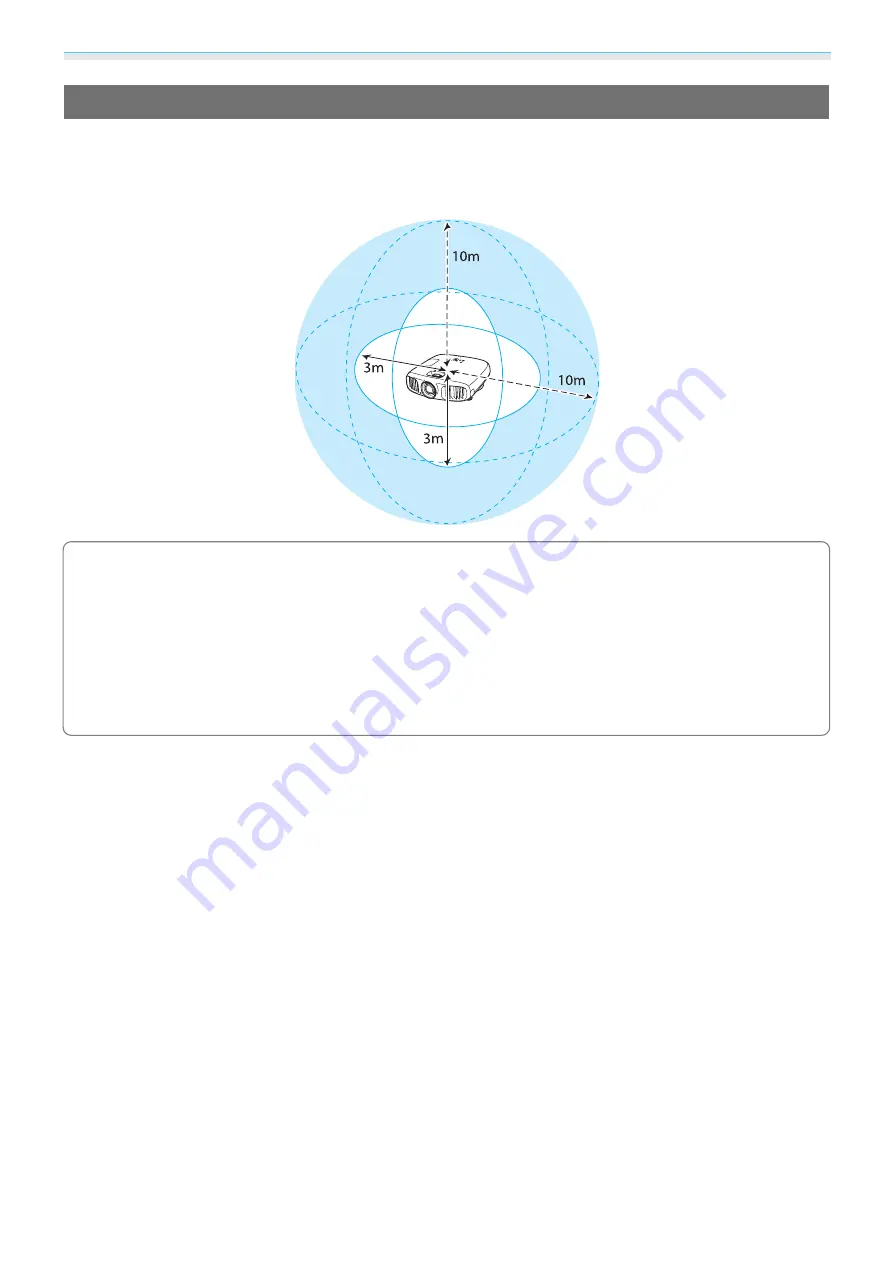
Range for Viewing 3D Images

The projector allows you to view 3D images within the range shown in the figure below.

You can view 3D images within a range of 10 meters from the projector.

The distance for pairing is three meters.

c

3D images may not be displayed correctly if there is any interference from other Bluetooth
communication devices. Do not use these devices at the same time.

The communication method for 3D Glasses uses the same frequency (2.4 GHz) as wireless LAN
(IEEE802.11b/g) or microwave ovens. Therefore, if these devices are used at the same time, radio wave
interference may occur, the image may be interrupted, or communication may not be possible. If you
do need to use these devices at the same time, make sure there is enough distance between them and
the projector.

The 3D Glasses for this projector use the active shutter system based on the standards provided by the
Full HD 3D Glasses Initiative

.

Содержание EH-TW8100

Страница 1: ...User s Guide ...

Страница 2: ...before using the pro jector User s Guide this guide Contains information on setting up and basic operations before using the projector using the Configuration menu and handling problems and performing routine maintenance Quick Start Guide Contains information on the procedures for setting up the projector Read this first 3D Glasses User s Guide Contains information on handling the 3D Glasses and w...

Страница 3: ...n that if ignored could possibly result in personal injury or physical damage due to incorrect handling General Information Indications Attention Indicates procedures which may result in damage or malfunctions to occur c Indicates additional information and points which may be useful to know regarding a topic s Indicates a page where detailed information regarding a topic can be found Menu Name In...

Страница 4: ...able Clamp 21 Preparing the Remote Control 22 Installing the Remote Control Batteries 22 Remote Control Operating Range 23 Operating range left to right 23 Operating range top to bottom 23 Basic Operations Starting and Ending Projection 24 Turning on the Projector and Projecting 24 If the Target Image is not Projected 25 Turning Off 25 Adjusting the Projected Screen 27 Displaying the Test Pattern ...

Страница 5: ...rget image 59 Switching the image source 60 Remote control operating range 62 Using the HDMI Link Function 63 HDMI Link Function 63 HDMI Link Settings 63 Device Connections 64 Changing Between Two Types of Images 65 Types of Screen that can be Displayed Simultaneously 65 Projecting on a Split Screen 65 Starting split screen display 65 Changing the split screen settings 66 Configuration Menu Config...

Страница 6: ...ter 93 Replacing the lamp 94 Resetting lamp hours 95 Appendix Optional Accessories and Consumables 97 Optional Items 97 Consumables 97 Supported Resolutions 98 Component Video 98 Composite Video 98 Computer Signals Analog RGB 98 HDMI1 HDMI2 Input Signal 99 3D Input Signal 99 WirelessHD Input Signal 99 Specifications 100 Glossary 103 General Notes 104 Notes when Wearing 3D Glasses 104 General Notic...

Страница 7: ...rd 2D images into 3D images s p 52 You need dedicated 3D Glasses based on 3D Active Shutter Eyewear Technology to view 3D images s p 46 Adjusting Images to Suit your Surroundings Color Mode By simply selecting the Color Mode you can project the optimum image to suit your surroundings s p 31 Setting Example Living Room For use in a bright room Cinema For movies and concerts in a dark room ...

Страница 8: ...devices to project images from the connected AV device even if the projector is off s p 53 Projector Transmitter Multi mediaplayers gameconsoles and so on Other Useful Functions In addition the following useful functions are provided The remote control contains a backlight function allowing for easy use even in dark rooms Operations are also simplified by only pressing the button s p 11 Lens shift...

Страница 9: ... Receives signals from the remote control s p 23 e Lens shutter Closes automatically when the projector is turned off to protect the lens from being scratched or soiled s p 24 f Projector s lens Images are projected from here g Air filter cover When cleaning or replacing the air filter open this cover and remove the air filter s p 90 p 93 Air intake vent Intake vent for air used to cool the projec...

Страница 10: ...or s errors through a combination of other indicators lit and flashing s p 79 d Displays and closes the configuration menu On the configuration menu you can make adjustments and settings for Signal Image Input Signal and so on s p 67 e Control panel cover Cover for the control panel When you want to use the control panel grip the knob and slide the cover open s p 30 f Selects the adjustment value ...

Страница 11: ...Introduction 10 Buttons Indicators Function j Changes to the image from each input port s p 25 k Turns the projector power on or off s p 24 Lit when the projector is on s p 80 ...

Страница 12: ...ful when operating the remote control in the dark d Splits the screen in two and projects two image sources simultaneously s p 65 e Changes to the image from each input port s p 25 f This button displays the settings menu for HDMI Link With the other buttons you can then start or stop playback and so on for connected devices that meets the HDMI CEC standards s p 63 g Adjusts the volume for connect...

Страница 13: ...s p 67 l When a menu is displayed it accepts and enters the current selection and moves to the next level s p 67 m The adjustment value returns to its default value when pressed while the me nu s adjustment screen is displayed s p 67 n Displays and closes the configuration menu On the configuration menu you can make adjustments and settings for Signal Image Input Signal and so on s p 67 o Return t...

Страница 14: ...er button s p 73 t Saves loads or erases a memory s p 42 A Reducesthejarringeffectcausedbyquickmovementsbyinterpolatingframes and adjusts to render a smoother clearer image s p 39 B Temporarily hides or shows the image s p 30 C Displays and closes the test pattern s p 27 D WiHD Transmitter control Turns on the WirelessHD Transmitter or switches the input and output Make sure you point the remote c...

Страница 15: ...port on video equip ment s p 19 e Video port Connects to the composite video output port on video equipment s p 19 f PC port Connects to the RGB output port on a computer s p 20 g RS 232C port When controlling the projector connect the projector to a computer with an RS 232C cable This port is for control use and should not normally be used s p 100 h Trigger out port Connects with external devices...

Страница 16: ...nts Attaches the optional ceiling mount here when suspending the projector from a ceiling s p 97 c Cable cover fixing screw Attaches the optional cable cover d Air exhaust vent Exhaust vent for air used to cool the WirelessHD receiver When suspending from a ceiling make sure it is setup so that dust does not collect in this section e Screw for anamor phic lens Attaches the anamorphic lens ...

Страница 17: ...Introduction 16 Appearance Units mm a Center of lens b Distance from center of lens to suspension bracket fixing point c Lens direction ...

Страница 18: ... projector Do not setup the projector on its side This may cause malfunctions to occur Try not to setup the projector in locations subject to high humidity and dust or in locations subject to smoke from fires or tobacco smoke Attention Clean the air filter once every three months Clean it more often if the environment is particularly dusty s p 93 Placing on a table and so on and projecting Suspend...

Страница 19: ...ximum Tele Distance A Distance B Distance E 40 89 x 50 117 252 23 73 42 60 130 x 75 177 380 34 109 63 80 180 x 100 238 508 46 145 83 100 220 x 120 298 636 57 181 104 120 270 x 150 359 764 68 218 125 150 330 x 190 450 956 85 272 156 180 440 x 250 540 1148 103 327 188 4 3 Screen Size Projection Distance C Lens Shift Maximum Values D W x H Minimum Wide Maximum Tele Distance A Distance B Distance E 40...

Страница 20: ...r section on the rear Remove the interface cover before connecting any cables s p 21 Connecting to Video Equipment To project images from DVD players or VHS video and so on connect to the projector using one of the following methods When using an HDMI cable Fix the HDMI cable in place using the HDMI cable clamp s p 21 When using a video cable When using a component video cable c The cable differs ...

Страница 21: ... communicate the projector s status on or off to connected devices such as electric screens c When using the Trigger out port set the Trigger Out function s Extended Operation Trigger Out p 75 Connecting WirelessHD devices EH TW9100W EH TW8100W only The projector receives transmissions from the WirelessHD Transmitter and projects the images s p 53 Change the projected image by pressing the button ...

Страница 22: ...ooves at the top c When reattaching first insert the protruding sections into the grooves at the top Make sure you store the interface cover safely as you need this when transporting the projector Connecting an HDMI Cable Clamp If the HDMI cable is thick and hangs down make sure you secure it to the cable holder with an HDMI clamp so that the cable s weight does not disconnect it from the port c I...

Страница 23: ...ery cover While pushing the battery compartment cover catch lift the cover up b Replace the old batteries with new batteries Check the polarity of the batteries and before installing c Reattach the battery cover Press the cover until it clicks into place c If delays in the responsiveness of the remote control occur or if it does not operate it probably means that the batteries are becoming flat Wh...

Страница 24: ...3 Remote Control Operating Range The operation range for the WirelessHD Transmitter differs s p 62 Operating range left to right Operating range top to bottom Remote control signals are not available in this range ...

Страница 25: ... the lens during projection c This projector provides a Child Lock function to prevent children from accidentally turning the power on and a Control Panel Lock function to prevent accidental operations and so on s Settings Child Lock Control Panel Lock p 73 Whenusingatanaltitudeof1500mormore setHighAltitudeModetoOn sExtended Operation High Altitude Mode p 75 This projector provides an Auto Setup f...

Страница 26: ...ent source check that the port you have connected to is the same as the Input Signal s Extended Input Signal Video Signal Component p 75 Turning Off a Turn off the connected equipment b Press the button on the remote control or the projector s control panel Remote control Control panel A confirmation message is displayed c Press the button again Projection ends and thelensshuttercloses automatical...

Страница 27: ...Basic Operations 26 e Turn off the main power switch c If the main power switch is not turned off some electricity is consumed even if no operations are made ...

Страница 28: ...st pattern EH TW9100W EH TW8100W EH TW9100 EH TW8100 You can adjust the display position and so on by using this test pattern For EH TW9100W EH TW9100 you can also select patterns that display R red G green and B blue individually as well as the pattern for adjusting the display position You can use it as a pattern to perform color adjustment when an image signal is being input Press the button to...

Страница 29: ...ng to adjust the size of the projected screen Adjusting the Projector s Tilt If the projection screen is tilted the left and right sides of the projector are at different heights when the projector is setup on a table adjust the front foot so that both sides are level with each other ...

Страница 30: ...right and left can be adjusted by up to 47 of the width of the screen Toresettheimagepositiontothecenter returnthedial to the central position To locate the center of the lens shift range turn the lens shift dial until you hear it click Caution Whentransportingtheprojector returnthelensto thecentralposition Ifyoutransporttheprojectorwhen the lens is shifted up down left or right the lens shift mec...

Страница 31: ...he projected screen to the screen size You can make keystone settings from the configuration menu s Settings Keystone p 73 You can make effective corrections within a projection angle of 30 top to bottom Forpositionadjustment youcanmaintainthequalityoftheprojectedimagebyperformingcorrection using lens shift Use keystone when you cannot make adjustments using lens shift Hiding the Image Temporarily...

Страница 32: ...he configuration menu s Image Color Mode p 68 b Select Color Mode Press the buttons from the displayed menu to select Color Mode and then press the button to confirm the selection When projecting 2D images You can select Dynamic Living Room Natural THX and Cinema 3D Dynamic 3D Cinema and 3D THX are grayed out and cannot be selected When projecting 3D images You can select 3D Dynamic 3D Cinema and ...

Страница 33: ...X For use when projecting 3D images A color mode authorized by THX Ltd 3D THX may not be displayed depending on the model you are using Switching the Screen Between Wide and Zoom Aspect You can change the input signal s type aspect ratio and resolution to match the Aspect of the projection screen The available Aspect varies depending on the image signal currently being projected a Press the button...

Страница 34: ...image displayed in 16 9 with black margins at the top and bottom for subtitle placement The margins at the top and bottom of the screen image are used for subtitles For EH TW9100W EH TW9100 you can also set Anamorphic Wide and Horiz Squeeze c IfAnamorphicWideisselectedwhenOverscanisset theimagemaybetruncated SetOverscanto Off and then project s Signal Advanced Overscan p 70 Set Anamorphic Wide and...

Страница 35: ...ess Adjusts the overall color brightness of the image a Press the button EH TW9100W EH TW8100W EH TW9100 EH TW8100 c You can make settings from the configuration menu s Image Advanced RGBCMY p 68 b Use the buttons to select the color you want to adjust and then press the button to confirm the selection c Use the buttons to select Hue Saturation or Brightness d Use the buttons to make adjustments P...

Страница 36: ... the value the lighter the dark portions of the image become but bright areas may appear discolored The upper part of the gamma adjustment graph becomes roun ded When a large value is entered bright parts of the image be come dark The lower part of the gamma adjustment graph becomes rounded c The horizontal axis of the gamma adjustment graph shows the input signal level and the vertical axis shows...

Страница 37: ...rwhenmovedtotheright positive anddarkerwhenmoved to the left negative Offset When the image is made brighter shading for the darker sections is more vividly expressed When the image is made darker the image appears more full bodied but shading for the darker sections is harder to distinguish Gain When the image is made brighter the bright sections become whiter and shading is lost When the image i...

Страница 38: ...ncreased and red tints grow stronger as the value is reduced c Press the button to return the adjustments to their default values Skin Tone You can adjust the skin tone Make adjustments if the skin tone is too red or too green and so on The menu is displayed in the following order Image Skin Tone Use the buttons to make adjustments The image becomes greener when set to the right positive and redde...

Страница 39: ...or vertically a Press the button Remote control Control panel The configuration menu is displayed b Select Image Sharpness The Sharpness adjustment screen is displayed c Select Advanced at the top right of the screen and then press the button to confirm the selection The Advanced adjustment screen is displayed d Use the buttons to select the item and then use the buttons to make the adjustments Th...

Страница 40: ... the configuration menu s Image Auto Iris p 68 b Use the buttons to select the item and then press the button to confirm the selection Frame Interpolation This setting compares the current and previous frames and then creates a frame between them to reduce fuzziness and produce clearer images You can select the level of interpolation from Low Normal or High If you notice any distortion and so on a...

Страница 41: ...ke adjustments The higher the number the stronger the effect c Press the button to exit the menu Image Processing Improves the response speed for images projected at high speed such as games This is only available when receiving a progressive signal input from the Component HDMI1 or HDMI2 ports or from WirelessHD a Press the button The configuration menu is displayed b Select Signal Advanced Image...

Страница 42: ...being used You can easily adjust the color gamut by selecting from the color space names registered in advance This can be set when Color Mode is set to Natural a Press the button The configuration menu is displayed b Select Image Advanced Color Gamut c Selectthecolorspaceaccordingtothe device being used d Press the button to exit the menu ...

Страница 43: ...polation Super resolution Advanced Noise Reduction Setup Level EPSON Super White Overscan HDMI Video Range Saving a Memory You can register a memory when Color Mode is set to anything except Auto a Makesettingsthatyouwanttosaveto the configuration menu b Press the button EH TW9100W EH TW8100W EH TW9100 EH TW8100 c Use the buttons to select Save Memory and then press the button to confirm the selec...

Страница 44: ... Select the target memory name A confirmation message is displayed If you select Yes the content of the saved memory is erased c If you want to erase all of the saved memories go to Reset Reset Memory on the configuration menu s p 77 Renaming a Memory You can rename each memory name using up to 12 characters Giving the memory a name that is easy to remember is useful when loading the memory a Pres...

Страница 45: ...ge 44 d Enter a name Use the buttons to select a character and then press the button to con firm the selection Enter up to 12 characters When you have finished entering the name se lect Finish The memory name is changed ...

Страница 46: ... 70 If a 3D image is not displayed try switching by pressing the button c How a 3D image is perceived varies depending on the individual The image is not displayed in 3D if 3D Display is set to Off Press the button on the remote control s Signal 3D Setup 3D Display p 70 The projector automatically selects the appropriate 3D format but if the 3D image is not displayed correctly use 3D Format to sel...

Страница 47: ...e by using the USB Charging Adapter supplied Charging using the WirelessHD Transmitter Use the USB cable to connect the 3D Glasses to the WirelessHD Transmitter Charging using the USB Charging Adapter Use the USB cable to connect the 3D Glasses to the USB Charging Adapter and then connect the USB Charging Adapter to an electrical outlet Attention Only connect to an electrical outlet that uses the ...

Страница 48: ...u stay within a range of three meters from the projector Otherwise pairing may not be performed correctly If synchronization cannot be performed within 30 seconds pairing is automatically canceled When pairing is cancelled 3D images cannot be viewed because pairing fails Wearing the 3D Glasses a Turn on the 3D Glasses by sliding the Power switch to On The indicator turns on for several seconds and...

Страница 49: ...not use these devices at the same time The communication method for 3D Glasses uses the same frequency 2 4 GHz as wireless LAN IEEE802 11b g or microwave ovens Therefore if these devices are used at the same time radio wave interference may occur the image may be interrupted or communication may not be possible If you do need to use these devices at the same time make sure there is enough distance...

Страница 50: ... such as automatic doors or fire alarms Heating Do not place the 3D Glasses in a fire on a heat source or leave them unattended in a location subject to high temperatures Because this device has a built in rechargeable lithium battery it could cause burns or a fire if it ignites or explodes Charging When charging connect the supplied cable to the USB port designated by Epson Do not charge using ot...

Страница 51: ...r uncomfortable when viewing 3D images stop viewing immediately Continuing to view the 3D images could cause you to feel unwell When viewing 3D images be sure to always wear 3D Glasses Do not attempt to view 3D images without 3D Glasses Doing so could cause you to feel unwell Do not place any breakable or fragile objects around you when using 3D Glasses 3D images may cause you to move your body in...

Страница 52: ...mages is six years old Children under the age of six are still developing and viewing 3D images may cause complications Consult your doctor if you have any concerns Childrenviewing3Dimagesthrough3DGlassesshouldalwaysbeaccompaniedbyanadult Itisoftendifficult to tell when a child is feeling tired or uncomfortable which could result in them feeling suddenly unwell Always check with your child to ensu...

Страница 53: ...yed b Select Signal 3D Setup and then press the button to confirm the selection The 3D Setup screen is displayed c Select 2D to 3D Conversion and then press the button to confirm the selection d Select the strength of the 3D effect and then press the button to confirm the selection e Press the button c When using 2D to 3D Conversion set 3D Format to Auto or 2D s Signal 3D Setup 3D Format p 70 ...

Страница 54: ...lowing ways You do not need to connect a cable to the projector This is useful if you cannot set it up near the AV device You can connect up to five AV devices at the same time and switch images using the remote control As well as the projector you can connect another output device such as a television to the Output port and then switch the output using the remote control This allows other output ...

Страница 55: ...udio Out port Connectstoaudiodevicesequippedwithanopticaldigitalaudioinputport g HDMI Output port Connects to other output devices such as televisions You can switch the output using the Output button h HDMI Input port Connects to the AV device you want to playback You can switch the input image using the Input button i 3D Glasses charging port Connects a USB cable to charge the 3D Glasses j t ind...

Страница 56: ...h from the WirelessHD settings menu s Settings WirelessHD Reception p 73 Setting the WirelessHD Transmitter a Set up the WirelessHD Transmitter connected to the projector so that they are facing each other s p 58 b Connect the WirelessHD Transmitter to an electrical outlet using the supplied AC adapter c Using an HDMI cable connect the AV device you want to use to the Input port on the WirelessHD ...

Страница 57: ...he WirelessHD Transmitter Make sure you point the remote control at the WirelessHD Transmitter when using the button on the remote control Remote control WirelessHD Transmit ter c Check the status of the Link indicator on the WirelessHD Transmitter If the WirelessHDTransmitter is connected to the projector the Link indicatorflashes and then remains on c If the indicator continues to flash slowly t...

Страница 58: ... is not going to be used for an extended period WirelessHD Settings Menu a Press the button The configuration menu is displayed b Select Settings WirelessHD The WirelessHD settings screen is displayed c Make settings for each of the displayed functions Available functions on the WirelessHD settings menu Function Explanation Device Connections DisplaysalistofavailableWirelessHDdevicesthatcanbeconne...

Страница 59: ...shelf or other location that does not block the signal from being transmitted from the front of the device Note that placing the transmitter on a metal shelf may cause signal instability The antennas are built into the front of the projector and the WirelessHD Transmitter Make sure the antennas face each other face the front when setting up the devices Place the projector and the WirelessHD Transm...

Страница 60: ...ut c Make sure you point the remote control at the WirelessHD Transmitter when performing operations usingthe button switchinput andthe button switchoutput ontheremotecontrol Switching the target image You can switch the output image between devices such as televisions connected to the Output port on the WirelessHD Transmitter and the projector a Turn on the projector or the television b Turn on t...

Страница 61: ...ther output device The output target projected last time is projected the next time the projector is turned on c You can switch to the other output device even when the projector is off Switching the image source YoucanswitchtheimagesourcefortheAVdeviceconnectedtotheWirelessHDTransmitter Whenswitching each input source is displayed on one screen as a preview This allows you to switch easily betwee...

Страница 62: ...mitter and then press the button Displays the sub screen for the connected device b When switching between the sub screen and the main screen hold down the button for approximately 3 seconds until the screen changes c To close the sub screen press the button again The projected image is switched c When the sub screen is displayed press the button to switch the image for the sub screen When the sub...

Страница 63: ...ful Functions 62 Remote control operating range The following shows the operating range between the remote control and the WirelessHD Transmitter Operating range left to right Operating range top to bottom ...

Страница 64: ...is played back on the connected device Or powers on the connected device when the projector is turned on Power Off Link Powers off the connected device when the projector is turned off This only works when the connected device s CEC power link function is enabled Note that depending on the status of the connected device for example if it is record ing the device may not power off Input Change Link...

Страница 65: ...Device Connections list is displayed Devices that have a green icon to their left are linked If the device name cannot be determined this field is left blank b Select the device you want to operate using the HDMI Link function c If the cable does not meet the HDMI standards operations are not possible Some connected devices or functions of those devices may not operate properly even if they meet t...

Страница 66: ...rojection HDMI1 HDMI2 WirelessHD Component Video PC HDMI1 HDMI2 WirelessHD Component Video PC EH TW9100W EH TW8100W only Projecting on a Split Screen Starting split screen display Pressthe buttonontheremotecontrolwhiletheprojector is projecting The input image is displayed as a split screen The imagewhich was being displayed isprojected ontheleft and the image specified in Source from the Split Sc...

Страница 67: ...n during split screen projection to immediately display the Split Screen Setup menu b Make settings for each of the displayed functions Available functions on the Split Screen Setup menu Function Explanation Screen Size Changes the left and right screen size using Equal Larger Left and Larger Right Source Selects which source is displayed on the left and right Swap Screens Changes the left and rig...

Страница 68: ...selection When you select the top menu on the left the sub menu on the right changes The line at the bottom is a guide for operations c Use the buttons to select the sub menu on the right and then press the button to confirm the selection The adjustment screen for the selected function is displayed d Use the buttons to adjust the settings Ex Adjustment bar Ex Choices Press the button on an item di...

Страница 69: ...dings and the image you are projec ting s p 31 Brightness Adjusts the brightness when the image appears too dark Contrast Adjusts the contrast between light and shade in the images By increasing the contrast the images become vivid Color Satura tion 1 Adjusts the color saturation for the im ages Tint 1 Adjusts the tint for the images Sharpness Standard Adjusts the image sharpness Adjusts the overa...

Страница 70: ...eriencing bright over exposure of whites in your im age When set to On HDMI Video Range settings are disabled Color Gam ut 4 HDTV EBU SMPTE C Sets the color gamut to match the stand ard for the video device being used s p 41 Power Con sumption Normal ECO You can set the lamp brightness to one of two settings Select ECO if the images being projected aretoobright WhenECOisselected pow er consumption...

Страница 71: ...ng 3D content on or off Aspect 2 Auto Normal Full Zoom Wide Anamor phic Wide 7 Horiz Squeeze 7 Selects the aspect mode s p 32 Zoom Size 2 Available when Aspect or Zoom are set Any parts at the top or bottom that cannot be seen when Zoom is set are squeezed vertically to fit on the screen The higher you set this value the more the image is squeezed vertically Zoom Caption Pos 2 Available when Aspec...

Страница 72: ...r not to automatically adjust the image whenever the input signal is changed When enabled the tracking display position and synchronization are automatically config ured Frame Interpo lation Off Low Normal High Reduces afterimages when projecting moving images by interpolating between one frame and the next s p 39 Super resolu tion 0 5 Reduces blurring that occurs at the edge of im ages when the r...

Страница 73: ...perience under or overexposure when set to Auto set the video level of the projector to match that of the DVD player s video level YourDVDplayermaybesettoNormalorExpand The Auto option is not displayed when connec ted to a connected device s DVI port Image Processing Fine Fast Performs processing to improve the image s p 40 Reset Yes No Resets all Signal settings except for Aspect to their default...

Страница 74: ...ectional or Device PJ or to power on a connected de vicewhentheprojectoristurnedon Bidirectional or PJ Device Power Off Link On Off Sets whether or not to power off connected devices when the pro jector is turned off WirelessHD Device Connections Displays a list of available Wire lessHD devices that can be connec ted WirelessHD On Off Enables or disables the WirelessHD function Reception Displays ...

Страница 75: ...creen if any buttons are pressed To unlock press and hold the button on the con trol panel for at least 7 seconds If changed this setting is enabled once you close the configuration menu Projection Front Front Ceiling Rear Rear Ceiling Change this setting depending on how the projector is installed Front Select if you are projecting in front of the screen Front Ceiling Select if you are projecting...

Страница 76: ...eep mode When in standby mode press the button on the remote con trol or the button on the control panel to start projection Illumination On Off Set this to Off if the light from the indicators on the control panel bother you when watching a movie in a dark room Trigger Out On Off 1 SettheTriggerOutfunctiontocommunicatethe projector s power onstatus andsoontoexternal devices When set to Off no vol...

Страница 77: ... 25 Input Signal Video Signal Auto NTSC NTSC4 43 PAL M PAL N PAL PAL60 SECAM Sets the signal type depending on the video de vice connected to the Video port When set to Auto the video signal is set automatically If you notice noise in the image even when set to Auto or if you are not seeing any image at all select the correct signal type from the available options Component Auto YCbCr YPbPr Sets t...

Страница 78: ...ame Packing Side by Side or Top and Bottom Sync Info Displays the image signal information This information may be needed if service is required Deep Color Displays deep color Video Signal Displays the settings for Video Signal in the Signal menu Status This is information about errors that have occurred on the projector This information may be needed if service is required Serial Number Displays ...

Страница 79: ...Screen Size Equal Larger Left Larger Right Changes the left and right screen sizes s p 66 Source Left Right PC Video Component HDMI1 HDMI2 WirelessHD Selectswhichsourceisdisplayedon the left and right s p 66 Swap Screens Changes the left and right screens s p 66 Exit Split Screen Exits split screen display s p 66 Only EH TW9100W EH TW8100W is displayed ...

Страница 80: ...thelampwithanewlamp as soon as possible s p 94 The lamp may explode if you continue to use it in this status orange High Temp Warning You can continue projecting If the temperature rises too high again projection stops automatically If the projector is installed next to a wall make sure there is at least 20 cm between the wall and the projector s exhaust vent If the air filter is clogged clean it ...

Страница 81: ...re there is at least 20 cm between the wall and the projector s exhaust vent If the air filter is clogged clean it s p 90 If turning the power back on does not clear the problem stop using the projector and remove the power plug from the elec trical outlet Contact your local dealer or the nearest Epson repair center s Epson Projector Contact List Indicator status during normal operation Lit Flashi...

Страница 82: ...Images are fuzzy or out of focus p 83 Interference or distortion appears in the images p 84 The image is truncated large or small or only a part of the image is projected p 84 Image colors are not right The whole image appears purplish or greenish images are black white or colors appear dull p 85 Images appear dark p 85 Projection stops automatically p 85 Problems when projection starts The projec...

Страница 83: ...nput Signal Video Sig nal p 75 When Component is input If nothing is projected even when Component is set to Auto from the configuration menu set the signal that matches the connected device s Extended Input Signal Compo nent p 75 Are the configuration menu settings correct Reset all of the settings s Reset Reset All p 77 Only when projecting computer image sig nals Was the connection made while t...

Страница 84: ...r projection are securely connected s p 19 Is the correct image input port selected Change the image with the source buttons on the remote con trol or the button on the control panel s p 25 Is the connected device turned on Turn on the device Only when projecting computer image sig nals Are the image signals being output to the projector Change it so that the image signal is set to external output...

Страница 85: ... p 19 Is an extension cable being used If an extension cable is used electrical interference may affect the signals Only when projecting computer image sig nals Are the Sync and Tracking settings adjusted correctly The projector uses automatic adjustment functions to project at the optimum status However depending on the signal some may not be adjusted correctly even after performing self correc t...

Страница 86: ... menu s Image Advanced p 68 Only when projecting images from a video device Are the color saturationand tintadjusted cor rectly Adjust the Color Saturation and Tint settings from the config uration menu s p 68 Images appear dark Check Remedy Is the image brightness set correctly Adjust the Brightness setting from the configuration menu s Image Brightness p 68 Is the contrast adjusted correctly Adj...

Страница 87: ...es stopusing the projector remove the power plug from the electrical outlet and contact your local dealer or the nearest projector information center s Epson Projector Contact List Problems with the remote control The remote control does not respond Check Remedy Is the remote control light emitting area pointing towards the remote receiver on the projector during operation Point the remote control...

Страница 88: ...r s Guide for the 3D Glasses to perform pairing Are there any devices that cause radio wave interference in the vicinity When using other devices at the same time with the frequency band 2 4 GHz such as Bluetooth communication devices wire less LAN IEEE802 11b g or microwave ovens radio wave inter ference may occur the image may be interrupted or communi cation may not be possible Do not use the p...

Страница 89: ...hin the Wire lessHD transmission range Check the range within which the WirelessHD s transceiver can communicate and view within that range s p 58 Is the supplied WirelessHD Transmitter turned on Check the power lamp on the WirelessHD Transmitter If there is no power being supplied make sure the connector for the AC adapter is securely connected and then turn on the power switch Is the Link indica...

Страница 90: ...erse affect on the image Make sure that there are no obstacles be tween the WirelessHD Transmitter and the projector within the WirelessHD transmission range s p 58 Is the reception too low If the transmissions are not strong enough communication may be unstable Check Reception as you set up the transmitter as it is sometimes possible to improve the strength of the transmission by moving the Wirel...

Страница 91: ...ernal temperature of the projector to rise and this can lead to problems with operation and shorten the optical engine s service life It is recommended that you clean the air filter at least once every three months Clean them more often than this if using the projector in a particularly dusty environment Do not rinse the air filter in water Do not use detergents or solvents Lightly brush the air f...

Страница 92: ...ilter by the knob in the center and insert it at an angle g Install the air filter cover Securethetabontheoutsidefirst andthen secure the tab on the lens side Cleaning the main unit Clean the projector s surface by wiping it gently with a soft cloth If it is particularly dirty moisten the cloth with water containing a small amount of neutral detergent and then firmly wring the cloth dry before usi...

Страница 93: ... filter has been cleaneds p 90 Lamp replacement period The following message is displayed when projection starts It is time to replace your lamp Please contact your Epson projector reseller or visit www epson com to purchase The projected image gets darker or starts to deteriorate c The lamp replacement message is set to appear after 3900 H in order to maintain the initial brightness and quality o...

Страница 94: ... main power switch and then disconnect the power cable b Remove the air filter cover Hookyourfingerintothetabontheairfilter cover and remove it from the lens side c Remove the old air filter Grip the knob in the center of the air filter and pull it straight out d Install the new air filter Grip the air filter by the knob in the center and insert it at an angle e Install the air filter cover Secure...

Страница 95: ...y Caution Do not touch the lamp cover immediately after turning off the projector as it is still hot Wait until the lamp has cooled down sufficiently before removing the lamp cover Otherwise you could get burnt a Press the button on the remote control or the control panel to turn off the power turn off the main power switch and then disconnect the power cable b Loosen the lamp cover fixing screw c...

Страница 96: ... not turn on The lamp contains mercury Dispose of used lamps in accordance with your local laws and regulations on disposing of fluorescent tubing Resetting lamp hours After replacing the lamp make sure you reset the lamp hours The projector records how long the lamp is turned on and a message and indicator notify you when it is time to replace the lamp a Turn on the power b Press the button The c...

Страница 97: ...Maintenance 96 d Use the buttons to select Yes and then press the button to execute The lamp hours are reset ...

Страница 98: ...iling pipe 450 450 mm white ELPFP13 Ceiling pipe 700 700 mm white ELPFP14 RF system 3D Glasses ELPGS03 You will need additional pairs to watch 3D im ages in a group Cable cover ELPCC04B Black ELPCC04W White Usethiswheninstallingtheprojectoronaceiling to cover the cables and improve the overall ap pearance Do not attach the cable cover when the cable is secured with an HDMI cable clamp USB Charging...

Страница 99: ...20 x 1080 HDTV 1080p 50 60 1920 x 1080 Composite Video Signal Refresh Rate Hz Resolution dots TV NTSC 60 720 x 480 TV SECAM 50 720 x 576 TV PAL 50 60 720 x 576 Computer Signals Analog RGB Signal Refresh Rate Hz Resolution dots VGA 60 72 75 85 640 x 480 SVGA 56 60 72 75 85 800 x 600 XGA 60 70 75 85 1024 x 768 SXGA 70 75 85 1152 x 864 60 75 85 1280 x 960 60 75 85 1280 x 1024 WXGA 60 1280 x 768 60 13...

Страница 100: ...ing Side by Side Top and Bot tom HDTV750p 720p 50 60 1280 x 720 HDTV1125i 1080i 50 60 1920 x 1080 HDTV1125p 1080p 50 60 1920 x 1080 HDTV1125p 1080p 24 1920 x 1080 WirelessHD Input Signal Signal Refresh Rate Hz Resolution dots VGA 60 640 x 480 SDTV 480i 60 720 x 480 SDTV 576i 50 720 x 576 SDTV 480p 60 720 x 480 SDTV 576p 50 720 x 576 HDTV 720p 50 60 1280 x 720 HDTV 1080i 50 60 1920 x 1080 HDTV 1080...

Страница 101: ...0 V area Operating 357 W Standby power consumption 0 30 W Standby power consumption 7 5 W 220 to 240 V area Operating 340 W Standby power consumption 0 39 W Standby power consumption 8 4 W Operating altitude Altitude 0 to 2286 m Operating temperature 5 to 35 C No condensation Storage temperature 10 to 60 C No condensation Mass Approx 8 6 kg Approx 8 4 kg Connectors Component port x 1 3RCA pin jack...

Страница 102: ...the projector tilted at an angle of more than 10 it could be damaged or cause an accident RS 232C Cable layouts Connector shape D sub 9 pin male Projector input port name RS 232C Signal name Signal Name Function GND Signal wire ground TD Transmit data RD Receive data At the projector At the computer At the projector PC serial cable At the computer Communications protocol Default baud rate setting ...

Страница 103: ...e reasonable protection against harmful interference in a residential installation This equipment generates uses and can radiate radio frequency energy and if not installed and used in accordance with the instructions may cause harmful interference to radio communications However there is no guarantee that interference will not occur in a particular installation If this equipment does cause harmfu...

Страница 104: ...ayback or output Interlace Transmits information needed to create one screen by sending every other line starting from the top of the image and working down to the bottom Images are more likely to flicker because one frame is displayed every other line NTSC An abbreviation for the National Television Standards Committee A terrestrial analog color broadcasting method This method is used in Japan No...

Страница 105: ...ringhighreliability safetysuchastransportationdevicesrelated to aviation rail marine automotive etc disaster prevention devices various safety devices etc or functional precision devices etc you should use this product only after giving consideration to including fail safes and redundancies into your design to maintain safety and total system reliability Because this product was not intended for u...

Страница 106: ...our use by Stonestreet One LLC under a software license agreement Stonestreet One LLC is and shall remain the sole owner of all right title and interest whatsoever in and to Bluetopia and your use is subject to such ownership and to the license agreement Stonestreet One LLC reserves all rights related to Bluetopia not expressly granted under the license agreement and no other rights or licenses ar...

Страница 107: ...7 Connecting 19 Connecting to a computer 20 Connecting to video equipment 19 Connecting WirelessHD devices 20 Contrast 68 Control panel 8 9 Control panel lock 74 Cool down 25 D Deep color 77 Device connections 57 73 Direct power on 75 Display background 76 Display settings 76 Displaying the test pattern 27 E EPSON Super White 72 Erase device name 73 Erase memory 43 77 Error Warning indicators 79 E...

Страница 108: ... 77 Remote control 11 22 Rename device name 73 Rename memory 43 77 Replacement periods for consumables 92 Replacement time 92 Replacing consumables 93 Replacing the air filter 93 Replacing the lamp 94 Reset 69 72 73 75 76 Reset all 77 Reset lamp hours 77 95 Reset memory 43 77 Reset menu 77 Resolution 77 RGB 69 RGBCMY 34 69 Right screen 78 S Saturation 34 69 Save memory 42 76 Scan mode 77 Screen si...

Страница 109: ...Index 108 V Video port 19 Video signal 76 77 Viewing area 48 V Keystone 73 W Wide 32 WiHD indicator 54 WirelessHD 53 73 Z Zoom 32 Zoom adjustment 28 Zoom Caption Pos 70 Zoom ring 8 Zoom size 70 ...

Отзывы: