Configuration Menu
79
Function
Menu/Settings
Explanation
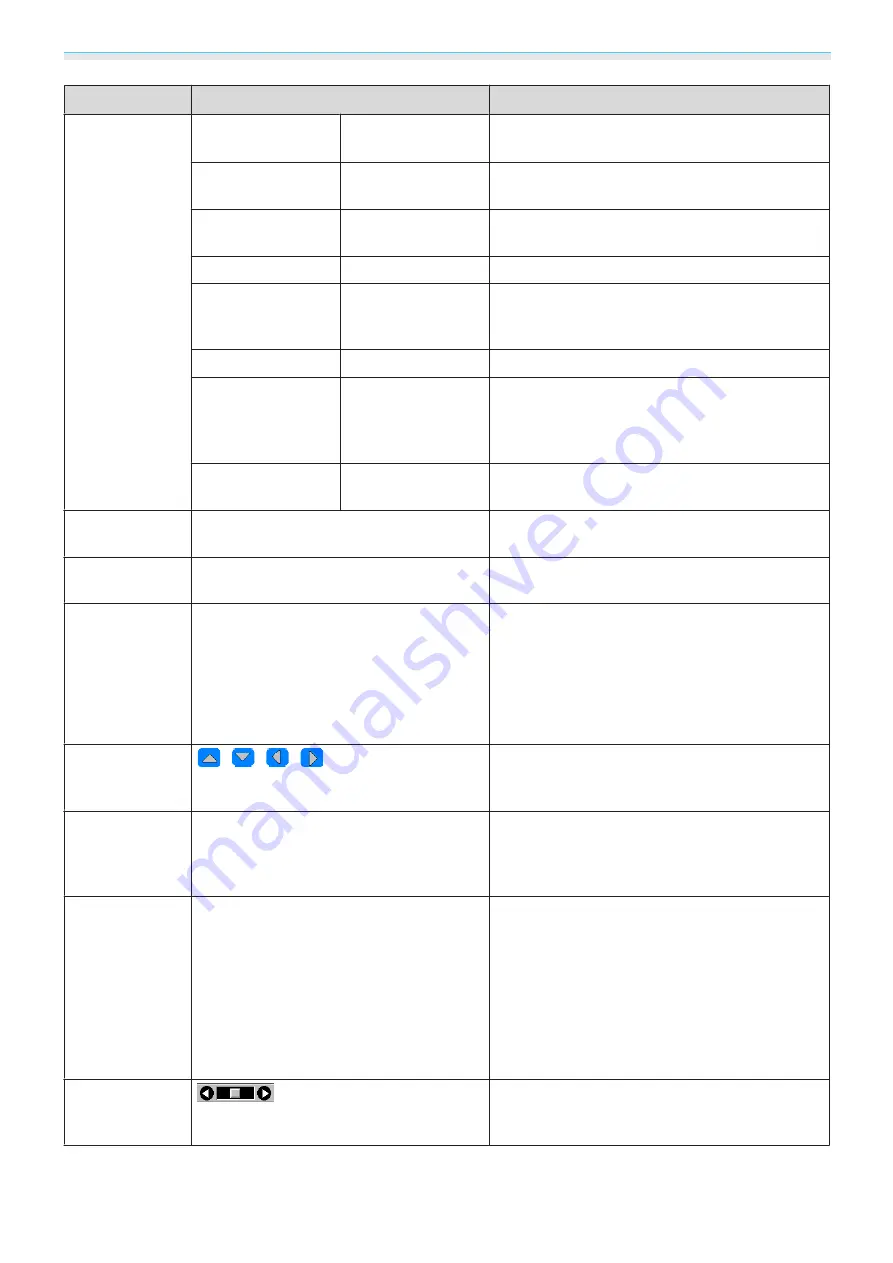
3D Setup
*1
3D Display
Auto, 3D, 2D
To view 3D images, set this to
Auto
or
3D
.
s
3D Format
Side by Side, Top
and Bottom
Sets the 3D format for the input signal.
2D-to-3D Conver-
sion
Off, Weak, Medium,
Strong
Converts 2D images to 3D images.
3D Depth
-10 - 10
Sets the depth for the 3D image.
Diagonal Screen
Size
60 - 300
Sets the projection size for the 3D image. By
matching this to the actual size, you can achieve
the optimum 3D effect.
3D Brightness
Low, Medium, High
Sets the brightness for the 3D image.
Inverse 3D Glasses
Yes, No
Reverses the synchronization timing for the left/
right shutters on the 3D Glasses and the left/right
images. Enable this function if the 3D effect is not
displayed correctly.
3D Viewing Notice
On, Off
Turns the notice that appears when viewing 3D
content on or off.
Aspect
*2
Auto
*1
, Normal, Full, Zoom, Anamorphic
Wide
*3
, Horiz. Squeeze
*3
Selects the aspect mode.
s
Tracking
*2
*4
Varies depending on the input signal.
Adjusts computer images when vertical stripes
appear in the images.
Sync.
*2
*4
0 - 31
Adjusts computer images when flickering, fuzzi-
ness, or interference appear in the images.
•
Adjusting the
Brightness
,
Contrast
, or
Sharp‐
ness
may cause flickering or fuzziness.
•
When adjusting
Sync.
after adjusting the
Track‐
ing
, you can create a more vivid image.
Position
*2
*4
Adjusts the display position up, down, left, and
right when a part of the image is missing so that
the whole image is projected.
Auto Setup
*4
On, Off
Sets whether or not to automatically adjust the
image whenever the input signal is changed.
When enabled, the Tracking, Position, and
Sync. are automatically configured.
Overscan
*1
*2
Auto, Off, 4%, and 8%
Changes the output image ratio (the range of the
projected image).
•
Off
,
4%
,
8%
: Sets the range of the image. When
set to
Off
, the entire range of the image is pro-
jected. Depending on the image signal, you may
notice noise at the top and bottom of the image.
•
Auto
: Automatically sets to
Off
or
8%
depend-
ing on the input signal.
Blanking
Covers part of the image with a blank (black
screen). You can set the top, bottom, left, or right
of the image.
Содержание EH-TW7300
Страница 1: ...User s Guide ...
Страница 19: ...Preparing 18 Overhead view ...


