


Start Here
12
When the ink confirmation message appears on the LCD
screen, select
Done to start charging the ink. Ink charging
takes approximately 10 minutes. A message appears
when ink charging is complete. Press the
OK button to
continue.
Caution:
Do not turn off the product, raise the scanner unit, or
load paper while the product is charging or you’ll waste ink.
Note:
After some ink is used for charging, the rest is available
for printing.
13
To complete filling the ink tanks, repeat steps 1 through 6
using the remaining ink in the bottles.
Note:
Replace the bottle cap before disposing of the bottles.
14
Close the ink tank cover and scanner unit.
15
Select
Next and follow the on-screen instructions to reset
the ink levels.
16
Follow the on-screen instructions to adjust the print
quality. Press the
OK button to continue.
Note:
You can change these settings later using the product’s
control panel. For more information, see the online User’s Guide.
3
Load paper
See the online User’s Guide for information about loading
capacity and available paper types and sizes.
1
Make sure the product is not charging, and then open
the front of the paper cassette and pull out the paper
cassette.
2
Slide the side edge guides all the way out.
Read these instructions before using your product.
The illustrations show the L6191, but the steps are the same for
all models, unless otherwise specified.
1
Unpack
Power cable
USB cable
Telephone cord
(L6191 only)
Note:
Do not open the ink bottles until you are ready to fill the ink
tanks. The ink bottles are vacuum packed to maintain reliability.
1
Remove all protective materials from the product.
2
Lift up the scanner unit. Remove all protective materials
from inside the product.
Caution:
Do not touch the flat white cable or the ink tubes and
their translucent cover.
2
Fill ink tanks
Note:
This product requires careful handling of ink. If ink spills, wipe
it off immediately with a damp towel to avoid permanent stains. If ink
gets on your clothes or belongings, it may not come off.
Warning:
Keep the ink bottles out of the reach of children and do not
drink the ink.
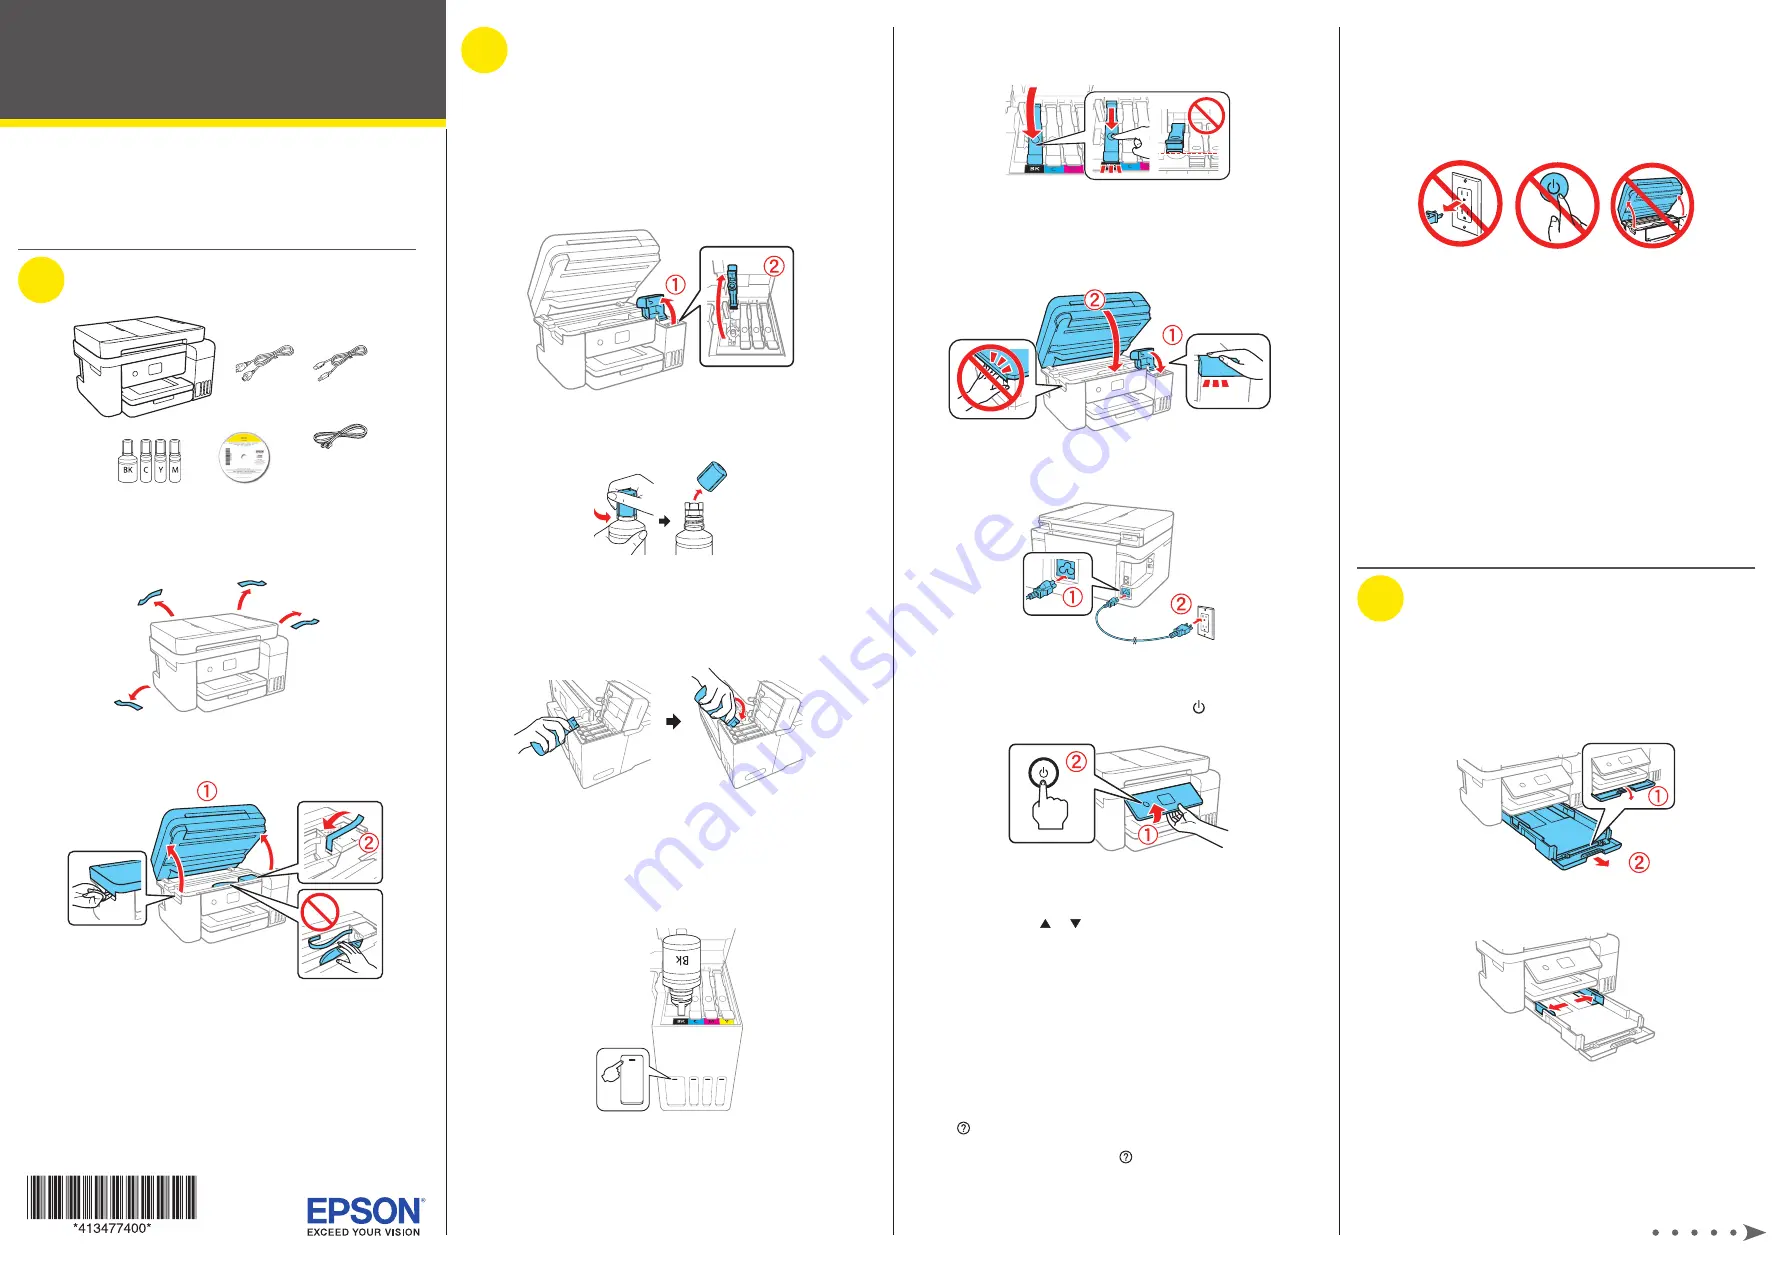
1
Open the ink tank cover, then open the cap for the ink
tank you are going to fill.
2
Unpack one of the ink bottles. Hold the ink bottle upright
and slowly turn the bottle cap to remove it.
Caution:
Do not shake or squeeze the ink bottles. Do not touch
the top of the ink bottle after its cap is removed.
3
Position the top of the ink bottle along the slot in front of
the filling port, then slowly stand the bottle up to insert it.
Note:
Refer to the color-coded sticker to identify the color of
each tank. Do not force the bottles into position; they are keyed
for each color.
4
Wait for the ink to fill the tank.
Do not squeeze the bottle.
Ink flows into the tank and stops automatically when the
ink is filled to the upper line.
Note:
If ink does not flow from the bottle, lift and reinsert the
bottle.
5
When the ink tank is full, remove the ink bottle and
securely close the ink tank cap. Place the remaining ink
aside; you will need it later.
Note:
Replace the bottle cap and tighten it.
6
Repeat the previous steps for the other colors.
7
Close the ink tank cover and then the scanner unit.
8
Connect the power cord to the back of the product and to
an electrical outlet.
Caution:
Do not connect to your computer yet.
9
Raise the control panel, then press the power button to
turn on the product.
Note:
If an error message appears, turn off the product and
check that no protective material has been left inside the product.
10
L6171: Press or to select your language on the LCD
screen, then press the
OK button.
L6191: Select your language, country, and time.
Follow steps 11 and 12 to continue ink charging.
Note:
You can change these settings later using the product’s
control panel. For more information, see the online User’s Guide.
11
When the message to see the Start Here sheet appears
on the LCD screen:
L6171: Press the OK button, then press and hold the
help button for
3 seconds.
L6191: Press and hold the help button for 3 seconds.
L6171/L6191


