background image

Projector Placement

18

You can place the projector on almost any flat surface to project an image.
You can also install the projector in a ceiling mount if you want to use it in a

fixed location. An optional ceiling mount is required when suspending the

projector from a ceiling.
Note the following points when selecting a projector location:
• Place the projector on a sturdy, level surface or install it using a compatible

mount.

• Leave plenty of space around and under the projector for ventilation, and

do not place it on top of or next to anything that could block the vents.

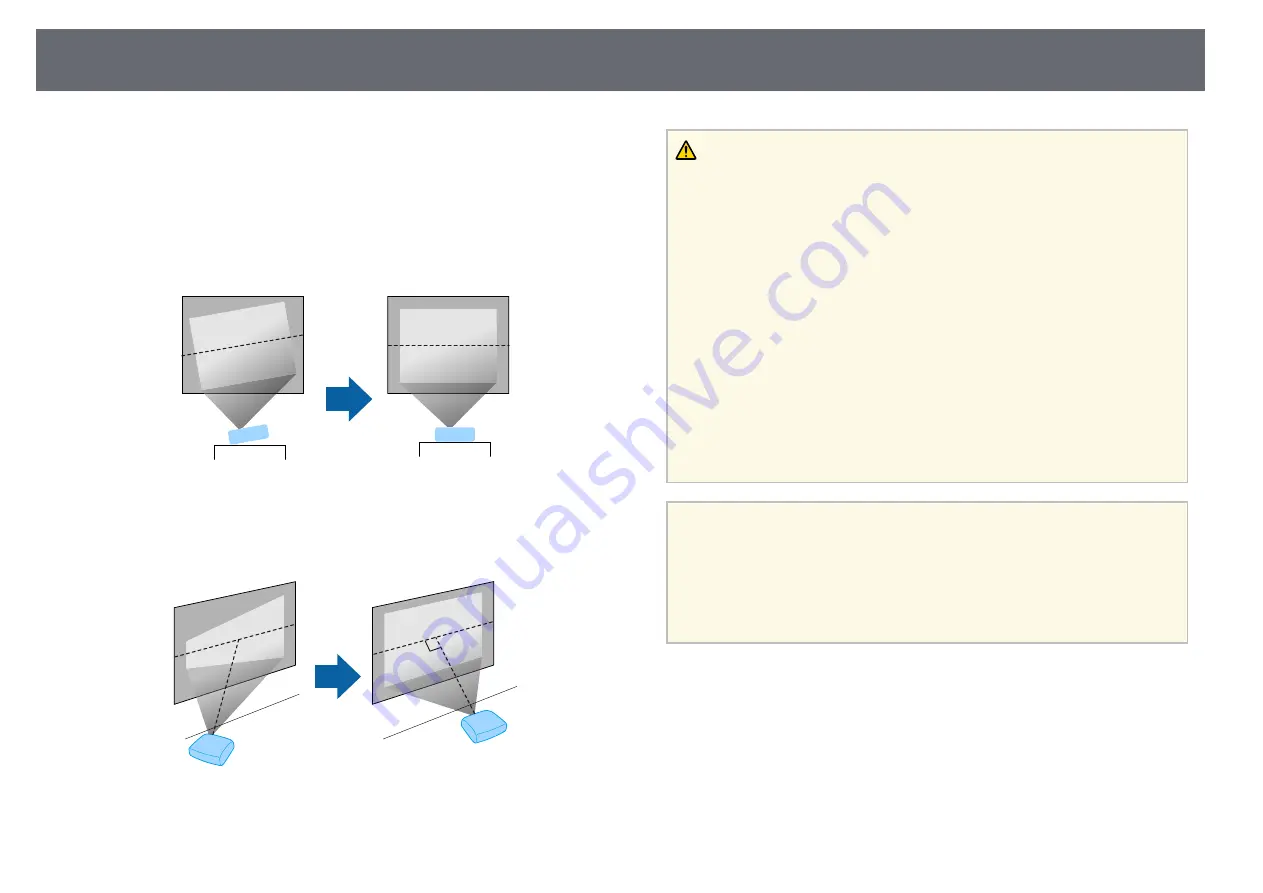
• Place the projector parallel to the screen.

Warning

• You must install a ceiling mount when suspending the projector from a ceiling.

If you do not install the projector correctly, it could fall and cause damage or

injury.

• Do not use adhesives on the ceiling mount fixing points to prevent the screws

from loosening, or use lubricants, oils, or similar substances on the projector; the

projector case may crack causing it to fall from its ceiling mount. This could

cause serious injury to anyone under the ceiling mount and could damage the

projector.

• Do not cover the projector's air intake or air exhaust vents. If the vents are

covered, the internal temperature could rise and cause a fire.

• Do not install the projector on an unstable surface or in a location beyond the

weight specifications of the projector. Otherwise, it could fall or topple causing

an accident and injury.

• When installing the projector in a high position, take measures to prevent falling

by using wires to ensure safety in an emergency, such as an earthquake, and to

prevent accidents. If it is not installed correctly, it could fall causing an accident

and injury.

Attention

• If you are using the projector at altitudes above 1500 m, set the

High Altitude

Mode

setting to

On

in the projector's

Extended

menu to ensure the projector's

internal temperature is regulated properly.

s

Extended

>

Operation

>

High Altitude Mode

• Try not to setup the projector in locations subject to high humidity and dust, or

in locations subject to smoke from fires or tobacco smoke.

g

g

Related Links

• "Projector Setup and Installation Options"

p.19

• "Projection Distance"

p.20

• "Image Shape"

p.49

• "Projector Setup Settings - Extended Menu"

p.158

Содержание EB-L400U

Страница 1: ...User s Guide ...

Страница 2: ...Connecting to External USB Devices 25 USB Device Projection 25 Connecting to a USB Device 26 Disconnecting a USB Device 26 Connecting to a Document Camera 26 Connecting to an HDBaseT Transmitter 27 Connecting to External Output Devices 27 Connecting to a VGA Monitor 28 Connecting to External Speakers 28 Attaching and Removing the Cable Cover 30 Attaching the Zoom Ring Locks 31 Installing Batteries...

Страница 3: ...ide Show 77 Starting a PC Free Movie Presentation 78 PC Free Display Options 79 Projecting in Content Playback Mode 81 Switching to Content Playback Mode 81 Projecting Your Playlists 82 Adding Effects to Your Projected Image 83 Content Playback Mode Restrictions 84 Shutting Off the Image and Sound Temporarily 85 Stopping Video Action Temporarily 86 Zooming Images 87 Using the Remote Control as a P...

Страница 4: ...orked Projector in Content Playback Mode 129 Web Control Options in Content Playback Mode 130 Registering Digital Certificates from a Web Browser 134 Setting Up Projector Network E Mail Alerts 135 Network Projector E mail Alert Messages 135 Setting Up Monitoring Using SNMP 136 Using ESC VP21 Commands 137 ESC VP21 Command List 137 Cable Layouts 137 PJLink Support 139 Crestron Connected Support 140 ...

Страница 5: ...lurry 196 Solutions When the Image Brightness or Colors are Incorrect 196 Solutions When an Afterimage Remains on the Projected Image 197 Solutions to Sound Problems 197 Solutions When Image File Names are not Displayed Correctly in PC Free 197 Solving Projector or Remote Control Operation Problems 198 Solutions to Projector Power or Shut Off Problems 198 Solutions to Problems with the Remote Cont...

Страница 6: ...Safety Symbols corresponding to IEC60950 1 A2 217 Laser Safety Information 219 Laser Warning Labels 219 Glossary 221 Notices 223 FCC Compliance Statement 223 Indication of the manufacturer and the importer in accordance with requirements of EU directive 224 Restriction of Use 224 Operating System References 224 Trademarks 224 Copyright Notice 225 Copyright Attribution 225 ...

Страница 7: ...ates information that if ignored could possibly result in personal injury or physical damage due to incorrect handling General Information Notations Attention This label indicates procedures that may result in damage or injury if sufficient care is not taken This label indicates additional information that may be useful to know Button name Indicates the name of the buttons on the remote control or...

Страница 8: ...Introduction to Your Projector Refer to these sections to learn more about your projector s features and part names g g Related Links Projector Features p 9 Projector Parts and Functions p 11 ...

Страница 9: ... Auto Power On feature to turn on the projector when the projector detects an image signal from the port you specified as the Auto Power On source Home screen feature to easily select an input source and useful functions g g Related Links Home Screen p 36 Turning On the Projector p 35 Easy Wireless Projection Screen Mirroring to connect your projector and mobile device wirelessly using Miracast te...

Страница 10: ... Google Play a Any fees incurred when communicating with the App Store or Google Play are the responsibility of the customer Epson iProjection Chromebook to connect your projector and Chromebook device wirelessly using the app available on the Chrome Web Store a Any fees incurred when communicating with the Chrome Web Store are the responsibility of the customer g g Related Links Using the Project...

Страница 11: ...ctor Parts Front Top EB L615U EB L610U EB L510U EB L610W EB L610 EB L400U EB L500W EB L500 Name Function A Air intake vent Takes in air to cool the projector internally B Front adjustable foot When setup on a surface such as a desk extend the foot to adjust the position of the image C Focus ring Adjusts the image focus D Zoom ring Adjusts the image size E Projection lens Images are projected from ...

Страница 12: ...aged by heat near the vent Hot air from the air exhaust vent could cause burns warping or accidents to occur N Remote receiver Receives signals from the remote control g g Related Links Projector Indicator Status p 189 Remote Control Operation p 33 Resizing the Image with the Zoom Ring p 54 Focusing the Image Using the Focus Ring p 55 Adjusting the Image Position Using Lens Shift p 44 Projector Pa...

Страница 13: ...le wire lock through here and lock it in place Name Function E Air filter cover screws Screws to fix the air filter cover in place F Front adjustable foot When setup on a surface such as a desk extend the foot to adjust the position of the image g g Related Links Installing a Security Cable p 103 Projector Parts Interface Ports Name Function A Computer1 port Inputs image signals from a computer an...

Страница 14: ...cover J HDMI2 port Inputs video signals from HDMI compatible video equipment and computers This projector is compatible with HDCP K HDMI1 port L HDBaseT port EB L615U EB L610U EB L510U EB L610 W Connects a LAN cable to the optional HDBaseT Transmitter M LAN port Connects a LAN cable to connect to a network N Cable holder Pass a commercially available cable tie through here to secure cables Project...

Страница 15: ...ing the projector s menu I Up arrow button Displays the Geometry Correction menu Selects menu items while displaying the projector s menu or help J Menu button Displays and closes the projector s menu g g Related Links Selecting an Image Source p 56 Projector Parts Remote Control Name Function A Power button Turns the projector on or off ...

Страница 16: ... Zoom buttons Zooms in or zooms out the image area N A V Mute button Turns the video and audio on or off temporarily O Split button Projects two images from different image sources simultaneously by splitting the projected screen P Home button Displays and closes the Home screen Q Freeze button Pauses or resumes images Name Function R Volume up down buttons Adjusts the speaker volume S Pointer but...

Страница 17: ...tions in these sections to set up your projector g g Related Links Projector Placement p 18 Projector Connections p 22 Attaching and Removing the Cable Cover p 30 Attaching the Zoom Ring Locks p 31 Installing Batteries in the Remote Control p 32 ...

Страница 18: ...This could cause serious injury to anyone under the ceiling mount and could damage the projector Do not cover the projector s air intake or air exhaust vents If the vents are covered the internal temperature could rise and cause a fire Do not install the projector on an unstable surface or in a location beyond the weight specifications of the projector Otherwise it could fall or topple causing an ...

Страница 19: ... Installation p 19 Projection Modes p 41 Precautions on Installation You can install the projector or mount it to the ceiling at any horizontal or vertical angle Note the following precautions when installing the projector Attention If the projector is installed at an angle it should be installed by qualified technicians using mounting hardware designed for use with this projector Install the proj...

Страница 20: ... projectors next to each other make sure hot air from the exhaust vent does not go into the air intake vent of another projector A 150 cm If you use a partition you can narrow the space between the projectors A 20 cm B 40 cm Partition Projection Distance The distance at which you place the projector from the screen determines the approximate size of the image The image size increases the farther t...

Страница 21: ...ojector Placement 21 See the Appendix for details about how far to place the projector from the screen based on the size of the projected image g g Related Links Screen Size and Projection Distance p 207 ...

Страница 22: ...ecting to a Computer for HDMI Video and Audio p 23 Connecting to a Computer for VGA Video and Audio You can connect the projector to your computer using a VGA computer cable You can play sound through the projector s speaker system by connecting a commercially available 3 5 mm stereo mini jack audio cable a To connect a computer that does not have a VGA video port you need an adapter that allows y...

Страница 23: ...2009 and earlier may not support audio through the HDMI port a Connect the HDMI cable to your computer s HDMI output port b Connect the other end to the projector s HDMI port a If you have problems hearing audio through the HDMI connection connect one end of a commercially available 3 5 mm stereo mini jack audio cable to the projector s Audio port and the other end to your computer s audio out por...

Страница 24: ...before connecting it to the projector Doing so could damage the projector a Connect the HDMI cable to your video source s HDMI output port b Connect the other end to the projector s HDMI port a If you have problems hearing audio through the HDMI connection connect one end of a commercially available 3 5 mm stereo mini jack audio cable to the projector s Audio port and the other end to your video s...

Страница 25: ...omputer port on the projector c Tighten the screws on the VGA connector d Connect the audio cable to your video source s audio out ports e Connect the other end to the projector s Audio port If your image colors appear incorrectly you may need to change the Input Signal setting in the projector s Signal menu s Signal Advanced Input Signal g g Related Links Input Signal Settings Signal Menu p 153 P...

Страница 26: ...B Device You can connect your USB device to the projector s USB A port and use it to project images and other content a If your USB device came with a power adapter plug the device into an electrical outlet b Connect the USB cable or USB flash drive to the projector s USB A port as shown Attention Use the USB cable supplied with or specified for use with the device Do not connect a USB hub or a US...

Страница 27: ...ol Communications s Extended Standby Mode Standby Mode If you connected an Extron XTP transmitter or switcher to the projector s HDBaseT port select On as the Extron XTP setting in the projector s Extended menu Control Communications is automatically set to On and Standby Mode is automatically set to Communication On s Extended HDBaseT Extron XTP s Extended Standby Mode Standby Mode Wired remote c...

Страница 28: ...can be output to an external monitor You cannot output signals input from other ports or component video signals b Connect the external monitor s cable to your projector s Monitor Out port g g Related Links Projector Setup Settings Extended Menu p 158 Connecting to External Speakers To enhance the sound from your presentation you can connect the projector to external self powered speakers You can ...

Страница 29: ... the appropriate cable to connect your external speakers such as a stereo mini jack to pin jack cable or another type of cable or adapter c Connect one end of the cable to your external speakers as necessary d Connect the stereo mini jack end of the cable to your projector s Audio Out port g g Related Links Projector Setup Settings Extended Menu p 158 ...

Страница 30: ... EB L610 a Pass a commercially available cable tie through the cable holder and tie the cables together Caution Do not bundle the power cord to the other cables Otherwise a fire may occur b Place the cable cover on the projector as shown guiding the cables through the notch on the base of the cable cover c Tighten the cable cover screws To remove the cover loosen the cover screws and pull the cove...

Страница 31: ...taching the Zoom Ring Locks 31 Make sure you attach the zoom ring locks that come with the projector to prevent the zoom ring from moving unexpectedly after adjusting the projected image EB L500W EB L500 ...

Страница 32: ...old batteries if necessary a Dispose of used batteries according to local regulations c Insert the batteries with the and ends facing as shown Warning Check the positions of the and marks inside the battery holder to ensure the batteries are inserted the correct way If the batteries are not used correctly they could explode or leak causing a fire injury or damage to the product d Replace the batte...

Страница 33: ...om almost anywhere in the room Make sure that you aim the remote control at the projector s receivers within the distance and angles listed here a Avoid using the remote control in conditions with bright fluorescent lights or in direct sunlight or the projector may not respond to commands If you are not going to use the remote control for a long time remove the batteries ...

Страница 34: ...Menus p 40 Projection Modes p 41 Setting the Screen Type p 42 Adjusting the Image Position Using Lens Shift p 44 Displaying a Test Pattern p 46 Adjusting the Image Height p 48 Image Shape p 49 Resizing the Image with the Zoom Ring p 54 Focusing the Image Using the Focus Ring p 55 Selecting an Image Source p 56 Image Aspect Ratio p 58 Color Mode p 63 Adjusting the Image Color p 65 Adjusting the Bri...

Страница 35: ...button for the desired video source on the remote control If the Home screen is displayed select the source you want to project Warning Never look into the projector lens when the light source is on This can damage your eyes and is especially dangerous for children When turning on the projector at a distance using the remote control make sure there is no one looking into the lens During projection...

Страница 36: ...can select the wireless connection methods according to the devices you are using such as smartphones or computers C Indicates the projector is in Content Playback mode D Displays the Help screen E Displays the projector s menu F Performs menu options assigned to Home Screen in the projector s Extended menu G Selects the brightness for the light source H Changes the projector s color mode a The Ho...

Страница 37: ...regularly turn off the projector by shutting off the power outlet direct shutdown Schedule periodic Light Source Calibration events in the projector s Extended menu s Extended Schedule Settings Since the projector supports the direct shutdown feature it can be turned off directly using the breaker a Press the power button on the control panel or remote control The projector displays a shutdown con...

Страница 38: ...he Date Time setting and press Enter You see this screen g Select Date press Enter and use the displayed keyboard to enter today s date h Select Time press Enter and use the displayed keyboard to enter the current time i Select Time Difference UTC press Enter and set the time difference from Coordinated Universal Time j When you are finished select Set and press Enter k To activate daylight saving...

Страница 39: ...39 m To update the time automatically through an Internet time server select the Internet Time setting and press Enter Then select settings n When you are finished select Set and press Enter o Press Menu or Esc to exit the menus ...

Страница 40: ...er language you can change the Language setting a Turn on the projector b Press the Menu button on the control panel or remote control c Select the Extended menu and press Enter d Select the Language setting and press Enter e Select the language you want to use and press Enter f Press Menu or Esc to exit the menus ...

Страница 41: ...ottom and horizontally to project from a ceiling or wall mount and behind a translucent screen g g Related Links Changing the Projection Mode Using the Menus p 41 Projector Setup and Installation Options p 19 Changing the Projection Mode Using the Menus You can change the projection mode to flip the image over top to bottom and or left to right using the projector menus a Turn on the projector and...

Страница 42: ...ect your screen s aspect ratio and press Enter f Press Menu to exit the menus g Adjust the aspect ratio for the projected image if necessary g g Related Links Adjusting the Image Position Using Screen Position p 42 Adjusting the Image Position Using Screen Position You can adjust the image position if there are margins between the edge of the image and the projected screen frame a You cannot adjus...

Страница 43: ...pe 43 c Select the Extended menu and press Enter d Select Display Screen Screen Position e Use the arrow buttons on the control panel or remote control to adjust the position of the image f When you are finished press Menu ...

Страница 44: ...rojector before setting the focus zoom and lens shift for maximum accuracy Keep the vertical and horizontal lens shift dials in their center positions for the clearest picture a Turn on the projector and display an image b Turn the vertical and horizontal lens shift dials on the projector to adjust the position of the projected image as necessary EB L615U EB L610U EB L510U EB L610W A Center of len...

Страница 45: ...is at the maximum value V 12 EB L610 A Center of lens B Projected image when the lens is set to the home position C Maximum range V 50 D When the horizontal direction is at the maximum value V 5 a You cannot move the image horizontally when the lens is shifted vertically all the way ...

Страница 46: ...so display the Test Pattern setting in the projector s Settings menu The test pattern is displayed c Press the down arrow button on the control panel again and then press Enter to display the pattern you want d While the pattern is displayed press the left or right arrow button on the remote control or press Enter to cycle through the available test patterns e Adjust the image as necessary f Press...

Страница 47: ...BCMY Settings Geometry Correction Extended Multi Projection a To set menu items that cannot be set while the test pattern is being displayed or to fine tune the projected image project an image from the connected device Except for custom Gamma settings Except for the Color Uniformity setting ...

Страница 48: ...projector so that it only needs to be tilted at a small angle a Turn on the projector and display an image b To adjust the image height rotate the front foot to extend or retract it A Extend the front foot B Retract the front foot c If the image is tilted rotate the rear feet to adjust their height A Extend the rear foot B Retract the rear foot If the projected image is unevenly rectangular you ne...

Страница 49: ...cting Image Shape with H V Keystone You can use the projector s H V Keystone setting to correct the shape of an image that is unevenly rectangular on the sides a You cannot combine H V Keystone correction with other image shape correction methods a Turn on the projector and display an image b Press the Menu button on the control panel or remote control c Select the Settings menu and press Enter d ...

Страница 50: ...y V Keystone H Keystone a If you have adjusted the position of the projected image by using the lens shift feature adjust the V Balance and H Balance settings as necessary EB L615U EB L610U EB L510U EB L610W EB L610 V Balance H Balance g When you are finished press Esc After correction your image is slightly smaller g g Related Links Projector Feature Settings Settings Menu p 155 ...

Страница 51: ...nd press Enter d Select Geometry Correction and press Enter e Select Quick Corner and press Enter Then press Enter again if necessary You see the area selection screen f Use the arrow buttons to select the corner of the image you want to adjust Then press Enter a To reset the Quick Corner corrections hold down Esc for about two seconds while the area selection screen is displayed and then select Y...

Страница 52: ...g g Related Links Projector Feature Settings Settings Menu p 155 Correcting Image Shape with Arc Correction You can use the projector s Arc Correction setting to adjust the shape of an image projected on a curved or spherical surface a Turn on the projector and display an image b Press the Menu button on the control panel or remote control c Select the Settings menu and press Enter d Select Geomet...

Страница 53: ... for about two seconds while the area selection screen is displayed and then select Yes g Press the arrow buttons to adjust the image shape of the selected area as necessary To return to the area selection screen press Enter a If you see this screen you cannot adjust the shape any further in the direction indicated by the gray triangle h Repeat steps 7 and 8 as needed to adjust any remaining areas...

Страница 54: ... the image using the projector s zoom ring a Wait 20 minutes after turning on the projector before setting the focus zoom and lens shift for maximum accuracy a Turn on the projector and display an image b Rotate the zoom ring to enlarge or reduce the image ...

Страница 55: ...ocusing the Image Using the Focus Ring 55 You can correct the focus using the focus ring a Wait 20 minutes after turning on the projector before setting the focus zoom and lens shift for maximum accuracy ...

Страница 56: ...edia and press play c Do one of the following Press the Source Search button on the control panel or remote control until you see the image from the source you want a This screen is displayed when no image signal is detected Check the cable connections between the projector and image source Press the button for the source you want on the remote control If there is more than one port for that sourc...

Страница 57: ... the source you want to use from the screen displayed a HDBaseT is available only with the EB L615U EB L610U EB L510U EB L610W Screen Mirroring is available only with the EB L615U EB L610U g g Related Links Projector Parts Control Panel p 14 ...

Страница 58: ...te control The shape and size of the displayed image changes and the name of the aspect ratio appears briefly on the screen c To cycle through the available aspect ratios for your input signal press the Aspect button repeatedly a To display images without black bars set Resolution to Wide or Normal in the projector s Signal menu according to the computer s resolution g g Related Links Input Signal...

Страница 59: ... screen are not projected Projected Image Appearance with Each Aspect Mode Black bands and cropped images may project in certain aspect ratios depending on the aspect ratio and resolution of your input signal See the following table to confirm the position of black bands and cropped images a The image for Native varies depending on the input signal EB L615U EB L610U EB L510U EB L610W EB L400U EB L...

Страница 60: ...mal Auto 4 3 Aspect mode Aspect ratio for input signals 16 10 16 9 4 3 16 9 H Zoom V Zoom Native When inputting an HDTV signal 720p 1080i 1080p the aspect ratio of the signal is maintained while the image is trimmed on the left and right and displayed Only computer images and images from the HDMI ports or the HDBaseT port The image may differ depending on the resolution of the input signal ...

Страница 61: ...nal 720p 1080i 1080p the aspect ratio of the signal is maintained while the image is trimmed on the left and right and displayed Only computer images and images from the HDMI ports or the HDBaseT port The image may differ depending on the resolution of the input signal Screen type setting 16 9 Aspect mode Aspect ratio for input signals 16 10 16 9 4 3 Normal Auto Full H Zoom V Zoom Native ...

Страница 62: ...Image Aspect Ratio 62 Screen type setting 16 10 Aspect mode Aspect ratio for input signals 16 10 16 9 4 3 Normal Auto 16 9 Full H Zoom V Zoom Native ...

Страница 63: ... Mode button repeatedly a You can also set the Color Mode setting in the projector s Image menu g g Related Links Image Quality Settings Image Menu p 151 Available Color Modes You can set the projector to use these color modes depending on the input source you are using Color mode Description Dynamic This is the brightest mode Best for prioritizing brightness Presentation Best for projecting vivid...

Страница 64: ... the control panel or remote control c Select the Image menu and press Enter d Select Dynamic Contrast and press Enter e Choose one of the following options and press Enter Normal for standard brightness adjustment High Speed to adjust brightness as soon as the scene changes f Press Menu or Esc to exit the menus ...

Страница 65: ...Image menu and press Enter d Select Advanced and press Enter e Select RGBCMY and press Enter f Select the color to adjust and press Enter g Do the following as necessary for each setting To adjust the overall hue of the color bluish greenish reddish adjust the Hue setting To adjust the overall vividness of the color adjust the Saturation setting To adjust the overall color brightness of the color ...

Страница 66: ...a larger value the dark areas of images become brighter but the color saturation for lighter areas may become weaker a If you selected DICOM SIM as the Color Mode setting in the projector s Image menu select the adjustment value according to the projection size If the projection size is 80 inches or less select a small value If the projection size is 80 inches or more select a large value Medical ...

Страница 67: ...rrow buttons to select the color tone you want to adjust on the gamma adjustment graph Then press the up or down arrow button to adjust the value and press Enter i Press Menu or Esc to exit the menus g g Related Links Image Quality Settings Image Menu p 151 ...

Страница 68: ...n noise This makes the estimated life span of the light source approximately 20 000 hours Extended lets you set the brightness to 70 and extends the life expectancy of the light source This makes the estimated life span of the light source approximately 30 000 hours Custom lets you to select a custom brightness level between 70 to 100 g If you selected Custom select Brightness Level from the Brigh...

Страница 69: ... setting and whether Constant Brightness is on or off a The light source life span varies depending on the environmental conditions and usage The hours listed here are an approximate and are not guaranteed After 20 000 hours of use you may need to replace parts in the projector If Constant Brightness is turned on and you have exceeded the usage hours listed here you may not be able to select a hig...

Страница 70: ...ightness 70 Brightness Level setting Hours 85 6000 hours 80 10000 hours 75 14000 hours 70 19000 hours EB L510U EB L500W EB L500 Brightness Level setting Hours 85 17000 hours 80 19000 hours 75 22000 hours 70 24000 hours ...

Страница 71: ...sentation b To lower or raise the volume press the Volume buttons on the remote control as shown A volume gauge appears on the screen c To set the volume to a specific level for an input source select Volume in the projector s Settings menu Caution Do not start a presentation at a high volume setting Sudden loud noises may cause hearing loss Always lower the volume before powering off so that you ...

Страница 72: ...jecting a PC Free Presentation p 76 Projecting in Content Playback Mode p 81 Shutting Off the Image and Sound Temporarily p 85 Stopping Video Action Temporarily p 86 Zooming Images p 87 Using the Remote Control as a Pointer p 88 Saving a User s Logo Image p 89 Saving Settings to Memory and Using Saved Settings p 91 Using Multiple Projectors p 92 Projector Security Features p 99 ...

Страница 73: ...the projector menus a While using the split screen feature other projector features may not be available and some settings may be automatically applied to both images a Press the Split button on the remote control The currently selected input source moves to the left of the screen a You can perform the same operations from Split Screen in the projector s Settings menu b Press the Menu button You s...

Страница 74: ...Enter To exit the menu press Menu a Depending on the video input signals the images may not appear at the same size even if you select Equal f To select the audio select Audio Source press Enter select an audio option and press Enter To exit the menu press Menu a Select Auto to hear audio from the largest screen or the left screen g To align the projected images select Align press Enter select the...

Страница 75: ...plied to the image on the right Adjustments that affect the entire projected image such as Color Mode and Color Temp are applied for both left and right images Even if you make adjustments for Noise Reduction and Deinterlacing in the projector s Image menu Noise Reduction is set to 0 and Deinterlacing is set to Off for the image on the right s Image Image Enhancement Noise Reduction s Image Advanc...

Страница 76: ... try formatting the media for Windows instead File contents File type extension Details Image jpg Make sure the file is not CMYK format Progressive format Highly compressed Above 8192 8192 resolution bmp Make sure the file is not Above 1280 800 resolution gif Make sure the file is not Above 1280 800 resolution Animated Interlaced png Make sure the file is not Above 1280 800 resolution Interlaced M...

Страница 77: ... device to the projector you can switch to the USB input source and start your slide show a You can change the PC Free operation options or add special effects by highlighting Option at the bottom of the screen and pressing Enter a Press the USB button on the remote control The PC Free file list screen is displayed a If the Select Drive screen is displayed press the arrow buttons to select the dri...

Страница 78: ...d image press the up or down arrow button To move to the next or previous image press the left or right arrow button e To stop the display follow the on screen instructions or press the Esc button You return to the file list screen f Turn off the USB device if necessary and then disconnect the device from the projector g g Related Links PC Free Display Options p 79 Connecting to a USB Device p 26 ...

Страница 79: ... to play back all the movies in a folder in sequence select the Slideshow option at the bottom of the screen d To stop movie playback press the Esc button highlight Exit and press Enter You return to the file list screen e Turn off the USB device if necessary and then disconnect the device from the projector g g Related Links PC Free Display Options p 79 Connecting to a USB Device p 26 PC Free Dis...

Страница 80: ...on 80 Setting Options Description Effect No No effect Wipe Transitions between images using a wipe effect Dissolve Transitions between images using a dissolve effect Random Transitions between images using a random variety of effects ...

Страница 81: ...ng Your Playlists p 82 Adding Effects to Your Projected Image p 83 Content Playback Mode Restrictions p 84 Switching to Content Playback Mode Before you project your playlists you need to switch to Content Playback mode a Turn on the projector b Press the Menu button select the Settings menu and then press Enter c Select Content Playback and press Enter d Select On and press Enter You see a confir...

Страница 82: ...ger Operation Guide for instructions b In Content Playback mode connect the USB flash drive into the projector s USB A port c Press the USB button on the remote control The first or scheduled playlist is projected a You can also hold down the Num and numeric buttons to project the favorite playlist You can set a remote control shortcut key using the Epson Projector Content Manager software To sele...

Страница 83: ... following options as necessary Shape to select the shape effect you want from circles rectangles or customized shapes a You can add your images as customized shapes using the Epson Projector Content Manager software See the Epson Projector Content Manager Operation Guide for details Filter Effect to select whether to mask inside or outside of the selected shape Size to set the shape size Position...

Страница 84: ...ontent Playback Mode Restrictions Operating restrictions You cannot perform the following operations in Content Playback mode Color Temp when Warm White or Cool White is selected as Color Filter Blanking Split Screen Display Background Screen Auto Source Search Remote Password PC Free Document camera ...

Страница 85: ... The light source turns off and the projected image and sound are interrupted b To turn the image and sound back on press A V Mute again a The projector s power automatically turns off 30 minutes after A V Mute is enabled You can disable this feature s Extended Operation A V Mute Settings A V Mute Timer If you selected A V Mute as the A V Mute Release setting in the Extended menu you can still con...

Страница 86: ...sentation and keep the current image on the screen Any sound or video action continues to run however so you cannot resume projection at the point that you stopped it a Press the Freeze button on the remote control to stop the video action b To restart the video action in progress press Freeze again ...

Страница 87: ...o To move the crosshair diagonally press any pair of adjacent arrow buttons at the same time Press the E Zoom button repeatedly to zoom into the image area Press and hold the E Zoom button to zoom in more quickly To pan around the zoomed image area use the arrow buttons To zoom out of the image press the E Zoom button To return to the original image size press Esc The enlarged image is projected a...

Страница 88: ...rrow You can change the shape in the Pointer Shape setting in the projector s Settings menu a Press the Pointer button on the remote control b Use the arrow buttons to move the pointer on the screen To move the pointer diagonally press any pair of adjacent arrow buttons at the same time c Press Esc to remove the pointer from the screen g g Related Links Projector Feature Settings Settings Menu p 1...

Страница 89: ...t you do not want to share between multiple projectors as a user s logo a Display the image you want to project as the user s logo b Press the Menu button select the Extended menu and press Enter c Select User s Logo Start Setting and press Enter You see a prompt asking if you want to use the displayed image as a user s logo a Adjustments such as Geometry Correction E Zoom Aspect Scale or Screen T...

Страница 90: ...letion message is displayed j Press Esc to exit the message screen k Select the Extended menu and press Enter l Select Display and press Enter m Select when you want to display the User s Logo screen To display it whenever there is no input signal select Display Background and set it to Logo s Extended Display Display Background To display it whenever you turn the projector on select Startup Scree...

Страница 91: ...following settings Image menu settings Color Matching in the Extended menu Save Memory lets you save your current settings to memory 10 memories with different names are available a A memory name that has already been used is indicated by a blue mark Saving over a previously saved memory overwrites the settings with your current settings Erase Memory lets you erase the selected memory settings Ren...

Страница 92: ... the images match closely You can set a unique projector ID for each projector to operate them individually using a remote control and then correct the brightness and color for each projector a In some cases the brightness and color tone may not match completely even after correction If brightness and color tone differences become more noticeable over time repeat the adjustments g g Related Links ...

Страница 93: ... want to operate using the remote control a Aim the remote control at the target projector and press the ID button The current Projector ID is displayed on the projected screen It disappears after about 3 seconds b While holding the ID button press the number button that matches the ID of the projector you want to operate The projector you want to operate is selected c Press the ID button to check...

Страница 94: ...ector ID setting to Off you can operate the projector using the remote control whichever ID you select on the remote control Matching the Image Colors You can match the display quality of multiple projectors that will project next to each other Turn on all the projectors and select the Color Matching setting in each projector s Extended menu so that all the projectors display quality match on the ...

Страница 95: ...s the Menu button select the Extended menu and press Enter b Select Multi Projection and press Enter c Select Color Uniformity and press Enter d Select Color Uniformity and press Enter e Select On and press Enter Then press Esc f Select Adjustment Level and press Enter g Select the level and press Esc h Select Start Adjustments and press Enter i Select the area you want to adjust and press Enter A...

Страница 96: ... C cyan M magenta and Y yellow color components Turn on all the projectors and select the RGBCMY setting in each projector s Extended menu so that the color tone on the combined screen becomes entirely even a Press the Menu button select the Extended menu and press Enter b Select Multi Projection and press Enter c Select RGBCMY and press Enter d Select the color to adjust and press Enter e Do the ...

Страница 97: ...djust the Brightness setting f Press Menu or Esc to exit the menus Scaling an Image You can project the same image from multiple projectors and use the Scale feature to crop and combine them into one large image a Press the Menu button select the Signal menu and press Enter b Select Scale and press Enter You see this screen c Select On as the Scale setting ...

Страница 98: ...ore of the following scaling options and adjust it as necessary or to scale the image horizontally and vertically at the same time Scale Vertically to scale the image vertically only Scale Horizontally to scale the image horizontally only f Select the Clip Adjustment setting and use the arrow buttons to adjust the coordinates and size of each image as you view the screen g Select Clip Range to pre...

Страница 99: ... the projector without first entering a password When plugging the power cord and turning on the projector at first time you must enter the correct password This also applies to Direct Power On and Auto Power On User s Logo Protection password prevents anyone from changing the custom screen displayed when the projector turns on or when no signal is being input The custom screen discourages theft b...

Страница 100: ... re enter the password f Press Esc to return to the menu g Make a note of the password and keep it in a safe place Selecting Password Security Types After setting a password you see this menu allowing you to select the password security types you want to use If you do not see this menu hold down the Freeze button on the remote control for 5 seconds until the menu appears To prevent unauthorized us...

Страница 101: ...es in succession the message The projector s operation will be locked is displayed for approximately 5 minutes and the projector switches to standby mode If this happens disconnect the power plug from the electrical outlet reinsert it and turn the projector back on The projector displays the password entry screen again so that you can enter the correct password If you have forgotten the password m...

Страница 102: ...ol Panel Lock setting takes effect g g Related Links Unlocking the Projector s Buttons p 102 Unlocking the Projector s Buttons If the projector s buttons have been locked do one of the following to unlock them Hold down the Enter button on the control panel for 7 seconds A message is displayed and the lock is released Select Off as the Control Panel Lock setting in the projector s Settings menu s ...

Страница 103: ...ity slot on the projector to attach a Kensington Microsaver Security system a For more details on the Microsaver Security System see http www kensington com Use the security cable attachment point on the projector to attach a wire cable and secure it to a room fixture or heavy furniture a You can use a commercially available theft prevention wire lock See the documentation supplied with the wire l...

Страница 104: ...structions in these sections to set up your projector for use on a network g g Related Links Wired Network Projection p 105 Wireless Network Projection p 108 Wireless Network Projection from a Mobile Device Screen Mirroring p 116 Secure HTTP p 121 ...

Страница 105: ...c for instructions g g Related Links Connecting to a Wired Network p 105 Selecting Wired Network Settings p 105 Connecting to a Wired Network To connect the projector to a wired local area network LAN use a 100Base TX or 10Base T network cable To ensure proper data transmission use a Category 5 shielded cable or better a Connect one end of the network cable to your network hub switch or router b C...

Страница 106: ... the projector by anyone not in the room with it You must enter a displayed randomized keyword from a computer using Epson iProjection to access the projector and share the current screen Display Keyword lets you select whether to display a projector keyword on the projected image when accessing the projector using Epson iProjection Display LAN Info lets you set the display format for the projecto...

Страница 107: ... the IP address from being displayed on the LAN standby screen and Home screen set the IP Address Display setting to Off h When you finish selecting settings select Complete and follow the on screen instructions to save your settings and exit the menus i Press the LAN button on the remote control The wired network settings complete when you see the correct IP address on the LAN standby screen ...

Страница 108: ... the App Store or Google Play Any fees incurred when communicating with the App Store or Google Play are the responsibility of the customer Epson iProjection Chromebook app allows you to project from Chromebook devices You can download Epson iProjection from the Chrome Web Store Any fees incurred when communicating with the Chrome Web Store are the responsibility of the customer g g Related Links ...

Страница 109: ...e it in place with the screw Selecting Wireless Network Settings Manually Before you can project from your wireless network you need to select network settings for the projector a Press the Menu button select the Network menu and press Enter b Select On as the Wireless LAN Power setting c Select Network Configuration and press Enter ...

Страница 110: ...lt Projector Keyword lets you turn on a security password to prevent access to the projector by anyone not in the room with it You must enter a displayed randomized keyword from a computer using Epson iProjection to access the projector and share the current screen Display Keyword lets you select whether to display a projector keyword on the projected image when accessing the projector using Epson...

Страница 111: ...and Home screen set the SSID Display setting or the IP Address Display setting to Off k When you finish selecting settings select Complete and follow the on screen instructions to save your settings and exit the menus l Press the LAN button on the remote control The wireless network settings are complete when you see the correct IP address on the LAN standby screen When you have finished making wi...

Страница 112: ...ptions to match the settings used on your network WPA2 PSK security WPA2 EAP security WPA WPA2 PSK security WPA WPA2 EAP security Available only for the Advanced connection mode a Contact your network administrator for guidance on entering the correct information a If you want to set up the WPA2 EAP or WPA WPA2 EAP security make sure your digital certificate file is compatible with projector regis...

Страница 113: ...B storage device to the projector s USB A port l Press Enter to display the certificate list m Select the certificate to import using the displayed list A message is displayed prompting you to enter the password for the certificate n Enter a password and press Enter The certificate is imported and a completion message appears o Select your EAP settings as necessary User name lets you enter a user ...

Страница 114: ...se it to connect a mobile device using the Epson iProjection iOS Android app a Make sure you have installed the latest version of Epson iProjection on your device V1 3 0 or later supports this feature You can download Epson iProjection for free from the App Store or Google Play Any fees incurred when communicating with the App Store or Google Play are the responsibility of the customer When using ...

Страница 115: ...y into the same port used for the wireless LAN module EB L510U EB L610W EB L610 EB L400U EB L500W EB L500 You see a projected message that the network information update is complete f Remove the USB key If your projector needs the wireless LAN module reinsert the wireless LAN module into the projector g Connect the USB key to a USB port on your computer a In Windows Vista if the AutoPlay window is...

Страница 116: ...device Do not change the projector s Screen Mirroring Settings during Screen Mirroring projection Doing so may cause the projector to disconnect and it may take a while to re connect s Network Screen Mirroring Settings Do not turn off the projector directly by the breaker during Screen Mirroring projection a Mobile devices with Android installed or Windows 8 1 or later installed mainly support Mir...

Страница 117: ...e g For the Extended operation mode select the Extended setting Meeting Mode lets you select the type of meeting Select Interruptions OK to connect to another mobile device during Screen Mirroring projection or No Interruptions to exclusively connect to one device Channel lets you select the wireless channel used by Screen Mirroring h Select the Display setting as necessary Display PIN Code lets y...

Страница 118: ...g standby screen or at the bottom right of the projected image The projector displays the image from your mobile device a It may take some time until the connection is established While connecting do not disconnect the projector s power cord Doing so may cause your device to freeze or malfunction Depending on the mobile device you may need to delete a device when connecting Follow the on screen in...

Страница 119: ...the projector s power cord Doing so may cause your device to freeze or malfunction Connecting Using Screen Mirroring in Windows 8 1 You can set up your computer for wireless projection from Charms in Windows 8 1 You can play audio through the projector s speaker system by connecting using Screen Mirroring a Select Screen Mirroring Settings on your projector as necessary b Press the LAN button on t...

Страница 120: ...n your computer enter the PIN code displayed on the Screen Mirroring standby screen or at the bottom right of the projected image The projector displays the image from your computer a It may take some time until the connection is established While connecting do not disconnect the projector s power cord Doing so may cause your device to freeze or malfunction ...

Страница 121: ...e Menus You can create your Web server certificate and import it using the projector menus and a USB flash drive a You can also register the digital certificates from your Web browser However be sure to register just once or the certificate may not install correctly a Make sure your digital certificate file is compatible with projector registration and directly placed on the USB storage device b P...

Страница 122: ...HTTP Specification Description Format PKCS 12 Extension PFX P12 Encryption RSA Hashes MD5 SHA 1 SHA 256 SHA 384 SHA 512 Key length 512 1024 2048 4096 bit Common name Network host name Organization Optional Password Up to 32 alphanumeric characters required You can set a password using up to 64 alphanumeric characters However you need to use your Web browser to enter more than 32 characters ...

Страница 123: ...trolling a Networked Projector Using a Web Browser p 125 Controlling a Networked Projector in Content Playback Mode p 129 Registering Digital Certificates from a Web Browser p 134 Setting Up Projector Network E Mail Alerts p 135 Setting Up Monitoring Using SNMP p 136 Using ESC VP21 Commands p 137 PJLink Support p 139 Crestron Connected Support p 140 Setting Projector Event Schedules p 145 ...

Страница 124: ...agement software Windows only lets you monitor and control your projector through the network See the Epson Projector Management Operation Guide for instructions You can download Epson Projector Management from the following Web site http www epson com ...

Страница 125: ...ou can use a Web browser to select settings and control projection even if the projector is in standby mode when the power is off s Extended Standby Mode Standby Mode a Make sure the projector is turned on b Make sure your computer or device is connected to the same network as the projector c Start your Web browser on the computer or device d Go to the Epson Web Control screen by entering the proj...

Страница 126: ...cters IPv6 Settings manual HTTP port port number used for Web Control except for 80 default 843 3620 3621 3625 3629 4352 4649 5357 10000 10001 41794 g g Related Links Web Control Options p 126 Projector Setup Settings Extended Menu p 158 Network Menu Basic Menu p 165 Web Control Options Basic Control a If you see a log in window enter your user name and password The user name is EPSONREMOTE and th...

Страница 127: ...plays the projector s setting menus C Use your finger or mouse to navigate the menus D Returns to the previous menu E Displays help topics a You cannot change the following settings using Epson Web Control HDMI Link Pointer Shape User Button Test Pattern Message Position User s Logo Language HDBaseT Signal Level Content Playback Test Pattern A Returns to the Epson Web Control screen B Displays ava...

Страница 128: ... Using a Web Browser 128 C Turns off test pattern display Status Information A Returns to the Epson Web Control screen B Displays a list of monitored settings C Displays the setting status D Select to view different status information ...

Страница 129: ... Make sure your computer or device is connected to the same network as the projector c Start your Web browser on the computer or device d Go to the Epson Web Control screen by entering the projector s IP address into the browser s address box When entering an IPv6 address wrap the address with and The Epson Web Control screen is displayed A Controls the projector remotely B Edits playlists for Con...

Страница 130: ...c Web Control Password You can only select the following settings from Advanced Monitor Password up to 16 alphanumeric characters IPv6 Settings manual HTTP port port number used for Web Control except for 80 default 843 3620 3621 3625 3629 4352 4649 5357 10000 10001 41794 g g Related Links Web Control Options in Content Playback Mode p 130 Crestron Connected Support p 140 Web Control Options in Co...

Страница 131: ...Control screen B Controls playback of the playlist C Edits copies or deletes the playlist D Creates a new playlist USB Memory Device A Returns to the Epson Web Control screen B Copies images or movies you want to add to playlists to a USB flash drive C Deletes images or movies on the USB flash drive ...

Страница 132: ...h playlist starts and finishes using the time table feature in the Epson Projector Content Manager software For details see the Epson Projector Content Manager Operation Guide OSD Control Pad A Returns to the Epson Web Control screen B Displays the projector s setting menus C Use your finger or mouse to navigate the menus D Returns to the previous menu E Displays help topics ...

Страница 133: ...ojector in Content Playback Mode 133 a You cannot change the following settings using Epson Web Control HDMI Link Pointer Shape User Button Test Pattern Message Position User s Logo Language HDBaseT Signal Level Content Playback ...

Страница 134: ...ector is turned on c Start your Web browser on a computer or device connected to the network d Go to the Epson Web Control screen by entering the projector s IP address into the browser s address box You see the Epson Web Control screen e Select Advanced a You may need to log in before you see the Advanced screen If a login screen is displayed enter your user name and password The user name is EPS...

Страница 135: ...Enter the e mail address to be indicated as the sender in From h Choose an address field enter the e mail address and select the alerts you want to receive Repeat for up to three addresses a Your e mail address can be up to 32 alphanumeric characters long i When you finish selecting settings select Complete and follow the on screen instructions to save your settings and exit the menus a If a criti...

Страница 136: ...nd press Enter c Select the Notifications menu and press Enter d Set the SNMP setting to On e Enter up to two IP addresses to receive SNMP notifications using 0 to 255 for each address field a Do not use these addresses 127 x x x or 224 0 0 0 through 255 255 255 255 where x is a number from 0 to 255 This projector supports SNMP agent version 1 SNMPv1 f Enter the SNMP Community Name up to 32 alphan...

Страница 137: ...ned The following commands are available Item Command Power On Off On PWR ON Off PWR OFF Item Command Signal selection Computer1 Auto SOURCE 1F RGB SOURCE 11 Component SOURCE 14 Computer2 Auto SOURCE 2F RGB SOURCE 21 Component SOURCE 24 HDMI1 SOURCE 30 HDMI2 SOURCE A0 USB SOURCE 52 LAN SOURCE 53 Screen Mirroring SOURCE 56 HDBaseT SOURCE 80 A V Mute On Off On MUTE ON Off MUTE OFF Screen Mirroring i...

Страница 138: ...jector side is shown on the left and the computer side on the right Signal name Function GND Signal wire ground TD Transmit data RD Receive data Communications protocol Default baud rate setting 9600 bps Data length 8 bit Parity None Stop bit 1 bit Flow control None ...

Страница 139: ...d by the PJLink standard adaptability verification http pjlink jbmia or jp english Non compatible commands Function PJLink command Mute settings Image muting set AVMT 11 Audio muting set AVMT 21 Input ports and corresponding input source number Input port name Input source number Computer1 11 Computer2 12 HDMI1 32 HDMI2 33 USB 41 LAN 52 HDBaseT 56 Screen Mirroring 57 HDBaseT is available only with...

Страница 140: ...mputer using a Web browser g g Related Links Setting Up Crestron Connected Support p 140 Controlling a Networked Projector Using Crestron Connected p 140 Projector Setup Settings Extended Menu p 158 Setting Up Crestron Connected Support To set up your projector for monitoring and control using a Crestron Connected system make sure your computer and projector are connected to the network If you are...

Страница 141: ...rrows in the box e To control projection remotely click the on screen buttons that correspond to the projector s remote control buttons You can scroll through button options at the bottom of the screen a These on screen buttons do not directly correspond to the projector s remote control buttons OK acts as the Enter button Menu displays the projector s menu f To view information about the projecto...

Страница 142: ... Adjusts the image brightness Color Adjusts the color saturation for the images Sharpness Adjusts the image sharpness Zoom Enlarges or reduces the image without changing the projection size Click the arrow buttons to change the position of an enlarged image D Arrow buttons Performs the same operations as the arrow buttons on the remote control OK Performs the same operation as Enter on the remote ...

Страница 143: ...meric characters and symbols DHCP Select to use DHCP You cannot enter an IP address if DHCP is enabled IP Address Enter the IP address to assign to the currently connected projector Subnet Mask Enter a subnet mask for the currently connected projector Default Gateway Enter the gateway address for the currently connected projector Send Click to confirm the changes made to the Projector C Enabled Ad...

Страница 144: ... the computer New Password Enter the new password when changing the password to open the operation window up to 26 alphanumeric characters Confirm Enter the same password as you entered in New Password If the passwords are not the same an error is displayed Send Click to confirm the changes made to the User Password ...

Страница 145: ...e a If you set a Schedule Protection password turn off your Schedule Protection password first Light Source Calibration does not start if the projector is used continuously for more than 24 hours in the Constant Brightness mode or regularly turned off by shutting off the power outlet Set Light Source Calibration events to occur only after 100 hours of usage a Set the date and time in the Date Time...

Страница 146: ...ing the event status A valid schedule regular schedule invalid schedule B The date currently selected highlighted in yellow C one time schedule regular schedule standby schedule turns communication on or off during standby invalid schedule i To edit a scheduled event select the schedule and press Esc j Select an option from the menu displayed On or Off lets you enable or disable the selected event...

Страница 147: ...hange the event details or date and time Clear lets you remove the scheduled event from a list k Select Complete then select Yes To delete all scheduled events select Schedule Reset g g Related Links Setting the Date and Time p 38 Setting a Password p 99 ...

Страница 148: ...g the Displayed Keyboard p 150 Image Quality Settings Image Menu p 151 Input Signal Settings Signal Menu p 153 Projector Feature Settings Settings Menu p 155 Projector Setup Settings Extended Menu p 158 Projector Network Settings Network Menu p 163 Projector Information Display Info Menu p 172 Projector Reset Options Reset Menu p 175 Copying Menu Settings Between Projectors Batch Setup p 176 ...

Страница 149: ...tons to move through the menus listed on the left The settings for each menu are displayed on the right a The available settings depend on the current input source c To change settings in the displayed menu press Enter d Press the up or down arrow button to move through the settings e Change the settings using the buttons listed on the bottom of the menu screens f To return all the menu settings t...

Страница 150: ... Finish on the keyboard to confirm your entries Select Cancel to cancel entering text a You can select projector settings and control projection over a network using a Web browser from your computer Some symbols cannot be entered using the displayed keyboard Use your Web browser to enter the text g g Related Links Available Text Using the Displayed Keyboard p 150 Controlling a Networked Projector ...

Страница 151: ...or Temp Color Temp sets the color temperature according to the color mode you selected Higher values tint the image blue and lower values tint the image red G M Correction G M Correction makes fine adjustments to the color tone Higher values tint the image green and lower values tint the image red Customized Customized adjusts the individual R red G green and B blue components of the offset and ga...

Страница 152: ...vailable when the Color Mode is set to Dynamic or Cinema Reset Resets all adjustment values on the Image menu for the selected color mode to their default settings a The Brightness setting does not affect light source brightness To change the light source brightness select Brightness Settings s Settings Brightness Settings g g Related Links Available Color Modes p 63 ...

Страница 153: ...ected input source Tracking Varying levels available Adjusts the signal to eliminate vertical stripes in computer images Sync Varying levels available Adjusts the signal to eliminate fuzziness or flickering in computer images Position Adjusts the image location on the screen Auto Setup On Off Automatically optimizes computer image quality when On Overscan Auto Off 4 8 Changes the projected image r...

Страница 154: ...en using multiple projectors to project one image adjusts the scale of the image displayed by each projector Reset Resets all adjustment values on the Signal menu to their default settings except for the following Input Signal g g Related Links Projected Image Appearance with Each Aspect Mode p 59 ...

Страница 155: ...the Audio Out Device setting is set to AV System s Settings HDMI Link Audio Out Device HDMI Link Adjusts the HDMI Link options Device Connections Device Connections lists the devices connected to the HDMI ports HDMI Link HDMI Link enables or disables the HDMI Link features Audio Out Device Audio Out Device selects whether to output audio from the internal speakers or a connected audio video system...

Страница 156: ... Mode is set to Custom Pointer Shape Pointer 1 Pointer 2 Pointer 3 Changes the shape of the remote control pointer Setting Options Description Remote Receiver Front Rear Front Rear Off Limits reception of remote control signals by the selected receiver Off turns off all receivers User Button Light Source Mode Info Test Pattern Resolution Display the QR Code On Screen Display Image Enhancement Cont...

Страница 157: ...Menu 157 Setting Options Description Reset Resets all adjustment values on the Settings menu to their default settings except for the following Audio Out Device Power On Link Power Off Link Link Buffer User Button Memory Content Playback ...

Страница 158: ...rature warning on your projected image Set to Off if you do not want to display messages Display Background Display Background sets the screen color or logo to display when no signal is received Startup Screen Startup Screen set to On to display a logo when the projector starts up Air Filter Notice Displays a message when a clog in the air filter is detected Screen Sets the aspect ratio and positi...

Страница 159: ... on in Content Playback mode Quick Startup Quick Startup select the time period for Quick Startup mode The projector enters this mode when you turn it off You can start projecting in approximately five seconds by pressing the power button Enabling this item increases standby power consumption Set A V Output to While Projecting first s Extended A V Settings A V Output Setting Options Description Mo...

Страница 160: ...ternet time server A V Settings Selects various audio and video output settings A V Output A V Output set to Always On to output audio and images to external devices when the projector is in standby mode Set Quick Startup to Off first s Extended Operation Quick Startup Setting Options Description Audio Settings Audio Output selects the audio input port when projecting images from anything except f...

Страница 161: ...ectors make sure you select the same color mode for all of the projectors Color Matching Color Matching corrects the difference between the tint and brightness of each projected image Color Uniformity Color Uniformity adjusts the color tone balance for the whole screen RGBCMY RGBCMY adjusts the Hue Saturation and Brightness for R Red G Green B Blue C Cyan M Magenta and Y Yellow color components Se...

Страница 162: ...isplay Display Background Startup Screen in the Display setting and A V Mute Release in the A V Mute Settings setting Set User s Logo Protection to Off first When the Sleep Mode Timer setting is enabled and if there is no signal input for a certain period of time the light source dims before the projector turns off g g Related Links Selecting Password Security Types p 100 ...

Страница 163: ...ng to On Screen Mirroring Settings To Screen Mirroring Settings menu Configures your Screen Mirroring settings Setting Options Description Wireless LAN Power On Off Configures your wireless LAN settings Select On to project images via a wireless LAN If you do not want to connect via wireless LAN turn it off to prevent unauthorized access by others Net Info Wireless LAN Connection Mode Wireless LAN...

Страница 164: ... a compatible Web browser This allows you to access the projector remotely g g Related Links Network Menu Screen Mirroring Settings p 164 Network Menu Basic Menu p 165 Network Menu Wireless LAN Menu p 166 Network Menu Wired LAN Menu p 168 Network Menu Notifications Menu p 169 Network Menu Others Menu p 170 Network Menu Reset Menu p 171 Selecting Password Security Types p 100 Network Menu Screen Mi...

Страница 165: ...s channel used by Screen Mirroring Display Display PIN Code Set to On to display the eight digit PIN code on the projected image when projecting input sources other than Screen Mirroring Display Device Name Set to On to display the newly connected device name on the projected image when projecting input sources other than Screen Mirroring Reset Resets all adjustment values on the Screen Mirroring ...

Страница 166: ...ojector s network information By simply reading the QR code with Epson iProjection you can connect the mobile device to the projector through a network The default value is Text QR Code Network Menu Wireless LAN Menu Settings on the Wireless LAN menu let you select the wireless LAN settings s Network Network Configuration Wireless LAN Setting Options Description Connection Mode Select the type of ...

Страница 167: ...ging the passphrase periodically for security If the network settings are initialized it returns to the initial passphrase EAP Method Set the EAP settings for WPA2 EAP and WPA WPA2 EAP security Setting Options Description EAP Type EAP Type selects the protocol for authentication PEAP authentication protocol widely used in Windows Server PEAP TLS authentication protocol used in Windows Server Selec...

Страница 168: ...a number from 0 to 255 for IP Address 255 255 255 255 or 0 0 0 0 through 254 255 255 255 for Subnet Mask and 0 0 0 0 127 x x x or 224 0 0 0 through 255 255 255 255 for Gateway Address SSID Display On Off Select whether to display the SSID on the network standby screen and Home screen IP Address Display On Off Select whether to display the IP address on the network standby screen and Home screen IP...

Страница 169: ...onnect the projector to the network using IPv6 IPv6 is supported to monitor and control the projector over a network using Epson Web Control and PJLink Auto Configuration Auto Configuration set to On to assign addresses automatically according to the Router Advertisement Use Temporary Address Use Temporary Address set to On if you want to use a temporary IPv6 address Network Menu Notifications Men...

Страница 170: ...o not use spaces and any symbols other than Set the SNMP community name PJLink Notification On Off Enables or disables the PJLink notification function Notified IP Address IP address Enter the IP address to receive the projector s operating status when the PJLink notification function is enabled Enter the addresses using 0 to 255 for each address field Do not use these addresses 127 x x x or 224 0...

Страница 171: ...mation to be acquired using Control4 Simple Device Discovery Protocol SDDP Message Broadcasting On Off Set to On to receive the message delivered by Epson Projector Management See the Epson Projector Management Operation Guide for details Available only when Crestron Connected is set to Off g g Related Links Crestron Connected Support p 140 Network Menu Reset Menu Settings on the Reset menu let yo...

Страница 172: ...nfo Menu Projector Info Menu You can display information about the projector and input sources by viewing the Projector Info menu in the projector s Info menu a The available settings depend on the current input source Information item Description Total Op Time Displays the number of hours the projector has been used in its operating life Operation Hours Displays the number of hours the projector ...

Страница 173: ...n 0022 0027 0028 0029 0030 0031 0035 Unstable screen mirroring communication Check the network communication status wait a few moments and try connecting to the network again 0023 0024 0025 Connection failed If you see the PIN entry screen on your computer enter the PIN code displayed on the Screen Mirroring standby screen or at the bottom right of the projected image If this does not solve the pr...

Страница 174: ...ot match the network Check the wireless LAN security settings and make sure that the security certificate is installed correctly 089B EAP server authentication failed Check the wireless LAN security settings and make sure that the security certificate is installed correctly 089C EAP client authentication failed Check the wireless LAN security settings and make sure that the security certificate is...

Страница 175: ...or before performing light source calibration for maximum accuracy Run Periodically Set to On to perform light source calibration periodically every 100 hours of usage Setting Options Description Schedule Settings Moves to the Schedule Settings screen Reset All Config Resets most of the projector settings to their default values Reset All Factory Default Resets all of the projector settings to the...

Страница 176: ...to power outages communication errors or other problems that may cause such failures g g Related Links Transferring Settings From a USB Flash Drive p 176 Transferring Settings From a Computer p 177 Transferring Settings From a USB Flash Drive You can copy menu settings from one projector to another of the same model using a USB flash drive a The USB flash drive must use a FAT format and not incorp...

Страница 177: ...Disconnect the power cord from the projector and check that all of the projector s indicators have turned off b Connect a USB cable to the computer s USB port and to the projector s Service port c Hold down the Esc button on the remote control or the control panel and connect the power cord to the projector d When all of the projector s indicators turn on release the Esc button The computer recogn...

Страница 178: ...t correctly g g Related Links Batch Setup Error Notification p 178 Batch Setup Error Notification The projector s indicators notify you if an error occurs during a batch setup operation Check the status of the projector s indicators and follow the instructions described in the table here Indicator status Problem and solutions Laser Orange flashing fast Temp Orange flashing fast The batch setup fil...

Страница 179: ...rojector Follow the instructions in these sections to maintain your projector g g Related Links Projector Maintenance p 180 Cleaning the Lens p 181 Cleaning the Projector Case p 182 Air Filter and Vent Maintenance p 183 ...

Страница 180: ...y parts you should replace are the air filter and remote control batteries If any other part needs replacing contact Epson or an authorized Epson servicer Warning Before cleaning any part of the projector turn it off and unplug the power cord Never open any cover on the projector except as specifically explained in this manual Dangerous electrical voltages in the projector can injure you severely ...

Страница 181: ...t free cloth with lens cleaner and gently wipe the lens Do not spray any liquid directly on the lens Warning Do not use a lens cleaner that contains flammable gas The high heat generated by the projector may cause a fire Attention Do not use glass cleaner or any harsh materials to clean the lens and do not subject the lens to any impacts otherwise it could be damaged Do not use canned air or the g...

Страница 182: ...e a soft dry lint free cloth To remove stubborn dirt use a soft cloth moistened with water and mild soap Do not spray liquid directly on the projector Attention Do not use wax alcohol benzene paint thinner or other chemicals to clean the projector case These can damage the case Do not use canned air or the gases may leave a flammable residue ...

Страница 183: ...emperature inside the projector has reached a high level Do not wait until this warning appears to maintain your projector filter as prolonged exposure to high temperatures may reduce the life of your projector g g Related Links Cleaning the Air Filter p 183 Replacing the Air Filter p 185 Cleaning the Air Filter You need to clean the projector s air filters in the following situations The filter o...

Страница 184: ...Vacuum the front of the air filter the side with the tabs to remove any remaining dust Attention Do not rinse the air filter in water or use any detergent or solvent to clean it Do not use canned air The gases may leave a flammable residue or push dust and debris into the projector s optics or other sensitive areas g Place the air filter in the projector as shown h Close the air filter cover and t...

Страница 185: ... orange The air filter is torn or damaged You can replace the air filter while the projector is mounted to the ceiling or placed on a table a Turn off the projector and unplug the power cord b Turn the projector upside down c Loosen the screws and open the air filter cover d Pull the air filter out of the projector a Dispose of used air filters according to local regulations Filter frame Polypropy...

Страница 186: ...Air Filter and Vent Maintenance 186 f Close the air filter cover and tighten the screws g g Related Links Replacement Parts p 206 ...

Страница 187: ... g g Related Links Projection Problems p 188 Projector Indicator Status p 189 Using the Projector Help Displays p 192 Solving Image or Sound Problems p 193 Solving Projector or Remote Control Operation Problems p 198 Solving Network Problems p 200 Solutions to Problems in Content Playback mode p 203 ...

Страница 188: ... it on If this does not solve the problem check the following The indicators on the projector may indicate the problem The projector s Help system can display information about common problems The solutions in this manual can help you solve many problems If none of these solutions help contact Epson for technical support ...

Страница 189: ... Indicator and status Problem and solutions Power Lit blue Status Lit blue Laser Off Temp Off Filter Off Normal operation Power Lit blue Status Flashing blue Laser Off Temp Off Filter Off Warming up or shutting down When warming up wait about 30 seconds for an image to appear All buttons are disabled during warm up and shutting down Power Lit blue Status Off Laser Off Temp Off Filter Off Standby s...

Страница 190: ...Mode setting to On in the projector s Extended menu s Extended Operation High Altitude Mode If the problem persists unplug the projector and contact Epson for help Indicator and status Problem and solutions Power Flashing blue Status Indicator status varies Laser Flashing orange Temp Indicator status varies Filter Indicator status varies Laser warning Turn the projector off unplug it and contact E...

Страница 191: ...ucted by nearby objects Clean or replace the air filter If the problem persists unplug the projector and contact Epson for help Power Indicator status varies Status Indicator status varies Laser Flashing orange Temp Indicator status varies Filter Indicator status varies The projector is unable to maintain constant brightness and the Constant Brightness setting is disabled s Settings Brightness Set...

Страница 192: ... Press the Home button on the remote control c Select Help on the Home screen The Help menu is displayed d Use the up and down arrow buttons to highlight the problem you want to solve e Press Enter to view the solutions f Perform one of the following actions when you are finished To select another problem to solve press Esc To exit the help system press Menu ...

Страница 193: ...t the Brightness setting in the projector s Image menu Adjust Brightness Settings s Settings Brightness Settings Check the Display setting in the projector s Extended menu to make sure Messages is set to On If the projector does not respond when you press the control panel buttons the buttons may be locked for security Unlock the buttons in the Control Panel Lock setting in the projector s Setting...

Страница 194: ...r LCD option if necessary c Click the Arrange or Arrangement tab d Select Mirror Displays Solutions When Not Supported Message Appears If the message Not supported is displayed try the following solutions Make sure the correct input signal is selected in the projector s Signal menu Make sure the computer s display resolution does not exceed the projector s resolution and frequency limits If necess...

Страница 195: ...orner p 51 Solutions When the Image Contains Noise or Static If the projected image contains electronic interference noise or static try the following solutions Check the cables connecting your computer or video source to the projector They should be Separated from the power cord to prevent interference Securely connected at both ends Not connected to an extension cable Check the settings in the p...

Страница 196: ...12 Focusing the Image Using the Focus Ring p 55 Cleaning the Lens p 181 Solutions When the Image Brightness or Colors are Incorrect If the projected image is too dark or light or the colors are incorrect try the following solutions Press the Color Mode button on the remote control to try different color modes for the image and environment Check your video source settings Adjust the available setti...

Страница 197: ...ut in the A V Settings setting in the projector s Extended menu When you are connecting the projector to a Mac using an HDMI cable make sure your Mac supports audio through the HDMI port If not you need to connect an audio cable If you want to use a connected audio source when the projector is off set the Standby Mode option to Communication On and make sure the A V Settings options are set correc...

Страница 198: ...erheated and turned off If the power button on the remote control does not turn on the projector check its batteries and make sure at least one of the remote receivers are available in the Remote Receiver setting in the projector s Settings menu The cooling fans may run in standby status depending on the projector settings Also when the projector wakes from standby status the fans may cause an une...

Страница 199: ...ction without first setting a password Try entering 0000 using the remote control If you have entered an incorrect password too many times and see a message displaying a request code write down the code and contact Epson for help Provide the request code and proof of ownership for assistance in unlocking the projector If you set a Epson Web Control password and forgot the user ID or password try e...

Страница 200: ...s the projector through a Web browser make sure you are using the correct ID and password For the user ID enter EPSONWEB You cannot change the user ID For the password enter the password set in the projector s Network menu The default password is admin Make sure you have access to the network the projector is on If your Web browser is set up to connect via a proxy server the Epson Web Control scre...

Страница 201: ...es are connected to the projector with No Interruptions settings s Network Screen Mirroring Settings Extended Meeting Mode Change the Channel setting according to the wireless LAN environment s Network Screen Mirroring Settings Extended Channel Check the mobile device s settings Make sure the settings on the mobile device are correct When connecting again immediately after disconnecting it may tak...

Страница 202: ...olving Network Problems 202 Update to the latest version of the wireless driver or firmware on the mobile device g g Related Links Wireless Network Projection from a Mobile Device Screen Mirroring p 116 ...

Страница 203: ...ls on creating a playlist Make sure the USB flash drive is directly connected to the projector Do not use a multi card reader or a USB hub to expand a USB port If the USB flash drive is partitioned you may not be able to play back playlists Delete all of the partitions before saving the playlists on the USB flash drive Do not share a playlist between projectors that are different in resolution Col...

Страница 204: ... Links Optional Accessories and Replacement Parts p 205 Screen Size and Projection Distance p 207 Supported Monitor Display Resolutions p 212 Projector Specifications p 214 External Dimensions p 216 List of Safety Symbols corresponding to IEC60950 1 A2 p 217 Laser Safety Information p 219 Glossary p 221 Notices p 223 ...

Страница 205: ...0 Mobile X Type Screen ELPSC21 Portable X type screens aspect ratio 16 9 Multi Aspect Screen ELPSC26 Portable multi aspect screen Cables Computer cable ELPKC02 1 8 m for mini D sub 15 pin mini D Sub 15pin Computer cable ELPKC09 3 m for mini D sub 15 pin mini D Sub 15pin Computer cable ELPKC10 20 m for mini D sub 15 pin mini D Sub 15pin Use when connecting to the Computer port Mounts Ceiling mount ...

Страница 206: ...ge such as books OHP documents or slides External Speaker ELPSP02 External self powered speaker HDBaseT Transmitter ELPHD01 EB L615U EB L610U EB L510U EB L610W Use when sending an HDMI or RS 232C signal over a long distance HDCP 2 2 is not supported Replacement Parts Air filter ELPAF56 Use as a replacement for used air filters ...

Страница 207: ...L510U WXGA EB L610W 16 10 screen size A B Minimum Wide to Maximum Tele Vertical Lens Shift Bottom to Top 50 108 67 144 235 67 0 60 129 81 174 283 81 0 70 151 94 204 331 94 0 80 172 108 233 378 108 0 100 215 135 292 474 135 0 120 258 162 351 569 162 0 150 323 202 440 713 202 0 200 431 269 588 951 269 0 300 646 404 884 1429 404 0 500 1077 673 1476 2384 673 0 4 3 screen size A B Minimum Wide to Maxim...

Страница 208: ... 150 305 229 467 757 229 0 200 406 305 624 1010 305 0 300 610 457 938 1517 457 0 470 955 716 1472 2378 716 0 16 9 screen size A B Minimum Wide to Maximum Tele Vertical Lens Shift Bottom to Top 45 100 56 150 245 65 9 50 111 62 167 273 73 10 60 133 75 202 328 87 12 70 155 87 236 383 102 15 80 177 100 270 438 116 17 100 221 125 339 549 145 21 120 266 149 407 659 174 25 150 332 187 510 825 218 31 200 ...

Страница 209: ...174 283 3 16 10 screen size A B Minimum Wide to Maximum Tele 70 151 94 204 331 3 80 172 108 233 378 4 100 215 135 292 474 5 120 258 162 351 569 6 150 323 202 440 713 7 200 431 269 588 951 10 300 646 404 884 1429 14 500 1077 673 1476 2384 24 4 3 screen size A B Minimum Wide to Maximum Tele 45 91 69 147 240 2 50 102 76 164 267 3 60 122 91 197 321 3 70 142 107 231 375 4 80 163 122 264 429 4 100 203 1...

Страница 210: ... 239 390 3 100 215 135 300 488 3 150 323 202 451 733 5 200 431 269 603 979 7 250 538 337 754 1224 8 280 603 377 845 1371 9 4 3 screen size A B Minimum Wide to Maximum Tele 25 51 38 83 136 1 30 61 46 100 164 1 40 81 61 134 219 2 50 102 76 169 275 2 60 122 91 203 331 2 80 163 122 271 442 3 100 203 152 340 553 4 120 244 183 408 664 5 150 305 229 511 831 6 200 406 305 682 1108 8 250 508 381 854 1386 1...

Страница 211: ... Minimum Wide to Maximum Tele 28 62 35 84 138 1 30 66 37 91 149 1 40 89 50 122 199 1 50 111 62 153 249 2 60 133 75 184 300 2 80 177 100 246 401 3 100 221 125 308 502 3 150 332 187 464 754 5 200 443 249 619 1006 7 250 553 311 775 1258 9 275 609 342 853 1384 10 16 10 screen size A B Minimum Wide to Maximum Tele 29 62 39 85 140 1 40 86 54 118 193 1 50 108 67 149 243 2 60 129 81 179 292 2 70 151 94 20...

Страница 212: ...he Resolution setting in the projector s Signal menu Available only for EB L615U EB L610U EB L510U EB L400U Even when signals other than those mentioned above are input it is likely that the image can be projected However not all functions may be supported Component Video Signal Refresh rate Hz Resolution dots SDTV 480i 480p 60 720 480 SDTV 576i 576p 50 720 576 HDTV 720p 50 60 1280 720 HDTV 1080i ...

Страница 213: ...ts HDTV 1080p 24 30 50 60 1920 1080 Only when an HDMI connection is made using the optional HDBaseT Transmitter for EB L615U EB L610U EB L510U EB L610W Available only for EB L615U EB L610U EB L510U EB L400U Available only for EB L615U EB L610U EB L510U EB L610W EB L400U EB L500W ...

Страница 214: ...ximum horizontal direction Approx 30 Light source Laser diode Light source output power Up to 104 5 W Wavelength 449 to 461 nm Light source life Normal or Quiet Light Source Mode Up to about 20 000 hours Extended Light Source Mode Up to about 30 000 hours Max audio output 10 W Speaker 1 Power supply EB L615U EB L610U EB L510U EB L610W EB L610 EB L500W EB L500 100 240V AC 10 50 60Hz 3 8 1 7 A EB L4...

Страница 215: ...cations Computer1 port 1 Mini D Sub15 pin female Computer2 Monitor Out port 1 Mini D Sub15 pin female Audio 1 port 1 Stereo mini pin jack Audio 2 port 1 Stereo mini pin jack Audio Out port 1 Stereo mini pin jack HDMI1 port 1 HDMI Audio is only supported by PCM HDMI2 port 1 HDMI Audio is only supported by PCM USB A port 1 USB connector Type A Service port 1 USB connector Type B LAN port 1 RJ 45 HDB...

Страница 216: ...ter of lens to suspension bracket fixing point EB L615U EB L610U EB L510U EB L610W EB L610 74 mm EB L400U 78 2 mm EB L500W EB L500 77 8 mm C EB L615U EB L610U EB L510U EB L610W EB L610 EB L400U 339 mm EB L500W EB L500 320 mm The unit in these illustrations is mm ...

Страница 217: ... To identify the positive and negative connections the polarity on a piece of equipment to which a d c power supply may be connected No Symbol mark Approved standards Description I The same as No 8 J IEC60417 No 5001B Battery general On battery powered equipment To identify a device for instance a cover for the battery compartment or the connector terminals K IEC60417 No 5002 Positioning of cell T...

Страница 218: ...tor V ISO3864 IEC60825 1 Caution laser radiation To indicate the equipment has a laser radiation part W ISO 3864 Disassembly prohibition To indicate a risk of injury such as electric shock if the equipment is disassembled X IEC60417 No 5266 Standby partial standby To indicate that part of the equipment is in the ready status Y ISO3864 IEC60417 No 5057 Caution movable parts To indicate that you mus...

Страница 219: ...n the temperature gets too high The brightness of the light source declines the longer it is used You can change the relationship between usage time and decline in brightness settings Note the following about light source calibration Whenever the usage time reaches 100 hours calibration starts automatically for the light source when the projector is turned off However this does not start automatic...

Страница 220: ...Laser Safety Information 220 Top As with any bright source do not stare into the beam RG2 IEC EN 62471 5 2015 ...

Страница 221: ...rding to subnet mask HDCP HDCP is an abbreviation for High bandwidth Digital Content Protection It is used to prevent illegal copying and protect copyrights by encrypting digital signals sent over DVI and HDMI ports Because the HDMI port on this projector supports HDCP it can project digital images protected by HDCP technology However the projector may not be able to project images protected with ...

Страница 222: ... address on a divided network subnet from the IP address SVGA A screen size standard with a resolution of 800 horizontal 600 vertical dots SXGA A screen size standard with a resolution of 1 280 horizontal 1 024 vertical dots Sync The signals output from computers have a specific frequency If the projector frequency does not match this frequency the resulting images are not of a good quality The pr...

Страница 223: ... residential installation This equipment generates uses and can radiate radio frequency energy and if not installed and used in accordance with the instructions may cause harmful interference to radio communications However there is no guarantee that interference will not occur in a particular installation If this equipment does cause interference to radio and television reception which can be det...

Страница 224: ...ment on this product s suitability after a full evaluation Operating System References Microsoft Windows Vista operating system Microsoft Windows 7 operating system Microsoft Windows 8 operating system Microsoft Windows 8 1 operating system Microsoft Windows 10 operating system In this guide the operating systems above are referred to as Windows Vista Windows 7 Windows 8 Windows 8 1 and Windows 10...

Страница 225: ...in any form or by any means electronic mechanical photocopying recording or otherwise without the prior written permission of Seiko Epson Corporation No patent liability is assumed with respect to the use of the information contained herein Neither is any liability assumed for damages resulting from the use of the information contained herein Neither Seiko Epson Corporation nor its affiliates shal...

Отзывы: