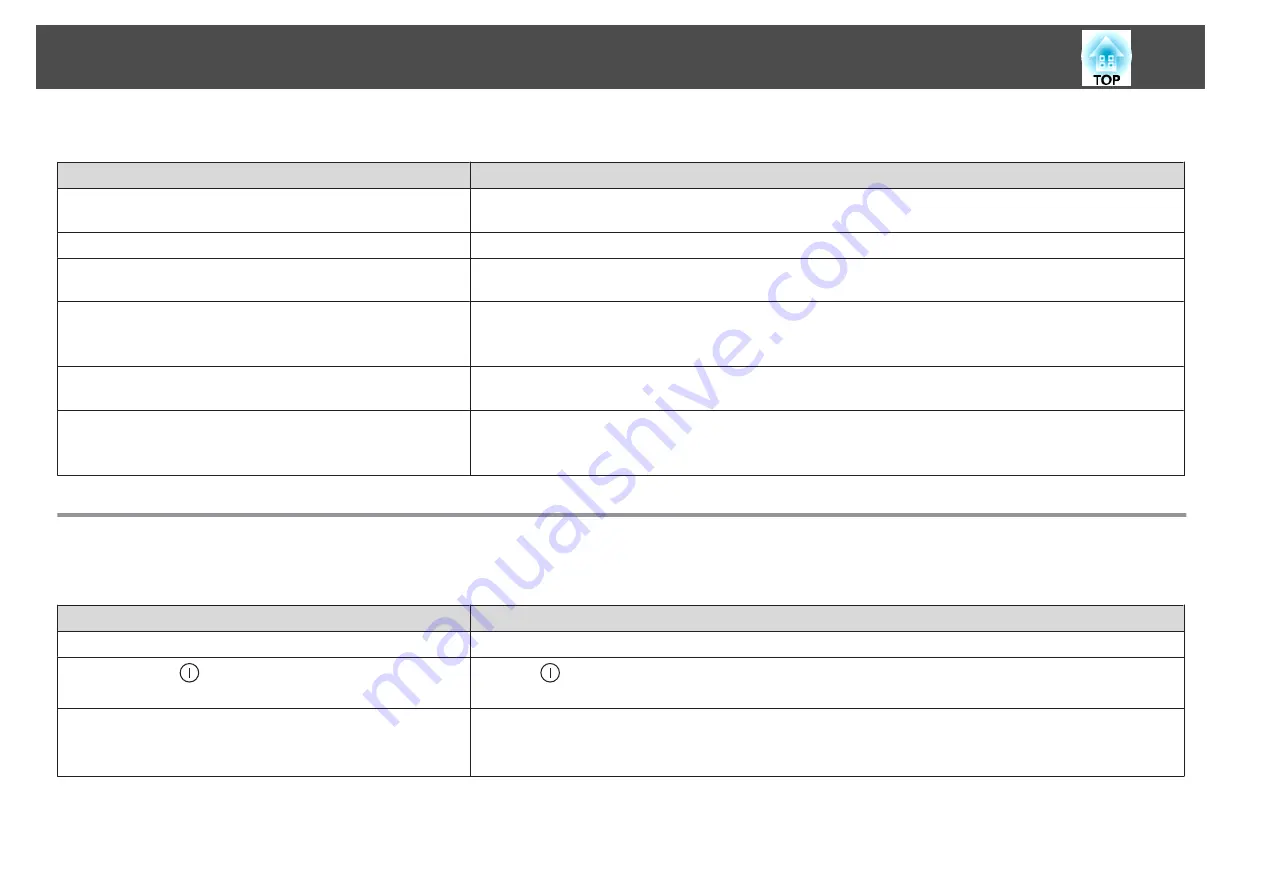
Automatic adjustments are not performed correctly
Check
Remedy
Have at least 20 minutes passed since the power was turned on?
Auto adjustment does not work correctly until the temperature of the projector is stable. Perform auto adjustment 20
minutes after turning on the projector or canceling Shutter.
Is the cover of the built-in camera clean?
Make sure that the cover of the built-in camera is clean. Clean the cover if it is dirty.
Is an analog signal being input?
When inputting an analog signal, the color and brightness of the input image changes, and the results of adjustment may
not be applied correctly.
Has the image been corrected using Geometry Correction?
Auto adjustment may not work for images corrected using Geometry Correction. Set
Geometry Correction
to
Off
or
reduce the correction range.
s
Settings
-
Geometry Correction
Is the brightness of the surroundings appropriate?
If a powerful spotlight or natural light shines into the area during auto adjustment, the brightness of the surroundings
changes and auto adjustment does not operate correctly. Make sure the brightness of the surroundings does not change.
Is the blending width 15 to 45%?
If the blending width in Edge Blending is 15% or less, or 45% or more, the Screen Matching function may not operate
correctly. Check the blending width.
s
Extended
-
Multi-Projection
-
Edge Blending
Problems when Projection Starts
The projector does not turn on
Check
Remedy
Is the main power switch set to Off?
Turn on the main power switch to supply power to the projector.
Did you press the [
] button on the remote control or control
panel?
Press the [
] button to turn on the power.
Are the indicators switched off?
The power cord is not connected correctly or power is not being supplied.
Disconnect and then reconnect the power cord.
Check that your electrical outlet or power source is functioning correctly.
Problem Solving
169
Содержание EB-L25000U
Страница 1: ...User s Guide ...
Страница 13: ...Introduction This chapter explains the names for each part ...
Страница 24: ...Preparing the Projector This chapter explains how to install the projector and connect projection sources ...
Страница 49: ...Basic Usage This chapter explains how to project and adjust images ...
Страница 114: ...Security Functions 114 ...
Страница 115: ...Configuration Menu This chapter explains how to use the Configuration menu and its functions ...
Страница 146: ...Troubleshooting This chapter explains how to identify problems and what to do if a problem is found ...
Страница 186: ...m To complete the adjustment press the Menu button Image Maintenance 186 ...
Страница 187: ...Appendix ...
Страница 222: ...790 395 146 299 378 5 A Center of lens 860 475 738 754 633 936 646 710 Units mm Appearance 222 ...


