background image

Guía de instalación

20

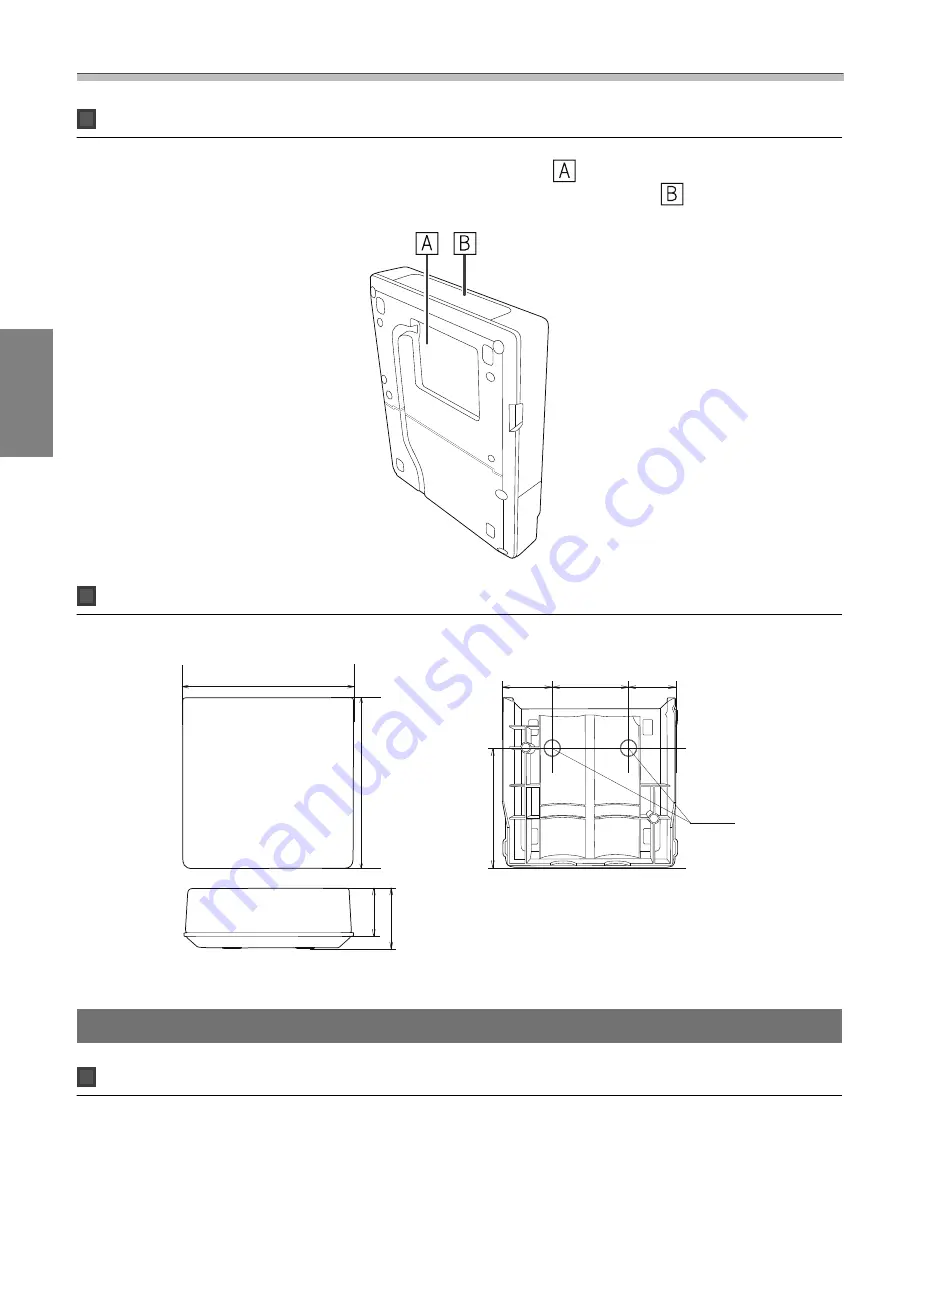
Orificios para colocar los cables

Cuando coloque los cables a través de una pared, utilice la posición (

) que se muestra en la figura siguiente

como los orificios para colocar cables. De lo contrario, quite la tapa de los cables (

) y diríjalos desde allí.

Dirija el cable de la impresora por la ranura en la parte posterior del Control Pad.

Portalápices (dimensiones externas y peso)

[Unidad: mm]

99.9

70.0

101.9

44.4

28.8

28.8

35.5

36.0

2 x M4

El portalápices pesa aproximadamente 93 g.

Unidad táctil (solo EB-1460Ui/EB-1450Ui)

Unidad táctil (dimensiones externas y peso)

[Unidad: mm]

Содержание EB-1460Ui

Страница 1: ...Installation Guide Guide d installation Guía de instalación English Français Español Printed in China XX XX XX XXX ...

Страница 2: ...ling Caution This symbol indicates information that if ignored could possibly result in personal injury or physical damage due to incorrect handling Explanation of Symbols Symbols Explanation Symbol indicating an action that must not be done Symbol indicating an action that should be done c Symbol indicating related or useful information Safety Precautions for Installation Warning The setting plat...

Страница 3: ...of the pro jector and the setting plate is approximately 16 kg not including cables Ensure the strength of the wall before mounting this product on the wall If the wall is not strong enough reinforce the wall before installation Inspect the setting plate on a regular basis to ensure there are no broken parts or loose screws If any parts are damaged stop using the setting plate immediately If this ...

Страница 4: ...act your local dealer or the nearest Epson service call center Continuing to use the product in an abnormal condition could cause a fire electric shock or visual impairment Caution Donotinstallthisproductinalocationwheretheoperatingtemperatureforyourprojector model may be exceeded Such an environment may damage the projector Install this product in a place free from excessive dust and humidity to ...

Страница 5: ...uters digital watches or mobile phones A powerful magnet within the unit could corrupt data or cause a malfunction About This Installation Guide Thisguidedescribeshowtomounttheultrashort throwprojectorEB 1460Ui EB 1450Ui EB 1440Uionawall It also describes how to install the Touch Unit EB 1460Ui EB 1450Ui only Control Pad and Pen Stand after mounting on a wall ...

Страница 6: ...verheat and the power may turn off without warning When using the projector in an environment of 35 C or more install a partition to block the heat vented from the projector s air exhaust vent Make sure the partition is slightly larger than the exhaust vent approx 2 cm wider and taller and then install the partition 10 to 30 cm from the exhaust vent It is recommended to keep connection cable lengt...

Страница 7: ...nt of the screen Install vertically on a table and project from the front of the desk When installing vertically on a table you need the optional Interactive Table Mount ELPMB29 Before installing the Touch Unit make sure that the installation surface is not warped or distorted and that any unevenness on the screen surface is less than 5 mm When installing the Touch Unit on a whiteboard secure the ...

Страница 8: ... f is more than 51 mm you cannot install the Touch Unit outside the whiteboard If there is a frame around the screen make sure that the thickness of the top of the frame e is less than 3 mm If the thickness of the top of the screen exceeds 3 mm the Touch Unit will not operate correctly ...

Страница 9: ...0 Attached labels 21 Laser diffusion port 21 Projection Distance Table 23 Figures of Installation Dimensions 23 When installing the Touch Unit EB 1460Ui EB 1450Ui only 24 When installing the Control Pad and the Pen Stand 27 When Projected Image is Smaller than 85 Inches 28 16 10 projected image 29 When Projected Image is 85 inches or more 30 16 10 projected image 31 Installing the Setting Plate 32...

Страница 10: ...ction 98 When two projectors are installed in parallel and you are using the interactive function 99 Setting the projectors in sync 100 Setting Multi Projection Interactive 101 Batch Setup Function 108 Setup Using a USB flash drive 109 Saving settings to the USB flash drive 109 Copying saved settings to other projectors 111 When Setup Fails 112 Attaching a Security Cable 113 General Notice 114 ...

Страница 11: ...e Pen Stand s p 61 When installing the Touch Unit finish installing the projector first and then follow the procedures below EB 1460Ui EB 1450Ui only The procedure differs depending on where the Touch Unit is to be installed When installing the Touch Unit outside the whiteboard using the Touch Unit Bracket a Installing the Touch Unit s p 64 b Adjusting the Angle of Laser Diffusion s p 69 c Perform...

Страница 12: ...allel to project one large screen follow the steps below a Installing the Setting Plate and the Projector s p 32 b Adjusting the Position of the Projector s p 46 c Setting the Projector ID s p 95 d Adjusting the Image in Multi Projection s p 98 Whentwo projectors are installed in parallel and you want tousetheinteractivefunction makethefollowing settings Make the settings for each projector a Sett...

Страница 13: ...gon wrench for M4 Open ended spanner 13 mm for M8 and M6 6 mm for hexagonal axis Shape Name Quan tity Application M4x12mmhexagonsocketheadcapbolt with washer spring washer 5 For wall plate assembly 4 For 3 axis adjustment unit arm installation 4 For slide plate projector installation M6 x 20 mm hexagon shoulder head bolt with washer spring washer 1 For setting plate wall plate installation M6 x 20...

Страница 14: ...lling the Control Pad on a wall and so on prepare commercially available M4 screws 20 mm x4 When installing the Pen Stand on a wall and so on prepare commercially available M4 screws 20 mm x2 Touch Unit EB 1460Ui EB 1450Ui only The following supplied products are necessary when attaching the Touch Unit Confirm that you have all items before beginning When installing the Touch Unit outside the whit...

Страница 15: ...ommercially available M4 screws Touch Unit Bracket Installation plate Securing plate M4 x 12 mm hexagon socket head cap bolts x2 M4 x 25 mm hexagon socket head cap bolts x2 M4 x 55 mm hexagon socket head cap bolt x1 M4 x 70 mm hexagon socket head cap bolt x1 For the installation plate you also need three commercially available 4 mm diameter wood screws or three M4 anchor bolts ...

Страница 16: ...al slide adjustment range 38 mm See the fig ure below Horizontal roll adjustment range 3 Fine adjustments possible with adjust ment dial s p 46 Horizontal rotation adjustment range 8 Fine adjustments possible with adjust ment dial s p 46 Vertical tilt adjustment range 3 Fine adjustments possible with adjust ment dial s p 46 Horizontal slide adjustment range 45 mm See the fig ure below Wall plate c...

Страница 17: ... 24 24 131 131 99 99 79 192 3 234 4 24 60 24 496 5 1 5 1 R 1 0 The offset value for the position of the center of the projected image and the center of the wall plate is 27 mm Cable routing holes Whenroutingcablestoconnecttotheprojectorthroughawall usepositions and inthefollowing figure as the cable routing holes Vertical slide adjustment range Unit mm ...

Страница 18: ...ation Guide 17 Horizontal slide adjustment range Unit mm Forward backward slide adjustment range Arm slide adjustment range Unit mm 263 Adjustment range for 3 axis adjustment unit installation position Unit mm ...

Страница 19: ...external tuners Use commercially available M4 screws Unit mm 2 x M4 30 5 49 7 60 8 35 Control Pad Pen Stand Control Pad external dimensions weight Unit mm 153 5 107 15 47 135 9 111 3 5 11 5 109 5 63 3 29 30 9 4 x M4 47 51 5 Weight approx 262 g Operating temperature 0 to 50 C no condensation Operating temperature 20 to 60 C no condensation ...

Страница 20: ...Otherwise remove the cable cover and route the cables from there Route the printer cable along the groove at the back of the Control Pad Pen Stand external dimensions weight Unit mm 99 9 70 0 101 9 44 4 28 8 28 8 35 5 36 0 2 x M4 The Pen Stand weighs approximately 93 g Touch Unit EB 1460Ui EB 1450Ui only Touch Unit external dimensions weight Unit mm ...

Страница 21: ...20 The Touch Unit weighs approximately 450 g Touch Unit Bracket external dimensions adjustment range weight Top Unit mm 229 8 228 57 62 Front Unit mm 101 104 8 Installation plate front Unit mm 90 Ø4 2 2 5 7 2 4 5 90 56 74 ...

Страница 22: ... affixed to the Touch Unit to indicate that it is a Class 1 laser product The labels contain the following information Class 1 laser product Warning Do not open the case The device contains a high power laser product Warning Caution If this section is opened class 3B invisible laser radiation will be emitted Avoid exposure to the radiation beams Laser diffusion port The laser beam is diffused from...

Страница 23: ...Installation Guide 22 ...

Страница 24: ...theprojected imageand the centerof thewallplateis27mm Unit mm Projected image size Wall plate Minimum projection distance Wide maxi mum zoom to maximum Tele minimum zoom Screen Numbers on the arm slide scale Distance from the top of the projected image to the bottom wall plate installation screw hole Distance from the top of the projected image to the wall plate temporary securing screw hole Heigh...

Страница 25: ...uch Unit outside the whiteboard using the bracket When f is less than 20 mm or more than 50 mm install the Touch Unit on the whiteboard When the thickness of the top of the frame e is 3 mm or more install the Touch Unit on the whiteboard Caution InstallthebottomedgeoftheTouchUnitsothatitis25to100mmfromthetopedgeoftheprojectedimage If there are obstacles between the projected image and the Touch Un...

Страница 26: ... locations of the obstacles s p 52 Make sure there is a space of approximately 20 mm between the place where the infrared deflector is stuck and the bottom of the projected image When installing the Touch Unit on the whiteboard without using the Touch Unit Bracket You need to leave at least 120 mm distance between the top edge of the projected image and the top edge of the actual screen Unit mm ...

Страница 27: ...nfrared deflectors over the locations of the obstacles s p 52 Make sure there is a space of at least 20 mm between the place where the infrared deflector is stuck and the bottom of the projected image If there are obstacles in the shaded areas in the following figure such as cables whiteboard trays holders or a thick frame touch operations will not operate correctly ...

Страница 28: ... in the following figure Unit mm 㻝㻜㻜 㻡㻜 㻝㻜㻜 㻝㻜㻜 When installing the Pen Stand next to the Control Pad do not install it so that it covers the groove in the front cover as shown in the following figure c When installing the Touch Unit do not install the Control Pad on the projection screen and the surrouding area shaded area in the following figure Otherwise The Touch Unit will not operate correctl...

Страница 29: ...table provides the figures when mounting the 3 axis adjustment unit at the position marked with a stamp The distance from the top of the projected image to the bottom wall plate installation screw hole c is the number given when the vertical slide is set to the standard position Match the notch on the setting plate to the position of the stamp on the wall plate ...

Страница 30: ... 6 75 161 5x101 0 9 0 to 24 9 19 9 to 35 8 22 8 42 0 101 0 76 163 7x10² 3 9 6 to 25 7 20 5 to 36 6 23 1 42 3 102 3 77 165 9x10³ 7 10 2 to 26 5 21 1 to 37 4 23 4 42 6 103 7 78 168 0x105 0 10 8 to 27 3 21 7 to 38 2 23 7 42 9 105 0 79 170 2x10⁶ 3 11 4 to 28 1 22 3 to 39 0 24 0 43 2 106 3 80 172 3x10⁷ 7 12 0 to 29 0 22 9 to 39 9 24 2 43 4 107 7 81 174 5x10⁹ 0 12 6 to 29 8 23 5 to 40 7 24 5 43 7 109 1 ...

Страница 31: ...ble provides the figures when mounting the 3 axis adjustment unit at the position marked with a stamp The distance from the top of the projected image to the bottom wall plate installation screw hole c is the number given when the vertical slide is set to the standard position Match the notch on the setting plate to the position of the stamp on the wall plate ...

Страница 32: ...to 37 9 20 3 to 40 1 27 1 46 3 121 1 91 196 0x122 5 18 7 to 38 7 20 9 to 40 9 27 3 46 5 122 5 92 198 2x123 9 19 4 to 39 6 21 6 to 41 8 27 6 46 8 123 9 93 200 3x125 2 20 0 to 39 7 22 2 to 41 9 27 9 47 1 125 2 94 202 5x126 5 20 6 to 39 7 22 8 to 41 9 28 2 47 4 126 5 95 204 6x127 9 21 3 to 39 7 23 5 to 41 9 28 5 47 7 127 8 96 206 8x129 2 21 9 to 39 7 24 1 to 41 9 28 7 47 9 129 3 97 208 9x130 6 22 5 t...

Страница 33: ...ing to the connected devices For details see the projector s User s Guide on the Document CD ROM Necessary cables when using the Easy Interactive Function When performing mouse operations using the Easy Interactive Function you need a USB cable Even when projecting using a computer cable a USB cable is necessary to perform mouse operations Necessary cables when installing two projectors in paralle...

Страница 34: ...y cables when installing the Touch Unit EB 1460Ui EB 1450Ui only You need the supplied Touch Unit connection cable when installing the Touch Unit and connecting it to the projector Operations are not performed correctly with a commercially available cable The shape of the plug that connects to the projector and the plug that connects to the Touch Unit differ See the following figure to connect to ...

Страница 35: ...orage device you need the USB cable supplied and a commercially available USB storage device When printing the projected image you need the USB cable supplied and the USB cable supplied with your printer Wheninputingcharacters with a USB keyboardusingtheRemoteDesktopfunction youneedthe USB cable supplied and a commercially available USB keyboard c The following Epson projectors can be connected to...

Страница 36: ...xample Document camera Dedicated USB cable supplied with document cam era Computer Computer cable optional accessory External speakers Audio cable commercially available External monitor DVI D cable commercially available LAN device LAN cable commercially available ...

Страница 37: ...o not use adhesives lubricants or oils to install or adjust the setting plate If you use adhesives to prevent the screws from loosening or things such as lubricants or oils on the slide plate fixing part of the projector the case may crack and cause the projector to fall resulting in personal injury or property damage Assemble the parts a Connect the plate and frames x2 and secure with the M4 x 12...

Страница 38: ...n If the standard position is not correct loosen the M4 bolt and adjust the position of the slide plate When you have finished making adjustments tighten the bolt c Secure the 3 axis adjustment unit and the slide plate to the base of the projector with the M4 x 12 mm bolts x4 supplied Bolt installation positions ...

Страница 39: ...jected image to the wall plate temporary securing screw hole d s Projection Distance Table p 23 c Use the screw hole in the following figure as the temporary screw hole for the wall plate The distance from the bottom wall plate installation screw hole to the temporary screw hole is 192 3 mm Werecommend markingthefollowing positions These will be the basis for determining the mounting position of t...

Страница 40: ... right from the center line of the projection surface up to a maximum of 45 mm Match the height and checked in step 1 to the lines on the template sheet Unit mm c Drive a commercially available M10 screw into the position of the temporary screw hole for the wall plate Leave a gap of 6 mm or more between the wall and the screw head d Determine the positions for the mounting holes for the wall plate...

Страница 41: ...mercially available anchors into the holes Attach the nut and tap it with a hammer until the core touches the top of the an chor h Tighten the nut with a commercially available spanner to secure the wall plate to the wall Determine the projection distance and then pass the cables through the setting plate a Check the following values in the projection distance table Numbers on the arm slide scale ...

Страница 42: ...at the ends of the cables that connect to the projector are on the projector s interface side Warning Do not hang the rest of the cable over the setting plate They could fall and cause an accident c Route the Touch Unit connection cable through the setting plate EB 1460Ui EB 1450Ui only Route the cable so that the end that connects to the Touch Unit appears from the lower part of the setting plate...

Страница 43: ...e wall plate Insert the top of the hexagonal axis into the wall plate and then insert it into the slot at the bottom Caution Do not wire the Touch Unit connection cable into the wall EB 1460Ui EB 1450Ui only If it is wired into the wall it cannot be connected to the Touch Unit Take care not to trap the cables between the setting plate and wall plate ...

Страница 44: ...tighten the supplied M6 bolt x1 with the spanner d Adjust the vertical slide with the open ended spanner and align it with the standard position Tightening the hexagonal axis at the top raises the setting plate and loosening the axis lowers it Tightening the M8 bolt at the bottom lowers the setting plate and loosening the bolt raises it You can also use a 17 mm socket wrench ...

Страница 45: ...Installation Guide 44 e Tighten the M6 bolt x1 to fix the setting plate in position Securing the projector to the setting plate a Loosen the screws x2 and remove the cable cover from the projector ...

Страница 46: ... unit to the setting plate with the M4 x 12 mm bolts x4 supplied When a projected image is smaller than 85 inches Mount the unit at the stamp When a projected image is 85 inches or more Mount the unit at the stamp Smaller than 85 inches 85 inches or more ...

Страница 47: ...rs to the screw holes in the following figure Install the wireless LAN module supplied in the wireless LAN unit module slot Adjusting the Position of the Projector Donotmakeadjustmentsusingtheprojector sKeystonefunction Doingsomayresultinareductioninimagequality When setting up multiple projectors using the batch setup function perform the batch setup before adjusting the projected image s Batch S...

Страница 48: ...l Caution While projecting do not put your face or hands near the air exhaust vent and do not place objects that may become warped or damaged by heat near the vent Hot air from the air exhaust vent could cause burns warping or accidents to occur b Open the air filter cover and then adjust the focus using the focus lever Fine tune the focus later After you finish making adjustments close the air fi...

Страница 49: ...anges Using the Remote Control c For details on connecting to devices and projecting images see the Quick Start Guide The aspect ratio does not change when no images are being projected from the connected device You can also change the aspect ratio from Aspect from the Signal menu s Projector s User s Guide Projector menu d Press the projector s Menu button Using the Remote Control Using the Contr...

Страница 50: ...ustment dial at the top c Repeat steps 6 to 11 as necessary After you finish making adjustments tighten the adjustment dial at the bottom g LoosentheM4screw x1 withthehexagonwrench andthenadjustthehorizontalrotation with the adjustment dial After you finish making adjustments tighten the M4 screws that you loosened ...

Страница 51: ... vertical tilt using the adjustment dial at the top After you finish making adjustments tighten the adjustment dial at the bottom i Loosen the M4 bolt with the hexagon wrench and then adjust the horizontal slide After you finish making adjustments tighten the M4 bolt that you loosened ...

Страница 52: ...nded spanner and then adjust the vertical slide Adjust the vertical slide with the hexagonal axis at the top or the bottom Tightening the hexagonal axis at the top raises the setting plate and loosening the axis lowers it Tightening the M8 bolt at the bottom lowers the setting plate and loosening the bolt raises it You can also use a 17 mm socket wrench After you finish making adjustments tighten ...

Страница 53: ... the areas are out of focus adjust the focus until the areas are uniform After you finish making adjustments close the air filter cover n Press the Esc button on the remote control or the control panel to remove the guidance screen Sticking the infrared deflectors EB 1460Ui EB 1450Ui only When installing the Touch Unit if there are any obstacles at the bottom of the whiteboard such as a frame or t...

Страница 54: ... not stick tape or place anything on the infrared deflectors The infrared deflector will not function correctly Arc Correction When fine tuning the shape of the projected image perform Arc Correction a Turn on the projector and then press the Menu button Using the Remote Control Using the Control Panel b Select Geometry Correction from Settings ...

Страница 55: ...any further is displayed while adjusting you cannot adjust the shape any further in the direction indicated by the gray triangle g Repeat steps 5 and 6 as needed to adjust any remaining sides Calibrating the pen Check thatadjusting the positionof the projector is complete before you start calibrating theinteractive pen s Adjusting the Position of the Projector p 46 ...

Страница 56: ...ee the projector s User s Guide on the Document CD ROM c Whentwoprojectorsareinstalledinparallelandyouareusingtheinteractivefunction setthemulti projection interactive features before adjusting the pen s When two projectors are installed in parallel and you are using the interactive function p 99 a Turn on the projector and then press the Menu button Using the Remote Control Using the Control Pane...

Страница 57: ...es A green dot is displayed at the top left of the projection screen e Touch the center of the dot with the pen tip of the interactive pen The dot disappears and moves to the next position c Make sure you touch the center of the dot Otherwise it may not be positioned correctly ...

Страница 58: ...e bottom right When all of the dots disappear calibration is complete c Check that there are no obstacles between the interactive pen and the Interactive pen receiver If you touch the wrong position press the Esc button on the remote control to return to the previous dot To cancel calibration hold down the Esc button for two seconds ...

Страница 59: ... wall plate covers to route the cables Perform deburring on the cut sides to smooth off any sharp edges Make sure you do not damage the cables when routing them through the cut holes Also make sure you operate the cutter safely When removing the wall plate cover press the tabs at the top and bottom of the rear of the wall plate cover with a hexagonal wrench and pull it forward ...

Страница 60: ... Guide 59 b Fit the end cap to the setting plate c If you are concerned about the groove in the arm stick the supplied masking sticker c Attach the cable cover to the projector and then secure it with the screws x2 ...

Страница 61: ...aintenance and repairs Warning Neverloosentheboltsandnutsafterinstallation Confirmthatthescrewshavenotbecomelooseonaregular basis If you find any loose screws tighten them firmly Otherwise the product may fall and cause personal injury or property damage Do not hang on this product or hang a heavy object on this product If this product falls it could cause death or personal injury ...

Страница 62: ...and p 27 a Remove the front cover b Check the installation position and secure with commercially available M4 screws 20 mm x4 Warning Be careful not to tilt the screws to the installation surface when securing Make sure that the Control Pad is secured properly Do not use double sided tape or magnets to secure the Control Pad c We recommend checking the operation of the Control Pad before securing ...

Страница 63: ...cables when installing the Control Pad p 34 d Paste the port protection stickers supplied to the plugs on the Control Pad that are not being used s Control Pad p 13 e Attach the front cover Installing the Pen Stand See the following for the installation location of the Pen Stand s When installing the Control Pad and the Pen Stand p 27 a Remove the front cover ...

Страница 64: ...re with commercially available M4 screws 20 mm x2 Warning Be careful not to tilt the screw to the installation surface when securing Make sure that the Pen Stand is secured properly Do not use double stick tapes or magnets to secure the Pen Stand c Attach the cover ...

Страница 65: ...hen installing the Touch Unit on the whiteboard without using the Touch Unit Bracket s p 87 WheninstallingtheTouchUnitoutsidethewhiteboard usingtheTouchUnitBracket Installation Procedure Install the Touch Unit outside the whiteboard using the Touch Unit Bracket and connect it to the projector Check that the screen is parallel to the surface on which the Touch Unit is installed Caution Only connect...

Страница 66: ... Select Touch Unit Setup d Select Installation Pattern The installation pattern is displayed on the projected image e Loosen the screw at the bottom of the dial cover using a commercially available No 2 cross head screwdriver ...

Страница 67: ...ecommend marking the following installation positions positions of the screw holes to make installation easier Center line of installation pattern Align with the center line of the installation plate 25 to 100 mm from the top edge white line of the projected image Align with the bottom line of the installation plate Unit mm 25 100mm ...

Страница 68: ...e Touch Unit with the two M4 x 25 mm bolts supplied Adjust the position so that the two screw holes of the Touch Unit and the two screw holes of the securing plate are aligned Tighten the bolts to the securing plate using the supplied hexagon wrench Caution There is a powerful magnet on the rear of the Touch Unit Do not trap your hand between the Touch Unit and the securing plate ...

Страница 69: ...xagon wrench k Measure the distance from the wall to the surface of the screen f l Adjust the height of the left and right according to the value f measured in step 11 Loosen the two screws and move the Touch Unit back and forth to adjust the left and right so that the arrow aligns with the value on the scale the same as f When you have finished adjusting tighten the two screws ...

Страница 70: ...supplied hexagon wrench When f 20 to 35 mm M4 x 55 mm bolt When f 35 to 50 mm M4 x 70 mm bolt n Connect the Touch Unit connection cable that is connected to the projector to the TCH port on the Touch Unit Angle Adjustment An infrared laser in the shape of a curtain is emitted from the Touch Unit The infrared laser reflects off your fingerwhentouchedtothewhiteboardtherebydetectingthefingerpositiona...

Страница 71: ...t so that the projector can correctly detect the position of your finger A C B B A Infrared laser emission unit B Fulcrum C Vertical movable point If the laser is not emitted parallel to the screen the projector will not detect touch operations or the position of your finger correctly ...

Страница 72: ...lick operation is not recognized If there are any obstacles at the bottom of the whiteboard such as a frame or trays the laser will be reflected and the location of your finger will not be detected correctly Stick infrared deflectors on the frame and the trays to prevent them from reflecting the laser s Sticking the infrared deflectors EB 1460Ui EB 1450Ui only p 52 c Whentwoprojectorsareinstalledi...

Страница 73: ...ctive Function from the projector s Extended menu b Select Touch Unit Setup c Set Power to On The Touch Unit power turns on and the indicator is lit blue c WhenPowerissettoOn thenexttimetheprojectoristurnedon theTouchUnitautomatically turns on ...

Страница 74: ...Installation Guide 73 d Select Angle Adjustment e Select Installing the Touch Unit with the bracket The following screen is displayed ...

Страница 75: ...exagon wrench supplied with the setting plate g Turn the adjustment dials on the Touch Unit counterclockwise until you hear a clicking sound When you hear a clicking sound coming from the adjustment dial stop turning and then press the button on the remote control The following screen is displayed ...

Страница 76: ...eens Place the bottom of the markers onto the screen Non magnetic screens Use the supplied tape to secure the markers Attach the tape so that the either end of marker does not come loose off the screen Correct Incorrect c Do not place anything other than the markers near the projected image during angle adjustment If other objects are on the projected image angle adjustment may not be performed co...

Страница 77: ...ent screw on the Touch Unit counterclockwise to display the pointers Adjusting the angle of the Touch Unit using the adjustment screw Before adjustment After adjustment When the pointers overlap in the correct position the colors become solid ...

Страница 78: ...rom your arm or body do not overlap with the markers If the pointers are not solid colors check if the Touch Unit and screen are parallel Adjust the Touch Unit Bracket so that the Touch Unit and screen are parallel j When the pointers on the left and right become solid colors press the button on the remote control The following screen is displayed ...

Страница 79: ...lly up towards the center of the projected image When you turn the adjustment dial counterclockwise the pointer moves diagonally down away from the center of the projected image When the pointers overlap in the correct position the colors become solid c If you hear a clicking sound from the dial the pointer does not move any further When turning the dials make sure shadows from your arm or body do...

Страница 80: ...rs press the button on the remote control The following screen is displayed m Place the markers at the top marker positions 1 When angle adjustment is performed correctly the upper pointers become solid colors If the upper pointers do not become solid colors start again from step 1 ...

Страница 81: ...le adjustment is performed correctly the bottom pointers become solid colors If the bottom pointers do not become solid colors start again from step 4 o When you have finished checking remove the markers and then press the button on the remote control The following screen is displayed ...

Страница 82: ...ss the button on the remote control Then go to step 17 If some dots remain as shown in the following figure check the following points If the dots on the left and right do not disappear Remove any obstacles that are on the left and right oftheprojectionscreen Afterremovinganyobstacles pressthe or buttonontheremote control and then perform step 16 again Perform additional adjustment if dots still r...

Страница 83: ... sure you store the markers in a safe place Additional adjustments Perform additional adjustments if the dots on the left and right remain after adjusting the angle If the laser crosses the frame of the screen it reflects within the screen and touch operations cannot be performed correctly Additional adjustments adjust the height of the laser beam so that it does not cross the frame on the left an...

Страница 84: ... this adjust using the same procedure for angle adjustment from step 11 Follow the on screen instructions to make adjustments s Angle Adjustment p 69 When you have finished making adjustments perform a touch calibration s Touch Calibration p 84 c Make sure you store the markers in a safe place ...

Страница 85: ...ction check the following before performing touch calibration The multi projection interactive features are set s When two projectors are installed in parallel and you are using the interactive function p 99 Both projectors and the Touch Unit are turned on a Press the projector s Menu button Using the Remote Control Using the Control Panel b Select Easy Interactive Function from Extended c Select ...

Страница 86: ...stallation Guide 85 d Select Touch Calibration The focus adjustment message is displayed e Check that the screen is in focus and then select Yes A dot is displayed at the top left of the projection screen ...

Страница 87: ...ept the tip of your finger g Repeat step 6 until all of the dots disappear When all of the dots disappear touch calibration is complete c If you touch the wrong position press the Esc button on the remote control or control panel This returns you to the previous dot You cannot go back by two dots To cancel touch calibration hold down the Esc button for two seconds It may take several seconds after...

Страница 88: ...not be attached to a screen use commercially available M4 screws x3 Attach the Touch Unit to the same level surface as the screen surface Installation Procedure Install the Touch Unit and then connect to the projector Caution Only connect the Touch Unit to the EB 1460Ui EB 1450Ui Do not connect it to any other projectors or devices a Turn on the projector and then press the Menu button Using the R...

Страница 89: ... Select Touch Unit Setup d Select Installation Pattern The installation pattern is displayed on the projected image e Loosen the screw at the bottom of the dial cover using a commercially available No 2 cross head screwdriver ...

Страница 90: ...tion for the Touch Unit We recommend marking the following installation positions to make installation easier Center line of installation pattern Align with the center line of the Touch Unit 25 to 100 mm from the top edge of the projected image Align with the bottom edge of the Touch Unit Unit mm ...

Страница 91: ...en secure Caution When installing the Touch Unit on a magnetic surface be careful not to trap your fingers or any other part of your body between the magnets and the installation surface Powerful magnets are used which can cause injury if you trap your fingers Non magnetic screens Attach spacers and secure with M4 screws x3 ...

Страница 92: ...t This section explains how to adjust the angle of the Touch Unit For details on angle adjustment see p 69 c Whentwoprojectorsareinstalledinparallelandyouwanttousetheinteractivefunction setthemulti projection interactive features in advance s Multi Projection settings p 95 Before adjusting the angle make sure that interactive pen calibration is complete s Calibrating the pen p 54 ...

Страница 93: ...ctive Function from the projector s Extended menu b Select Touch Unit Setup c Set Power to On The Touch Unit power turns on and the indicator is lit blue c WhenPowerissettoOn thenexttimetheprojectoristurnedon theTouchUnitautomatically turns on ...

Страница 94: ...Installation Guide 93 d Select Angle Adjustment ...

Страница 95: ...outside the whiteboard using the bracket s Angle Adjustment p 69 c When installing the Touch Unit using magnets stick labels on the tabs on the sides of the Touch Unit Match the center of the labels with the tabs If the Touch Unit moves out of position use the labels to reinstall it at the correct position When you have finished making adjustments perform a touch calibration s Touch Calibration p ...

Страница 96: ...parations See the documentation provided with your computer to check how to make settings Connect a cable from one computer to each projector the computer needs two image output ports Set to output images to multiple screens from one computer Multi Projection settings Follow the steps below when using the Multi Projection function a Setting the Projector ID s p 95 b Adjusting the Image in Multi Pr...

Страница 97: ...dix 96 b Select Multi Projection from Extended c Select Projector ID d Select the ID number for the target projector e Press the Menu button to close the menu Repeat steps 1 to 5 for the remaining projectors ...

Страница 98: ...for the projector is displayed on the projected screen The display turns off after approximately three seconds g While holding down the ID button press the button with the same number as the projector ID for the projector you want to operate Remote control operations for the projector with the selected ID are enabled ...

Страница 99: ...for the remote control is 0 When Projector ID is set to Off you can operate the projector using the remote control regardless of the ID setting selected using the remote control When the remote control ID is set to 0 you can operate all of the projectors regardless of the projector ID setting Adjusting the Image in Multi Projection Check that projector position adjustment is complete s Adjusting t...

Страница 100: ...available when Power Consumption is set to Normal from the ECO menu Color Matching Adjustthecolorand brightnessingradationsfromallwhitetoallblack Whentwoprojectorsareinstalledinparallelandyouareusingtheinteractivefunction When two projectors are installed in parallel and you want to use the interactive function after adjusting the image for multi projection make the following settings Make the set...

Страница 101: ...stalling the Setting Plate p 32 a Connect the SYNC ports for each projector by using the optional remote control cable set ELPKC28 When the projectors are connected by cable operations for the interactive pen stabilize The SYNC port has an IN and OUT socket When you connect one end of the remote control cable set to an IN socket connect the other end to an OUT socket In Out b Turn on the projector...

Страница 102: ...inished adjusting the image for multi projection If you perform image adjustment after setting interactive the pen position may not be correct s Adjusting the Image in Multi Projection p 98 The procedure differs depending on whether or not the Touch Unit is used When not using the Touch Unit a Turn on the projector on the left and turn off the projector on the right ...

Страница 103: ...Appendix 102 b Press the Menu button Using the Remote Control Using the Control Panel c Select Easy Interactive Function from Extended d Select Advanced from General e Select Multi Projection ...

Страница 104: ...x 103 f Select Left g Calibrate the pen s p 54 h Turn off the projector on the left i Turn on the projector on the right and perform steps 2 to 5 j Select Right from Multi Projection k Calibrate the pen s p 54 ...

Страница 105: ...uch Unit EB 1460Ui EB 1450Ui only a Turn on the projector on the left and turn off the projector on the right b Press the Menu button Using the Remote Control Using the Control Panel c Select Easy Interactive Function from Extended ...

Страница 106: ...Appendix 105 d Select Advanced from General e Select Multi Projection f Select Left g Calibrate the pen s p 54 ...

Страница 107: ...s p 91 i Turn off the projector on the left j Turn on the projector on the right and perform steps 2 to 5 k Select Right from Multi Projection l Calibrate the pen s p 54 m Installing and adjusting the angle for the Touch Unit The procedure differs depending on where the Touch Unit is installed When installing the Touch Unit outside the whiteboard using the Touch Unit Bracket Installing the Touch U...

Страница 108: ...Appendix 107 o Performing touch calibration for each projector s p 84 ...

Страница 109: ...ns menu and the Others menu Lamp Hours and Status from the Info menu Perform batch setup before adjusting the position of the projectors Adjustment values for the projected image such as Keystone are copied by the batch setup function If batch setup is performed after adjusting the position of the projectors the adjustments you made may change By using the batch setup function the registered User ...

Страница 110: ...ctor s USB A port c Connect the USB flash drive directly to the projector If the USB flash drive is connected to the projector through a USB hub the settings may not be saved correctly ConnectanemptyUSBflashdrive IftheUSBflashdrivecontainsdataotherthanthebatchsetup file the settings may not be saved correctly If you have saved a batch setup file from another projector to the USB flash drive delete...

Страница 111: ...ndicators start flashing the batch setup file is being written Caution Do not disconnect the power cord from the projector while the file is being written If the power cord is disconnected the projector may not start correctly Do not disconnect the USB flash drive from the projector while the file is being written If the USB flash drive is disconnected the projector may not start correctly When wr...

Страница 112: ... file the settings may not be reflected copied correctly c Whileholdingdownthe Menu buttonontheremotecontrolorthecontrolpanel connect the power cord to the projector The status indicator and the power indicator turn blue and the lamp indicator and the temperature indicator turn orange When all of the projector s indicators turn on release the Menu button The indicators turn on for approximately 75...

Страница 113: ...ecttheUSBflashdrive unplugand then plug in the projector s power cord and then try again Are the power indicator and the status in dicatorflashingbluequickly andthelamp indicator and the temperature indicator flashing orange quickly Writingthesettingsmayhavefailedandanerrormayhaveoccurred in the projector s firmware Stop using the projector remove the power plug from the electrical outlet and cont...

Страница 114: ...on points on the projector and the setting plate See the user s guide supplied with the wire lock for locking instructions The security slot on this product is compatible with the Microsaver Security System manufactured by Kensington See the following for more details on the Microsaver Security System http www kensington com Projector Touch Unit EB 1460Ui EB 1450Ui only cannot be used when attache...

Страница 115: ... General Notice OS X is a trademark of Apple Inc MicrosoftandWindowsaretrademarksorregisteredtrademarksofMicrosoftCorporationintheUnitedStates and or other countries SEIKO EPSON CORPORATION 2016 All rights reserved ...

Страница 116: ...Guide d installation ...

Страница 117: ......

Страница 118: ... manipulation incorrecte Attention Ce symbole indique des informations qui si elles sont ignorées peuvent provoquer des bles sures ou des dommages physiques en raison d une manipulation incorrecte Explication des symboles Symboles Explication Symbole indiquant une action à ne pas faire Symbole indiquant une action à faire c Symbole signalant des informations connexes ou utiles Consignes de sécurit...

Страница 119: ...de ce produit sur un mur le mur doit être assez résistant pour tenir le projecteur et la plaque d installation Ce produit doit être installé sur un mur en béton Le poids combiné maximal du projecteur et de la plaque d installation est d environ 16 kg câbles non compris Vérifiez la résistance du mur avant de monter ce produit dessus Si la solidité du mur est insuffisante renforcez le mur avant de p...

Страница 120: ...trée Ne couvrez pas les entrées ou sorties d air du projecteur Si les orifices de ventilation sont couverts la température interne pourrait augmenter et causer un incendie Évitez les emplacements sujets à de hautes températures comme à proximité de radiateurs et laissez un espace d au moins 50 cm entre le mur et l orifice de ventilation N utilisez pas le projecteur à un emplacement exposé à des co...

Страница 121: ...ctile veuillez à ce que personne n utilise un équipement médical par exemple un pacemaker dans les environs Un aimant puissant génère des interférences électromagnétiques dans l appareil ce qui peut cau ser des dysfonctionnements des équipements médicaux Attention Ne vous approchez pas de l unité tactile avec des supports de stockage magnétiques com me des cartes magnétiques ou des appareils élect...

Страница 122: ...ssement Lorsque vous utilisez le projecteur dans un environnement de 35 C ou plus installez une partition pour bloquer la chaleur ventilée par les sorties de ventilation du projecteur Assurez vous que la partition est légèrement plus grande que la sortie de ventilation environ 2 cm plus large et haute puis installez la partition à 10 à 30 cm de l orifice de ventilation Nous vous recommandons d uti...

Страница 123: ...ers l avant de l écran Installez verticalement sur une table et projetez vers l avant du bureau Lors de l installation à la verticale sur une table vous devez disposer de l Interactive Table Mount en option ELPMB29 Avant d installer l unité tactile assurez vous que la surface d installation n est pas déformée ou irrégulière les irrégularités sur la surface de l écran ne devant pas dépasser 5 mm Lo...

Страница 124: ...t de plus de 51 mm vous ne pouvezpas installer l unité tactile hors du tableau blanc Si un cadre se trouve autour de l écran assurez vous que l épaisseur du sommet du cadre e est inférieure à 3 mm Si l épaisseur du sommet de l écran dépasse 3 mm l unité tactile ne fonctionnera pas correctement ...

Страница 125: ...nt 19 Unité tactile dimensions externes poids 19 Crochet de l unité tactile dimensions externes plage de réglage poids 20 Étiquettes jointes 21 Port de diffusion du laser 21 Tableau de distance de projection 23 Illustrations des dimensions de l installation 23 Lors de l installation de l unité tactile EB 1460Ui EB 1450Ui uniquement 24 Lors de l installation du Control Pad et du porte stylet 27 Lor...

Страница 126: ...teur 97 Réglage de l image en multi projection 100 Lorsque deux projecteurs sont installés en parallèle et que vous utilisez la fonction interactive 101 Réglage des projecteurs en synchronisation 102 Réglage de la multi projection interactive 103 Fonction de configuration en lot 110 Installation avec une clé USB 111 Enregistrer les réglages sur la clé USB 111 Copier les réglages enregistrés sur d ...

Страница 127: ...Lors de l installation de l unité tactile terminez d abord l installation du projecteur puis suivez les procédures ci dessous EB 1460Ui EB 1450Ui uniquement La procédure diffère selon l emplacement d installation prévu pour l unité tactile Lorsque vous installez l unité tactile hors du tableau blanc avec le crochet de l unité tactile a Installer l unité tactile s p 66 b Ajuster l angle de diffusio...

Страница 128: ...plus grand suivez les étapes ci dessous a Installer la plaque d installation et le projecteur s p 32 b Réglage de la position du projecteur s p 47 c Réglage de l ID du projecteur s p 97 d Réglage de l image en multi projection s p 100 Lorsque deux projecteurs sont installés en parallèle et que vous souhaitez utiliser la fonction interactive effectuez les réglages suivants Effectuez les réglages po...

Страница 129: ...est fixée lors de l expédition Fiche modèle pour l installation de la plaque mu rale Capuchon de protection Étiquette de masquage Clé à six pans pour M4 Clé plate 13 mm pour M8 et M6 6 mm pour l axe hexagonal Forme Nom Quan tité Application Boulon à tête cylindrique à six pans M4 x 12 mm avec rondelle rondelle élastique 5 Pour l assemblage de la plaque murale 4 Pour l installation du dispositif de...

Страница 130: ...s les éléments avant de commencer Control Pad Porte stylet Mini câble stéréo pour le branchement du Control Pad environ 5 m Étiquettes de protection des ports Lors de l installation du Control Pad sur un mur ou autre préparez des vis M4 disponibles dans le commerce 20 mm x 4 Lors de l installation du porte stylet sur un mur ou autre préparez des vis M4 disponibles dans le commerce 20 mm x 2 Unité ...

Страница 131: ... trois vis M4 disponibles dans le commerce Crochet de l unité tactile Plaque d installation Plaque de fixation Boulon à tête cylindrique à six pans M4 x 12 mm x2 Boulon à tête cylindrique à six pans M4 x 25 mm x2 Boulon à tête cylindrique à six pans M4 x 55 mm x1 Boulon à tête cylindrique à six pans M4 x 70 mm x1 Pourlaplaqued installation vousaurezégalementbesoindetroisvisàboisde4mmdediamètredisp...

Страница 132: ...d installation du dispositif de réglage à 3 axes 87 mm Voir l illustra tion ci des sous Plage de réglage du coulisse ment vertical 38 mm Voir l illustra tion ci des sous Plage de réglage du roulis hori zontal 3 Réglages précis possibles avec la molette de réglage s p 47 Plage de réglage de la rotation horizontale 8 Réglages précis possibles avec la molette de réglage s p 47 Plage de réglage de l i...

Страница 133: ...plaque séparés lors de la livraison Unité mm 186 4 130 2 107 3 28 3 45 45 24 24 131 131 99 99 79 192 3 234 4 24 60 24 496 5 1 5 1 R 1 0 Le décalage pour la position du centre de l image projetée et du centre de la plaque murale est de 27 mm Trous d acheminement des câbles Lorsque vous acheminez des câbles pour vous connecter au projecteur à travers un mur utilisez les positions et de l illustratio...

Страница 134: ...u coulissement horizontal Unité mm Plage de réglage du coulissement vers l avant l arrière Plage de réglage du coulissement du bras Unité mm 263 Plage de réglage à partir de la position d installation du dispositif de réglage à 3 axes Unité mm ...

Страница 135: ...nes Utilisez des vis M4 disponibles dans le commerce Unité mm 2 x M4 30 5 49 7 60 8 35 Control Pad Porte stylet Control Pad dimensions externes poids Unité mm 153 5 107 15 47 135 9 111 3 5 11 5 109 5 63 3 29 30 9 4 x M4 47 51 5 Poids environ 262 g Température de fonctionnement de 0 à 50 C sans condensation Température de fonctionnement de 20 à 60 C sans condensation ...

Страница 136: ...n retirez le couvercle des câbles et acheminez les câbles à partir d ici Faites passer le câble de l imprimante le long de la rainure à l arrière du Control Pad Porte stylet dimensions externes poids Unité mm 99 9 70 0 101 9 44 4 28 8 28 8 35 5 36 0 2 x M4 Le porte stylet pèse environ 93 g Unité tactile EB 1460Ui EB 1450Ui uniquement Unité tactile dimensions externes poids Unité mm ...

Страница 137: ...unité tactile pèse environ 450 g Crochet de l unité tactile dimensions externes plage de réglage poids Supérieur Unité mm 229 8 228 57 62 Avant Unité mm 101 104 8 Plaque d installation avant Unité mm 90 Ø4 2 2 5 7 2 4 5 90 56 74 ...

Страница 138: ... pour indiquer qu il s agit d un produit laser de classe 1 Les étiquettes contiennent les informations suivantes Produit laser de classe 1 Avertissement n ouvrez pas le boîtier L appareil contient un produit laser haute puissance Avertissement Attention si cette section est ouverte un rayonnement laser invisible de classe 3B sera émis Évitez l exposition aux faisceaux laser Port de diffusion du la...

Страница 139: ...Guide d installation 22 ...

Страница 140: ...age projetée et du centre de la plaque murale est de 27 mm Unité mm Taille de l image projetée Plaque murale Distance de projection minimale large zoom maximal à maximale télé zoom minimal Écran Chiffres sur l échelle du coulissement de bras Distance entre le haut de l image projetée et le trou de vis d installation inférieur de la pla que murale Distance entre le haut de l image projetée et le tr...

Страница 141: ...n dehors du tableau blanc avec le crochet Lorsque f est inférieur à 20 mm ou supérieur à 50 mm installez l unité tactile sur le tableau blanc Lorsque l épaisseur du dessus du cadre e est de 3 mm ou plus installez l unité tactile sur le tableau blanc Attention Installez le bord inférieur de l unité tactile pour qu il se trouve de 25 à 100 mm du bord supérieur de l image projetée Si des obstacles se...

Страница 142: ...ng des emplacements des obstacles s p 54 Assurez vous qu il y a un espace d environ 20 mm entre l endroit auquel le déflecteur infrarouge est bloqué et le bas de l image projetée Lorsque vous installez l unité tactile sur le tableau blanc sans crochet de l unité tactile Vous devez laisser une distance d au moins 120 mm entre le bord supérieur de l image projetée et le bord supérieur de l écran rée...

Страница 143: ...s fournis sur les emplacements des obstacles s p 54 Assurez vous qu il y a un espace d au moins 20 mm entre l endroit auquel le déflecteur infrarouge est bloqué et le bas de l image projetée Si des obstacles sont présents dans les zones ombrées sur l illustration suivante comme des câbles desplateauxdetableaublanc dessupportsouuncadreépais lesopérationstactilesnefonctionneront pas correctement ...

Страница 144: ... montre l illustration suivante Unité mm 㻝㻜㻜 㻡㻜 㻝㻜㻜 㻝㻜㻜 Lorsque vous installez le porte stylet à proximité du Control Pad il ne faut pas qu il recouvre la rainure du couvercle avant comme le montre l illustration suivante c Lors de l installation de l unité tactile n installez pas le Control Pad sur l écran de projection et dans les zones environnantes zone ombrée sur l illustration suivante L uni...

Страница 145: ...ction indique les chiffres lorsque vous installez le dispositif de réglage à 3 axes à la position indiquée par le poinçon Ladistanceduhautdel imageprojetéeetlebasdutroudevisd installationdelaplaquemurale c correspond au chiffre indiqué lorsque le coulissement vertical est à la position standard Alignez l encoche sur la plaque d installation avec la position du poinçon sur la plaque murale ...

Страница 146: ... 3 à 35 0 22 6 41 8 99 6 75 161 5x101 0 9 0 à 24 9 19 9 à 35 8 22 8 42 0 101 0 76 163 7x10² 3 9 6 à 25 7 20 5 à 36 6 23 1 42 3 102 3 77 165 9x10³ 7 10 2 à 26 5 21 1 à 37 4 23 4 42 6 103 7 78 168 0x105 0 10 8 à 27 3 21 7 à 38 2 23 7 42 9 105 0 79 170 2x10⁶ 3 11 4 à 28 1 22 3 à 39 0 24 0 43 2 106 3 80 172 3x10⁷ 7 12 0 à 29 0 22 9 à 39 9 24 2 43 4 107 7 81 174 5x10⁹ 0 12 6 à 29 8 23 5 à 40 7 24 5 43 ...

Страница 147: ...n indique les chiffres lorsque vous installez le dispositif de réglage à 3 axes à la position indiquée par le poinçon Ladistanceduhautdel imageprojetéeetlebasdutroudevisd installationdelaplaquemurale c correspond au chiffre indiqué lorsque le coulissement vertical est à la position standard Alignez l encoche sur la plaque d installation avec la position du poinçon sur la plaque murale ...

Страница 148: ...8 90 193 9x121 2 18 1 à 37 9 20 3 à 40 1 27 1 46 3 121 1 91 196 0x122 5 18 7 à 38 7 20 9 à 40 9 27 3 46 5 122 5 92 198 2x123 9 19 4 à 39 6 21 6 à 41 8 27 6 46 8 123 9 93 200 3x125 2 20 0 à 39 7 22 2 à 41 9 27 9 47 1 125 2 94 202 5x126 5 20 6 à 39 7 22 8 à 41 9 28 2 47 4 126 5 95 204 6x127 9 21 3 à 39 7 23 5 à 41 9 28 5 47 7 127 8 96 206 8x129 2 21 9 à 39 7 24 1 à 41 9 28 7 47 9 129 3 97 208 9x130 ...

Страница 149: ...informations reportez vous au Guide de l utilisateur du projecteur sur le CD ROM de documentation Câbles nécessaires lors de l utilisation de la fonction Easy Interactive Function LorsquevouseffectuezdesopérationsàlasourisaveclafonctionEasyInteractiveFunction vousaurezbesoin d un câble USB Même lorsque vous projetez depuis un câble d ordinateur un câble USB est nécessaire pour effectuer des opérat...

Страница 150: ...de l installation de l unité tactile EB 1460Ui EB 1450Ui uniquement Vous avez besoin du câble de connexion à l unité tactile fourni lors de l installation de l unité tactile et de sa connexion au projecteur Les opérations ne fonctionnent pas correctement avec un câble disponible dans le commerce La forme de la fiche qui se connecte au projecteur et celle qui se connecte à l unité tactile sont diff...

Страница 151: ...age USB vous aurez besoin du câble USB fourni et d un périphérique de stockage USB disponible dans le commerce Lorsque vous imprimez l image projetée vous avez besoin du câble USB fourni et du câble USB fourni avec votre imprimante Lorsque vous saisissez des caractères à l aide d un clavier USB en utilisant la fonction Remote Desktop vous avez besoin du câble USB fourni et d un clavier USB disponi...

Страница 152: ... document Câble USB dédié fourni avec la caméra document Ordinateur Câble d ordinateur accessoire optionnel Haut parleurs externes Câble audio disponible dans le com merce Moniteur externe Câble DVI D disponible dans le commerce Appareil réseau local Câble LAN disponible dans le commerce ...

Страница 153: ...s d adhésifs ni d huiles ou lubrifiants pour installer ou régler la plaque d installation Si vous utilisez des adhésifs pour empêcher les vis de se desserrer ou si vous utilisez des lubrifiants ou des huiles surlaplaquecoulissantedefixationduprojecteur leboîtierrisquedesedétériorer aurisquedeprovoquer la chute du projecteur et des blessures corporelles ou des dommages matériels Assembler les pièce...

Страница 154: ...position standard n est pas correcte desserrez le boulon M4 et ajustez la position de la plaque coulissante Lorsque vous avez terminé les ajustements serrez le boulon c Fixez l unité d ajustement à 3 axes et la plaque coulissante sur la base du projecteur avec les boulons M4 x 12 mm x4 fournis Positions d installation des bou lons ...

Страница 155: ...jetée et le trou de vis de fixation temporaire de la plaque murale d s Tableau de distance de projection p 23 c Utilisez le trou de vis dans l illustration suivante comme trou de vis temporaire pour la plaque murale La distance du trou de vis d installation inférieur de la plaque murale au trou de vis temporaire est de 192 3 mm Nous vous conseillons de marquer les positions suivantes Elles serviro...

Страница 156: ...la droite de la ligne centrale de la surface de projection de 45 mm au maximum Ajustez la hauteur et vérifiée en étape 1 sur la ligne sur la fiche modèle Unité mm c Placez temporairement une vis M10 disponible dans le commerce dans le trou de vis pour la plaque murale Laissez un espace de 6 mm ou plus entre le mur et la tête de vis d Déterminez les positions des trous de montage sur la plaque mura...

Страница 157: ...M10 x 60 mm disponibles dans le commerce dans les trous Fixez l écrou et tapotez le avec un mar teaujusqu àcequelapartiecentraletou che le dessus de la patte de fixation h Serrezl écrouavecuneclefdisponibledanslecommercepourfixerlaplaquemuraleaumur Déterminez la distance de projection puis passez les câbles à travers la plaque d installation a Vérifiez les valeurs suivantes dans le tableau de dist...

Страница 158: ...ide d installation 41 b Desserrez les boulons M4 x 12 mm x2 et étendez le coulissement de bras sur la plaque d installation Alignez la glissière avec les distances combinées de b et x vérifiées en étape 1 ...

Страница 159: ...tallation Ils pourraient tomber et causer un accident c Dirigez le câble de connexion à l unité tactile à travers la plaque d installation EB 1460Ui EB 1450Ui uniquement Dirigez le câble de sorte quel extrémité qui seconnecte à l unité tactile apparaisse depuis la partie inférieure de la plaque d installation Dirigez le câble de connexion du Control Pad à travers la plaque d installation EB 1460Ui...

Страница 160: ...plaque murale puis insérez le dans l emplacement sur le bas Attention Ne dirigez pas les câbles de branchement de l unité tactile sur le mur EB 1460Ui EB 1450Ui uniquement Sinon vous ne pourrez pas brancher les câbles sur l unité tactile Veillez à ne pas bloquer les câbles entre la plaque d installation et la plaque murale ...

Страница 161: ...lon M6 fourni x1 avec la clé d Ajustez la glissière verticale avec la clé plate puis alignez la avec la position standard Serrez l axe hexagonal sur le dessus pour relever la plaque d installation et desserrez le pour l abaisser Serrez le boulon à six pans M8 sur le bas pour abaisser la plaque d installation et desserrez le pour la relever Vous pouvez également utiliser une clé à douille de 17 mm ...

Страница 162: ...ide d installation 45 e Serrez le boulon M6 x1 pour fixer la plaque d installation en place Fixer le projecteur à la plaque d installation a Desserrez les vis x2 et retirez le cache du câble du projecteur ...

Страница 163: ...es sur la plaque coulissante avec les boulons M4 x 12 mm x4 fournis Lorsqu une image projetée est plus petite que 85 po montez l unité sur le poinçon Lorsqu une image projetée fait 85 po ou plus montez l unité sur le poinçon moins de 85 pouces 85 pouces ou plus ...

Страница 164: ...trous de vis dans l illustration suivante Installez le module LAN sans fil fourni dans l emplacement du module de l unité LAN sans fil Réglage de la position du projecteur Nefaitespasd ajustementaveclafonctionKeystoneduprojecteur Vousrisqueriezdedétériorerlaqualitédel image Lorsque vous configurez plusieurs projecteurs avec la fonction de configuration en lot utilisez la configuration en lot avant...

Страница 165: ...Ui EB 1450Ui uniquement p 54 a Appuyez sur le bouton Power de la télécommande ou sur le panneau de commandepour allumer le projecteur À l aide de la télécommande À l aide du panneau de com mande Attention Lors de la projection ne placez pas votre visage ou vos mains près des orifices de ventilation Ne placez pas non plus des objets qui pourraient être déformés ou endommagés par la chaleur à proxim...

Страница 166: ...le faire plus tard sélectionnez Non c Modifier le format de l image projetée uniquement si nécessaire Projetez des images depuis un appareil connecté puis appuyez sur le bouton Aspect de la télécommande Chaque fois que vous appuyez sur le bouton le nom de l aspect s affiche à l écran et le rapport largeur hauteur change À l aide de la télécommande c Pour plus de détails sur la connexionà des appar...

Страница 167: ...m mande e Sélectionnez Guide d installation dans Réglage L écran de guidage s affiche f Après avoir desserré la molette de réglage en bas réglez le rouleau horizontal à l aide de la molette d ajustement en haut c Répétez les étapes 6 à 11 si nécessaire Après avoir effectué les réglages serrez la molette de réglage en bas ...

Страница 168: ...ale avec la molette de réglage Après avoir effectué les réglages serrez les vis M4 que vous venez de desserrer h Après avoir desserré la molette de réglage en bas réglez l inclinaison verticale à l aide de la molette d ajustement en haut Après avoir effectué les réglages serrez la molette de réglage en bas ...

Страница 169: ...z la glissière horizontale Après avoir effectué les réglages serrez le boulon M4 que vous venez de desserrer j Desserrez les boulons M4 x2 avec la clé hexagonale puis ajustez la glissière avant arrière Après avoir effectué les réglages serrez les boulons M4 que vous venez de desserrer ...

Страница 170: ... l abaisser SerrezleboulonM8surlebaspourabaisserlaplaqued installationetdesserrez lepourlarelever Vouspouvez également utiliser une clé à douille de 17 mm Après avoir effectué les réglages serrez le boulon M6 que vous venez de desserrer l Vérifiez que tous les boulons desserrés lors des étapes 6 à 11 sont bien serrés Avertissement Serrez les boulons et toutes les vis fermement Sinon le produit peu...

Страница 171: ...l écran de guidage Coller les déflecteurs infrarouges EB 1460Ui EB 1450Ui uniquement Lorsque vous installez l unité tactile si des obstacles se trouvent en bas du tableau blanc par exemple un cadre ou des plateaux les opérations tactiles ne fonctionneront pas correctement Si des obstacles sont présents collez les déflecteurs infrarouges sur le bord inférieur du tableau blanc avant d ajuster la pos...

Страница 172: ...l image projetée effectuez la Correction de l arc a Allumez le projecteur et appuyez sur le bouton Menu À l aide de la télécommande À l aide du panneau de com mande b Sélectionnez Corr géométrique dans Réglage c Sélectionnez Correction de l arc d Sélectionnez Correction de l arc ...

Страница 173: ...ge de la position du projecteur p 47 Vous disposez de deux méthodes pour calibrer le stylet Calibrage auto et Calibrage manuel Lors du premier calibrage du stylet après installationdu projecteur effectuez leCalibragemanuel pourun calibrage optimal Pour la méthode Calibrage auto reportez vous au Guide de l utilisateur du projecteur sur le CD ROM de documentation c Lorsque deux projecteurs sont inst...

Страница 174: ...tallation 57 a Allumez le projecteur et appuyez sur le bouton Menu À l aide de la télécommande À l aide du panneau de com mande b Sélectionnez Easy Interactive Function dans Avancé c Sélectionnez Calibrage manuel ...

Страница 175: ...tionnez Oui Un point vert s affiche dans le coin supérieur gauche de l écran de projection e Touchez le centre du point avec la pointe du stylet interactif Le point disparaît et se déplace vers la position suivante c Veillez à toucher le centre du point Sinon il pourrait être mal positionné ...

Страница 176: ...te Le calibrage est terminé lorsque tous les points ont disparu c Vérifiez qu il n y a aucun obstacle entre le stylet interactif et le Récepteur du stylet interactif Si vous avez touché la mauvaise position appuyez sur le bouton Esc de la télécommande pour revenir au point précédent Pour annuler le calibrage maintenez le bouton Esc enfoncé pendant deux secondes ...

Страница 177: ... acheminer les câbles Procédez à un ébavurage sur les côtés coupés pour adoucir les angles pointus Veillez à ne pas endommager les câbles lors de leur acheminement à travers les trous coupés Veillez également à manipuler la lame en toute sécurité Lorsque vous retirez le couvercle de la plaque murale appuyez sur les languettes en haut et en bas de l arrière du couvercle de la plaque murale avec une...

Страница 178: ...nstallation 61 b Placez le bouchon sur la plaque de réglage c Si la rainure du bras vous dérange collez l autocollant de masquage fourni c Fixez le cache du câble sur le projecteur puis serrez le avec les vis x2 ...

Страница 179: ...ssement Ne desserrez jamais les écrous et les boulons après l installation Vérifiez régulièrement que les vis ne se sont pas desserrées Si vous constatez le moindre jeu resserrez fermement les vis concernées Sinon le produit peut tomber et provoquer des blessures corporelles ou des dommages matériels Ne vous suspendez pas au produit et n y suspendez pas un objet lourd Si ce produit tombe il pourra...

Страница 180: ... Retirez le couvercle avant b Vérifiezl emplacementd installation etfixezavecdesvisM4disponiblesdanslecommerce 20 mm x 4 Avertissement Attention de ne pas incliner les vis sur la surface d installation lorsque vous les serrez Assurez vous que le Control Pad soit bien fixé N utilisez pas d adhésif double face ou d aimants pour fixer le Control Pad c NousvousrecommandonsdevérifierlefonctionnementduC...

Страница 181: ... lors de l installation du Control Pad p 34 d Collez les étiquettes de protection des ports fournies sur les fiches non utilisée du Control Pad s Control Pad p 13 e Fixez le couvercle avant Installation du porte stylet Voir ce qui suit pour l emplacement d installation du porte stylet s Lors de l installation du Control Pad et du porte stylet p 27 a Retirez le couvercle avant ...

Страница 182: ...isponiblesdanslecommerce 20 mm x 2 Avertissement Attention de ne pas incliner la vis sur la surface d installation lorsque vous la serrez Assurez vous que le porte stylet soit bien fixé N utilisez pas d adhésif double face ou d aimants pour fixer le porte stylet c Fixez le couvercle ...

Страница 183: ...z l unité tactile sur le tableau blanc sans crochet de l unité tactile s p 89 Lorsque vous installez l unité tactile hors du tableau blanc avec le crochet de l unité tactile Procédure d installation Installez l unité tactile hors du tableau blanc avec le crochet de l unité tactile et connectez la au projecteur Vérifiez que l écran est parallèle à la surface sur laquelle l unité tactile est install...

Страница 184: ...7 c Sélectionnez Config uni tactile d Sélectionnez Motif d installation Le motif d installation s affiche sur l image projetée e Desserrez la vis en bas du cadran avec un tournevis cruciforme no 2 disponible dans le commerce ...

Страница 185: ...onseillons de marquer les positions d installation suivantes pour les trous de vis pour simplifier l installation Ligne centrale du motif d installation Alignez avec la ligne centrale de la plaque d installation 25 à 100 mm depuis le bord supérieur de l image projetée ligne blanche Alignez avec la ligne inférieure de la plaque d installation Unité mm 25 100mm ...

Страница 186: ... unité tactile avec les deux boulons M4 x 25 mm fournis Réglez la position pour que les deux trous de vis de l unité tactile et les deux trous de vis de la plaque de fixation soient alignés Serrez les boulons sur la plaque de fixation à l aide de la clé hexagonale fournie Attention Un aimant puissantse trouveàl arrière del unitétactile Ne placezpasvotremainentre l unitétactile et la plaque de fixa...

Страница 187: ...gonale fournie k Mesurez la distance entre le mur et la surface de l écran f l Réglez la hauteur à gauche et à droite selon la valeur f mesurée à l étape 11 Desserrez les deux vis et déplacez l unité tactile par va et vient pour régler la gauche et la droite de sorte que la flèche s aligne avec la même valeur sur l échelle que f Lorsque vous avez terminé l ajustement serrez les deux vis ...

Страница 188: ...installation en utilisant la clé hexagonale fournie Lorsque f de 20 à 35 mm boulon M4 x 55 mm Lorsque f de 35 à 50 mm boulon M4 x 70 mm n Branchez le câble de connexion de l unité tactile branchée sur le projecteur sur le port TCH de l unité tactile Réglage de l angle Un laser infrarouge en forme de rideau est émis depuis l unité tactile Le laser infrarouge se réfléchit sur votre doigt lorsque vou...

Страница 189: ...ue le projecteur puisse détecter la position de votre doigt A C B B A unité d émission laser infrarouge B point d appui C point amovible vertical Si le laser n est pas émis en parallèle à l écran le projecteur ne détectera pas les opérations tactiles ou la position de votre doigt correctement ...

Страница 190: ...ectée mais sans reconnaissan ce des clics Sidesobstaclessetrouventenbasdutableaublanc parexempleuncadreoudesplateaux lelasersereflétera et l emplacement de votre doigt ne sera pas détecté correctement Collez des déflecteurs infrarouges sur le cadre et les plateaux pour les empêcher de réfléchir le laser s Coller les déflecteurs infrarouges EB 1460Ui EB 1450Ui uniquement p 54 c Lorsquedeuxprojecteu...

Страница 191: ...le menu Avancé du projecteur b Sélectionnez Config uni tactile c Réglez Alimentation sur On L unité tactile s allume et le voyant est éclairé en bleu c Lorsque l Alimentation est réglée sur On l unité tactile s allumera automatiquement au prochain démarrage du projecteur ...

Страница 192: ...Guide d installation 75 d Sélectionnez Réglage de l angle e Sélectionnez Installation de l unité tactile avec le support L écran suivant s affiche ...

Страница 193: ... clé hexagonale fournie avec la plaque de montage g Tournez les cadrans de réglage de l unité tactile dans le sens antihoraire jusqu à ce que vous entendiez un clic Lorsque vous entendez un clic provenant du cadran d ajustement arrêtez de tourner et appuyez sur le bouton de la télécommande L écran suivant s affiche ...

Страница 194: ... magnétiques placez le bas des marqueurs sur l écran Écrans non magnétiques utilisez la bande fournie pour attacher les marqueurs Attachez la bande de sorte qu aucune extrémité du marqueur ne se détache de l écran Correct Incorrect c Ne placez rien d autre que les marqueurs à proximité de l image projetée lors du réglage de l angle Si d autres objets se trouvent sur l image projetée le réglage de ...

Страница 195: ...ge sur l unité tactile dans le sens horaire inversé pour afficher les pointeurs Réglage de l angle de l unité tactile avec la vis de réglage Avant réglage Après réglage Lorsque les pointeurs se superposent sur la bonne position les couleurs se figent ...

Страница 196: ... ombres de votre bras ou corps ne couvrent pas les marqueurs Si les pointeurs ne sont pas de couleur unie vérifiez que l unité tactile et l écran sont parallèles Réglez le crochet de l unité tactile de sorte que l unité tactile et l écran sont parallèles j Lorsque les couleurs des pointeurs à gauche et à droite se figent appuyez sur le bouton de la télécommande L écran suivant s affiche ...

Страница 197: ...e haut en direction du centre de l image projetée Lorsque vous tournez le cadran d ajustement dans le sens antihoraire le pointeur se déplace à la diagonale vers le bas à l écart du centre de l image projetée Lorsque les pointeurs se superposent sur la bonne position les couleurs se figent c Si vous entendez un clic venant du cadran le pointeur ne peut pas aller plus loin Lorsque vous tournez les ...

Страница 198: ...yez sur le bouton de la télécommande L écran suivant s affiche m Placez les marqueurs sur les positions de marqueur supérieures 1 Lorsque vous réglez l angle correctement les couleurs des pointeurs supérieurs se figent Si les couleurs des pointeurs supérieurs ne se figent pas retournez à l étape 1 ...

Страница 199: ...vous réglez l angle correctement les couleurs des pointeurs inférieurs se figent Si les couleurs des pointeurs inférieurs ne se figent pas retournez à l étape 4 o Lorsque vous avez terminé les vérifications enlevez les marqueurs puis appuyez sur le bouton de la télécommande L écran suivant s affiche ...

Страница 200: ...et appuyez sur le bouton de la télécommande Puis allez à l étape 17 Si certains points restent comme sur l illustration suivante vérifiez les éléments suivants Siles pointssurlagauche etladroitene disparaissentpas retirezlesobstaclessurlagaucheetladroite de l écran de projection Après avoir retiré les obstacles appuyez sur le bouton ou de la télécommande puis effectuez à nouveau l étape 16 Effectu...

Страница 201: ...ans un endroit sûr Réglages supplémentaires Effectuez des réglages supplémentaires si les points à gauche et à droite restent après avoir ajusté l angle Si le laser traverse le cadre de l écran il se reflète sur l écran et les opérations tactiles ne peuvent pas être effectuées correctement Effectuez des réglages supplémentaires pour ajuster la hauteur du faisceau laser afin qu il ne traverse pas l...

Страница 202: ...uivant la même procédure que pour celui de l angle étape 11 Suivez les instructions à l écran pour effectuer les réglages s Réglage de l angle p 71 Lorsque vous avez terminé les ajustements effectuez le calibrage tactile s Calibrage tactile p 86 c Assurez vous que vous stockez les marqueurs dans un endroit sûr ...

Страница 203: ... suit avant d effectuer le calibrage tactile Les fonctionnalités interactives multi projection sont définies s Lorsque deux projecteurs sont installés en parallèle et que vous utilisez la fonction interactive p 101 Les deux projecteurs et l unité tactile sont allumés a Appuyez sur le bouton Menu du projecteur À l aide de la télécommande À l aide du panneau de com mande b Sélectionnez Easy Interact...

Страница 204: ...ctionnez Calibrage tactile Le message d ajustement de la mise au point s affiche e Vérifiez que la mise au point de l écran est correcte puis sélectionnez Oui Un point s affiche dans le coin supérieur gauche de l écran de projection ...

Страница 205: ...étez l étape 6 jusqu à ce que tous les points disparaissent Le calibrage tactile est terminé lorsque tous les points ont disparu c Si vous avez touché une mauvaise position appuyez sur le bouton Esc de la télécommande ou du panneau de commande Ceci permet de revenir au point précédent Vous ne pouvez pas revenir de deux points Pour annuler le calibrage tactile maintenez le bouton Esc enfoncé pendan...

Страница 206: ... fixés sur un écran utilisez des vis M4 x3 disponibles dans le commerce Fixez l unité tactile sur la surface de l écran à niveau Procédure d installation Installez l unité tactile puis connectez la au projecteur Attention Ne branchez l unité tactile que sur le EB 1460Ui EB 1450Ui Ne le branchez pas sur d autres projecteurs ou appareils a Allumez le projecteur et appuyez sur le bouton Menu À l aide...

Страница 207: ...0 c Sélectionnez Config uni tactile d Sélectionnez Motif d installation Le motif d installation s affiche sur l image projetée e Desserrez la vis en bas du cadran avec un tournevis cruciforme no 2 disponible dans le commerce ...

Страница 208: ...unité tactile Nous vous conseillons de marquer les positions d installation suivantes pour simplifier l installation Ligne centrale du motif d installation Alignez la avec la ligne centrale de l unité tactile 25 à 100 mm depuis le bord supérieur de l image projetée Alignez avec le bord inférieur de l unité tactile Unité mm ...

Страница 209: ... Lors de l installation de l unité tactile sur une surface magnétique veillez à ne pas coincer vos doigtsoutouteautrepartiedevotrecorpsentrelesaimantsetlasurfaced installation Desaimants puissants sont utilisés ce qui peut causer des blessures si vous vous coincez vos doigts Écrans non magnétiques placez les entretoises et attachez les avec des vis M4 x3 ...

Страница 210: ... explique comment régler l angle de l unité tactile Pour plus de détails sur le réglage de l angle consultez p 71 c Lorsquedeuxprojecteurssontinstallésenparallèleetquevoussouhaitezutiliserlafonctioninteractive configurez les fonctions interactives multi projection en avance s Paramètres multi projection p 97 Avant d ajuster l angle vérifiez que le calibrage du stylet interactif est terminé s Calib...

Страница 211: ...le menu Avancé du projecteur b Sélectionnez Config uni tactile c Réglez Alimentation sur On L unité tactile s allume et le voyant est éclairé en bleu c Lorsque l Alimentation est réglée sur On l unité tactile s allumera automatiquement au prochain démarrage du projecteur ...

Страница 212: ...Guide d installation 95 d Sélectionnez Réglage de l angle ...

Страница 213: ...au blanc avec le crochet s Réglage de l angle p 71 c Lorsque vous installez l unité tactile à l aide d aimants collez des étiquettes sur les languettes sur les côtés de l unité tactile Faites correspondre le centre des étiquettes avec les languettes Si l unité tactile se déplace hors position utilisez les étiquettes pour réinstaller au bon endroit Lorsque vous avez terminé les ajustements effectue...

Страница 214: ...ez la documentation fournie avec votre ordinateur pour vérifier comment effectuer les réglages Connectez un câble d un ordinateur sur chaque projecteur l ordinateur a besoin de deux ports de sortie d image Réglez pour émettre des images vers plusieurs écrans depuis un ordinateur Paramètres multi projection Suivez les étapes ci dessous pour utiliser la fonction multi projection a Réglage de l ID du...

Страница 215: ...ectionnez Projection multiple dans Avancé c Sélectionnez ID projecteur d Sélectionnez l ID pour le projecteur cible e Appuyez sur le bouton Menu pour fermer le menu Répétez les étapes 1 à 5 pour les autres projecteurs ...

Страница 216: ...ni pour le projecteur s affiche sur l écran projeté L affichage s éteint après environ trois secondes g Tout en maintenant le bouton ID enfoncé appuyez sur le bouton avec le même numéro que l ID du projecteur que vous souhaitez utiliser Les opérations à la télécommande pour le projecteur avec l ID sélectionné sont activées ...

Страница 217: ...nde est 0 Lorsque ID projecteur est réglé sur Off vous pouvez contrôler le projecteur avec la télécommande quel que soit l ID sélectionné à l aide de la télécommande Lorsque l ID de la télécommande est réglé sur 0 vous pouvez contrôler tous les projecteurs indépendamment du paramètre d ID de projecteur Réglage de l image en multi projection Vérifiez que le réglage de la position du projecteur est ...

Страница 218: ...ponible uniquementlorsqueleparamètreConsommationélectr estréglésur Normal dans le menu ECO Assortiment couleur Réglez la couleur et la luminosité en dégradés de blanc à noir Lorsque deux projecteurs sont installés en parallèle et que vous utilisez la fonction interactive Lorsquedeuxprojecteurssontinstallésenparallèleetquevoussouhaitezutiliserlafonctioninteractive après ajustement de l image pour l...

Страница 219: ... deux projecteurs avant d effectuer les réglages s Installer la plaque d installation p 32 a Connectez les ports SYNC de chaque projecteur en utilisant le jeu de câbles de télécommande optionnel ELPKC28 Lorsque les projecteurs sont reliés par câble les opérations pour le stylet interactif se stabilisent Le port SYNC dispose de ports IN et OUT Lorsque vous connectez une extrémité du jeu de câble de...

Страница 220: ...er l image pour la multi projection Si vous effectuez le réglage de l image après le réglage des fonctions interactives la position du stylet pourrait ne pas être correcte s Réglage de l image en multi projection p 100 La procédure diffère en fonction de l utilisation ou non de l unité tactile Lorsque vous n utilisez pas l unité tactile a Allumez le projecteur de gauche et éteignez celui de droite...

Страница 221: ...b Appuyez sur le bouton Menu À l aide de la télécommande À l aide du panneau de com mande c Sélectionnez Easy Interactive Function dans Avancé d Sélectionnez Avancé dans Général e Sélectionnez Projection multiple ...

Страница 222: ...ctionnez Gauche g Étalonnez le stylet s p 56 h Éteignez le projecteur de gauche i Allumez le projecteur de droite et effectuez les étapes 2 à 5 j Sélectionnez Droite dans Projection multiple k Étalonnez le stylet s p 56 ...

Страница 223: ... tactile EB 1460Ui EB 1450Ui uniquement a Allumez le projecteur de gauche et éteignez celui de droite b Appuyez sur le bouton Menu À l aide de la télécommande À l aide du panneau de com mande c Sélectionnez Easy Interactive Function dans Avancé ...

Страница 224: ...Annexe 107 d Sélectionnez Avancé dans Général e Sélectionnez Projection multiple f Sélectionnez Gauche g Étalonnez le stylet s p 56 ...

Страница 225: ... Éteignez le projecteur de gauche j Allumez le projecteur de droite et effectuez les étapes 2 à 5 k Sélectionnez Droite dans Projection multiple l Étalonnez le stylet s p 56 m Installation et réglage de l angle de l unité tactile La procédure diffère selon l emplacement d installation de l unité tactile Lorsque vous installez l unité tactile hors du tableau blanc avec le crochet de l unité tactile...

Страница 226: ...Annexe 109 o Effectuer le calibrage tactile pour chaque projecteur s p 86 ...

Страница 227: ...es Durée de lampe et Etat depuis le menu Information Effectuez la configuration en lot avant d ajuster la position des projecteurs Les valeurs d ajustement de l image projetée dont Keystone sont copiées par la fonction de configuration en lot Si la configuration en lot est effectuée après avoir ajusté la position des projecteurs les ajustements effectués peuvent changer En utilisantla fonctiondeco...

Страница 228: ... projecteur Si la clé USB est branchée au projecteur via un concentrateur USB les paramètres pourraient ne pas être enregistrés correctement Branchez une clé USB vide Si la clé USB contient des données autres que le fichier de configuration en lot les paramètres pourraient ne pas être enregistrés correctement Si vous avez enregistré un fichier de configuration en lot depuis un autre projecteur sur...

Страница 229: ...le fichier de configuration en lot est en cours d écriture Attention Ne débranchez pas le cordon d alimentation du projecteur lorsque le fichier est en cours d écriture Si le cordon d alimentation est débranché le projecteur pourrait ne pas démarrer correctement Ne débranchez pas la clé USB du projecteur lorsque le fichier est en cours d écriture Si la clé USB est débranchée le projecteur pourrait...

Страница 230: ...nlot lesparamètrespourraient ne pas être copiés correctement c Tout en maintenant le bouton Menu de la télécommande ou du panneau de commande enfoncé branchez le cordon d alimentation au projecteur Le voyant d état et le voyant d alimentation s allument en bleu et le voyant de lampe et celui de température s allument en orange Lorsque tous les voyants du projecteur s allument relâchez le bouton Me...

Страница 231: ...hez la clé USB débranchez et re branchez le cordon d alimentation du projecteur puis essayez à nouveau Est ce que le voyant d alimentation et ce lui d état clignotent en bleu rapidement et ceux de la lampe et de la température en orange L écriture des réglages peut avoir échoué et une erreur peut être survenue dans le firmware du projecteur Arrêtez d utiliser le pro jecteur débranchez la fiche d a...

Страница 232: ...installation Consultez le guide de l utilisateur fourni avec le verrou câblé pour les instructions de verrouillage L emplacement de sécurité sur ce produit est compatible avec le système de sécurité Microsaver fabriqué par Kensington Consultez ce qui suit pour plus de détails sur le système de sécurité Microsaver http www kensington com Projecteur Unité tactile EB 1460Ui EB 1450Ui uniquement ne pe...

Страница 233: ...rale OS X est une marque commerciale d Apple Inc Microsoft et Windows sont des marques commerciales ou déposées de Microsoft Corporation aux États Unis et ou dans d autres pays SEIKO EPSON CORPORATION 2016 All rights reserved ...

Страница 234: ...Guía de instalación ...

Страница 235: ......

Страница 236: ...so la muerte debido a un manejo incorrecto Precaución Este símbolo hace referencia a información que si se ignora podría causar daños personales y materiales debido a un manejo incorrecto Explicación de los símbolos Explicación de los símbolos Este símbolo indica una acción que no se debe realizar Este símbolo indica una acción que sí se debe realizar c Este símbolo indica información relacionada ...

Страница 237: ...producto deberá instalarse en una pared de cemento El peso máximo conjunto del proyector y la placa de fijación es de aproximadamente 16 kg cables no incluidos Compruebe la resistencia de la pared antes de instalar este producto en la misma Si la pared no fuese lo suficientemente resistente refuércela antes de la instalación Compruebe regularmente la placa de fijación para garantizar que no haya p...

Страница 238: ...ación en la que haya combustible o gas explosivo El proyector puede prenderse debido a la alta temperatura de la lámpara interna del proyector Si observa anomalías en este producto desconecte inmediatamente los cables del pro ducto y a continuación póngase en contacto con su distribuidor local o con el centro de atención al cliente de Epson Si continúa utilizando el producto en condiciones anómala...

Страница 239: ...orrectamente Precaución No pase cerca de la Unidad táctil con sistemas de almacenamiento magnéticos como por ejemplo tarjetas magnéticas o con dispositivos electrónicos de precisión como por ejem plo ordenadores relojes digitales o teléfonos móviles Launidadcontieneunpotenteimánquepodríadañarlosdatosoprovocarunmalfuncionamiento Acerca de esta Guía de instalación Esta guía describe cómo montar el p...

Страница 240: ...previo aviso Cuandoutiliceelproyectorenunentornodonde latemperatura sea de35 Co superior instale una separación para bloquear el calor expulsado por las aberturas de evacuación de aire del proyector Asegúrese de que la separación es ligeramente más grande que la abertura de evacuación aproximadamente 2cm más ancha y más alta y a continuación instale la partición a una distancia de entre 10 y 30 cm...

Страница 241: ...a pantalla Instálelo verticalmente sobre una mesa y proyecte desde delante del escritorio Cuando lo instale verticalmente sobre una mesa necesitará el accesorio opcional Interactive Table Mount ELPMB29 Antes de instalar la unidad táctil asegúrese de que la superficie de instalación no está torcida o deformada y que cualquier irregularidad en la superficie de la pantalla es inferior a 5 mm Cuando i...

Страница 242: ...superior a 51 mm no puede instalar la unidad táctil fuera de la pizarra Si hay un marco alrededor de la pantalla asegúrese de que el grosor de la parte superior de dicho marco e sea inferior a 3 mm Si el grosor de la parte superior de la pantalla supera los 3 mm la Unidad táctil no funcionará correctamente ...

Страница 243: ...50Ui 20 Unidad táctil dimensiones externas y peso 20 Soporte de la Unidad táctil dimensiones externas intervalo de ajuste y peso 21 Etiquetas colocadas 22 Puerto de emisión láser 22 Tabla de distancias de proyección 24 Cifras de dimensiones de instalación 24 Cuando se instale la Unidad táctil solo EB 1460Ui EB 1450Ui 25 Durante la instalación del Control Pad y portalápices 28 Cuando la imagen proy...

Страница 244: ...del proyector 98 Ajustar la imagen en proyección múltiple 101 Cuandodosproyectoresseinstalanenparalelo y utiliza la función interactiva 102 Establecer los proyectores en sincronización 103 Establecer la función interactiva de proyección múltiple 104 Función de configuración por lotes 111 Configuración mediante una unidad flash USB 112 Guardar la configuración en la unidad flash USB 112 Copiar la c...

Страница 245: ...p 64 Cuando instale la Unidad táctil termine de instalar primero el proyector y a continuación siga los siguientes procedimientos solo EB 1460Ui EB 1450Ui El procedimiento es diferente dependiendo del lugar en el que se vaya a instalar la Unidad táctil Cuando instale la Unidad táctil fuera de la pizarra mediante el soporte de la Unidad táctil a Instalar la Unidad táctil s p 67 b Ajustar el ángulo ...

Страница 246: ...grande siga los pasos que se indican a continuación a Instalar la placa de fijación y el proyector s p 33 b Ajustar la posición del proyector s p 48 c Establecer el ID del proyector s p 98 d Ajustar la imagen en proyección múltiple s p 101 Cuando se instalen dos proyectores en paralelo y desee utilizar la función interactiva realice la siguiente configuración Realice la configuración para cada pro...

Страница 247: ...laca deslizante se fija en el momento del envío Plantilla para instalar la placa de la pared Tapa Pegatina de ocultación Llave allen hexagonal pa ra M4 Llave inglesa abierta 13 mm para M8 y M6 6 mm para eje hexagonal Forma Nombre Canti dad Uso Tornillo de cabeza allen M4 x 12 mm con arandela arandela de presión 5 Para montar la placa de la pared 4 Para instalar el brazo y la unidad de ajuste de 3 ...

Страница 248: ...comenzar Control Pad Portalápices Cable mini estéreo para conectar el Control Pad aprox 5m Adhesivos de protección de los puertos Cuando instale el Control Pad en una pared prepare los tornillos M4 20 mm x4 que puede encontrar en cualquier tienda especializada Cuando instale el portalápices en una pared prepare los tornillos M4 20 mm x2 que puede encontrar en cualquier tienda especializada Unidad ...

Страница 249: ...no magnética prepare tres tornillos M4 disponibles en el mercado Soporte de la unidad táctil Placa de instalación Placa de fijación Tornillos de cabeza hexagonal M4 x 12 mm x2 Tornillos de cabeza hexagonal M4 x 25 mm x2 Tornillo de cabeza hexagonal M4 x 55 mm x1 Tornillo de cabeza hexagonal M4 x 70 mm x1 Para la placa de instalación también necesita tres tornillos para madera de 4 mm de diámetro d...

Страница 250: ...ón de la unidad de ajuste de 3 ejes 87 mm Consulte la figura si guiente Intervalo de ajuste de desliza miento vertical 38 mm Consulte la figura si guiente Márgenes de ajuste de giro ho rizontal 3 Con la rosca de ajuste podrá realizar ajus tes precisos s p 48 Márgenes de ajuste de rotación horizontal 8 Con la rosca de ajuste podrá realizar ajus tes precisos s p 48 Márgenes de ajuste al inclinar ver...

Страница 251: ...ola placa separados en el momento del envío Unidad mm 186 4 130 2 107 3 28 3 45 45 24 24 131 131 99 99 79 192 3 234 4 24 60 24 496 5 1 5 1 R 1 0 El valor de ajuste de la posición del centro de la imagen proyectada y el centro de la placa de la pared es 27 mm Orificios para colocar los cables Cuando coloque los cables para conectar el proyector a través de una pared utilice las posiciones y de la s...

Страница 252: ... deslizamiento horizontal Unidad mm Márgenes de ajuste de deslizamiento hacia adelante atrás Márgenes de ajuste de deslizamiento del brazo Unidad mm 263 Intervalo de ajuste para la posición de instalación de la unidad de ajuste de 3 ejes Unidad mm ...

Страница 253: ...rificios de tornillos permiten fijar dispositivos periféricos y accesorios como elementos de ajuste externos Utilice tornillos M4 disponibles en el mercado Unidad mm 2 x M4 30 5 49 7 60 8 35 Control Pad Portalápices Control Pad dimensiones externas y peso Unidad mm ...

Страница 254: ...stalación 19 153 5 107 15 47 135 9 111 3 5 11 5 109 5 63 3 29 30 9 4 x M4 47 51 5 Peso 262 g aprox Temperatura de funcionamiento 0 a 50 C sin condensación Temperatura de funcionamiento 20 a 60 C sin condensación ...

Страница 255: ...es De lo contrario quite la tapa de los cables y diríjalos desde allí Dirija el cable de la impresora por la ranura en la parte posterior del Control Pad Portalápices dimensiones externas y peso Unidad mm 99 9 70 0 101 9 44 4 28 8 28 8 35 5 36 0 2 x M4 El portalápices pesa aproximadamente 93 g Unidad táctil solo EB 1460Ui EB 1450Ui Unidad táctil dimensiones externas y peso Unidad mm ...

Страница 256: ...aproximadamente 450 g Soporte de la Unidad táctil dimensiones externas intervalo de ajuste y peso Parte superior Unidad mm 229 8 228 57 62 Parte frontal Unidad mm 101 104 8 Placa de instalación parte frontal Unidad mm 90 Ø4 2 2 5 7 2 4 5 90 56 74 ...

Страница 257: ...tencia que indican que se trata de un producto láser de Clase 1 Las etiquetas contienen la siguiente información Producto láser de Clase 1 Advertencia No abra la carcasa El dispositivo contiene un producto láser de alta potencia Advertencia Precaución Si abre esta sección se emitirá radiación láser invisible de clase 3B Evite la exposición a haces de radiación Puerto de emisión láser El haz láser ...

Страница 258: ...Guía de instalación 23 ...

Страница 259: ...idad mm Tamaño de la imagen proyectada Placa de la pared Distancia mínima de proyección gran angu lar zoom máximo a máxima teleobjetivo zoom mínimo Pantalla Númerosdelaregladeldeslizamientodelbra zo Distancia entre la parte superior de la imagen proyectada y el orificio del tornillo de instala ción inferior de la placa de pared Distancia entre la parte superior de la imagen proyectada y el orifici...

Страница 260: ...pizarra mediante el soporte Cuando la distancia f sea inferior a 20 mm o superior a 50 mm instale la Unidad táctil en la pizarra Cuando el grosor de la parte superior del marco e sea de 3 mm o más instale la Unidad táctil en la pizarra Precaución Instale el borde inferior de la Unidad táctil de forma que se encuentre a una distancia de entre 25 y 100 mm del borde superior de la imagen proyectada S...

Страница 261: ...icaciones de los obstáculos s p 55 Asegúrese de que hay un espacio de 20 mm aproximadamente entre la placa en la que se pega el deflector de infrarrojos y la parte inferior de la imagen proyectada Cuando instale la Unidad táctil en la pizarra sin utilizar el soporte de la Unidad táctil Deberá dejar una distancia mínima de 120 mm entre el borde superior de la imagen proyectada y el borde superior d...

Страница 262: ...nistrados sobre las ubicaciones de los obstáculos s p 55 Asegúrese de que hay un espacio mínimo de 20 mm entre la placa en la que se pega el deflector de infrarrojos y la parte inferior de la imagen proyectada Si hay obstáculos en las áreas sombreadas en la siguiente figura como pueden ser cables encimeras de pizarra soportes o un marco grueso las operaciones táctiles no funcionarán correctamente ...

Страница 263: ...e los cables según se muestra en la figura siguiente Unidad mm 㻝㻜㻜 㻡㻜 㻝㻜㻜 㻝㻜㻜 Cuando instale el portalápices junto al Control Pad no lo instale tapando la ranura frontal según se muestra en la figura siguiente c Cuando instale la Unidad táctil no instale el Control Pad en la pantalla de proyección y el área circundante área sombreadaenlasiguientefigura En casocontrario la Unidadtáctilnofuncionará ...

Страница 264: ...alores cuando se monta la unidad de ajuste de 3 ejes en la posición donde aparece la marca La distancia desde la parte superior de la imagen proyectada al orificio del tornillo de instalación inferior de la placa de pared c es el valor que aparece cuando el deslizamiento vertical está en la posición estándar Haga coincidir la muesca en la placa de fijación con la posición de la marca en la placa d...

Страница 265: ...4x99 6 8 4 a 24 1 19 3 a 35 0 22 6 41 8 99 6 75 161 5x101 0 9 0 a 24 9 19 9 a 35 8 22 8 42 0 101 0 76 163 7x10² 3 9 6 a 25 7 20 5 a 36 6 23 1 42 3 102 3 77 165 9x10³ 7 10 2 a 26 5 21 1 a 37 4 23 4 42 6 103 7 78 168 0x105 0 10 8 a 27 3 21 7 a 38 2 23 7 42 9 105 0 79 170 2x10⁶ 3 11 4 a 28 1 22 3 a 39 0 24 0 43 2 106 3 80 172 3x10⁷ 7 12 0 a 29 0 22 9 a 39 9 24 2 43 4 107 7 81 174 5x10⁹ 0 12 6 a 29 8 ...

Страница 266: ...es cuando se monta la unidad de ajuste de 3 ejes en la posición donde aparece la marca La distancia desde la parte superior de la imagen proyectada al orificio del tornillo de instalación inferior de la placa de pared c es el valor que aparece cuando el deslizamiento vertical está en la posición estándar Haga coincidir la muesca en la placa de fijación con la posición de la marca en la placa de la...

Страница 267: ... a 39 2 26 8 46 0 119 8 90 193 9x121 2 18 1 a 37 9 20 3 a 40 1 27 1 46 3 121 1 91 196 0x122 5 18 7 a 38 7 20 9 a 40 9 27 3 46 5 122 5 92 198 2x123 9 19 4 a 39 6 21 6 a 41 8 27 6 46 8 123 9 93 200 3x125 2 20 0 a 39 7 22 2 a 41 9 27 9 47 1 125 2 94 202 5x126 5 20 6 a 39 7 22 8 a 41 9 28 2 47 4 126 5 95 204 6x127 9 21 3 a 39 7 23 5 a 41 9 28 5 47 7 127 8 96 206 8x129 2 21 9 a 39 7 24 1 a 41 9 28 7 47...

Страница 268: ...nforme a los dispositivos conectados Para más información consulte el Manual de usuario del proyector Document CD ROM Cables necesarios cuando se utiliza Easy Interactive Function CuandorealiceoperacionesconelratónmedianteEasyInteractiveFunction necesitaráuncableUSB Incluso cuando realice proyecciones utilizando un cable de ordenador será necesario un cable USB para realizar operaciones con el rat...

Страница 269: ... la Unidad táctil solo EB 1460Ui EB 1450Ui Necesitará el cable de conexión de la Unidad táctil suministrado cuando instale dicha unidad y la conecte al proyector Las operaciones no podrán realizarse correctamente si se utiliza un cable convencional adquirido en cualquier tienda La formadelenchufequeseconectaalproyector yelenchufequeseconectaalaUnidadtáctilsondiferentes Consulte la siguiente figura...

Страница 270: ...ministrado y un dispositivo de almacenamiento masivo de USB disponible en tiendas Al imprimir la imagen proyectada necesitará el cable USB suministrado y el cable USB suministrado con su impresora Al imprimir caracteres con un teclado USB utilizando la función Remote Desktop necesita el cable USB suministrado y un teclado USB disponible en tiendas c Los siguientes proyectores Epson pueden conectar...

Страница 271: ...mara de documentos Cable USB dedicado suministrado con la cámara de documentos Ordenador Cable de ordenador accesorio opcional Altavoces externos Cable de audio disponible en tiendas Monitor externo Cable DVI D disponible en tiendas Dispositivo LAN Cable de LAN disponible en tiendas ...

Страница 272: ...e adhesivos lubricantes o aceites para instalar o ajustar la placa de fijación Si usa adhesivos para evitar que los tornillos se aflojen o lubricantes o aceites en la placa deslizante de la parte de fijación del proyector la caja se podría romper haciendo que caiga el proyector y causando daños personales o materiales Montar las piezas a Conecte la placa y los marcos x2 y fíjelos con los tornillos...

Страница 273: ...lizante Si la posición estándar no es correcta afloje el tornillo M4 y ajuste la posición de la placa deslizante Cuando haya terminado de realizar los ajustes apriete el tornillo c Fijelaunidaddeajustede3ejesylaplacadeslizantealabasedelproyectorconlostornillos M4 x 12 mm x4 suministrados Posiciones de instalación del perno ...

Страница 274: ...el orificio del tornillo de fijación temporal de la placa de pared d s Tabla de distancias de proyección p 24 c Utilice el orificio del tornillo de la siguiente figura como orificio de tornillo temporal para la placa de pared La distancia entre el orificio del tornillo de instalación inferior de la placa de pared y el orificio del tornillo temporal es de 192 3 mm Es recomendable marcar las siguien...

Страница 275: ...tral de la superficie de proyección hasta 45 mm Haga coincidir el alto y comprobados en el paso 1 con las líneas de la plantilla Unidad mm c Coloque un tornillo M10 disponible en el mercado en la posición del orificio del tornillo temporal para la placa de pared Deje una separación de 6 mm o más entre la pared y la cabeza del tornillo d Determinar las posiciones para los agujeros de montaje para l...

Страница 276: ...eros Coloque la tuerca y golpéela conunmar tillo hasta que el centro toque a parte su perior del perno de anclaje h Apretar la tuerca con una llave inglesa que puede adquirir en cualquier tienda especializada para fijar la placa a la pared Determine la distancia de proyección y a continuación pase los cables a través de la placa de fijación a Comprobar los siguientes valores en la tabla de distanc...

Страница 277: ...xtremos de los mismos que se van a conectar al proyector se encuentren en el lado de la interfaz de dicho proyector Advertencia No cuelgue el resto del cable en la placa de fijación Se podrían caer y provocar un accidente c Pase el cable de conexión de la Unidad táctil a través de la placa de fijación solo EB 1460Ui EB 1450Ui Pase el cable de forma que el extremo que se conecta a la Unidad táctil ...

Страница 278: ...Guía de instalación 43 Acoplar la placa de fijación a la placa de la pared a Insertar el eje hexagonal en la placa de fijación ...

Страница 279: ...laca de pared y a continuación insértelo en la ranura que se encuentra en la parte inferior Precaución NoconecteelcabledeconexióndelaUnidadtáctilalapared soloEB 1460Ui EB 1450Ui Siseconecta a la pared no se podrá conectar a la Unidad táctil Tenga cuidado de no atrapar los cables entre la placa de fijación y la placa de la pared ...

Страница 280: ...te ligeramente el tornillo M6 x1 suministrado con una llave inglesa d Ajuste el deslizamiento vertical con la llave inglesa fija y alinéelo con la posición estándar Al apretar el eje hexagonal en la parte superior la placa de fijación sube si afloja el eje la placa baja Al apretar el tornillo M8 en la parte inferior la placa de fijación baja si afloja el tornillo la placa sube También puede utiliz...

Страница 281: ... de instalación 46 e Apretar el tornillo M6 x1 para sujetar la placa de fijación en su lugar Fijar el proyector a la placa de fijación a Aflojar los tornillos x2 y quitar la cubierta del cable del proyector ...

Страница 282: ...ión con los tornillos M4 x 12 mm x4 suministrados Cuando una imagen proyectada sea inferior a 85 pulgadas aprox 215 cm monte la unidad en la marca Cuando una imagen proyectada sea superior a 85 pulgadas aprox 215 cm monte la unidad en la marca menos de 85 pulgadas 85 pulgadas o más ...

Страница 283: ...os de los tornillos de la figura siguiente Instale el módulo LAN inalámbrico suministrado en la ranura del módulo de la unidad LAN Ajustar la posición del proyector No realice ajustes utilizando la función Keystone del proyector Si lo hace la calidad de la imagen podría verse mermada Cuando configure varios proyectores utilizando la función de configuración por lotes realice la configuración agrup...

Страница 284: ...infrarrojos solo EB 1460Ui EB 1450Ui p 55 a Presione el botón Power del mando a distancia o del panel de control para encender el proyector Con el mando a distancia Con el panel de control Precaución Durante la proyección no coloque la cara o las manos cerca de los conductos de salida de aire y no coloque objetos que puedan deformarse o dañarse por el calor cerca de dichos conductos El aire calien...

Страница 285: ...n otro momento seleccione No c Cambiar la relación de aspecto de la imagen proyectada solamente cuando sea necesario Proyecte imágenes desde un dispositivo conectado y a continuación presione el botón Aspect del mando a distancia Cada vez que presiona el botón aparece en la pantalla el nombre de la relación de aspecto Con el mando a distancia c Para obtener detalles sobre cómo conectar dispositivo...

Страница 286: ...ción en Ajustes Se mostrará la pantalla de indicaciones f Después de aflojar la rosca de ajuste situada en la parte inferior ajuste el giro horizontal mediante la rosca de ajuste situada en la parte superior c Repita los pasos 6 a 11 según sea necesario Una vez finalizados los ajustes apriete la rosca de ajuste situada en la parte inferior ...

Страница 287: ...osca de ajuste Cuando termine de realizar ajustes apriete los tornillos M4 que aflojó anteriormente h Despuésdeaflojarlaroscadeajustesituadaenlaparteinferior ajustelainclinaciónvertical mediante la rosca de ajuste situada en la parte superior Una vez finalizados los ajustes apriete la rosca de ajuste situada en la parte inferior ...

Страница 288: ...iento horizontal Cuando termine de realizar ajustes apriete el tornillo M4 que aflojó anteriormente j Aflojar los tornillos M4 x2 con la llave allen hexagonal y a continuación ajustar el deslizamiento hacia adelante atrás Cuando termine de realizar ajustes apriete los tornillos M4 que aflojó anteriormente ...

Страница 289: ...ja el eje la placa baja Al apretar el tornillo M8 en la parte inferior la placa de fijación baja si afloja el tornillo la placa sube También puede utilizar una llave de tubo de 17 mm Cuando termine de realizar ajustes apriete los tornillos M6 que aflojó anteriormente l Asegurarse de que todos los tornillos que aflojó en los pasos 6 a 11 están firmemente apretados Advertencia Aprietefirmementetodos...

Страница 290: ...talla de indicaciones Pegar los reflectores de infrarrojos solo EB 1460Ui EB 1450Ui Cuando instale la unidad táctil si hay algún obstáculo en la parte inferior de la pizarra como un marco o repisas las operaciones táctiles no funcionarán correctamente Si hay algún obstáculo pegue los deflectores de infrarrojos a lo largo del borde inferior de la pizarra antes de ajustar la posición del proyector c...

Страница 291: ...e la imagen proyectada realice la Corrección arco a Encienda el proyector y a continuación presione el botón Menu Con el mando a distancia Con el panel de control b Seleccione Correc geométrica en Ajustes c Seleccione Corrección arco d Seleccione Corrección arco ...

Страница 292: ...n del lápiz interactivo s Ajustar la posición del proyector p 48 Dispone de dos métodos para calibrar el lápiz Calibración automát y Calibración manual Cuando calibre el lápiz por primera vez después de instalar el proyector ejecute el método Calibraciónmanual para realizar una calibración óptima Para el método Calibración automát consulte el Manual de usuario Document CD ROM c Cuando instale dos ...

Страница 293: ... el mando a distancia Con el panel de control b Seleccione Easy Interactive Function en Extendida c Seleccionar Calibración manual d Asegúrese de que la pantalla esté enfocada y a continuación seleccione Sí Aparecerá un punto verde en la parte superior izquierda de la pantalla de proyección ...

Страница 294: ...9 e Toque el centro del punto con la punta del lápiz interactivo El punto desaparecerá y se trasladará a la siguiente posición c Asegúrese de tocar el centro del punto De lo contrario puede que no se posicione correctamente ...

Страница 295: ...parte inferior derecha Cuando todos los puntos desaparezcan la calibración se habrá completado c Compruebe que no hay obstáculos entre el lápiz interactivo y el Receptor del lápiz interactivo Si toca la posición incorrecta presione el botón Esc del mando a distancia para volver al punto anterior Para cancelar la calibración mantenga presionado el botón Esc durante dos segundos ...

Страница 296: ...pared para pasar los cables Termine de quitar el material sobrante en los lados cortados para eliminar todos los bordes cortantes Asegúrese de no dañar los cables cuando los dirija a través de los orificios cortados Asegúrese también de que utiliza la cuchilla de manera segura Cuandoquitelacubierta delaplacadepared presionelaspestañassituadasenlapartesuperior e inferior de la parte posterior de di...

Страница 297: ...n 62 b Ajuste la tapa a la placa de fijación c Si le molesta la ranura del brazo pegue la pegatina de ocultación suministrada c Acoplar la tapa de los cables en el proyector y a continuación fijarla con los tornillos x2 ...

Страница 298: ... y las reparaciones Advertencia No afloje nunca las tuercas y tornillos después de la instalación Compruebe regularmente que los tornillos no se han aflojado Si encuentra algún tornillo flojo apriételo firmemente De lo contrario el producto podría caerse provocando daños personales o materiales No se cuelgue en este producto ni cuelgue de él objetos pesados Si el producto se cae podría causar la m...

Страница 299: ... p 28 a Quitar la tapa frontal b Compruebe la posición de instalación y fíjela con los tornillos M4 disponibles 20 mm x4 Advertencia Tenga cuidado de no inclinar los tornillos hacia la superficie de instalación cuando lo vaya a fijar Asegúrese de que el Control Pad está firmemente fijado No utilice cinta de doble cara o imanes para fijar el Control Pad c Recomendamos comprobar el funcionamiento de...

Страница 300: ... el Control Pad p 35 d Pegue los adhesivos de protección de los puertos suministrados en los conectores que no vaya a utilizar del Control Pad s Control Pad p 13 e Fije la tapa frontal Instalación del portalápices Consulte lo siguiente para obtener información sobre la ubicación de instalación del portalápices s Durante la instalación del Control Pad y portalápices p 28 a Quitar la tapa frontal ...

Страница 301: ...s M4 disponibles 20 mm x2 Advertencia Tenga cuidado de no inclinar el tornillo hacia la superficie de instalación cuando lo vaya a fijar Asegúrese de que el portalápices está firmemente fijado No utilice cinta adhesiva de doble cara o imanes para fijar el portalápices c Fije las cubiertas ...

Страница 302: ...l en la pizarra sin utilizar el soporte de la Unidad táctil s p 90 Cuando instale la Unidad táctil fuera de la pizarra mediante el soporte de la Unidad táctil Procedimiento de instalación Instale la Unidad táctil fuera de la pizarra mediante el soporte para la Unidad táctil y conéctela al proyector Compruebe que la pantalla se encuentra en una posición paralela a la superficie en la que está insta...

Страница 303: ...ad táctil d Seleccione Patrón instalación El patrón de instalación se mostrará en la imagen proyectada e Afloje el tornillo situado en la parte inferior de la tapa de los diales mediante un destornillador de estrella n º 2 disponible en el mercado ...

Страница 304: ...arque las siguientes posiciones de instalación posiciones de los orificios de los tornillos para que la instalación sea más fácil línea de centro del patrón de instalación Alinee con la línea central de la placa de instalación 25 a 100 mm desde el borde superior línea blanca de la imagen proyectada Alinee con la línea inferior de la placa de instalación Unidad mm 25 100mm ...

Страница 305: ...s tornillos M4 x 25 mm suministrados Ajuste la posición de forma que los dos orificios de los tornillos de la unidad táctil y los dos orificios de los tornillos de la placa de fijación estén alineados Apriete los tornillos en la placa de fijación mediante la llave hexagonal suministrada Precaución En la parte posterior de la Unidad táctil hay un imán potente No deje que su mano quede atrapada entr...

Страница 306: ...rada k Mida la distancia entre la pared y la superficie de la pantalla f l Ajuste la altura del lado derecho e izquierdo conforme al valor f medido en el paso 11 Afloje los dos tornillos y mueva la Unidad táctil hacia atrás y hacia delante para ajustar el lado izquierdo y derecho de forma que la flecha quede alineada con el valor de la regla correspondiente a f Cuando haya terminado el ajuste apri...

Страница 307: ...al suministrada Cuando f 20 a 35 mm tornillo M4 x 55 mm Cuando f 35 a 50 mm tornillo M4 x 70 mm n ConecteelcabledeconexióndelaUnidadtáctil queestáconectadoalproyector alpuerto TCH de dicha unidad Ajuste del ángulo Desde la unidad táctil se emite un láser infrarrojo con la forma de una cortina El láser infrarrojo se refleja en su dedo cuando toca la pizarra detectando así la posición de dicho dedo ...

Страница 308: ... forma que el proyector pueda detectar correctamente la posición del dedo A C B B A Unidad de emisión de láser infrarrojo B Fulcro C Punto móvil vertical Si el láser no se emite en paralelo a la pantalla el proyector no detectará las operaciones táctiles o la posición del dedo correctamente ...

Страница 309: ...no reconoce ninguna operación de clic Si hay obstáculos en la parte inferior de la pizarra como un marco o repisas el láser se reflejará y la ubicación de su dedo no se detectará correctamente Pegue los deflectores de infrarrojos en el marco y las repisas para evitar que reflejen el láser s Pegar los reflectores de infrarrojos solo EB 1460Ui EB 1450Ui p 55 c Cuando instale dos proyectores en paral...

Страница 310: ...tor b Seleccione Ajust Unidad táctil c Establezca Alimentación en On La alimentación de la Unidad táctil se activará y el indicador se iluminará en azul c Cuando la opción Alimentación esté establecida en On la próxima vez que encienda el proyector la Unidad táctil se encenderá automáticamente ...

Страница 311: ...Guía de instalación 76 d Seleccione Ajuste del ángulo e Seleccione Instalar la unidad táctil con soporte Se mostrará la siguiente pantalla ...

Страница 312: ...zando la llave hexagonal suministrada con la placa de fijación g Gire los diales de ajuste de la Unidad táctil en sentido contrario a las agujas del reloj hasta escuchar un clic Cuando escuche un clicprocedente del dialde ajuste deje de girar y acontinuación presione elbotón del mando a distancia Se mostrará la siguiente pantalla ...

Страница 313: ...as coloque la parte inferior de los marcadores en la pantalla Pantallas no magnéticas utilice la cinta suministrada para fijar los marcadores Acople la cinta de forma que los extremos del marcador no sobresalgan de la pantalla Correcto Incorrecto c No coloque nada que no sean los marcadores cerca de la imagenproyectadadurante el ajuste del ángulo Si hay otros objetos en la imagen proyectada puede ...

Страница 314: ...táctil en sentido contrario a las agujas del reloj para mostrar los punteros Ajuste el ángulo de la unidad táctil mediante el tornillo de ajuste Antes del ajuste Después del ajuste Cuando los punteros se superpongan en la posición correcta los colores serán más vivos ...

Страница 315: ...u cuerpo no se superpongan con los marcadores Si los punteros no presentan un color sólido compruebe si la Unidad táctil y la pantalla están en paralelo Ajuste el soporte de la Unidad táctil de forma que dicha unidad y la pantalla estén en paralelo j Cuando los colores de los punteros situados a la izquierda y derecha sean más vivos presione el botón del mando a distancia Se mostrará la siguiente ...

Страница 316: ... arriba hacia el centro de la imagen proyectada Cuando gire el dial de ajuste en sentido contrario a las agujas del reloj el puntero se moverá diagonalmente hacia abajo desde el centro de la imagen proyectada Cuando los punteros se superpongan en la posición correcta los colores serán más vivos c Si escucha un clic procedente del dial el puntero no se moverá más Cuando gire los diales asegúrese de...

Страница 317: ... mando a distancia Se mostrará la siguiente pantalla m Coloque los marcadores en las posiciones de marcador superiores 1 Cuando el ajuste del ángulo se haya realizado correctamente los colores de los punteros superiores serán más vivos Si los colores de los punteros superiores no se ven más vivos comience de nuevo desde el paso 1 ...

Страница 318: ...ado correctamente los colores de los punteros inferiores serán más vivos Si los colores de los punteros inferiores no se ven más vivos comience de nuevo desde el paso 4 o Cuando haya terminado de realizar las comprobaciones quite los marcadores y a continuación presione el botón del mando a distancia Se mostrará la siguiente pantalla ...

Страница 319: ... paso 17 Si algunos puntos permanecen tal y como se muestra en la siguiente figura compruebe la información que se muestra a continuación Si los puntos de la izquierda y la derecha no desaparecen quite cualquier obstáculo que se encuentre a la izquierda y a la derecha de la pantalla de proyección Después de retirar cualquier obstáculo presione el botón o del mando a distancia y a continuación repi...

Страница 320: ... táctil p 87 c Asegúrese de guardar los marcadores en un lugar seguro Ajustes adicionales Realice ajustes adicionales si siguen apareciendo los puntos de la izquierda y la derecha después de ajustar el ángulo Si el láser cruza el marco de la pantalla se reflejará dentro de esta y las operaciones táctiles no se podrán realizar correctamente Ajuste la altura del haz láser de forma que no cruce el ma...

Страница 321: ...el mismo procedimiento para el ajuste del ángulo a partir del paso 11 Siga las instrucciones que aparezcan en la pantalla para realizar ajustes s Ajuste del ángulo p 72 Cuando haya finalizado de realizar los ajustes lleve a cabo una calibración táctil s Calibración táctil p 87 c Asegúrese de guardar los marcadores en un lugar seguro ...

Страница 322: ...uebe lo siguiente antes de realizar la calibración táctil Las funciones interactivas de proyección múltiple están establecidas s Cuando dos proyectores se instalan en paralelo y utiliza la función interactiva p 102 Ambos proyectores y la Unidad táctil están encendidos a Presione el botón Menu del proyector Con el mando a distancia Con el panel de control b Seleccione Easy Interactive Function en E...

Страница 323: ...eleccione Calibración táctil Se mostrará el mensaje de ajuste de enfoque e Asegúrese de que la pantalla esté enfocada y a continuación seleccione Sí Aparecerá un punto en la parte superior izquierda de la pantalla de proyección ...

Страница 324: ... Repita el paso 6 hasta que todos los puntos desaparezcan Cuando todos los puntos desaparezcan la calibración táctil se habrá completado c Sitocalaposiciónincorrecta presioneelbotón Esc delmandoadistanciaodelpaneldecontrol Esta acción le devolverá al punto anterior No puede retroceder dos puntos Para cancelar la calibración táctil mantenga presionado el botón Esc durante dos segundos La calibració...

Страница 325: ...a utilice 3 tornillos M4 que puede adquirir en cualquier tienda Acople la Unidad táctil a la superficie del mismo nivel que la superficie de la pantalla Procedimiento de instalación Instale la Unidad táctil y a continuación conéctela al proyector Precaución Conecte la Unidad táctil solamente a EB 1460Ui EB 1450Ui No la conecte a ningún otro proyector o dispositivo a Encienda el proyector y a conti...

Страница 326: ...ad táctil d Seleccione Patrón instalación El patrón de instalación se mostrará en la imagen proyectada e Afloje el tornillo situado en la parte inferior de la tapa de los diales mediante un destornillador de estrella n º 2 disponible en el mercado ...

Страница 327: ... la Unidad táctil Le recomendamos que marque las siguientes posiciones de instalación para que ésta sea más fácil línea de centro del patrón de instalación Alinee con la línea de centro de la Unidad táctil 25 a 100 mm desde el borde superior de la imagen proyectada Alinee con el borde inferior de la Unidad táctil Unidad mm ...

Страница 328: ...ución Cuando instale la Unidad táctil en una superficie magnética tenga cuidado para que sus dedos o cualquier otra parte de su cuerpo no queden atrapados entre los imanes y la superficie de instalación El producto utiliza imanes potentes que podrían provocarle lesiones si sus dedos quedaran atrapados Pantallas no magnéticas acople los separadores y fíjelos con 3 tornillos M4 ...

Страница 329: ... ajustar el ángulo de la Unidad táctil Para obtener detalles sobre el ajuste del ángulo consulte p 72 c Cuando instale dos proyectores en paralelo y desee utilizar la función interactiva establezca las funciones interactivas de proyección múltiple por adelantado s Configuración de proyección múltiple p 98 Antes de ajustar el ángulo asegúrese de que se ha completado la calibración del lápiz interac...

Страница 330: ...tor b Seleccione Ajust Unidad táctil c Establezca Alimentación en On La alimentación de la Unidad táctil se activará y el indicador se iluminará en azul c Cuando la opción Alimentación esté establecida en On la próxima vez que encienda el proyector la Unidad táctil se encenderá automáticamente ...

Страница 331: ...Guía de instalación 96 d Seleccione Ajuste del ángulo ...

Страница 332: ...pizarra mediante el soporte s Ajuste del ángulo p 72 c Cuando instale la Unidad táctil mediante imanes pegue las etiquetas en las pestañas de los laterales de dicha unidad Haga coincidir el centro de las etiquetas con las pestañas Si la Unidad táctil cambia de posición utilice las etiquetas para volver a instalarla en la posición correcta Cuando haya finalizado de realizar los ajustes lleve a cabo...

Страница 333: ... proporcionada con el ordenador para saber cómo realizar la configuración Conecte un cable desde un ordenador a cada proyector el ordenador necesita dos puertos de salida de imagen Establezca el envío de las imágenes a varias pantallas desde un ordenador Configuración de proyección múltiple Siga los pasos que se indican a continuación cuando utilice la función de proyección múltiple a Establecer e...

Страница 334: ...ione Multi proyección en Extendida c Seleccione ID del proyector d Seleccione el número de ID para el proyector de destino e Presione el botón Menu para cerrar el menú Repita los pasos 1 a 5 para los proyectores restantes ...

Страница 335: ...lproyectorsemostraráenlapantallaproyectada Lapantallaseapagarádespués de aproximadamente tres segundos g Mientras mantiene presionado el botón ID presione el botón con el mismo número que el ID del proyector para el proyector que desea utilizar Las operaciones del mando a distancia para el proyector con el ID seleccionado se habilitarán ...

Страница 336: ...ia es 0 Cuando ID del proyector se establece en Off puede utilizar el proyector mediante el mando a distancia independientemente de la configuración de ID seleccionada utilizando dicho mando Cuando el ID del mando a distancia se establece en 0 puede utilizar todos los proyectores independientemente de la configuración de ID del proyector Ajustar la imagen en proyección múltiple Compruebe que el aj...

Страница 337: ... la estándar Esto solo está disponible cuando Consumo eléctrico se establece en Nor mal en el menú ECO Coincidencia colores Ajuste el color y el brillo en gradaciones desde todo blanco a todo negro Cuando dos proyectores se instalan en paralelo y utiliza la función interactiva Cuando se instalen dos proyectores en paralelo y desee utilizar la función interactiva después de ajustar la imagen para p...

Страница 338: ...ra ambos proyectores antes de realizar la configuración s Instalar la placa de fijación p 33 a Conecte los puertos de sincronización para cada proyector mediante el juego opcional de cables del mando a distancia ELPKC28 Cuando los proyectores se conecten por cable las operaciones del lápiz interactivo se estabilizarán El puerto de sincronización tiene tomas IN y OUT Cuando conecte un extremo del j...

Страница 339: ... que ha finalizado el ajuste de la imagen para la proyección múltiple Si realiza el ajuste de la imagen después de establecer la función interactiva la posición del lápiz puede no ser correcta s Ajustar la imagen en proyección múltiple p 101 El procedimiento difiere en función de si utiliza o no la Unidad táctil Cuando no utilice la Unidad táctil a Encienda el proyector de la izquierda y apague el...

Страница 340: ...Apéndice 105 b Presione el botón Menu Con el mando a distancia Con el panel de control c Seleccione Easy Interactive Function en Extendida d Seleccione Avanzado en General e Seleccione Multi proyección ...

Страница 341: ... Seleccione Izquierda g Calibre el lápiz s p 57 h Apague el proyector de la izquierda i Encienda el proyector de la derecha y realice los pasos 2 a 5 j Seleccione Derecha en Multi proyección k Calibre el lápiz s p 57 ...

Страница 342: ... Unidad táctil solo EB 1460Ui EB 1450Ui a Encienda el proyector de la izquierda y apague el de la derecha b Presione el botón Menu Con el mando a distancia Con el panel de control c Seleccione Easy Interactive Function en Extendida ...

Страница 343: ...Apéndice 108 d Seleccione Avanzado en General e Seleccione Multi proyección f Seleccione Izquierda g Calibre el lápiz s p 57 ...

Страница 344: ... Apague el proyector de la izquierda j Encienda el proyector de la derecha y realice los pasos 2 a 5 k Seleccione Derecha en Multi proyección l Calibre el lápiz s p 57 m Instalar y ajustar el ángulo para la Unidad táctil El procedimiento es diferente dependiendo del lugar en el que se vaya a instalar la Unidad táctil Cuando instale la Unidad táctil fuera de la pizarra mediante el soporte de la Uni...

Страница 345: ...Apéndice 110 o Realice la calibración táctil para cada proyector s p 87 ...

Страница 346: ...ción y Otros Horas lámpara y Estado del menú Información Realice la configuración por lotes antes de ajustar la posición de los proyectores Los valores de ajuste para la imagen proyectada como por ejemplo Keystone se copian en la función de configuración por lotes Silaconfiguraciónporlotesserealizadespuésdeajustarlaposicióndelosproyectores losajustes realizados pueden cambiar Mediante la función d...

Страница 347: ...d flash USB directamente al proyector Si la unidad flash USB se conecta al proyector a través de un concentrador USB es posible que la configuración no se guarde correctamente Conecte una unidad flash USB vacía Si la unidad flash USB contiene otros datos que no sea el archivo de configuración por lotes es posible que la configuración no se guarde correctamente Si ha guardado un archivo de configur...

Страница 348: ...chivo de configuración por lotes se está escribiendo Precaución No conecte el cable de alimentación desde el proyector mientras el archivo se esté escribiendo Si el cable de alimentación se desconecta es posible que el proyector no se inicie correctamente No desconecte la unidad flash USB del proyector mientras el archivo se está escribiendo Si la unidad flash USB se desconecta es posible que el p...

Страница 349: ... configuración no se copie correctamente c Mientras se mantiene presionado el botón Menu del mando a distancia o del panel de control conecte el cable de alimentación al proyector El color de los indicadores de estado y alimentación cambiará a azul y el de los indicadores de lámpara y temperatura a naranja Cuando todos los indicadores del proyector estén encendidos suelte el botón Menu El indicado...

Страница 350: ...fe el cable de alimentación del proyector y a continuación vuelva a enchufarlo y por último inténtelo de nuevo Parpadean los indicadores de alimenta ción y estado en azul y los indicadores de lámpara y temperatura en naranja todos ellos rápidamente La escritura de la configuración puede haber fallado y un error pue de haber ocurrido en el firmware del proyector Deje de utilizar el proyector quite ...

Страница 351: ...ryenlaplacadefijación Consulteelmanualdeusuariosuministradoconlacadena antirrobo para obtener instrucciones sobre cómo bloquearla La ranura de seguridad de este producto es compatible con el sistema de seguridad Microsaver fabricado por Kensington Consulte la siguiente información para obtener más detalles sobre el sistema de seguridad Microsaver http www kensington com Proyector Unidad táctil sol...

Страница 352: ...general OS X es una marca comercial de Apple Inc Microsoft y Windows son marcas comerciales o marcas registradas de Microsoft Corporation en Estados Unidos y u otros países SEIKO EPSON CORPORATION 2016 All rights reserved ...

Страница 353: ...Installation Guide Guide d installation Guía de instalación English Français Español Printed in China XX XX XX XXX ...

Отзывы: