background image

8

Scanner Basics

See these sections to learn about the basic features of your scanner.

Scanner Parts Locations
Changing the Power Off and Sleep Timer Settings

Scanner Parts Locations

See these sections to identify the parts on your scanner.

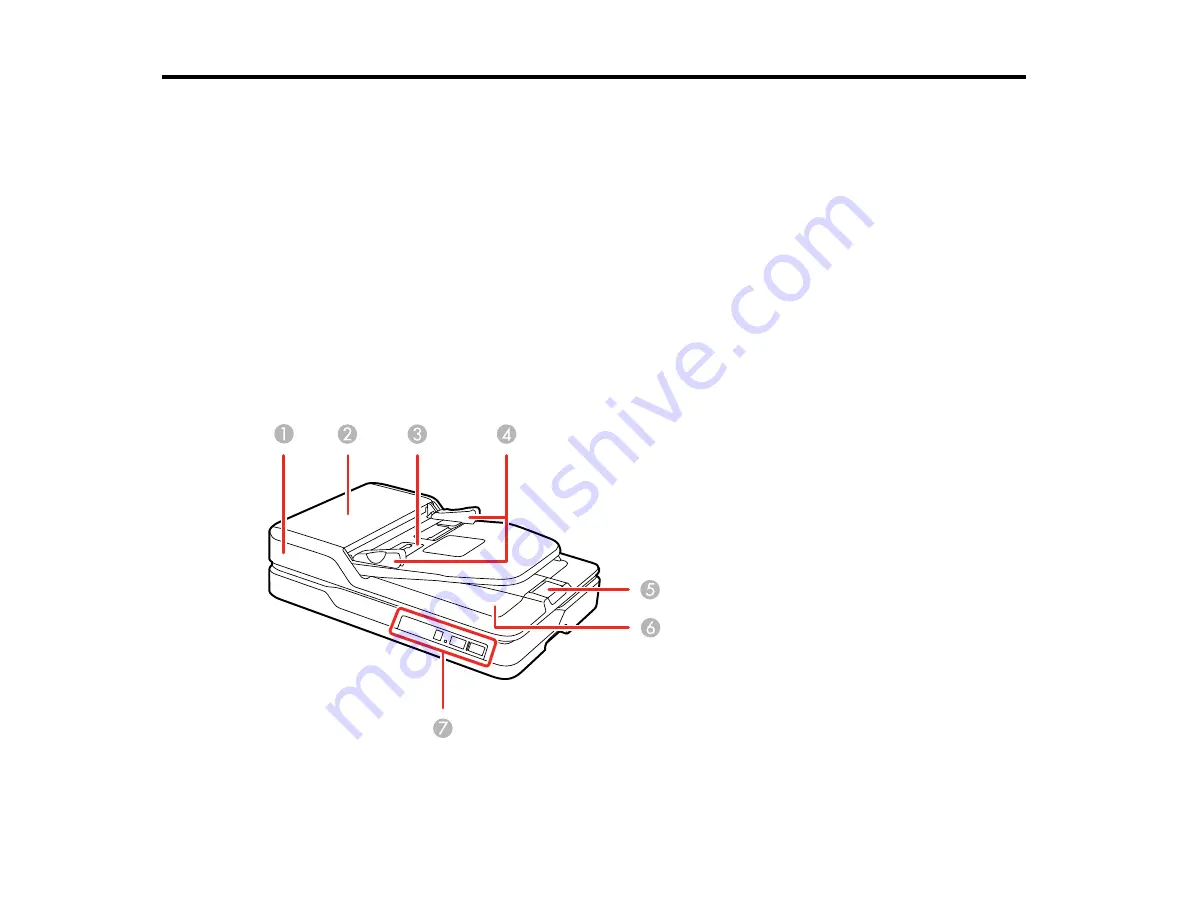
Scanner Parts
Scanner Buttons and Lights
Epson Scanner Accessories

Parent topic:

Scanner Basics

Scanner Parts

1

ADF (Automatic Document Feeder)

Содержание DS-1630

Страница 1: ...DS 1630 User s Guide ...

Страница 2: ......

Страница 3: ...nit 25 Network Interface Unit Control Panel 25 Connecting the Network Interface Unit 26 Setting Up Network Scanning 26 Scanning to Network Computers from the Network Interface Unit Windows 28 Scanning 30 Starting a Scan 30 Starting a Scan from a Scanner Button 30 Adding and Assigning Scan Jobs with Document Capture Pro Windows 31 Assigning Start Button Settings or Scan Jobs Mac 33 Starting a Scan ...

Страница 4: ...Scanner 77 Cleaning Your Scanner 77 Cleaning the ADF 77 Transporting Your Scanner 83 Solving Problems 84 Scanner Light Status 84 Solving Scanning Problems 85 Scanner Does Not Turn On or Turns Off Unexpectedly 85 Start Button Does Not Work as Expected 85 Scanning Software Does Not Operate Correctly 86 Cannot Start Epson Scan 2 86 Scanning is Slow 87 Solving Original Document Feeding Problems 87 Ori...

Страница 5: ...Mac 98 Where to Get Help 99 Technical Specifications 101 Windows System Requirements 101 Mac System Requirements 101 General Specifications 102 Dimension Specifications 103 Electrical Specifications 104 Environmental Specifications 104 Safety and Approvals Specifications 105 Notices 106 Important Safety Instructions 106 Restrictions on Copying 107 Default Delay Times for Power Management for Epson...

Страница 6: ......

Страница 7: ...7 DS 1630 User s Guide Welcome to the DS 1630 User s Guide For a printable PDF copy of this guide click here ...

Страница 8: ...nner Parts Locations Changing the Power Off and Sleep Timer Settings Scanner Parts Locations See these sections to identify the parts on your scanner Scanner Parts Scanner Buttons and Lights Epson Scanner Accessories Parent topic Scanner Basics Scanner Parts 1 ADF Automatic Document Feeder ...

Страница 9: ...9 2 ADF cover 3 Input tray 4 Edge guides 5 Stopper 6 Output tray 7 Control panel 1 Document mat ...

Страница 10: ...canner glass 1 AC inlet 2 USB port Parent topic Scanner Parts Locations Scanner Buttons and Lights 1 power button 2 error light 3 stop button 4 ready light 5 start button Parent topic Scanner Parts Locations ...

Страница 11: ...anner Parts Locations Changing the Power Off and Sleep Timer Settings You can use the Epson Scan 2 Utility to change the time period before the scanner enters sleep mode and turns off automatically 1 Do one of the following to access the Epson Scan 2 Utility Windows 10 Click and select EPSON Epson Scan 2 Utility Windows 8 x Navigate to the Apps screen and select Epson Scan 2 Utility Windows other ...

Страница 12: ...the scanner to go to sleep as the Sleep Timer setting 4 Select the length of time after which you want the scanner to automatically turn off when not in use as the Power Off Timer setting 5 Click Set to save the settings 6 Close the Epson Scan 2 Utility Parent topic Scanner Basics ...

Страница 13: ...g Standard Size Originals in the ADF Placing Long Originals in the ADF Original Document Specifications for the ADF Parent topic Placing Originals on the Scanner Related references Original Document Specifications for the ADF Placing Standard Size Originals in the ADF You can place multi page original documents in the Automatic Document Feeder ADF You can also use the ADF to scan both sides of a 2...

Страница 14: ...14 1 Remove any documents from the scanner glass Note Also wipe off any dust or stains from the areas shown here with a soft dry cloth ...

Страница 15: ...edge guides outward and raise the stopper Note If your originals are legal size 14 inches 356 mm or longer leave the stopper closed 3 Fan your stack of originals and tap them gently on a flat surface to even the edges ...

Страница 16: ...t the originals but not too tightly Parent topic Placing Originals in the Automatic Document Feeder Placing Long Originals in the ADF You can place one original that is 15 5 inches 393 8 mm or longer in the ADF Caution Make sure your original meets the specifications for the ADF before loading it ...

Страница 17: ...17 1 Remove any documents from the scanner glass Note Also wipe off any dust or stains from the areas shown here with a soft dry cloth 2 Slide the edge guides outward ...

Страница 18: ... 3 Insert your original into the ADF faceup and top edge first 4 Slide the edge guides against the original but not too tightly Note When scanning support your original as it feeds into and exits the ADF ...

Страница 19: ...paper type Yes A4 8 3 11 7 inches 210 297 mm Yes Legal 8 5 14 inches 216 356 mm No A5 5 8 8 2 inches 148 210 mm Yes A6 4 1 5 8 inches 105 148 mm No B5 7 2 10 1 inches 182 257 mm Yes Longer than 15 5 inches 393 8 mm 1 sheet No You can load original documents within the following range of sizes Maximum 8 5 120 0 inches 216 3048 mm for single sided scanning and 8 5 11 7 inches 216 297 mm for double s...

Страница 20: ...ached Originals with labels or tape not firmly attached Postcards Envelopes Business cards Plastic cards Carbon less paper Thermal paper Coated paper Parent topic Placing Originals in the Automatic Document Feeder Placing Originals on the Scanner Glass You can place originals directly on the scanner glass Caution Do not place heavy objects on the scanner glass and do not press on the glass with to...

Страница 21: ...21 1 Open the scanner cover Caution Be careful not to open the scanner cover more than 70 or you may damage it ...

Страница 22: ...22 2 Place your original facedown on the scanner glass with the top edge facing as shown Slide the original to the edges of the indicated corner ...

Страница 23: ...23 Note Move your original about 0 1 inch 2 5 mm away from the edges as shown to avoid cropping ...

Страница 24: ...ver gently to keep your original in place Note If your original is over 0 4 inch 10 mm thick leave the scanner cover open and gently press down on your original instead as you scan Parent topic Placing Originals on the Scanner ...

Страница 25: ... Network Interface Unit Control Panel 1 power button turns the unit on and off 2 LCD screen displays status operations and error messages 3 settings button selects product settings network settings and maintenance options 4 Reset button returns the LCD to the default screen 5 Stop button cancels scanning 6 OK button and arrows use the arrows to highlight an option and the OK button to select it 7 ...

Страница 26: ...o set up computers for network scanning using the Epson Scan 2 Utility Note Make a note of the IP address or host name of the Epson Network Interface Unit so you can enter it in these steps 1 Do one of the following to start the Epson Scan 2 Utility Windows 10 Click and select EPSON Epson Scan 2 Utility Windows 8 x Navigate to the Apps screen and select Epson Scan 2 Utility Windows other versions ...

Страница 27: ...27 You see a screen like this Note If you see an Enable Editing button Windows or a lock icon Mac click it so that you can modify the scanner settings 3 Select your scanner and click Add ...

Страница 28: ...pson Network Interface Unit and click Add 5 Click OK to save your settings and then close Epson Scan 2 Utility Parent topic Using the Network Interface Unit Scanning to Network Computers from the Network Interface Unit Windows You can scan to a network computer directly from the Epson Network Interface Unit Windows You first set up a scan job in Document Capture Pro and then select the computer yo...

Страница 29: ...ess the OK button Note If your scanner is part of a network group make sure to set the computer to the same network group or it will not appear on the LCD screen 3 If you set up a password in Document Capture Pro enter the password at the prompt 4 Select a scan job and press the OK button on the Epson Network Interface Unit 5 Press the start button on the scanner or Epson Network Interface Unit Yo...

Страница 30: ...ng Program Parent topic Scanning Starting a Scan from a Scanner Button You can scan using the start button on your scanner This automatically starts Document Capture Pro Windows or Document Capture Mac and the scan job you have assigned to the button Note Make sure Epson Scan 2 and Document Capture Pro Windows or Document Capture Mac are installed on the computer connected to the scanner 1 Make su...

Страница 31: ...n the Document Capture Pro program Note The settings may vary depending on the software version you are using See the help information in Document Capture Pro for details 1 Do one of the following to start Document Capture Pro Windows 10 Click and select Epson Software Document Capture Pro Windows 8 x Navigate to the Apps screen and select Document Capture Pro Windows other versions Click or Start...

Страница 32: ...32 You see a window like this 3 Click the Job Settings button Note If you do not see the button click the symbol in the Job bar ...

Страница 33: ... button click the Button Assignment icon 6 Select the job that you want to assign to the start button from the drop down list 7 Click OK then click OK again You can now use the assigned scan job when you scan with the start button on your product Parent topic Starting a Scan from a Scanner Button Assigning Start Button Settings or Scan Jobs Mac You can view or change the default scan settings when...

Страница 34: ...ter a name for the new job select settings as necessary and click OK You can now use the new scan job when you scan with Document Capture Note See the Help information in Document Capture for details 4 If you want to assign a scan job to the start button click the icon at the bottom of the window and click Event Settings 5 Select the job that you want to assign to the start button 6 Click OK Paren...

Страница 35: ...nned image to a file Windows 10 Click and select EPSON Epson Scan 2 Windows 8 x Navigate to the Apps screen and select Epson Scan 2 Windows other versions Click or Start and select All Programs or Programs Select EPSON Epson Scan 2 Epson Scan 2 Mac Open the Applications folder open the Epson Software folder and select Epson Scan 2 ...

Страница 36: ...36 You see an Epson Scan 2 window like this ...

Страница 37: ...pen the scanned image in the program 1 Open your scanning program and select its scanning option See your scanning program help for instructions 2 Select your product Note In certain programs you may need to select your product as the source first If you see a Select Source option choose it and select your product With Windows do not select a WIA option for your product not all scan functions will...

Страница 38: ...38 You see an Epson Scan 2 window like this ...

Страница 39: ... details 1 Load your original in the product 2 Do one of the following to start Document Capture Pro Windows 10 Click and select Epson Software Document Capture Pro Windows 8 x Navigate to the Apps screen and select Document Capture Pro Windows other versions Click or Start and select All Programs or Programs Select Epson Software Document Capture Pro You see the Document Capture Pro window You ma...

Страница 40: ...40 You see a window like this 4 Select Scan Settings from the Scan Setting Name list or select Scan Scan Settings from the menu bar ...

Страница 41: ...41 You see a window like this 5 Select any displayed settings you want to use and click OK Note See the help information in Document Capture Pro for details 6 Click Scan ...

Страница 42: ...red images click the Add Page s icon and follow the instructions on the screen 8 Check the scanned images and edit them as necessary Note See the help information in Document Capture Pro for details 9 Click one of the Destination icons to choose where to send your scanned files If you cannot see all of the icons below click the arrows next to the icons 10 Depending on the destination you chose cli...

Страница 43: ...o one of the following to start Document Capture Pro Windows 10 Click and select Epson Software Document Capture Pro Windows 8 x Navigate to the Apps screen and select Document Capture Pro Windows other versions Click or Start and select All Programs or Programs Select Epson Software Document Capture Pro You see the Document Capture Pro window You may see a screen asking you to select your scanner...

Страница 44: ...ck the Scan Settings button select any displayed settings you want to use and click OK Note See the help information in Document Capture Pro for details If you do not see the Scan Settings button click the symbol in the Scan and bar 7 Click one of the destination icons in the Scan and section of the window Your product starts scanning and you see the settings window 8 Select any destination settin...

Страница 45: ...er you specify You can select settings preview and change the scanned file settings as necessary Note The settings may vary depending on the software version you are using See the Help information in Document Capture for details 1 Load your original in the product 2 Open the Applications folder open the Epson Software folder and select Document Capture You see a window like this Note You may need ...

Страница 46: ...s 4 Select any displayed scan settings you want to use Note See the Help information in Document Capture for details 5 If you want to select detailed scan settings close the Scan Settings window open the Scan menu at the top of the Mac desktop and select Displays the EPSON Scan Setup Screen 6 Click the Scan icon and select any detailed scan settings you want to use from the Epson Scan 2 window 7 C...

Страница 47: ...tured images click the icon select Acquire from Scanner and repeat the previous steps 9 Check the scanned images and edit them as necessary 10 Click one of the Destination icons to choose where to send your scanned files If you cannot see all of the icons below click the arrow next to the icons 11 Depending on the destination you chose click OK or Send to complete the operation Parent topic Scanni...

Страница 48: ...can scan your document and save the scanned image in various file formats in your operating system s Documents or My Documents folder or open it in your scanning program You can preview the scanned image and select or change settings as necessary 1 Load your original in the product 2 Start Epson Scan 2 ...

Страница 49: ...49 You see this window ...

Страница 50: ... select Auto Detect to have Epson Scan 2 automatically detect the size You can select Customize to enter a custom size if necessary 6 Select your original image type and how you want it scanned as the Image Type setting 7 Select the Resolution setting you want to use for your scan 8 Select any of the additional settings that you want to use on the Main Settings tab 9 Click the Advanced Settings ta...

Страница 51: ...o save your scanned file as the Image Format setting If necessary select Options and select any desired format options 12 Select Settings to modify the file name settings Enter the file name for your scanned file in the File Name field 13 Select the location in which you want to save your scanned file as the Folder setting If necessary select Select to choose an alternate folder or create a new fo...

Страница 52: ...entation of the text may take longer to scan Correct Document Skew Corrects skewed originals image contents or both Add or edit pages after scanning Lets you add remove or edit the pages in a scan including rotating pages and changing the page order Note To save multiple pages in a single file you must select a file format that supports multiple pages such as PDF or Multi TIFF If you select anothe...

Страница 53: ...s Advanced Settings Tab You can select these additional scanning settings on the Epson Scan 2 Advanced Settings tab Not all adjustment settings may be available depending on other settings you have chosen or your scanner s features ...

Страница 54: ... the light and dark areas of the overall scanned image Gamma Adjusts the midtone density of the scanned image Threshold Adjusts the level at which black areas in text and line art are delineated improving text recognition in OCR Optical Character Recognition programs Unsharp Mask Makes the edges of certain image areas clearer Turn off this option to leave softer edges Descreening Removes the rippl...

Страница 55: ...A TIFF file format when multiple pages are saved to the same file allowing you to edit the images using a compatible program PDF pdf A document format that is readable by Windows and Mac systems using Adobe Reader Acrobat or other programs You can save multi page documents in one PDF file Searchable PDF pdf A document format that is readable by Windows and Mac systems using Adobe Reader Acrobat or...

Страница 56: ...anning Scanning Special Projects Your product s scanning software offers various options to help you quickly complete special scan projects Scanning Two Originals onto One Sheet Stitching Images Scanning Multi Page Originals as Separate Files Saving Scanned Documents as a Searchable PDF Using Epson Scan 2 Saving Scanned Documents as a Searchable PDF with Document Capture Mac Saving a Scan as an Of...

Страница 57: ...ure Pro Windows 8 x Navigate to the Apps screen and select Document Capture Pro Windows other versions Click or Start and select All Programs or Programs Select Epson Software Document Capture Pro 3 If you see a Switch to Simple View button in the upper right corner of the window click it You see a window like this ...

Страница 58: ...58 4 Click the Scan Settings button then click Detailed Settings You see an Epson Scan 2 window like this ...

Страница 59: ...Scanning Special Projects Scanning Multi Page Originals as Separate Files You can use Document Capture Pro Windows to scan multi page originals as separate scanned files You indicate how the separate files are created by defining a maximum page count per file or by inserting blank pages barcodes or characters that can be detected by the software as separation markers Note The settings may vary dep...

Страница 60: ...60 You see the Document Capture Pro window 3 If you see a Switch to Simple View button in the upper right corner of the window click it You see a window like this ...

Страница 61: ...to use and click OK Note See the help information in Document Capture Pro for details 6 Click one of the destination icons except Print in the Scan and section of the window Your product starts scanning and you see the settings window 7 Select the Apply job separation checkbox 8 Click Separation Settings ...

Страница 62: ...See the help information in Document Capture Pro for details 10 If necessary select Create Folder and select a folder name 11 Select any other folder naming settings you want and click OK then click OK again Your originals are saved into separate files and folders as specified Parent topic Scanning Special Projects ...

Страница 63: ...ou install your product software as instructed on the Start Here sheet If you install your scanner software programs individually be sure to also install this component if you want to perform OCR 1 Load your original in the product for scanning 2 Start Epson Scan 2 3 Select your scan settings 4 Click Preview and adjust the area you want to scan if necessary 5 If you are using the ADF reload the ej...

Страница 64: ... Related topics Placing Originals on the Scanner Saving Scanned Documents as a Searchable PDF with Document Capture Mac You can scan a document with Document Capture and save the text in a searchable PDF In a searchable PDF text is recognized using Optical Character Recognition OCR and then embedded in the scanned original Note The settings may vary depending on the software version you are using ...

Страница 65: ...65 You see a window like this Note You may need to select your scanner from the scanner list 3 Click the Scan icon ...

Страница 66: ...s 4 Select any displayed scan settings you want to use Note See the Help information in Document Capture for details 5 If you want to select detailed scan settings close the Scan Settings window open the Scan menu at the top of the Mac desktop and select Displays the EPSON Scan Setup Screen 6 Click the Scan icon and select any detailed scan settings you want to use from the Epson Scan 2 window 7 C...

Страница 67: ...t the previous steps 9 Check the scanned images and edit them as necessary 10 Open the File menu at the top of the Mac desktop and select Save As 11 Select PDF as the File Type setting and click the Options button 12 Select the Create Searchable PDF checkbox and click OK 13 Click one of the Destination icons to choose where to send your scanned file If you cannot see all of the icons below click t...

Страница 68: ...u are using See the help information in Document Capture Pro for details 1 Load your original in the product 2 Do one of the following to start Document Capture Pro Windows 10 Click and select Epson Software Document Capture Pro Windows 8 x Navigate to the Apps screen and select Document Capture Pro Windows other versions Click or Start and select All Programs or Programs Select Epson Software Doc...

Страница 69: ...icons except Print to choose where to send your scanned files Your product starts scanning and you see the settings window 7 Select the Office format file you want to use from the File Type drop down list Note The first time you select an Office format file you are prompted to download a plug in update for Microsoft Office files Select Yes to download and install the plug in 8 Click Option to disp...

Страница 70: ...e Mac You can use Document Capture Mac to save your scans in one of these Microsoft Office file fomats Microsoft Word docx and Microsoft Excel xlsx Note The settings may vary depending on the software version you are using See the Help information in Document Capture for details 1 Load your original in the product for scanning 2 Open the Applications folder open the Epson Software folder and selec...

Страница 71: ...est of these steps 4 Select any displayed scan settings you want to use Note See the Help information in Document Capture for details 5 If you want to select detailed scan settings close the Scan Settings window open the Scan menu at the top of the Mac desktop and select Displays the EPSON Scan Setup Screen 6 Click the Scan icon and select any detailed scan settings you want to use from the Epson ...

Страница 72: ...vious steps 9 Check the scanned images and edit them as necessary 10 Open the File menu at the top of the Mac desktop and select Save As 11 Select DOCX Word or XLSX Excel as the File Type setting Note The first time you select an Office file type setting in Document Capture you see a prompt to download a necessary plug in for Microsoft Office files Select Yes and follow the on screen instructions ...

Страница 73: ...int server or a cloud service Note The settings may vary depending on the software version you are using See the help information in Document Capture Pro for details 1 Load your original in the product 2 Do one of the following to start Document Capture Pro Windows 10 Click and select Epson Software Document Capture Pro Windows 8 x Navigate to the Apps screen and select Document Capture Pro Window...

Страница 74: ...74 You see a window like this ...

Страница 75: ...Your product starts scanning and you see the settings window Note If you cannot see all of the icons the service software may not be installed or the service may not be available on your platform 7 Enter any required information to set up the destination You may need to log in to your cloud service to authenticate the connection and allow Document Capture Pro to access the cloud service If you hav...

Страница 76: ...Adjust any settings and click OK Note See the help information in Document Capture Pro for details Your originals are uploaded to the indicated server or cloud service Parent topic Scanning Special Projects ...

Страница 77: ...1 Turn off the scanner using the power button 2 Unplug the AC power cord 3 Disconnect the USB cable 4 Clean the outer case with a cloth dampened with mild detergent and water 5 If the scanner glass gets dirty clean it with a soft dry cloth If the glass surface is stained with grease or some other hard to remove material use a small amount of glass cleaner on a soft cloth to remove it Wipe off all ...

Страница 78: ...Do not use oil or other lubricants inside the product or let water get inside it Do not open the product case Do not press the surface of the scanner glass with any force and be careful not to scratch or damage the scanner glass A damaged glass surface can decrease the scan quality 1 Open the ADF cover ...

Страница 79: ...79 2 Use a soft dry lint free cloth microfiber is recommended or the Epson cleaning kit to clean the rollers 3 Close the ADF cover ...

Страница 80: ...80 4 Open the ADF ...

Страница 81: ...81 5 Press the tabs on the document mat and remove the mat ...

Страница 82: ...de of the clear portion of the document mat Caution Do not wipe the clear portion with too much force or you may damage it 7 Slide the notches on the base of the document mat into the scanner lid and push the top tabs into place until they click 8 Close the ADF Parent topic Cleaning and Transporting Your Scanner ...

Страница 83: ...2 Turn off the scanner using the power button 3 Unplug the AC power cord 4 Disconnect the USB cable 5 Place the scanner in its original packing materials if possible or use equivalent materials with cushioning around the scanner Caution When carrying the scanner hold it from the bottom on both sides Avoid tilting the scanner or the ADF may open and cause injury Parent topic Cleaning and Transporti...

Страница 84: ...ight Light status Condition solution error light is flashing slowly A paper jam has occurred Open the ADF cover and remove any jammed originals Close the cover to clear the error and load your originals again error and ready lights are flashing fast A fatal error has occurred Turn the product off and then back on again If the error continues contact Epson for support error light is on ready light ...

Страница 85: ...urely connected to the scanner and to a working electrical outlet If the scanner turns off unexpectedly you may need to adjust the Power Off Timer setting in the Epson Scan 2 Utility Parent topic Solving Scanning Problems Related tasks Changing the Power Off and Sleep Timer Settings Start Button Does Not Work as Expected If the start start button does not start the correct program or perform the c...

Страница 86: ...der Imaging Devices in the Device Manager If you connected the scanner using a USB cable make sure it is connected directly to your computer or through only one USB hub If you are using a TWAIN compliant program make sure that the correct product is selected as the Scanner or Source setting If you are using the scanner with the optional Network Interface Unit make sure the network cable is securel...

Страница 87: ...ng time the scanner may have automatically slowed down to protect the scanner mechanism from overheating or becoming damaged Let the scanner rest with the power on for 30 minutes then try scanning again If you are running virus protection or other security software exclude the TWAIN log files from monitoring or set the TWAIN log file as read only See your virus protection or security software inst...

Страница 88: ...ent is not curled or creased Try cleaning the inside of the ADF Parent topic Solving Original Document Feeding Problems Related references Original Document Specifications for the ADF Related tasks Cleaning the ADF Related topics Placing Originals on the Scanner Originals Jam in the Automatic Document Feeder If your originals jam in the ADF follow the steps here to clear the jam 1 Remove your orig...

Страница 89: ...89 3 If you cannot remove the originals make sure the ADF cover is open and raise the ADF ...

Страница 90: ...90 4 Press the tabs on the document mat and remove the mat ...

Страница 91: ... remove any jammed originals 6 Slide the notches on the base of the document mat into the scanner lid and push the top tabs into place until they click 7 Close the ADF then close the ADF cover 8 Reload your originals ...

Страница 92: ...chy at the Edges Image is Too Dark Back of Original Image Appears in Scanned Image Characters are not Recognized During Conversion to Editable Text OCR Binding Margins on a Scanned Booklet are Blurry Ripple Patterns Appear in an Image Scanned Image Colors Do Not Match Original Colors Scanned Image Edges are Cropped Resetting the Epson Scan 2 Settings Parent topic Solving Problems Image Consists of...

Страница 93: ... Scanner Straight Lines in an Image Appear Crooked If straight lines in an original appear crooked in a scanned image make sure to place your original straight when you scan it Parent topic Solving Scanned Image Quality Problems Related tasks Cleaning the ADF Related topics Placing Originals on the Scanner Image is Distorted or Blurry If a scanned image appears distorted or blurry try these soluti...

Страница 94: ...ed original cover its edges with paper to block external light as you scan it Parent topic Solving Scanned Image Quality Problems Image is Too Dark If your scanned image is too dark try these solutions If the Image Type is set to Color or Grayscale adjust the Brightness setting Check the brightness and contrast settings of your computer monitor Parent topic Solving Scanned Image Quality Problems R...

Страница 95: ... Set the Image Type to Grayscale Set the scanning resolution between 200 and 600 dpi If the original document is in landscape mode set the Rotate setting to Auto in Epson Scan 2 If you are using OCR software check the manual for any additional adjustments Parent topic Solving Scanned Image Quality Problems Related references Additional Scanning Settings Advanced Settings Tab Related tasks Scanning...

Страница 96: ...ing in Epson Scan 2 Scanned Image Colors Do Not Match Original Colors Printed colors can never exactly match the colors on your computer monitor because printers and monitors use different color systems monitors use RGB red green and blue and printers typically use CMYK cyan magenta yellow and black Check the color matching and color management capabilities of your computer display adapter and the...

Страница 97: ...EPSON Epson Scan 2 Utility Windows 8 x Navigate to the Apps screen and select Epson Scan 2 Utility Windows other versions Click or Start and select All Programs or Programs Select EPSON Epson Scan 2 Epson Scan 2 Utility Mac Open the Applications folder open the Epson Software folder and select Epson Scan 2 Utility 2 Click the Other tab 3 Click Reset Note If resetting the Epson Scan 2 settings does...

Страница 98: ...anner software program and click Uninstall Change 4 Restart your computer then see the Start Here sheet to re install your software Note If you find that re installing your scanner software does not solve a problem contact Epson Parent topic Uninstall Your Scanner Software Uninstalling Scanner Software Mac In most cases you do not need to uninstall your scanner software before re installing it How...

Страница 99: ...ies and documentation get FAQs and troubleshooting advice or e mail Epson with your questions Speak to a Support Representative Before you call Epson for support please have the following information ready Product name Product serial number located on a label on the product Proof of purchase such as a store receipt and date of purchase Computer configuration Description of the problem Then call U ...

Страница 100: ...sories at epson com U S sales epson ca Canadian sales or epson com jm Caribbean sales You can also purchase accessories from an Epson authorized reseller To find the nearest one call 800 GO EPSON 800 463 7766 in the U S or 800 807 7766 in Canada Parent topic Solving Problems ...

Страница 101: ...cifications Safety and Approvals Specifications Windows System Requirements To use your product and its software your computer should use one of these Microsoft operating systems Windows 10 Windows 8 x Windows 7 Note For the latest product software available for your operating system visit the Epson support site at epson com support U S epson ca support Canada or epson com jm support Caribbean sel...

Страница 102: ...nd select Downloads Parent topic Technical Specifications General Specifications Scanner type Flatbed color with ADF Photoelectric device CIS Document size ADF double sided Maximum 8 5 11 7 inches 216 297 mm Minimum 3 5 6 7 inches 89 170 mm ADF single sided Maximum 8 5 15 5 inches 216 394 mm Minimum 3 5 5 0 inches 89 127 mm ADF single sided long paper mode 300 dpi Maximum 8 5 120 0 inches 216 3048...

Страница 103: ...nts Image data Color 30 bits per pixel internal 10 bits per pixel per color internal 24 bits per pixel external 8 bits per pixel per color external Grayscale 10 bits per pixel internal 8 bits per pixel external Black and white 10 bits per pixel internal 1 bits per pixel external Interface One USB 3 0 SuperSpeed Type B port Light source RGB LED Parent topic Technical Specifications Dimension Specif...

Страница 104: ...imately 5 8 W Sleep mode Approximately 0 8 W Power off mode Approximately 0 15 W Power consumption 220 to 240 V model Operating Approximately 11 W Ready mode Approximately 6 2 W Sleep mode Approximately 0 9 W Power off mode Approximately 0 25 W Parent topic Technical Specifications Environmental Specifications Temperature Operating 50 to 95 F 10 to 35 C Storage 4 to 140 F 20 to 60 C Humidity non c...

Страница 105: ...Specifications Safety and Approvals Specifications United States Safety UL60950 1 EMC FCC part 15 Subpart B class B Canada Safety CAN CSA C22 2 No 60950 1 EMC CAN CSA CEI IEC CISPR 22 Class B Parent topic Technical Specifications ...

Страница 106: ... cable to reach it easily Do not use with wet hands When connecting this product to a computer or other device with a cable ensure the correct orientation of the connectors Each connector has only one correct orientation Inserting a connector in the wrong orientation may damage both devices connected by the cable Do not insert objects into any opening as they may touch dangerous voltage points or ...

Страница 107: ... scanner and the power cord and refer servicing to qualified service personnel under the following conditions The power cord or plug is damaged liquid has entered the scanner the scanner has been dropped or the case has been damaged the scanner does not operate normally or exhibits a distinct change in performance Do not adjust controls that are not covered by the operating instructions Unplug the...

Страница 108: ...utes between you and Epson The term Dispute is meant to have the broadest meaning permissible under law and includes any dispute claim controversy or action between you and Epson arising out of or relating to this Agreement Epson branded products hardware and including any related software or other transaction involving you and Epson whether in contract warranty misrepresentation fraud tort intent...

Страница 109: ...the small claims court of your state or municipality if the action is within that court s jurisdiction and is pending only in that court 1 5 WAIVER OF CLASS ACTIONS AND CLASS ARBITRATIONS YOU AND EPSON AGREE THAT EACH PARTY MAY BRING DISPUTES AGAINST THE OTHER PARTY ONLY IN AN INDIVIDUAL CAPACITY AND NOT AS A PLAINTIFF OR CLASS MEMBER IN ANY CLASS OR REPRESENTATIVE PROCEEDING INCLUDING WITHOUT LIM...

Страница 110: ...propriate filing fee to JAMS 500 North State College Blvd Suite 600 Orange CA 92868 U S A iii Send one copy of the Demand for Arbitration to the other party same address as the Dispute Notice or as otherwise agreed by the parties b Hearing Format During the arbitration the amount of any settlement offer made shall not be disclosed to the arbitrator until after the arbitrator determines the amount ...

Страница 111: ...te resolution procedure and class action waiver provisions other than a change to Epson s address in this Agreement Epson will obtain your affirmative assent to the applicable amendment If you do not affirmatively assent to the applicable amendment you are agreeing that you will arbitrate any Dispute between the parties in accordance with the language of this Section 1 or resolve disputes as provi...

Страница 112: ...e liable for any damages or problems arising from the use of any options or any consumable products other than those designated as Original Epson Products or Epson Approved Products by Seiko Epson Corporation Seiko Epson Corporation shall not be held liable for any damage resulting from electromagnetic interference that occurs from the use of any interface cables other than those designated as Eps...

Страница 113: ...ub infozip license html indefinitely and a copy at http www info zip org pub infozip license html Copyright c 1990 2007 Info ZIP All rights reserved For the purposes of this copyright and license Info ZIP is defined as the following set of individuals Mark Adler John Bush Karl Davis Harald Denker Jean Michel Dubois Jean loup Gailly Hunter Goatley Ed Gordon Ian Gorman Chris Herborth Dirk Haase Greg...

Страница 114: ...ins the right to use the names Info ZIP Zip UnZip UnZipSFX WiZ Pocket UnZip Pocket Zip and MacZip for its own source and binary releases Parent topic Copyright Notice libTIFF Software Acknowledgment Copyright 1988 1997 Sam Leffler Copyright 1991 1997 Silicon Graphics Inc Permission to use copy modify distribute and sell this software and its documentation for any purpose is hereby granted without ...

Страница 115: ...product While some countries laws permit limited copying or reuse of copyrighted material in certain circumstances those circumstances may not be as broad as some people assume Contact your legal advisor for any questions regarding copyright law Parent topic Copyright Notice Copyright Attribution 2019 Epson America Inc 12 19 CPD 51808R3 Parent topic Copyright Notice ...

Отзывы: