


EPSON Stylus CX4100/CX4200/CX4700/CX4800/DX4200/DX4800/DX4850
Revision A
ADJUSTMENT
Adjustment by Using Adjustment Program
176
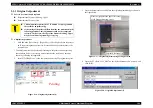
5.2.5 Ink Charge
Adjustment procedure
1. Select “Ink charge” in the Adjustment Program.
2. Click the [Ink charge] button to perform the initial ink charge setting.
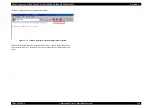
5.2.6 Head ID Input
Adjustment procedure
1. Select “Input Head ID” in the Adjustment Program.
2. Input the 13-digits code of the Head ID label applied to the Print Head. Enter
the Head ID from left to right on the top row and from top to bottom in due
order.
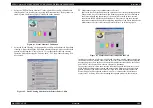
5.2.7 Top Margin Adjustment
Adjustment procedure
1. Set Normal Paper A4/Letter on the Paper Support.
2. Select “Top margin adjustment” in the Adjustment Program.
3. Click the [Print] button to print the Top margin adjustment pattern.
4. Confirmed the printed pattern and measure exact distance from Paper top
edge to a line.
5. Input your decided parameter to the edit box and click the [Input] button.
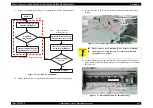
Figure 5-1. Top Margin Adjustment Printing Pattern
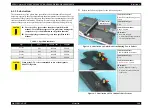
5.2.8 First Dot Adjustment
Adjustment procedure
1. Set Photo Paper A4/Letter on the Paper Support.
2. Select “First dot position adjustment” in the Adjustment Program.
3. Click the [Print] button to print the First dot position adjustment pattern.
4. Check the printed patterns and select a pattern number that has 5mm margin
from the paper edge.
5. Click the [Input] button to write the adjustment value of checked item.
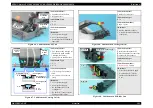
[Treatment procedure for NG product]
1. Replace the repaired (replaced) part with new one.
2. Print the check pattern, and check the adjustment result.
3. If the result is NG level, confirm the installation condition of removed parts
during disassembly.
4. Perform Step 2 again.
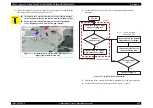
Figure 5-2. First dot position adjustment Printing Pattern
[Judging Standard]
The distance from a paper top edge to a line is:
• 3.7 to 5.1mm Choose the “-” from a combobox.
• 2.3 to 3.7mm Choose the “0” from a combobox.
• 0.9 to 2.3mm Choose the “+” from a combobox.
-4
0
4
8
[Judging Standard]
Standard: 5mm away from left edge.
Содержание CX4200 - Stylus Color Inkjet
Страница 9: ...C H A P T E R 1 PRODUCTDESCRIPTION ...
Страница 60: ...C H A P T E R 2 OPERATINGPRINCIPLES ...
Страница 87: ...C H A P T E R 3 TROUBLESHOOTING ...
Страница 121: ...C H A P T E R 4 DISASSEMBLY ASSEMBLY ...
Страница 171: ...C H A P T E R 5 ADJUSTMENT ...
Страница 187: ...C H A P T E R 6 MAINTENANCE ...
Страница 194: ...C H A P T E R 7 APPENDIX ...
Страница 217: ...Model PX A650 Stylus CX4700 CX4800 DX4800 DX4850 CX4100 CX4200 DX4200 Board C610 MAIN Rev C Sheet 1 2 ...
Страница 218: ...Model PX A650 Stylus CX4700 CX4800 DX4800 DX4850 CX4100 CX4200 DX4200 Board C610 MAIN Rev A Sheet 2 2 ...
Страница 219: ...Model PX A650 Stylus CX4700 CX4800 DX4800 DX4850 CX4100 CX4200 DX4200 Board C610 PSB Rev B Sheet 1 1 ...
Страница 220: ...Model PX A650 Stylus CX4700 CX4800 DX4800 DX4850 CX4100 CX4200 DX4200 Board C610 PSE Rev B Sheet 1 1 ...
Страница 221: ...Model PX A650 Stylus CX4700 CX4800 DX4800 DX4850 Board C571 PNL Rev D Sheet 1 1 ...
Страница 222: ...Model Stylus CX4100 CX4200 DX4200 Board C577 PNL Rev A Sheet 1 1 ...
Страница 223: ...Model PX A650 Stylus CX4700 CX4800 DX4800 DX4850 CX4100 CX4200 DX4200 Board C610 I F Rev B Sheet 1 1 ...