background image

Environmental Specifications

Temperature
/humidity

Printing

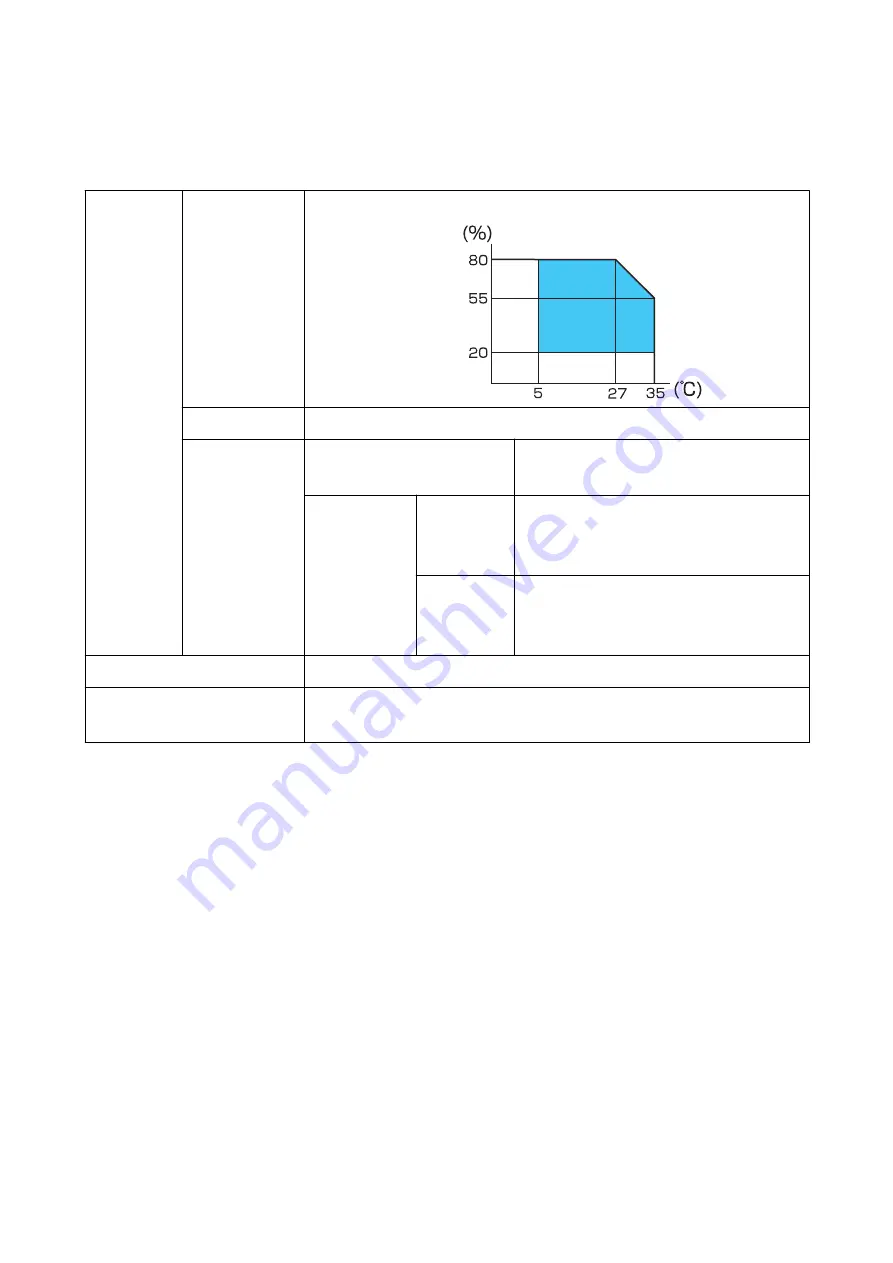
5 to 35°C, 20 to 80%RH without condensation (the blue-colored range in the graph)

Barcode printing

15 to 35°C, 20 to 85% RH without condensation

Storage

When packed

(Ink not charged)

-20 to 60°C, 5 to 85% RH without condensation

(When -20°C or 60°C, within 120 hours)

With ink
charged

Gloss black
ink

-15 to 40°C

(Within 6 months at 0 to 25°C)

(Within 1 month at 40°C)

Matte black
ink

-10 to 40°C

(Within 6 months at 0 to 25°C)

(Within 1 month at 40°C)

Elevation

0 to 3000 m

Noise

Approx. 58 dB

Based on Epson evaluation conditions.

CW-C4000 Series     User’s Guide

Specifications

78

Содержание CW-C4000 Series

Страница 1: ...User s Guide M00142600 EN ...

Страница 2: ...29 How to Replace the Ink Cartridges 29 Replacing the Maintenance Box 32 Checking the Amount of Empty Space in the Maintenance Box 32 How to Replace the Maintenance Box 32 Printer Driver Settings 35 Media Definition 35 Media Name 35 Width 36 Length 36 Gap Between Labels 36 Media Form 36 Media Saving 37 Media Coating Type 37 Print Quality 37 Color Correction 38 Spot Color Setting 38 Settings For Pa...

Страница 3: ... Disappear 69 Roll Paper is Jammed 70 Fanfold Paper is Jammed 72 Specifications Product Specifications 74 Electrical Specifications 76 Overall Dimensions 77 Environmental Specifications 78 Paper Specifications 79 Ink Cartridge 80 Maintenance Box 81 Appendix Consumables and Options 82 Ink Cartridge 82 Maintenance Box 83 OT PT40 84 OT WA34 86 Restriction of Use 89 Notes 90 Trademarks 90 CW C4000 Ser...

Страница 4: ...eference Guide Provides information necessary for installing the product performing daily tasks and developing a system using the product Download this document from the following URL https www epson biz com Manual viewable with PC Online Video Manual The videos provides a clear description of the setup procedure Download this document from the following URL https www epson biz com prd cw c4k inf ...

Страница 5: ...rning Handling the product improperly by ignoring this symbol can lead to death or serious injury Caution Handling the product improperly by ignoring this symbol can lead to injury and property damage Symbols for General Information cImportant Indicates information with which you must comply when using the product Mishandling due to ignoring this information may cause the product to fail or malfun...

Страница 6: ...d from the CD ROM included with the product Name Overview Install Navi Allows you to install the printer driver and other software and also connect the product with the computer Printer driver Driver to print from Windows applications The utility CW C4000 Series PrinterSetting for configuring the printer settings can be started from the driver For details on how to use the driver refer to Help or ...

Страница 7: ...ration panel Menu Printer Status Print Firmware Version How to Check the Printer Driver Version You can check the version in the printer driver screen A Printer driver version Screens in This Manual The screens in this manual and the screens actually displayed in Windows may differ depending on the product used and operating system Unless otherwise specified the screens in this manual are those wh...

Страница 8: ...substances such as alcohol or paint thinner present or near fire Otherwise electric shock or fire may occur Shut down the product immediately if it produces smoke a strange odor or unusual noise Otherwise electric shock or fire may occur If an abnormality occurs immediately turn off the power and remove the plug from the outlet and then contact qualified service personnel for advice Shut down the ...

Страница 9: ...proper procedures Doing so may cause fire or injury Follow the instructions in this manual to install them properly Before moving the product shut down and unplug the product and make sure that all the cables are disconnected Failure to do so may damage a cable causing electric shock or fire Do not subject the product to vibration or shock while the power is on Doing so may cause printing malfunct...

Страница 10: ...ord Do not lay the power cord near a heating appliance Do not insert or remove the power plug with a wet hand Doing so may cause electric shock Do not connect many power cords to one outlet Doing so may cause fire Supply power directly from a power outlet Regularly disconnect the power plug from the outlet and clean the base of the prongs and between the prongs Leaving the power plug connected to ...

Страница 11: ...nk remains in the used ink cartridges All the ink colors are consumed also for the maintenance operations when an ink cartridge is replaced and for print head cleaning Do not turn off the power or open the ink cartridge cover during ink charging while the power LED lamp is flashing Opening the cover may cause the ink to be recharged resulting in more ink being consumed Also it may result in normal...

Страница 12: ...ed later When the printer is powered off with the power button the print head is automatically capped to prevent the ink from drying When you will not use the printer after installing the ink cartridges be sure to turn the power off with the power button Do not pull out the power plug or turn off the breaker while the power is on Printing on water repellent paper such as art paper which is slow dr...

Страница 13: ...ur skin eyes or mouth take the following actions When ink gets onto your skin immediately wash the area with soap and water When ink gets into your eyes immediately flush them with water Leaving the ink as is may result in bloodshot eyes or mild inflammation If something is wrong immediately consult with a doctor When ink gets into your mouth immediately spit it out and consult with a doctor Do no...

Страница 14: ...se injury Caution Do not touch the movable blade of the auto cutter with a hand Doing so may cause injury Caution To prevent fingers from being trapped the lock mechanism is activated to stop the cover closing if the unit is raised up from the installation surface When using the product install it on a level surface CW C4000 Series User s Guide Before use 14 ...

Страница 15: ... width mm Gap between labels mm Continuous plain paper without black marks 1 Roll paper 25 4 to 108 Continuous plain paper without black marks 1 Fanfold paper 50 to 108 Continuous plain paper without black marks Roll paper 25 4 to 108 Full page label with or without black marks Roll paper 25 4 to 112 21 4 to 108 Die cut label Gap 2 Roll paper 25 4 to 112 21 4 to 108 2 0 to 6 0 Die cut label withou...

Страница 16: ...han 10 mm in length are cut automatically the printed label may adhere to the cutter blade and become difficult to remove Depending on shape thickness and stiffness of die cut labels the labels may peel off their backing paper inside the printer When you want to use die cut labels that do not meet the paper specifications contact qualified service personnel for advice Paper Types Supported paper t...

Страница 17: ...load paper like the following Such paper will cause paper jams and print stains Thermal paper Paper joined together by tape etc Paper joined to the core by tape etc Paper of A size B size etc CW C4000 Series User s Guide Before use 17 ...

Страница 18: ... Paper with transparent backing paper CW C4000 Series User s Guide Before use 18 ...

Страница 19: ...to lock the paper ejection guides 3 Maintenance box cover Open this cover to install or replace the maintenance box U Replacing the Maintenance Box on page 32 4 Front cover Open this cover to load or replace paper 5 Ink cartridge cover Open this cover to install or replace the ink cartridge U Replacing the Ink Cartridges on page 29 6 Paper ejection guides These guides are for preventing the paper ...

Страница 20: ...e roll paper guides Push down this lever to lock the roll paper guides 2 Roll paper guides These guides are for fixing the roll paper in place Adjust them to match the paper width 3 Shutter Adjust this to match the paper width U Adjusting the Shutters on page 51 CW C4000 Series User s Guide Before use 20 ...

Страница 21: ... Fanfold paper guides These guides are for preventing the paper from getting out of position when fed into the printer Adjust them to match the paper width 3 Paper feed guide Attach this cover inside the front cover when using fanfold paper 4 Rear cover Open this cover to load or replace the fanfold paper U Loading Fanfold Paper on page 46 CW C4000 Series User s Guide Before use 21 ...

Страница 22: ...saddle to prevent disconnection of the cable 2 AC inlet Connect the power cable 3 LAN port Connect a LAN cable 4 USB B port Connect a USB Type B cable 5 USB A port for connecting an optional device Connect the optional Wireless LAN Unit CW C4000 Series User s Guide Before use 22 ...

Страница 23: ...se LED Stays on or flashes while the printer is paused 2 power button Turns on or off the printer 3 home button Displays the Home screen 4 back button Use to return to the previous screen 5 cut button Use to cut paper 6 arrows buttons and OK button Use the buttons to select a menu item and then press the OK button to activate the selected menu or setting 7 feed button Press this briefly to feed pa...

Страница 24: ...urrent page is finished Press this button again to resume printing If this button is pressed while the printer is idling the printer is paused Press this button again to return the printer to its idling state 10 Screen Status of the printer menus and error messages are displayed CW C4000 Series User s Guide Before use 24 ...

Страница 25: ...he Power On Hold down the power button until the power LED lights up Turning the Power Off Hold down the power button until a power off confirmation message is displayed Then select Yes on the confirmation screen The power LED goes out and the printer is turned off CW C4000 Series User s Guide Basic Operation 25 ...

Страница 26: ...28 Checking the Paper Information Information of currently loaded paper paper type and paper source setting is displayed on the home screen Note Touch this area to directly access the Paper Settings menus You can also make the paper settings using the printer driver U Printer Driver Settings on page 35 If the settings differ between the operation panel and the printer driver the settings of the pr...

Страница 27: ...an check the print head nozzles for clogging To print the check patterns select the menu as described below Using the Operation Panel Menu Maintenance Print Head Nozzle Check Using the Printer Driver Click Nozzle Check on the Printer Utilities tab Using the WebConfig Select Print Nozzle Check Pattern on the Maintenance window and then click Start CW C4000 Series User s Guide Basic Operation 27 ...

Страница 28: ...ou can also print a list of the fonts and bar codes that are already registered in the printer or the newly registered images and templates If the Wireless LAN Unit has been connected to the printer wireless network status and settings are printed on the Network Settings section of the status sheet Checking Network Connection and Settings You can check the network connection status and settings by...

Страница 29: ...int until you are prompted to replace the ink cartridge Replace the ink cartridge as necessary How to Replace the Ink Cartridges The procedure below is for replacing the BK cartridge Follow the same procedure for replacing the other color cartridges cImportant When replacing the black ink cartridge make sure to replace with a cartridge of the same type of black ink The printer does not work if you...

Страница 30: ...wn in the figure below shake the cartridge horizontally Move the cartridge by about 5 cm to both directions and repeat it about 15 times for about 5 seconds D Take out the new ink cartridge from the bag U Cautions on Ink Cartridges on page 11 CW C4000 Series User s Guide Basic Operation 30 ...

Страница 31: ... Caution Do not touch the areas shown in the figure E Install the ink cartridge F Close the ink cartridge cover CW C4000 Series User s Guide Basic Operation 31 ...

Страница 32: ... or a computer Note Even if the maintenance box is running low on space you can still print until you are prompted to replace it Replace the maintenance box with a new one as necessary How to Replace the Maintenance Box A Open the maintenance box cover B Take out the maintenance box When disposing of the used maintenance box put it in a plastic bag that came with the new maintenance box U Disposal...

Страница 33: ... Caution Do not touch the areas shown in the figure D Insert the new maintenance box all the way in E Close the maintenance box cover CW C4000 Series User s Guide Basic Operation 33 ...

Страница 34: ...home screen Note It is recommended to clean the platen at the same time you replace the maintenance box U Cleaning the Platen on page 56 The non woven cloth and cotton swabs used for cleaning are included in the replacement maintenance box CW C4000 Series User s Guide Basic Operation 34 ...

Страница 35: ...driver settings Media Definition The size form type and other settings of frequently used paper can be registered as a media definition The set media definition can be selected from the Media Name pull down menu This is convenient because you will not need to set the paper settings of the driver when printing from an application if you register a media definition in advance If you wish to set the ...

Страница 36: ...etting 108 0 mm Length Can be specified from 8 to 406 4 mm Initial setting 174 8 mm Gap Between Labels When Media Form is Die cut Label 2 to 6 mm Initial setting 3 mm When Media Form is other than Die cut Label 0 to 6 mm Initial setting 3 mm Media Form Die cut label gap detection Initial setting Die cut label black mark detection Full page Label black mark detection Full page Label no detection Co...

Страница 37: ...Lower And Upper Margin No Saving Initial setting Media Coating Type Plain Paper Matte Paper Initial setting Synthetic Texture Paper Wristband Paper Glossy Paper Glossy Film High Glossy Paper Print Quality When Media Coating Type is Plain Paper Max Speed Speed Initial setting Normal Quality When Media Coating Type is Matte Paper Synthetic or Texture Paper Max Speed Speed CW C4000 Series User s Guid...

Страница 38: ...above description If you change the Media Coating Type the Print Quality will be automatically set to the initial setting suitable for the selected paper type Color Correction Epson Vivid Color Initial setting Epson Preferred Color ICM None Spot Color Setting No Spot Color Initial setting Settings For Paper Handling After Print Cut after printing last label Cut at specified label Cut after last pa...

Страница 39: ... printer is disabled Pause None Initial setting Pause at Cut Pause at Job End Pause at Collate End Media Detection The initial setting of Media Source and Media Detection will change depending on the settings of the printer Media Source Supply from Inside Roll Paper Supply from Outside Fanfold Paper Supply from Outside Roll Paper Media Detection Gap detection Black mark detection No detection CW C...

Страница 40: ...nter Set roll paper into the printer Paper is supplied from outside the printer Place fanfold paper behind the printer cImportant To supply roll paper from outside the printer prepare an external paper feeder and paper rewinder by yourself For more details contact qualified service personnel for advice When replacing paper with a different shape form or type of paper change the paper settings eith...

Страница 41: ... front cover If you open the cover before the home screen is displayed the printer may fail to load the paper correctly A Turn the printer on B Open the front cover C If the paper feed guide has been attached remove it D Raise the lock lever of the roll paper guides CW C4000 Series User s Guide Basic Operation 41 ...

Страница 42: ...E Slide the roll paper guides outward as far as they go F Lower the lock lever of the roll paper guides G Insert paper with the printable side face up CW C4000 Series User s Guide Basic Operation 42 ...

Страница 43: ... I Slide the roll paper guides against the paper J Lower the lock lever of the roll paper guides K According to the paper width open and or close the platen shutters U Adjusting the Shutters on page 51 CW C4000 Series User s Guide Basic Operation 43 ...

Страница 44: ... the paper ejection guides M Slide the paper ejection guides outward N Pull out the paper as shown O Hold down the paper by hand and slide the roll paper guides against the paper CW C4000 Series User s Guide Basic Operation 44 ...

Страница 45: ...s until it clicks into place Q Pull out the leading edge of the roll paper and then close the front cover R Press the Pause button Check that the printer is ready for printing by checking the home screen CW C4000 Series User s Guide Basic Operation 45 ...

Страница 46: ...hen open the front cover If you open the cover before the home screen is displayed the printer may fail to load the paper correctly A Turn the printer on B Open the front cover C Open the rear cover D Remove the paper feed guide and then close the rear cover CW C4000 Series User s Guide Basic Operation 46 ...

Страница 47: ...he paper width open and or close the platen shutters U Adjusting the Shutters on page 51 G Lower the lock lever of the paper ejection guides H Slide the paper ejection guides outward as far as they go CW C4000 Series User s Guide Basic Operation 47 ...

Страница 48: ... lock lever of the paper ejection guides until it clicks into place J Close the front cover K Open the rear cover L Raise the lock lever of the fanfold paper guides CW C4000 Series User s Guide Basic Operation 48 ...

Страница 49: ...on to the paper feed slot 40mm N Slide the fanfold paper guides against the paper O Lower the lock lever of the fanfold paper guides P Insert the leading edge of the paper with the printable side face up When you insert about 100 mm of the paper the paper is automatically fed further into the printer CW C4000 Series User s Guide Basic Operation 49 ...

Страница 50: ...Q Close the rear cover R Press the Pause button Check that the printer is ready for printing by checking the home screen CW C4000 Series User s Guide Basic Operation 50 ...

Страница 51: ...em with a finger Furthermore the paper width can be checked on the label at the top of the main unit Caution If the shutters are not correctly opened closed paper may be jammed or smudged with ink Paper width Backing paper width Shutter state 25 4 to 43 8 mm Close all the shutters 43 9 to 58 4 mm Open the innermost shutters 58 5 to 73 0 mm Open the inner four shutters CW C4000 Series User s Guide ...

Страница 52: ...Backing paper width Shutter state 73 1 to 87 6 mm Open the inner six shutters 87 7 to 102 2 mm Open the inner eight shutters 102 3 mm or longer Open all the shutters CW C4000 Series User s Guide Basic Operation 52 ...

Страница 53: ...to Remove Paper A Check that the printer has been turned on B Open the front cover C Remove roll paper or paper core from the printer D Close the front cover CW C4000 Series User s Guide Basic Operation 53 ...

Страница 54: ...E Press the Pause button Removing the paper is now completed To load paper see Loading Roll Paper on page 41 or Loading Fanfold Paper on page 46 CW C4000 Series User s Guide Basic Operation 54 ...

Страница 55: ...r Cleaning the Exterior A Turn the printer off and then disconnect the power cable from the outlet B Wipe off any dirt with a dry cloth or cloth that has been slightly dampened See the Technical Reference Guide for cleaning precautions CW C4000 Series User s Guide Maintenance 55 ...

Страница 56: ... following the steps below Caution Do not use water or alcohol Take care not to change the position of the shutters on the platen If the shutters are opened or closed incorrectly paper may get jammed or be smudged with ink Take care not to deform or damage the four sensors A Turn the printer off and then disconnect the power cable from the outlet B Open the front cover C Remove the roll paper or f...

Страница 57: ...platen cleaning to clean the platen E Use cotton swabs to clean the holes and around the holes If the holes are blocked be sure remove the dirt to unblock the holes F Close the front cover CW C4000 Series User s Guide Maintenance 57 ...

Страница 58: ...ter off and then disconnect the power cable from the outlet B Open the front cover and remove the paper C Remove the adhesive adhered to the fixed blade of the auto cutter on the front cover side Remove it with a cotton swab or the like dampened with alcohol Caution Do not directly touch the fixed blade of the auto cutter Doing so may cause injury to a finger CW C4000 Series User s Guide Maintenan...

Страница 59: ... gloss black ink Normal Clogging When the printed patterns show the nozzle clogging state run a head cleaning Printing Nozzle Check Patterns You can print the nozzle check patterns using the nozzle check function available from the operation panel or the printer driver Using the Operation Panel Menu Maintenance Print Head Nozzle Check Using the Printer Driver Click Nozzle Check on the Printer Util...

Страница 60: ... from the head to clean it If there is not much ink remaining head cleaning may not be possible Replace the ink cartridges and then try again U Replacing the Ink Cartridges on page 29 Using the Operation Panel Menu Maintenance Print Head Cleaning Menu Maintenance Power Cleaning Using the Printer Driver Click Print Head Cleaning or Power Cleaning on the Printer Utilities window CW C4000 Series User...

Страница 61: ...CW C4000 Series User s Guide Maintenance 61 ...

Страница 62: ...eplace the paper Load media that matches the print area size Or change the print area to match it with the media size U Loading and Replacing Paper on page 40 Information The roll paper is not loaded Load roll paper U Loading and Replacing Paper on page 40 Information The fanfold paper is not loaded Load fanfold paper U Loading and Replacing Paper on page 40 Information Paper jam Remove the jammed...

Страница 63: ...remaining U How to Replace the Ink Cartridges on page 29 Maintenance Error Cannot recognize the ink cartridge Select Next to clear the error Reinstall the ink cartridge If the error reoccurs replace the ink cartridge with a new one U How to Replace the Ink Cartridges on page 29 Information You have not installed genuine Epson ink cartridges For the best performance of the printer it is recommended...

Страница 64: ...iles Printer Error Turn on the printer again See your documentation for more details XXXXXX 1 Turn off the printer 2 Check that there is no paper jam or foreign materials near the ejection slot 3 Turn the printer on If the printer error still occurs contact qualified service personnel for advice When contacting tell the person the XXXXXXXX a 6 or 8 digit alphanumeric code Information Cannot start ...

Страница 65: ...ectively 2 If the IEEE802 3az function has been enabled on your computer disable it 3 Connect the computer and printer directly with a LAN cable 4 On the printer select Menu General Settings Network Settings Connection Check to check the IP address of the printer 5 Start WebConfig on the computer Start your web browser and enter the IP address of the printer 6 Select the Network Settings tab then ...

Страница 66: ...r driver U Printer Driver Settings on page 35 White or Black Banding near the Edges Cause Solution and Reference The outside shutters on the platen which are not needed to be opened for the paper are open Air flow from the outside shutters adversely affect the printing operation and may cause white banding on printouts Set the shutters on the platen according to the instructions on the label attac...

Страница 67: ...ition may be laterally shifted or blurred print may occur Replace the paper with a new one Paper is Smeared or Smudged with Ink Cause Solution and Reference The paper being used and the Media Coating Type setting differ Check the paper being used and the Media Coating Type setting of the printer driver U Printer Driver Settings on page 35 If foreign matter is adhered to the head the paper may be s...

Страница 68: ...ish to set the entire area of the label size as the printable area enable Borderless Printing When Borderless Printing is enabled edges of label image may be printed on the backing paper so create margins of 1 5 mm at the top bottom left and right in the label image data Margins of Label Are Large Cause Solution and Reference The margin setting is too large Check the margin settings in the applica...

Страница 69: ...f not the printer driver is not installed C Install the printer driver U Downloading the Latest Version on page 4 The printer does not turn on Check that the power cable is connected to the printer and outlet properly U Connectors on page 22 Print Job is Canceled on PC but Printing Message on Printer Does Not Disappear If you cancel printing in printer queue on the computer it may cause the print ...

Страница 70: ...Roll Paper is Jammed A Open the front cover B Remove the jammed paper C Pull out the leading edge of the roll paper and then close the front cover CW C4000 Series User s Guide Troubleshooting 70 ...

Страница 71: ...the CW C4000 Series Technical Reference Guide Note After removing jammed paper make sure that there is no labels or adhesive left inside the printer If you use the printer without removing them it leads to frequent paper jams or may cause poor print quality If paper jam occurs frequently clean the inside of the printer U Maintenance on page 55 CW C4000 Series User s Guide Troubleshooting 71 ...

Страница 72: ...Fanfold Paper is Jammed A Open the front cover B Cut out the jammed paper C Open the rear cover and then remove the jammed paper D Close the rear cover CW C4000 Series User s Guide Troubleshooting 72 ...

Страница 73: ...ical Reference Guide Note After removing jammed paper make sure that there is no labels or adhesive left inside the printer If you use the printer without removing them it leads to frequent paper jams or may cause poor print quality If paper jam occurs frequently clean the inside of the printer U Maintenance on page 55 CW C4000 Series User s Guide Troubleshooting 73 ...

Страница 74: ... 101 6 mm 100 mm s Print quality setting Speed 600 600 dpi width height Printing width 25 4 mm 111 mm s Printing width 101 6 mm 70 mm s Print quality setting Normal 600 600 dpi width height Printing width 25 4 mm 63 mm s Printing width 101 6 mm 48 mm s Print quality setting Quality 600 1200 dpi width height Printing width 25 4 mm 27 mm s Printing width 101 6 mm 18 mm s Print quality setting Max Qu...

Страница 75: ...Item Specifications Weight Approx 13 kg CW C4000 Series User s Guide Specifications 75 ...

Страница 76: ... AC ADAPTER K1 Model number M248B Rated voltage 42 V DC Rated current 1 38 A Power consumption Operating Approx 28 2 W on average Standby Approx 2 6 W on average Power off Approx 0 13 W on average Based on Epson evaluation conditions CW C4000 Series User s Guide Specifications 76 ...

Страница 77: ... Specifications Height 285 mm Width 310 mm Depth 283 mm Unit mm With OT PT40 Installed 1 2 Unit mm 1 When paper ejection tray is extended 2 When paper ejection tray is retracted CW C4000 Series User s Guide Specifications 77 ...

Страница 78: ...e When packed Ink not charged 20 to 60 C 5 to 85 RH without condensation When 20 C or 60 C within 120 hours With ink charged Gloss black ink 15 to 40 C Within 6 months at 0 to 25 C Within 1 month at 40 C Matte black ink 10 to 40 C Within 6 months at 0 to 25 C Within 1 month at 40 C Elevation 0 to 3000 m Noise Approx 58 dB Based on Epson evaluation conditions CW C4000 Series User s Guide Specificat...

Страница 79: ...f paper can be used with the printer Paper Type When using Matte Ink When using Gloss Ink Plain paper Matte paper Texture Paper Synthetic Wristband paper Glossy paper Glossy Film High Glossy Paper CW C4000 Series User s Guide Specifications 79 ...

Страница 80: ...K SJIC45P C SJIC45P M SJIC45P Y CW C4050 SJIC46P BK SJIC46P MK SJIC46P C SJIC46P M SJIC46P Y Type 4 individual color cartridges Ink colors Black gloss black matte black cyan magenta yellow Ink type Pigmented ink Expiration date 6 months after installation in the printer 3 years after manufacture including the period of use Storage temperature Transporting without unpacking 20 to 60 C within 5 days...

Страница 81: ...ted waste ink absorbing material Storage temperature Transporting without unpacking 20 to 60 C within 5 days when 60 C Storage without unpacking 20 to 40 C within 1 month when 40 C Installed 20 to 40 C within 1 month when 40 C CW C4000 Series User s Guide Specifications 81 ...

Страница 82: ...ges Use of non genuine Epson ink cartridges can adversely affect the printer and print quality and prevent the printer from realizing its maximum performance Epson cannot guarantee the quality and reliability of non genuine Epson products Repairs for any damage or breakdown of this product due to the use of non genuine Epson products will not be free of charge even if the warranty period is still ...

Страница 83: ...ce box can adversely affect the printer and prevent the printer from realizing its maximum performance Repairs for any damage or breakdown of this product due to the use of non genuine Epson products will not be free of charge even if the warranty period is still valid Epson cannot guarantee the quality and reliability of non genuine Epson products Disposal of Maintenance Box Dispose the ink cartr...

Страница 84: ... In the case of roll paper the paper is curled so if multiple labels or sheets are printed and ejected they may overflow the tray Depending on the printer model OT PT40 comes with the printer Attach the tray by following the steps below A Attach the tray by hooking it onto the hooks on the under side of the paper ejection guides B Pull the lever at the bottom right of the OT PT40 to release the lo...

Страница 85: ...C Extend the tray until the paper length indication matches with the length of your paper D Push in lever at the bottom right of the OT PT40 to lock it in place CW C4000 Series User s Guide Appendix 85 ...

Страница 86: ...inting on any other type of paper or label Be careful not to hurt yourself when attaching or removing OT WA34 to from the printer Read the instruction manual included with the wristband to use it safely and correctly Attaching OT WA34 A Open the front cover B Remove roll paper or paper core from the printer C Attach the OT WA34 by inserting it into the grooves inside the front cover CW C4000 Serie...

Страница 87: ...D Close the front cover Removing OT WA34 A Open the front cover B Remove the OT WA34 CW C4000 Series User s Guide Appendix 87 ...

Страница 88: ...C Close the front cover CW C4000 Series User s Guide Appendix 88 ...

Страница 89: ...to aviation rail marine automotive etc disaster prevention devices various safety devices etc or functional precision devices etc you should use this product only after giving consideration to including fail safes and redundancies into your design to maintain safety and total system reliability CW C4000 Series User s Guide Appendix 89 ...

Страница 90: ...liates shall be liable to the purchaser of this product or third parties for damages losses costs or expenses incurred by purchaser or third parties as a result of accident misuse or abuse of this product or unauthorized modifications repairs or alterations to this product or excluding the U S failure to strictly comply with Seiko Epson Corporation s operating and maintenance instructions 6 Seiko ...

Отзывы: