Epson C380045HA - Stylus Color 980 Inkjet Printer Скачать руководство пользователя страница 9

EPSON Stylus COLOR 980

8/00

EPSON Stylus COLOR 980

 - 9

Removing and Installing Ink Cartridges

You can replace a cartridge when the 


B

 black or 


A

 color ink 

out light is either flashing or on. (If you perform these steps 
when both ink out lights are off, the printer cleans the print 
heads as described on page 10.)

Follow these steps to replace an ink cartridge when its ink out 
light is on:

1. Make sure the printer is turned on and not printing, then 

open the printer cover.

2. Press the 


R

 cleaning button and hold it for about three 

seconds until the print head moves left and the 


P

 power 

light begins flashing. The print head moves to the black or 
color cartridge replacement position, depending on which 
ink cartridge is empty.

To avoid damaging the printer, never move the print head 
by hand. Don’t open the clamp or remove a cartridge 
except to replace it with a new one. Once you remove a 
cartridge, you can’t reuse it, even if it contains ink.

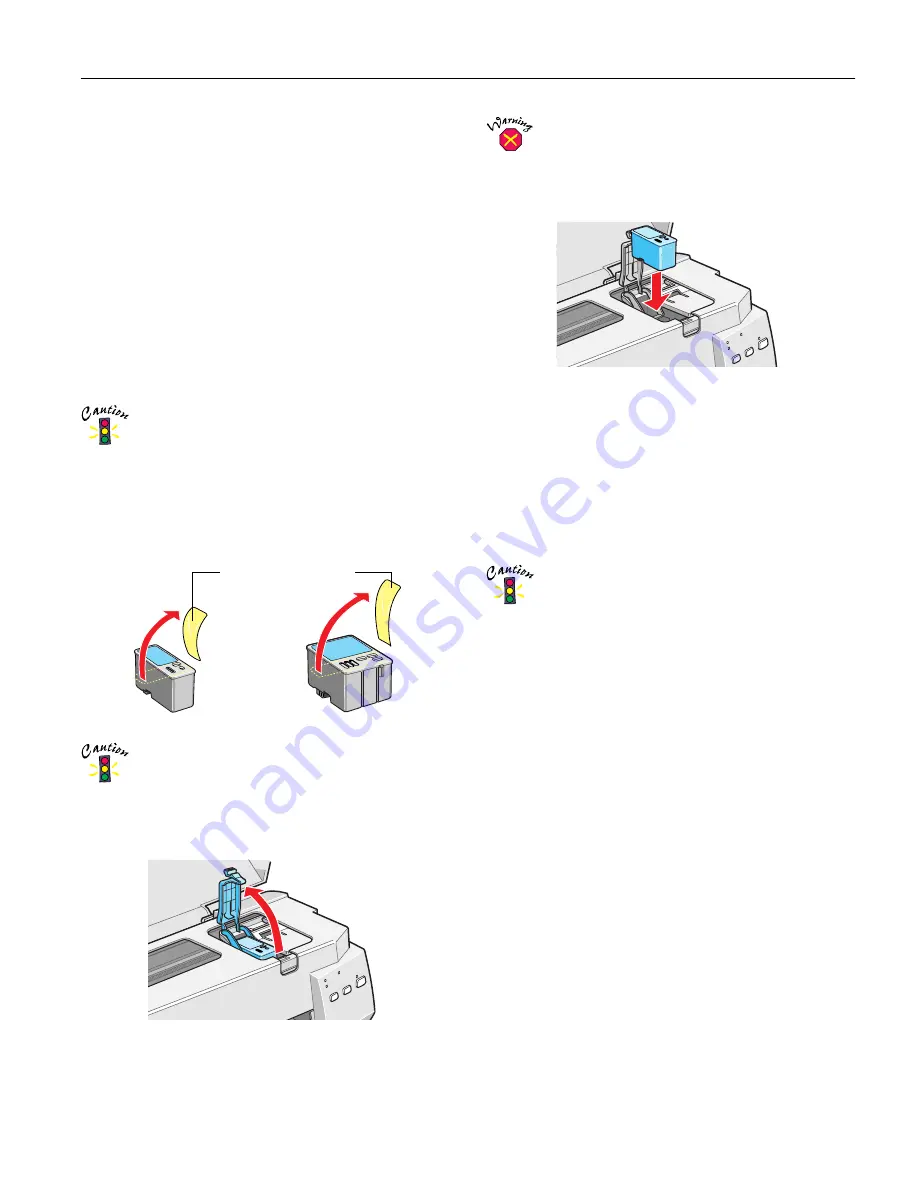
3. Remove the new ink cartridge from its packaging. 

4. Remove 

only

 the yellow part of the tape seal on top as 

shown to the right. Don’t pull off the blue portion or try to 
remove the clear seal underneath the cartridge.

You must remove the yellow tape from the top of the 
cartridge or you will permanently damage it. Do not 
remove the clear seal from the bottom of the cartridge; 
ink will leak.

5. Pull up the ink cartridge clamp. The cartridge rises up from 

its holder.

6. Lift the cartridge out of the printer and dispose of it 

carefully. 

If ink gets on your hands, wash them thoroughly with 
soap and water. If ink gets into your eyes, flush them 
immediately with water.

7. Lower the new ink cartridge into its holder with the label 

facing up and toward the back of the printer.

8. Press down the ink cartridge clamp until it locks in place.

9. If you need to replace the other ink cartridge, repeat steps 2 

through 8 before continuing with step 10.

10. Press the 


R

 cleaning button and close the printer cover. 

The printer moves the print head and begins charging the 
ink delivery system.

The 


P

 power light flashes, and the printer makes various 

sounds. Charging takes about one minute. When it’s finished, 
the 


P

power light stops flashing and stays on.

Never turn off the printer while the 


P

 power light is 

flashing, unless the printer hasn’t moved or made noise 
for more than 5 minutes.

Replacing an Outdated Ink Cartridge

If an ink cartridge is more than six months old, you may need 
to replace it. You may notice that your printouts don’t look as 
good as they used to. If print quality doesn’t improve after 
cleaning and aligning the print head, you can replace one or 
both cartridges.

Follow these steps to replace an ink cartridge 

before

 the 


B

 black 

or 


A

 color ink out light is flashing or on:

1. Make sure the printer is turned on and not printing, then 

open the printer cover.

2. Press the 


E

 load/eject button and hold it down for three 

seconds until the print head moves to the left to the black 
ink cartridge replacement position and the 


P

power light 

begins flashing.

black cartridge

color cartridge

Remove the yellow tape 

Содержание C380045HA - Stylus Color 980 Inkjet Printer

Страница 1: ...of 17 lb 64 g m2 paper Dimensions Storage Width 18 4 inches 467 mm Depth 11 7 inches 297 mm Height 7 8 inches 199 mm Printing Width 18 4 inches 467 mm Depth 23 4 inches 594 mm Height 12 8 inches 325 mm Weight 18 5 lb 8 4 kg without the ink cartridges Electrical Also designed for IT power systems with Phase to Phase voltage 220 240 V Part name Part number Paper support assembly 1040662 Printer cove...

Страница 2: ...pages A4 5 coverage at 360 dpi Cartridge life 2 years from production date and up to within 6 months after opening package at 77 F 25 C Storage temperature 4 to 104 F 20 to 40 C 1 month at 104 F 40 C Transit temperature 22 to 140 F 30 to 60 C 1 month at 104 F 40 C 120 hours at 140 F 60 C Freezing temperature 3 2 F 16 C 0 4 F 18 C Dimensions 1 1 W 2 6 D 1 6 H inches 28 9 W 67 4 D 41 8 H mm 2 1 W 2 ...

Страница 3: ...utive 7 5 10 inches Plain paper bond paper and special ink jet papers distributed by EPSON 0 003 to 0 004 inch 0 08 to 0 11 mm 17 to 24 lb 64 to 90 g m2 Transparencies and glossy film Letter 8 5 11 inches A4 210 297 mm A6 105 148 mm glossy film only Transparencies and glossy film distributed by EPSON Photo Paper 4 6 inches 102 152 mm Letter 8 5 11 inches A4 210 297 mm Panoramic 8 27 23 4 inches 21...

Страница 4: ... with this printer A BL BR C1 A BR C1 BL Envelopes Singlesheets and cards C2 Paper name Size Part number EPSON 360 dpi Ink Jet Paper Letter A4 8 3 x 11 7 inches S041060 S041059 EPSON High Quality Ink Jet Paper Letter A4 8 3 x 11 7 inches S041111 S041117 EPSON Photo Quality Ink Jet Paper Letter A4 8 3 x 11 7 inches Legal S041062 S041061 S041067 EPSON Photo Quality Ink Jet Cards A6 4 1 x 5 8 inches ...

Страница 5: ...Make sure none of the sheets are curled creased old stuck together or too thin Then reload the stack against the right edge guide and slide the left edge guide over to the paper s left edge Then turn the printer on S is on When the S paper out light comes on your paper is out or incorrectly loaded Make sure none of the sheets are curled creased old stuck together or too thin Then reload the stack ...

Страница 6: ...check to determine whether the problem comes from the printer itself or some other source Follow these steps to run the printer check 1 Make sure both the printer and computer are turned off 2 Disconnect the interface cable from the printer 3 Make sure paper is loaded in the printer Load paper that s at least 8 27 inches 210 mm wide This prevents ink from spraying inside the printer and smudging y...

Страница 7: ...ible See Paper on page 3 for more media storage information Set the thickness lever to the position when you print on envelopes or if ink smears when you print on other thick media Open the printer cover and position the lever as shown below Then close the cover and print Make sure you return the lever to the 0 position before you print on regular media For this media name Then select this Media T...

Страница 8: ...t light flashes you have a paper jam Press the E load eject button to try to clear the jam If that doesn t work turn off the printer and gently pull the paper forward toward the output tray to pull it out Don t pull the paper backward toward the paper support Make sure none of the sheets are curled creased old stuck together or too thin Then reload the paper against the right edge guide and slide ...

Страница 9: ...ge out of the printer and dispose of it carefully If ink gets on your hands wash them thoroughly with soap and water If ink gets into your eyes flush them immediately with water 7 Lower the new ink cartridge into its holder with the label facing up and toward the back of the printer 8 Press down the ink cartridge clamp until it locks in place 9 If you need to replace the other ink cartridge repeat...

Страница 10: ...them immediately with water 8 Lower the new ink cartridge into its holder with the label facing up and toward the back of the printer 9 Press down the ink cartridge clamp until it locks in place 10 Press the E load eject button The print head moves to the color ink cartridge replacement position If you need to replace the color ink cartridge repeat steps 6 through 9 Then continue with step 11 11 P...

Страница 11: ...ights are off 2 Press the R cleaning button and hold it down for three seconds Cleaning takes about 30 seconds during which the printer makes some noise and the P power light flashes Never turn off the printer while the P power light is flashing unless the printer hasn t moved or made noise for more than 5 minutes 3 After the P power light stops flashing print a page to test the print quality and ...

Страница 12: ...t three seconds While it is flashing press the E load eject button The printer prints a sheet of instructions in English French German Italian Spanish and Portuguese explaining how to align the print heads Follow these instructions If the E load eject button isn t pressed while the S paper out light is flashing the printer enters default setting mode If this happens turn off the printer and repeat...

Страница 13: ...g the printer clean the print head see page 10 if output is misaligned align the print head see page 12 Related Documentation TM SC980 EPSON Stylus COLOR 980 Service Manual PL SC980 EPSON Stylus COLOR 980 Parts Price List CPD 10632 EPSON Stylus COLOR 980 Printer Basics CPD 10633 EPSON Stylus COLOR 980 Start Here EPSON Stylus COLOR 980 Reference Guide HTML format to view it you need a browser such ...

Отзывы: