Epson C11CG94402BY Скачать руководство пользователя страница 15

Light

Status

Solutions

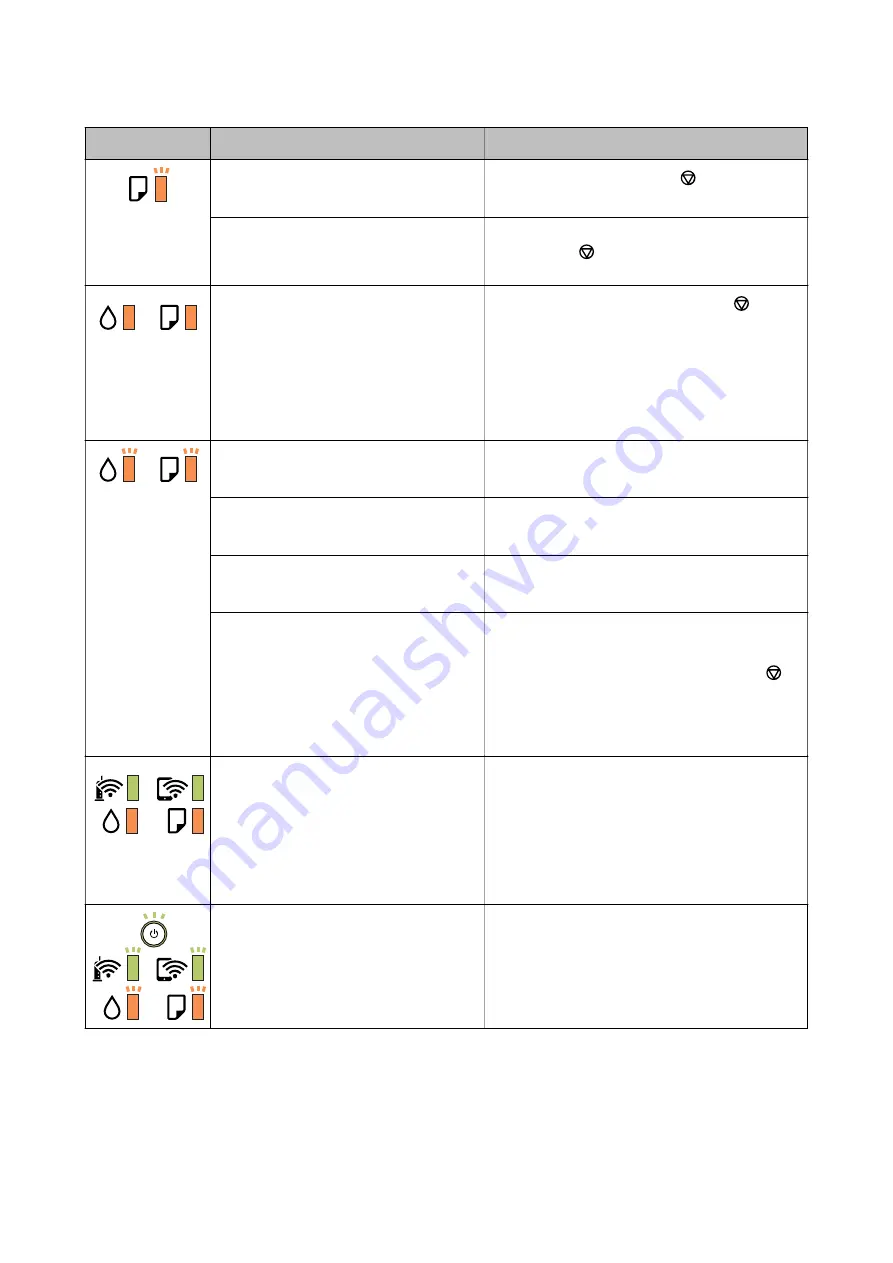
Flashing slowly (at 1.25 second intervals)

A paper jam has occurred.

Remove the paper and press the 

 button.

Flashing fast (at 0.5 second intervals)

Paper remains inside the printer.

Load A4 size paper in the rear paper feed slot, and

then press the 

 button to remove the paper inside.

Load paper in the portrait direction.

The printer was not turned off correctly.*

Because the printer was turned off while
operating, the nozzles may have dried
and clogged.

* The power was turned off with a power
strip or breaker, the plug was pulled out of
the outlet, or an electrical failure occurred.

After clearing the error by pressing the 

 button,

we recommend performing a nozzle check. Cancel
any pending print jobs.

To turn off the printer, make sure you press the 

P

button.

Flashing simultaneously

The printer cover is open.

Close the printer cover until it clicks.

Flashing simultaneously

The output switch lever is lowered.

Raise the output switch lever.

Flashing simultaneously

The output switch lever is raised.

Open the paper cassette cover, and then lower the
output switch lever.

Flashing alternately

A maintenance box is nearing or at the end
of its service life.

The maintenance box needs to be replaced.

When a message saying that you can continue

printing is displayed on the computer, press the 
button to continue printing. The lights stop flashing
for the time being, however, they will continue to
flash at regular intervals until the maintenance box is
replaced.

The printer has started in recovery mode
because the firmware update failed.

Follow the steps below to try to update the firmware
again.

1. Connect the computer and the printer with a USB
cable. (During recovery mode, you cannot update the
firmware over a network connection.)

2. Visit your local Epson website for further
instructions.

A printer error has occurred.

Open the printer cover and remove any paper inside
the printer. Turn the power off and on again.

If the error continues to occur after turning the power
off and on again, contact Epson support.

Related Information

&

“Removing Jammed Paper” on page 96

&

“Contacting Epson Support” on page 133

&

“Installing the Latest Applications” on page 90

User's Guide

Printer Basics

15

Содержание C11CG94402BY

Страница 1: ...User s Guide NPD6008 00 EN ...

Страница 2: ...ing or Adding New Wireless Routers 28 Changing the Connection Method to a Computer 28 Restoring the Network Settings from the Control Panel 29 Preparing the Printer Loading Papers 30 Available Paper and Capacities 30 Loading Paper in the Paper Cassette 33 Loading Paper in the Rear Paper Feed Slot 36 Loading Envelopes and Precautions 38 List of Paper Type 38 Outputting Paper 39 Saving Power 39 Savi...

Страница 3: ... for Paper Feeding Problems 84 Checking the Total Number of Pages Fed Through the Printer 85 Checking the Total Number of Pages Fed Through the Printer Printer Buttons 86 Checking the Total Number of Pages Fed Through the Printer Windows 86 Checking the Total Number of Pages Fed Through the Printer Mac OS 86 Network Service and Software Information Application for Configuring Printer Operations We...

Страница 4: ...hotos are Sticky 115 The Position Size or Margins of the Printout Are Incorrect 115 Printed Characters Are Incorrect or Garbled 115 The Printed Image Is Inverted 116 Mosaic Like Patterns in the Prints 116 The Printout Problem Could Not be Cleared 116 Other Printing Problems 116 Printing Is Too Slow 116 Printing Slows Down Dramatically During Continuous Printing 117 Other Problems 117 Operation Sou...

Страница 5: ...upport website at http support epson net Digital manual Start EPSON Software Updater on your computer EPSON Software Updater checks for available updates of Epson software applications and the digital manuals and allows you to download the latest ones Related Information Software Update Tools EPSON Software Updater on page 89 Using the Manual to Search for Information The PDF manual allows you to ...

Страница 6: ...ages you need Click Print in the File menu and then specify the pages you want to print in Pages in Pages to Print To specify a series of pages enter a hyphen between the start page and the end page Example 20 25 To specify pages that are not in series divide the pages with commas Example 5 10 15 Marks and Symbols Caution Instructions that must be followed carefully to avoid bodily injury cImporta...

Страница 7: ...to the following operating systems Additionally Windows is used to refer to all versions Microsoft Windows 10 operating system Microsoft Windows 8 1 operating system Microsoft Windows 8 operating system Microsoft Windows 7 operating system Microsoft Windows Vista operating system Microsoft Windows XP operating system Microsoft Windows XP Professional x64 Edition operating system Microsoft Windows ...

Страница 8: ...n performance Do not adjust controls that are not covered by the operating instructions Place the printer near a wall outlet where the plug can be easily unplugged Do not place or store the printer outdoors near excessive dirt or dust water heat sources or in locations subject to shocks vibrations high temperature or humidity Take care not to spill liquid on the printer and not to handle the print...

Страница 9: ...pere rating If you plan to use the printer in Germany the building installation must be protected by a 10 or 16 amp circuit breaker to provide adequate short circuit protection and over current protection for the printer When connecting the printer to a computer or other device with a cable ensure the correct orientation of the connectors Each connector has only one correct orientation Inserting a...

Страница 10: ...acilities or near medical equipment follow directions from the authorized personnel representing the medical facilities and follow all posted warnings and directions on the medical equipment Radio waves from this printer may negatively affect the operation of automatically controlled devices such as automatic doors or fire alarms and could lead to accidents due to malfunction When using this print...

Страница 11: ... jammed paper C Ink tank cover Open to refill the ink tank D Ink tank cap E Ink tank Contains black ink and is located on the print head F front cover Open when removing jammed paper G Paper cassette cover Open to load paper in the paper cassette A feeder guard Prevents foreign substances from entering the printer This cover should usually be closed User s Guide Printer Basics 11 ...

Страница 12: ...up to the front of the printer F Edge guide Feeds the paper straight into the printer Slide to the edges of the paper G paper guide extension Slide out to load legal size paper H Paper cassette Loads paper A Rear cover Remove when removing jammed paper B LAN port Connects a LAN cable C USB port Connects a USB cable to connect with a computer D AC inlet Connects the power cord Related Information C...

Страница 13: ...he WPS push button D Stops the current operation Cancels paper out errors and paper jam errors Hold this button down for five seconds until the P button flashes to run print head cleaning Functions using Button Combinations Wi Fi Direct Simple AP Setup Hold down the and buttons simultaneously to start Wi Fi Direct Simple AP Setup PIN Code Setup WPS Hold down the and buttons simultaneously to start...

Страница 14: ...a wireless Wi Fi network The printer is connected to a network in Wi Fi Direct Simple AP mode Error Status When an error occurs the light turns on or flashes Details of the error are displayed on the computer screen On Flashing Light Status Solutions Wi Fi connection error has occurred Press the button to clear the error and try again Initial ink charging may not be complete See the Start Here pos...

Страница 15: ...tch lever is raised Open the paper cassette cover and then lower the output switch lever Flashing alternately A maintenance box is nearing or at the end of its service life The maintenance box needs to be replaced When a message saying that you can continue printing is displayed on the computer press the button to continue printing The lights stop flashing for the time being however they will cont...

Страница 16: ...with an Ethernet cable Wi Fi Connection Connect the printer and the computer or smart device to the wireless router This is the typical connection method for home or office networks where computers are connected by Wi Fi through the wireless router Related Information Connecting to a Computer on page 17 User s Guide Network Settings 16 ...

Страница 17: ...imple AP connection when the printer is connected by Wi Fi the Wi Fi is temporarily disconnected Related Information Making Wi Fi Direct Simple AP Connection Settings on page 20 Connecting to a Computer We recommend using the installer to connect the printer to a computer You can run the installer using one of the following methods Setting up from the website Access the following website and then ...

Страница 18: ...etup Note If you want to connect a computer and a smart device to the printer at the same time we recommend connecting the computer first Making Wi Fi Settings from the Printer You can make network settings from the printer s control panel in several ways Choose the connection method that matches the environment and conditions that you are using If the wireless router supports WPS you can make set...

Страница 19: ...ton on the wireless router until the security light flashes If you do not know where the WPS button is or there are no buttons on the wireless router see the documentation provided with your wireless router for details 2 Hold down the button on the printer for at least five seconds until the light and the light flash alternately The connection setting will start When a connection is established th...

Страница 20: ...enter the PIN code an eight digit number printed on WPS PIN Code column of the network status sheet into the wireless router within two minutes When a connection is established the light turns on Note See the documentation provided with your wireless router for details on entering a PIN code The printer is in a connection error status when the light and the light flash simultaneously After clearin...

Страница 21: ...inted on this report 4 On the computer s network connection screen or the smart device s Wi Fi screen select the same SSID shown on the network status sheet to connect 5 Enter the password printed on the network status sheet into the computer or smart device You can confirm the status of Wi Fi Direct on the network status sheet Note When you connect from a smart device using Wi Fi Direct connectio...

Страница 22: ...twork information by printing it such as the maximum number of devices you can connect by Wi Fi Direct simple AP 1 Load papers 2 Hold down the button on the printer s control panel for at least five seconds until the power light flashes The network status sheet is printed Note If you release the button within five seconds before the power light flashes a network connection report is printed Relate...

Страница 23: ... follow the solutions a Error code b Messages on the Network Environment Related Information E 1 on page 24 E 2 E 3 E 7 on page 24 E 5 on page 25 E 6 on page 25 E 8 on page 25 E 9 on page 26 E 10 on page 26 E 11 on page 26 E 12 on page 27 E 13 on page 27 Message on the Network Environment on page 28 User s Guide Network Settings 23 ...

Страница 24: ...p if your wireless router does not support WPS Makes sure your SSID uses only ASCII characters alphanumeric characters and symbols The printer cannot display an SSID that contains non ASCII characters Makes sure you know your SSID and password before connecting to the wireless router If you are using a wireless router with its default settings the SSID and password are located on a label on the wi...

Страница 25: ...wireless router is using shared authentication with WEP security make sure the authentication key and index are correct If the number of connectable devices on the wireless router is less than the number of network devices that you want to connect make settings on the wireless router to increase the number of connectable devices See the documentation provided with the wireless router to make setti...

Страница 26: ...ct You can check the IP address subnet mask and default gateway from the Network Status part on the network connection report If DHCP is enabled change the printer s Obtain IP Address setting to Auto If you want to set the IP address manually check the printer s IP address from the Network Status part on the network connection report and then select Manual on the network settings screen Set the su...

Страница 27: ...stered password is set on the printer Related Information Printing a Network Status Sheet on page 22 Connecting to a Computer on page 17 E 13 Solutions Check the following Network devices such as a wireless router hub and router are turned on The TCP IP Setup for network devices has not been set up manually If the printer s TCP IP Setup is set automatically while the TCP IP Setup for other network...

Страница 28: ... Direct Simple AP connection To add another computer or smart device disconnect one of the connected devices or connect it to the other network first You can confirm the number of wireless devices which can be connected simultaneously and the number of connected devices by checking the network status sheet Replacing or Adding New Wireless Routers If the SSID changes due to the replacement of a wir...

Страница 29: ... click Next Restoring the Network Settings from the Control Panel You can restore all network settings to their defaults 1 Turn the printer off 2 While holding down the button press the button until the light and the light flash alternately Restoration is complete when the light and the light are off User s Guide Network Settings 29 ...

Страница 30: ...rmal print quality settings are available Although some printer drivers allow you to select a better print quality the printouts are printed using Standard or Normal Paper suitable for printing documents Media Name Size Loading Capacity Sheets 2 Sided Printing Paper Cassette Rear Paper Feed Slot Epson Bright White Ink Jet Paper A4 200 1 Paper suitable for printing documents and photos Media Name S...

Страница 31: ...2x257 to 215 9 297 1 1 1 Paper on which information such as the sender s name or corporation name are pre printed in the header There must be a margin of 3 mm or more at the top of the paper 2 sided printing is not available for letterhead paper Thick papers Media Name Size Loading Capacity Sheets 2 Sided Printing Paper Cassette Rear Paper Feed Slot Thick paper 91 to 256 g m2 Letter A4 B5 A5 A6 Le...

Страница 32: ... curled flatten it or curl it slightly in the opposite direction before loading Printing on curled paper may cause paper jams and smears on the printout Do not use paper that is wavy torn cut folded damp too thick too thin or paper that has stickers stuck to it Using these types of paper causes paper jams and smears on the printout Make sure you are using long grain paper If you are not sure what ...

Страница 33: ...per cassette cover until it clicks 2 Check that the printer is not operating and then slide out the paper cassette cImportant The paper cassette cannot be removed 3 Slide the edge guides to their maximum position User s Guide Preparing the Printer 33 ...

Страница 34: ...aper until it touches the back of the paper cassette cImportant Do not load more than the maximum number of sheets specified for the paper 8 5 x 13 in Load paper using the line Legal Load paper using the line User s Guide Preparing the Printer 34 ...

Страница 35: ...type For letterhead paper if you print on paper that is smaller than the setting in the printer driver the printer may print beyond the edges of the paper which can lead to ink smears on your printouts and excess ink building up inside the printer Make sure you select the correct paper size setting 2 sided printing is not available for letterhead paper Also the print speed may be slower Related In...

Страница 36: ...Feed Slot 1 Open the feeder guard 2 Slide out the edge guides 3 Load a single sheet of paper at the center of the rear paper feed slot with the printable side facing up Envelopes Pre punched paper User s Guide Preparing the Printer 36 ...

Страница 37: ...tterhead paper select Letterhead as the paper type For letterhead paper if you print on paper that is smaller than the setting in the printer driver the printer may print beyond the edges of the paper which can lead to ink smears on your printouts and excess ink building up inside the printer Make sure you select the correct paper size setting 2 sided printing is not available for letterhead paper...

Страница 38: ...envelopes are puffed up with air press them down to flatten them before loading Do not use envelopes that are curled or folded Using these envelopes causes paper jams and smears on the printout Do not use envelopes with adhesive surfaces on the flaps or window envelopes Avoid using envelopes that are too thin as they may curl during printing Related Information Available Paper and Capacities on pa...

Страница 39: ... front of the printer We also recommend outputting envelopes to the front of the printer Saving Power The printer enters sleep mode or turns off automatically if no operations are performed for a set period You can adjust the time before power management is applied Any increase will affect the product s energy efficiency Please consider the environment before making any change Depending on the loc...

Страница 40: ...n select the printer 2 Click Options Supplies Utility Open Printer Utility 3 Click Printer Settings 4 Do one of the following Note Your product may have the Power Off Timer feature or Power Off If Inactive and Power Off If Disconnected features depending on the location of purchase Select the time period before the printer enters sleep mode as the Sleep Timer setting and click Apply To make the pr...

Страница 41: ...art button and select Control Panel Printers in Hardware and Sound Right click on your printer and select Printing preferences Windows XP Windows Server 2003 R2 Windows Server 2003 Click the start button and select Control Panel Printers and Other Hardware Printers and Faxes Right click on your printer and select Printing preferences Accessing the printer driver from the printer icon on the task b...

Страница 42: ... Right clicking an item displays Help When you select Print Preview you can see a preview of your document before printing 6 Click OK to close the printer driver window 7 Click Print Note When you select Print Preview a preview window is displayed To change the settings click Cancel and then repeat the procedure from step 2 Related Information Available Paper and Capacities on page 30 Loading Pape...

Страница 43: ...ties on page 30 Print Settings 1 On the printer driver s Main tab select an option from 2 Sided Printing 2 Click Settings make the appropriate settings and then click OK Make settings for Print Density if necessary Note To print a folded booklet select Booklet When setting Print Density you can adjust print density according to the document type Printing may be slow depending on the combination of...

Страница 44: ...ng Related Information Printing Basics on page 41 Main Tab on page 56 Printing and Stacking in Page Order Reverse Order Printing You can print from the last page so that documents are stacked in page order for outputting paper to the front of the printer Print Settings On the printer driver s Main tab select Reverse Order Related Information Printing Basics on page 41 User s Guide Printing 44 ...

Страница 45: ...you want to print on from the Output Paper setting Select Reduce Enlarge Document and then select Fit to Page or Zoom to When you select Zoom to enter a percentage Select Center to print the images in the center of the page Related Information Printing Basics on page 41 More Options Tab on page 56 Printing One Image on Multiple Sheets for Enlargement Creating a Poster This feature allows you to pr...

Страница 46: ... select the cutting guide options Related Information Printing Basics on page 41 Main Tab on page 56 Making Posters Using Overlapping Alignment Marks Here is an example of how to make a poster when 2x2 Poster is selected and Overlapping Alignment Marks is selected in Print Cutting Guides The actual guides are printed in monochrome but for this explanation they are shown as blue and red lines User ...

Страница 47: ... of Sheet 1 along the vertical blue line through the center of the top and bottom cross marks 2 Place the edge of Sheet 1 on top of Sheet 2 and align the cross marks then temporarily tape the two sheets together from the back User s Guide Printing 47 ...

Страница 48: ...along the vertical red line through the alignment markers this time the line to the left of the cross marks 4 Tape the sheets together from the back 5 Repeat steps 1 to 4 to tape Sheet 3 and Sheet 4 together User s Guide Printing 48 ...

Страница 49: ...e horizontal blue line through the center of the left and right side cross marks 7 Place the edge of Sheet 1 and Sheet 2 on top of Sheet 3 and Sheet 4 and align the cross marks and then temporarily tape them together from the back User s Guide Printing 49 ...

Страница 50: ...8 Cut the taped sheets in two along the horizontal red line through the alignment markers this time the line above the cross marks 9 Tape the sheets together from the back User s Guide Printing 50 ...

Страница 51: ...oter You can print information such as a user name and printing date in headers or footers Print Settings On the printer driver s More Options tab click Watermark Features and then select Header Footer Click Settings and then select the items you want to print User s Guide Printing 51 ...

Страница 52: ...nting Not selected Tone Correction Automatic Note You can also add your own watermark or anti copy pattern Print Settings On the printer driver s More Options tab click Watermark Features and then select Anti Copy Pattern or Watermark Click Settings to change details such as the size density or position of the pattern or the mark Related Information Printing Basics on page 41 More Options Tab on p...

Страница 53: ...ion of the saved files is ecl To open a Print Project click Job Arranger Lite on the printer driver s Maintenance tab to open the Job Arranger Lite window Next select Open from the File menu to select the file Related Information Printing Basics on page 41 Main Tab on page 56 Adjusting the Print Tone You can adjust the tone used in the print job These adjustments are not applied to the original da...

Страница 54: ...ormation Printing Basics on page 41 More Options Tab on page 56 Printing to Enhance Light Text and Lines You can enhance light letters and lines to make them more visible or to sharpen images Print Settings On the printer driver s More Options tab click Image Options in the Tone Correction setting Select Enhance Light Text and Lines Related Information Printing Basics on page 41 More Options Tab o...

Страница 55: ...tion Printing Basics on page 41 Maintenance Tab on page 57 Canceling Printing You can cancel a print job from the computer However you cannot cancel a print job from the computer once it has been completely sent to the printer In this case cancel the print job by using the printer s control panel Canceling On your computer right click on your printer in Devices and Printers Printer or in Printers ...

Страница 56: ...ge and the binding margins When printing multi page documents you can select to print starting from either the front or the back side of the page Print Density Select the document type to adjust the print density If the appropriate print density is selected you can prevent images from bleeding through to the reverse side Select User Defined to adjust the print density manually Multi Page Allows yo...

Страница 57: ...o perform manual tone correction Click Advanced for further settings Image Options Enables print quality options such as Emphasize Text You can also thicken thin lines to make them visible on the printouts Watermark Features Allows you to make settings for anti copy pattern or watermarks Additional Settings Rotate 180 Rotates pages 180 degrees before printing This feature is helpful when printing ...

Страница 58: ...t click each item to view the Help for more details Print Queue Displays the jobs waiting to be printed You can check pause or resume print jobs Printer and Option Information Displays the number of sheets of paper fed into the printer Language Changes the language used on the printer driver window To apply the settings close the printer driver and then open it again Software Update Starts EPSON S...

Страница 59: ...ers or Print Scan Print Fax remove the printer and then add the printer again See the following to add a printer http epson sn 5 Change the settings as necessary See the menu options for the printer driver for details 6 Click Print Related Information Available Paper and Capacities on page 30 Loading Paper in the Paper Cassette on page 33 List of Paper Type on page 38 Menu Options for Print Settin...

Страница 60: ... Printing Settings from the pop up menu Select the method of 2 sided printing and then make the Document Type settings Note Printing speed may be reduced depending on the document type When printing photos with dense data select Text Graphics or Text Photos in the Document Type setting If the printouts are smeared or ink bleeds through to the other side of the paper adjust the Print Density and In...

Страница 61: ... page order and Border Related Information Printing Basics on page 58 Menu Options for Layout on page 63 Printing and Stacking in Page Order Reverse Order Printing You can print from the last page so that documents are stacked in page order for outputting paper to the front of the printer Print Settings Select Paper Handling from the pop up menu Select Reverse as the Page Order setting User s Guid...

Страница 62: ...ting at a specific percentage do one of the following Select Print from the File menu of the application Select Printer enter a percentage in Scale and then click Print Select Page Setup from the File menu of the application Select your printer in Format For enter a percentage in Scale and then click OK Note Select the paper size you set in the application as the Paper Size setting Related Informa...

Страница 63: ...rees before printing Select this item when printing on paper such as envelopes that are loaded in fixed direction in the printer Flip horizontally Inverts an image to print as it would appear in a mirror Menu Options for Color Matching ColorSync Select the method for color adjustment These options adjusts colors between the printer and the computer display to minimize the difference in color EPSON...

Страница 64: ...Two sided Printing Prints on both sides of the paper Making Operation Settings for the Mac OS Printer Driver Accessing the Operation Settings Window of the Mac OS Printer Driver Select System Preferences from the menu Printers Scanners or Print Scan Print Fax and then select the printer Click Options Supplies Options or Driver Operation Settings for Mac OS Printer Driver Skip Blank Page Avoids pri...

Страница 65: ...he Epson Connect service If you start Epson iPrint when the printer is not connected to the network a message is displayed instructing you to connect to the printer Follow the instructions to complete the connection See the URL below for the operating conditions http epson sn Related Information Printing Using a Network Service on page 93 Installing Epson iPrint You can install Epson iPrint on you...

Страница 66: ...gs such as paper size and paper type G Displays the paper size When this is displayed as a button tap it to display the paper settings currently set on the printer H Displays photos and documents you selected I Starts printing Note To print from the document menu using iPhone iPad and iPod touch running iOS start Epson iPrint after transferring the document you want to print using the file sharing...

Страница 67: ...e select Connected devices Printing and then enable Epson Print Enabler 6 From an Android application such as Chrome tap the menu icon and print whatever is on the screen Note If you do not see your printer tap All Printers and select your printer Related Information Loading Paper in the Paper Cassette on page 33 Connecting to a Smart Device on page 18 Canceling Printing Printer Button Press the y...

Страница 68: ...n select Enable EPSON Status Monitor 3 Related Information Accessing the Printer Driver on page 41 Checking the Status of the Maintenance Box Mac OS X 1 Start the printer driver utility Mac OS X v10 6 x to v10 9 x Select System Preferences from the menu Printers Scanners or Print Scan Print Fax and then select the printer Click Options Supplies Utility Open Printer Utility Mac OS X v10 5 8 Select ...

Страница 69: ...ay contain recycled materials this does not affect printer function or performance Specifications and appearance of the ink bottle are subject to change without prior notice for improvement For Europe Product BK Black ET M1180 111 M1180 110 1 110S 2 1 High capacity 2 Standard capacity Note For users in Europe visit the following website for information on Epson s ink bottle yields http www epson e...

Страница 70: ...y splatter when the ink tank is filled or refilled with ink If ink gets on your clothes or belongings it may not come off Use ink bottles with the correct part code for this printer Do not shake too vigorously or squeeze the ink bottles For optimum print results do not maintain low ink levels for extended periods of time To obtain optimum printing results refill the ink tank to the upper line at l...

Страница 71: ...ver 2 Open the cap of the ink tank 3 While holding the ink bottle upright turn the cap slowly to remove it cImportant Be careful not to spill any ink Do not touch the top of the ink bottle after removing the cap otherwise you may be smeared with ink User s Guide Refilling Ink and Replacing Maintenance Boxes 71 ...

Страница 72: ...oving its cap otherwise ink may spill Note If the ink does not start flowing into the tank remove the ink bottle and try reinserting it 5 When the ink reaches the upper line pull out the bottle Ink pours into the tank just by holding the bottle normally without squeezing The ink flow stops automatically when the ink is filled to the upper line User s Guide Refilling Ink and Replacing Maintenance B...

Страница 73: ...ghten the cap of the ink bottle Note If any ink remains in the ink bottle tighten the cap and store the bottle upright for later use 7 Close the ink tank cap securely 8 Close the ink tank cover firmly 9 If the H light flashes press the y button User s Guide Refilling Ink and Replacing Maintenance Boxes 73 ...

Страница 74: ...e installed correctly Remove the maintenance box and re install it Do not tilt the used maintenance box until after it is sealed in the plastic bag otherwise ink may leak Do not touch the openings in the maintenance box as you may get smeared with ink Do not reuse a maintenance box which has been removed and left detached for a long period Ink inside the box will have solidified and no more ink ca...

Страница 75: ... avoid ink leakage 1 Remove the new maintenance box from its package cImportant Do not touch the green chip on the side of the maintenance box Doing so may prevent normal operation and printing Note A transparent bag for the used maintenance box is provided with the new maintenance box 2 Loosen the screw with a flat head screwdriver and then remove the cover 3 Remove the used maintenance box cImpo...

Страница 76: ...bag shut 5 Insert the new maintenance box all the way into the printer Make sure you insert the box in the correct direction 6 Reattach the cover Related Information Maintenance Box Code on page 74 Maintenance Box Handling Precautions on page 74 User s Guide Refilling Ink and Replacing Maintenance Boxes 76 ...

Страница 77: ...ut causing nozzles ink outlets to clog In these cases turn the printer on and off again as soon as possible to cap the print head Check if Nozzles are Clogged Nozzle Check If the nozzles are clogged the printouts become faint or visible banding appears When print quality has declined first use the nozzle check feature to check if the nozzles are clogged Check if Nozzles are Clogged Nozzle Check Pr...

Страница 78: ...ng For details see the related information below Related Information Loading Paper in the Paper Cassette on page 33 Cleaning the Print Head Head Cleaning on page 80 Power Cleaning the Print Head Power Cleaning on page 81 Check if Nozzles are Clogged Nozzle Check Windows 1 Load A4 size plain paper in the paper cassette 2 Access the printer driver window 3 Click Nozzle Check on the Maintenance tab 4...

Страница 79: ...ac OS 1 Load A4 size plain paper in the paper cassette 2 Select System Preferences from the menu Printers Scanners or Print Scan Print Fax and then select the printer 3 Click Options Supplies Utility Open Printer Utility 4 Click Nozzle Check 5 Follow the on screen instructions to print the nozzle check pattern 6 Examine the printed pattern and then perform one of the following options depending on...

Страница 80: ...t for at least six hours without printing and then run the nozzle check again and repeat the head cleaning if necessary We recommend to turn off the printer If print quality has still not improved contact Epson support To prevent the print head from drying out do not unplug the printer while the power is on Cleaning the Print Head Printer Buttons Hold the y button down for at least five seconds un...

Страница 81: ...o three times until all lines are printed correctly Related Information Check if Nozzles are Clogged Nozzle Check on page 77 Power Cleaning the Print Head Power Cleaning The power cleaning feature may improve print quality in the following cases The most nozzles are clogged You performed the nozzle check and head cleaning three times and then waited for at least six hours without printing but prin...

Страница 82: ...1 Access the printer driver window 2 Click Power Cleaning on the Maintenance tab 3 Follow the on screen instructions Related Information Accessing the Printer Driver on page 41 Check if Nozzles are Clogged Nozzle Check on page 77 Running Power Cleaning Mac OS 1 Select System Preferences from the menu Printers Scanners or Print Scan Print Fax and then select the printer 2 Click Options Supplies Uti...

Страница 83: ...plies Utility Open Printer Utility 4 Click Print Head Alignment 5 Follow the on screen instructions Cleaning the Paper Path When the printouts are smeared or scuffed or paper does not feed correctly clean the roller inside cImportant Do not use tissue paper to clean the inside of the printer The print head nozzles may be clogged with lint Cleaning the Paper Path Windows 1 Access the printer driver...

Страница 84: ...eaning the Paper Path for Paper Feeding Problems When paper is not fed from paper cassette correctly clean the roller inside 1 Turn off the printer by pressing the P button 2 Unplug the power cord and then disconnect the power cord 3 Make sure that the ink tank cap is securely closed cImportant If the ink tank cap is not securely closed ink may leak 4 the printer cover 5 Slide out the paper casset...

Страница 85: ...inter standing for a long time 7 Dampen a soft cloth with water wring it out thoroughly and then wipe the roller while rotating it with the cloth 8 Return the printer to its normal position and then insert the paper cassette 9 Connect the power cord Checking the Total Number of Pages Fed Through the Printer You can check the total number of pages fed through the printer User s Guide Maintaining th...

Страница 86: ...per in the Paper Cassette on page 33 Checking the Total Number of Pages Fed Through the Printer Windows 1 Access the printer driver window 2 Click Printer and Option Information on the Maintenance tab Related Information Accessing the Printer Driver on page 41 Checking the Total Number of Pages Fed Through the Printer Mac OS 1 Select System Preferences from the menu Printers Scanners or Print Scan...

Страница 87: ...OS Browser Windows XP SP3 or later Microsoft Edge Internet Explorer 8 or later Firefox Chrome Mac OS X v10 6 8 or later Safari Firefox Chrome iOS Safari Android 2 3 or later Default browser Chrome OS Default browser Use the latest version Running Web Config on a Web Browser 1 Check the printer s IP address Press the button to print the network connection report and then check the printer s IP addr...

Страница 88: ...ound 2 Right click on your printer and select Properties 3 Select the Web Service tab and click the URL Running Web Config on Mac OS 1 Select System Preferences from the menu Printers Scanners or Print Scan Print Fax and then select the printer 2 Click Options Supplies Show Printer Webpage Application for Printing Web Pages E Web Print E Web Print is an application that allows you to easily print ...

Страница 89: ...dows Vista Windows XP Click the start button and then select All Programs or Programs Epson Software EPSON Software Updater Note You can also start EPSON Software Updater by clicking the printer icon on the task bar on the desktop and then selecting Software Update Starting on Mac OS Select Go Applications Epson Software EPSON Software Updater Application for Configuring Multiple Devices EpsonNet ...

Страница 90: ...pplication you need to uninstall it first 1 Make sure the printer and the computer are available for communication and the printer is connected to the Internet 2 Start EPSON Software Updater The screenshot is an example on Windows 3 For Windows select your printer and then click to check for the latest available applications 4 Select the items you want to install or update and then click the insta...

Страница 91: ...date the applications or the firmware cImportant Do not turn off the computer or the printer until the update is complete otherwise the printer may malfunction Note If you cannot find the application you want to update in the list you cannot update using the EPSON Software Updater Check for the latest versions of the applications from your local Epson website http www epson com Uninstalling Applic...

Страница 92: ...nge or Uninstall Windows XP Windows Server 2003 R2 Windows Server 2003 Click Change Remove or Remove Note If the User Account Control window is displayed click Continue 7 Follow the on screen instructions Uninstalling Applications Mac OS 1 Download the Uninstaller using EPSON Software Updater Once you have downloaded the Uninstaller you do not need to download it again each time you uninstall the ...

Страница 93: ... Internet are as follows Email Print When you send an email with attachments such as documents or images to an email address assigned to the printer you can print that email and the attachments from remote locations such as your home or office printer Epson iPrint This Application is for iOS and Android and allows you to print from a smart phone or tablet You can print documents images and website...

Страница 94: ...AP mode Error Status When an error occurs the light turns on or flashes Details of the error are displayed on the computer screen On Flashing Light Status Solutions Wi Fi connection error has occurred Press the button to clear the error and try again Initial ink charging may not be complete See the Start Here poster to complete initial ink charging No paper is loaded or more than one sheet has bee...

Страница 95: ...ch lever is raised Open the paper cassette cover and then lower the output switch lever Flashing alternately A maintenance box is nearing or at the end of its service life The maintenance box needs to be replaced When a message saying that you can continue printing is displayed on the computer press the button to continue printing The lights stop flashing for the time being however they will conti...

Страница 96: ...hen select the printer 2 Click Options Supplies Utility Open Printer Utility 3 Click EPSON Status Monitor You can check the printer status ink levels and error status Checking the Software Status You may be able to clear the problem by updating the software to the latest version To check the software status use the software update tool Related Information Software Update Tools EPSON Software Updat...

Страница 97: ...ts operating it could cause an injury Be careful not to touch the protruding parts to avoid injury 1 Open the front cover 2 Lower the output switch lever 3 Remove the jammed paper cImportant Do not touch the parts inside the printer Doing so may cause a malfunction 4 Raise the output switch lever 5 Close the front cover User s Guide Solving Problems 97 ...

Страница 98: ...ide the Printer Caution Never touch the buttons on the control panel while your hand is inside the printer If the printer starts operating it could cause an injury Be careful not to touch the protruding parts to avoid injury 1 Open the printer cover 2 Remove the jammed paper User s Guide Solving Problems 98 ...

Страница 99: ...m and ink tubes inside the printer Doing so may cause a malfunction If you touch the translucent film make sure you clean it 3 Close the printer cover until it clicks Removing Jammed Paper from Rear Cover 1 Remove the rear cover User s Guide Solving Problems 99 ...

Страница 100: ... conditions Use paper supported by this printer Follow the paper handling precautions Do not load more than the maximum number of sheets specified for the paper Clean the roller inside the printer Related Information Environmental Specifications on page 121 Paper Handling Precautions on page 32 Available Paper and Capacities on page 30 List of Paper Type on page 38 Paper Jams Load paper in the cor...

Страница 101: ...tion name are pre printed in the header select Letterhead as the paper type setting Power and Control Panel Problems Power Does Not Turn On Make sure the power cord is securely plugged in Hold down the P button for a little longer Power Does Not Turn Off Hold down the P button for a little longer If you still cannot turn off the printer unplug the power cord To prevent the print head from drying o...

Страница 102: ...irectly to the computer If the USB cable cannot be recognized change the port or change the USB cable If the printer cannot print using a USB connection try the following Disconnect the USB cable from the computer Right click on the printer icon displayed on the computer and then select Remove Device Next connect the USB cable to the computer and try a test print Re set the USB connection by follo...

Страница 103: ... a Network Status Sheet on page 22 Checking the Software and Data Make sure that a genuine Epson printer driver is installed If a genuine Epson printer driver is not installed the available functions are limited We recommend using a genuine Epson printer driver See the related information link below for details If you are printing a large data size image the computer may run out of memory Print th...

Страница 104: ...m Preferences from the menu Printers Scanners or Print Scan Print Fax and then select the printer Click Options Supplies and if the Options tab and Utility tab are displayed on the window a genuine Epson printer driver is installed on your computer Related Information Installing the Latest Applications on page 90 User s Guide Solving Problems 104 ...

Страница 105: ... devices and printers Printers Printers and Faxes see the following to select the icon Example USB connection EPSON XXXX Series Network connection EPSON XXXX Series network If you install the printer driver multiple times copies of printer driver may be created If copies such as EPSON XXXX Series copy 1 are created right click the copied driver icon and then click Remove Device Make sure the print...

Страница 106: ...mation Checking the SSID Connected to the Printer on page 109 Checking the SSID for the Computer on page 110 Cannot Connect from Devices Even Though Network Settings are No Problems If you cannot connect from the computer or smart device to the printer even though the network connection report does not show any problems see the following When you are using multiple wireless routers at the same tim...

Страница 107: ...or smart device to a 5 GHz SSID you cannot connect to the printer because the printer only supports communication over 2 4 GHz Connect the computer or smart device to the same SSID as the printer Most wireless routers have a privacy separator feature that blocks communication between connected devices If you cannot communicate between the printer and the computer or smart device even if they are c...

Страница 108: ...ee the following and try to re connect Check how many devices are connected Check how many devices are connected to the printer If the number of connected devices has not exceeded the maximum a connection error may have occurred Move the printer and computer or smart device closer to the wireless router to help with radio wave communication check that the SSID and password are correct and then try...

Страница 109: ...ry devices If the maximum number of devices have already been connected to the printer disconnect the unnecessary devices and try to connect the new device Delete the SSID for Wi Fi Direct on the Wi Fi screen for the device that you do not need to connect to the printer Checking the SSID Connected to the Printer You can check the SSID by printing a network connection report network status sheet or...

Страница 110: ...k tray on the desktop Check the name of the connected SSID from the list displayed Mac OS Click the Wi Fi icon at the top of the computer screen A list of SSIDs is displayed and the connected SSID is indicated with a check mark User s Guide Solving Problems 110 ...

Страница 111: ... report 5 Check the printer s IP address on the network connection report 6 On the computer access Web Config Launch a Web browser and then enter the printer s IP address 7 Select Advanced Settings from the list at the top right of the window 8 Select Network Settings Wired LAN 9 Select OFF for IEEE 802 3az 10 Click Next 11 Click OK 12 Remove the Ethernet cable connected to the computer and the pr...

Страница 112: ...anding or Unexpected Colors Appear The print head nozzles may be clogged Perform a nozzle check to check if the print head nozzles are clogged Clean the print head if any of the print head nozzles are clogged Related Information Check if Nozzles are Clogged Nozzle Check on page 77 Colored Banding Appears at Intervals of Approximately 3 3 cm Select the appropriate paper type setting for the type of...

Страница 113: ...head nozzles are clogged Align the print head Checking the paper Use paper supported by this printer Do not print on paper that is damp damaged or too old If the paper is curled or the envelope is puffed up flatten it Do not stack the paper immediately after printing Dry the printouts completely before filing or displaying them When drying the printouts avoid direct sun light do not use a dryer an...

Страница 114: ... the ink bottle before the date printed on the package Try to use genuine Epson ink bottles This product is designed to adjust colors based on the use of genuine Epson ink bottles The use of non genuine ink bottles may cause print quality to decline Related Information Check if Nozzles are Clogged Nozzle Check on page 77 Aligning the Print Head on page 82 Available Paper and Capacities on page 30 ...

Страница 115: ...he photo paper you need to clean the paper path Related Information Cleaning the Paper Path on page 83 The Position Size or Margins of the Printout Are Incorrect Load paper in the correct direction and slide the edge guides against the edges of the paper Select the appropriate paper size setting Adjust the margin setting in the application so that it falls within the printable area Related Informa...

Страница 116: ...uninstalling and then reinstalling the printer driver Related Information Uninstalling Applications on page 91 Installing the Latest Applications on page 90 Other Printing Problems Printing Is Too Slow Close any unnecessary applications Lower the quality setting High quality printing slows down the printing speed Enable the bidirectional or high speed setting When this setting is enabled the print...

Страница 117: ...s are too loud enable Quiet Mode Enabling this feature may reduce printing speed Windows printer driver Enable Quiet Mode on the Main tab Mac OS printer driver Select System Preferences from the menu Printers Scanners or Print Scan Print Fax and then select the printer Click Options Supplies Options or Driver Select On as the Quiet Mode setting Application Is Blocked by a Firewall for Windows Only...

Страница 118: ...eed in the printer or the print quality may decline depending on the paper properties or quality Printable Area Printable Area for Single Sheets Print quality may decline in the shaded areas due to the printer s mechanism A 3 0 mm 0 12 in B 3 0 mm 0 12 in C 46 0 mm 1 81 in D 44 0 mm 1 73 in Printable Area for Envelopes Print quality may decline in the shaded areas due to the printer s mechanism A ...

Страница 119: ...4 IPv6 UPnP Printing IPv4 Information appliance PictBridge Printing Wi Fi IPv4 Digital camera Epson Connect Email Print Remote Print IPv4 Google Cloud Print IPv4 IPv6 Network Scanning Epson Scan 2 IPv4 IPv6 Event Manager IPv4 Epson Connect Scan to Cloud IPv4 ADF 2 sided scanning Fax Send a fax IPv4 Receive a fax IPv4 Wi Fi Specifications Standards IEEE802 11b g n 1 Frequency Range 2 4 GHz Maximum ...

Страница 120: ...X IEEE802 3az Energy Efficient Ethernet 2 Communication Mode Auto 10Mbps Full duplex 10Mbps Half duplex 100Mbps Full duplex 100Mbps Half duplex Connector RJ 45 1 Use a category 5e or higher STP Shielded twisted pair cable to prevent risk of radio interference 2 The connected device should comply with IEEE802 3az standards Security Protocol SSL TLS HTTPS Server Client Supported Third Party Services...

Страница 121: ...p mode Approx 0 8 W Power off Approx 0 2 W Note Check the label on the printer for its voltage For European users see the following Website for details on power consumption http www epson eu energy consumption Environmental Specifications Operation Use the printer within the range shown in the following graph Temperature 10 to 35 C 50 to 95 F Humidity 20 to 80 RH without condensation Storage Tempe...

Страница 122: ...ote Mac OS may not support some applications and features The UNIX File System UFS for Mac OS is not supported Font Information Available Fonts for PCL URW Scalable Font Font Name Family HP Equivalent Symbol Set for PCL5 Nimbus Mono Medium Bold Italic Bold Italic Courier 1 Letter Gothic Medium Bold Italic Letter Gothic 1 Nimbus Mono PS Regular Bold Oblique Bold Oblique CourierPS 3 Nimbus Roman No4...

Страница 123: ...Light Italic Demi Italic ITC Bookman 3 URW Century Schoolbook Roman Bold Italic Bold Italic New Century Schoolbook 3 Nimbus Roman Medium Bold Italic Bold Italic Times 3 URW Chancery Medium Italic ITC Zapf Chancery Medium Italic 3 Symbol Symbol 4 URW Dingbats Wingdings 5 Dingbats ITC Zapf Dingbats 6 Standard Symbol SymbolPS 4 URW David Medium Bold HP David 7 URW Narkis Medium Bold HP Narkis 7 URW M...

Страница 124: ...dering which font to use you should also consider which symbol set to combine with the font Note Since most software handles fonts and symbols automatically you will probably never need to adjust the printer s settings However if you are writing your own printer control programs or if you are using older software that cannot control fonts refer to the following sections for symbol set details List...

Страница 125: ...in 6J VeMath 6M 8859 10ISO 6N DeskTop 7J Math 8 8M Roman 8 8U WiE Europe 9E Pc1004 9J 8859 15ISO 9N PcTk437 9T Windows 9U PsText 10J IBM US 10U IBM DN 11U McText 12J PcMultiling 12U VeInternati 13J PcEur858 13U VeUS 14J PiFont 15U PcE Europe 17U Unicode 3 0 18N WiBALT 19L WiAnsi 19U PcBlt775 26U Pc866Cyr 3R User s Guide Appendix 125 ...

Страница 126: ... WinCyr 9R Pc851Grk 10G ISOCyr 10N Pc8Grk 12G ISOGrk 12N Pc866Ukr 14R Hebrew7 0H 8859 8 ISO 7H Hebrew8 8H Pc862Heb 15H PC 862 Hebrew 15Q Arabic8 8V HPWARA 9V Pc864Ara 10V Symbol 19M Wingdings 579L ZapfDigbats 14L OCR A 0O OCR B 1O OCR B Extension 3Q Code3 9 0Y EAN UPC 8Y User s Guide Appendix 126 ...

Страница 127: ... This equipment complies with FCC IC radiation exposure limits set forth for an uncontrolled environment and meets the FCC radio frequency RF Exposure Guidelines in Supplement C to OET65 and RSS 102 of the IC radio frequency RF Exposure rules This equipment should be installed and operated so that the radiator is kept at least 7 9 inches 20 cm or more away from a person s body excluding extremitie...

Страница 128: ...d other official postal items bearing valid postage Government issued revenue stamps and securities issued according to legal procedure Exercise caution when copying the following items Private marketable securities stock certificates negotiable notes checks etc monthly passes concession tickets etc Passports driver s licenses warrants of fitness road passes food stamps tickets etc Note Copying th...

Страница 129: ...tle upright when tightening the cap and take precautions to prevent ink from leaking when transporting the bottle for example putting the bottle in a bag Do not put opened ink bottles in the box with printer 1 Turn off the printer by pressing the P button 2 Make sure the power light turns off and then unplug the power cord cImportant Unplug the power cord when the power light is off Otherwise the ...

Страница 130: ...closed 9 Pack the printer in its box using the protective materials cImportant Make sure you keep the printer horizontal when transporting or storing the printer by packing it in its box otherwise ink may leak When you use the printer again make sure you remove the tape securing the print head If print quality has declined the next time you print clean and align the print head User s Guide Appendi...

Страница 131: ...ated as Original Epson Products or Epson Approved Products by Seiko Epson Corporation Seiko Epson Corporation shall not be held liable for any damage resulting from electromagnetic interference that occurs from the use of any interface cables other than those designated as Epson Approved Products by Seiko Epson Corporation 2018 Seiko Epson Corporation The contents of this manual and the specificat...

Страница 132: ...his code illustrates a sample implementation of the Arcfour algorithm Copyright April 29 1997 Kalle Kaukonen All Rights Reserved Redistribution and use in source and binary forms with or without modification are permitted provided that this copyright notice and disclaimer are retained THIS SOFTWARE IS PROVIDED BY KALLE KAUKONEN AND CONTRIBUTORS AS IS AND ANY EXPRESS OR IMPLIED WARRANTIES INCLUDING...

Страница 133: ... if you give them the following information Product serial number The serial number label is usually on the back of the product Product model Product software version Click About Version Info or a similar button in the product software Brand and model of your computer Your computer operating system name and version Names and versions of the software applications you normally use with your product ...

Страница 134: ...w Zealand Epson New Zealand wishes to provide you with a high level of customer service In addition to your product documentation we provide the following sources for obtaining information Internet URL http www epson co nz Access the Epson New Zealand World Wide Web pages Worth taking your modem here for the occasional surf The site provides a download area for drivers Epson contact points new pro...

Страница 135: ...otline You can also contact our technical staff at the following telephone and fax numbers Phone 852 2827 8911 Fax 852 2827 4383 Help for Users in India Contacts for information support and services are World Wide Web http www epson co in Information on product specifications drivers for download and products enquiry are available Helpline Service product information and ordering consumables BSNL ...

Отзывы: