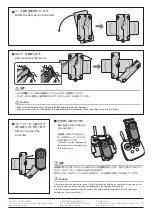
A
ベース部分を横向きにします。
Rotate the base part to horizontal.
B
ホルダーを開閉します。
Open and close the mount.
C
コントローラーの取り付け
または取り外しを行います。
Attach or remove the
controller.
送信機への取り付け方法は、ド
ローン本体のユーザーガイドな
どを参照してください。
See the user's guide supplied with
the drone for details on attaching
to the transmitter.
注意
•
必ず手順
A
でベース部分を横向きにしてから、ホルダーを開閉してください。
• ホルダーを 180 度開くと結合部が外れます。外れたときは、はめ直してください。
Caution
• Make sure that the base part is horizontal before opening or closing the mount.
• If you open the mount to 180 degrees, the joined sections will come apart. Reposition the parts and re-join them.
■
送信機への取り付け例
Example of attaching to
a transmitter
SEIKO EPSON CORPORATION
3-5, Owa 3-chome, Suwa-shi, Nagano-ken 392-8502 Japan
http://www.epson.com/
台灣愛普⽣科技股份有限公司
110 台北市信義區松仁路 7 號 14 樓
http://www.epson.com.tw/
한국엡손주식회사
153-803 서울시 금천구 서부샛길 606 대성디폴리스 A 동 27 층
http://www.epson.co.kr/
注意
送信機に取り付け後、コントローラー部をつかんで送信機を持ち上げたり、強く引っ張ったりしないでく
ださい。ホルダーがベースから外れるおそれがあります。
外れたときは、ホルダーとベースの中心を合わせ、ツメの破損に注意してはめ直してください。
Caution
After attaching to the transmitter, do not lift the transmitter by holding the controller section, and do not
pull it with excessive force. Otherwise, the holder could be separated from the base.
If they do become separated, align the center of the holder and the base, and make sure you do not
damage the clips as you attach it.


