background image

After 13 minutes of inactivity, the screen turns 

black to save energy. Touch the screen to return the 

screen to its previous state.

Q

e

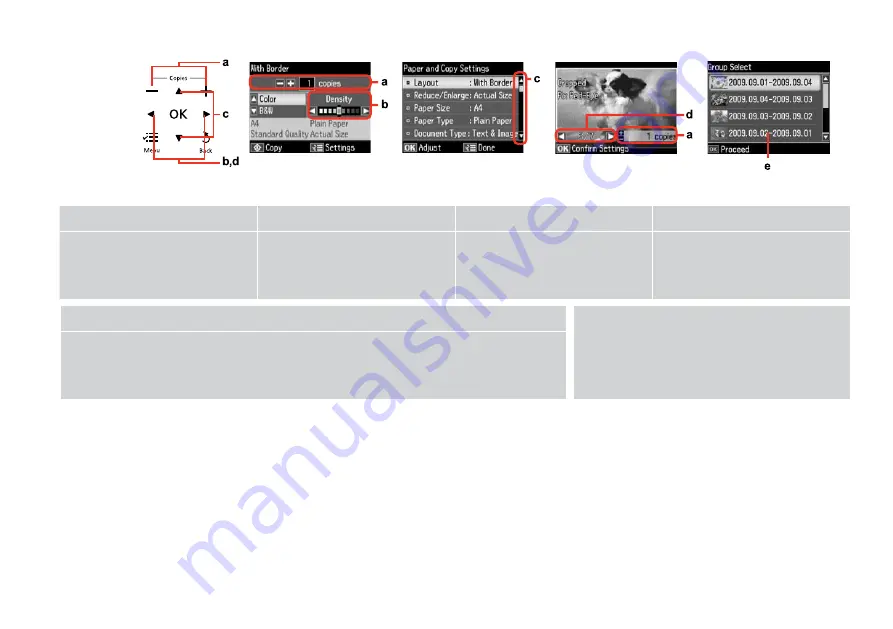
When you have more than 999 photos on your memory card, the LCD screen displays a message to let you select 
a group. Images are sorted by the date they were taken. To select and show images in a group, press 

u

 or 

d

 to 

select a group and then press OK. To re-select a group or folder, select Print PhotosSelect Location, and then 
select Select Group or Select Folder.

The actual screen display may differ slightly from those shown in this guide.

Using the LCD Screen

a

b

c

d

Use or - to set the number of 
copies for the selected photo.

Press 

l

 or 

r

 to set the density.

Press 

u

 or 

d

 to select the menu item. The 

highlight moves up or down.

Press 

l

 or 

r

 to change the photo displayed 

on the LCD screen.

Содержание Artisan 635

Страница 1: ...Basic Operation Guide for use without a computer ...

Страница 2: ... Photos 28 Printing in Various Layouts 30 Printing on a CD DVD 32 Printing Photo Greeting Cards 35 Printing from an External USB Device 38 Print Photos Mode Menu List 39 Other Mode Scanning to a Memory Card 42 Scanning to a Computer 43 Backup to an External USB Device 44 Other Mode Menu List 45 Setup Mode Maintenance Checking the Ink Cartridge Status 48 Checking Cleaning the Print Head 50 Aligning...

Страница 3: ...wed carefully to avoid bodily injury Caution Cautions must be observed to avoid damage to your equipment Must be observed to avoid bodily injury and damage to your equipment Note Notes contain important information and hints for using the printer Indicates a page number where additional information can be found ...

Страница 4: ...any options or any consumable products other than those designated as Original Epson Products or Epson Approved Products by Seiko Epson Corporation Seiko Epson Corporation shall not be held liable for any damage resulting from electromagnetic interference that occurs from the use of any interface cables other than those designated as Epson Approved Products by Seiko Epson Corporation EPSON is a re...

Страница 5: ...ble gases inside or around the printer Doing so may cause fire Except as specifically explained in your documentation do not attempt to service the printer yourself Keep ink cartridges out of the reach of children Do not shake the ink cartridges too vigorously otherwise ink may leak from the cartridge If you remove an ink cartridge for later use protect the ink supply area from dirt and dust and s...

Страница 6: ...all point pen sharp pencil stylus pen and so on The touchpad is a capacitive touch panel that only responds to direct finger touch The touchpad may not respond to touch from wet hands gloved hands or over the protective sheet or stickers Adjusting Angle of Control Panel To lower or close the panel unlock by pushing the button at the rear and then lower Simply lift the panel to raise it ...

Страница 7: ... the view of photos or crops the photos Displays Help to solve problems e f g h x l u r d OK y The LCD screen displays a preview of the selected images or displays settings Displays detailed settings for each mode Selects photos and menus Cancels returns to the previous menu i j k x y Sets the number of copies Starts copying printing Stops copying printing or reset settings ...

Страница 8: ...w images in a group press u or d to select a group and then press OK To re select a group or folder select Print Photos Select Location and then select Select Group or Select Folder The actual screen display may differ slightly from those shown in this guide Using the LCD Screen a b c d Use Copies or to set the number of copies for the selected photo Press l or r to set the density Press u or d to...

Страница 9: ... Handling Media and Originals ...

Страница 10: ...wn horizontally A B Slide to the corner Place photos 5 mm apart You can reprint photos from 30 40 mm to 127 178 mm Q You can copy photos of different sizes at the same time as long as they are larger than 30 40 mm Q Place in the center ...

Страница 11: ... Paper Plain Paper 80 c Epson Photo Quality Ink Jet Paper Matte 100 d Epson Matte Paper Heavyweight Matte 20 e Epson Premium Glossy Photo Paper Prem Glossy 20 f Epson Premium Semigloss Photo Paper Prem Glossy 20 g Epson Ultra Glossy Photo Paper Ultra Glossy 20 h Epson Glossy Photo Paper Glossy 20 i Epson Photo Paper Photo Paper 20 1 Paper with a weight of 64 to 90 g m 2 30 sheets for paper that al...

Страница 12: ...12 Loading Paper Open and slide out Open and slide out Load printable side up A B D Slide edge guide C Make sure that the lever is in up position Q ...

Страница 13: ...13 Do not use paper with binder holes Q Align the edges of the paper before loading Q Fit E Do not load paper above the H arrow mark inside the edge guide Q ...

Страница 14: ...14 Loading a CD DVD Close A Move the lever down B Do not move the tray lever while the printer is operating c Place C Insert D Align the arrow marks E You can also print on a Blu ray Disc Q ...

Страница 15: ...15 To print on 8 cm CDs see the online User s Guide Q Removing a CD DVD Pull out A Move the lever up B ...

Страница 16: ...e the card all the way into the slot It should not be fully inserted c Inserting a Memory Card A B Insert one card at a time Check the light stays on Removing a Memory Card Check the light stays on A B Remove On Flashing Q ...

Страница 17: ...cture Card xD Picture Card Type M xD Picture Card Type M xD Picture Card Type H SD SDHC SDXC MultiMediaCard MMCplus MMCmobile MMCmicro miniSD miniSDHC microSD microSDHC Memory Stick Memory Stick PRO MagicGate Memory Stick Memory Stick Duo Memory Stick PRO Duo Memory Stick PRO HG Duo MagicGate Memory Stick Duo Memory Stick Micro CompactFlash Microdrive ...

Страница 18: ...18 ...

Страница 19: ...19 Copy Mode ...

Страница 20: ...20 Copying Documents A R 12 B R 10 C Load paper Place original horizontally Select Copy F G Set the density Enter the copy setting menu Set the number of copies D E Select a color mode ...

Страница 21: ...21 H J K Select Paper and Copy Settings Finish the settings Start copying I R 26 Select the appropriate copy settings Make sure you set the Paper Size and Paper Type Q ...

Страница 22: ...22 Copy Restore Photos Load paper Place original horizontally Select Copy Select Copy Restore Photos Select On or Off Proceed Enter the copy setting menu A R 12 B R 10 C E F G D ...

Страница 23: ...p H for the second photo Q Make sure you set the Paper Size and Paper Type Q Set the number of copies Enter the copy setting menu K R 26 Select the appropriate print settings J Select Paper and Copy Settings L Finish the settings M Start copying ...

Страница 24: ...24 Copying a CD DVD A R 10 B Place original Select Copy E F Proceed Set the printing area Enter copy menu C D Select Copy to CD DVD ...

Страница 25: ...lect Test print on A4 paper Q I Select a color mode and proceed To adjust print position select Setup Printer Setup then CD DVD R 56 Q H R 14 Load a CD DVD If you print on the colored areas shown on the right the units are in mm the disk or CD DVD tray may be stained with ink Q ...

Страница 26: ...r Type Borderless Expansion Enhance Filter Copy to CD DVD Paper and Copy Settings Document Type Quality Copy Layout Wizard With Border Borderless 2 up Copy Maintenance R 56 1 You can restore the faded photo by selecting On in the Color Restoration setting in this wizard 2 Select the amount the image is expanded when printing Borderless photos 3 Your image is slightly enlarged and cropped to fill t...

Страница 27: ...27 Print Photos Mode ...

Страница 28: ...inting Photos A R 12 B R 16 C Load photo paper Insert a memory card Select Print Photos F Set the number of copies Select View and Print Photos D E Select a photo To select more photos repeat steps E and F Q ...

Страница 29: ...t settings After step F you can crop and enlarge your photo Press and make the settings Q Make sure you set the Paper Size and Paper Type Q G Enter the print setting menu J Start printing To adjust photos select Photo Adjustments and make the settings R 39 Q ...

Страница 30: ...30 A R 12 B R 16 C E F G D Load paper Insert a memory card Select Print Photos Select a layout Select paper type and size Select Automatic layout Select Photo Layout Sheet Printing in Various Layouts ...

Страница 31: ...select more photos repeat step H Q If you select Place photos manually place photos as shown in 1 or leave a blank as shown in 2 Q H J K I Select a photo Finish selecting photos Set the number of copies Print ...

Страница 32: ...D DVD A R 16 B Insert a memory card Select Print Photos Select Print on CD DVD C D Select a layout E Select Automatic layout If you select Place photos manually place photos as shown in 1 or leave a blank as shown in 2 Q ...

Страница 33: ...p F Q After step F you can crop and enlarge your photo Press and make the settings Q G Finish selecting photos H R 25 Set the printing area and proceed If you want to print a test sample on paper select Test print on A4 paper Q I Select Print on a CD DVD ...

Страница 34: ... jacket select in the Home menu Print Photos Photo Layout Sheet then Jewel Upper or Jewel Index as the layout Q To make optional print settings press x Q To adjust the print position see Copying a CD DVD R 25 Q K R 14 Load a CD DVD J Close ...

Страница 35: ...andwritten messages by using an A4 template First print a template write your message and then scan the template to print your cards Insert a memory card Select Print Photos Select Print Photo Greeting Card Load A4 plain paper Printing Photo Greeting Cards ...

Страница 36: ...36 G J Select a paper type and size Print E F H I Proceed Select the photo to print Select a layout Select a frame K Check u aligns with the corner of the sheet ...

Страница 37: ...37 L M N O R 10 Q Select the style of the text Select the type Write a message or drawing Place the template face down Select and proceed R Set the number of copies S Start printing P Load photo paper ...

Страница 38: ...16 C D Load photo paper Remove Connect an external USB device Select Print Photos After step D follow the steps for memory card printing R 28 Q The supported photo file format is JPEG For external USB device specifications see the online User s Guide Q ...

Страница 39: ...utomatic cropping and leave white space at the edges of the photo 5 Select On to increase the print speed Select Off to improve the print quality 6 Select PhotoEnhance to adjust the brightness contrast and saturation of your photos automatically Select P I M to use your camera s PRINT Image Matching or Exif Print settings 7 Depending on the type of photo parts of the image other than the eyes may ...

Страница 40: ...40 ...

Страница 41: ...41 Other Mode ...

Страница 42: ... 16 B R 10 C D E R 45 F Insert a memory card Place original horizontally Select Scan Select Scan to Memory Card Select settings and scan Check the message on the screen If the edges of the photo are faint change the Scan Area E R 45 Q ...

Страница 43: ...y Select Scan Select an item Scanning to a Computer Make sure you have installed software for this printer on your computer and connected following the instructions on the Start Here poster Q The data is automatically saved to your computer Q ...

Страница 44: ...t Select Back Up Data Select Back Up Memory Card Follow the on screen instructions To change the writing speed press x select Writing Speed and set Q A folder is automatically created for each backup You can print photos from the backup external USB device R 38 Q ...

Страница 45: ...y Card Format JPEG PDF Scan Area A4 Auto Cropping Max Area Document Text Photograph Quality Standard Best Scan to PC Scan to PC PDF Scan to PC Email uScan Mode Back Up Data Mode Back Up Memory Card Other Mode Menu List ...

Страница 46: ...46 ...

Страница 47: ...47 Setup Mode Maintenance ...

Страница 48: ...48 Checking the Ink Cartridge Status C Finish Select Setup A B Select Ink Levels Y BK LC LM M C Yellow Black Light Cyan Light Magenta Magenta Cyan Ink is low ...

Страница 49: ...eliability of non genuine ink If non genuine ink cartridges are installed the ink cartridge status may not be displayed Q If an ink cartridge is running low prepare a new ink cartridge Q The ink levels displayed are an approximate indication Q ...

Страница 50: ...ses some ink from all cartridges so clean the print head only if quality declines Q C Select Maintenance Load A4 size paper A R 12 B Select Setup Select Nozzle Check D E Start the nozzle check Checking Cleaning the Print Head ...

Страница 51: ...cleaning four times turn off the printer for at least six hours Then try cleaning the print head again If quality still does not improve contact Epson support Q F Check the pattern Do not turn off the printer during head cleaning If the head cleaning is incomplete you may not be able to print Q ...

Страница 52: ...52 C Select Maintenance Load A4 size paper A R 12 B Select Setup F Select the most solid pattern Select Head Alignment D E Print patterns Aligning the Print Head ...

Страница 53: ...53 H Repeat G for all patterns G Select the pattern number ...

Страница 54: ...t External Device Setup Remove A B Select Setup Select Print Settings D R 56 F Connect and turn on the camera Printing from a Digital Camera G See your camera s guide to print E Select appropriate print settings ...

Страница 55: ...ize 80 80 pixels to 9200 9200 pixels Depending on the settings on this printer and the digital camera some combinations of paper type size and layout may not be supported Q Some of the settings on your digital camera may not be reflected in the output Q ...

Страница 56: ...lay Format External Device Setup Print Settings For details on the setting items see the Print Photos Mode Menu List R 39 Photo Adjustments Restore Default Settings Setup Mode 1 If the printout is smeared set this function to On 2 You can select the LCD screen display format from 1 up with Info 1 up without Info and View Thumbnail Images Setup Mode Menu List ...

Страница 57: ...57 Solving Problems ...

Страница 58: ...ore the end of their service life When the ink pads are saturated the printer stops and Epson support is required to continue printing A printer s ink pad is at the end of its service life Please contact Epson Support Contact Epson support to replace ink pads Paper jam inside the product Press OK to see how to remove the paper R 63 Ink cartridge is not recognized Please replace the cartridge Make ...

Страница 59: ...havior Information about non genuine ink levels may not be displayed Make sure you have a new ink cartridge before you begin replacement Once you start replacing a cartridge you must complete all the steps in one session Do not leave the printer with the ink cartridges removed or do not turn off the printer during cartridge replacement Otherwise ink remaining in the print head nozzles will dry out...

Страница 60: ...C D E Do not lift the scanner unit when the document cover is open c Check the color to replace Open Open Pinch and remove Never open the cartridge cover while the print head is moving w B Select Replace now ...

Страница 61: ...t and push Close J Close If you find it difficult to close the cover press down on each cartridge until it clicks into place c Start charging ink K F Unpack new cartridge Be careful not to break the hooks on the side of the ink cartridge c ...

Страница 62: ...Maintenance Ink Cartridge Replacement and then follow the instructions from step C Q If you had to replace an ink cartridge during copying to ensure copy quality after ink charging is finished cancel the job that is copying and start again from placing the originals Q ...

Страница 63: ...63 B C Remove Close A Open Paper Jam If paper still remains near the rear feeder gently pull it out Q Press x or turn off and then on D ...

Страница 64: ...User s Guide to align the print head F To clean the inside of the printer make a copy without placing a document on the document glass For further information see your online User s Guide G For best results use up ink cartridge within six months of opening the package R 59 H Try to use genuine Epson ink cartridges and paper recommended by Epson I If a moiré cross hatch pattern appears on your copy...

Страница 65: ...the troubleshooting information contact Epson support services for assistance You can get the contact information for Epson support for your area in your online User s Guide or warranty card If it is not listed there contact the dealer where you purchased your product ...

Страница 66: ...66 Getting More Information If the online manual icon is not displayed insert the CD and select Epson Online Guides in the installer screen Online manual ...

Страница 67: ...ge replacing 59 ink cartridge status 48 Ink levels 56 J Jams paper 63 M Memory Card 16 N Nozzle check 56 P P I M 26 39 Panel 6 7 8 Paper jams 63 Paper loading 12 Paper Type 11 PhotoEnhance 26 39 Print All Photos 39 Proof sheet Thumbnail 39 Q Quality 64 R red eye correction 39 Restore Default Settings 56 S Safety Instructions 5 Saturation 39 Save photos backup 44 45 Scan document copy 20 Scan photo...

Страница 68: ... 2011 Seiko Epson Corporation All rights reserved Printed in XXXXXX Artisan 635 BK Black C Cyan M Magenta Y Yellow LC Light Cyan LM Light Magenta 82N 81N ...

Отзывы: