background image

4-100

100

|

Printing with Epson Drivers for Windows

Choosing Basic Print Options

Before you print, you need to set basic printing properties. Make sure you 
have installed the Epson driver and utilities from the CD-ROM. 

The driver offers automatic settings that optimize print quality and speed 
when you’re using Epson media. You can also choose advanced settings for 
more control over your printer and color management options, as described 
on page 110. 

Follow these steps to make basic settings:

1. Start an application, open the file you want to print, and select 

Print

 in 

your application. You see the Print window.

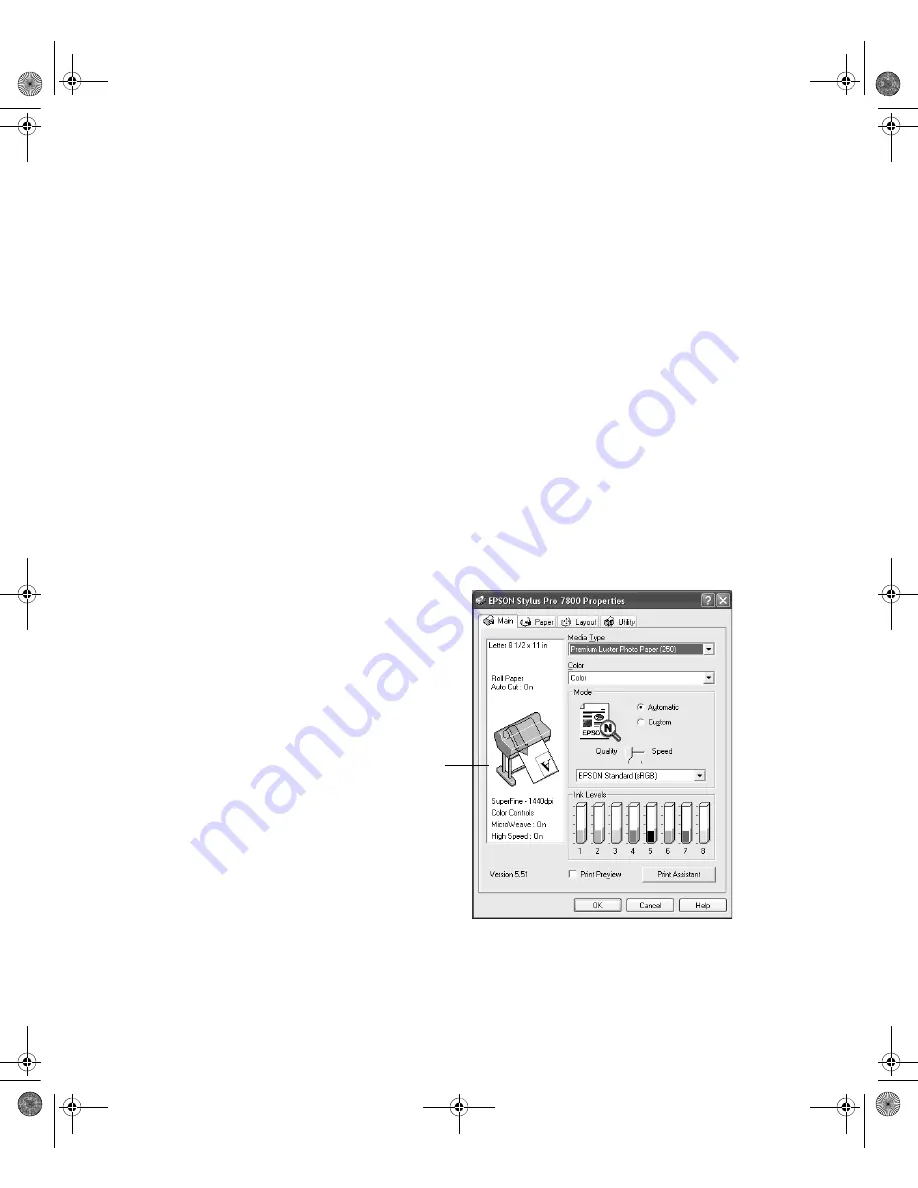
2. Make sure your printer is selected, then click the

 Properties 

button. 

Or, if you see a 

Setup

Printer

, or 

Options 

button, click it instead. 

Then click 

Properties

 on the next screen. You see a window like the 

following:

Note: 

If you need more 

information about print 
options, you can click 
the 

Help

 button on 

any screen.

This box shows 
you the current 
settings, but you 
can’t change 
them from here

7800-9800Guide.book  Page 100  Monday, April 10, 2006  11:59 AM

Содержание 7800 - Stylus Pro Color Inkjet Printer

Страница 1: ...Epson Stylus Pro 7800 9800 PRINTER GUIDE 7800 9800Guide book Page 1 Monday April 10 2006 11 59 AM ...

Страница 2: ...ly and may be trademarks of their respective owners Epson disclaims any and all rights in those marks The ENERGY STAR emblem does not represent EPA endorsement of any product or service Legal Notices Neither Seiko Epson Corporation nor its affiliates shall be liable to the purchaser of this product or third parties for damages losses costs or expenses incurred by purchaser or third parties as a re...

Страница 3: ... the receiving antenna Increase the separation between the equipment and receiver Connect the equipment into an outlet on a circuit different from that to which the receiver is connected Consult the dealer or an experienced radio TV technician for help WARNING The connection of a non shielded equipment interface cable to this equipment will invalidate the FCC Certification of this device and may c...

Страница 4: ...4 7800 9800Guide book Page 4 Monday April 10 2006 11 59 AM ...

Страница 5: ...asket 25 Unpacking and Assembling the Epson Stylus Pro 9800 27 Unpacking and Assembling the Stand 28 Unpacking the Printer 29 Mounting the Printer on the Stand 31 Attaching the Basket 34 Connecting the Power Cord 37 Installing Ink 38 Connecting to Your System 40 Connecting to the Network 41 Installing the Software for Macintosh 43 Adding the Printer in Mac OS X 10 4 45 Adding the Printer in Mac OS...

Страница 6: ...r Basket 70 Catching Printouts From the Epson Stylus Pro 7800 71 Catching Printouts in Front of the Epson Stylus Pro 9800 72 Catching Printouts Under the Epson Stylus Pro 9800 73 Optimizing the Settings for Your Paper 75 Creating Paper Configurations 75 Printing Your Paper Configurations 77 Selecting Paper Configurations 77 3 Printing with Epson Drivers for Macintosh Choosing Page Setup Options 80...

Страница 7: ...Status Information 120 Viewing Status Information 121 Checking and Cleaning the Print Head 122 Running the Nozzle Check and Head Cleaning Utilities 123 Using the Control Panel Menu 124 Manually Checking and Cleaning the Print Head 124 Running a Power Cleaning Cycle 125 Aligning the Print Head 126 Replacing Ink Cartridges 127 Switching Black Ink Cartridges 132 Draining the Old Ink 132 Installing th...

Страница 8: ...nt Quality 154 Solving Operational Problems 158 Solving Miscellaneous Printing Problems 159 Solving Paper Problems 160 Fixing Paper Eject Problems 161 Clearing Paper Jams 162 Uninstalling and Reinstalling the Printer Driver 164 Macintosh 164 Windows 164 A Specifications Environmental 165 Electrical 165 Dimensions and Weight 166 Printer Interfaces 166 Safety Approvals 166 Media 166 Roll Paper 166 C...

Страница 9: ... using the printer s menu system Attach it to your printer for easy reference The electronic Reference Guide on the CD ROM provides additional information about the printer drivers and utility software You can read the guide using a web browser such as Safari TM Mozilla FireFox or Netscape Navigator or Microsoft Internet Explorer versions 4 0 or later Warnings Cautions Notes and Tips Please follow...

Страница 10: ...lus Pro 9800 C12C811161 C12C811151 Paper Roller Spindle High Tension 2 or 3 inch Epson Stylus Pro 7800 Epson Stylus Pro 9800 C12C811155 C12C811152 Manual Media Cutting System Epson Stylus Pro 7800 Epson Stylus Pro 9800 C12C815231 C815182 Replacement Manual Cutting Blade for Manual Media Cutting System C815192 One year extended warranty EPP7898B1 Two year extended warranty EPP7898B2 Tip Check the E...

Страница 11: ... Time Monday through Friday Support hours and days are subject to change without notice Before you call make sure you have your Unit ID number which is included with the Epson Preferred Protection Plan information that came with your printer You ll also need your printer serial number and proof of purchase Epson also provides technical assistance 24 hours a day through the World Wide Web You can r...

Страница 12: ...reWire connection a shielded IEEE 1394 cable up to 10 feet long For network connection the optional Ethernet card described on page 10 and a compatible cable Windows System Requirements To use your printer in either a stand alone or peer to peer network environment your system should include the requirements listed below IBM compatible PC with a Pentium IV 2 GHz or higher processor recommended Win...

Страница 13: ... when lifting it See page 23 for the 7800 or 32 for the 9800 When setting up the printer make sure you have enough space around it You may need more space behind the printer if you print on large sheets of heavy stock or posterboard See page 17 for the 7800 or 27 for the 9800 Place the printer on a flat stable surface The printer will not operate properly if it is tilted or at an angle Avoid place...

Страница 14: ...t insert objects through the slots Take care not to spill liquid on the printer Do not attempt to service the printer yourself The lamp in this product contains mercury Please consult your state and local regulations regarding disposal or recycling Do not put in the trash Power down the printer from the control panel unplug the printer and refer servicing to qualified service personnel under the f...

Страница 15: ... Do not use an ink cartridge beyond the date printed on the cartridge carton Use up the ink cartridge within six months of installation for best results Do not dismantle ink cartridges or try to refill them This could damage the print head Do not touch the ink supply port its surrounding area or the green IC chip on the side of the ink cartridge Doing so may affect normal operation and printing Ca...

Страница 16: ...16 16 Introduction 7800 9800Guide book Page 16 Monday April 10 2006 11 59 AM ...

Страница 17: ...e the printer The following illustration shows the minimum space required for using the Epson Stylus Pro 7800 You will also need floor space of approximately 8 8 feet to assemble the printer and stand Chapter 1 Setting Up the Printer Caution Two people are required to unpack and set up the printer Note When choosing a place for the printer leave adequate room for easy access and ventilation Avoid ...

Страница 18: ...sure you have all these items Parts Tools and Accessories 2 Bases 2 Legs Bottom horizontal strut Top horizontal strut 4 Basket hooks Paper basket 4 Base bolts 2 Strut bolts 2 Wing screws 2 Collars 6 Hex screws with washers 2 Hex wrenches 7800 9800Guide book Page 18 Monday April 10 2006 11 59 AM ...

Страница 19: ...Assemble the left leg and base in the same way 4 Attach the bottom horizontal strut as shown then fasten it with one collar and one strut bolt at each end Make sure the bolts are tight Note Make sure you tighten all bolts before moving to the next section Bolt holes Underside view of base showing location of bolt holes Collar Strut bolt 7800 9800Guide book Page 19 Monday April 10 2006 11 59 AM ...

Страница 20: ...Use the small hex wrench to fasten the hex screws 6 Make sure each part of the stand is tightened securely Unpacking the Printer 1 Open the box and remove the roll paper spindle polystyrene foam and cardboard cushions 7800 9800Guide book Page 20 Monday April 10 2006 11 59 AM ...

Страница 21: ...have all the items shown below in addition to the printer A B Remove ink cartridges and accessories Note The printer includes a Photo Black cartridge If you prefer to use Matte Black the Matte Black cartridge can be purchased separately See page 128 FireWire cable Black Ink Conversion Kit Spindle adapters Paper guides Power cord Roll paper and spindle Ink cartridges 7800 9800Guide book Page 21 Mon...

Страница 22: ...e cardboard panels and other packing materials from around the printer Mounting the Printer on the Stand 1 Lock the casters and lower the stabilizer knobs to keep the stand from rolling 7800 9800Guide book Page 22 Monday April 10 2006 11 59 AM ...

Страница 23: ... Up the Printer 23 2 Have two people lift the printer 3 Mount the printer on the stand as shown WARNING Two or more people are required to lift the printer 7800 9800Guide book Page 23 Monday April 10 2006 11 59 AM ...

Страница 24: ...maintenance tank on the right side near the bottom 6 Open the front cover Follow the red wire to locate the bolt and bracket securing the print head Then unscrew the bolt and remove the bracket as shown Save the bolt and bracket in case you need to ship the printer Note To prevent paper jams don t place the bolt back in the printer 7800 9800Guide book Page 24 Monday April 10 2006 11 59 AM ...

Страница 25: ...ter stand and catches your prints as they come out 1 Attach the basket hooks as shown The free ends of the hooks should point outward 2 Snap the basket s plastic connectors onto the hooks at the rear of the stand Make sure the connectors are positioned as shown 7800 9800Guide book Page 25 Monday April 10 2006 11 59 AM ...

Страница 26: ... See page 161 for more information 6 Raise the stabilizer knobs and unlock the casters Then move the printer to the place of use The casters are meant for moving the printer for only a short distance Lock the casters and extend the stabilizer knobs after moving 7 Make sure you save the box and packaging in case you need to ship the printer When you are finished assembling the printer go to Connect...

Страница 27: ...ro 9800 You will also need floor space of approximately 13 13 feet to assemble the printer and stand Note When choosing a place for the printer leave adequate room for easy access and ventilation Avoid locations subject to direct sunlight excessive heat moisture or dust Also avoid locations near potential sources of interference such as loud speakers cordless phones TVs or air conditioners 12 in 1...

Страница 28: ...he box 2 Lift the box up then set it aside 3 Unpack the stand and make sure you have all these items Parts Tools and Accessories Base sections Support bar Basket hooks Paper basket Hex wrench 4 Bolts 2 Wing nuts with spring washers and plain washers 5 Paper supports 7800 9800Guide book Page 28 Monday April 10 2006 11 59 AM ...

Страница 29: ...eave the bolts a little loose so that you can adjust the position when you insert the bolts at the other end 5 Attach the base section to the other end 6 Tighten all four bolts securely Unpacking the Printer 1 Open the box and remove the roll paper spindle polystyrene foam and cardboard cushions 7800 9800Guide book Page 29 Monday April 10 2006 11 59 AM ...

Страница 30: ...ave all the items shown below in addition to the printer A B Remove ink cartridges and accessories Note The printer includes a Photo Black cartridge If you prefer to use Matte Black the Matte Black cartridge can be purchased separately See page 128 Black Ink Conversion Kit Spindle adapters Paper guides Power cord Roll paper and spindle Ink cartridges FireWire cable 7800 9800Guide book Page 30 Mond...

Страница 31: ...rinter on the Stand 1 Lock the two casters to keep the stand from rolling Then extend the stabilizer knobs 2 Orient the printer in relation to the stand as shown Caster lock Stabilizer knob 7800 9800Guide book Page 31 Monday April 10 2006 11 59 AM ...

Страница 32: ...our locations as shown and set the printer on the stand 4 Fasten the printer to the stand with the wing nuts spring washers and plain washers WARNING Do not attempt to lift the printer with fewer than four people Top view 7800 9800Guide book Page 32 Monday April 10 2006 11 59 AM ...

Страница 33: ...des of the printer to make sure you remove all the tape 6 Open the front cover Follow the red wire to locate the screw and bracket securing the print head Then unscrew the bolt and remove the bracket as shown Save the bolt and bracket in case you need to ship the printer 7 Close the front cover 7800 9800Guide book Page 33 Monday April 10 2006 11 59 AM ...

Страница 34: ... meant for moving the printer for only a short distance Lock the casters and extend the stabilizer knobs after moving Attaching the Basket 1 Attach the basket hooks to the upper guides on the left and right sides 2 Turn the basket so its seams face downward and spread it on the floor 7800 9800Guide book Page 34 Monday April 10 2006 11 59 AM ...

Страница 35: ...at the fabric folds around the bar Then insert the plastic pins into the stand as shown 4 Slide out the upper basket hooks to their full length Then hook the middle bar of the basket as shown 5 Insert the lower bars into the holes on the bottom of the base as shown 7800 9800Guide book Page 35 Monday April 10 2006 11 59 AM ...

Страница 36: ...nside of the basket Install them in the order indicated below 7 If you find that your roll paper is curled too tightly to eject properly attach the 5 paper guides to the bottom of the printer See page 161 for more information 7800 9800Guide book Page 36 Monday April 10 2006 11 59 AM ...

Страница 37: ...g the power cord into a properly grounded electrical outlet Note The illustrations in this section and the following sections show the Epson Stylus Pro 9800 but the instructions are the same for the 7800 Caution Do not use an outlet that is controlled by an automatic timer or wall switch Otherwise you may accidentally shut off the printer and cause damage 7800 9800Guide book Page 37 Monday April 1...

Страница 38: ... appears on the LCD display 2 Press both ink compartment covers to open them Make sure the ink levers are in the raised released position 3 Remove each ink cartridge from its package and gently shake the cartridge Note The default black ink cartridge is Photo Black If you prefer to use Matte Black sold separately see page 128 you can install the Matte Black cartridge immediately instead of install...

Страница 39: ...r the ink levers The printer begins charging the ink delivery system and the P Power light flashes 6 When messages appear on the LCD display follow the instructions to raise or lower the ink levers After ink charging is completed you need to load paper so that READY will appear on the display Caution Charging takes about 10 minutes Never turn off the printer release the paper lever or open the fro...

Страница 40: ...hat both the printer and the computer are off 2 Plug the interface cable into the appropriate port on the printer 3 Plug the other end of the cable into the appropriate connector on your computer Note Epson recommends the USB 2 0 or network connection for the most reliable performance USB cable not included FireWire cable included FireWire connection USB connection 7800 9800Guide book Page 40 Mond...

Страница 41: ...ed a standard RJ 45 straight through network cable To connect directly to your computer s network interface you need an RJ 45 crossover cable Before you install the print server make sure you check the documentation included with the card for additional instructions Then follow these steps to install the card 1 Turn off your computer and printer 2 IMPORTANT Unplug the printer from its electrical o...

Страница 42: ...nternal slot 6 Use the two screws included with the card to secure it 7 Connect one end of the appropriate cable to the card Then connect the other end to your network hub or to your computer s Ethernet port 8 Plug in the printer s power cord Follow the instructions in the next section to install your printer software then configure the printer for your network as described on page 53 7800 9800Gui...

Страница 43: ...ssary double click the Epson CD ROM to open its window 3 Double click the Epson installer icon You see the Epson Installation Program 4 Double click Install Printer Driver for Stylus Pro 7800 or Install Printer Driver for Stylus Pro 9800 depending on the printer you have Note You can check for a newer version of your printer driver on the Epson support site at http support epson com 7800 9800Guide...

Страница 44: ...hile the guide is installed 9 Do one of the following If you are finished installing software click Exit If you installed the optional EpsonNet print server card double click Install EpsonNet Config Enter your password and follow the on screen instructions You can use EpsonNet Config to configure your printer for network use as described on page 53 When you see the prompt click Restart Remove the ...

Страница 45: ... You see your printer in the Printer Browser 3 Wait while your Macintosh finds the printer driver and the Add button becomes available Then click the Add button Click here to add your printer Tip If you want to rename the printer for easier identification enter a new name for it in the Name field on this screen 7800 9800Guide book Page 45 Monday April 10 2006 11 59 AM ...

Страница 46: ...age 50 to update your printer firmware if necessary Adding the Printer in Mac OS X 10 3 1 Open the Applications folder then open the Utilities folder and open the Printer Setup Utility 2 If you see a message like this click Add then skip to step 4 7800 9800Guide book Page 46 Monday April 10 2006 11 59 AM ...

Страница 47: ...ther EPSON USB EPSON FireWire or EPSON TCP IP The Stylus Pro 7800 or 9800 appears on the screen 5 Click your printer name then click Add Tip If you want to rename the printer for easier identification select the printer name in the list and click Show Info Type a new name and click Apply Changes 7800 9800Guide book Page 47 Monday April 10 2006 11 59 AM ...

Страница 48: ...Follow these steps to install the software for Windows 1 Make sure your printer is turned off 2 Turn on your computer 3 Insert the printer software CD ROM in your computer The installer starts automatically If it doesn t start double click My Computer or click Start My Computer Then double click your CD ROM icon 7800 9800Guide book Page 48 Monday April 10 2006 11 59 AM ...

Страница 49: ...P Remote Panel begins installing 8 Follow the on screen instructions to install the EPSON LFP Remote Panel 9 Double click Install Additional Color Profiles to install the profiles for your printer When installation is complete click OK 10 Double click Install Reference Guide and wait while the guide is installed 11 Do one of the following If you are finished installing software click Exit If you i...

Страница 50: ...ersion of firmware on the Epson support site and update your printer if necessary Downloading the Firmware 1 Navigate to http support epson com in your browser 2 Choose your printer 3 Click Drivers and Downloads to find the newest firmware 4 Choose the version for Macintosh or Windows and follow the instructions on the screen then continue with the instructions in the next section to upgrade the f...

Страница 51: ...rinter is selected 3 Click the Firmware Updater button Note Although the illustrations in this section show Macintosh screens the procedure is the same in Windows Note For more information on using the LFP Remote Panel click Help to see the electronic guide Tip For best results use a USB connection when you update the firmware on your printer 7800 9800Guide book Page 51 Monday April 10 2006 11 59 ...

Страница 52: ...ting process If it is the same you don t need to update 7 When the update is complete close the Firmware Updater window and LFP Remote window If you installed the EpsonNet print server card follow the instructions in the next section to configure the printer for your network Caution Don t turn off the printer while the firmware is updating Note After you install the software you need to load paper...

Страница 53: ...ware The EpsonNet Config program searches for all Epson printers on the network and displays the MAC address for each printer that it finds for example 3 Highlight the printer that you want to configure and click Configuration to access the TCP IP selection screen 4 If necessary contact your network administrator to assign an appropriate IP address A static address is recommended For more informat...

Страница 54: ...1 54 54 Setting Up the Printer 7800 9800Guide book Page 54 Monday April 10 2006 11 59 AM ...

Страница 55: ...inter before purchasing large quantities or printing large jobs If you use non Epson paper or other media you may need to adjust various settings and create special paper configurations See page 75 for instructions Supported paper sizes Roll paper Cut sheets EpsonStylus Pro 9800 8 to 44 0 in wide 203 to 1118 mm Letter size up to 44 in wide EpsonStylus Pro 7800 8 to 24 0 in wide 203 to 610 mm Lette...

Страница 56: ...both the printer driver software and on the printer s control panel See page 81 Mac OS X or page 107 Windows for instructions on selecting the paper source in your printer software Keep unused media in its original packaging and store it in a cool dry place to maintain quality Avoid storing your printouts where they will be exposed to high temperature humidity or direct sunlight Store sheet media ...

Страница 57: ...you re printing on canvas or other heavy media Media that is too thick may damage the cutter Use of Epson s optional Manual Media Cutting System is recommended See page 10 for more information The following media and other similar materials may not work with the built in cutter Fine art paper including Epson Textured and UltraSmoothTM Fine Art Paper PremierArtTM Water Resistant Canvas for Epson Vi...

Страница 58: ... onto the gray paper stop at the right end of the spindle 3 Slide the black paper stop back onto the spindle and insert it into the end of the roll Make sure it is firmly fixed into the left end of the paper roll Note The spindle accommodates both 2 inch and 3 inch roll paper cores To switch between different size cores see page 62 Avoid touching the printable surface of the paper as much as possi...

Страница 59: ... Make sure the printer is turned on then press the l Paper Source button until the or icon appears on the LCD display 4 Make sure the P Power light is not flashing then release the paper lever Caution To avoid feeding excess paper make sure you don t select when you re using roll paper Caution Do not release the paper lever while the P Power light is flashing or you may damage the printer 7800 980...

Страница 60: ...n t come out you may need to adjust the suction If you are loading heavy paper press the u Paper Feed button to increase the suction If you are loading lightweight paper press the d Paper Feed button to decrease it If the paper still doesn t come out open the front cover and pull it out manually 7800 9800Guide book Page 60 Monday April 10 2006 11 59 AM ...

Страница 61: ...oll paper cover 9 Press the Pause button or wait for 5 seconds The paper feeds into printing postion automatically and READY appears on the control panel To avoid indenting or creasing the paper remove it from the paper path and roll it up when you are not printing Note Opening the front cover causes printing to stop Do not open the front cover while printing is in progress or your print quality m...

Страница 62: ... end at the top 5 Slide the black paper stop off the top of the spindle 6 Remove the roll paper from the spindle Switching Between 2 Inch and 3 Inch Roll Paper You can convert the spindle to accept roll paper with either a 2 inch or 3 inch core by using the spindle adapters Follow these steps to attach the adapters for using 3 inch roll paper 1 Remove the black paper stop from the end of the spind...

Страница 63: ...ist of media that should not be used with the built in cutter Follow these steps to cut manually with the built in cutter 1 Before you print press the l Paper Source button until you see the icon on the LCD display 2 Run your print job 3 Press the button The printer automatically feeds the paper to the cutter guide 4 If necessary adjust the cutting position by pressing the u or d Paper Feed button...

Страница 64: ...ars next to ON 7 Press the Pause button to exit the menu You can also specify trim lines from your printer driver software For instructions see page 90 Mac OS X or page 105 Windows Using Cut Sheet Paper You can print on many types of cut sheet paper and other media The printer accepts sheets ranging from letter size to 24 inches wide 7800 or 44 inches wide 9800 You can leave your roll paper on the...

Страница 65: ...rinting position automatically and READY appears on the control panel 7 Print your page After it is finished the sheet stays in the printer 8 To remove your print press the button or release the paper lever Tip You can also load cut sheet paper without releasing the paper lever This method is recommended for small sheets or fine art paper Note For heavy paper you may need to increase the suction b...

Страница 66: ...Paper Source button until the icon appears on the LCD display 3 Make sure the paper lever is in the locked position 4 Feed the sheet into the paper slot Make sure the right edge of the paper is straight and aligned with the scale on the roll paper cover 5 Press the Pause button The sheet feeds into printing position automatically and READY appears on the control panel 6 Print your page After it is...

Страница 67: ...a more than 19 mil 0 5 mm thick 1 Set the paper basket to catch your printouts in front of the printer See pages 71 or 72 for instructions 2 Make sure no other paper is loaded for printing You can leave roll paper on the spindle but make sure you wind it up fully 3 Press the l Paper Source button until the icon appears on the LCD display 4 Push the paper lever back to the released position 7800 98...

Страница 68: ...when the cover is open 6 Feed the posterboard into the paper slot until it meets resistance 7 Align the board with the scale on the roll paper cover Note If you re using stock more than 39 inches long load it long edge first in landscape orientation 9800 only 7800 9800Guide book Page 68 Monday April 10 2006 11 59 AM ...

Страница 69: ...satisfactory when using very thin or very thick stock you may need to change this setting Follow these steps 1 Press the Menu button Printer Setup appears on the LCD display 2 Press the Menu button again to select the Printer Setup menu and highlight PLATEN GAP 3 Press Menu again STANDARD is highlighted as the current setting 4 Use the u and d buttons to change the setting STANDARD is the default ...

Страница 70: ...or more information Using the Paper Basket The paper basket attaches to your printer and catches your printouts as they come out The basket keeps your printouts from getting dirty or scratched You can set it up either to catch the paper under the printer or in front of the printer Follow the instructions on page 71 for the Epson Stylus Pro 7800 or page 72 for the 9800 Widest Wider Wide Narrow Caut...

Страница 71: ...o catch printouts in front of the printer pull the paper basket forward as shown below Use this method for posterboard or any prints that are 36 inches or more in length To catch printouts under the printer lift the basket up as shown 7800 9800Guide book Page 71 Monday April 10 2006 11 59 AM ...

Страница 72: ...the basket in front of the printer Use this method for posterboard or any prints that are 62 inches or more in length 1 If you are using the paper guides make sure they are in front of the basket as shown below 2 Slide the upper metal rods all the way in Then push the lower rods down so that they rest on the floor 7800 9800Guide book Page 72 Monday April 10 2006 11 59 AM ...

Страница 73: ... slide properly to the floor Catching Printouts Under the Epson Stylus Pro 9800 Follow these steps to catch printouts under the printer 1 Remove the metal rod from the upper basket hooks 2 Pull the upper hooks out all the way and place the metal rod back on the hooks 7800 9800Guide book Page 73 Monday April 10 2006 11 59 AM ...

Страница 74: ...e basket rings on the upper hooks 4 If you are using the paper guides squeeze the guides and push them back as shown Note If printouts on matte paper have banding pull the paper guides forward 7800 9800Guide book Page 74 Monday April 10 2006 11 59 AM ...

Страница 75: ... you want to configure is loaded in the printer Then follow these steps 1 Press the Menu button then press the d button until CUSTOM PAPER is highlighted 2 Press Menu to display PAPER NUMBER 3 Press Menu then press the u button to select a paper configuration number 1 to 10 Press the button to save the number setting 4 Press the l button then the d button to highlight PLATEN GAP Press Menu then pr...

Страница 76: ...ust the speed for thick media You may need to experiment to determine the cleanest cut for your paper PPR FEED ADJUSTMENT helps eliminate banding Choose a lower value if you see white lines on your prints or a higher value if you see dark lines DRYING TIME lets you print with non Epson media and avoid smearing the ink You can make the print head wait up to 10 seconds after each pass to allow ink t...

Страница 77: ...per Configurations Once you have created a paper configuration you can select it whenever you print on that paper 1 Press the r Menu button then press the d button to highlight CUSTOM PAPER 2 Press Menu PAPER NUMBER is highlighted 3 Press Menu then press the u button to select the configuration number that you want to use If you select STANDARD the printer uses the driver settings If you select a ...

Страница 78: ...2 78 78 Handling Paper and Other Media 7800 9800Guide book Page 78 Monday April 10 2006 11 59 AM ...

Страница 79: ...cialist Make sure any profiles you want to use are located in the standard folder for your operating system When you install the Epson printer driver the ready made profiles are automatically copied to the right folder This chapter includes the following information for Mac OS X Choosing page setup settings for cut sheets and roll paper Choosing basic print options Choosing advanced print options ...

Страница 80: ...ke the best use of your paper 1 Open the file you want to print and select Page Setup in your application You see this screen 2 Open the Format for drop down menu and select your printer Note the following limitations on borderless printing Borderless printing takes longer than normal printing Margins are required at the top and bottom of the page on cut sheets Full borderless printing is availabl...

Страница 81: ...ing on the size you choose The standard size setting prints on cut sheet paper with a bottom margin larger than the top and sides Maximum reduces the bottom margin available for printing on plain paper sheets only Borderless Auto Expand prints on cut sheets and enlarges your image up to 3 to fit the width of the paper without side borders Borderless Retain Size prints your image at the size you sp...

Страница 82: ... a series of continuous borderless images without space between them Roll Paper prints on roll paper with the standard printable area 4 If you are printing on roll paper choose Manage Custom Sizes from the Paper Size menu If you are printing on a cut sheet skip to step 7 In Mac OS X 10 3 choose Custom Paper Size from the Settings menu 5 Click the plus sign give your paper size a name and define it...

Страница 83: ...select printing options The Epson driver offers automatic settings that optimize print quality and speed when you re using Epson media You can also choose advanced settings for more control over your printer and color management options as described on page 87 1 Select Print in your application You see the screen shown below 2 Choose your printer from the Printer menu 3 Select Print Settings from ...

Страница 84: ...when you print on smaller sheets For PremierArt Water Resistant Canvas for Epson choose the Watercolor Paper Radiant White setting If your paper is not listed check the instructions included with the paper or look on the Epson web site http prographics epson com If you are using non Epson paper consult the manufacturer for the best setting You may have to experiment with different settings to dete...

Страница 85: ...ause this setting reproduces blue and green tones that cannot be displayed by your monitor your printouts may differ from the screen images when this option is selected The Charts and Graphs setting intensifies colors and lightens the midtones and highlights of an image Use this setting for presentation graphics such as charts and graphs The EPSON Standard sRGB setting increases the contrast in im...

Страница 86: ... on vector based data including text graphics and line art This setting does not affect photographs Continue with the instructions in the next section to select color management settings If you are using the color management settings in Photoshop or another application it is very important to turn off color management in the printer driver as described on page 87 Note The Print Quality settings av...

Страница 87: ...anced Settings to specify individual values for brightness contrast saturation and CMY inks ColorSync for mapping colors to your printer s profile In most cases you will get better results by applying color management in your application rather than in the printer driver If you choose this setting you can choose ColorSync from the drop down menu and choose filters or other settings Off No Color Ad...

Страница 88: ...ink saturation level Drying Time per Print Head Pass lets you print with non Epson media and avoid smearing the ink You can make the print head wait up to 5 seconds after each pass to allow ink to dry on the page Paper Feed Adjustment helps reduce banding Choose a lower value if you see white lines on your prints or a higher value if you see dark lines Paper Thickness helps reduce vertical banding...

Страница 89: ...xperiment to determine the best setting for your paper Platen Gap lets you fine tune the setting for various paper thicknesses Choosing Roll Paper Options If you are printing on roll paper make sure you choose one of the roll paper options as the Paper Size setting as described on page 80 In addition you need to check these settings for various cutting and feeding options 1 Select Roll Paper Optio...

Страница 90: ...utter See page 57 for a list of media that are not recommended for use with the built in cutter 3 Select either of the following options Print Page Line prints trim lines on the right and bottom edges of your pages Save Roll Paper saves paper by not feeding the blank portion of the last page of your document Available only when you ve selected Roll Paper Banner as the Paper Source Borderless Print...

Страница 91: ...inches for borderless printing using either the Auto Expand Standard or Retain Size setting Non Epson roll media widths Make sure you set the margins to zero when printing a custom page size for borderless printing Recommended image widths in inches for borderless printing Roll paper width Image width with Auto Expand Image width with Retain Size Custom Paper Size for Retain Size only 8 3 8 06 8 3...

Страница 92: ...xpansion The widths shown in the table on page 91 work with the Standard Expansion setting If you use the slider to adjust the amount of expansion you can calculate the image width as follows Using the Min setting subtract 0 125 inch from the media width to determine the image width Using the Max setting subtract 0 415 inch from the media width to determine the image width 7800 9800Guide book Page...

Страница 93: ...re correct select Save As from the Presets drop down menu You see the following 3 Type a name and click OK 4 When you re ready to print click the Print button See page 96 for instructions on monitoring your print job Note If you check the settings on each screen in the drop down menu go through them carefully from top to bottom Avoid cycling through them repeatedly or you may lose your settings Ca...

Страница 94: ...ing on certain media types 1 Select Print Settings from the drop down menu You see this screen 2 Choose the Media Type setting for the paper you have loaded in the printer 3 Choose Advanced B W Photo for the Color setting 4 Uncheck High Speed for the best quality Note If you are printing from Photoshop make sure you do not use Photoshop s color management settings when using Advanced Black and Whi...

Страница 95: ...opular presets such as Cool Warm and Sepia Note that the presets will affect the target found in the tone color circle Tone allows you to easily change the entire tonal scale of your black and white output While Darker is the default setting you may see better results if you choose Dark Brightness adjusts the overall lightness and darkness of your image Contrast adjusts the difference between the ...

Страница 96: ...e tone hue to add to your print The closer you select to the edge of the wheel the more color you will add Preview approximates the image tone based on your settings Note that this preview always shows the same image and is not color managed It provides a level of feedback as you make changes Managing Print Jobs After you click Print you can monitor the progress of your print job using the Print C...

Страница 97: ...ow Checking Ink Levels and the Maintenance Tank The Epson Printer Utility lets you check the levels of ink in the printer and the level of the maintenance tank 7800 or tanks 9800 You can also run maintenance utilities from this screen See pages 122 to 123 for instructions 1 Double click the Applications folder on your hard drive 2 Double click EPSON Printer Utility 3 Select your printer and click ...

Страница 98: ...sMonitor icon The software checks the amount of ink in the printer and maintenance tank s and displays the StatusMonitor window 5 To recheck the ink levels click the Update button To close the Status Monitor click OK 7800 9800Guide book Page 98 Monday April 10 2006 11 59 AM ...

Страница 99: ...reate your own profiles if you have the required hardware and software or you can have them created by a color specialist Make sure any profiles you want to use are located in the standard folder for your operating system When you install the Epson printer driver the ready made profiles are automatically copied to the right folder This chapter includes the following information Choosing basic prin...

Страница 100: ...described on page 110 Follow these steps to make basic settings 1 Start an application open the file you want to print and select Print in your application You see the Print window 2 Make sure your printer is selected then click the Properties button Or if you see a Setup Printer or Options button click it instead Then click Properties on the next screen You see a window like the following Note If...

Страница 101: ...ose Advanced B W Photo if you are printing black and white photos on certain paper types For paper types that don t support this option print black and white photos with the Color setting Select Black only if you re printing line drawings or other non photographic images See page 112 for more information about advanced black and white photo printing 5 Set the Mode option as follows Click Automatic...

Страница 102: ...ft in the drop down list The Advanced Photo setting lets you print at 2880 dpi the highest resolution available The PhotoEnhanceTM setting allows you to correct noise and other problems common to digital camera images and automatically select 1440 dpi Click Custom then click the Advanced button to turn off color management in the printer driver if your application performs color management or acce...

Страница 103: ...b You see this window 2 Select Roll Paper or Roll Paper Banner as the Paper Source setting The Roll Paper Banner setting allows you to print a series of continuous images without any margin space between them This option is not available with all applications and is mostly for tiling an image 3 If you want to print without margins click Borderless Note that borderless printing takes longer than no...

Страница 104: ...e page 106 for more information about borderless printing 4 Choose one of the following Auto Cut settings Off disables automatic cutting Choose this setting if you want to operate the cutter manually print multiple print jobs without cutting or print on heavy media that must be cut by hand See page 63 for instructions on operating the cutter manually Single Cut causes the images to be printed end ...

Страница 105: ...document is automatically rotated 90 degrees and printed crosswise Be sure to click Roll Width and select the width of your roll paper Print Page Line prints trim lines on the right and bottom edges of your pages Save Roll Paper saves paper by not feeding the blank portion of the last page of your document Available only if you ve selected Roll Paper Banner as the Paper Source 7 Make the settings ...

Страница 106: ...r borderless printing with minimal image clipping Using this setting and the Retain Size setting you can create a custom paper width equal to the width of the roll media The following table shows recommended image widths in inches for borderless printing using either the Auto Expand Standard or Retain Size setting Non Epson roll media widths Recommended image widths in inches for borderless printi...

Страница 107: ...tting subtract 0 415 inch from the media width to determine the image width Choosing Cut Sheet Paper Options 1 On the Properties window click the Paper tab You see this window 2 Select Sheet as the Paper Source setting 3 If you want to print to the edges of the page click Borderless Note that borderless printing applies only to the left and right sides of the page on cut sheets margins are require...

Страница 108: ...ithout borders 4 Select the Paper Size loaded in the printer 5 Select the Orientation you want 6 If you want to reduce or enlarge your image click the Layout tab See the next section for more information 7 After making your settings click OK Choosing Layout Options You can print a poster size image even if your application does not support poster printing Follow these steps to reduce or enlarge yo...

Страница 109: ...the print size you may see reduced quality in the print Choosing Advanced Print Options The advanced settings give you complete control over your printing environment If you are using color management settings in Photoshop or another application it is very important to access the advanced settings and turn off color management in the printer driver as described on page 110 1 Follow the steps on pa...

Страница 110: ... settings which control image contrast by modifying the midtones and midlevel grays PhotoEnhance allows you to correct noise and other problems common to digital camera images Off No Color Adjustment disables color management in the printer driver Choose this mode when you use a color managed workflow in Photoshop or other software ICM adjusts colors based on the printer s ICC profile using the Im...

Страница 111: ...er Feed Adjustment helps reduce banding Choose a lower value if you see white lines on your prints or a higher value if you see dark lines Paper Suction lets you decrease the paper suction level when printing on thinner papers less than 12 lb such as CAD drafting paper Paper Thickness helps reduce vertical banding and creates a sharper image when printing on unusually thick or thin paper Cut Metho...

Страница 112: ...utral and toned black and white prints using your Epson driver and offers an alternative black and white workflow Advanced Black and White Photo mode also provides settings for more advanced black and white control Whether your photo is color or grayscale you can use this unique screening and color management technology to create stunning black and white prints This mode is available only when pri...

Страница 113: ... target found in the tone color circle Tone allows you to easily change the entire tonal scale of your black and white output While Darker is the default setting you may see better results if you choose Dark Brightness adjusts the overall lightness and darkness of your image Contrast adjusts the difference between the light and dark areas of your image Shadow and Highlight Tonality allow you to co...

Страница 114: ...iew always shows the same image and is not color managed It provides a level of feedback as you make changes Managing Print Jobs Your printer comes with several utilities that let you check on your print jobs and cancel pause or restart them The Progress Meter opens each time you send a print job Status Monitor 3 which appears on the taskbar when you print lets you check the printer s status and m...

Страница 115: ...low monitoring by other users who share the printer You can also use the Speed and Progress utility to improve printing speed 1 Do one of the following Windows XP Click Start and select Printers and Faxes Right click your printer icon and select Printing Preferences Windows 2000 Click Start point to Settings then select Printers Right click your printer icon and select Properties Document Defaults...

Страница 116: ...ecause the RAW format requires fewer resources printing is faster and you can avoid certain problems such as insufficient memory or disk space Page Rendering Mode speeds printing by rendering the entire page Use this setting if print speed is extremely slow or the print head stops for a few minutes while printing Printing will take longer to start Coarse Rendering allows you to override the length...

Страница 117: ...hen select the icon to use When the shortcut is enabled you can simply double click the icon to open the Status Monitor 3 window or right click it then select Monitoring Preferences in the pop up menu 7 Select Allow monitoring of shared printers if your printer is shared and you want to let other users monitor it 8 Click OK to save your settings 9 Click OK to close the Speed Progress window and re...

Страница 118: ...4 118 118 Printing with Epson Drivers for Windows 7800 9800Guide book Page 118 Monday April 10 2006 11 59 AM ...

Страница 119: ...d time Performing additional maintenance tasks Replacing the paper cutter blade Replacing the maintenance tank Cleaning the printer Transporting or storing the printer In addition to the features described in this chapter you can also use the menu system on the printer to fine tune a variety of printer settings For more information see the electronic Reference Guide included on the CD ROM that cam...

Страница 120: ...various printer parts Follow these steps to print the status check sheet 1 Make sure paper is loaded in the printer 2 Press the Menu button 3 Press the d button to highlight TEST PRINT then press Menu 4 Press d to highlight STATUS SHEET then press Menu You see PRINT 5 Press to start printing The amount of ink left or the component life is indicated as follows E F 100 81 of ink or service life rema...

Страница 121: ...of ink left press d to highlight INK LEVEL then press Menu The status of the first cartridge is displayed using the E F symbols described on page 120 Continue pressing d to see the status of the remaining cartridges When done press the l button To check how much of the maintenance tank has been used press d to highlight MAINTENANCE TANK then press Menu The status of the tank is displayed using the...

Страница 122: ...d printer parts is indicated with these symbols E F 100 81 of ink or service life remaining E F 80 61 E F 60 41 E F 40 21 E F 20 11 less than 10 of ink or service life remaining 4 Press the Pause button to exit the menu For more information about the Printer Status menu see your electronic Reference Guide Checking and Cleaning the Print Head If your printed image shows a color shift or horizontal ...

Страница 123: ...y in your Applications folder Select your printer and click OK Windows XP Click Start and select Control Panel Double click Printers and Faxes Right click your printer icon and select Printing Preferences Click the Utility tab Windows 2000 Click Start point to Settings then select Printers Right click your printer icon and select Printing Preferences Click the Utility tab You see a menu like the f...

Страница 124: ...cally read If the printer finds clogged nozzles it runs a cleaning cycle Manually Checking and Cleaning the Print Head If you turn off Auto Cleaning you can print a nozzle check and manually examine it to determine whether any nozzles are clogged or deflected Then you can run a cleaning cycle by pressing and holding the Menu button 1 Press the Menu button PRINTER SETUP is highlighted Press Menu ag...

Страница 125: ...nded only as a last resort The cartridges need to be at least 50 full to use power cleaning You may need to replace a low cartridge to run the cleaning cycle After cleaning you can reinsert the old cartridge 1 Print a nozzle check to make sure the print head needs cleaning as described on page 124 2 Make sure the printer is ready and the red B ink light on the printer s LCD display is not on or fl...

Страница 126: ...align from the printer s control panel This will do the most thorough job in the shortest time and it s all automatic If you haven t already done so it s a good idea to run a nozzle check before aligning the print head page 124 This ensures that the print head alignment patterns print correctly Follow these steps to align the print head using the control panel 1 Make sure the printer is turned on ...

Страница 127: ...exit head alignment mode If you want to fine tune the automatic alignment process you can perform a manual head alignment as described in the electronic Reference Guide Replacing Ink Cartridges Before you begin a large print job you should check your ink levels If one of your cartridges is low you can replace it before you start Or you can wait until the ink runs out replace the cartridge and then...

Страница 128: ...www epson ca or 800 807 7766 Before you start make sure the printer is powered on Then follow these steps to replace an ink cartridge 1 Note the color of the cartridge that is low or empty This is the cartridge you need to replace Slot no Cartridge 110 ml 220 ml 1 Light Light Black T562900 T563900 2 Light Magenta T562600 T563600 3 Light Cyan T562500 T563500 4 Light Black T562700 T563700 5 Photo Bl...

Страница 129: ...rom the printer It s a good idea to save your first set of empty cartridges so you can use them for transporting the printer if necessary WARNING Do not shake the empty cartridge or ink may leak out If ink gets on your hands wash them thoroughly with soap and water If ink gets in your eyes flush them immediately with water 7800 9800Guide book Page 129 Monday April 10 2006 11 59 AM ...

Страница 130: ...it 7 Hold the cartridge with the arrow pointing toward the printer Then insert the cartridge into the slot Don t force it in Note If you can t insert the cartridge smoothly you may have the wrong cartridge Check the package and product code If the B ink light remains on after installing the cartridge it may not be inserted fully 7800 9800Guide book Page 130 Monday April 10 2006 11 59 AM ...

Страница 131: ...rtment covers Once the cartridge is installed the printer returns to its READY state Caution Do not remove and re insert cartridges more often than necessary Doing so can compromise the needle valve seal and allow air to enter the ink tubes causing nozzle damage 7800 9800Guide book Page 131 Monday April 10 2006 11 59 AM ...

Страница 132: ...nutes to switch and consumes a significant quantity of ink don t switch cartridges more often than necessary Changing the black ink cartridge also consumes color ink The amount of ink flushed through the printer varies but approximately 88 to 117 ml of ink all cartridges combined is used All cartridges should be at least 30 full before you begin the conversion process If MAINT TANK FULL or MAINT T...

Страница 133: ...ges from the right ink compartment 8 When INSTALL C M Y CONVERSION CARTRIDGES appears insert the three conversion cartridges in the slots on the right ink compartment Note If REPLACE CONVERSION CRTG appears press the Pause button Remove the old conversion cartridge s from the right ink compartment and then insert the new conversion cartridge s Go to step 4 to start again 7800 9800Guide book Page 1...

Страница 134: ...he New Black Ink Cartridge 1 When draining is complete RAISE THE RIGHT INK LEVER appears on the LCD Raise the ink lever on the right ink compartment 2 When REMOVE C M Y CONVERSION CARTRIDGES appears remove the conversion cartridges from the slots on the right ink compartment 3 When INSTALL ALL FOUR INK CARTRIDGES ON THE RIGHT SIDE appears insert the cartridges in their specified slots including th...

Страница 135: ...e left ink lever and cover Updating the Printer Driver Information After you have switched black ink modes you need to update the driver information Follow the instructions for your operating system Mac OS X Check the ink status using the Epson Printer Utility following the instructions on page 97 Confirm that the correct black cartridge is displayed Windows Access the printer driver as described ...

Страница 136: ...occasionally You can use maintenance mode to do the following Print a hex dump for diagnosing problems Change the language or units of measurements used on the printer s control panel menus Enable the printable pages counter Change the default pressure setting for the automatic cutter Run a super strong cleaning cycle Track the amount of roll paper remaining Enable power on roll paper feed Return ...

Страница 137: ...The printer exits maintenance mode and returns to normal operation To enable remaining paper counter press the d button to highlight REMAINING PPR SETUP then press Menu Press the d button to select ROLL then press To change the units of measurement press the d button to highlight UNIT then press Menu Press the d button to switch from METER to FEET INCH then press to select it Press the l button wh...

Страница 138: ...hat do not work with the cutter You can check the status of your cutter by printing the status check sheet or viewing its status on the control panel See page 121 for instructions You can obtain a new cutter blade from Epson part number C12C815291 Removing the Old Blade Make sure the printer is on then follow these steps to remove the blade 1 Press the Menu button 2 Press the d button until MAINTE...

Страница 139: ... SEE LABEL TO REPLACE CUTTER is displayed on the LCD display hold down the side pin as shown and turn the latch to the right 7 Release the side pin The cutter pops out WARNING The blade is sharp Be careful when removing it 7800 9800Guide book Page 139 Monday April 10 2006 11 59 AM ...

Страница 140: ... Printer 8 Carefully remove the cutter blade Installing the New Cutter Blade Remove the new blade from its package then follow these steps to install it 1 Insert the new cutter as shown 7800 9800Guide book Page 140 Monday April 10 2006 11 59 AM ...

Страница 141: ...itial ink charge and manual and automatic print head cleaning When the tank is almost full the message MAINTENANCE TANK NEAR FULL appears on the LCD display When the tank is completely full the printer stops working and MAINTENANCE TANK FULL appears on the LCD You can check how much space remains in the maintenance tank by viewing its indicator on the control panel shown below You can also check i...

Страница 142: ...lay 2 If you have the Epson Stylus Pro 9800 check the LCD display to determine which tank needs to be replaced left or right 3 Grasp the handle at the bottom of the tank on the side of the printer and gently pull out the maintenance tank 4 Place the used tank in the plastic bag included with the new tank 5 Insert the new tank 100 81 20 to nearly full 80 61 Tank nearly full 60 41 Tank full 40 21 Ta...

Страница 143: ...ssembly using a soft brush 5 If the paper path accidentally gets soiled with ink gently clean it with a soft lint free cloth dampened with water 6 If the outer case is dirty clean it with a soft clean cloth dampened with mild detergent Keep the ink cartridge compartments closed to prevent water from getting inside 7 To wash the paper basket remove the shafts then machine wash with mild detergent a...

Страница 144: ... repairs See page 148 for instructions Preparing the Printer for Shipment 1 Turn off the printer and wait until the carriage moves to the home position on the far right and the P Power light goes off Then unplug the printer 2 Remove the following parts Power cord and interface cables Paper basket Roll paper spindle All paper or other media Optional auto take up reel if installed Optional manual cu...

Страница 145: ...e stand First make sure the casters are locked and the two stabilizer knobs are touching the floor 6 Remove the two wing nuts and lock washers securing the printer to the stand underneath the printer Keep them in a safe place Tip For more secure transportation tape all doors and covers shut Caster lock Stabilizer knob 7800 9800Guide book Page 145 Monday April 10 2006 11 59 AM ...

Страница 146: ...1 for more information Removing the Optional Print Server Card If you need to exchange your printer or ship it to Epson for repairs you must remove the Ethernet card 1 Turn off the printer and disconnect the power cord 2 Disconnect the Ethernet cable 3 Remove the two screws securing the card 4 Make sure the card is cool before pulling it out of the slot WARNING The Stylus Pro 7800 weighs about 131...

Страница 147: ...t turn the printer back on wait until the carriage moves to the home position then turn off the printer 2 Disconnect the power cord and interface cable 3 Remove the roll paper spindle and close the roll paper cover Make sure the front cover is closed 4 Raise the ink levers 5 Push in the metal rods supporting the paper basket then roll up the paper basket so it doesn t drag on the ground Caution Do...

Страница 148: ...me Keep in mind that the first time you start printing after moving the printer the print head nozzles may be clogged especially if the printer hasn t been turned on for a long time You may need to run a cleaning cycle page 122 and realign the print head page 126 to ensure good print quality If you have not used your printer for more than a month you may see this message when you turn it on POWER ...

Страница 149: ...you diagnose problems To identify the most common problems check the messages and lights on the control panel See pages 150 through 154 for more information If you re using the Epson printer driver and Status Monitor utility check your software for error messages See Chapter 4 or 5 for more information To determine whether the problem is caused by the printer itself disconnect the printer from you...

Страница 150: ...cut button Message Explanation Response BORDERLESS ERROR LOAD CORRECT SIZE PAPER The borderless setting is selected for A2 size sheets 11 7 16 5 or roll paper that doesn t support borderless printing Change the setting in the printer driver or load different paper CARRIAGE LOCKED RELEASE THE CARRIAGE LOCK The print head is locked Remove the bracket securing the print head see page 33 CLEANING ERRO...

Страница 151: ...ter then update the firmware again see page 50 for instructions I F CARD ERROR CHECK CARD TYPE Wrong interface card installed Turn off the printer and remove the card See the documentation that came with the card INK CARTRIDGE ERROR BK INK CHANGE The black ink cartridge needs to be changed Select YES to switch the black ink cartridge or NO to continue using the installed black ink cartridge INK CA...

Страница 152: ...E INK CARTRIDGE AND DRIVER SETTINGS MATCH The black ink cartridge option does not match what is selected in the driver A non Epson ink cartridge is installed Stop printing and then press and hold the Pause button for 3 seconds Select the correct black ink cartridge option in the driver see page 135 If you want to continue printing press the Pause button Press and hold the Pause button for 3 second...

Страница 153: ...e paper lever and remove the jammed paper Turn the printer off and then back on see page 162 for more information PAPER OUT LOAD PAPER Paper ran out Load paper PAPER SETTING ERROR LOAD CUT SHEET PAPER The paper path is wrong Load cut sheet paper as described on page 65 Press the l Paper Source button until the icon appears on the LCD display PAPER SETTING ERROR LOAD ROLL PAPER Roll paper is not lo...

Страница 154: ...ber then turn the printer off Unplug the printer and wait 30 seconds Then plug it in and turn it back on If the message remains contact Epson as described on page 11 UNABLE TO PRINT MAKE SURE PAPER IS LOADED An error may be occurring when you try to print patterns such as a nozzle check Exit the Test Print menu and check for low ink or incorrectly loaded paper Message Explanation Response Problem ...

Страница 155: ... light to see if you are low on ink Replace ink cartridges if necessary as described on page 127 Run a nozzle check and cleaning cycle See page 122 for instructions Align the print head as described on page 126 Make sure the Media Type setting in the printer software is correct for the media you re printing on If you re using cut sheet media make sure the printable side is face up Choose a higher ...

Страница 156: ...is low as described on page 127 Make sure color settings in your application or printer software are correct Your print has gaps or appears faint Check the expiration date printed on each of the ink cartridges If the cartridge is too old replace it as described on page 127 Make sure the Media Type setting in the printer software is correct for the media you re printing on Run a nozzle check and cl...

Страница 157: ...g instructions Turn off High Speed in your Advanced settings The platen gap setting is too narrow Use the control panel to change the setting to WIDE or WIDER See page 69 for instructions Run a nozzle check and cleaning cycle see page 122 The bottom edge of your print is smeared The paper is curled toward the printable side Flatten the paper or curl it toward the other side Make sure the Media Typ...

Страница 158: ...as occurred Follow the instructions for the messages beginning on page 150 The printer sounds as if it s printing but nothing prints Follow the instructions beginning on page 123 to clean the print head Communication between the computer and printer may have been momentarily interrupted Try restarting the computer and printing again Nothing prints Turn off the printer and computer Make sure the in...

Страница 159: ... the Flip Horizontal setting in your printer software See page 86 Mac OS X or page 110 Windows for instructions Blank paper is printed Make sure your software is installed correctly and the printer is selected Make sure the Paper Size setting in your printer software is correct for the paper you re using Make sure the Paper Source setting in your printer software is correct A ruled line on your pr...

Страница 160: ...inter isn t located in a brightly lit area The paper sensors may not operate correctly Make sure the Media Type and Paper Source settings in the printer software are correct Make sure the platen gap setting is correct for the paper or media you re printing on See page 69 for more information If you re not using Epson media use a paper configuration to adjust for the paper s thickness and drying ti...

Страница 161: ...er There are two paper guides for the Epson Stylus Pro 7800 and five for the 9800 Attach the guides to the bottom of the printer as shown Do one of the following If you are feeding paper in front of the printer move the guides to the forward position Epson Stylus Pro 7800 Epson Stylus Pro 9800 7800 9800Guide book Page 161 Monday April 10 2006 11 59 AM ...

Страница 162: ...nter printing stops and you see a PAPER JAM message on the LCD display Follow these steps to clear a paper jam 1 Cut the paper at the paper insertion slot 2 Release the paper lever Note If banding appears on your print leave the paper guides in the forward position Caution To avoid damaging the printer never move the paper lever while the P Power light is flashing 7800 9800Guide book Page 162 Mond...

Страница 163: ...paper 5 Close the front cover if necessary Press the P Power button to turn the printer off and then back on 6 Make sure the paper light is on and the following message appears on the LCD display PAPER OUT LOAD PAPER Then reload your paper 7800 9800Guide book Page 163 Monday April 10 2006 11 59 AM ...

Страница 164: ...to install the software Windows 1 On Windows XP click Start Control Panel On Windows 2000 double click My Computer then double click the Control Panel icon 2 Double click Add Remove Programs Click EPSON Printer Software in the program list then select your printer icon 3 Click the Change Remove or Add Remove button and follow the on screen instructions 4 If you want to reinstall your printer softw...

Страница 165: ...be between 35 and 45 RH 20 to 85 RH Specification Description Input voltage range 90 V to 264 V Rated frequency range 50 to 60 Hz Input frequency range 49 to 61 Hz Rated current 1 0 A at 120 V 0 5 A at 220 V Power consumption Epson Stylus Pro 7800 Approx 50 W or less ISO 10561 letter pattern 6 W or less in sleep mode 1 W or less in power off mode Epson Stylus Pro 9800 Approx 55 W or less ISO 10561...

Страница 166: ...es 501mm 27 12 inches 678 mm Weight without consumables 131 lb 59 kg printer 23 1 lb 10 5 kg stand 198 lb 90 kg printer 23 1 lb 10 5 kg stand Safety standards UL 60950 CSA 22 2 No 60950 EMC FCC part 15 subpart B class B CSA C108 8 class B Maximum roll width 24 4 inches Stylus Pro 7800 44 7 inches Stylus Pro 9800 Maximum roll length Up to 150 feet for 2 inch cored media Up to 673 feet for 3 inch co...

Страница 167: ... 11 14 inches 30 40 cm 11 8 15 7 inches A3 11 7 16 5 inches US B 11 17 inches Super A3 B 13 19 inches B3 JB3 14 2 20 3 inches 16 20 inches 40 60 cm 15 7 23 6 inches A2 16 5 23 4 inches US C 17 22 inches B2 19 7 27 8 inches US D 22 34 inches A1 23 4 33 1 inches 60 90 cm 23 6 35 4 inches 30 24 inches Super A1 24 36 inches B1 28 7 40 6 inches A0 33 1 44 inches US E 34 44 inches 44 36 inches Super A0 ...

Страница 168: ...s edge to edge printing on some media Ink Cartridges Cartridge life 2 years from production date if unopened within 6 months after opening package Temperature Storage uninstalled 22 to 104 F 30 to 40 C 1 month at 104 F 40 C Storage installed 4 to 104 F 20 to 40 C 1 month at 104 F 40 C Capacity 110 or 220 ml Weight 110 ml Approximately 8 82 oz 250 g 220 ml Approximately 13 05 oz 370 g 7800 9800Guid...

Страница 169: ...ows 114 Cartridges see Ink cartridges Changing black ink 132 to 135 Cleaner cleaning unit checking status 120 to 122 Cleaning print head 122 to 126 137 printer 143 Coarse Rendering setting 116 Color management Mac OS X 87 94 to 96 Windows 110 to 114 Color problems 159 ColorSync settings 87 Component life checking 120 to 122 Connecting printer 40 Control panel aligning print head 126 to 127 buttons...

Страница 170: ...et card installing 41 to 53 ordering 10 removing 146 system requirements 12 13 F Faint prints 156 FireWire cable connecting 40 requirements 12 13 Firmware updating 50 to 52 Flip Horizontal setting Mac OS X 86 problems 159 Windows 110 H Head Alignment menu 126 Head unit print head checking status 120 to 122 Heavy media cutting 63 Height of printer 166 Help Epson 11 Hex dump 136 High Speed Copies se...

Страница 171: ...s 89 to 91 Status Monitor 97 to 98 system requirements 12 uninstalling software 164 Maintenance 119 to 143 Maintenance menu 125 138 Maintenance mode 136 Maintenance tank checking status 120 to 122 ordering 10 replacing 141 to 142 Manual cutter ordering 10 Manuals how to use 9 Margins default 168 incorrect 159 printing without 80 to 82 90 to 91 103 to 107 Media Type Mac OS X 84 Windows 101 Memory r...

Страница 172: ...blade 138 to 141 Paper light 150 Paper Size setting Mac OS X 81 to 83 problems 159 Windows 105 Paper Source setting problems 159 Windows 103 107 Pause light 150 Pausing print jobs Mac OS X 97 Windows 114 PF paper feed motor checking status 120 to 122 PhotoEnhance 110 Platen Gap setting control panel 69 to 70 Macintosh 89 problems 156 Windows 112 Posterboard 67 to 69 Power cleaning cycle 125 to 126...

Страница 173: ...rints 158 operational 158 paper 160 to 163 print quality 154 to 157 print speed 116 printer driver 158 to 159 printing stops 158 roll paper cannot be cut 159 size limitation 116 smeared prints 157 159 Progress Meter 114 116 R Registering non Epson media 75 to 77 Requirements system 12 to 13 Resolution Mac OS X 86 Windows 110 Roll paper attaching to spindle 58 cannot be cut 159 cutting manually 63 ...

Страница 174: ...4 removing shipping bracket 33 setting up 27 to 36 stand unpacking and assembling 28 to 29 unpacking 29 to 30 Suction 76 89 111 Support Epson 11 System requirements 12 to 13 T Technical support 11 Temperature requirements 165 Test Print menu 120 Time and date setting 136 Total prints checking 122 Transporting printer 144 to 148 Trim lines printing control panel 64 Mac OS X 90 Windows 105 Troublesh...

Страница 175: ...ware 48 to 50 layout options 103 to 108 managing print jobs 114 to 117 monitoring preferences setting 115 to 117 optimizing print speed 115 to 117 paper configuration options 110 to 112 roll paper options 103 to 108 Speed and Progress utility 115 to 117 status alerts 117 Status Monitor 114 to 117 system requirements 12 to 13 uninstalling software 164 user defined paper size 105 7800 9800Guide book...

Страница 176: ... 176 176 Index 7800 9800Guide book Page 176 Monday April 10 2006 11 59 AM ...

Отзывы: