background image

18

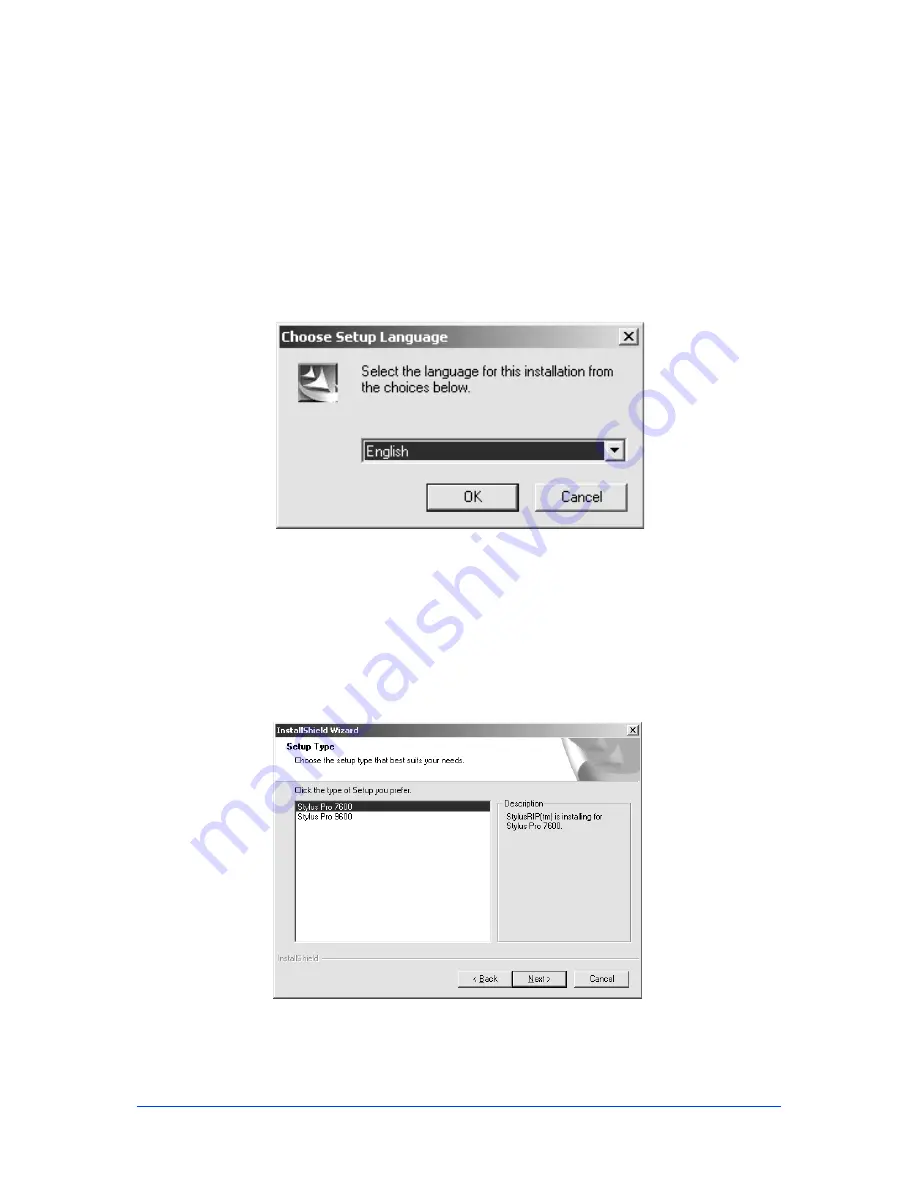
3. The Choose Setup Language dialog box appears 

automatically. 

Note:

If the dialog box does not appear automatically, double-click 

Setup.exe

 in the 

Setup

 folder on the CD-ROM.

4. Select English and click 

OK

.

5. Continue installation by following the instructions that 

appear on your screen.

6. When the InstallShield wizard appears, select the printer 

attached and click the 

Next

 button.


Содержание 2200 - Stylus Photo Color Inkjet Printer

Страница 1: ...SON CORPORATION s operating and maintenance instructions SEIKO EPSON CORPORATION shall not be liable for any damages or problems arising from the use of any options or any consumable products other than those designated as Original EPSON Products or EPSON Approved Products by SEIKO EPSON CORPORATION Adobe PageMaker PostScript and the PostScript logo are trademarks of Adobe Systems Incorporated whi...

Страница 2: ... Me 29 For Windows 2000 XP 29 Uninstalling Procedure 31 Uninstalling StylusRIP Professional StylusRIP Professional Monitor 31 Uninstalling a Printer Driver 32 Color Matching 33 CMYK Simulation 33 RGB Simulation 33 Media 33 Chapter 2 Printing With PSserver Using the PSserver 34 Exiting the PSserver 36 Checking Print Status 36 Starting the PSserver automatically 38 Using the Preferences Dialog Box 3...

Страница 3: ...tion setting 50 Chapter 3 Troubleshooting Troubleshooting Hints 54 Cannot select a printer when starting StylusRIP Professional 54 Getting the Best Possible Print Quality 55 Printer prints out illegible type or characters 56 Wrong fonts or jagged type 56 StylusRIP Professional takes a long time before printing starts 56 EPS files do not print 56 Bitmap images or clip art looks jagged 57 TIFF image...

Страница 4: ...pe 57 PPD in PageMaker 6 0 is missing 58 Color matching differs during offset printing with Windows Application despite the fact that the product s CMYK simulation function is in use 58 When a problem occurs with ECP mode 58 Glossary Index ...

Страница 5: ...5 Notes contain important Information and useful tips on the operation of your printer ...

Страница 6: ...and images are processed stored and reproduced using the PostScript code When you print from an application such as PageMaker StylusRIP Professional processes the PostScript code and sends the processed image to the printer Note The screens used in this manual is an example when the EPSON Stylus Pro 7600 is connected The model name on the screen will differ depending on the printer used Features E...

Страница 7: ... in a standalone or network environment At least 64 MB of RAM 128 MB recommended Also any memory requirements for optional software must be added to this total At least 200 MB of available disk space As the number of files in the jobs folder increases the amount of required disk space also increases Windows 98 Second Edition Me 2000 XP operating system CD ROM drive is required Interface The Stylus...

Страница 8: ...s supported by EPSON Standard Windows Driver Before installing StylusRIP Professional it is necessary to connect the printer you want to use and install EPSON Standard Windows Driver However EpsonNet 10 100 Base Tx Ext Print Server C12C82394 cannot be used ...

Страница 9: ...e StylusRIP Professional CD ROM before setting up StylusRIP Professional The README file contains some important notices and the latest information concerning StylusRIP Professional Also be sure to note the following when setting up StylusRIP Professional Turn off all virus protection For instructions on how to do this see your virus protection or Windows documentation Close all other active appli...

Страница 10: ...ally to print Therefore when installing EPSON Standard Windows Driver set the port of the print destination to match the printer you are using with StylusRIP Professional This section explains how to install the PSserver for Windows Follow these steps For Windows 2000 and XP To install PS Driver in Windows 98 Second Edition or Me see the section entitled For Windows 98 Second Edition and Me 1 Make...

Страница 11: ... installation by following the instructions that appear on your screen 6 When the InstallShield wizard appears select the printer attached and click the Next button 7 Continue installation by following the instructions that appear on your screen ...

Страница 12: ...usRIP Professional is finished the following dialog appears Click the Finish button The installation of PS Driver begins 9 TheAddPrinterwizardstartsandtheinstallationofPSDriver begins Click the Next button and continue the installation ...

Страница 13: ...nter Then click the Next button 11 Select a printer port Check Use the following port and select StylusRIP Professional from the port list Then click the Next button 12 Select a printer model Click the Have Disk button and specify the location of the INF file The INF file is saved in the following location on the CD ROM ...

Страница 14: ...0 xp ps_setup When you finish selecting click the OK button 13 Model names of printers appear Select the printer attached Then click the Next button 14 Continue the installation by following the instructions that appear on your screen ...

Страница 15: ...ork printer name If you are not sharing the printer check Do not share this printer Then click the Next button 16 If you are sharing the printer enter Location and Comment If you are not sharing the printer this dialog box does not appear When you finish entering click the Next button ...

Страница 16: ...16 17 In Print Test Page select No and then click the Next button 18 When Completing the Add Printer Wizard appears click the Finish button ...

Страница 17: ...s 2000 XP Click Yes 19 The installation is now complete Click the Finish button and restart your computer You can use StylusRIP Professional after you restart your computer For Windows 98 Second Edition and Me 1 Make sure Windows is running 2 Insert the CD ROM into the appropriate drive ...

Страница 18: ...oes not appear automatically double click Setup exe in the Setup folder on the CD ROM 4 Select English and click OK 5 Continue installation by following the instructions that appear on your screen 6 When the InstallShield wizard appears select the printer attached and click the Next button ...

Страница 19: ...ur screen 8 When the installation of StylusRIP Professional is finished the following dialog appears Click the Finish button The installation of PS Driver begins 9 TheAddPrinterwizardstartsandtheinstallationofPSDriver begins Click the Next button and continue the installation ...

Страница 20: ...r Then click the Next button 11 Select a printer model Click the Have Disk button and specify the location of the INF file The INF file is saved in the following location on the CD ROM english win9x ps_setup When you finish selecting click the OK button ...

Страница 21: ...21 12 Model names of printers appear Select the printer attached Then click the Next button 13 Select a printer port Select StylusRIP Professional from the port list Then click the Next button ...

Страница 22: ...22 14 Continue the installation by following the instructions that appear on your screen 15 When the following dialog asking you to print a test page appears select No and click the Finish button ...

Страница 23: ...rofessional after you restart your computer To Share a Printer in Windows 98 Second Edition Me If you want to share a printer in Windows 98 Second Edition or Me and print from a computer connected to a network share the printer according to the following procedure 1 Open the Control Panel and double click Network ...

Страница 24: ...hare the folder Check I want to be able to allow others to print to my printer s if you want to share the printer driver 4 Click the OK button 5 The network dialog box appears Click the OK button 6 If you are asked to insert the Windows CD into the CD ROM drive insert the CD in the CD ROM drive and click the OK button ...

Страница 25: ...25 7 Restart your computer 8 Select the printer you want in the Printer window Then right click and click Sharing in the menu that appears 9 Click the Shared As radio button and select options you want ...

Страница 26: ... the printer driver on each computer according to the following procedure Sharing a Printer in Windows 2000 XP Follow the procedure below if the printer properties were not set up for sharing when the printer driver was installed or when installing a printer driver for a version of Windows other than Windows 2000 XP 1 From the Printers folder select the StylusRIP Professional printer driver that y...

Страница 27: ...g in the menu that appears The Printer Properties dialog box will appear 3 On the Sharing tab check Shared as and enter the name of the printer you want to share 4 To install a printer driver for a different version of Windows click Additional Drivers ...

Страница 28: ...ated on the CD ROM in the following directory english win9x ps_setup 7 Complete the setup by following the on screen instructions 8 After the printer driver is successfully installed click OK to close the Printer Properties dialog box Note By clicking Additional Drivers and installing a printer driver for a different version of Windows you can then use a client computer to select the shared Stylus...

Страница 29: ...twork printer may also be selected by clicking Browse 7 When the screen asking you to select the printer type is displayed click Have Disk and specify the path to the INF file containing installation information If your CD ROM drive is D the path will be D ENGLISH WIN9X ps_setup change the drive letter as needed for your system 8 Select the correct model and install according to the on screen inst...

Страница 30: ...server on which the XXX printer resides does not have the correct printer driver installed 8 When the screen asking you to select the printer type is displayed click Have Disk and specify the path to the INF file containing installation information If your CD ROM drive is D the path will be D ENGLISH WIN2000 XP PS_SETUP change the drive letter as needed for your system 9 Select the correct model a...

Страница 31: ...then Control Panel 2 Double click the Add Remove Program icon 3 Select the program you want to uninstall Select EPSON StylusRIP Professional in this case 4 If you are using Windows 98 Second Edition or Me click the Add Remove button If you are using Windows 2000 or XP click the Change Remove button 5 When the uninstalling of EPSON StylusRIP Professional is complete a message appears Click the Fini...

Страница 32: ...n Me 1 Click Start then Settings and then Printers 2 Right click the icon representing the installed printer and then select Delete For Windows 2000 XP 1 Click Start then Settings and finally Printers 2 Right click the icon representing the installed printer and then select Delete The icon will be deleted from the Printer window 3 To delete a driver file right click in the Printer window with the ...

Страница 33: ...atching can be accomplished CMYK Simulation Color matching for the CMYK inks of the printing press can be performed For this purpose a standard CMYK profile is preinstalled RGB Simulation Color matching for various RGB color spaces can be performed For this purpose a standard RGB profile is preinstalled Media Colormatchingforvariousprintmediacanbeperformed Forthis purpose a profile for special pap...

Страница 34: ...ob reaches the top of the queue the PSserver sends it to the printer to be printed The PSserver just like any other application must be opened before you can use it Using the PSserver Start PSserver according to the procedure below If you are starting StylusRIP Professional for the first time it is necessary to select a printer and enter a license key 1 Turn on the printer Make sure the printer s ...

Страница 35: ... OK button 4 A dialog box asking you to enter a license key appears Enter the license key and click the OK button Note The license key is written on the CD ROM case Enter the license key the first time you start StylusRIP Professional It is not necessary to enter the license key for the subsequent startups 5 PSserver starts and you can now print ...

Страница 36: ...ntil you turn off your PC Checking Print Status In the main window of PSserver the print status of the print job currently being processed appears You can hide the main window by selecting Hide Window on the Window menu To re display the main window select Show Window on the Window menu The following information appears in the main window Name of the job being processed Displays the name of the pr...

Страница 37: ...ent print job Progress Bar Shows the progress of processing using a bar Message Box When the Show Message button is clicked a message box appears This message box displays details of errors and warnings If you click the Hide Message button while the message box is being displayed you can hide the message box Note You can erase the messages that appear in the message box by selecting Message Clear ...

Страница 38: ...P Professional for default installation then choose Create Shortcut 2 Move the Shortcut into the C Win95 Start Menu StartUp Programs folder Using the Preferences Dialog Box You can make special preferences settings by choosing Preferences on the Edit menu Raster Spool Mode This setting turns on or off raster image spooling The default setting is on It is on when a check appears in the check box Cl...

Страница 39: ...e that your print job requires depends on the size of resolution of and amount of detail in the print job If you do not have enough space on your hard disk StylusRIP Professional stops spooling when the hard disk becomes full and restarts spooling as soon as the previous print job is finished This can cause slower performance than if Raster Spool Mode is turned off Note If you turn Raster Spool Mo...

Страница 40: ...inted Using Share Folder Share Folder is a function by which StylusRIP Professional directly processes and prints the files copied to Share Folder No application software is used and just copying a file PDF PS and other file types that can be directly printed by StylusRIP Professional to Share Folder will start printing By sharing this folder on a network you can print by simply copying a file fro...

Страница 41: ... Professional Preferences Opens the Preferences dialog box Share Folder Setting Opens the Share Folder Setting dialog box Print Setting Opens the Print Setting dialog box Color Manager Opens the Color Manager dialog box Printer Connection Reselects a printer Select this item if you want to change your printer connection Restore Restores the minimized StylusRIP Professional main window to the origi...

Страница 42: ...etting when you are printing a PDF or other file by directly selecting it The Printer Setting dialog box is displayed by selecting Printer Setting on the Edit menu If you are printing a file from application software this setting is not required since print setting will be performed in the printer driver dialog box Note The contents of Printer Setting vary depending on the printer attached ...

Страница 43: ... be simulated when you are printing RGB color data CMYK Simulation Specify the ink colors to be simulated when you are printing CMYK color data Grayscale Control Specify the type of data to be printed using only black ink when you are printing the gray part of color data Ink Specify to print in color or black and white Other Settings Othersettingsincludeahardwaredependentsettingandasetting specifi...

Страница 44: ...lation whose setting you want to change from the pull down menu ICC Profile Displays the ICC profile to be used for the selected CMYK simulation TochangetheICCprofile clickthe buttonandselect an ICC profile Be sure to select a CMYK profile as the ICC profile Color Adjust Displays whether or not Color Adjust is enabled for the selected CMYK simulation To enable Color Adjust click the TC button in t...

Страница 45: ... Save button and save the setting RGB You can change the color profile for the RGB simulation Select the RGB simulation whose setting you want to change from the pull down menu ICC Profile Displays the ICC profile to be used for the selected RGB simulation TochangetheICCprofile clickthe buttonandselect an ICC profile Be sure to select an RGB profile as the ICC profile Media You can change the colo...

Страница 46: ...tached The printed calibration sheet is used to measurecolorsbyusingtheoptionalEPSONColorCalibratorand to create a calibration table Click the button and then select a data file for the calibration table The selected file name is displayed in the box Note For how to use EPSON Color Calibrator and how to create the calibration table refer to the EPSON Color Calibrator User s Guide Paper Cinfigurati...

Страница 47: ... Device Options in the Printer properties window To set Device Options click the Properties button in a window that appears by selecting File and then Print Then select the Device Options tab Note DeviceOptionsaredependentonthefunctionsoftheprinter Depending on the printer you are attaching some of the following functions may not be used Media Type Specify the type of paper you are using for print...

Страница 48: ...ional printing will be performed and as a result the printing speed will get faster CMYK Simulation Specify the ink colors to be simulated when you are printing CMYK color data RGB Simulation Specify the color space of RGB colors to be simulated when you are printing RGB color data Grayscale Control Specify the type of data to be printed using only black ink when you are printing the gray part of ...

Страница 49: ...Source Specify the paper feed method No Margin Specify no four corner margin printing for single form paper and no left and right margin printing for roll paper To perform no margin printing it is necessary to set the custom paper size Note Certain types of paper cannot be used for printing without margins Check the manual supplied with the paper for the types of paper that can be used Check the p...

Страница 50: ...ion setting On the Device Option menu a symbol appears beside the Media Type setting you want to select in the Change settings for drop down list follow the steps below 1 Select the media type in the Change settings for drop down list ...

Страница 51: ...51 2 Click the Graphics tab 3 Select setting that does not have a symbol beside it the resolution in the Resolution drop down list 4 Click OK ...

Страница 52: ...tings Photo black Light black is the default ink setting StylusPhoto2100 and StylusPhoto2200 only support Photo black Light black ink These printers do not print using Matte black Light black or Matte black Matte black ink 1 From the Start Menu select Settings Printer 2 Right click on EPSON StylusRIP XXXXX and select Properties 3 Select the Device Settings tab from the displayed dialog box Windows...

Страница 53: ...53 Windows 2000 4 Select the black ink for the optional Black Ink Combination setting 5 Click the appropriate button and then click OK to close the dialog box ...

Страница 54: ... description of the problems you are encountering Troubleshooting Hints This section includes the most common problems StylusRIP Professional users may encounter These problems may include several possible solutions Cannot select a printer when starting StylusRIP Professional Check whether or not the EPSON Standard Windows Driver that has been shipped with the printer attached is already installed...

Страница 55: ...usRIP Professional These ICC color files provide support for printer color adjustment from the application but only for applications which support this feature CMYK files are usually developed in a device independent space which makes it possible to adjust specific printing parameters for specific printers instead of accepting the default options given in the color rendering dictionary To obtain h...

Страница 56: ...or print the bitmap image of the font Make sure you have the printer fonts installed properly If you have the correct printer fonts try cleaning the print head StylusRIP Professional takes a long time before printing starts Change to a faster CPU or add more RAM Complex jobs that use a large number of fonts will process faster on a faster CPU or with more RAM We recommends that you change to a fas...

Страница 57: ...n the output Screen savers interrupt the CPU during the printing process Turn off your screen saver Runaselftestontheprintertoverifythatyouhavenoclogged nozzles StylusRIP Professional does not run from Navigator or other special desktops StylusRIP Professional runs from Windows and may not run from special desktops like Navigator If you are using a special desktop click the Windows icon then click...

Страница 58: ...ation function is in use The colors of the printed product seem to differ because of different styles of lighting The printing simulation function presumes that printed products will be viewed under lighting with a correlated color temperature of 5 000K It is therefore recommended that the printout be viewed under standard lighting equivalent to 5 000K When a problem occurs with ECP mode If a prin...

Страница 59: ...r example a printer imagesetter or digital film recorder Interpreter A set of software functions that convert PostScript language commands into a raster image StylusRIP Professional uses the CPSI interpreter OPI Open Prepress Interface A set of PostScript language commands for defining and specifying the placement of images PostScript An interpretive computer language developed by Adobe that descr...

Страница 60: ...ssor An application or device that translates PostScript data into dots that can be printed PSserver A PC running the PSserver application TIFF Tagged Image File Format A standard image file format consisting of labeled fields ...

Страница 61: ...61 Index A Adobe PostScript 6 B Bitmap 57 E EPS 56 P PSserver 34 S System reqirement 7 T TIFF 57 ...

Страница 62: ......

Отзывы: