background image


34 


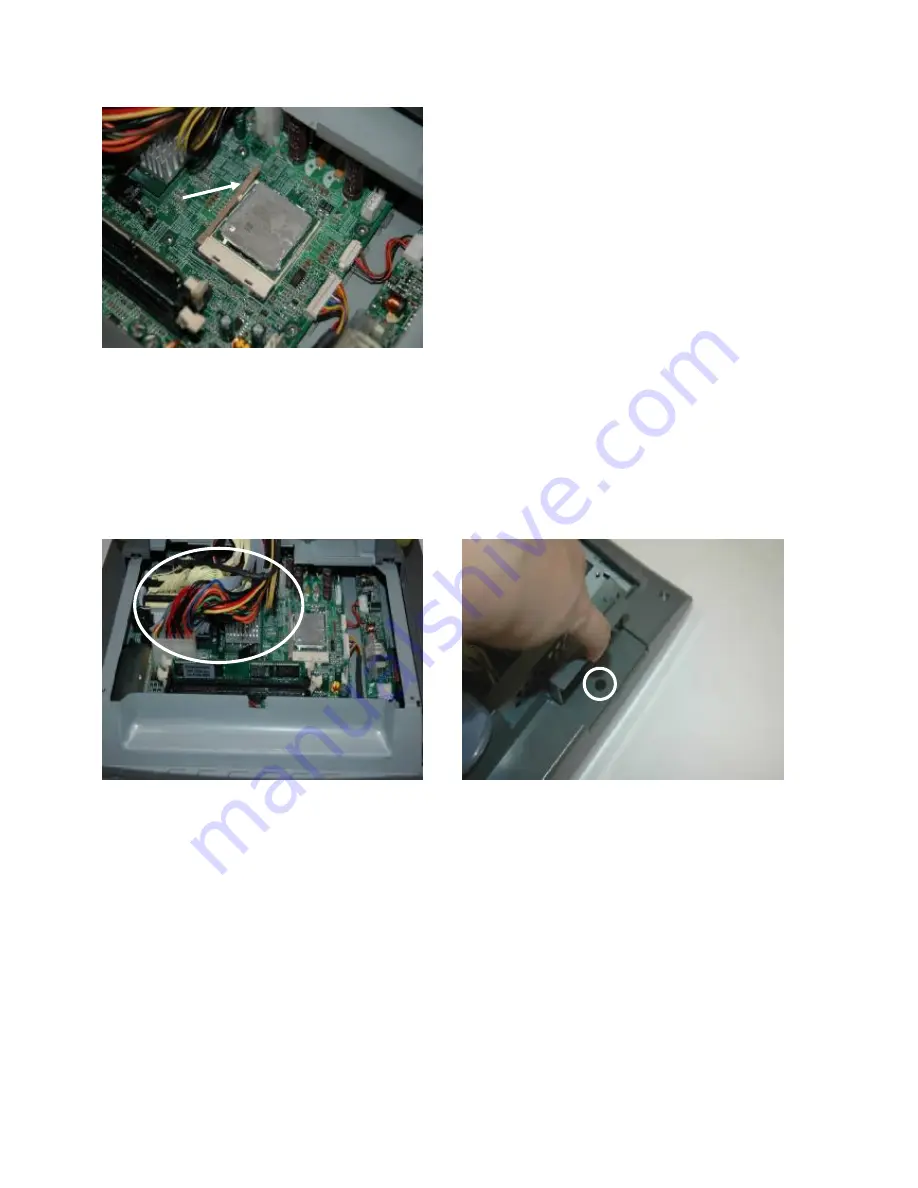
e. To remove the CPU, push the CPU 

socket lever down and away from the 

socket, and lift it up.


5.7.    Remove Motherboard   

Follow the instructions in chapter 5.6.first and remove the CPU. 


a. Disconnect the following cables (8):   

20pin cable, 100pin cable, IDE1 cable, 

IDE2 cable, USB3&4 cable, MIC&Line-in 

cable, speaker cable and CPU power 

cable. (Refer to Chapter 7).   


b. Open the compact flash card cover. 

Remove the screw (1).   

Содержание Odysse

Страница 1: ...User Manual December 2007 Revision 1 2 Odysse Hardware System...

Страница 2: ...incidental or consequential damages in connection with the furnishing performance or use of this material This document contains proprietary information that is protected by copyright All rights are...

Страница 3: ...provided 6 This product should be operated from the type of power indicated on the marking label If you are not sure of the type of power available consult your dealer or local power company 7 Do not...

Страница 4: ...ad the device should be taken to the waste collection centres for activation of the treatment collection recycling and disposal procedure To prevent possible harm to the environment or human health fr...

Страница 5: ...8 3 8 POSTouch Touch Screen Driver Installation 20 4 Peripherals Installation 23 4 1 MSR 23 4 2 VFD Customer Display 24 4 3 Compact Flash Card 26 5 System Disassembly 27 5 1 Replace HDD 27 5 2 Install...

Страница 6: ...out of the carton Remove the unit from the carton by holding it by the foam inserts The following contents should be found in the carton 1 1 Standard Items a Driver CD b Power Cord 1 2 Optional Items...

Страница 7: ...7 2 System View 2 1 Front view CD ROM USB 1 2 On Off Switch Compact Flash Power LED MSR Key VFD...

Страница 8: ...8 2 2 Rear View 24V DC LPT COM4 VGA Keyboard Mouse COM1 COM2 COM3 Power USB24V Power USB 12V LAN Cash Drawer Line in Line out...

Страница 9: ...Audio Driver CD Common Lan_driver R8139_810x 10 100Mb LAN Driver CD Common INTEL USB20 USB 2 0 Driver CD Common Elo_Touch ELO Touch Screen Driver CD Common POS_Touch POSTouch Touch Screen Driver The f...

Страница 10: ...10 c Click the Yes button on the License Agreement window d Click the Next button on the Readme Information window e Click the Finish button and restart your system...

Страница 11: ...the Win2K_XP on the My Computer window b Click the v14 19 50 on the My Computer window c Select win2K_xp141950 on the v14 19 50 window d Click the Next button on the Intel R Chipset Graphics Driver S...

Страница 12: ...hics Media Accelerator Driver window f Click the Yes button on the Intel R Graphics Media Accelerator Driver window g Select Yes I want to restart my computer now and click the Finish button on the In...

Страница 13: ...stallation a Click A3 71 on the My Computer window b Double click wdm_a371 on the My Computer window c Click Next button on the Realtek AC 97 Audio Setup window d Click Yes button on the Digital Signa...

Страница 14: ...e Click Finish button on the Realtek AC 97 Audio Setup window 3 5 LAN Driver Installation a Double click the Setup on the My Computer window b Click the Finish button on the Maintenance complete wind...

Страница 15: ...15 c Click the OK button and restart your system 3 6 USB2 0 Driver Installation a Right click the My Computer on the windows and select properties b Select Hardware Device Manager on system properties...

Страница 16: ...evice Manager d Select Device Update Driver e Click the Next button on the Welcome window f Select Search for a suitable and click the Next button on the Install Hardware Device Drivers window g Selec...

Страница 17: ...17 h Press Browse to select driver and then click the OK button to next page i Click the Next button on Driver Files Search Results window j Click the Finish button to complete this process k Finished...

Страница 18: ...a Click sw500930 on the My computer window b Click the OK button on the Welcome window c Click the Unzip button on the WinZip Self Extractor window d Select Install Serial Touchscreen Drivers and then...

Страница 19: ...the on the Select the COM ports window g Select COM5 and click the Next button on the Choose the COM ports window h Click the Next button on the You have selected the COM ports window i Click the Fini...

Страница 20: ...n the Elo Touchscreen Properties window l Follow the instructions on the screen to calibrate the touch panel 3 8 POSTouch Touch Screen Driver Installation a Double click the Setup on the My Computer w...

Страница 21: ...on the Wellcome window d Select Install the software automatically and click the Next button on the URTC1000 window e Click the Next button on the License Agreement window f Click the Next button on...

Страница 22: ...and click the Next button on the Options window i Click the Next button on the Ready to Install window j Click the Continue Anyway button on the URTC 1000 window k Click the Finish button on the Inst...

Страница 23: ...t The MSR and VFD customer display are packed separately for transportation and can be installed by the user 4 1 MSR a Remove the screws 2 of the MSR dummy door b Slide the MSR dummy door out as shown...

Страница 24: ...FD dummy door b Slide the VFD dummy door out c Remove the screws 2 of the CPU RAM door d Slide the CPU RAM door out e Pass the VFD cable through the hole as shown in the picture f Click both sides of...

Страница 25: ...the MSR to the CPU RAM door with the four screws 4 supplied with the MSR h Connect the VFD cable to the connector as shown i Slide the CPU ram door into position j Fasten the CPU ram door to the LCD...

Страница 26: ...Compact Flash Card a Open the compact flash card cover b Insert the compact flash card with the label facing up into the compact flash card slot Note Power must be off when installing the compact flas...

Страница 27: ...5 1 Replace HDD a Loosen the screws 2 that secure the base rear cover b Slide the base rear cover toward the back of the terminal c Remove the screws 2 d Pull the base cover bracket towards you by th...

Страница 28: ...d power cables f Lift the base cover bracket to disengage it from the base chassis Remove the screws 2 g Turn over the base cover bracket to access the HDD bracket h Remove the screws 4 to separate th...

Страница 29: ...1 items a to e to open the system remove the base cover bracket a Tighten the screws 4 to assemble the HDD and the HDD bracket b Install the second HDD in its location and secure it with the screws 2...

Страница 30: ...er bracket as described in chapter 5 1 a Disconnect the cables 3 including power cable IDE cable and 100 pin cable b Remove the screws 2 of the 24V DC port and remove the screws 2 of the line in and l...

Страница 31: ...place CD ROM The CD ROM is located in the base chassis a Remove the back cover screw 1 at the bottom of terminal b Open the base door c Use a screwdriver to remove the CD ROM d Remove the CD ROM and r...

Страница 32: ...s It is necessary to remove the base cover bracket first as described in chapter 5 1 a Remove the screws 2 to take the CPU ram door out b Disconnect the 20pin cable 1 c Remove the back cover screw 1 a...

Страница 33: ...t b The memory slots are located on the mainboard To remove the memory module use your finger to push the DIMM slot ejector clips into the down position Remove the memory module from the slot c Discon...

Страница 34: ...ove Motherboard Follow the instructions in chapter 5 6 first and remove the CPU a Disconnect the following cables 8 20pin cable 100pin cable IDE1 cable IDE2 cable USB3 4 cable MIC Line in cable speake...

Страница 35: ...ove the screws 2 of the MSR d Remove the screw 1 e Remove the screws 2 f Remove the screws 2 g Use your hands to carefully press in the two sides to separate the LCD chassis from the base including LC...

Страница 36: ...36 h Remove the screw 1 of the touch board i Disconnect the cables 2 of the touch board j Disconnect the cables 2 of the inverter board k Remove the screws 6 to remove the motherboard...

Страница 37: ...Board Follow the instructions in chapter 5 7 items a to g to remove the base and LCD cover a Disconnect the cable 1 of the touch board b Disconnect the 5 wire resistive cable 1 c Remove the screws 2 t...

Страница 38: ...he Inverter Board Follow the instructions in chapter 5 7 items a to g to remove the base and LCD cover a Disconnect the cables 2 b Disconnect the backlight cables 2 c Remove the screws 2 to remove the...

Страница 39: ...chapter 5 7 items a to g to remove the base and LCD cover a Disconnect the cable 1 of the MSR connect board b Remove the screws 2 c Remove the screws 5 that secure the LCD chassis Then remove the LCD...

Страница 40: ...40 6 Jumper Settings Main Board JP1 JP2 JP5 JP9 JP3 JP4 JP6 JP7 JP8 JP10...

Страница 41: ...Function JP4 SHORT Use I Button NC No I Button 1 2 3 4 4 CMOS Operation Mode Setting Function JP5 SHORT CMOS Normal NC CMOS Reset 1 2 To clear the CMOS 1 Remove AC power from the unit 2 Open the cabin...

Страница 42: ...n 1 2 3 4 5 6 7 8 9 10 11 12 NC 8 LCD ID Setting LVDS JP6 Panel Number Resolution Bits Channel 1 2 3 4 5 6 7 8 0 640 x 480 18 Single SHORT SHORT SHORT SHORT 1 800 x 600 18 Single SHORT SHORT SHORT OPE...

Страница 43: ...1 COM1 COM2 Cash Drawer DC Power Jumper Setting JP1 SHORT Cash Drawer COM2 COM1 1 2 3 4 5 6 7 8 9 10 11 1 2 13 1 4 15 1 6 17 1 8 19 2 0 21 2 2 23 2 4 25 2 6 27 2 8 29 3 0 31 3 2 33 3 4 NC 24 V 24 V 1...

Страница 44: ...44 3 USB DC Power Jumper Setting JP3 JP4 SHORT JP3 SHORT JP4 SHORT 1 2 3 4 1 2 3 4 24V 12V 24V 12V Factory Default Setting Note OPEN SHORT...

Страница 45: ...45 7 Connectors CN1 CN3 CN13 CN11 CN20 Fan CN12 CN6 CN14 CN31 CN30 CN19 CN22 CN10 CN24 IDE2 IDE1 DIMM DIMM CPU Power LAN 20Pin 100Pin CN25 CN21...

Страница 46: ...terface CN6 Inverter Power CN10 IDE ACT LED CN11 Power Switch CN12 15 POS Card Reader CONN CN13 USB6 CN14 USB5 CN19 USB3 USB4 CN20 I Button CN21 Hardware Reset CN22 XC9536 Modify Port CN24 Power LED C...

Страница 47: ...BIOS Setup 1 Turn on or reboot this product 2 Press the DEL key immediately after the product is turned on or press the DEL key when the following message is displayed during POST the Power on Self Te...

Страница 48: ...a different BIOS version the contents of the menu may differ Standard CMOS Features This setup page includes the standard CMOS features Advanced BIOS Features This setup page includes the enhanced AWA...

Страница 49: ...s indicate the most appropriate value of the system parameters for a standard system performance Set Supervisor Password Change set or disable the password It allows the supervisor to change BIOS sett...

Страница 50: ...system 4 After the system booted from the boot device execute the flash utility by typing AF832A EXE in DOS prompt The following screen will appear 5 Type the new BIOS file name onto the gray area tha...

Страница 51: ...51 10 Troubleshooting...

Страница 52: ...52 Power Circuit Troubleshooting...

Страница 53: ...53 LCD Panel Troubleshooting...

Страница 54: ...54 Peripheral Troubleshooting...

Страница 55: ...Color Performance O K No Stop at Windows Yes No Yes Jumper Setting is Correct Yes Yes Change PCB No Reset Jumper Yes Start B LCD Panel Troubleshooting End Yes Software Installing O K No Reinstall Soft...

Страница 56: ...56 Touch Screen Troubleshooting...

Страница 57: ...torage Devices HDD 2 x 3 5 HDD Drive Bay ODD 1x Slim CD ROM DVD ROM drive bay LCD Touch Panel LCD Size 15 TFT Brightness nits Up to 250 cd Maximal Resolution 1024 x 768 Touch Screen Type 5 wire resist...

Страница 58: ...35 Options Magnetic Card Reader 3 Tracks magnetic card reader Customer Display VFD customer display COM4 12V power Wi Fi Wireless LAN Mini PCI 802 11a b g wireless LAN Dimensions W x D x H mm 418x361...

Отзывы: