background image


RATE AUTOMATIC 

Rate Automatic is used when vector cutting to adjust the rate that the laser is firing to the match 
the speed of the carriage.  The higher the rate the more pulses that the laser will fire in a given 
distance.  Normally the higher the rate, the better the cutting.  Normally you would leave the 
Rate Automatic box checked on. 


MAP COLORS TO SPEED/POWER 

The Radius also has the capability to assign different power and speed settings to objects in a 
design.  This is useful in a variety of ways.  You can program the machine to engrave an area 
deeper than surrounding areas for emphasis.  You can also program the machine to make 
columns for your engraving jobs which will cut down on engraving time.  The feature also 
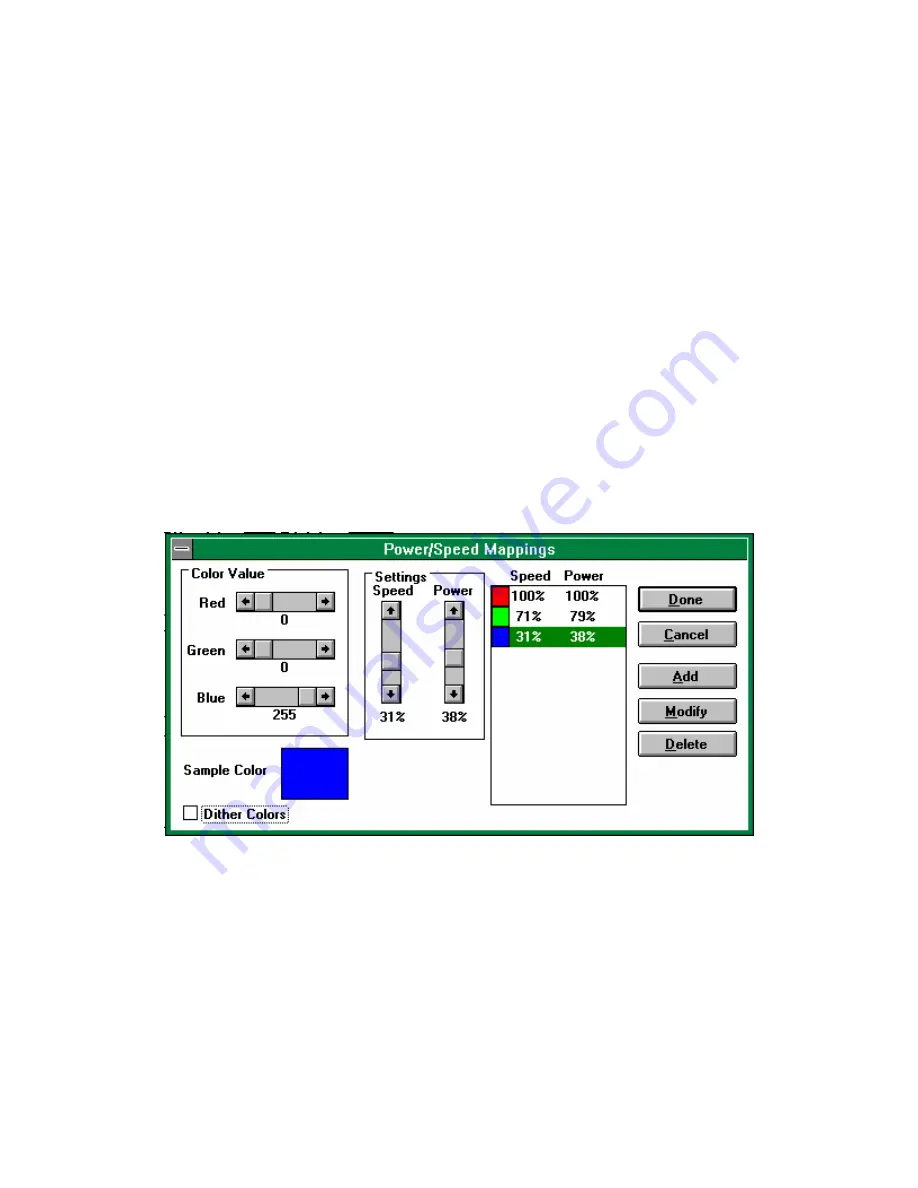
allows you to control the sequence or order of engraving.  Make sure that the MAP COLORS 
TO SPEED/POWER box has an X in it and then click on the COLOR MAPS... button.  You 
should see a screen like this: 


COLOR VALUE 


This is how you define a color.  The description uses an RGB (Red Green Blue) value 

to define a color.  Use the slide bars to produce the color you want.  A value of 255 Blue with 
0 Green and 0 Red is shown.  This is plain old blue.  Each combination of the three-color 
values is unique and can be used to set a power and speed value.  The colors will engrave in the 
sequence shown in the box on the right.  
 

18 

Содержание Radius 4000

Страница 1: ...500 Corporate Circle Suite L Golden CO 80401 Phone 303 277 1188 Fax 303 277 9669 Owner s Manual for EPILOG Radius Model 4000 Revision E December 1998 ...

Страница 2: ...E SAFETY 11 SAFETY FEATURES AND REGULATORY COMPLIANCE 12 SECTION 3 USING THE EPILOG RADIUS PRINT DRIVER 15 RESOLUTION 15 JOB TYPE 15 PIECE SIZE 17 CONFIGURATIONS 17 AUTOFOCUS 17 COMPUTER CONTROLLED SPEED POWER 17 RATE AUTOMATIC 18 MAP COLORS TO SPEED POWER 18 SECTION 4 USING THE EPILOG RADIUS 20 KEYBOARD COMMANDS 20 SHIFT 20 STOP 20 ONLINE 20 RESET 21 POWER 21 SPEED 21 FOCUS 21 REPEAT 21 POINTER 2...

Страница 3: ...34 FOCUS WITH THE ROTARY 35 ROTARY REMOVAL 36 SECTION 9 ENGRAVING RUBBER STAMPS 37 INSTALLING THE STAMP DRIVER 37 LAYOUT FOR STAMPS 37 SECTION 10 MEMORY CONFIGURATION 40 SECTION 11 IN CASE OF DIFFICULTY 41 SECTION 12 ENGRAVING MACHINE MAINTENANCE 48 SECTION 13 MATERIAL SUPPLIERS 50 SECTION 14 ABOUT THE RADIUS 53 RECOMMENDED COMPUTER 53 SCANNER 53 SOFTWARE 53 1 Getting Started 3 2 Laser Safety 8 3 ...

Страница 4: ...Double Head Option 28 8 Air Assist Option 29 9 Rotary Option 30 10 Rubber stamp engraving 33 11 Memory configuration 37 12 In Case of Difficulty 38 13 Maintenance 45 14 Supplier Information 47 15 General information 50 4 ...

Страница 5: ...em and place the metal hooks into the slots on the pallet These ramps will allow you to roll the machine off the pallet There is a left and a right ramp The raised edges must be on the outside not facing each other 6 Locate the four wooden blocks located under the machine The machine is supported by these blocks and the blocks will need to be pulled out With a friend lift one side of the machine j...

Страница 6: ...o 15 amp circuits must be provided One for the Radius and one for the chiller Each with a NEMA L6 15R receptacle HUBBEL 4560 or equivalent 1 Unpack the chiller by cutting the straps securing it to the pallet Remove the packing material 2 Lift the chiller off the pallet The chiller is heavy and at least two people will be required Be careful not to lift beyond your ability or to drop the chiller on...

Страница 7: ... on the Radius The Radius power switch is located on the front lower right of the machine ALL MODELS 1 Verify that the machine beeps and begins moving The lens carriage will slowly move into the home position and the display will show the word OFFLINE if everything is okay 2 Press the focus key and with your finger spin the black knob on the keyboard clockwise until the table is all the way up It ...

Страница 8: ...om left of your screen Click on SETTINGS Click on PRINTERS Double Click on ADD PRINTER In the ADD PRINTER WIZARD click on Next Normally you should select Local Printer then click Next Click on Have Disk In the Install From Disk window your 3 5 floppy drive should be pre selected in the Install From Manufacturer s Disk box If it is click on OK If necessary change the drive designation then click on...

Страница 9: ...ERTIES h Click on DETAILS i Click on SETUP j Set the RESOLUTION to 160 DPI k Set the PIECE SIZE to 24 Horizontal 18 Vertical l Click OKAY m Click OKAY again then exit the Printer windows This procedure will allow Corel version 5 0 to print all resolutions offered in the Epilog Print Driver YOUR RADIUS LASER IS NOW READY FOR USE 9 ...

Страница 10: ... Laser Diode Pointer option as safe as possible Its beam path is located well inside the cabinet and under normal conditions no hazardous levels of laser radiation can escape To ensure safety Epilog offers the following recommendations DO NOT disassemble the engraver or remove any of its protective covers DO NOT attempt to look directly into the beam of the Laser Diode Pointer DO NOT operate the L...

Страница 11: ...to the engraver system when the unit is turned on FIRE SAFETY Laser engravers represent a significant fire hazard Most engraving materials are inherently combustible and while the objective of most engraving and cutting operations is to vaporize material without burning it is astonishingly easy to ignite a flame Usually this is a simple flare of burning gases issuing from the focused spot on the w...

Страница 12: ...dible emission indication on units having the Laser Diode Pointer option The engraver s beeper sounds every five seconds when the pointer is on 21 CFR 1040 10 requires that certification identification and warning labels be placed on laser products Reproductions samples of all such labels on the Radius Model 4000 Laser Engraver follow with their locations specified 1 Certification Identification L...

Страница 13: ...ANGER Invisible laser radiation when open AVOID EYE OR SKIN EXPOSURE TO DIRECT OR SCATTERED RADIATION b Label for models with the Laser Diode Pointer option DANGER Visible and invisible laser radiation when open AVOID EYE OR SKIN EXPOSURE TO DIRECT OR SCATTERED RADIATION 3 Defeatably interlocked Protective Housing Safety Label This label is located on the right side of the cabinet below the access...

Страница 14: ...ht hand side of the engraver s cabinet directly below the Certification Identification label b Aperture Safety Label This label is located inside the engraver s cabinet at the right rear above the aperture through which the engraving laser and Laser Diode Pointer beams enter the cabinet AVOID EXPOSURE Visible and invisible laser radiation is emitted from this aperture 14 ...

Страница 15: ...ow many cuts or lines per inch the machine will engrave Available resolutions range from 160 to 1200 DPI 300 is normally a minimum for production work 500 or 600 would be used when quality is more critical The greater the number of lines per inch the greater the engraving time required JOB TYPE Job type allows you to designate whether you want to engrave in Raster Mode cut in Vector mode or Combin...

Страница 16: ...ster engraving scanned photographs Epilog uses an error diffusion process in the print driver to greatly enhance the look of an engraved photograph All black text and other scanned black white images will engrave correctly in the Photograph setting While it is a matter of personal taste you will probably find that grey shades and color clipart look better when engraved using Clip Art mode VECTOR V...

Страница 17: ...rst select the desired settings for a particular job in the Epilog Radius Laser Setup window Next to save these settings and identify them with a name click the cursor in the Configurations box and type in your custom name of up to 18 characters long spaces are allowed When you click the SAVE button this custom setup will be saved When you are in the Epilog Radius Laser Setup window you can click ...

Страница 18: ...urrounding areas for emphasis You can also program the machine to make columns for your engraving jobs which will cut down on engraving time The feature also allows you to control the sequence or order of engraving Make sure that the MAP COLORS TO SPEED POWER box has an X in it and then click on the COLOR MAPS button You should see a screen like this COLOR VALUE This is how you define a color The ...

Страница 19: ...you have an X in this box the colors will be given a texture If the box is empty the colors will engrave out as a smooth solid When you are finished click on the DONE button and you will go back to the previous screen If you don t want the changes you have made to stick click on the CANCEL button and everything you have done will be forgotten You will need to be sure that your drawing program uses...

Страница 20: ... off the laser Once the engraver has stopped you can open the door to examine your engraving By closing the door and pressing the ONLINE button the engraver will start engraving at the point where it stopped As long as you did not disturb the workpiece the engraver will continue engraving without loss of registration CAUTION If you have stopped the engraver and opened the door to examine your work...

Страница 21: ...CUS Pressing the Focus key and turning the control knob raises or lowers the engraving table to move your workpiece closer to or further from the fixed focus lens A metal focus gage is provided to determine the correct distance from the workpiece to the focus lens The focus gage is the small metal triangle in the accessory kit The gage attaches to the shelf immediately in front of and below the fo...

Страница 22: ...s goes into the green slot and the red lens goes into the red slot The red lens is a longer focal length and will give better results cutting thick material and engraving at lower resolutions 300 DPI and below The blue lens is a shorter focal length and will give better results engraving at high resolutions 600 DPI and above For engraving inside bowls or shadow boxes the red lens can be put into t...

Страница 23: ...REMEMBER THE STEPS 1 Insert the item to be engraved 2 Focus or enable autofocus 3 Close the door 4 Confirm the exhaust is on 5 Press ONLINE and then Print from your computer 23 ...

Страница 24: ...different operations for the three laser power levels available with the Radius Be sure to find the table that is correct for your laser The label on the front of the machine indicates the laser power 25 WATT RADIUS 300 DPI ENGRAVING SPEED POWER 600 DPI ENGRAVING SPEED POWER CUTTING SPEED POWER 1 4 Wood 20 100 30 100 1 100 1 4 Acrylic 20 100 100 15 1 100 Anodized Aluminum 100 70 100 50 N A Brass P...

Страница 25: ...Matboard 100 70 100 70 20 80 Melamine 40 100 60 100 N A Rubber Stamps 15 100 20 100 5 100 25 ...

Страница 26: ... 15 5 100 Anodized Aluminum 100 60 100 40 N A Brass Painted 100 55 100 40 N A Corian Or Avonite 25 100 25 100 N A Delrin 30 100 35 100 15 100 Glass 45 100 50 100 N A Laserable Plastic 100 65 100 55 18 50 Leather 100 65 100 55 N A Marble 35 100 35 100 N A Matboard 100 65 100 65 20 75 Melamine 45 100 65 100 N A Rubber Stamps 18 100 20 95 10 100 26 ...

Страница 27: ... 10 100 Anodized Aluminum 100 40 100 30 N A Brass Painted 100 40 100 30 N A Corian Or Avonite 40 100 50 100 N A Delrin Seals 40 100 60 100 45 100 Glass 50 100 60 100 N A Laserable Plastic 100 40 100 35 25 30 Leather 100 50 100 40 N A Marble 50 100 60 100 N A Matboard 100 50 100 30 20 40 Melamine 70 100 80 100 N A Rubber Stamps 40 100 50 100 30 100 27 ...

Страница 28: ... 5 100 Anodized Aluminum 100 30 100 30 N A Brass Painted 100 25 100 25 N A Corian Or Avonite 100 100 100 100 N A Delrin Seals 40 100 60 100 35 25 Glass 60 100 70 100 N A Laserable Plastic 100 20 100 15 35 10 Leather 100 30 100 25 N A Marble 100 100 100 100 N A Matboard 100 30 20 Oct 35 10 Melamine 100 80 100 70 N A Rubber Stamps 70 100 100 100 30 50 28 ...

Страница 29: ...enclosures removed and never modify the enclosure The laser is invisible DO Please allow a few minutes a week for cleaning your machine Just a small amount of effort at the end of the week will pay off with years of trouble free operation of your machine Learn how your machine operates so you can plan your layouts to minimize processing time There is a considerable difference between typical and m...

Страница 30: ...quired engraving time The machine will be more efficient if your designs allow the laser to work with a logo and text as opposed to having to work strictly in terms of the number of square inches on the item to be engraved which is the case with a border 30 ...

Страница 31: ...op of the optical assembly so the screw holes align with the optical assembly and put the screws in and tighten them Please be careful to keep the screws straight so they thread in properly See photo to verify part placement 4 Space the primary and secondary heads about 12 inches apart and set the connecting strut in between the heads The flanges on the strut face down Align the holes in the end o...

Страница 32: ...will take care of the duplication automatically Prepare your artwork as though you were making only a single piece 32 ...

Страница 33: ...nnection point for the compressor is on the back panel on the recessed power plate The Radius uses a rigid plastic quick release connector Simply push in the supply hose from the compressor and you are attached In the upper right corner of the engraving cavity there is a flow control valve that adjusts the air pressure flowing through the air lines Ensure that this valve is open and that adequate ...

Страница 34: ... rotary attachment is now installed Turn the power on 6 The engraver knows that the rotary attachment is installed and changes its home position to a point directly above the center point of the drive wheels on the attachment ARTWORK SETUP FOR THE ROTARY 1 2 3 4 There is no special requirement for laying out jobs for the rotary The left margin of your job layout corresponds with the left edge of t...

Страница 35: ...raving table so that you don t forget where you put it You will need it later for engraving glasses 5 If you are engraving a mug with a handle the two drive wheels can be reduced in width by removing the two thumbscrews on the inside of each wheel FOCUS WITH THE ROTARY 1 Place the focus gage on the lens carriage Press shift and then use the Move X and Move Y functions to get the focus gage directl...

Страница 36: ... to the laser 3 Depress the release tab on the connector and unplug the connector 4 Remove the rotary attachment NOTE The rotary device only works in Raster mode The front control panel will display Remove Rotary if Vector mode is selected from the driver 36 ...

Страница 37: ...uld be black with areas to be removed white 2 If you want to have the laser cut the individual stamps out from the sheet place a 001 outline with no fill around each stamp You can use rectangles or you can use the pen tool to draw a tight outline that follows the shape of the stamp 3 Draw your boundary The boundary or Fence is what the laser will use to determine the limits of the background mater...

Страница 38: ...ine and must completely enclose your design You can cut out individual stamps by using a 001 outline within the fence The stamp driver panel is shown below Once your artwork is set up you need to specify how you want the machine to cut the stamp 38 ...

Страница 39: ...NE UNATTENDED 4 5 6 7 8 VECTOR POWER AND SPEED Vector mode is used in the stamp driver to cut out the stamps after they have been engraved Generally cut only most of the way through the sheet Leaving a small amount of rubber generally gives the best result allowing the sheet to be easily peeled apart SHOULDERS Use the adjuster to determine the size of the shoulders A small number will give steep s...

Страница 40: ...discard used data as it engraves to make room for additional new data If you print a file larger than 16 MB to the laser it will engrave the entire job but you will not be able to repeat that job If you want to repeat a job that is larger than 16 MB you will need to download it to the laser from your computer Please be aware that if you are sending a job that is 16 MB or larger to the laser much o...

Страница 41: ...our artwork is correct for vectoring Scanned images will not vector Filled or solid images will not vector outlines only If you are using Corel 3 0 or Corel 5 0 verify that line width is 007 or less If you are using Corel 6 0 or Corel 7 0 the line width is DPI dependent If you are vectoring at 600 DPI then your line width must be 001 If you are vectoring at 300 DPI then your line width must be 003...

Страница 42: ...you are using Corel 3 0 or 5 0 do not rotate your image Rotate the artwork before you scan it If you are using Corel 5 0 verify that it is version G1 To do this click on Help in Corel 5 0 then click on About CorelDraw If it is not revision G1 then contact Corel for the free upgrade Be prepared with your serial number of your Corel they will require it If you are using Corel 6 0 or 7 0 there are th...

Страница 43: ... the carriage can be moved freely with the power off If the engraver can t find the home position it will not power up properly Problem Poor engraving quality Solution 1 If you feel you are not getting the depth that you once were this is more then likely a maintenance issue See section thirteen for instructions on cleaning the optics If you are not sure of the location of all of your mirrors cont...

Страница 44: ...nction Solution 1 Verify that there is nothing obstructing the rotation of the fan 2 Verify the fan is clean Using a vacuum should clean the fan adequately 3 Verify the connector is still connected 4 If need be contact Epilog for replacement Problem Light burned out Solution The plastic lens over the light can be removed by squeezing the top and bottom then gently pulling Try reseating the bulb Re...

Страница 45: ...touches the gauge Shut off the machine and with your hand move the carriage to each of the four corners with the focus gauge still installed It should just touch the table in the four corners as it did in the starting position upper left corner If there is a variance the table will need to be readjusted Contact Epilog for the correct procedure Problem Engraver stops in the middle of a job Solution...

Страница 46: ...r will not operate with either door open by law and design If the doors are closed and you get this message check to be sure that there are no obstructions and the doors are closed completely If they are closed completely the door contacts need adjustment Please call Epilog for assistance Problem Engraver displays laser error Solution This signal may occasionally appear during periods of low speed...

Страница 47: ...tems Turn power off and try again If the error persists your machine needs to have a component replaced Contact Epilog technical support Problem Engraver displays remove rotary Solution The rotary can not be used for vector jobs Reset the print mode to RASTER 47 ...

Страница 48: ...is If you detect odor while engraving or if the smoke in the cabinet is visible in the area of the lens carriage inspect the exhaust system Check for loose or broken pipe hose connections or obstructions BEARINGS The bearing system on the Radius is designed to be maintenance free with the exception of periodic cleaning No lubrication or adjustment should be required CLEANING Periodically once a we...

Страница 49: ...alcohol as they contain impurities which can contaminate the optics If chemicals are not readily available in your area you may obtain pure ethyl grain alcohol at any liquor store under such brand names as Golden Grain and Everclear Wet the swab thoroughly with the solvent and then blot it against a paper towel or piece of cotton so that it is no longer soaking wet Then daub the optic gently rotat...

Страница 50: ...TALS Identification Plates Inc 1555 HighPoint Drive Mesquite TX 75149 9009 800 395 2570 Victory 1820 N Major Avenue Chicago IL 60639 800 327 5578 R S Owens Co 5535 North Lynch Avenue Chicago IL 60630 800 282 6200 3 PRESSBOARD PLAQUES Melamine Quail Industries 300 Fallon Road Hollister CA 95023 800 232 1031 4 WALNUT PLAQUES SPECIALTY WOOD PRODUCTS Colorado Heirloom 333 E 4th Street Loveland CO 8053...

Страница 51: ...5 Lake Ozark MO 65049 573 365 2441 5 MIRRORED ACRYLIC Alenite Dodge 5750 W Bloomingdale Avenue Chicago IL 60639 800 227 2440 6 CORIAN or FOUNTAINHEAD Synthetic Marble Johnson Plastics 9240 Grand Avenue South Minneapolis MN 55420 3604 800 869 7800 Customer Service 7 ENGRAVEABLE PLASTICS Innovative Plastics Inc PO Box 7065 Alogonquin IL 60102 815 477 0778 Johnson Plastics 9240 Grand Avenue South Min...

Страница 52: ...aphics 15841 Graham Street Huntington Beach CA 92649 888 733 0061 9 PEN PENCIL SETS IMARK Pen Co 3008 Pleasant Valley Lane Arlington TX 76015 817 465 6681 10 RUBBER STAMP MATERIAL Stewart Superior 1800 W Larchmont Avenue Chicago IL 60613 2496 800 621 1205 52 ...

Страница 53: ...R The Epilog RADIUS uses the latest technology providing a powerful tool that is simple to setup and operate The Radius can mark engrave and cut a variety of non metallic materials The Radius is available with three different laser power levels Any model can be upgraded to a higher wattage at the factory The 25 and 30 watt units are air cooled and the cooling fans are built in the rear of the unit...

Страница 54: ...uipment has been tested and found to comply with the limits for a Class A digital device pursuant to Part 15 of the FCC rules These limits are designed to provide reasonable protection against harmful interference when the equipment is operated in a commercial environment This equipment generates uses and can radiate radio frequency energy and if not installed and used in accordance with the instr...

Отзывы: