34
109
10
107
108
111
15
112
114
31
27
40
115
113
29
13
116
83
110
EXPLODED DRAWING D
Model No. EPTL99112.2 R0113A
Страница 1: ...uipment Save this manual for future reference USER S MANUAL www epicfit com ACTIVATE YOUR WARRANTY To register your product and activate your warranty today go to www epicfit com registration CUSTOMER...
Страница 2: ...decals may not be shown at actual size WARNING DECAL PLACEMENT WARNING DECAL PLACEMENT 2 IMPORTANT PRECAUTIONS 3 BEFORE YOU BEGIN 6 PART IDENTIFICATION CHART 7 ASSEMBLY 8 OPERATION AND ADJUSTMENT 12 H...
Страница 3: ...pres sor into an appropriate outlet see page 12 To avoid overloading the circuit do not plug other electrical devices except for low power devices such as cell phone chargers into the surge suppressor...
Страница 4: ...ly lift 45 lbs 20 kg to move the treadmill 23 When folding or moving the treadmill make sure that the storage latch is holding the frame securely in the storage position 24 Never insert any object int...
Страница 5: ...5...
Страница 6: ...er reading this manual please see the front cover of this manual To help us assist you please note the product model number and serial number before contacting us The model number and the location of...
Страница 7: ...wings below to identify small parts used for assembly The number in parentheses below each draw ing is the key number of the part from the PART LIST near the end of this manual The number following th...
Страница 8: ...s the following tools the included hex keys an adjustable wrench To avoid damaging parts do not use power tools ASSEMBLY 1 2 Identify the left leg extension assembly B Insert the extension assembly in...
Страница 9: ...of the left Upright Attach the left handrail assembly C to the Upright 96 with two 3 8 x 3 1 4 Screws 2 and two 3 8 Star Washers 3 Attach the right handrail assembly D in the same way Note There is n...
Страница 10: ...with four 5 16 x 3 4 Screws 1 four 5 16 Flat Washers 6 and four 3 8 External Star Washers 4 as shown only one side is shown Start all four Screws and then tighten them 1 E F 96 6 6 4 5 With the help...
Страница 11: ...8 Nut 8 that you just removed Firmly tighten the 3 8 Nut Lower the Frame 61 as described on page 24 8 7 65 61 9 Make sure that all parts are properly tightened before you use the treadmill If there ar...
Страница 12: ...into a surge suppressor and plug the surge suppressor into an appropriate outlet that is properly installed and grounded in accordance with all local codes and ordinances The outlet must be on a nomi...
Страница 13: ...xercise session You can also set a calorie time or distance goal The console also offers two user defined workouts that allow you to create your own workouts and store them in memory for future use Wh...
Страница 14: ...step 4 at the right Note The console can display speed and distance in either miles or kilometers To nd out which unit of measurement is selected or to change the unit of measurement see HOW TO CHANGE...
Страница 15: ...he console is set to metric units To stop the walking belt press the Stop button The time will begin to flash in the display To restart the walking belt press the Start button or the Speed increase bu...
Страница 16: ...rt the key 6 Measure your heart rate if desired Before using the heart rate monitor remove the sheets of plas tic from the metal contacts if necessary In addition make sure that your hands are clean T...
Страница 17: ...speed and or incline setting is programmed for the next segment the treadmill will automatically adjust to the new speed and or incline setting The workout will continue in this way until the last seg...
Страница 18: ...7 When you are finished exercising remove the key from the console See step 8 on page 16 HOW TO CREATE A USER DEFINED WORKOUT 1 Insert the key into the console See HOW TO TURN ON THE POWER on page 14...
Страница 19: ...y time during the workout you can manu ally override the setting by pressing the Speed or Incline buttons however when the next seg ment of the workout begins the treadmill will automatically adjust t...
Страница 20: ...ing and distance of the workout The display will also show the approximate number of calories you will burn during the workout and a profile of the speed settings of the workout If you select a compet...
Страница 21: ...ill not function If the demo mode is turned on the word ON will appear in the matrix To turn on or turn off the demo mode press the Enter button Units The selected unit of measurement will appear in t...
Страница 22: ...press the Enter button to select the letter number or symbol When you have finished entering the password press the Done button A numerical code and a web address will appear in the matrix Go to the w...
Страница 23: ...check the IP address and the previous instructions of this step Follow the instructions on the web page to connect the tread mill to your wireless network Note A warning may appear stating that the se...
Страница 24: ...ch knob is locked in the storage position Moving the treadmill may require two people 1 Hold the frame and one of the handrails and place one foot against a wheel 2 Pull back on the handrail until the...
Страница 25: ...se a Check the power switch see the drawing above If the switch has tripped wait for five minutes and then press the switch back in b Make sure that the power cord is plugged in If the power cord is p...
Страница 26: ...then press the Incline increase or decrease button again When the incline is calibrated remove the key from the console SYMPTOM The walking belt slows when walked on a Use only a surge suppressor tha...
Страница 27: ...latform Be careful to keep the walking belt centered Then plug in the power cord insert the key and carefully walk on the treadmill for a few minutes Repeat until the walk ing belt is properly tighten...
Страница 28: ...c Exercise If your goal is to strengthen your cardiovascular system you must perform aerobic exercise which is activity that requires large amounts of oxygen for prolonged periods of time For aerobic...
Страница 29: ...or Cap 46 2 Isolator Spring 47 2 Isolator 48 1 Left Frame Cover 49 1 Left Foot Rail Cover 50 1 Left Foot Rail 51 1 Idler Roller 52 1 Warning Decal 53 1 Walking Platform 54 1 Walking Belt 55 2 Belt Gui...
Страница 30: ...tment Tube 111 1 Top Adjustment Tube 112 1 Console Base Frame 113 2 Console Clamp 114 8 Console Bushing 115 2 Console Ground Wire 116 1 Console Base Back 117 1 Console 118 1 Console Frame 119 1 Access...
Страница 31: ...72 25 11 83 71 36 39 14 10 10 33 66 102 14 7 32 8 67 14 11 67 33 14 70 49 52 30 10 45 47 46 45 54 30 28 10 48 10 18 55 30 36 28 43 23 10 30 59 17 17 13 13 22 60 30 30 30 73 30 30 25 26 35 9 58 57 56 2...
Страница 32: ...32 38 78 79 83 37 24 38 19 80 24 78 79 10 10 37 76 99 77 20 10 74 10 10 75 13 81 10 82 10 10 84 10 42 42 10 84 10 85 42 88 14 86 87 14 14 14 EXPLODED DRAWING B Model No EPTL99112 2 R0113A...
Страница 33: ...95 10 10 91 90 94 10 2 3 89 93 10 10 2 3 9 9 9 10 101 9 12 12 106 106 38 38 10 104 105 103 103 9 1 100 97 38 87 92 96 97 98 38 1 9 101 101 101 101 101 13 1 4 1 4 6 6 EXPLODED DRAWING C Model No EPTL99...
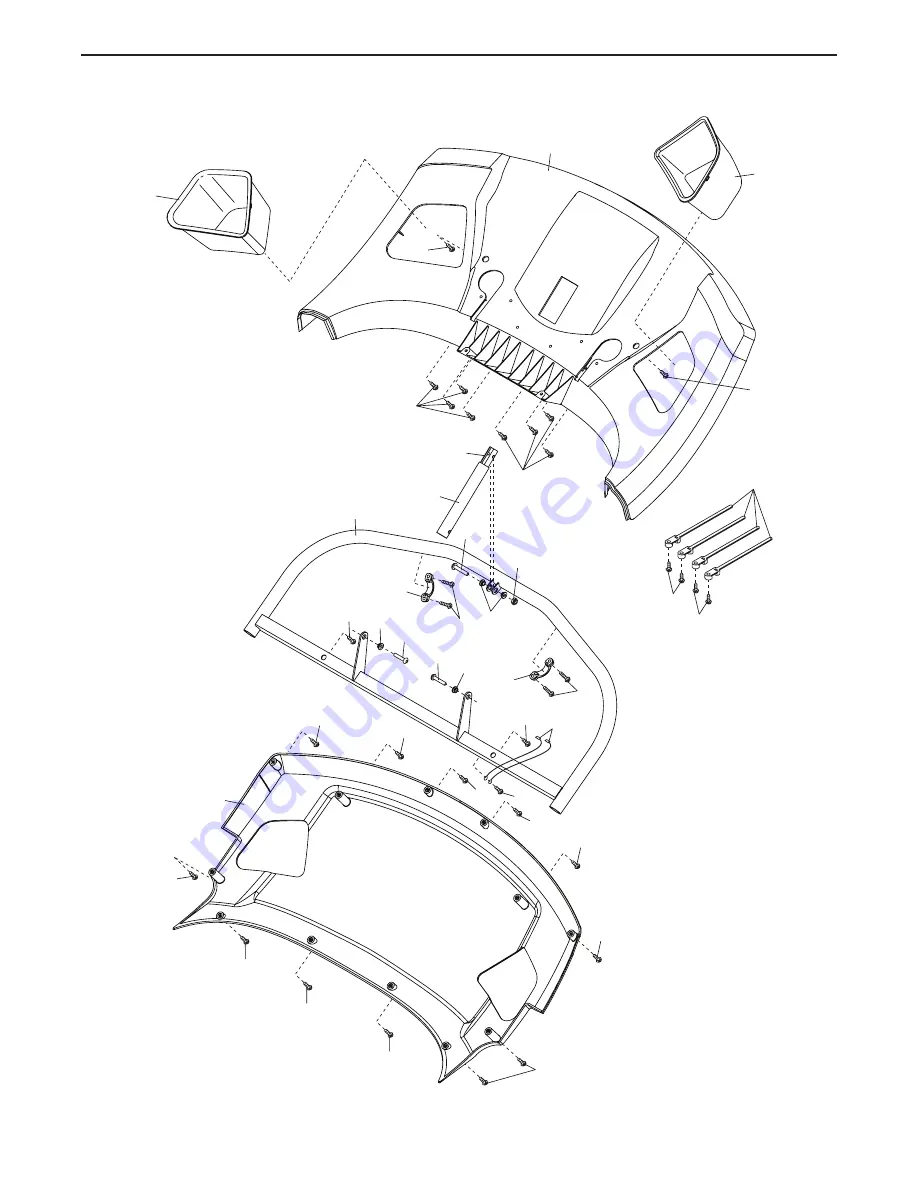
Страница 34: ...34 109 10 107 108 10 111 15 10 10 112 114 114 114 31 31 27 40 27 10 10 115 113 113 29 29 29 29 29 29 29 29 29 29 29 13 116 83 10 10 110 EXPLODED DRAWING D Model No EPTL99112 2 R0113A...
Страница 35: ...35 10 44 44 83 10 117 120 122 10 68 119 10 10 10 69 10 10 10 10 10 10 121 83 10 114 114 114 114 40 10 10 10 10 10 10 10 10 118 15 40 16 40 EXPLODED DRAWING E Model No EPTL99112 2 R0113A...
Страница 36: ...uthorized by ICON ICON is not responsible or liable for indirect special or consequential damages arising out of or in con nection with the use or performance of the product damages with respect to an...