

HUIZHOU EPEVER TECHNOLOGY CO., LTD TEL: +86-752-3889706 Website: www.epever.com
3
4
Note: The EPEVER RTU 4G A supports 9~48V DC power. While a larger transient
current is needed when the wireless network sends the data, it is suggested to
adopt a DC power of 12V/500mA or above.
Note: If the EPEVER RTU 4G A is connected with the inverter or inverter/charger.
Connect the DB9 connector of the RS485 communication cable to the EPEVER
RTU 4G A. Then connect the ends of the RS485 communication cable to the
battery and the device COM port. The
master LORA module is no longer needed.
6. Specifications
Item
Specifications
Network type
GPRS class12
Coding method
CS1 – CS4(Comply with SMG31bis)
Frequency
GSM900/1800MHZ, CDMA: BC0, WCDMA: B1/B8,
TD-SCDMA: B34/B39, LTE TDD: B38/B39/B40/B41,
LTE FDD: B1/B3/B5/B8
GPRS transmission rate
150M
Network protocol
TCP/UDP/FTP/PPP/DNS
SIM card voltage
3V/1.8V
Antenna connector
50Ω IPX connector
Communication port
RS485
Serial port baud
9600~115200bps
Power
9~48VDC
Power consumption
Communication: <200mA/5V; Idle: <40mA/5V
Environment temperature
-40~85
℃
Relative humidity
0~95%(Non-condensing)
Dimension (L x W x H)
101.2mm x 64mm x 26mm
Mounting hole size
∅
3.2mm
Net Weight
54.0g
Electromagnetic
compatibility
Electrostatic discharge immunity test, level 3
Anti-interference test, level 3
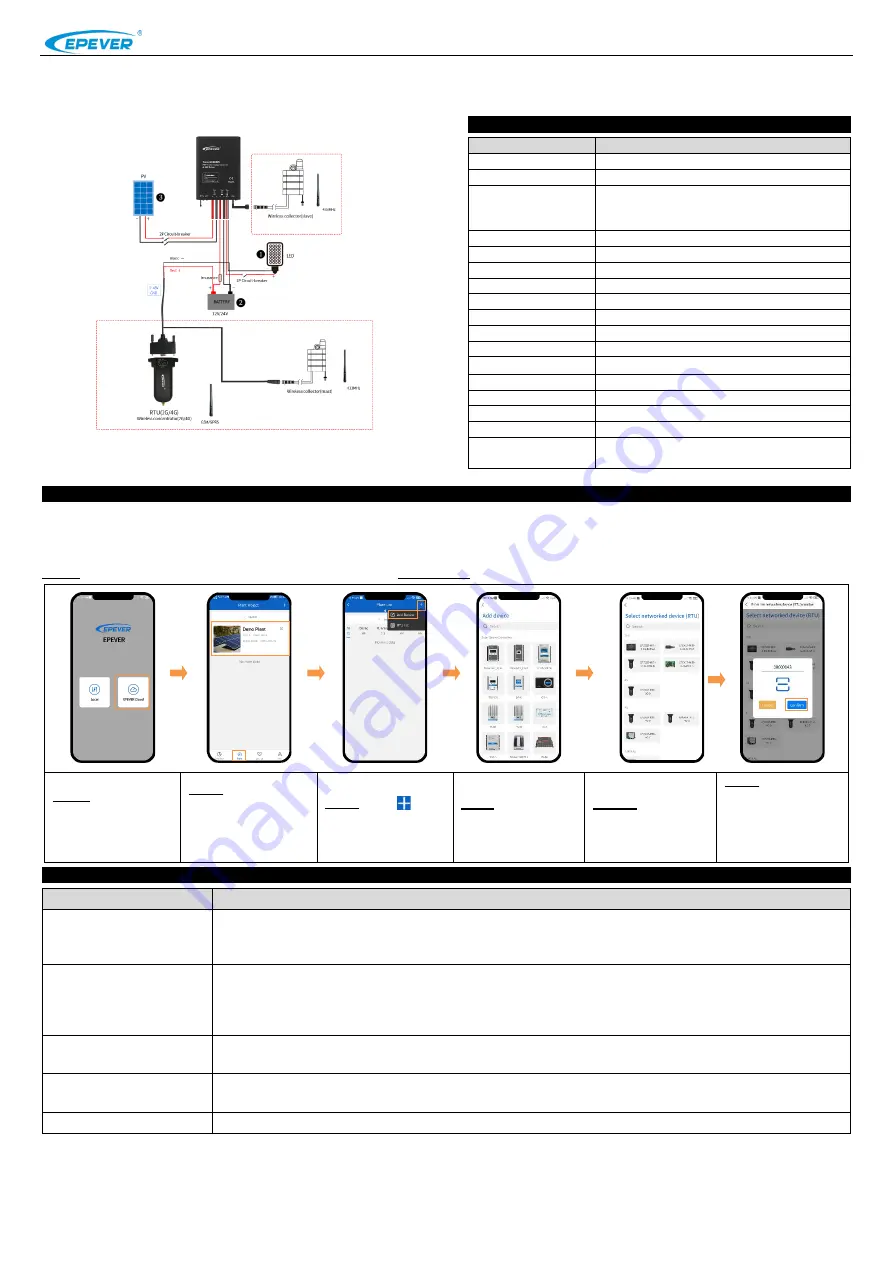
7. Connect the device to the EPEVER cloud server
The device connected with the EPEVER RTU 4G A can be added to the Cloud server by the PC or mobile APP. Take adding the device through the mobile APP as
an example (For the operations of adding a device by PC, refer to the
EPEVER Cloud Server user manual
).
CAUTION: Please get the Android or IOS version of the EPEVER cloud APP according to your phone system and install it successfully.
Step 1: Connect the EPEVER RTU 4G A with the device as chapter 5, Installation.
Step 2: Open the APP,
click the "EPEVER Cloud"
icon,
and
input
the
account to log in.
Step 3: Click the "Plant"
icon (it is the "Light" icon
instead when login in with
the streetlight account),
and select a project.
Step 4: Click "
> Add
Device" on the "Plant
List" page.
Step 5: Select the device
to be added to the cloud
server.
Step
6:
Select
the
connected module (the
EPEVER RTU 4G A).
Step 7: Input the ID (or
scan the QR code) on the
module label, and click
"Confirm" to enter the
Plant or Light project
page directly.
8. Troubleshooting
Faults
Solutions
LED
indicators are OFF
1.
Check whether to supply power to the EPEVER RTU 4G A.
2.
Check whether the power supply's poles are connected inversely. The EPEVER RTU 4G A is equipped with anti-reverse protection. The reverse
connection does not cause fatal damage. However, it affects the normal use before the correct connection is restored.
The network indicator is ON solid
After power is on, the network indicator is on solid for 60 seconds. If it still cannot flash after 60 seconds, please check:
1.
Check whether the SIM card is inserted correctly. 2. Check whether the GPRS service is activated.
The Network indicator is on solid again after running for a while:
1.
Check whether the server status is normal. 2. Check whether the SIM card is loose or arrear.
Smoke emits along with a pungent
smell
The connected battery voltage exceeds the rated voltage, causing the internal components to burn out. Don't hesitate to contact the supplier in
time and send it to the manufacturer.
Unregister on the network
1. Check whether the SIM card is inserted correctly. 2. Check whether the SIM card has activated the GPRS service.
3. Check whether the input power is sufficient. Input power should be 12VDC/500mA.
Parameters can't be configured
1. Check whether the connection to the PC is correct. 2. Check whether the serial port selection is correct.
Any changes without prior notice! Version number: 3.3


