background image

Chapter 04: 

Using Your eo Ultra-Mobile Tablet PC with Microsoft® Windows® 7

     47

Tools Menu

The Tools menu on the keyboard allows you to switch between 

the standard and expanded keyboard modes, dock or float the 

keyboard, and open the Input Panels’ “Options” menu. Addition-

ally, you can get more information about using the Input Panels 

by tapping on the “Help topics” menu item.

Input Panel Options

The Options panel contains 

six tabs that house all of the 

configuration options for 

controlling how the input 

panels work.

Opening

This tab contains the option 

to open the Input Panels by 

tapping or simply pointing 

at the panel tab with the 

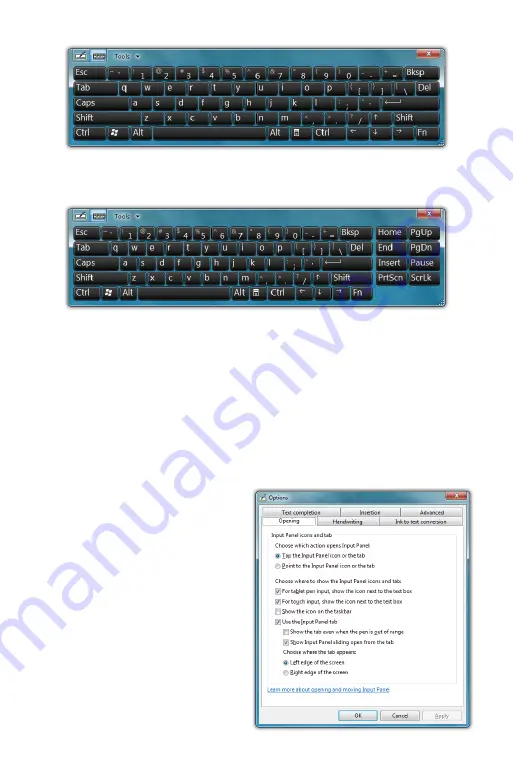
Input Panel Standard Keyboard. Can be resized to better support fingers or 

the stylus pen. Buttons in the upper left corner of the panel switches between 

on-screen keyboard and writing pad.

Input Panel Extended Keyboard adds eight function keys to the right side of 

the panel. Extended Keyboard mode switch is located in the “Tools” menu.

Содержание a7400

Страница 1: ...User s Guide eo a7400 7 Ultra Mobile Tablet PC ...

Страница 2: ......

Страница 3: ... the eo logo TabletKiosk and the TabletKiosk logo are registered trademarks or trademarks of Sand Dune Ventures Inc in the United States and or other countries Microsoft Windows Windows XP Windows Vista and the Windows logo are either registered trademarks or trademarks of Microsoft Corporation in the United States and or other countries Intel the Intel logo Intel Atom and Atom inside are trademar...

Страница 4: ...n any form without prior written permission of TabletKiosk If you have any questions regarding the eo Ultra Mobile Tablet PC or the information contained within this manual please contact TabletKiosk at info tabletkiosk com Important Safety Instructions For your own safety and the safety of your equipment please follow these rules for the handling and care of your eo Ultra Mobile Tablet PC Keep th...

Страница 5: ...the eo Ultra Mobile Tablet PC For safety reasons and to prevent permanent damage the equip ment should only be repaired by qualified service personnel Contact a qualified service center if any of the following issues should arise 1 AC adapter power cord or plug is damaged 2 Liquid has been spilled into the eo Ultra Mobile Tablet PC 3 The eo Ultra Mobile Tablet PC has been exposed to exces sive moi...

Страница 6: ...nada CSA certified 2 wire cord SPT 2 18AWG 3 wire cord SVT or SJT 18 AWG 3 conductor The cord should be provided with a molded on cord connec tor body at the other end The cord length must not exceed 3 meters 9 8 feet Outside the U S A and Canada the plug must be rated for 250 VAC 2 5 amp minimum and must display an international agency approval marking The cord must be suitable for use in the end...

Страница 7: ...ful interference to radio or television reception which can be determined by turning the equipment off and on the user is encouraged to try to correct the interference by one or more of the following measures Reorient or relocate the receiving antenna Increase the separation between the equipment and the receiver Connect the equipment into an outlet on a circuit different from that to which the re...

Страница 8: ...must not be co located or operating in conjunction with any other antenna or transmitter 2 This equipment complies with FCC RF radiation exposure limits set forth for an uncontrolled environment This device was tested for typical lap held operations with the device contacted directly to the human body to the back side of the Tablet PC To maintain compliance with FCC RF exposure compliance requirem...

Страница 9: ... Causing Equipment Regulations IC Warning statement a WLAN To prevent radio interference to the licensed service this device is intended to be operated indoors and away from windows to provide maximum shielding Equipment or its transmit antenna that is installed outdoors is subject to licensing b For LPD This device complies with Industry Canada licence exempt RSS standard s Operation is subject t...

Страница 10: ...romettre le fonctionnement European Union CE Marking Declaration This product has been tested and found to comply with the EMC requirement subject to the EU directive for CE marking Caution To Prevent Hearing Damage To prevent possible hearing damage do not listen at high volumes for long periods ...

Страница 11: ...Preface ix This Page Left Blank Intentionally ...

Страница 12: ......

Страница 13: ... Battery Pack 2 To Remove the Battery Pack 3 Step 2 Connecting the Ultra Mobile Tablet PC to an External Power Source 3 Step 3 Connecting Applicable Peripherals and Networking Cables 4 Step 4 Powering on the eo Ultra Mobile Tablet PC 4 Step 5 Completing the Operating System Installation 4 Interacting with the Active Digitizer and or Touch Screen 5 Touch Screen 5 Active Digitizer mode a7400D only 6...

Страница 14: ...ch Screen Features 33 Enabling and Disabling Touch Input 33 Touch Action Double Tap Settings 33 Using the Touch Pointer 34 Panning Gesture Settings 35 Disable Single Finger Panning 35 Inertia 35 Configuring and Calibrating the Digitizer 36 Calibrating the Digitizer 37 Pen Actions 38 Double tap 39 Press and Hold 39 Start Tablet PC Input Panel 40 Pen Configuration 40 Pen Pop up Menu 41 Adding a comm...

Страница 15: ... Flicking 57 Connecting to the Internet 57 Using a Wired LAN 58 Using Both DHCP and a Static IP Address 60 Using a Wireless LAN 61 Bluetooth Wireless Connectivity 62 Intel Graphics and Media Control Panel 65 Setting Up Your Display s 66 Changing Display Properties 66 Enabling Multiple Monitor Support 66 Enhancing the Display 67 Custom Resolutions Advance Mode only 68 3D Performance 68 Media 68 Pow...

Страница 16: ...essful System Reinstall 86 BIOS Set up 89 Entering the BIOS 89 Navigating in the BIOS 90 Main Menu 91 System Time 91 System Date 91 Advanced Menu 92 PXE LAN Boot 92 G Sensor Enabled 92 WebCam1 92 WebCam2 92 AC In Auto Boot 92 Boot Up Num Lock 93 Configure SATA as 93 Hardware Monitor 93 Security Menu 94 Supervisor Password 94 User Password 94 Change Supervisor Password 94 Change User Password 94 TP...

Страница 17: ... 101 Input Panels 101 Display 101 Audio 102 WiFi Wireless 102 Bluetooth Wireless 103 Gigabit Ethernet Embedded LAN Controller 103 TPM Security 104 I O Ports 104 Weight 104 Measurements 104 Case Color 105 LED Indicators 105 Function Buttons Right Side 105 Control Switches Top 105 AC Adapter 105 Operating Environment 106 Storage Environment 106 ...

Страница 18: ......

Страница 19: ...001 should come securely packaged in its shipping carton along with the items listed below2 Please contact your dealer immediately if anything is missing or damaged 1 Power Cord and AC Adapter 2 Microfiber Cleaning Cloth 3 Neoprene Slip Case 4 Quick Start Guide 1 There are two models of the eo a7400 Ultra Mobile Tablet PC the a7400D Dual Digitizer Touch screen and a7400T Touch screen only Please c...

Страница 20: ...ert the batteries while holding the system if you prefer CAUTION When turning over the eo a7400 be careful not to place it on a surface that could scratch or damage the screen You can place the included slip case on the surface before carefully setting the computer down to protect the screen Align the battery into the battery compartment and then slide it into the computer until it clicks securely...

Страница 21: ...ed on the tab and hold it there Carefully slide the battery out of its bay The second battery on the eo a7400 is hot swappable thanks to its internal first battery This means you can change out a discharged battery for a spare charged battery without first hav ing to power off the system You should however make sure the first internal battery as some charge remaining before removing the second bat...

Страница 22: ...net and or a corporate LAN using a wired connection RJ45 as opposed to wirelessly connect the external peripheral now See the chapter entitled Touring Your eo Ultra Mobile Tablet PC to identify which ports to use Step 4 Powering on the eo Ultra Mobile Tablet PC Locate the three power switches on the top on the tablet The switch is the computer s main power toggle Slide it to the right and hold it ...

Страница 23: ...ment you wish to interact with in order to select it or if the element is a button to activate it Sliding your finger while touching the screen will move the on screen pointer around as if you were using a mouse and holding down the left mouse button In other words you would be performing what is known as a drag operation Also as the screen is sensitive to touch resting your palm on it while tappi...

Страница 24: ...ual mode screen it will also have come with a special stylus pen that you will use to interact with the digitizer panel Only this stylus will activate the digitizer panel Hold the stylus pen as if you were writing with a standard pen Place the tip of the stylus just above the screen and move it around without letting it actually touch the screen The screen should automatically switch to Active Dig...

Страница 25: ...e Lift the stylus from the screen to complete the button press Dragging the stylus around while touching the screen is equiva lent to holding down the left mouse button and dragging Similar to when in touch screen mode Windows 7 supports pen gestures as a way to invoke short cuts to aid you while working You can learn more about pen gestures in the chapter Using Your eo a7400 Ultra Mobile Tablet P...

Страница 26: ......

Страница 27: ...h the controls and Input Output I O ports on the faces and sides of the tablet Understanding the layout of the system will help you use your eo a7400 more efficiently while in the field or on the go Chapter 02 Touring Your eo Ultra Mobile Tablet PC The eo a7400T features a capacitive touch screen while the eo a7400D features an all new auto switching dual mode screen with Wacom active digitizer pe...

Страница 28: ...ons 2 Hard Disk Drive Activity Light Blinks blue when the solid state drive is being accessed 3 Battery Charge Indicators Glows orange when the batteries are charging and changes to green when the corresponding battery is fully charged Slowly blinks orange when a corresponding battery s charge drops below 10 and quickly blinks orange when below 5 Don t light up when running on battery unless in a ...

Страница 29: ...ile writing or navigating will have no influence on the pointer s position Capacitive Touch Screen a7400T Touch Screen is responsive to touch by any object as the screen s sensors react purely to the electrical charge emitted by a human touch as opposed to a magnetic tip or electrical conduction Resting your hand on the screen while writing or navigating may affect the pointer s position 6 Dual Di...

Страница 30: ...and more 2 Ventilation Port Fan exhaust port for expelling hot air from the interior of the eo Ultra Mobile Tablet PC Do not block to prevent over heating 3 Wireless Networking Power Toggle Slide the toggle switch to power on the wireless networking adapter s transmitter The switch will glow blue when the WiFi adapter is powered on Slide switch back to power off the wireless networking transmitter...

Страница 31: ...n the Bluetooth transmitter off to conserve battery power 5 System Power Resume Toggle Slide this switch and hold for 2 3 seconds to power on the computer or to resume normal operation if the computer is in Suspend Mode Slide and holding for 4 6 seconds to immediately turn off the computer NOTE Using this switch to power off the computer is not recom mended unless the computer has stopped respondi...

Страница 32: ... Ethernet cable Supports 10 100 1000 Mbps protocols 4 Audio In Used to input stereo audio from external devices such as a microphone radio or tape player 5 MiniUSB 2 0 Port High speed 480 Mbps Universal Serial Bus 2 0 port for con necting peripherals such as a mouse CD DVD drive printer digital camera and more Backward compatible with USB 1 1 devices Not for powering the system 6 Headphone Audio O...

Страница 33: ...dia Card Reader Compatible with Secure Digital SD Secure Digital High Capacity SDHC Multimedia Cards MMC Memory Stick MS and Memory Stick Pro MS Pro 10 Anti Theft Kensington Lock Use with the locking device sold separately to attach the eo Ultra Mobile Tablet PC to a desk table kiosk or other stationary apparatus to help prevent the computer from being stolen ...

Страница 34: ... without an attached keyboard must support a hardware mechanism to generate the SAS which is also known as CTRL ALT DEL or CAD 4 DC Power In Plug the AC adapter s connection cable into this port to provide power to the computer 5 Docking Cradle Stabilizing Groove Used to align and secure the eo a7400 in its docking cradle 6 USB 2 0 Port High speed 480 Mbps Universal Serial Bus 2 0 port for connect...

Страница 35: ...onnector will allow the use of optional expansion devices such as the a74DC Docking Cradle Power pass thru is supported 2 Docking Cradle Lock Ports These two ports are used to lock the a7400 into the docking cradle for added security and stability when used in conjuc tion with a vehicle mounted dock ...

Страница 36: ...lation Port Fan exhaust port for expelling hot air from the interior of the eo Ultra Mobile Tablet PC Do not block to prevent over heating 3 5 0 MegaPixel Video Still Camera with LED Flash CCD video and still camera capable of taking 5 0MPixel still images or 720p 30fps HD video 4 Docking Cradle Stabilizing Grooves Used to align and secure the eo a7400 in its docking cradle 5 System Ventilation In...

Страница 37: ... the internal battery pack provides for ap proximately seven 7 hours of system runtime This battery is user replacable and hot swappable 8 SIM Card Slot Insert SIM card from your wireless carrier to enable 3G WWAN service For WiFi 3G models only 9 Windows COA The Windows Certificate of Authenticity 10 Touch Screen On Off Switch Switch turns the touch screen on and off Default state is on Close up ...

Страница 38: ......

Страница 39: ...eeding to recharge the batteries or swapping out the external battery for a charged one Operations that will significantly reduce battery life include but are not limited to the following 1 Using external bus powered USB drives such as optical floppy and hard disk drives 2 Using wireless communications devices including the inter nal WiFi networking card optional 3G WWAN data module Bluetooth adap...

Страница 40: ...rnal power source When each battery is fully charged its corresponding indicator will turn green Be sure that both indicators have turned green before at tempting to run the eo a7400 on battery power for the first time Calibrating the batteries After using the system for a while you may find that battery performance diminishes This is normal for Lithium Ion batteries however if you see a large dro...

Страница 41: ...uest a BIOS update or replacements In general running the system until a Battery Low warning indicator appears and then fully charging the battery full discharge charge cycle will ensure the accuracy of the battery status gauge and prolong the battery s charge efficiency Running your system until the batteries are almost totally drained like described in the calibration routine on a regular basis ...

Страница 42: ...puter or being exposed to an overly hot environment the battery may not charge when you connect the computer to an electrical outlet If this occurs disconnect the computer from the electrical outlet and allow it and the battery to cool to room temperature Then reconnect the computer to an electrical outlet to continue charging the battery Battery Status Windows 7 has an applet in the Control Panel...

Страница 43: ...ll need to purchase replace ment batteries during the life of your Tablet PC IMPORTANT To avoid damage only use TabletKiosk replacement batteries To prevent loss of data do not remove both battery packs at the same time while the system is powered on unless attached to an external power source Also be sure to check the status of each battery before removing it If you remove a battery and the remai...

Страница 44: ...ngs were lost Enter the BIOS and choose to restore the settings to default If this does not correct the error contact your dealer or visit TabletKiosk s website at www tabletkiosk com and submit a support request to obtain proper BIOS settings Storing a Battery When storing your computer for an extended period of time it is recommended that you remove the battery packs and store them in a dry cool...

Страница 45: ...Chapter 03 This page left blank intentionally 27 This page left blank intentionally ...

Страница 46: ......

Страница 47: ...tains tips and details to help you get the most from your eo a7400 when using Microsoft Windows 7 Navigating in Windows 7 on a Tablet PC Typically when working on a Tablet PC you use a stylus pen or your fingers instead of a mouse and keyboard to interact directly with objects on your screen You can open move edit and delete items such as icons files windows and more with easy to use basic functio...

Страница 48: ...sence of your resting hand When using a capacitive stylus or your finger in touch screen mode instead of sliding the pen or your finger around the screen to move the pointer simply tap on with what you want to interact Sliding the pen while lightly touching the tip to the screen will move the on screen pointer around as if you were using a mouse and holding down the left mouse button In other word...

Страница 49: ...e a check mark in the box Hover over another icon and when it appears tap in its check box In touch screen mode tap an icon to highlight it The selection check box should appear Tap in it to add it to the selection Now press and hold either icon and start dragging and you should notice that both icons move together This multiple selection feature works with other types of opera tions such as cutti...

Страница 50: ...ou want to calibrate for pen or touch Tap the touch button and the touch calibration screen will appear DUAL MODE SCREEN NOTE To calibrate the touch screen you must use either your finger or a stylus meant for use on a capacitive touch screen If you attempt to use the digitizer stylus to calibrate the touch screen you will be presented with an error message 4 Follow the on screen instructions to c...

Страница 51: ...er accept any input Make sure you have a mouse and or keyboard available to attach to the system if your eo a7400 doesn t have a digitizer panel or you will not be able to control Windows Re check the box and click Apply to re enable touch input Touch Action Double Tap Settings To adjust how fast and how far apart your fingers can be to perform double tap enabled actions tap on the Settings button...

Страница 52: ...h item on the screen a graphical representation of a mouse will appear near the on screen pointer now a standard arrow icon when you tap somewhere on the screen While the mouse is visible tapping on the left or right mouse button will perform the equivalent action the same as if you clicked with a real mouse Tapping on the mouse and sliding your finger around the screen will move the pointer just ...

Страница 53: ...ingle Finger Panning Simply check it again to re enable single finger panning NOTE In order to pan left and right with a single finger you must first pan a short distance up or down to enable single finger panning left and right This helps prevent accidental selecting and dragging of text or objects around the screen Inertia Inertia is a property of physics that allows for the continuation of move...

Страница 54: ...when you have reached as far in a particular direction as you can pan the document window will bounce back as if running into a wall To turn off this animated visual cue simply uncheck the box Enable boundary feedback for pan gestures Configuring and Calibrating the Digitizer The Electromagnetic Active Digitizer by Wacom is the highest resolution input panel available on the eo a7400 In order to s...

Страница 55: ...he Digitizer There are two ways of getting to the calibration routine for the digitizer 1 In the Tablet PC Settings control panel tap on the Display tab and then tap on the Calibrate button Select Pen Input and the digitizer calibration screen will appear 2 In the ISD Pen Tablet Properties control panel tap on the Calibrate tab and then tap on the Calibrate button to open the digitizer calibration...

Страница 56: ...reen When you have finished choose to save the calibration data if you are satisfied with your results If you think you may have missed the center of some one of the cross hairs click Cancel to abandon the calibration data and keep the current calibra tion settings or tap Try again and repeat the calibration Pen Actions In the Pen and Touch control panel on the Pen Options tab is a table that list...

Страница 57: ...o adjust the Speed slider toward Fast and the Spatial slider toward Small Double tap on the picture of the door to test your new settings You can continue to adjust the sliders until you feel comfortable opening and closing the door Press and Hold Enables and disables the ability to perform a right click by pressing on the screen and holding You can also adjust how long you must keep your pen pres...

Страница 58: ...Pen Tablet Properties control panel you can adjust How hard you must press the eraser and pen tip to ad just the width of the lines they draw and erase this is known as pressure sensitivity What action the pen but ton performs if your stylus has only one button it is programmed with the lower button on the control panel How close together you must click on screen to perform a double click same as ...

Страница 59: ...ive positioning coordinates behavior mode but we recommend leaving your digitizer in pen mode as mouse mode can be a bit confusing for most people Adding a command to the menu 1 Tap on the Add drop down menu and select Keystrokes 2 Tap on the Add Special drop down to choose from a predefined list or use either the on screen or a USB keyboard to enter your own custom combi nation including modifier...

Страница 60: ...t Cut to the menu 1 Tap on the Add drop down menu and select Open Run 2 Tap on the Browse button to open the Ap plication to run dialog box and then navigate to the application you which to add and double tap on it 3 Enter the name as you would like it to appear in the pop up menu into the Name field Tap the OK button to Enter a name for the keystroke short cut as you want it to appear in the Pen ...

Страница 61: ...er information directly into any application that accepts standard keyboard inputs NOTE FOR DIGITIZER USERS By default when using an Active Digitizer the panel will be hidden until you bring the tip of the stylus near the screen The edge of the panel will sit just visible at the edge of the screen Hovering your pen over that edge of the Input Panel will cause it to slide out a bit making it easier...

Страница 62: ...ant to be able to display it 1 Press and hold on a blank space on the Windows Taskbar to call up a context menu 2 Tap on the top option entitled Toolbars and then tap on Tablet PC Input Panel option on the panel that appears This will place a perma nent button on the Taskbar next to the System Tray that will easily allow you to call up the panels whenever you like Writing Pad This pad allows you t...

Страница 63: ...nel Tools Menu To switch between word by word and character by character modes tap on the Tools drop down menu on the Input Panel Title bar From the drop down menu choose the mode you wish to use You can also use this menu to invoke Windows Handwriting Personalizer adjust where you want the input panels to appear on the screen undock the panel to move it anywhere on the screen or open the panels O...

Страница 64: ...title bar of the Input Panel just to the left of the Close button Tapping on this bar opens a panel with buttons that when clicked on illustrate how to accomplish a particular editing action On Screen Keyboard Use it the same way that you would use a standard keyboard By tapping on its keys you can enter letters numbers and symbols into documents and text fields as well as perform specialized func...

Страница 65: ...ptions The Options panel contains six tabs that house all of the configuration options for controlling how the input panels work Opening This tab contains the option to open the Input Panels by tapping or simply pointing at the panel tab with the Input Panel Standard Keyboard Can be resized to better support fingers or the stylus pen Buttons in the upper left corner of the panel switches between o...

Страница 66: ...ust get to the right edge of the Writing Pad before an additional line will appear Ink to text conversion This tab has options for adjusting when the Input Panel will automatically convert your handwriting to text as you are writing The Distance from Ink slider determines how far away your stylus must move from the text you are writing before converting the text while the Length of pause slider ad...

Страница 67: ...serted all at once or letter by letter determined by a specific pause duration Text Completion This tab allows you to turn off and on AutoComplete and Predic tive text options These options work much the same way as they do on smartphones Advanced This tab lets you change the Password security level altering the way the Tablet PC Input Panel and the on screen keyboard displays text and key presses...

Страница 68: ...lities designed to improve upon its default handwriting recognition accuracy To begin training Windows to better recognize and translate your handwriting from the Input Panel tap on Tools g Personalize Handwrit ing Recognition to open the Handwriting Personalization application NOTE You can also access the Handwriting Personalization application from the START Menu under All Programs g Accessories...

Страница 69: ...o translate your handwriting to be poor Automatic Learning Another feature Windows 7 offers to improve handwriting recognition is handwriting personalization through Automatic Learning This enables Windows to learn your handwriting on the fly as you write This feature is enabled by default so if you are the primary user of your Tablet PC you don t have to do anything to enable it If your eo a7400 ...

Страница 70: ...dded efficiency provided by keyboard short cuts Tablet PC users have another way to improve efficiency while working by using Windows 7 built in screen gestures to open applications close applications move data between applications and navigate within applications Windows has two different types of gestures depending on the type of input screen used pen gestures and touch gestures Pen Gestures In ...

Страница 71: ...flicks and are used independently of the input panel anywhere in Windows Navigational Flicks There are four default navigational pen flicks in Windows 7 Flick Direction Action Performed Up Page Up Right Back Down Page Down Left Forward The four default navigational flicks are enabled in Windows 7 by default Editing flicks must be enabled in order to customize pen flicks The four editing flicks can...

Страница 72: ...led Use flicks to perform common actions quickly and easily Below it are two option boxes select Navigational flicks and editing flicks to enable both types of flicks NOTE To disable flicks altogether uncheck the top check box Use flicks to perform common actions You ll know you have successfully invoked a pen flick as the name and icon representing the flick will fade in briefly on your screen wh...

Страница 73: ...the specific direction s drop down menu 2 At the bottom of the panel are two fields that should now be active Tap in the top field labeled Name Enter the name you would like for the action you are about to create by tapping on the keyboard tool tip that appears This is the name that will display in the drop down menu and as a tool tip when you invoke the flick action 3 Either tap on the Tab key in...

Страница 74: ...several gestures that support both single and multi touch contacts Standard Windows multi touch gestures only support capacitive touch screens Enabling and Disabling Multi Touch Gestures Many of the most useful gestures built into Windows 7 require two finger touch To disable these behaviors simply uncheck the box Enable multi touch gestures and inking Panning with or without Inertia Panning is si...

Страница 75: ...te an object such as a photo or PDF document Alternately you can place two fingers on the screen and then rotate one finger around the other in either a clockwise or counter clockwise direction Two Finger Tap Tap two fingers on the screen around where your intended target is the midpoint in order to zoom into that area to perform actions on small objects such as tapping on a text link in a web pag...

Страница 76: ...be within the reach of the networking cable you are using 1 Connect an Ethernet networking cable into the LAN port of your eo a7400 and then connect the other end into your broadband modem or the appropriate LAN port as instructed by your network administrator 2 If your network or Internet Service Provider ISP uses a Dynamic Host Control Protocol DHCP server as many do you should find that you can...

Страница 77: ... not recheck that your networking cable is properly connected or contact your network administrator 5 Tap on the Local Area Connection link and then tap on the Properties button from the Local Area Connection Proper ties window that appears If Windows asks you for permission to continue tap on the Continue button 6 On the Networking Tab you ll see a list box called This connection uses the followi...

Страница 78: ...mation in the Internet Protocol TCP IP Properties window tap OK to accept your changes and close the window 9 Repeat steps 5 through 7 selecting Internet Protocol Ver sion 6 TCP IPv6 this time if your network supports it 10 If you need to specify additional DNS servers WINS servers or gateways tap on the Advanced button to open the Advanced TCP IP Settings panel 11 Tap OK in the Local Area Connect...

Страница 79: ... tap OK to accept the settings and close the panel Using a Wireless LAN The WiFi wireless network adapter built into your eo a7400 is compatible with 802 11b g n wireless networks and therefore can connect to wireless routers or access points that support any of these standards 1 Turn on the WiFi transmitter using the toggle switch on the top of your tablet 2 In the System Tray on the Windows Task...

Страница 80: ...y If you do not know the correct security key to enter or still can t connect after entering the security key properly contact your network administrator or the technical support line of your ISP Bluetooth Wireless Connectivity Bluetooth is a short range wireless technology you can use to transfer data between your eo a7400 and other wireless devices that use Bluetooth such as wireless keyboards a...

Страница 81: ...ly one device found it will automatically begin the pairing process If there is more than one discoverable device found it will open a window prompting you to choose which device you would like to pair with your Tablet PC 4 If the device you are pairing requires a security code to be entered a window will open asking you to enter the requested PIN If a device is found that requires authentication ...

Страница 82: ...ing your remain ing devices 7 If your additional devices are not found simply place the target Bluetooth device into pairing mode again and start the process over As pairing mode broadcasts an active signal it draws additional power and therefore is set to last only a short duration of time to conserve battery life Your device s should now be connected to your tablet and available for use If succe...

Страница 83: ...nnection parameters To do this simply restart the Connection Wizard by tapping on the New Connection button and when the Bluetooth Wizard starts select the Custom Mode option before continuing Intel Graphics and Media Control Panel Using the Intel Graphics and Media Control Panel you can en able multi monitor support adjust color and brightness settings of your display s monitor resolution color d...

Страница 84: ...scale up the Windows desktop to fill the monitor screen if the resolution of the monitor is set higher than the resolution of the Primary display Center Image will center the desktop without scaling on the screen surrounded by a black border Enabling Multiple Monitor Support To enable multiple displays you will need to use the optional eo a74DC Docking Cradle Be sure to have your external monitor ...

Страница 85: ... have cho sen your operating mode select which monitor will be the Primary display and which will be the Secondary display The Primary display will control the resolution of the Windows desktop house the Windows Taskbar and be the only monitor active when operat ing in Single Display mode Enhancing the Display Display g Color Enhancement is where you can ad just the Brightness Contrast Gamma mid l...

Страница 86: ...et PC s graphics accelerator and is therefore not supported IMPORTANT If the settings on this panel are not familiar to you we recommend not creating a custom setting to prevent damaging the graphics chipset or your display 3D Performance The 3D Performance section is where you can adjust the 3D settings for better 3D performance higher frame rates or better display quality less screen tearing and...

Страница 87: ...ther to favor maximum performance or longer battery life Hot Keys Options and Support g Hot Key Manager will allow you to enable and disable keyboard short cuts for opening this control panel rotating the screen scaling the display and enabling disabling the display s Using keyboard short cuts are much quicker than having to open the control panel by tapping on the desktop opening the panel naviga...

Страница 88: ...information and program updates Realtek HD Audio Manager The Realtek HD Audio Manager is where you can control how audio is recorded and played back on your eo a7400 To enter this control panel go to START g Control Panel g Hardware and Sound and scroll down to Realtek HD Audio Manager Alternatively you can go to the System Tray and press and hold on the Realtek HD Audio Manager icon and tap on So...

Страница 89: ... environmental presets for sound effects and specify the audio playback format Volume Level The Main Volume section at the top of the Speakers tab has controls for stereo balance left and right system volume affects overall volume levels of all playback sounds use the volume control panel to adjust individual sound sources and volume muting The volume level applies to the default audio playback de...

Страница 90: ... your speak ers check to make sure the volume level is turned up high enough or not muted To encode surround sound audio as stereo sound for transfer out of the analog out headphone jack to a speaker system or receiver capable of surround sound matrix decoding place a check in the Virtual Surround check box If you are playing back deep booming sound tracks that are causing your externally connecte...

Страница 91: ...t the waveform of the audio playback to better conform to certain types of musical styles Use the Karaoke counter control to cancel out tone down frequencies associated with human voice sounds singing Default Audio Format Use this drop down to set the bit depth sampling rate and frequency of the audio playback The higher the settings the better quality the sound There reaches a point of loss of di...

Страница 92: ...ly connected sound source Recording Volume Level The Recording Volume section at the top of the Microphone tab has controls for stereo balance left and right input volume levels of the selected recording device muting and microphone boost Microphone Effects This sub section allows you to apply Noise Suppression to cancel out background noise and Acoustic Echo Cancellation to reduce echo caused by ...

Страница 93: ...obility Center Windows 7 includes the Mobility Center which groups together into one panel many of the most common functions mobile users may need while on the go To open the Mobility Center go to START g All Programs g Accessories g Windows Mobility Center Mobility Center puts these import functions together at your fingertip screen brightness volume battery status and power settings wireless net...

Страница 94: ......

Страница 95: ...ed solutions are presented in the following tables Audio Problems Solutions Problem Possible Cause Solution There is no sound The volume is either muted or turned down Use the Windows Volume control icon in the System Tray lower right corner of the Task Bar near the clock to ad just the volume and disable muting No sound is audible through externally attached speakers or headphones connected to th...

Страница 96: ...tra Mobile Tablet PC Contact support if you suspect the internal battery requires replacing Battery life icon in System Tray is not accurately displaying the remaining charge Batteries requires calibration Calibrate the batteries as specified in the chapter entitled Battery Care and Usage The battery pack is nearing the end of its life Replace the battery pack Use only bat teries recommended for u...

Страница 97: ...nd that the access Password WPA PIN Protected Set up or Key WEP is correct SIM card not inserted with optional 3G WWAN module Make sure that the SIM card provided by your wireless ISP is correctly installed in the 3G WWAN expansion module s SIM port Power Problems Solutions Problem Possible Cause Solution The computer is con nected to an external power source but does not turn on The internal batt...

Страница 98: ... are trying to connect to and that the access Password WPA PIN Protected Set up or Key WEP is correct Ethernet drivers are corrupt This can happen over time Check the TabletKiosk website to make sure you have the newest available drivers then uninstall the current drivers and install the new drivers The computer seems to connect but doesn t see any other computers Correct workgroup or domain name ...

Страница 99: ...available Wacom driv ers then uninstall the current drivers and install the new drivers The on screen pointer is not at the correct position when your finger touches the screen The touch screen requires calibrating Restart the eo a7400 At system initial ization the touch controller will auto calibrate The screen does not rotate when the eo a7400 is rotated The rotation lock button has been pressed...

Страница 100: ...g the device back into the other USB port Disconnect the device and power it off Shut off the eo a7400 normally Power on the device and plug it in Power on the eo a7400 Contacting Your Dealer If you still have a problem the next step is to contact the dealer where you purchased your eo a7400 Your dealer can determine if the problem will require that the computer be taken to a service center for re...

Страница 101: ...s settings or documents or reinstall your system without saving your docu ments or settings IMPORTANT You will need to have a mouse and or keyboard with standard F1 F12 function keys attached to your system in order to launch and navigate both the Advanced Boot Options menu and the Windows Recovery System Launching System Restore from Within Windows If you can boot into Windows you can initiate th...

Страница 102: ...very System 5 When the recovery system starts choose the keyboard language You will then be given another chance to cancel by clicking the No button when asked are you sure you want to install Windows If you are sure click the Yes button and the Windows install procedure will begin NOTE When you launch Windows Reinstall from within the Recovery Control Panel you will only be able to reinstall Wind...

Страница 103: ...ry 2 When the recovery system starts choose your preferred keyboard language 3 In order to access the recovery options you will need to login using your current Windows login NOTE Your current account must have administrator privileges in order to successfully login 4 After successfully logging in you will be taken to the System Recovery Options menu where you can choose to Repair your Windows ins...

Страница 104: ...einstall Windows If you are sure click the Yes button and the restore procedure will begin What To Do After a Successful System Reinstall After you have finished restoring Windows your system will reboot and Set up will configure Windows for first use When you have returned to the Windows desktop you should go to Windows Update and install any Critical updates until your system is current Finally ...

Страница 105: ...Chapter 05 Troubleshooting 87 This page left blank intentionally ...

Страница 106: ......

Страница 107: ... disable certain feature functions BOOT Enables user to set the device order the system will attempt to start up from SECURITY Allows user to set Administrator and User level passwords for accessing the system and the BIOS as well as enable and initialize the TPM SAVE EXIT Provides user with ability to save changes discard changes and exit the BIOS Entering the BIOS To enter the BIOS simply tap on...

Страница 108: ...cted fields NOTE How you enter the BIOS tapping with either your finger or the digitizer stylus pen is also how you will navigate in the BIOS For example if you tapped the screen with your finger then the BIOS will activate with the touch screen and will only respond to your finger On a system with a dual mode screen if you tapped with the digitizer stylus the BIOS will activate using the digitize...

Страница 109: ...nced Security Boot Exit F1 Help Esc Exit Select Item Change Values Enter Select Sub Menu F9 Setup Defaults F10 Save and Exit Main CPU Type Intel R Atom TM CPU N2600 1 60GHz CPU Speed 1 60 GHz Installed Memory 2048 MB System BIOS Version N26K_0 32 IA32 Build Date 10 10 2012 KBC Version 0 58 Serial Number SYN0000000000001 Asset Tag Number Asset Tag UUID 00000000 0000 0000 0000000000000000 Product Na...

Страница 110: ...e rear webcam AC In Auto Boot When enabled system will automatically power on and boot up when the system is plugged in Phoenix SecureCore Tiano Setup Main Advanced Security Boot Exit F1 Help Esc Exit Select Item Change Values Enter Select Sub Menu F9 Setup Defaults F10 Save and Exit Advanced PXE LAN BOOT Disabled G Sensor Enable Enabled WebCam1 Enabled WebCam2 Enabled AC In Auto Boot Disabled Boo...

Страница 111: ...ture enabled so the extended keypad will act as a numeric keypad as opposed to a navigational keypad Configure SATA as Sets SATA mode to IDE AHCI or RAID Mode should be set to AHCI to use Solid State Drives SSD Hardware Monitor Enters the hardware monitor which displays CPU and system temperature and fan speed ...

Страница 112: ...ut being required to enter an additional password TPM Support Enables Disables the Trusted Platform Module Phoenix SecureCore Tiano Setup Main Advanced Security Boot Exit F1 Help Esc Exit Select Item Change Values Enter Select Sub Menu F9 Setup Defaults F10 Save and Exit Security Supervisor Password Cleared User Password Cleared Change Supervisor Password Enter Change User Password Enter TPM Suppo...

Страница 113: ...d to the system or doesn t contain a boot able OS the next drive will be checked and so on down the list Phoenix SecureCore Tiano Setup Main Advanced Security Boot Exit F1 Help Esc Exit Select Item Change Values Enter Select Sub Menu F9 Setup Defaults F10 Save and Exit Boot Boot Priority Order 1 USB CDROM 2 USB HDD 3 USB FDD 4 SATA HDD LITEONIT LMT 256M3M 5 PXE Boot ...

Страница 114: ...efaults Loads the optimized system defaults as configured from the factory Selecting Yes changes all the BIOS settings back to their original optimized factory settings Selecting No keeps the BIOS settings as they are currently and returns to the menu Save Changes Saves the changes made in the BIOS but does not exit Phoenix SecureCore Tiano Setup Main Advanced Security Boot Exit F1 Help Esc Exit S...

Страница 115: ...Appendix A This page left blank intentionally 97 This page left blank intentionally ...

Страница 116: ......

Страница 117: ...gy Intel Streaming SIMD Extensions 2 and 3 Intel SSE2 and Intel SSE3 support and Supplemental Streaming SIMD Extension 3 SSSE3 support Intel 64 architecture Supports C0 C4 C1E C4E and Deep Power Down Technol ogy C6 states Execution Disable Bit support for enhanced security Chipset Intel NM10 Express Serial ATA 3Gb s SATA II 10Gb s each direction full duplex DMI Integrated 10 100 LAN Controller via...

Страница 118: ...ery 3 Series 1 Parallel 3S1P Lithium Ion cells per pack both internal and external Sanyo prismatic cells Typical capacity 1880mAh per pack Typical voltage 11 1V Maximum Discharge Current 3 76A Charge Voltage 12 6V Maximum Charge Current 1A Operating Temperature 0 45 C Storage Temperature 20 40 C Over Charge Protection Over Discharge Protection Over Cur rent and Output Short Protection Over Thermal...

Страница 119: ...upport standard Dual Mode Digitizer Pen and Capacitive Touch Screen with 4 point multi touch support optional Dual mode screen is auto sensing and auto switches between digitizer and touch automatically Digitizer features Wacom Electro Magnetic Resonance Technology with battery free Wacom stylus pen Digitizer Resolution 0 01mm 2540ppi Detectable Pen Tilt up to 50 from vertical Digitizer Position R...

Страница 120: ...Jacks WiFi Wireless Intel Centrino Wireless N 105 with power ON OFF switch WiFi Certified for IEEE 802 11b g n Microsoft WHQL Certified IEEE 802 11b g n 802 11d 802 11e 802 11I 802 11h Supports Infrastructure and SoftAP network architectures Supports seamless roaming between respective access points 802 11b 802 11g 802 11b g and 802 11b g n Supports WPA and WPA2 802 1X EAP TLS TTLS PEAP LEAP EAP F...

Страница 121: ...p polarity skew correction Crossover Detection and Auto Correction Wake on LAN and remote wake up Microsoft NDIS5 NDIS6 Checksum Offload IPv4 IPv6 TCP UDP and Segmentation Task Offload Large send v1 and v2 Full Duplex flow control IEEE 802 3x Supports jumbo frames to 9K bytes IEEE 802 3 IEEE 802 3u IEEE 802 3ab compliant IEEE 802 1P Layer 2 Priority Encoding IEEE 802 1Q VLAN tagging IEEE 802 3az D...

Страница 122: ...E for asymmetric key opera tions up to 2048 bit key length Power saving sleep mode I O Ports RJ45 10 100 Ethernet LAN 2x USB 2 0 Highspeed 1x Full size port 1x MiniUSB port 1x 3 5mm Audio Out 1x 3 5mm Audio In 1x DC In 1x Cradle Connector Optional Docking Cradle adds 3x USB 2 0 ports 1x DisplayPort Video Out 1x DC In with power pass thru 1x TabletKiosk Modular Expansion Port Weight 0 73 kg 1 6 lbs...

Страница 123: ...ue Bluetooth ON blue Function Buttons Right Side SAS Ctrl Alt Del Screen Rotation Lock Unlock User Programmable User Programmable Control Switches Top System Power Switch Bluetooth Transmitter Power On Off Wireless Networking Transmitter Power On Off AC Adapter Input voltage nominal 100 240 Vac Input voltage maximum 90 265 Vac Input Frequency 47 63Hz Input current 1 7A maximum at 90 Vac Output vol...

Страница 124: ...ch Mode up to 27 0Vdc maximum OCP Over Current Protection Auto Recovery up to 5 5A maximum OTP Over Temperature Protection to prevent catastrophic failure from overheating Operating Environment Temperature 5 C 35 C 41 F 95 F Humidity 20 80 without condensation Storage Environment Temperature 20 C 65 C 4 F 149 F Humidity 20 80 without condensation ...

Страница 125: ...Chapter 07 Specifications 107 This Page Left Blank Intentionally ...

Страница 126: ......

Страница 127: ......

Страница 128: ...310 782 1201 tel 310 782 1205 fax www tabletkiosk com UG a7400 rev 11 02 12 ...

Отзывы: