background image

Wall Mounting   

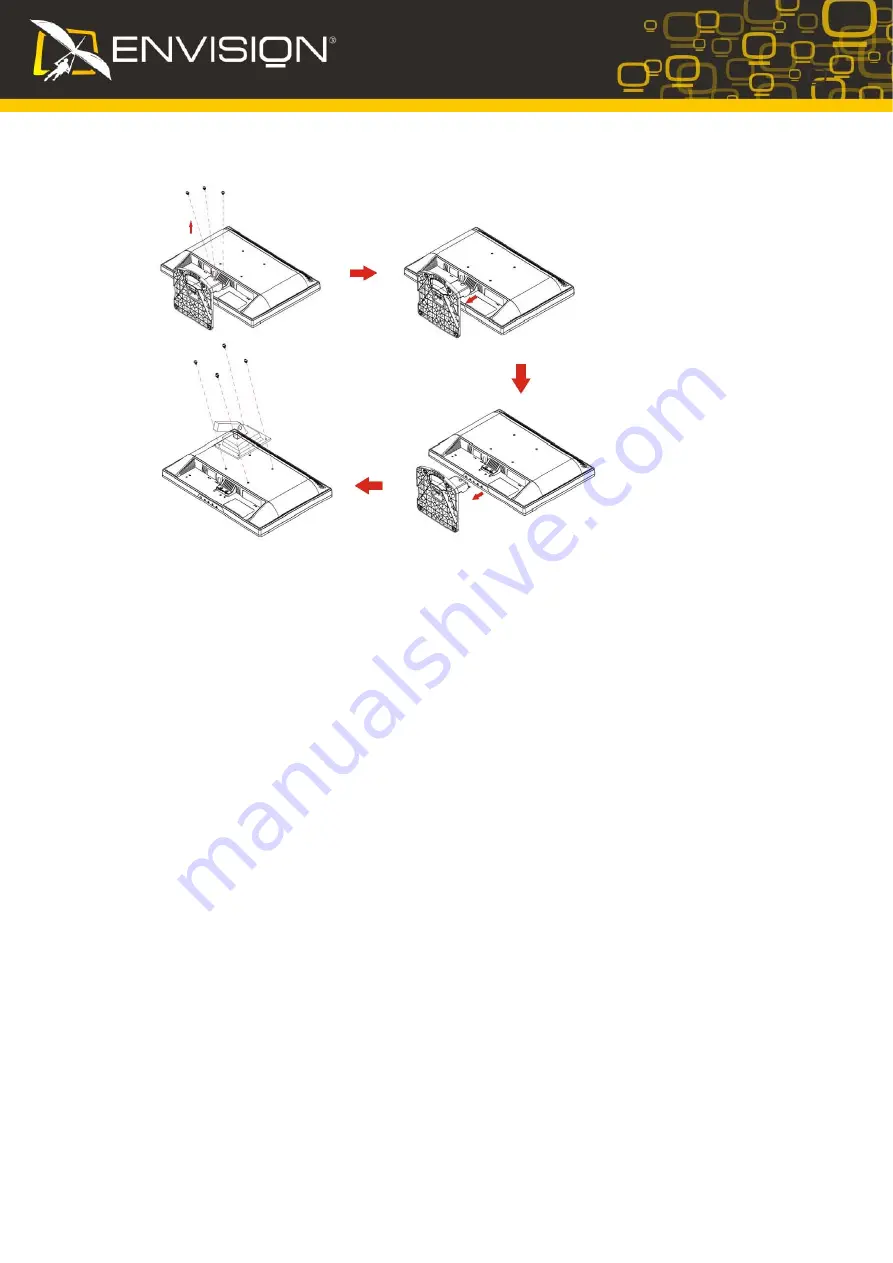
Preparing to Install An Optional Wall Mounting Arm   


This monitor can be attached to a wall mounting arm you purchase separately. Disconnect power before 
this procedure. Follow these steps: 

1.  Remove the base.   
2.  Follow the manufacturer's instructions to assemble the wall mounting arm.   
3.  Place the wall mounting arm onto the back of the monitor. Line up the holes of the arm with the 

holes in the back of the monitor.   

4.  Insert the 4 screws into the holes and tighten.   
5.  Reconnect the cables.   Refer to the user's manual that came with the optional wall mounting 

arm for instructions on attaching it to the wall.   

Noted : 

VESA mounting screw holes are not available for all models, please check with the dealer or 

official department of ENVISION.   

Setting the Optimal Resolution   

The recommended resolution for this monitor is 1440 by 900. To setup the monitor to this resolution, 
follow the steps below. 

1. Click 

START

.  

2. Click 

SETTINGS

.  

3. Click 

CONTROL PANEL

.  

4. Double 

click 

DISPLAY

.  

5. Click 

SETTINGS

.  

6.  Set the resolution 

SLIDE-BAR

 to 1440 by 900.   


6

Содержание H919w+

Страница 1: ...g Angle 4 Attaching the Cables 5 Wall Mounting 6 Setting the Optimal Resolution 6 External Controls 7 OSD Settings 8 Function Control Illustration 9 LED Indicators 12 i Menu software 12 Drivers 13 Technical Support 15 Frequently Asked Questions 15 Product Information 16 Specifications 16 EPA ENERGY STAR 17 Preset Display Modes 17 Pin Assignments 18 Plug and Play 19 ...

Страница 2: ...entions The following subsections describe notational conventions used in this document Notes Cautions and Warnings Throughout this guide blocks of text may be accompanied by an icon and printed in bold type or in italic type These blocks are notes cautions and warnings and they are used as follows NOTE A NOTE indicates important information that helps you make better use of your computer system C...

Страница 3: ...d radio TV technician for help NOTICE 1 The changes or modifications not expressly approved by the party responsible for compliance could void the user s authority to operate the equipment 2 Shielded interface cables and AC power cord if any must be used in order to comply with the emission limits 3 The manufacturer is not responsible for any radio or TV interference caused by unauthorized modific...

Страница 4: ...lied to your home consult your dealer or local power company The monitor is equipped with a three pronged grounded plug a plug with a third grounding pin This plug will fit only into a grounded power outlet as a safety feature If your outlet does not accommodate the three wire plug have an electrician install the correct outlet or use an adapter to ground the appliance safely Do not defeat the saf...

Страница 5: ...to look at the full face of the monitor then adjust the monitor s angle to your own preference Hold the stand so you do not topple the monitor when you change the monitor s angle You are able to adjust the monitor s angle from 5 to 20 NOTE Do not touch the LCD screen when you change the angle It may cause damage or break the LCD screen 4 R R ...

Страница 6: ...t the power cable to the AC port on the back of the monitor 2 Connect one end of the 15 pin D Sub cable to the back of the monitor and connect the other end to the computer s D Sub port If your monitor displays an image installation is complete If it does not display an image see Troubleshooting 5 1 2 R 2 Analog 3 Turn on your monitor and computer ...

Страница 7: ...nitor 4 Insert the 4 screws into the holes and tighten 5 Reconnect the cables Refer to the user s manual that came with the optional wall mounting arm for instructions on attaching it to the wall Noted VESA mounting screw holes are not available for all models please check with the dealer or official department of ENVISION Setting the Optimal Resolution The recommended resolution for this monitor ...

Страница 8: ...d at front panel of the monitor See Figure By changing these settings the picture can be adjusted to your personal preferences The power cord should be connected Press the power button to turn on the monitor The power indicator will light up 1 Auto Exit 2 Eco mode DCR 3 4 3 or wide 4 Menu 5 Power 7 1 2345 ...

Страница 9: ... the OSD press and hold the Menu button while the monitor is off and then press power button to turn the monitor on To un lock the OSD press and hold the Menu button while the monitor is off and then press power button to turn the monitor on Eco Mode and DCR hot key Press the Eco key continuously to select the Eco mode of brightness and DCR on when there is no OSD Eco mode hot key may not be avail...

Страница 10: ... 0 100 Contrast from Digital register Standard Standard Mode Text Text Mode Internet Internet Mode Game Game Mode Movie Movie Mode Eco mode Sports Sports Mode Gamma1 Adjust to Gamma1 Gamma2 Adjust to Gamma 2 Gamma Gamma3 Adjust to Gamma 3 Off Disable dynamic contrast ratio DCR On Enable dynamic contrast ratio 9 ...

Страница 11: ...Digital register Green Green Gain Digital register User Blue Blue Gain from Digital register Color Boost Full Enhance on or off Disable or Enable Full Enhance Mode Nature Skin on or off Disable or Enable Nature Skin Mode Green Field on or off Disable or Enable Green Field Mode Sky blue on or off Disable or Enable Sky blue Mode AutoDetect on or off Disable or Enable AutoDetect Mode Demo on or off D...

Страница 12: ...Position 0 100 Adjust the vertical position of OSD Timeout 5 120 Adjust the OSD Timeout Transparence 0 100 Adjust the transparence of OSD Language Select the OSD language Extra D SUB Select Analog Signal Source as Input Input Select Auto Config yes or no Auto adjust the picture to default Image Ratio wide or 4 3 Select wide or 4 3 format for display DDC CI yes or no Turn ON OFF DDC CI Support Info...

Страница 13: ... Power Mode Green or Blue Active off Mode Orange or red i Menu software Welcome to use i Menu software by ENVISION i Menu makes it easy to adjust your monitor display setting by menus on the screen instead of OSD button on the monitor 12 ...

Страница 14: ...on the Open button then click on the OK button 10 Select your monitor model and click on the Next button 11 Click on the Finish button then the Close button If you can see the Digital Signature Not Found window click on the Yes button Windows ME 1 Start Windows Me 2 Click on the Start button point to Settings and then click on Control Panel 3 Double click on the Display Icon 4 Select the Settings ...

Страница 15: ...d then select the appropriate drive F CD ROM Drive 11 Click on the Open button then click the OK button 12 Select your monitor model and click on the Next button If you can see the has not passed Windows Logo testing to verify its compatibility with Windows XP message please click on the Continue Anyway button 13 Click on the Finish button then the Close button 14 Click on the OK button and then t...

Страница 16: ...r as possible Use the maximum refresh rate your monitor is capable of at the resolution your are using Monitor Is Stuck In Active Off Mode The Computer Power Switch should be in the ON position The Computer Video Card should be snugly seated in its slot Make sure the monitor s video cable is properly connected to the computer Inspect the monitor s video cable and make sure none of the pins are ben...

Страница 17: ... preset resolution 1440 x 900 60 Hz Plug Play VESA DDC2B CI Input Connector D Sub 15pin Input Video Signal Analog 0 7Vp p standard 75 OHM Positive Power Source 100 240VAC 50 60Hz Active 37 W Resolution Power Consumption Standby 1W Connector Type 15 pin Mini D Sub Signal Cable Type Detachable Dimensions Weight Height with base 365mm Width 439mm Depth 190mm Weight monitor only 3 6 kg Physical Charac...

Страница 18: ...75Hz 37 500 75 000 Dos mode 720 400 70Hz 31 469 70 087 SVGA 800 600 56Hz 35 156 56 250 SVGA 800 600 60Hz 37 879 60 317 SVGA 800 600 72Hz 48 077 72 188 SVGA 800 600 75Hz 46 875 75 000 Mac mode 832 624 75Hz 49 725 74 500 XGA 1024 768 60Hz 48 363 60 004 XGA 1024 768 70Hz 56 476 70 069 XGA 1024 768 72Hz 57 500 72 074 XGA 1024 768 75Hz 60 023 75 029 XGA 1024 768 75Hz 60 023 74 927 SXGA 1280 1024 60Hz 6...

Страница 19: ... Pin Number 15 Pin Side of the Signal Cable 1 Video Red 2 Video Green 3 Video Blue 4 Ground 5 Detect Cable 6 GND R 7 GND G 8 GND B 9 5V 10 Ground 11 Ground 12 DDC Serial data 13 H sync 14 V sync 15 DDC Serial clock 18 ...

Страница 20: ...SA DDC STANDARD It allows the monitor to inform the host system of its identity and depending on the level of DDC used communicate additional information about its display capabilities The DDC2B is a bi directional data channel based on the I2 C protocol The host can request EDID information over the DDC2B channel ...

Отзывы: