background image


12 

ADJUSTING THE PICTURE   


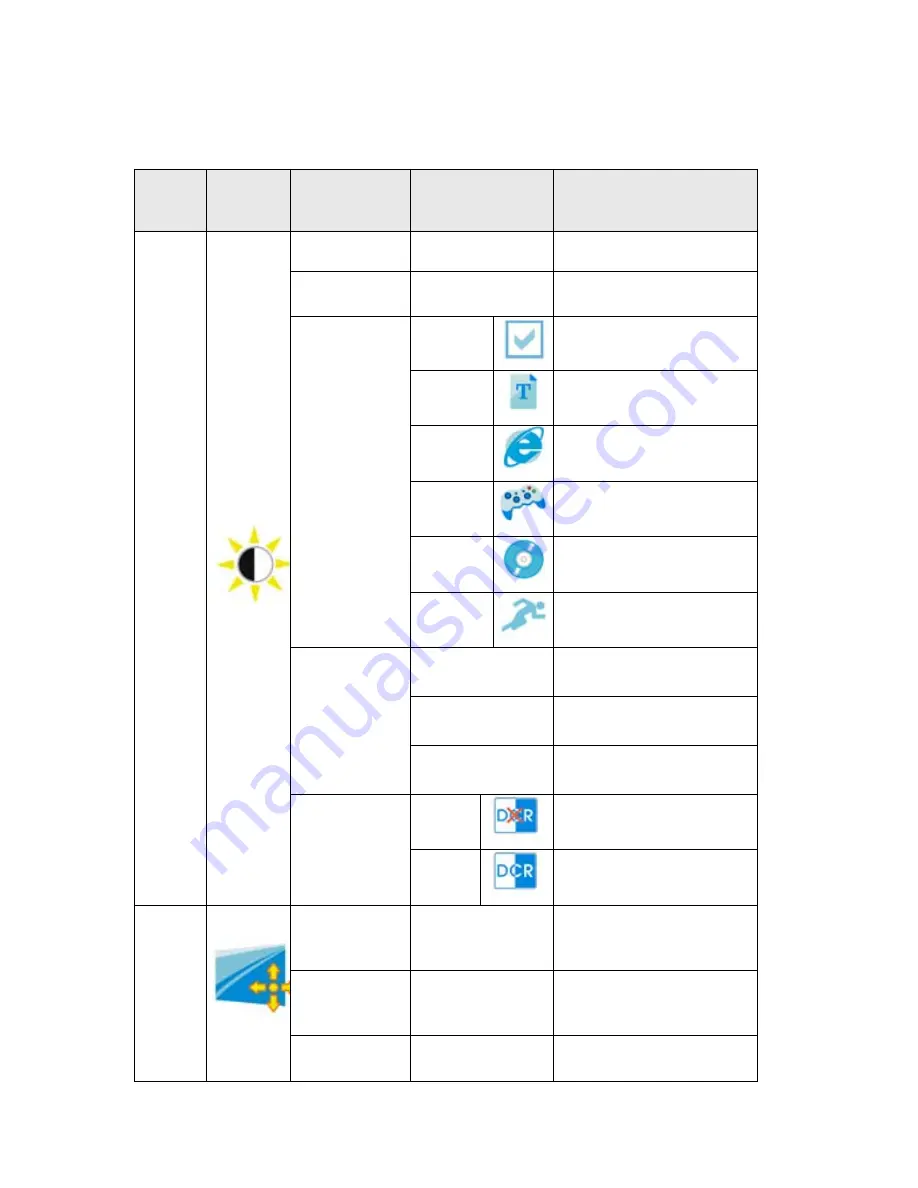
Function Control Illustration 


Main 

 Menu 

 Item 

Main 

Menu 

Icon 

Sub  

Menu 

 Item 

Sub Menu Icon 

Description 


Lumina

nce 


Brightness  

0-100 

Backlight Adjustment  

Contrast  

0-100 

Contrast from Digital-
register. 

Eco Mode 

Standard 


Standard Mode  

Text


Text Mode 

Internet


Internet Mode 

Game


Game Mode 

Movie


Movie Mode 

Sports


Sports Mode 

Gamma 

Gamma1 

Adjust to Gamma1 

Gamma2 

Adjust to Gamma2 

Gamma3 

Adjust to Gamma3 

DCR 

Off


Disable dynamic 
contrast ratio 

On


Enable dynamic contrast 
ratio 


Image 

Setup  


Clock  

0-100 

Adjust picture Clock to 
reduce Vertical-Line 
noise.  

Phase 

0-100 

Adjust Picture Phase to 
reduce Horizontal-Line 
noise  

H.Position 

0-100 

Adjust the horizontal 
position of the picture.  

Содержание G917w

Страница 1: ......

Страница 2: ...NSTRUCTIONS 4 CONTROLS AND CONNECTORS 5 ADJUSTING THE VIEWING ANGLE 6 OPERATING INSTRUCTIONS 7 GENERAL INSTRUCTIONS 7 RONT PANEL CONTROL 8 HOW TO ADJUST A SETTING 10 ADJUSTING THE PICTURE 11 13 PLUG AND PLAY 14 TECHNICAL SUPPORT FAQ 15 ERROR MESSAGE POSSIBLE SOLUTION 16 APPENDIX 17 SPECIFICATIONS 17 18 FACTORY PRESET TIMING TABLE 19 CONNECTOR PIN ASSIGNMENT 19 20 ...

Страница 3: ...Reorient or relocate the receiving antenna 2 Increase the separation between the equipment and receiver 3 Connect the equipment into an outlet on a circuit different from that to which the receiver is connected 4 Consult the dealer or an experienced radio TV technician for help HG Declaration SAFETY Lamp Disposal LAMP S INSIDE THIS PRODUCT CONTAIN MERCURY AND MUST BE RECYCLED OR DISPOSED OF ACCORD...

Страница 4: ...ed to your home consult your dealer or local power company The monitor is equipped with a three pronged grounded plug a plug with a third grounding pin This plug will fit only into a grounded power outlet as a safety feature If your outlet does not accommodate the three wire plug have an electrician install the correct outlet or ground the appliance safely Do not defeat the safety purpose of the g...

Страница 5: ... 0 01 or less such as a missing pixel or a pixel lit all of the time Due to the nature of the LCD screen an afterimage of the previous screen may remain after switching the image when the same image is displayed for hours In this case the screen is recovered slowly by changing the image or turning off the Power Switch for hours BEFORE YOU OPERATE THE MONITOR FEATURES 48 1cm 19 Wide TFT Color LCD M...

Страница 6: ...5 INSTALLATION INSTRUCTIONS Install Remove Figure 1 Installing and Removing the Base ...

Страница 7: ... AND CONNECTORS POWER CORD Connecting the D Sub Cable Connect one end of the 15 pin VGA cable to the back of the monitor and connect the other end to the computer s D Sub port Connect one end of the 24 pin DVI cable o the back of the monitor and connect the other end to the computer s DVI port Connecting the Power Cord Connect the power cord into your LCD monitor s power input socket and then plug...

Страница 8: ...preference Hold the stand so you do not topple the monitor when you change the monitor s angle You are able to adjust the monitor s angle from 5 to 20 Figure 3 NOTES Do not touch the LCD screen when you change the angle It may cause damage or break the LCD screen Careful attention is required not to catch your fingers or hands when you change the angle ...

Страница 9: ...anging these settings the picture can be adjusted to your personal preferences The power cord should be connected Connect the video cable from the monitor to the video card Press the power button to turn on the monitor position The power indicator will light up Figure 4 External Control Button EXTERNAL CONTROLS 1 Eco Mode Up 2 Contrast Left 3 DCR Right 4 Source Auto Exit 5 Power Menu ...

Страница 10: ... key continuously to select the Eco mode of brightness when there is no OSD Eco mode hot key may not be available in all models Power Indicator Blue Power On mode Orange Stand by mode Auto configure hot key 1 Auto configure hot key When the OSD is closed press Auto Source button continuously about 2 second to do auto configure 2 Press the Power button continuously about 2 second to turn off the mo...

Страница 11: ...ion repackage your monitor as it was originally packed at the factory Please make sure to clean the cabinet regularly with the provided cloth Any liquid will cauterize the screen Please make sure to clean the cabinet regularly with the provided cloth you can use soft cleanser to clean the stain instead of severe spray cleanser which will cauterize the monitor cabinet Dont leak liquid into monitor ...

Страница 12: ...con on main OSD then press the Menu Power button 5 Eco Mode hot key Press the Eco key continuously to select the Eco mode of brightness when there is no OSD Eco mode hot key may not be available in all models 6 Contrast adjustment hot key When there is no OSD press Contrast to active Contrast adjustment bar press or to adjust Contrast 7 DCR hot key Press DCR key continuously to active or disable D...

Страница 13: ... Mode Text Text Mode Internet Internet Mode Game Game Mode Movie Movie Mode Sports Sports Mode Gamma Gamma1 Adjust to Gamma1 Gamma2 Adjust to Gamma2 Gamma3 Adjust to Gamma3 DCR Off Disable dynamic contrast ratio On Enable dynamic contrast ratio Image Setup Clock 0 100 Adjust picture Clock to reduce Vertical Line noise Phase 0 100 Adjust Picture Phase to reduce Horizontal Line noise H Position 0 10...

Страница 14: ...able or Enable Full Enhance Mode Nature Skin on or off Disable or Enable Nature Skin Mode Green Field on or off Disable or Enable Green Field Mode Sky blue on or off Disable or Enable Sky blue Mode AutoDetect on or off Disable or Enable AutoDetect Mode Demo on or off Disable or Enable Demo Picture Boost Frame Size 14 100 Adjust Frame Size Brightness 0 100 Adjust Frame Brightness Contrast 0 100 Adj...

Страница 15: ...o Detect input signal DVI Select Digital Sigal Source as Input D SUB Select Analog Sigal Source as Input Auto Config yes or no Auto adjust the picture to default Image Ratio wide or 4 3 Select wide or 4 3 format for display DDC CI yes or no Turn ON OFF DDC CI Support Information Show the information of the main image and sub image source Reset Reset yes or no Reset the menu to default Exit Exit Ex...

Страница 16: ...MUST BE A VIDEO INPUT SIGNAL This monitor meets the Green monitor standards as set by the Video Electronics Standards Association VESA and The Swedish Confederation Employees NUTEK This feature is designed to conserve electrical energy by reducing power consumption when there is no video input signal present When there is no video input signal this monitor following a time out period will automati...

Страница 17: ... Card should be snugly seated in its slot Make sure monitor s video cable is properly connected to the computer Inspect monitor s video cable and make sure none of the pins are bent Make sure computer is operational by hitting the CAPS LOCK key on the keyboard while observing the CAPS LOCK LED The LED should either turn ON or OFF after hitting the CAPS LOCK key Missing one of the primary colors RE...

Страница 18: ...ture has horizontal disturbances in light picture For FOCUS and CLOCK adjustment use dot pattern or win 95 98 shut down mode pattern ERROR MESSAGE POSSIBLE SOLUTION CABLE NOT CONNECTED 1 Check that the signal cable is properly connected If the connector is loose tighten the connector s screws 2 Check the signal cable connection pins for damage INPUT NOT SUPPORT Your computer has been set to unsuit...

Страница 19: ... Resolution 1440X900 60Hz Plug Play VESA DDC2B CI Power Consumption ON Mode 37W OFF Mode 2W Input Connector D Sub 15pin DVI D 24pin Input Video Signal Analog 0 7Vp p standard 75 OHM Positive Digital signal Maximum Screen Size Horizontal 408 24mm Vertical 255 15mm Power Source AC100 240V 47 63Hz Environmental Considerations Operating Temp 0 C to 40 C Storage Temp 20 C to 60 C Operating Humidity 15 ...

Страница 20: ...Eco Mode Up Contrast Left DCR Right Source Auto Exit Power Menu Functions Luminance Image Setup Color Temp Color Boost Picture Boost OSD Setup Extra Reset Exit Power Consumption Maximum 37Watts Regulatory Compliance CE CB RoHS EPA ...

Страница 21: ...24 768 48 363 60 0 1024 768 56 476 70 0 1024 768 60 021 75 0 SXGA 1280 1024 64 00 60 0 1280 1024 80 00 75 0 WXGA 1440 900 55 935 59 8 CONNECTOR PIN ASSIGNMENT 1 5 6 10 11 15 15 Pin Color Display Signal Cable PIN NO DESCRIPTION PIN NO DESCRIPTION 1 Red 9 5V 2 Green 10 Detect Cable 3 Blue 11 Ground 4 N C 12 DDC Serial Data 5 Detect Cable 13 H Sync 6 R Ground 14 V Sync 7 G Ground 15 DDC Serial Clock ...

Страница 22: ...ld 15 GND return for 5V hsync vsync 4 TMDS Data 4 N C 16 Hot Plug Detect 5 TMDS Data 4 N C 17 TMDS Data 0 6 DDC Clock 18 TMDS Data 0 7 DDC Data 19 TMDS Data 0 5 Shield 8 Analogue Vertical Sync N C 20 TMDS Data 5 N C 9 TMDS Data 1 21 TMDS Data 5 N C 10 TMDS Data 1 22 TMDS Clock Shield 11 TMDS Data 1 3 Shield 23 TMDS Clock 12 TMDS Data 3 N C 24 TMDS Clock ...

Отзывы: