


a
SSembLy
anD
i
nStaLLation
of
i
nSeRt
S
uRRounD
p
aneLS
- f
iRepLace
i
nSeRt
:
The trim set for your surround panel must be installed before installing the surround panel onto the unit,
if not already done.
Plug
Installation
i
nStaLLation
anD
R
emovaL
of
c
ontRoL
p
aneL
in
t
he
S
uRRounD
p
aneL
- f
iRepLace
i
nSeRt
:
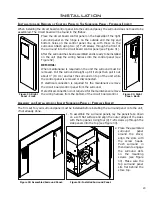
When installing the circuit board control panel into the surround panel, the surround does not need to be
assembled. The circuit board will be found in the firebox.
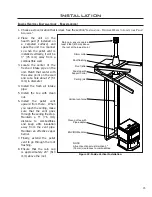
Place the circuit board control panel on the backside of the right
surround panel so the hinge is on the outside and the top and
bottom holes on the control panel line up with those on the
surround. Attach using two (2) T-20 screws through the front of
the surround into the circuit board control panel (see Figure 31).
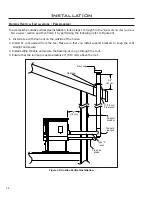
After the surround has been assembled and is ready to be installed
on the unit plug the wiring harness into the control panel (see
Figure 32).
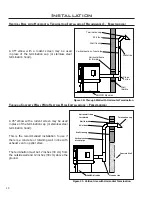
REMOVAL:
When maintenance is required on the unit the surround must be
removed. Pull the surround straight up till it stops then pull it out
about 4” (10 cm) and rest the surround on top of the unit while
the control panel is removed or disconnected.
If electrical connection is required for the maintenance remove
the circuit board control panel from the surround.
If electrical connection is not required for the maintenance remove
the wiring harness from the bottom of the circuit board control.
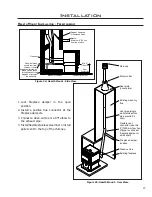
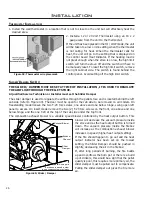
1. To assemble the surround panels, lay the panels face down
on a soft flat surface and align the outer edges of the sides
with the top panel. Using four (4) T-20 screws up through the
side panels into the top (see Figure 33).
Figure 32: Right
Panel - Back.
Figure 31: Right
Panel - Front.
Figure 33: Assembled Surround Panel.
23
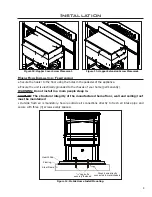
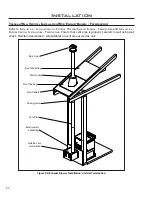
Figure 34: Installed Surround Panel.
2. Place the assembled
surround
panel
around the stove;
align the slots with
the screw heads.
Push surround in
then down to engage
the surround slots
on the mounting
screws (see Figure
34). Make sure the
top surround panel
sits flat behind the
stove top.
Содержание MERIDIAN-1
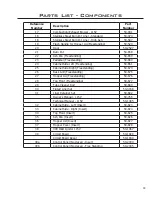
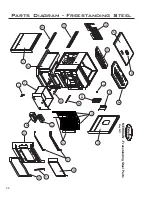
Страница 35: ...35 MERIDIAN Components May 2015 4 11 1 17 6 2 12 7 5 3 39 Parts Diagram Components...
Страница 38: ...38 Notes...