Enviro Alliance EF3 Скачать руководство пользователя страница 4

4

Safety Warnings & Recommendations

CLEANING:

 There will be some build up of fly ash and small amounts of creosote in the exhaust. This 

will vary due to the ash content of the fuel used and the operation of the stove. It is advisable to inspect 

and clean the exhaust vent semi-annually or every two tons of pellets. The appliance, flue gas connector 

and  the  chimney  flue  require  regular  cleaning.  Check  them  for  blockage  prior  to  re-lighting  after  a 

prolonged shut down period.

ASHES:

 Disposed ashes should be placed in a metal container with a tight fitting lid. The closed container 

of ashes should be on a non-combustible surface, well away from all combustible materials pending final 

disposal. If the ashes are disposed of by burial in soil or otherwise locally dispensed, they should be 

retained in the closed container until all cinders have been thoroughly cooled.

IMPORTANT:

 The door and ash drawer cover must be kept closed except during ignition, refueling and 

removal of residue material to prevent fume spillage.

GLASS:

 Do not abuse the glass by striking or slamming the door.  Do not attempt to operate the stove 

with broken glass. The stove uses ceramic glass. Replacement glass must be purchased from an ENVIRO 

dealer.  Do not attempt to open the door and clean the glass while the unit is in operation or if glass is 

hot. To clean the glass, use a soft cotton cloth and mild window cleaner, gas or wood stove glass cleaner, 

or take a damp paper towel and dip into the fly ash. This is a very mild abrasive and will not damage the 

glass.

ELECTRICAL:  The  use  of  a  surge  protected  power  bar  is  recommended. 

The  unit  must  be 

grounded. The grounded electrical cord should be connected to a standard 220-240 volts (1.40-1.57  

Amps), 50 hertz electrical outlet and also must be accessible. If this power cord should become damaged, 

a replacement power cord must be purchased from the manufacturer or a qualified dealer. Be careful 

that the electrical cord is not trapped under the appliance and that it is clear of any hot surfaces or sharp 

edges. This unit’s maximum power requirement is 282-341 watts

OPERATION:

 The door and ash drawer cover must be kept closed securely when the unit is in operation 

to prevent fume spillage and for proper and safe operation of the pellet stove. Also ensure all gaskets on 

the door are checked and replaced when necessary.  

CAUTION: 

When operating during adverse weather, if the unit exhibits dramatic changes in combustion 

stop using the unit immediately. 
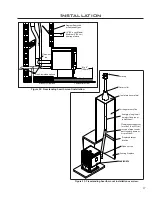
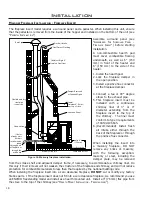
INSTALLATION:

  Contact your local building or fire official to obtain a permit and any information on 

installation restrictions and inspection requirements for your area. All local regulations, including those 

referring to national and European Standards need to be complied with when installing this appliance.

Be sure to maintain the structural integrity of your home when passing a vent through walls, ceilings, or 

roofs. It is recommended that the unit be secured into its position in order to avoid any displacement. This 

appliance must be installed on a floor with an adequate load bearing capacity. If an existing construction 

doesn’t meet these prerequisite, suitable measures (e.g. load distributing plate) shall be taken to achieve 

it.
DO NOT INSTALL A FLUE DAMPER IN THE EXHAUST VENTING SYSTEM OF THIS UNIT.
DO NOT CONNECT THIS UNIT TO A CHIMNEY FLUE SERVING ANOTHER APPLIANCE.

Содержание Alliance EF3

Страница 1: ...ICAL MANUAL Freestanding Fireplace Insert and Built In Heater 50 1767 2008 PLEASE READ THIS ENTIRE MANUAL BEFORE INSTALLATION AND USE OF THIS PELLET BURNING ROOM HEATER FAILURE TO FOLLOW THESE INSTRUCTIONS COULD RESULT IN PROPERTY DAMAGE BODILY INJURY OR EVEN DEATH Contact your building or fire officials about restrictions and installation inspection requirements in your area ...

Страница 2: ...estanding 13 Horizontal Exhaust Through Wall Installation 13 Through Wall With Vertical Rise and Horizontal Termination Installation Freestanding 14 Outside Vertical Installations Freestanding 15 Inside Vertical Installations Freestanding 16 Hearth Mount Installation Freestanding 16 Masonry Fireplace Installation Fireplace Insert 18 Installation For A Built In Heater 19 Installation of Control Pan...

Страница 3: ... a pellet burning appliance If it sounds the alarm correct the cause but do not deactivate You may choose to relocate the smoke detection devise within the room DO NOT REMOVE THE SMOKE DETECTOR FROM THE ROOM CHIMNEY OR RUN AWAY FIRE Call local fire department Close the draft fully Extinguish the fire in the burn pot liner with a cup of water and close the door Examine the flue pipes chimney attic ...

Страница 4: ... power bar is recommended The unit must be grounded The grounded electrical cord should be connected to a standard 220 240 volts 1 40 1 57 Amps 50 hertz electrical outlet and also must be accessible If this power cord should become damaged a replacement power cord must be purchased from the manufacturer or a qualified dealer Be careful that the electrical cord is not trapped under the appliance an...

Страница 5: ...heck is recommended to ensure proper combustion air is admitted to the combustion chamber Setting the proper combustion air is achieved by adjusting the slider damper located on the left side of the stove Minor soot or creosote may accumulate when the stove is operated under incorrect conditions such as an extremely rich burn black tipped lazy orange flames If you have any questions with regards t...

Страница 6: ... air for combustion outside Fresh Air connection is strongly recommended Fresh Air must be connected where required by local codes 7 Do not obtain combustion air from an attic garage or any unventilated space Combustion air may be obtained from a ventilated crawlspace 8 The power cord is 8 feet 2 43 m long and may require a grounded extension cord to reach the nearest electrical outlet Removing Pe...

Страница 7: ...30 1 4 768 mm 23 3 4 603 mm 21 15 16 557 mm 12 11 16 322 mm 23 5 8 600 mm Insert 22 15 16 582 mm Built In 24 5 8 626 mm 21 15 16 557 mm Figure 2 Dimensions of EF3 Freestanding Figure 3 Dimensions of EF3 Fireplace Insert Dimensions Fireplace Insert and Built In Heater ...

Страница 8: ...erature Mean Flue Gas Temperature Mean Flue Gas Temperature Reduced 229 6 C 445 F 212 9 C 415 F 94 1 C 201 F Nominal Heat Output CO emissions from Combustion Energy Efficiency 8 07 KWh 27536 BTU 0 027 88 09 Reduced Heat Output CO emissions from Combustion Reduced Energy Efficiency Reduced 3 08 KWh 10509 BTU 0 019 82 90 CO 2 at Nominal Output Nominal Fuel Consumption Rate Unit with Full Hopper 41 6...

Страница 9: ...ng Clearance to Combustibles Minimum Alcove width 36 inches 91 cm Minimum Alcove height 48 inches 122 cm Maximum Alcove depth 30 inches 76 cm Figure 5 EF3 Freestanding Minimum Alcove Size Clearances to Combustibles Fireplace Insert 10 25 4 cm Mantel 8 20 3 cm 8 20 3 cm Side Wall Floor Protection Minimum 6 15 cm in front of door Figure 6 EF3 Fireplace Insert Clearance to Combustibles Refer to Figur...

Страница 10: ...t In Heater recommended framing Pedestal Installation Install four 4 screws here Figure 8 Freestanding Pedestal Figure 9 Fireplace Insert Pedestal Figure 10 Built In Heater Pedestal Place the unit on its back on the pallet Back the four 4 5 16 hex head screws in the base off three 3 to four 4 full turns Align the keyholes in the pedestal with the screws lock into place Secure the two 2 pieces by t...

Страница 11: ...cessed into walls or siding Installation Vent Termination Requirements IT IS RECOMMENDED THAT YOUR PELLET STOVE BE INSTALLED BY AN AUTHORIZED DEALER INSTALLER Table 2 Use in conjunction with Figure 11 for allowable exterior vent termination locations Letter Minimum Clearance Description A 61cm 24 in Above grass top of plants wood or any other combustible materials B 122 cm 48 in Beside below any d...

Страница 12: ...2 EF3 Freestanding Inlet and Outlet Location Figure 13 EF3 Fireplace Insert Inlet and Outlet Location INSTALL VENT AT CLEARANCES SPECIFIED BY THE VENTING MANUFACTURER 12 Outside Fresh Air Connection Figure 14 Outside Air Connection This Heater must have adequate air for proper combustion in the room that it is installed A Fresh air intake is strongly recommended for all installations Failure to in...

Страница 13: ...nstructions for correct hole size and clearance to combustibles 5 Install the wall thimble as per the instructions written on the thimble Maintain an effective vapour barrier in accordance with local building codes Horizontal Exhaust Through Wall Installation Vent installation install vent at clearances specified by the vent manufacturer A chimney connector shall not pass through an attic or roof ...

Страница 14: ...d there are no trees plants etc within several feet a 45 elbow can be used as termination The elbow must be turned down to prevent rain from entering NOTE It is recommended that horizontal through wall installations have 3 to 5 feet 91 to 152 cm of vertical pipe in the system to help naturally draft the unit in the event of extreme weather or a power outage Some horizontal through wall installatio...

Страница 15: ...mbustible 6 15cm Rain cap Flashing 24 61cm 1 2 5cm Tee with cleanout Fresh air intake 3 7 5cm Clearance Support bracket Type L vent Figure 20 Outside Vertical Installation To accomplish a outside vertical pipe installation follow steps 1 through 5 in the Inside Vertical Installations Freestanding section and then finish it by performing the following refer to Figure 20 1 Install a tee with clean o...

Страница 16: ...le about 1 41 mm in diameter 5 Install the fresh air intake pipe 6 Install the tee with clean out 7 Install the pellet vent upward from there When you reach the ceiling make sure that the vent goes through the ceiling fire stop Maintain a 3 7 6 cm distance to combustibles and keep attic insulation away from the vent pipe Maintain an effective vapor barrier 8 Finally extend the pellet vent to go th...

Страница 17: ...igure 22 Freestanding hearth mount installation Rain cap Storm collar Seal plate cover plate Existing masonry flue Vent pipe single wall stainless flex pipe or solid PL vent Fireplace damper location Clean out tee Existing fireplace ENVIRO EF3 Flexible vent connector use this 5 foot 152cm section of pipe to vent past fireplace damper or small shelf Figure 23 Freestanding hearth mount installation ...

Страница 18: ... 4 Connect a tee or 90 degree elbow to the exhaust pipe 5 This fireplace insert must be installed with a continuous chimney liner of 3 or 4 diameter extending from the fireplace insert to the top of the chimney The liner must conform to type 3 requirements of CAN ULC S635 6 Recommended Install fresh air intake either through the back of the fireplace or through the positive flue connector When ins...

Страница 19: ...es not need to be assembled The control board will be found in behind the firebox Place the control panel on the backside of the right surround panel so the hinge is on the outside and the top and bottom holes on the control panel line up with those on the surround Attach using two 2 T 20 screws through the front of the surround into the circuit board control panel After the surround has been asse...

Страница 20: ... Insert each side panel anchor bolt through the top panel into the corresponding side panel holes and tighten using a 7 16 wench or socket refer to Figure 32 20 each hole and tighten just enough to keep the trim against the surround refer to Figure 30 REMOVAL When maintenance is required on the unit the surround must be removed Follow steps 4 through 7 in reverse order The side panel can remain at...

Страница 21: ...locking nut on rod Place lock nut and tighten Non locking nut Slider Side panel Push through the side Rod through panel Figure 35 Slider damper assembly Installation Thermostat Installation 1 Install the wall thermostat millivolt rated thermostat recommended or a 12 24 Volt rated thermostat set to millivolts in a location that is not too close to the unit but will effectively heat the desired area...

Страница 22: ... requires more primary air the slider damper must be pulled out to compensate Pulling the slider damper out gives the fire more air The easiest way to make sure that an efficient flame is achieved is to understand the characteristics of the fire A tall lazy flame with dark orange tips requires more air Open slider pull out slightly A short brisk flame like a blowtorch has too much air Close slider...

Страница 23: ...art contact your local service dealer for service 2 The stove will not operate when hot Check the Heat Level Indicator if a fire is not detected or if the fire has gone out the 3 light will flash because the Exhaust Temperature Sensor s contacts have opened Check the hopper for fuel Incorrect air damper setting Excessive air may consume the fire too quickly before the next drop of fuel leaving com...

Страница 24: ...mage to gray wires between Circuit Board and Vacuum Switch Inspect wires and connectors Combustion Blower failure The Combustion Blower is not turning fast enough to generate the proper vacuum in the Exhaust Channel Visual Check is the blower motor turning Check the Exhaust Blower voltage across the blower wires 220V on 5 setting and 165V on 1 setting Replace the Circuit Board if the Voltage readi...

Страница 25: ... of the unit When the units system light becomes solid then control of the unit is given back to the operator If there is no control of the Heat Level button make sure the Thermostat Timer is calling for heat Call your local dealer for service 10 The stove keeps going out If the stove goes out and leaves fresh unburned pellets or cigarette like ashes in the burn pot liner the fire is going out bef...

Страница 26: ...e Yellow Yellow Grey Grey Grey Grey Purple Purple Blue 115V Black 220V Brown Black Black Black Blue Black Armor Cable Supplied Vacuum Switch Combustion Blower Optional Exterior Exhaust Blower Power Cord Ground Ignitor Exhaust Temperature Sensor 5 Amp Fuse High Limit Temperature Sensor Convection Blower Auger Motor Common Hot Thermostat Convection Temperature Sensor ...

Страница 27: ...sor 160 F 71 C EF 013 5 High Limit Temperature Sensor 200 F 93 C Manual Reset EF 016 6 Vacuum Switch 220V EF 017 220V Silicone Hose EF 018 Aluminum Hose Barb EF 019 7 Ignition Burn Pot EF 021 8 Auger EF 025 9 Auger Brass Bushing Plate EF 026 10 Door Handle Complete EF 028 Door Handle Hardware Only EF 029 11 Firebox Liner With Insulation EF 047 Heat Exchanger Rod With Knob EF 051 Door Gasket 7 2 1 ...

Страница 28: ... 20 Ash Sill EF 121 21 FPI BIH Hopper Cover EF 122 22 Front Grill EF 123 Shoulder Bolt Hardened Bush Nut Set of 2 EF 124 Firebox Ceramic Wool Insulation EF 126 23 Steel Brick Lining EF 129 24 Freestanding Right Cabinet Side EF 133 25 Freestanding Left Cabinet Side EF 134 26 Freestanding Pedestal Complete EF 139 Ignitor Tube Only EF 140 27 Freestanding Hopper Lid Hinge EF 141 28 Freestanding Hopper...

Страница 29: ...ion Blower Exhaust Tube 50 327 Firebox Liner Top Rod 50 591 39 Door Assembly 50 602 40 Door Hinge Bracket 50 604 41 IEC Power Cord Inlet Socket 50 713 42 Fireplace Insert Cabinet Side Right 50 751 43 Fireplace Insert Cabinet Side Left 50 752 Glass Extrusions Set of 2 50 767 44 300 Watt Ignitor 220V 50 829 45 Circuit Board 5 Amp Fuses 220V Pair 50 834 46 Exhaust Blower Assembly 220V 50 900 Wiring H...

Страница 30: ...re Trim Painted 50 600 52 Regular Surround Panel Black Trim 50 100 Regular Trim Only Black 50 117 Regular Trim Only Brass EF 091 Regular Trim Only Nickel 50 129 53 Oversized Surround Panel Black Trim 50 101 Oversized Trim Only Black 50 119 Oversized Trim Only Brass EC 052 Oversized Trim Only Nickel 50 131 54 Built In Heater Surround Panel Black Trim EF 077A Built In Heater Trim Only Black 50 118 B...

Страница 31: ...31 Parts Diagram Components EF3 Circuit Board 220V Components January 2008 5 44 3 14 4 46 1 38 6 8 9 2 41 48 49 47 45 36 ...

Страница 32: ...Parts Diagram Steel 32 EF3 Circuit Board 220V Steel Components January 2008 54 53 52 16 34 15 21 29 28 25 43 40 17 26 30 13 31 7 37 51 39 10 22 20 33 23 11 42 24 29 28 50 18 19 12 27 32 34 ...

Страница 33: ...___ MODEL ___________________________________ SERIAL NUMBER ___________________________ DATE OF PURCHASE _____________ dd mm yyyy DATE OF INSTALLATION ___________ dd mm yyyy MAGNEHELIC AT INSTALL ___________________ INSTALLER S SIGNATURE _________________________________________ NAME OF INSTALLER _________________________________________ ADDRESS _________________________________________ __________...

Отзывы: