background image

5

Alle teksten en afbeeldingen in deze handleiding zijn auteursrechtelijk beschermd en intellectueel eigendom van ENTRYA BVBA.

Tous les textes et images dans ce manuel sont protégés par le droit d’auteur et la propriété intellectuelle d’ENTRYA BVBA.

All texts and images in this manual are protected by copyright laws and intellectual property of ENTRYA BVBA.


Installation Warnings


Installatie


Installation


Installation

• 

Only use the device in dry, closed spaces and not in locations that have explosion hazards.

• 

Never install the device next to or above a heater.

• 

The device may never be flush mounted without sufficient ventilation, do not cover the openings 

on the back of the device.

• 

Do not install the device in direct sunlight.

• 

Protect the device against vibrations and dropping.

• 

Video and audio may be influenced if the wiring is to close to an electromagnetic field. 


For example: microwave, TV, computer, ...

• 

Device must be protected against moist, high temperatures, dust and acids.

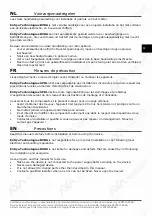
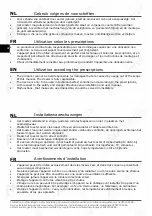
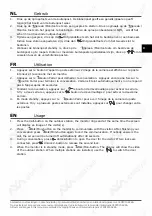
1.  Bevestig de bodemplaat met geschikte schroeven tegen de muur. Breng de kabel door de  

kabeldoorvoer en sluit aan op de connector.

2.  Haak het frontpaneel in de linkerzijde van de bodemplaat.

3.  Draai het ingehaakt frontpaneel tot het klikt in de bodemplaat.

Ga verder met het instellen van het adres (p.11), instellen van de eindweerstand (p.12) en de 

MASTER/SLAVE configuratie (p.12-13).

1. 

Fixez la plaque de fond avec les vis. Connectez le câble pour le BUS à le connecteur.

2. 

Accrochez le panneau avant  dans le coté gauche de la plaque de fond.

3. 

Cliquez le panneau avant avec un mouvement de rotation dans la plaque de fond.

Continuez avec l’adressage (p.11), la résistance de terminaison (p.12) et la configuration MAÎTRE/

ESCLAVE (p.12-13).

1.  Fix the bottom cover on the wall with screws. Connect the cable to the connector in the bottom 

cover.

2.  Hook the front cover in the left side of the bottom cover.

3.  Turn the hooked front panel until it clicks into the bottom cover.

Continue with setting the address (p.11), the terminal switch (p.12) and the MASTER/SLAVE 

configuration (p.12-13).

EN

NL 

FR 

EN

1

2

3

Содержание FACILA FP135

Страница 1: ...FACILA FP135 Binnenpost FP135 Poste int rieure FP135 Monitor Installatie en gebruikershandleiding Mode d emploi et installation Installation and user manual...

Страница 2: ...Installation Warnings 4 5 Installatie Installation Installation 5 Omschrijving Description Description 6 7 Hoofdmenu Menu principal Main menu 8 Gebruik Utilisation Usage 9 Intercom Interphone Intercom...

Страница 3: ...d installer ou d utiliser les appareils Entrya Technologies SPRL n est pas responsable des installations incorrectes ni du non respect des prescriptions locales en mati re d lectricit et de construct...

Страница 4: ...scope of this manual The dealer is fully responsible The device is only to be used in technical perfect condition and according to the prescriptions with respect to the safety and danger directives a...

Страница 5: ...against moist high temperatures dust and acids 1 Bevestig de bodemplaat met geschikte schroeven tegen de muur Breng de kabel door de kabeldoorvoer en sluit aan op de connector 2 Haak het frontpaneel...

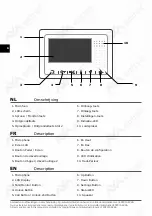
Страница 6: ...chrijving Description Description NL FR EN 1 Microfoon 6 Omhoog toets 2 LCD scherm 7 Omlaag toets 3 Spreek Monitor toets 8 Instellingen toets 4 Ontgrendeltoets 9 Indicatie LED 5 Oproeptoets Ontgrendel...

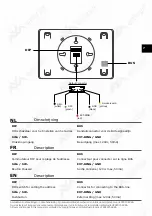
Страница 7: ...ption Description NL FR EN DIP BUS DIP schakelaar voor het instellen van het adres Aansluitconnector voor de BUS signaallijn SW SW EXT RING GND Drukknop ingang Bel uitgang max 12Vdc 50mA DIP BUS Commu...

Страница 8: ...FR EN Druk op Instelling Pijl Omhoog of Omlaag om het hoofdmenu op te roepen 1 Monitor Beeld van de buitenpost oproepen 2 Licht Trapverlichting bedienen in combinatie met DT210 A module 3 Intercom In...

Страница 9: ...ld van de buitenpost weer 2 Druk op de Spreek Monitor toets om een gesprek te starten Druk nogmaals op de Spreek Monitor toets om het gesprek te be indigen Indien de oproep onbeantwoord blijft wordt h...

Страница 10: ...deux postes int rieurs dans le m me installation 1 En mode Standby appuyez sur le bouton R glage pour ouvrir le menu principal 2 Appuyez sur le bouton d Appel pour ouvrir le menu Interphone 3 Appuyez...

Страница 11: ...Ma tre ou Esclave Configurez correctement les commutateurs DIP l aide du tableau suivant All monitors require an address All monitors in the same appartement receive the same address and need to be c...

Страница 12: ...e pijltjes en druk op de Oproeptoets om te bevestigen Stel met code 8006 in dat het beeld van de buitenpost wordt weergegeven op de SLAVE monitor standaard is dit niet actief S il y a plusieurs postes...

Страница 13: ...1x Oproep Buitenpost of 2x Intercom Oproep op de Insteltoets om te selecteren 3 Gebruik de pijltjestoetsen om een beltoon te kiezen 1 In Standby modus druk op de Insteltoets 2 Druk 3x op de Insteltoet...

Страница 14: ...tionner les fonctions 3 Adaptez les valeurs avec les fl ches During a call or monitoring it is possible to change the contrast brightness saturation and talking volume 1 During a call monitoring press...

Страница 15: ...images in this manual are protected by copyright laws and intellectual property of ENTRYA BVBA Eigenschappen Sp cifications Specifications NL FR EN Spanning Power Supply Tension DC 20 28V Stroomverbru...

Страница 16: ...ion menu 2 Choose in the table below the desired function 3 Press the Call button to confirm Extra functies Fonctions suppl mentaires Extra functions NL FR EN Code 2419 Reset naar Fabrieksinstellingen...

Отзывы: