background image

Pr

oduc

t M

anu

al

Pr

oduc

t M

anu

al

Ka

M

ai

 H

ybrid

 t

V Media

 Pla

yer

Ka

M

ai

 H

ybrid
 t

V Media

 Pla

yer

5

4

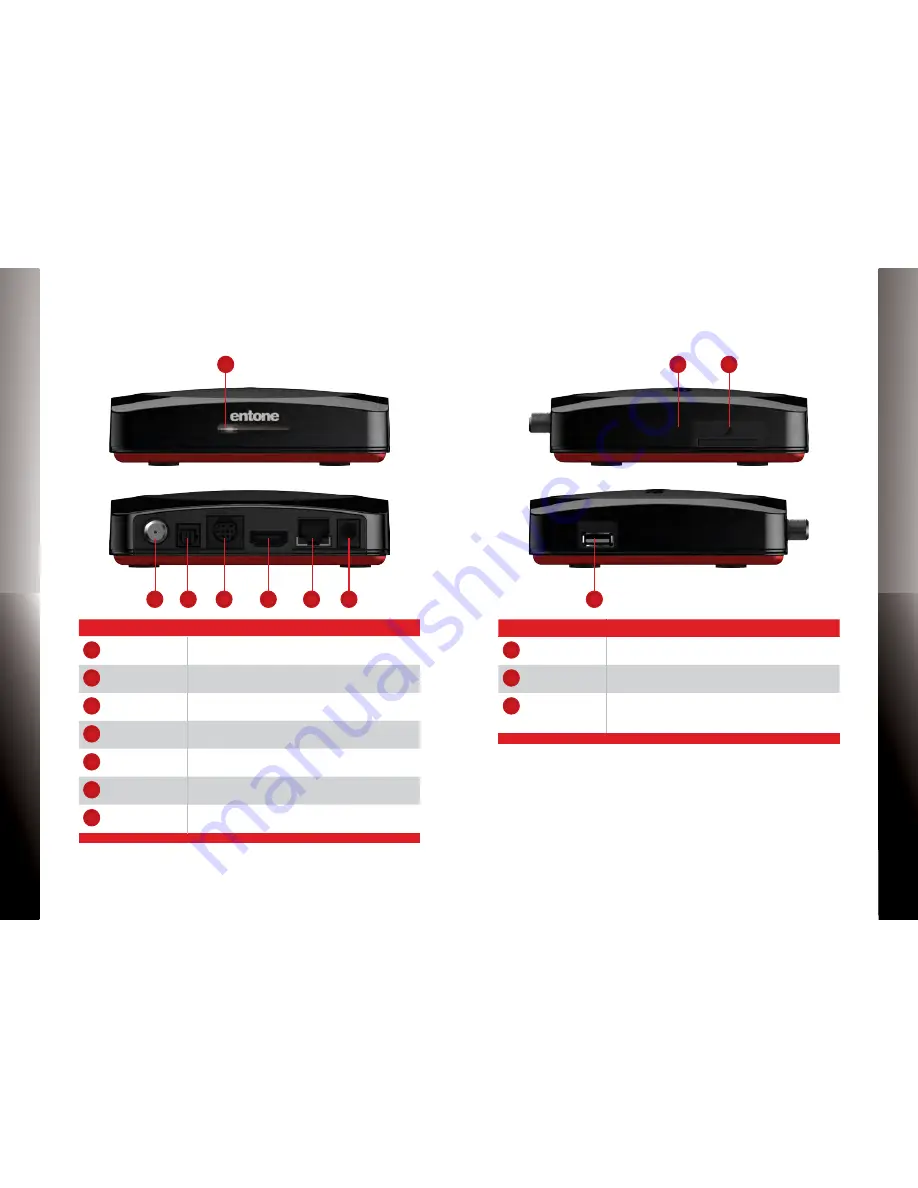
Kamai — Front and rear Panel

Name

Description

1

Power indicator

Solid blue indicates the unit is on

Flashing blue indicates the unit is starting up

2

antenna/cable 

connector

iec/F port for connecting to cable / antenna source

(tuner is optional item)

3

digital audio

S/PdiF digital optical audio toSlinK output

4

Sd Video

9-Pin din conector for connecting to video output us-

ing din-to-rca cable

5

HdMi

digital video and audio port for connecting to a high-

definition tV (HdtV)

6

ethernet

rJ45 plug for connecting to adSl modem or network 

access equipment

7

Power

dc power jack (100-240V, output 12V/1a)

Kamai — Side Panel

Name

Description

1

Factory reset

reset the device to factory settings with a thin metal 

probe

2

Sd card reader

Sd Memory card reader

For accessing media on an Sd memory card

3

uSb

to connect uSb devices such as uSb Flash drive and 

external Hard drive

(max 500ma load)

3

3

4

5

7

6

1

2

2

1

availability of certain features is dependent on your service provider.

availability of certain features is dependent on your service provider.

Содержание Kamai 500 Series

Страница 1: ...Kamai Hybrid TV Media Player 500 Series Product Manual ...

Страница 2: ... Home are trademarks of Entone Inc All other trademarks or registered trademarks belong to their respective owners CHANGES The material in this document is for information only and is subject to change without notice While rea sonable efforts have been made in the preparation of this document to assure its accuracy Entone Inc assumes no liability resulting from the use of the information contained...

Страница 3: ...ntrol Guide Kamai Hybrid TV Media Player Ethernet Cable Optional HDMI Cable Optional Additional items that may be required not included Ethernet Cable HDMI Cable RF Coaxial Cable Digital Audio Cable Network Router AC Power Adapter DIN to RCA Cable The Remote Control may vary and is dependent on your service provider The AC Power Adapter may vary and is dependent on your service provider ...

Страница 4: ... DIN to RCA cable 5 HDMI Digital video and audio port for connecting to a high definition TV HDTV 6 Ethernet RJ45 plug for connecting to ADSL modem or network access equipment 7 Power DC power jack 100 240V Output 12V 1A Kamai Side Panel Name Description 1 Factory Reset Reset the device to factory settings with a thin metal probe 2 SD Card Reader SD Memory Card Reader For accessing media on an SD ...

Страница 5: ...o the HDMI IN port on your TV This con nection provides both video and audio so you do not need a separate audio connection Proceed to Connecting TV Source on page 10 Option 2 Composite Video Use the DIN to RCA cable provided and connect the yellow cable to the yellow VIDEO IN port on your TV Then proceed to the next step Con necting Audio to connect the red white cables If you have already select...

Страница 6: ... video con nection then skip this audio section and proceed to Connect ing TV Source Option 1 Stereo Use the DIN to RCA cable provided and connect the red white cables to the AUDIO IN port on your TV Cable not included Option 2 Surround Sound If your TV is connected to an A V Receiver that supports Dolby Digital 5 1 Surround Sound use a digital audio cable sold separately to connect Kamai to the O...

Страница 7: ...our service provider for more details Cable not included Step 4 Connecting Network Select from one of the following networking options Option 1 Wireless Connect your Kamai to a Wireless Network Router or Access Point Note Internal Wi Fi is an optional feature for Kamai Contact your service provider for more details and instructions about the wireless network configuration Option 2 Connect an Ether...

Страница 8: ...ing the and marks on the batteries with the interior of the remote control 3 Snap on the battery cover to close Note Refer to the Remote Control Guide for more details about other remote control features Connecting to Power Source 1 Connect the power cord to the POWER port on the back of the Kamai 2 Plug the AC power adapter to a power outlet 3 Follow the on screen instructions NOTE Make sure your...

Страница 9: ...or service marks of others All information contained in this document is subject to change without notice Information contained in this document is provided on an as is basis In no event will Entone be liable for damages arising directly or indirectly from any use of the information contained in this document Subject to change without notice ...

Отзывы: