background image

Содержание SD 1

Страница 1: ...Music PRODUCTION SYNTH ...

Страница 2: ...with all local codes and ordi nances DANGER Improper connection of the equipment grounding conductor can result in the risk of electric shock Check with a qualified electrician or service personnel if you are in doubt as to whether the product is properly grounded Do not modify the plug provided with this product if it will not fit the outlet have a proper outlet installed by a qualified electrici...

Страница 3: ...lensonia I SD 1 Music Production Synthesizer Musician s Manual Version 1 0 ...

Страница 4: ... with the specifications in Subpart I of Part 15 of FCC rules which are designed to provide reasonable protection against such interference in a residential installation However there is no guarantee that interference will not occur in a particular installation if this equipment does cause interference to radio or television reception which can be determined by turning the equipment off and on the...

Страница 5: ...12 Section 2 Playing Sounds and Presets Program Memory 2 I Bank Buttons 2 2 Selecting a Sound 2 2 Choosing Internal ROM 0 ROM 1 and Cartridge Sounds 2 2 Layering Stacking a Sound with the Selected Sound 2 3 Primary Sound vs Layered Sounds 2 3 About Tracks 2 4 Preset Mode vs Sequencer Mode 2 4 About Presets 2 5 Preset Memory 2 6 Selecting Presets 2 6 Editing a Preset 2 7 Saving a Preset 2 8 Avoidin...

Страница 6: ... Sequence or Song 5 6 Playing Sequences and Songs 5 6 Sequencer Tracks 5 7 Replacing the Program on a Track 5 8 Layering Programs on The Tracks Pages 5 8 Sequencer Tracks and the Performance Parameters 5 Copying a Preset into 3 Sequencer Tracks 5 10 Creating a New Sequence or Song 5 11 Erasing All Sequencer Memory 5 12 Click Page 5 13 Seq Control Page 5 14 Using Multi Track Record 5 16 STEP ENTRY ...

Страница 7: ... Voices and Polyphony 7 2 Patch Select Buttons 7 2 Compare Using the Compare Button LED 7 3 Edit Buffer 7 3 Abandoning Your Edits 7 3 Select Voice Page 7 4 Group Edit Mode 7 S Programming the Patch Selects 7 6 Program Control Page 7 7 Write Page Saving a New Program into Memory 7 9 Section 8 Voice Programming SD 1 Voice Configuration 8 1 Modulators 8 3 About Modulation 8 3 Selecting a Modulator 8 ...

Страница 8: ...om one program to another 10 5 Copying all parameters from one voice to another 10 5 Copying a complete program to a new location 10 6 Making a copy of the compare buffer 10 6 Collecting parts from several sources into the copy buffer 10 6 Section 11 Storage Functions Disk Storage Using the Disk Drive to Save and Load Data 11 2 SD 1 Disk File Types 11 2 Disk Capacity Bytes Blocks and Files 11 3 Fi...

Страница 9: ...ack Edit Functions 12 10 Edit Track Range Page Setting the Time and Key Range 12 10 Track Edit Functions 12 11 Section 13 Sequencer Applications Using the SD 1 with a Drum Machine 13 1 Song Position Pointers 13 2 MIDI Song Selects 13 2 MIDI Controller Tricks Creating Template Sequences 13 2 MULTI Mode Receiving on up to 12 MIDI channels 13 4 A Few Important Points About Multi Mode 13 4 Using the S...

Страница 10: ...Table of Contents SD 1 Musician s Manual Table of Contents 6 ...

Страница 11: ...e The first thing the SD 1 does when it starts up is calibrate the keyboard Be sure not to touch the keyboard while the display reads CALIBRATING KEYBOARD DO NOT TOUCH Power Grounding Information Like many modern electrical devices your ENSONIQ product has a three prong power cord with earth ground to ensure safe operation Some products have power cords with only two prongs and no earth ground To ...

Страница 12: ...trips with built in surge spike suppressors for little more than the cost of unprotected power strips so using one is a good investment for all your electronic equipment A Line Conditioner This is the best but by far the more expensive way to protect your gear In addition to protecting against surges and spikes a line conditioner guards the equipment against excessively high or low line voltages I...

Страница 13: ...nes plug the phones into the rear panel jack marked Phones If you re running the SD 1 through a mixer in stereo be sure to pan the Left input fully left and the Right input fully right 11 1 1 EEE EEE EEEE r 1 us MMMMMMMMM 1111111111uumaullfiliwillual It is a good idea to make sure your audio system is turned off or down when making connections to avoid damaging speakers or other components Warning...

Страница 14: ...wer up the individual components before turning on the amplifier in your home stereo system you should first turn on the MIDI data transmiting source keyboards modules etc before you power up the receiving MIDI source This will prevent any unwanted MIDI information from being spit out of the transmitting source during power up which could confuse the MIDI recievers thereby disabling them If this s...

Страница 15: ...rs within the SD 1 The pedal gives you a handy alternative modulation source when for example you would want to use the mod wheel but both hands are busy A CV pedal plugged into this jack can also act a volume pedal controlling the overall volume level of the SD 1 A parameter on the Master page press Master then underline PEDAL MODNOL determines whether the CV pedal will act as a modulator or as a...

Страница 16: ... 1 itself does not go to this jack the Thru jack merely echoes what comes in at the MIDI hi jack Data Entry Communicating with the SD 1 Almost everything you do on the SD 1 whether it s selecting a sound editing that sound adjusting the tuning etc is controlled from the front panel using the following controls The 80 character fluorescent display The six soft buttons directly above and below the d...

Страница 17: ...ny capabilities It is likely that you have already encountered some form of parametric programming on other synthesizers What this means is that instead of having a separate knob or slider for each function you have one master Data Entry Slider and two arrow buttons which adjust the value of whichever parameter you select This approach has many advantages the most obvious of which is that it great...

Страница 18: ...t quickly will cause the parameter to jump to the absolute value which corresponds to the position of the slider Pressing the up and down arrow buttons will increase or decrease the value one step at a time Continuing to hold down either button will cause it to accelerate and run quickly through the values There is a quick way to center or zero out the value of any parameter which has a center val...

Страница 19: ... page for global bend range and on the Program Control page for setting an individual program s bend range separately MODULATION WHEEL Perhaps the most common use of the Mod Wheel is to add vibrato but it can also be assigned as a modulator anywhere within the SD 1 voice architecture to alter the pitch brightness volume and a great many other aspects of the sound Among the other controllers which ...

Страница 20: ...in unaffected Each preset or sequencer track can be programmed to generate Poly Key pressure channel pressure or none at all If you wish to change the pressure type for a given track you can do so on the second sub page of the Patch Select page in the Performance section of the SD 1 See Section 3 for more details Note that Poly Key pressure generates a tremendous amount of data and will consume se...

Страница 21: ...alize the unit When to Reinitialize If your SD 1 begins to behave in peculiar ways if the display shows words or lines that shouldn t be there if you start getting unexplained System Error messages if the sequencer and edit functions start doing unpredictable things try reinitializing the SD I before you seek factory service Warning When you reinitialize your SD 1 all your current internal sounds ...

Страница 22: ...e Cartridge For storing the programs and presets you create or edit Programs and presets can be saved to the Stor Cart 32 just like the internal memory The 60 programs and 20 presets in the program cartridge combined with the internal RAM and ROM give you 240 programs and 80 presets instantly available for performance VPC 100 Series ROM Cartridges Containing 60 factory programmed sounds and 20 pre...

Страница 23: ...ORMANCE REAL TIME TECHNIQUES Jeff Pressing SYNTHESIZER BASICS Dean Friedman MUSIC TECHNOLOGY H P Newquist A SYNTHESIST S GUIDE TO ACOUSTIC INSTRUMENTS Howard Massey Alexander Publishing For prices and additional information call 1 800 633 1123 MIDI 1991 HOW MIDI WORKS Dan Walker MURPHY S LAW MIDI BOOK Jeff Burger SAMPLING SAMPLING BASICS Bobby Maestas EPS SAMPLING BOOK Bobby Maestas SEQUENCING SEQ...

Страница 24: ...sounds as Programs In this manual we will use the words program and sound interchangeably to describe SD 1 programs The SD 1 gives you access to up to 240 different sounds at any time INT 60 sounds are stored in the SD 1 Internal Memory RAM ROM Read Only Memory Another 120 sounds are permanently stored in its ROM Memory Like the INT sounds the RMO and RM1 sounds are contained within the SD 1 but u...

Страница 25: ... sounds The status of the BankSet LED whether it is off on or flashing along with the display tells you where you are at any given time Press Sounds Then Hint To select internal sounds the BankSet LED should be off unlit If it is on or flashing press BankSet until it is off The display indicates INT followed by the bank in the upper left corner To select ROM 0 sounds press the BankSet button again...

Страница 26: ...ner of the display shows CRT plus the bank number 0 9 Once you have selected INT RMO RMI or CRT select a sound using the ten bank buttons and the six soft buttons above and below the display as shown previously Layering Stacking a Sound with the Selected Sound To layer or stack any program with the currently selected program double click the soft button corresponding to the sound name on the displ...

Страница 27: ...al instruments can respond to inbound information from such sequencers on multiple channels with each channel responding to a track from the sequencer When the SD 1 is used as a multi timbral sound generator played from its own sequencer the various tracks of the sequencer control the sounds played by the SD 1 Similarly the sequencer or the keyboard of the SD 1 can be used to send on MIDI channels...

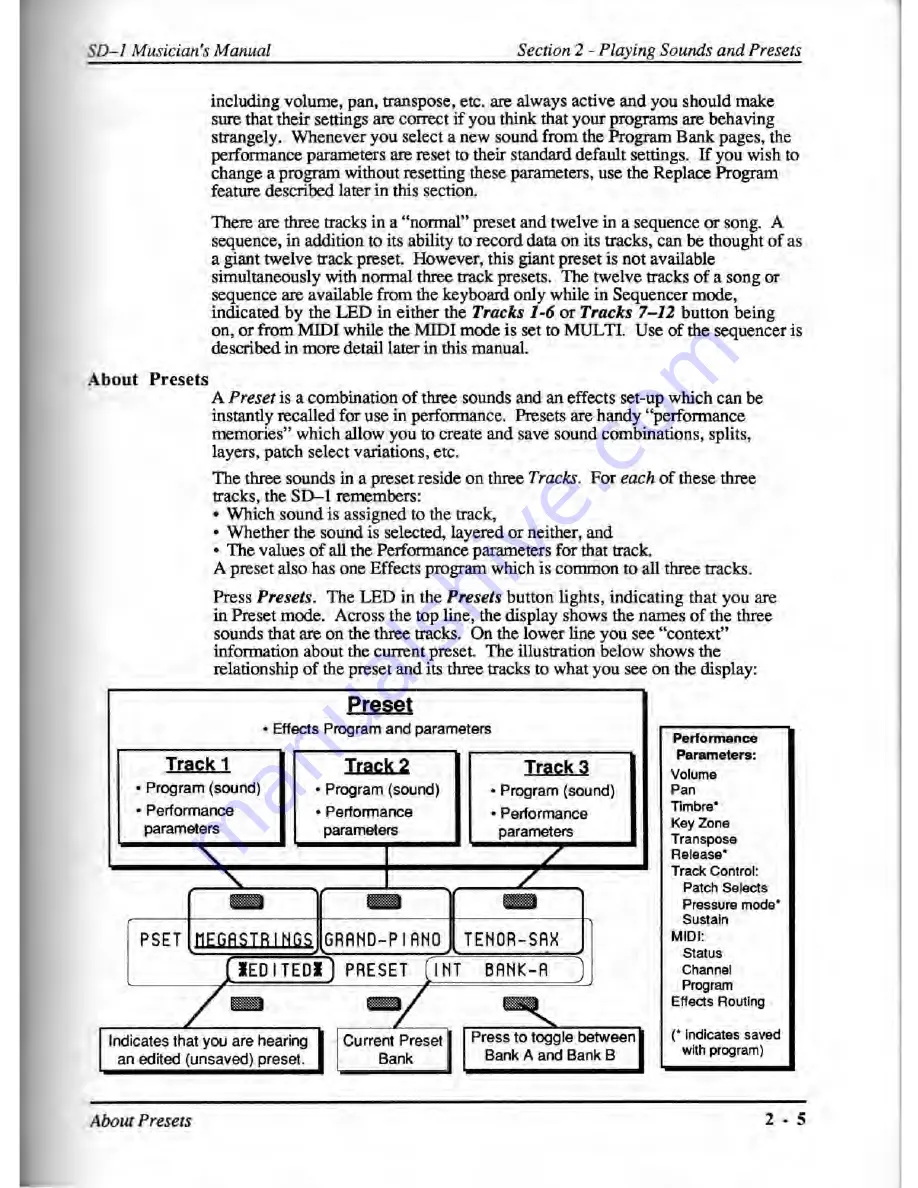
Страница 28: ... of as a giant twelve track preset However this giant preset is not available simultaneously with normal three track presets The twelve tracks of a song or sequence are available from the keyboard only while in Sequencer mode indicated by the LED in either the Tracks 1 6 or Tracks 7 12 button being on or from MIDI while the MIDI mode is set to MULTI Use of the sequencer is described in more detail...

Страница 29: ...press BankSet until it is off The display indicates INT BANK A or B To select ROM 0 presets press the BankSet button The BankSet LED flashes and the display indicates RMO BANK A or B To select ROM 1 presets press the BankSet button The BankSet LED flashes and the display indicates RMI BANK A or B To select cartridge presets press the BankSet button once again The BankSet LED lights and the display...

Страница 30: ...till have three programs layered press the Volume button in the Performance section The display shows U21 Across the top line you see the three programs you selected one with a solid underline and the other two with a flashing underline just as they appeared on the program bank pages On the lower line you see the volume levels for each sound You can select which one you want to adjust by pressing ...

Страница 31: ...that location BankSei Sounds Pr 5514 S ci ns 74 ALA 2 A 0 If you need to listen to a few presets in order to decide which one to replace simply press Presets and then select presets just as you normally would by pressing the bank buttons The word EDITED disappears from the screen meaning that you are listening to saved presets_ Your new preset is safe in its own edit memory But make sure you don t...

Страница 32: ...ges they are transferred to a track in the current preset and many of the performance parameters for that track are reset to standard default settings However you may wish to change which program is assigned to a track in a preset or in a sequence without changing any of the other settings for that track This is done using the Replace Program feature The Replace Program button is located next to t...

Страница 33: ... which your left hand plays an accompaniment sound and your right hand plays a solo sound This is easy to set up on the SD I by layering the two sounds and assigning them different key zoiies You can save this arrangement as a preset so that any time you select that preset you ll recall the keyboard split Since presets can hold three sounds you can add another solo by layering it double click and ...

Страница 34: ...ee tracks with a full set of programmable performance parameters including key zones transpositions release times timbral variations and others The settings of all performance parameters on sequencer tracks are saved for each track while the power to the SD 1 is off and are always available The buttons which control the pages containing these parameters are found in the Performance section of the ...

Страница 35: ...rlined This is the active parameter which can be modified You may select a parameter for a different track by using the soft buttons When programming performance presets the lower row of soft buttons is used to select tracks For sequencer or song tracks both upper and lower row of soft buttons are used Remember that you can edit parameters on tracks that you are not hearing The tracks that you can...

Страница 36: ...useful changes to the character of a sound without getting into more complex programming This performance parameter uses the data entry slider or up down arrow buttons to control various aspects of the sound depending on what the programmer has decided would be useful As one of the voice modulation sources TIMBRE can be assigned to anything that can be modulated in a program or effect The Timbre c...

Страница 37: ...the Key Zone Unlike other performance parameter pages the normal state of this page is to have no parameter fields underlined In order to seta Key Zone Select the track by pressing the soft button nearest the zone you wish to set This will result in the Low Key of the zone the left key number becoming underlined Play the key on the keyboard which you want to be the lowest key of the zone The under...

Страница 38: ...ia MIDI if the MIDI Transpose enable parameter in ON on the MIDI Control page Pressing the soft button for an already selected track will toggle the underline showing the active field from octave to semitone and back Ranges Octave parameter 4 to 4 octaves Semitone parameter 11 to 11 semitones It is possible to extend the transposition outside of the normal range by using the up and down arrow butt...

Страница 39: ... Envelope 3 controlled by the parameters on this page Range 64 to 64 Higher values lengthen release time Lower values shorten release time All tracks whose MIDI Status is set to MIDI or BOTH will send a MIDI Continuous Controller message controller 72 with the indicated value whenever this parameter is edited Preset tracks will also send this controller message when a preset is selected The curren...

Страница 40: ...f the patch select buttons and release it before you play the next note This will hold the 00 patch When programming patch variations you can set the mute status of the various voices in different patches without leaving the Select Voice page by using the HOLD feature Latching Patch Selects Latching is more permanent than holding because once latched the patch will remain assigned to the track eve...

Страница 41: ...ts the entire keyboard when activated When a sequencer track is set to CHAN Channel pressure will be recorded into the track You should consult the MIDI implementation chart of the MIDI device you will be using in conjunction with the SD 1 to see which if any type of pressure it responds to and transmits For best results set the SD 1 Pressure parameter to match the type of pressure supported by th...

Страница 42: ...erformance Presets All three tracks in a preset and all the tracks in a given sequence or song share the same effects program The effects program for the preset is inherited from the primary non layered selected program and any layered programs in the preset will use that same effect The effects program for the sequence or song is inherited from the current sequencer effect at the time the sequenc...

Страница 43: ...lay internal voices LOCAL The track will only play internal voices and will not send any data out MIDI Incoming MIDI will play internal voices MIDI Keys controllers etc will be be sent out via MIDI when the track is played from the keyboard However keys played or recorded on the track will not play SD 1 voices at all Incoming MIDI will play internal voices This is comparable to Local Off on some k...

Страница 44: ...and and are described below You may also wish to refer to the sections covering the MIDI Control page and the Sequencer Applications section Transmit Controls which channel the the three tracks of a preset will send data on only if SEND CHAN TRACK is selected on the MIDI Control Page Otherwise in Preset mode the SD 1 keyboard will send only on the base MIDI channel no matter which preset track is ...

Страница 45: ...ring Program Change Numbers Directly While this page is displayed or from the Tracks 1 6 and 7 12 pages in sequencer mode it is possible to send MIDI program change messages by holding the soft button nearest the track program name and then entering the MIDI program change number using the numbered bank buttons When you release the soft button the program change will be sent and the program number...

Страница 46: ...essor ESP chip The ESP is designed specifically for digital audio signal processing and in the SD 1 it has been integrated with a third generation version of the Digital Oscillator Chip DOC III and an external 16 bit digital to analog converter to provide a very high quality output signal The digital effects processing has been designed to complement the advanced performance features of the SD 1 a...

Страница 47: ...set more closely This effect applies to all preset tracks or their program voices which are routed to either FX destination bus The preset effect is displayed and edited by pressing the Effect button in the Performance section of the front panel There are four pages in total The top level page controls the routing of the effect and is described in the Performance Control part of this section The n...

Страница 48: ... DIST CHORUS REVB LPF DIST CHO REV PHASER REVERB Large Hall high density Reverb Small Hall high density Reverb Concert Hall Reverb Medium Room Reverb with more early reflections Small Room Reverb with more early reflections Chamber Reverb with lots of early reflections Large Hall Reverb with modulatable decay time Concert Reverb with modulatable decay time Separate Gated Reverb and Room Reverb War...

Страница 49: ... Chip When you select a program from one of the Program Bank pages the effect saved in that program will be loaded into the ESP and you will hear the program with its effect If you layer a program by double clicking its effect will not be loaded When you select or layer programs tracks from a preset or performance parameter page the effect is not changed When you change the program on a track from...

Страница 50: ...for 6 of the 12 tracks of the current song or sequence in Sequencer mode Subsequent presses reveal the effects programming parameters which are identical to those found in the Programming section Normally different voices in a program are assigned to the four different busses as set on the Output page The FX Bus Override parameter provides for the re routing of the voices without editing the sound...

Страница 51: ...kly and avoid the brief delay caused by the actions described above Pass rapidly over the types between the old type and the new type and then pause The new effect preset will be recalled only after you stop changing the type The Effects Busses The output of every voice in the SD I is assigned to a stereo bus A bus like the bus of a mixing board mixes together all the voices assigned to that bus i...

Страница 52: ...e SD 1 offers In this mode pan affects only the wet dry mix and does not affect stereo image panning from left to right Multiple Function Effect Mixer AUX O When the selected effect is a combined effect that has more than one signal processing function such as chorus and reverb the FX1 bus feeds Effect I and the FX2 bus feeds Effect 2 The FX2 Mix control sets the amount of Effect 2 usually reverb ...

Страница 53: ...ER DYNAMIC REVERB and DYNAMIC HALL These effects algorithms provide a highly optimized stereo effect such as studio quality reverb or complex chorusing The FXI and FX2 busses can be routed into the effect with different wet dry mixes LARGE_HALL REVER_B offers a large acoustic space high density reverb SMALL HALL REVERB is a small concert hall high density reverb CONCERT REVERB is a concert hall re...

Страница 54: ...t to right ratio of the stereo input to the effect LEFT WET RIGHT DRY in this mode pan is used to control the wet to dry mix ratio instead of the stereo balance Panning to the left will increase the amount of signal sent to the effect and panning to the right will decrease the effect level and increase the dry or bypass level The left channel of FX2 is sent directly to the effect without mixing Th...

Страница 55: ...used Any one of the effect modulators can be selected Uni DIFFUSION Concert Reverb and Warm Chamber only Range 00 to 99 This parameter determines whether the early reflections will appear as a series of discrete echoes lower values or will be more diffused higher values TIME Early Reflection Time Concert Reverb and Warm Chamber only Range 00 to 200 milliseconds Controls the time it takes for the e...

Страница 56: ...ix level controls the wet dry mix of the room reverb only The second sub page contains parameters which control the gated reverb The gated reverb algorithm simulates the sound of a reverb passed through a noise gate anOt s GATE TIME 025 SLOPE 090 THRESHOLO 05 PRE DELAY 008 RELEASE TiME 025 C 3 Mr TIME Gated Reverb Parameter Range 00 to 200 This parameter controls the amount of time the noise gate ...

Страница 57: ...Time parameter controls the rate at which the reverb level will fall to zero after the input signal falls below the threshold PRE DELAY Room Reverb Parameter HF DAMPING Room Reverb Parameter See the descriptions in the LARGE HALL REVERB section for details WARM HALL REVERB WARM HALL REVERB is based on the hall reverb algorithms and offers different effects by allowing decay time to be modulated Th...

Страница 58: ...very low values HF BANDWIDTH High Frequency Bandwidth Range 00 to 99 The High Frequency Bandwidth parameter acts as a low pass filter on the signal going into the reverb controlling the amount of high frequencies that will pass into the effect The higher the setting the more high frequencies are allowed to pass HF DAMPING High Frequency Damping Range 0 to 99 The High Frequency Damping parameter co...

Страница 59: ...busses can be routed into the effect with different wet dry mixes 12211 DECAY TIME F X 1 FX2 See the descriptions under the Warm Hall Reverb section REUERB DIFFUSION 97 PAE DELAY 250 DIFFUSION See the description in the LARGE HALL REVERB section PRE DELAY See the description under the Warm Hall Reverb section I 1 813 HF BANDWIDTH High Frequency Bandwidth HF DAMPING High Frequency Damping See the d...

Страница 60: ... modulation of the delay time of the chorus DEPTH Range 00 to 99 This controls the amount of modulation applied to the delay time of the chorus DELAY Range 00 to 2S0 milliseconds This parameter controls the delay time of the chorus FEEDBACK Range 99 to 99 This controls the amount of positive or negative feedback applied to the chorus FX2 MODE NORMAL STEREO SEND In this mode pan acts normally and b...

Страница 61: ...ntrols the amount of the FX2 bus signal sent to the reverb only CHORUS RATE 25 DEPTH 99 DELAY 030 MOD 99 MOD 99 M I X 85 RATE Range 00 to 99 This parameter controls the rate of modulation of the delay time of the chorus DEPTH Range 00 to 99 This parameter controls the amount of modulation applied to the delay time of the chorus DELAY Range 00 to 250 milliseconds This parameter controls the delay t...

Страница 62: ... higher frequencies are attenuated rolled off in the reverberation signal OFF higher frequencies are unaffected FLANGER REVERB 1 2 The flanger algorithm is similar to the chorus but with different controls The LFO changes the length of the delay line within the limits of MIN and MAX and the flanger mix is variable Assign a voice to FX1 to get both flanger and reverb or use FX2 for reverb only Deca...

Страница 63: ...h frequency by an octave subtract 12 MAX Maximum Notch Frequency Range 0 to 127 This parameter sets the maximum notch frequency of the flanger The units are semitones so if you wish to increase the notch frequency by an octave add 12 MODSRC Modulation Source This parameter selects the external modulation source to be used to modulate the flanger MIN and MAX parameters Any one of the effect modulat...

Страница 64: ... constant so if the range is narrow the apparent or perceived rate will be faster 12800 6400 3200 Modulation of flanger notch frequency over a two octave range MAX frequency 1600 of flanger comb filter 800 2 octaves in Hz 400 MIN 200 100 1 0 Time If the settings are modulated then both the fixed frequency of the notch and or range of frequencies in the sweep can be affected Modulated sweeps can be...

Страница 65: ...of the value determines the polarity of the feedback REVERB HF CUT See the description under Chorus Reverb 1 2 DELAY REVERB 1 2 A digital delay with 500 msec maximum delay and a standard reverb Assign a voice to FX1 to get both delay and reverb or use FX2 for reverb only 1 1 Decay Time See the description in the LARGE HALL REVERB section FX1 Reverb After Delay The mix level controls how much of th...

Страница 66: ...elayed repeats Time MOD Time Modulation Range 99 to 99 This parameter controls the amount of modulation applied to the TIME parameter Regen MOD Regeneration Modulation Range 99 to 99 This parameter controls the amount of modulation applied to the REGEN parameter MIX Range 00 to 99 This parameter sets the level of the delayed signal 0121 elli MODSRC Modulation Source This parameter selects the modu...

Страница 67: ...ly related to those in the individual effects Assign a voice to FXI to get both flanger and delay with reverb or use FX2 for reverb only Decay Time See the description in the LARGE HALL REVERB section FX1 Reverb After Flanger Delay The mix level controls how much of the hanger and delay output signal is sent to the reverb FX2 Reverb Mix This parameter controls the amount of the FX2 bus signal sent...

Страница 68: ...er controls the amount of the FX2 bus signal sent to the delay only HI Rotor SLOW Speed and FAST Speed Range 0 to 99 These parameters set the minimum and maximum speeds of the upper rotor of the rotating speaker LO ROTOR switch ROTO SPICR DEL AY only Range On or Off This switch turns the lower rotor on and off affecting the low frequency sound OVERDRIVE DIRTY ROTO DELAY only Range 0 to 99 This par...

Страница 69: ...mines how much time elapses before the simulated speaker resonance or feedback begins to occur Feedback AMOUNT Range 99 to 99 The Feedback Amount parameter controls the amount and polarity of the resonance or feedback to the speaker simulator REPEATS Range 99 to 99 This parameter acts like Delay Regeneration and controls the number of repeats of the FX2 delay STEREO WIDTH ROTO SPKR DELAY only Rang...

Страница 70: ...s effect is permanently set to SIN The chorus has an LFO which modulates a variable length delay line Assign a voice to FX1 to get distortion chorus and reverb or use FX2 for reverb only MI IM1 IMEI MI EMI Decay Time See the description in the LARGE HALL REVERE section FX1 Reverb After Distortion Chorus The mix level controls how much of the distortion chorus output signal is sent to the reverb FX...

Страница 71: ...level from the distortion effect into the Chorus Input level to the distortion effect is controlled by the Left input level to FX1 Panning full Left value 00 on the Output page will result in maximum distortion and panning full Right 99 will minimize distortion input drive Modulation of Pan on the Output page can affect the amount of distortion REVERS HF CUT Reverb High Frequency Cut This switch c...

Страница 72: ...al is sent to the reverb FX2 Reverb Mix This parameter controls the amount of the FX2 bus signal sent to the reverb only FILTER RESONFINCE 45 01ST UOL 60 CUTOFF 99 MODSRC MODWHEEL MOD 50 554 04 RESONANCE Range 00 to 99 16 values This parameter controls the amount of resonance at the cutoff frequency DIST VOL Range 00 to 99 This parameter controls the amount of distortion volume output CUTOFF Range...

Страница 73: ...ameter controls the output level from the distortion effect into the Chorus Input level to the distortion effect is controlled by the Left input level to FX1 Panning full Left value 00 on the Output page will result in maximum distortion and panning full Right 99 will minimize distortion input drive Modulation of Pan on the Output page can also affect the amount of distortion REVERB HF BANDWIDTH R...

Страница 74: ... how much of the phaser output signal is sent to the reverb FX2 Reverb Mix This parameter controls the amount of the FX2 bus signal sent to the reverb only RATE Range 00 to 99 This parameter controls the rate of modulation of the phaser poles DEPTH Range 00 to 99 This parameter controls the depth of the notches created by the phasing CENTER Range 00 to 99 This parameter controls the center of the ...

Страница 75: ...eter acts as a low pass filter on the signal going into the reverb controlling the amount of high frequencies that will pass into the effect The higher the setting the more high frequencies are allowed to pass HF DAMPING High Frequency Damping Range 0 to 99 The High Frequency Damping parameter controls the amount of attenuation of high frequencies in the decay of the reverberation As natural rever...

Страница 76: ...2 Click Page 5 13 Seq Control Page 5 14 Using Multi Track Record 5 16 STEP ENTRY 5 18 About the SAVE CHANGES Page 5 22 Using Sequencer Data Created on a VFXsp 5 23 Locate Page 5 23 Edit Times Using the Autopunch Feature 5 25 Edit Times in Song Mode 5 26 Setting the Edit Times in Real Time 5 27 Recording a Sequence 5 27 Playing Tracks in Audition Mode 5 29 Punching In on a Track 5 29 Playing Along ...

Страница 77: ...nts When you play middle C on the SD 1 for instance it instantly sends to its MIDI Out jack a series of numbers representing a Key Down event along with the location of the note on the keyboard and how hard the key was struck When you release the key the SD 1 sends a number meaning Key Up A MIDI instrument connected to the SD 1 can receive and translate those numbers and will play the middle C its...

Страница 78: ... and can be loaded from a disk the SD I sequencer can be upgraded its functions enhanced and new features added as easily as loading a new sequence There are two times when you will need to load the Sequencer Operating System When an updated version is released New Sequencer Q S disks can be obtained from your authorized ENSONIQ dealer as they become available If some unforeseen event or system er...

Страница 79: ...9 Steps and up to 99 Repetitions of each Step Within each Song Step individual tracks within the sequence can be muted or transposed But a Song on the SD 1 is much more than just as collection of sequences playing in order This is because each song has an additional set of 12 tracks which are completely independent of the tracks in its component sequences Each Song Track has its own sound program ...

Страница 80: ... the following states STOP Sequencer at rest PLAY Playing current sequence sequence selected SNGS Song Stop sequencer at rest with a song selected SNGP Song Play playing current song REC Recording on current track first pass ODUB Overdub re recording current track PLAY flashing Countoff playing prior to going into Play Record or Overdub REC flashing Record Standby waiting for you to play before go...

Страница 81: ...nce or Song later in this section Selecting a Sequence or Song Press Seq then press the Bank buttons labeled 0 9 to see the ten Sequence Bank pages Pressing the soft button next to any of the six locations on a page selects that as the current song or sequence When you select a song or sequence it becomes underlined The currently selected song or sequence is always underlined Playing Sequences and...

Страница 82: ... next to a track to select that track Press Tracks 7 12 This takes you to the second of the two Tracks pages Repiace Tracks Program 1 6 7 12 MMM TRAX SHIMMERY CHIFFLUTE HARPSICHORD MIRROR BELL UNDEFINED UNDEFINED Performance Track 11 The LED in the Tracks 7 12 button lights and the display shows the names of the programs on the remaining 6 sequence tracks Tracks which show UNDEFINED instead of a p...

Страница 83: ... in the first step Press Tracks 1 6 or Tracks 7 12 and select the track Press and hold Replace Program While holding down Replace Program press Performance Effects Use the Bank buttons and the soft buttons to pick a sound as before but now each time you pick a new sound its effect will become the sequence effect Press Replace Program again to exit Replace Program mode and return to the Tracks page...

Страница 84: ... Performance parameters are shown on different pages When you press Tracks 1 6 or Tracks 7 12 the SD 1 displays the names of the six programs on those six tracks TRAX DRUTI K I T 96 SMRK EIRSS RLTO SRX SYNTH HORNS LUSH STRNGS LI I DEPUNCH When you then select any of the Performance parameter pages the display will show only the parameter values for the six tracks and not the names of the programs ...

Страница 85: ...e one that will be recorded if you go into record You should get in the habit of always selecting a track from the Tracks 1 6 or Tracks 7 12 page before going into record Copying a Preset into 3 Sequencer Tracks You can copy the three tracks of a preset with all Performance parameter settings preserved into three tracks of the current song or sequence The preset will be copied whole into the three...

Страница 86: ...use the cursor buttons beneath beneath the words LEFT and RIGHT to move the underline to another character and edit that Continue this until the display shows the name you want Or you can use the keyboard to enter the name data if the Keyboard Naming function is enabled on the Master page Press YES The display shows CREATE NEW SEQ SEQUENCE 02 WITH TIME SIGNATURE 4 4 YES NO is Set the Time Signatur...

Страница 87: ...uttons labeled LEFT and RIGHT to edit the song name to create the name you desire Press YES The SD 1 returns to the current Sequencer Bank page with the new song selected Erasing All Sequencer Memory When you want to erase all sequences and songs in the SD 1 sequencer memory first make sure you have saved any important data to disk then Press and hold the Presets button While holding down the Pres...

Страница 88: ...ar countoff plays before the sequence or song begins to play REC a one bar countoff will occur in Record mode only QUIET the countoff will occur in Play or Record modes without the click VOLUME Controls how loud the click will be Range 00 to 99 PAN Controls the stereo position of the click and allows it to be sent out of the Main or Aux outputs DRY L DRY R and DRY C will send the click without eff...

Страница 89: ... or song and will enter Audition Play mode ADD New data recorded into an existing track will be added to or merged with data already in the track the existing data will be left intact Again the sequencer will exit record after one time through the sequence or song and enter Audition Play LOOPED As with ADD mode new data recorded into an existing track will be added to or merged with data already i...

Страница 90: ...sequence will not loop it will play once and stop Press Seq Control again to display the second sub page CONTROL SONG STEP EFFECT SONG STOP REC SOURCE BOTH EDIT TRACKS SONG SONG STEP EFFECT This controls which effect s will be used while a song is playing those from each individual sequence or a single override effect saved with the song A song contains a series of sequences which will play in ord...

Страница 91: ...1 are initially UNDEFINED Selecting undefined tracks while on the Track Select page TRAX will cause all the settings from the previously selected track to be copied to the new track including the MIDI channel number You will have to make sure that the channel assignments and other settings are correct after you have defined the appropriate number of tracks to record on Suggestion for Advanced User...

Страница 92: ...on the external sequencer LOOP OFF Create a new sequence with the correct time signature Make sure that the external sequencer will send its track data on MIDI channels that the SD I is set up to receive track MIDI channels 1 12 by default Make sure that the external sequencer will send program changes at the start of each track to automatically define the necessary tracks on the SD 1 or define th...

Страница 93: ...ant to save changes you make to the sequencer track parameters and performance mode in which you can change track parameters and then select a new sequence or song without the changes being saved OFF when SAVE CHANGES OFF you can edit any of the Track parameters replace the program on a track etc and the changes will be forgotten as soon as you select a new sequence Recording any new track data ho...

Страница 94: ...vents can be recorded at the same track location time If you use AutoStep for entering chords the result will be an arpeggiated chord similar to a guitar chord being strummed This is true because each note of the chord will advance the time by the step size causing older notes to have longer durations GATE Gate Time Select The gate time duration value of a note is assigned when a key is released T...

Страница 95: ...hen the AutoStep switch is on The range of step sizes is from whole notes 1 1 to 1 64th note triplets 1164T Dotted note values are also available 1 1D to 1 16D Note name Setting Beat Ciock Note name Setting Beet Olock Note name Setting Beat Cio Whole note 1 1 iiiT 4 00 2 64 Whole note triplet Half note 112 2 00 Half note triplet 1 2T 1 32 Quarter note 114 1 00 Dueler note triplet 1 4T 0 64 Eighth ...

Страница 96: ...next and you do not want to inadvertently enter wrong notes into the track Access to Other Pages while in Step Entry Your access to other pages is restricted in Step Entry mode in a way similar to Audition mode You may get to any of the Performance parameter pages the Click page and the Master page The Track Select pages 1 6 or 7 12 may be displayed and you may use Replace Program to enter program...

Страница 97: ...s of all the parameters listed above into sequencer memory Pressing NO leaves the settings of the parameters listed above as they were when you last recorded a track or answered YES when exiting the same sequence In either case the track data notes controllers and program changes are always saved Sometimes it s hard to remember when you get this page exactly what you changed As a general rule if y...

Страница 98: ... Page Select a sequence from one of the Sequencer Bank pages Press Locate When a sequence is selected the Locate page shows Current Sequence Current Track Time Signature C21 1M1 LOCATE SEQ FIRST UERSE TRACK 01 4 4 STOP TEMPO 120 GOTO BAR BEAT 001 01 Tempo I Auto locate Control The status of the sequencer whether it is in Play Stop Record etc is always shown in the lower left hand corner of the dis...

Страница 99: ...utton twice to locate to the same place After using the GOTO function to locate to a spot in the sequence press StoplCont to begin playing the sequence from that point Song Locate Page Select a song from one of the Sequencer Bank pages Press Locate When a song is selected the Locate page shows Sequence in Current Song Step Current Song Location Step Rep II eme 4 eM SONG LOCATE FIRST UERSE STEP REP...

Страница 100: ...the Step Rep field to move the cursor between the Step and Repetition selecting the desired destination Press the soft button beneath the Bar Beat field to move the cursor between the Bar and Beat Press GOTO again to complete the locating process and return to the main Locate page with the new location as the the current one After using the GOTO function to locate to a point in the song press Stop...

Страница 101: ...h function on the same page where the Edit Times are located See Seq Control page earlier in this section for a full discussion ON the SD I uses the Edit Times for entering and exiting record state OFF normal recording without using Edit Times RESET Pressing this soft button resets the currently selected time to its default value IN is reset to 001 01 00 or the beginning of the sequence and OUT is...

Страница 102: ... will concentrate on sequencing with the SD I alone and then cover sequencing remote MIDI instruments 1 Create a New Sequence Following the steps outlined earlier in this section create a new sequence 2 Select a Track Press the Tracks 1 6 button The display shows the first six tracks of the new sequence Track 1 is already defined and selected there is always one track selected in a sequence and th...

Страница 103: ...EP FIRST TRACK The length in bars of the first track is shown in the lower left corner of the display This will determine the length of the sequence Press YES to keep the track defining the length of the sequence or Press NO to erase the first track and start over again 6 Record Additional Tracks After you have answered YES to the question KEEP FIRST TRACK all other recording including re recordin...

Страница 104: ...nient If the sequencer is playing each time Play New or Play Old is selected the context will instantly switch Pressing Play will play the selected track from the beginning Punching In on a Track The SD 1 offers two methods for punching in or re recording a specific part of a track When the Autopunch function is of you can punch in manually just by playing the keyboard to start recording When Auto...

Страница 105: ...uence Auditioning New Sounds Whenever you go from Sequence mode to Sounds mode by pressing the Sounds button the SD 1 loads the effect for the current sound into the effects processor replacing the sequence effect Remember there is only one effects current at a time and any voices that play will go through that effect If you press Sounds while the sequencer is running or press Play while in Sounds...

Страница 106: ...channel as to a particular instrument you can 1 Play that instrument from the SD 1 keyboard 2 Record a track that will play back on that instrument when you play the sequence or song and 3 Send the destination device Program Changes and adjust its volume assuming the device receives MIDI Volume In other words once you have made the appropriate connections and set up the MIDI configuration of the t...

Страница 107: ... you play the keyboard now it doesn t sound on the SD 1 Assign the track a MIDI Channel Press the Performance MIDI button again the CHANNEL sub page appears Set the track to the MIDI channel of the instrument you want to sequence from that track Playing the SD 1 keyboard should now play the Receiving Instrument Set the Program Number Press the Performance MIDI button a third time the PROGRAM sub p...

Страница 108: ...be recorded When you play back the track you will notice that the screen is updated with the new value only on each quarter note But don t worry all the values you recorded between the screen updates are being played back by the track Recording Program Changes The SD 1 will record program changes into a song or sequence track allowing you to change the sound that is playing on the track as the tra...

Страница 109: ...o record program change 12 press 1 then 2 to record program change I06 press 1 then 0 then 6 and so on At the instant you want the program change recorded release the soft button The program change is recorded and sent to the remote device when the soft button is released so you can type the number in advance and let the button go at the exact instant you want the program change sent To send recor...

Страница 110: ...arious tracks letting you determine how each track is routed to or around the effects The available settings are DRY forces all voices to the dry bus FX1 forces FX2 voices to FX1 FX1 and DRY are unaffected FX2 forces FX1 voices to FX2 FX2 and DRY are unaffected VOICE uses normal voice routing as programmed into the sound but controllers from the track are not routed to the effects CNTRL uses norma...

Страница 111: ...that they are muted Pressing the soft button of a soloed track will un solo the track returning all tracks to their previous status When a track is soloed you can select another track then press its button again to solo it along with the other soloed track In this way you can un mute tracks one at a time to listen to any combination Just press the soft button of any of the muted tracks again to re...

Страница 112: ...ng of the output unless the new effect is the same in as the previous sequence When EFFECT SONG the effect which is stored in the song will be used for all the song steps and there will never be any muting or glitching of the output when new sequences play The setting of this parameter is saved with each song Whenever a new song is created it defaults to EFFECT SONG This ensures that there will be...

Страница 113: ...y tracks These are the song tracks Continuing with the above example the song tracks might look like this e 4 Sequence 1 Sequence 3 Sequence 3 SOOKI114kr T i aCk I Nakk 1 4 saguaro Tra 1 Sequence Track 2 Ser Ingeltacrr 2 Sequence Track 2 Sequence Track 3 Sec rack 3 Saquipproo Track 3 Sererroa 1 44 4 4 gratiaai4 11iai7k 4 Sequence Track 4 Secruenoe Track 6 See lialtUack 5 Sequence Track 6 Saguaros ...

Страница 114: ...ng tracks only When EDIT TRACKS SEQ the Tracks pages and the performance parameter pages will show the tracks for the individual sequences which make up the song steps Any changes made to these tracks when a song is selected will not be remembered after the song step is done playing To change anything about a sequence track you must first select the sequence and then change it there When a song is...

Страница 115: ...elect a different track then set the Edit Tracks parameter back to EDIT TRACKS SEQ Now press Volume or Pan and repeat the procedure To Record Volume or Pan Changes to a Song Track Select a song containing song tracks you want to mix down Press Seq Control select the Record Mode and set to RECORD MODE MIXDOWN Press Seq Control again and set the Edit Tracks parameter to EDIT TRACKS SONG Note that yo...

Страница 116: ...aying style and technique For each of the four velocity settings SOFT MED FIRM HARD there are four pressure thresholds 1 2 3 4 for a total of 16 available settings The pressure threshold can be varied between 1 minimum force required to bring in pressure and 4 maximum force required to bring in pressure SOFT 1 SOFT 2 SOFT 3 SOFT 4 This is for someone with a light touch On any of these settings a m...

Страница 117: ... you are are using the single Foot Switch which came with the SD 1 SW 1 then you should keep this parameter set to UNUSED SOSTENU makes the Foot Switch act almost like the sostenuto pedal on a piano Any keys that are held down when you press the pedal are sustained until you release the pedal but subsequent keys are not affected PATCH L makes the left pedal act like the left patch select button AD...

Страница 118: ...s CV PEDAL Determines whether the optional CVP 1 foot pedal will act as a volume pedal or modulator VOL the foot pedal will adjust the volume of the SD 1 MOD the foot pedal will affect anything that has PEDAL selected as a modulation source SYSTEM PITCH TABLE This parameter sets the type of system pitch table which will apply to all voices which have been programmed to use the SYSTEM pitch table P...

Страница 119: ...ram name the Tracks 1 6 and 7 12 pages in sequence mode and all performance parameter pages in preset mode will show MIDI CHAN instead of the name This is helpful when using the SD 1 as a MIDI controller or when sequencing remote MIDI devices as it shows you at a glance which tracks are playing only over MIDI and on which MIDI channels ON The track s program name will always appear on the Tracks 1...

Страница 120: ...ider or up and down arrows Cursor Cursor Left Flight Each octave of black keys repeats the same 5 characters found on the bottom octave 0 111112 1 II 6 7 1 19 IF IrC irg II It m Hif JKL ItN II ill QIPTOTR ii ITU Hi MI When KBD NAMING ON the keyboard naming function is available from The Write page for saving a single program to internal or cartridge memory The Edit Song and Edit Seq INFO pages for...

Страница 121: ...hannels may be selected as the basic MIDI channel of the SD 1 The effect of setting the base channel varies depending on the MIDI Mode and whether data is being sent or received Transmit If SEND CHAN BASE then the SD 1 only transmits on the base channel If SEND CHAN TRACK then keys controllers and program changes are transmitted on the channel defined in the preset or sequencer track Receive In Po...

Страница 122: ... this parameter Doing so will make a particular external controller available as a modulator to any of your programs One of the modulation sources that can be selected in the programming section is XCTRL The value of the XCTRL parameter is a MIDI controller number ranging from 01 to 95 When the SD 1 receives MIDI Controller messages corresponding to this controller number they will be routed to al...

Страница 123: ...eful for driving the SD 1 from a guitar controller or any other application where having up to twelve independent monophonic channels is desirable The SD 1 offers two types of Mono mode operation In both types the SD 1 will receive monophonically on twelve consecutive MIDI channels starting with the Base channel the base channel through base channel 11 The difference has to do with how those MIDI ...

Страница 124: ...It is normally OFF but in a MIDI loop setup it should be ON OFF this is the default setting When changes are made to the Performance Volume parameter on tracks with status MIDI or the volume pedal the SD 1 will transmit MIDI volume controller 7 messages which combine the track volume setting with the current setting of the volume pedal ON with this setting the SD 1 will not transmit changes made t...

Страница 125: ...e individual track programs in the preset Receiving from MIDI while on a preset page will minimize problems CONTROLLERS This switch controls whether the SD 1 will send and receive MIDI controllers pitch bend mod wheel pressure volume sustain pedal etc SONG SEL Song Select This determines whether the SD 1 will receive MIDI Song Select messages When SONG SEL OFF the SD 1 will ignore incoming Song Se...

Страница 126: ...the number of program change messages available within the MIDI standard To solve this problem the SD I uses the following program change numbers to control how subsequent program changes will be interpreted The following chart shows the effect of these four special program changes After Program Change Subsequent program changes will select 124 001 060 ROM 1 Programs 061 120 CRT Programs 126 001 0...

Страница 127: ... including the other special messages If the program you wish to select also requires a special control program change then send the control message immediately after the 125 followed by the program number you want to select Remember All SD 1 program changes are referred to and displayed as 001 to 128 but the actual codes transmitted and received over MIDI are less by one 000 to 127 6 12 MIDI Cont...

Страница 128: ... Output to the Aux Buss go straight to the Aux Outputs The stereo signals from FX1 V FX2 and the DRY buss are combined and fed to the Main VE N NN NN V Main Output SD I Musician s Manual Section 7 Programming the SD I Section 7 Programming the SD 1 What is a Program 7 1 Voices and Polyphony 7 2 Patch Select Buttons 7 2 Compare Using the Compare Button LED 7 3 Edit Buffer 7 3 Abandoning Your Edits ...

Страница 129: ... See Voice triggering Stealing notes in Section 8 Also you can assign low medium or high priority to each voice in a program which allows you to control how voices are reassigned See Output page in Section 8 Patch Select Buttons The two Patch Select buttons above and to the left of the pitch bend wheel provide instant access to four different variations within each program When you press either or...

Страница 130: ...at a time can reside there the edit buffer always contains the results of your last edit When you press the Compare button you are alternating between the program in the original memory location and the program in the edit buffer We refer to the program in the edit buffer as the Edit Program You can return to the edit program even after selecting another program as long as you don t change any par...

Страница 131: ...ess Select Voice The display looks something like this Voice 1 is selected I cm I Patch Select status The six locations on the screen represent the six voices which are available within the program For each voice the display shows the name of the wave that the voice is assigned to play and the mute status of the voice in the current patch When you press the soft button above or below one of these ...

Страница 132: ...ormed while in this group edit state will affect all of the voices which are not muted Ordinarily you can only select one voice at a time However if you want to edit the same parameter s for all the active voices simultaneously double click the Select Voice button The Select Voice page will appear with all the active voices in the current patch selected Now parameter changes you make on any of the...

Страница 133: ...e lower left corner of the display on the Select Voice page For either button a 0 indicates that the button is not being pressed and an asterisk or star indicates that the button is down While on the Select Voice Page press the Patch Select buttons and watch as the display changes to show the status of each patch variation Note that for each of the four patch select variations a different combinat...

Страница 134: ...ogram ON a custom pitch table or drum map does exist in the program and voices 5 and 6 have been replaced BEND RANGE The setting of this parameter determines whether the program has its own independent pitch bend range or whether it will use the system bend range to determine the maximum pitch change which can be applied by the the pitch wheel The bend range set on this page will override the syst...

Страница 135: ...ger restrike value which will cause the old note to decay more slowly rather than end abruptly when the new note starts Normal values are around 10 The higher the value the longer the fadeout time Range 00 to 99 If you hear clicking sounds when you restrike a note setting the Restrike time to higher values may eliminate the click GLIDE TIME This parameter controls the time it takes for the pitch t...

Страница 136: ... can use the keyboard to enter the name see Section 6 Moving the data entry slider all the way down gives you a blank space Also using dashes periods and slashes between characters can make a sound name hold together better when displayed on Program Bank and Preset pages Select a memory location for your new program Press one of the Bank buttons 0 9 As long as you hold the button down the display ...

Страница 137: ...hich the new program has just been saved The new program is underlined and is thus selected as the current program EXIT The button beneath the word EXIT can be pressed at any time to exit the WRITE Page and return to the Page you were on before entering it Copying an Existing Program to Another Location Sometimes you ll want to take an existing program one that you haven t been editing and simply ...

Страница 138: ... 8 10 Type Specific Wave Parameters 8 11 SD 1 Exclusive Sounds 8 14 MULTI DRUM Wave layouts 8 14 Pitch Page 8 16 Pitch Mod Page 8 17 Filters Page 8 19 Filter Configurations 8 21 Output Page 8 23 LFO Page 8 27 ENV 1 ENV 2 ENV 3 SD 1 Envelopes 8 30 Mod Mixer Page 8 36 SD 1 Voice Configuration Each of the six voices within a SD 1 program consists of a digital oscillator playing one of the 168 waves f...

Страница 139: ...ave LEO Amt LEO ko Mode Delay Level LFO Wave Mod Delay 1_6 Multiplier Digital Oscillator LEO Wave TRIANGI F SINE SINE TRI PQS SIN POS fTflk SEINTOOT1 1 SQUARE LFO Rate Mod Source Wave Del ay LEO Level Mod Source 97 Pitch 1 0 Mod L mt Pitch Mod Source Section 8 Voice Programming SD 1 Musician s Manual Tracking Curves OLIIK RISE CONVEX 1 CON VEX 2 CONVEX 3 LINEAR CONCAVE1 CONCAVE2 CONCAVE3 CONCAVE4 ...

Страница 140: ...nual levels for a great many aspects of a voice including real time control of some aspects of an effects program Selecting a Modulator On those programming pages where a modulator can be selected to vary the level of some function within an SD 1 voice the display shows MODSRC Modulation Source A modulator is chosen by selecting underlining that parameter with the appropriate soft button and then ...

Страница 141: ...an produce vibrato tremolo and many other effects depending on the LFO wave selected and where it is applied as a modulator There are seven possible waveshapes for the LFO See LFO Page later in this section for a complete discussion of the LFO ENV 1 ENV 2 ENV 3 The SD 1 has three complex Envelopes Envelopes are used to create changes over time in pitch brightness volume etc ENV 1 is permanently ro...

Страница 142: ...his Modulator is figured over the full 128 MIDI key numbers MIDI Key numbers 0 127 As the above illustration shows the effect of KEYBD as a modulator goes negative as well as positive The effect of KEYBD is to reduce the Level on notes below the break point Middle C and increase levels above that point Negative Modulation depths will do the opposite TIMBR Timbre Control This is a special modulator...

Страница 143: ...d via MIDI from another synthesizer or controller can be assigned as a modulator within your SD 1 Programs On the MIDI Control Page you seltct the number of the external controller that will be recognized by the SD I You don t have to be playing the SD 1 from an external instrument for this to work For example if you have a keyboard with a Breath Controller I Connect its MIDI Out to the SD 1 MIDI ...

Страница 144: ...taking your hands off the keyboard Pressure comes in two varieties Poly Keylmpressure or Polyphonic pressure which affects each note individually and Channel pressure or Mono pressure which affects all notes that are playing when you exert pressure on any key Either type of pressure is available on the SD 1 and both types are received via MIDI There is a Performance parameter on a sub page of the ...

Страница 145: ...wn custom kits PIANO SOUND One Megabyte of 16 bit sampled piano waveforms HIP PERCUSSN This class contains a wide variety of contemporary percussion and drum sounds that are just plain hip MISC SAMPLES A variety of sampled instruments electric acoustic and synthesized The next five wave classes contain a variety of sampled and algorithmically generated waves that are more synthesizer oriented TRAN...

Страница 146: ... V 4 SAWTOOTH SQUARE SINE WAVE TRIANGLE 1 2 HARMS 2HARM SAW FRETLESS DPNO TINE BUBBAWAVE CLAY WAVE CLAV VAR WOODWIND WWIND VAR PIPE ORGN BRASS ORG VOCAL BEL SYNTH BEL DIGI VOX CLARINET NHARMONIC TRIANG LP ANVIL LP CLUSTR LP TUBULAR L NOISE LP MULTI WAVE ALL WAVES DRUM SOUND GATE KICK ROOM KICK GATE SNARE RIM SNARE CLOSE HAT OPEN HAT RIDE CYMB DRY TCM L DRY TOM H GAT TOM L GAT TOM H RM TOM L RM TOM...

Страница 147: ...anged the first wave in that class is selected and lower line parameters are reset to default values for the new wave class DELAY The Delay determines how long the voice will wait after a key is struck before playing Adjustable from 000 to 250 A delay of up to 2 seconds is possible The size of the steps and the total range of this control in terms of actual delay time depend on the value of the De...

Страница 148: ...LES For these eleven categories of waves the bottom line of the display shows START This controls where in the sample the wave will begin playing When START 00 the whole wave will play As the start point is adjusted upwards it will begin playing further into the wave You can use this for example to skip the attack and play only the loop portion of looped sustaining sounds Range 00 to 99 VEL STARTM...

Страница 149: ...range near 50 Nepalis modulation Positive meduistion Stsrt Point When the wave type is TRANSWAVE the lower line of the display shows START The Start Point parameter controls where within the wave the voice will begin playing when the key is struck Range 00 to 99 MODSRC Modulation Source Here you choose which of the 15 modulators will control the movement of the sound Any of the modulators can be s...

Страница 150: ...y The lower line of the display shows JADE ALL WRUES START 000 Start Wave 1 MULT I WAUE LENGTH 005 DELAY 000 FORWARD Playback mode Forward or Backward START Start Wave Picks which of the waves in memory the loop will start on Range 000 to 249 LENGTH Length of Loop Controls how many waves will be included in the loop Range 000 to 243 FORWARD REVERSE Playback Mode Controls whether the multi wave wil...

Страница 151: ...ms which use the PIANO SOUND wave class will transfer information to the MEGAPIANO wave class when using the VFXs VERSION II MULTI DRUM Wave Layouts The 15 waves in the MULTI DRUM category provide different combinations of the individual waves in the DRUM SOUND and PERCUSSION classes These waves have been designed to provide maximum flexibility for creating custom drum kits while adhering to a bas...

Страница 152: ... area of the keyboard These waves are provided as an easy way for you to assign those particular sounds pre zoned to different voices so that each can be treated with its own volume filter and envelope settings etc The DRY TOMS ROOM TOMS GATE TOMS and CONGAS waves each consist of two samples with a split point around middle C allowing you access to both toms or both congas in a single voice These ...

Страница 153: ...ll use When you create a custom pitch table the SD 1 keeps the table inside the program Within the program the custom pitch table uses the space normally used to store the parameters for voices 5 and 6 Therefore when there is a custom pitch table in the program these two voices are not available replaced on the Select Voice page by the EDIT PITCH TABLE function Of the remaining four voices each in...

Страница 154: ...ntrol Page There are five GLIDE modes NONE Glide is off This is normal polyphonic operation with no portamento PEDAL Enables the sustain pedal to trigger glide and to control polyphony When the pedal is not pressed the voice behaves normally When you depress the sustain pedal the number of keys you are holding down defines the polyphony for as long as the pedal is down While the pedal is down new ...

Страница 155: ...ile still holding down another key the pitch will return to note you are holding TRIGGER Same as LEGATO mode except without the note memory When you release a key the voice does not re trigger or glide even if another key is being held down ENV 1 Envelope 1 Amount Determines the amount or depth by which Envelope 1 will affect pitch Range 99 to 99 LFO Low Frequency Oscillator Amount Determines the ...

Страница 156: ...s are divided between the two filters either as 2 and 2 or as 3 and 1 There are two FILTER Pages however if you change the number of poles on either page you will change number of poles on the other page high pass will remain high pass but the number of poles will change A 1 pole filter will rolloff at 6 dB per octave a 2 pole filter 12 dB per octave a 3 pole filter 18 dB per octave and 4 pole fil...

Страница 157: ...r a setting of 127 lets all the original signal pass through the filter Lower settings lower the cutoff frequency somewhat like turning down the treble on a stereo Range MO to 127 KED Keyboard Scaling Amount Sets the amount by which the location of a note on a keyboard will modulate the filter cutoff frequency keyboard filter tracking To have the filter track the keyboard exactly set KBD 50 Range ...

Страница 158: ... are the same as for Fitter 1 II HI PASS 2 1 or LO PASS 2 1 Filter 2 Mode FILTER 2 can be configured as a 2 pole or 1 pole high pass filter or a 2 pole or I pole low pass filter CUTOFF Filter 2 Cutoff Frequency KBD Keyboard Scaling Amount MODSRC Modulation Source MODAMT Modulation Amount ENV2 Envelope 2 Parameters and ranges are the same as for FILTER 1 Filter Configurations The diagrams below sho...

Страница 159: ... Low pass amplitude amplitude 12 rib oct amplitude 12 db oct freq cutoff frequency 0 frequency Filter 1 2 pole Low pass Fitter 2 2 pole High pass Section 8 Voice Programming SD 1 Musician s Manual a rnpOrud 181 b act amplitudes Sdbloct amp krud frequency 0 frequency frequency Filter 1 3 LP Fitter 2 1 HP Bandpass frequency Bandpass 8 22 Filters Page ...

Страница 160: ...ld also be thought of as Env 3 Amount Range 00 to 99 MODSRC Volume Modulator Selects one of the 15 available modulators to affect the volume of the voice This is in addition to Env 3 which is always routed to volume MODAMT Volume Modulator Amount Determines how much the modulator selected above will affect the volume of the voice Range 99 to 99 The two parameters on the lower line of the display p...

Страница 161: ...witches to the high key Now play the high key that note is entered as the high key and the cursor disappears If you made a mistake or want to enter a different range of values just select the parameter again and repeat the process Press Output again The display shows the second sub page OUTPUT DESTINATION BUS DRY PAN 50 MODSRC KEYI3D rI00A11T 1 25 DESTINATION BUS Each voice within a program can be...

Страница 162: ...ee parameters UZI PRE GAIN Pre gain applies a fixed boost of 12 dB to volume of the the voice This is intended to let the programmer compensate for the effects of heavy filtering or enveloping and for the fact that some waves simply have less apparent loudness than others For example a percussion sample which is by nature a quick peak has less energy than a sustaining square wave Ike gain lets you...

Страница 163: ...laying the same wave as another voice but detuned a bit HI is best used only for specific applications in which you want to protect a voice or voices from being stolen such as drums or a sustaining pad sound in a sequencer track VELOCITY THRESHOLD Selects a key velocity below which or above which the voice will not sound This allows velocity switching between different voices within the sound The ...

Страница 164: ...z value in Hz value in Hz value in Hz 0 05 20 1 25 40 6 25 60 11 25 80 16 25 1 05 21 1 50 41 6 50 61 11 50 81 16 50 2 06 22 1 75 42 6 75 62 11 75 82 16 75 3 06 23 2 00 43 7 00 63 12 00 83 17 00 4 06 24 2 25 44 7 25 64 12 25 84 17 25 5 07 25 2 50 45 7 50 65 i12 50 85 17 50 6 07 26 2 75 46 7 75 66 12 75 86 17 75 7 08 27 3 00 47 8 00 67 13 00 87 18 00 8 08 28 3 25 48 8 25 68 13 25_ 86 18 25 9 09 29 3...

Страница 165: ...level set with the LEVEL parameter This is useful for creating delayed vibrato tremolo etc Higher values give longer delay times Range 00 to 99 Press LFO again to access the second sub page of the LFO Page The display reads WAVESHAPE The Waveshape determines how the signal will rise and fall There are seven possible values TRIANGL the triangle wave is commonly used to modulate the LFO to produce v...

Страница 166: ...et to ON the LFO waveform will return to the beginning of its cycle each time a new key is struck NOISE SOURCE RATE One of the SD 1 s 15 available modulation sources is NOISE The Noise modulator is a signal whose level varies by random amounts Typically it might look like this 100 100 Noise Source Rate The Noise Source Rate defines how frequently the level will change Low values will cause it to c...

Страница 167: ...V 3 always controls the final volume contour of the voice Any other volume modulators selected on the Output page will occur before ENV 3 in the signal flow The SD 1 envelopes are descended from the venerable ADSR attack decay sustain release envelope but with many refinements While the ADSR envelope gives you control over three time segments and one level the SD 1 envelopes give you control over ...

Страница 168: ...termines the level the envelope will reach at the end of the time defined by ATTACK Range 00 to 99 Determines the level the envelope will reach at the end of DECAY 1 Range 00 to 99 Determines the level the envelope will reach at the end of DECAY 2 Range 00 to 99 Determines the level the envelope will reach at the end of DECAY 3 and retain as long as the key is held down Range 00 to 99 Press the En...

Страница 169: ...ero after the key has been released Values with a star next to the number will be affected by changes to the Performance Release parameter Values without a star will not be affected This allows you to choose which voices within a program will respond when you edit the Release parameter in performance See Section 3 for more Range 00 to 99 00 to 99 ENVELOPE TIMES time time time time time value in se...

Страница 170: ... Raising the value of KYBD FRACK will make all envelope times except Release shorter as you play notes above middle C and longer as you play below middle C higher notes will decay faster than lower ones The greater the value assigned to KYBD TRACK the greater the difference in decay time between the highest and lowest note Middle C will always remain the same and is not affected by this parameter ...

Страница 171: ... LFO type effects MODE ENV 3 Voice Triggering Stealing Notes Since Env 3 control the volume of the voice there are a number of special considerations to be aware of when using the the different envelope modes In NORMAL mode if you set a delay on the voice and you release the key before the designated delay time elapses the voice will not sound In FINISH mode if you set a delay on the voice and you...

Страница 172: ...arameter will lower all envelope level settings with a softer keystrike This means the settings you assign to INMAL PEAK BREAK 1 and BREAK 2 and SUSTAIN are maximum levels the levels that will be reached with the hardest keystrike The amount of VEL LEV will determine how much those levels will be reduced as you play softer With this parameter you can have continuous dynamic control over the five l...

Страница 173: ...and SRC 2 On the lower line of the display are two parameters for shaping the level and response of SRC 2 Internally the Mixer Shaper works like this This output is the modulator called MIXER and can be selected at any modulation input There are four parameters which can be selected on the Mod Mixer page SRC 1 Modulation Source 1 Select any of the 15 available modulators including the mixer itself...

Страница 174: ...lue of 1 0 leaves the modulator at its original level Fractional values 0 1 to 0 9 will reduce the level Values greater than 1 0 will amplify the effect of the modulator in most cases simply causing it to reach full level much sooner SHAPE Here you select which of the 16 tracking curves will be applied to the modulator selected as SRC 2 You can use one of the convex or concave shapes to make the m...

Страница 175: ...oother 1 It Section 8 Voice Programming SD 1 Musician s Manual Some possible applications for shaping the response of SRC 2 are shown below Input Src 2 Scale Factor Shape Output Convex Linear 8 38 Mod Mixer Page ...

Страница 176: ...lty with perfectly tuned scales is that you can t modulate keys as universally as with equal temperament Nonetheless computer technology keep in mind your SD I is in fact a computer has made it easy to create and employ alternate pitch tables_ Imagine starting a piece in equal temperament modulating to Pythagorean then Werckmeister then 19 tone and back to equal temperament simply by changing Prog...

Страница 177: ... words EDIT PITCH TABLE where voices 5 and 6 once were We have just created a custom pitch table with variable pitch values for each key Keep in mind that the custom pitch table will sound the same as the normal one until you edit it We will do this a bit later When you create a pitch table and start editing it you are in the edit buffer the Compare light is on and all edits will affect the data i...

Страница 178: ...neath EDIT PITCH TABLE This takes us to the EDIT PITCH TABLE page Go to sub page for Extrapolate Interpolate ED IT PITCH TABLE ICALCULF1TORI KEY C8 Ca AND IEX I TI 00 CENTS For every source key on the lower left you can see and edit the pitch of that key The source key can be thought of as the physical location of the key on the keyboard The playback pitch can be the same as the source key as show...

Страница 179: ...ble lets start over This time we ll work with an ancient tuning system called Pythagorean Then well work with the SD 1 built in pitch table calculator and two new procedures Extrapolation and Interpolation Creating and Extrapolating a Custom Pitch Table The EXTRAPOLATE command takes the pitch table relationships from within a key range and duplicates those relationships outside that range If you h...

Страница 180: ...it to select it Now play C4 middle C on the keyboard The underline jumps to the END key The END key should now be underlined Play C5 on the keyboard The parameter should read KEY RANGE START END C4 C5 You have defined the key range whose pitch intervals you want to duplicate over the entire keyboard Note that you can also set the start and end keys using the data entry controls and press the soft ...

Страница 181: ... the We ve just established an interval of octave between C2 and C7 Press CALCULATOR Set the key range to KEY RANGE START END C2 C7 Press INTERPOLATE The SD 1 has just Interpolated the octave C3 to C4 and divided it equally across the 61 note keyboard so we now have a 60 step octave You must save the program containing your custom pitch table or copy the custom pitch table into the system or you w...

Страница 182: ...y reads I 1 Press the soft button beneath SYSTEM The display briefly reads COPY TO SYSTEM PITCH TABLE and the custom pitch table is installed into the SD 1 operating system where it is available for use by any program Press Master twice to reach the second sub page of the Master page I 1 MASTER CU PEDAL UOL SYSTEM P I TCH TABLE CUSTOM IMO Note that the SYSTEM PITCH TABLE parameter has been set to ...

Страница 183: ...program will be selected from the cartridge normally and you will hear it when you play the next note You can convert normal Program Cartridges STC 32 into Pitch Table Cartridges and back again by holding Presets and then pressing Pitch You will see the message Mai CONUERT CARTRIDGE TO PITCH TABLE YES NO If you answer YES then the cartridge will be converted into a Pitch Table Cartridge If you ans...

Страница 184: ...vided by this feature The basic function of a Drum Map is to control how keys are assigned to voices and to provide a certain set of parameters to control how the voice is played When you play a key the system looks in the drum map for information about pitch volume panning wave type and destination voice s for that particular key Based on this information the key is sent to one or more voices to ...

Страница 185: ...fault drum map in the program Selecting DRUM MAP will also display the Select Voice page with the Drum Map option activated Note that the Program Control page will now show PITCH TABLE MAP to indicate that a drum map is active in the program Note Remember to save the edited program after you have created and edited a drum map Refer to The Write Page Saving a New Program into Memory in Section 7 Re...

Страница 186: ... the current Patch Select status which has special significance for programs with drum maps For each of the four Patch Select settings the mute status of the four voices controls which voices will respond to drum map keys assigned to that patch In the Drum Map Editor each key is assigned to one of the four patches or to a single default voice which resides in ROM EDIT DRUM MAP Selecting EDIT DRUM ...

Страница 187: ... greater range or precision of tuning is required then it is necessary to use pitch modulation in the destination voice s Refer to Section 8 Voice Programming for more information on Pitch Modulation Range 16 to 15 semi tones WAVE This parameter allows you to select the wave to be played following list of available drum map waves by the key from the MUTED KICK DRUM GATE KICK ROOM KICK HIP KICK SNR...

Страница 188: ...stored in ROM and are not editable For the four Patch Select settings the destination voices are within the current program and the number of active voices is determined by the mute status of the four voices within the specified patch for this setting the selected key is assigned to 00 Patch Select 00 0 Patch Select 0 0 Patch Select 0 Patch Select D1 Default 1 parameter set up ROM D 2 Default 2 pa...

Страница 189: ...ll a Drum Map into a program without just previously having copied a Drum Map into the Copy buffer the copy is not completed and the following message is displayed Selecting the KEY RANGE option will display another page which allows you to fill a range of keys with copies of the currently selected Drum Map key the key that was shown on the Drum Map Editor page when you pressed Copy I 1 You can sp...

Страница 190: ... modified component to another part of the same voice or program or even to use it in a different program Before the development of the VFX VFXsp and SD 1 this was not easy to accomplish without the aid of external computer based editors The Copy page of the SD 1 provides several useful functions which facilitate copying components from one place to another The components which can be copied may b...

Страница 191: ...elected voice one complete pitchtable voices 5 6 all parameters for selected program Note In order to use the copy functions successfully it is important to understand how to control the copy context and what is being copied The copy buffer is an invisible portion of memory used to hold the most recently copied parameters until they are recalled The contents of the copy buffer are completely indep...

Страница 192: ... or complete programs Special Recall Functions There are several exceptions to the normal pattern of operation in the RECALL function The first exceptions occur with the Envelope and Filter contexts When the copy context is set to any of the Filter or Envelope settings pressing RECALL will display an additional page which allows you to select the source and destination pages for the parameter tran...

Страница 193: ...r context COPY ALL UOICE PARAMETERS DEFAULT RECALL MAKE COPY The DEFAULT command will make a copy of the default voice into the copy buffer and then automatically recall it into the currently selected voice in the compare buffer as if you had performed the steps yourself This allows you to easily put the voice into a standard configuration which is often useful when creating new programs For the E...

Страница 194: ...AKE COPY option to copy the Effect page parameters into the copy buffer Select the program into which you wish to copy the effect If the sound you are working on is in the compare buffer make sure that the Compare LED is on Press Effect in the Programming section to redisplay the Program Effect page Press Copy You will be returned to the Copy page with the EFFECTS context Press the soft button bel...

Страница 195: ...copy refer to the section describing the Write page if you are unsure how to proceed Making a copy of the compare buffer If you wish to make a copy of the complete compare buffer before making some experimental edits that you are unsure of then use the following procedure to make a backup copy of the current compare or edit buffer Set the copy context to the Program context by pressing Program Con...

Страница 196: ...14 Cartridge Copying Programs from Internal to Cartridge 11 15 11 16 Copying Programs from Cartridge to Internal Copying Presets from Cartridge to Internal 11 16 Copying Presets from Internal to Cartridge 11 17 Copying Both from Internal to Cartridge 11 18 Copying Both from Cartridge to Internal 11 19 MIDI System Exclusive Recorder I 1 20 Saving Sys Ex Data from an External Device 11 21 11 23 Load...

Страница 197: ...You should keep your disks and the disk drive clean and free of dust dirt liquids etc Never put anything other than a disk in the disk drive Do not expose disks to extremes of temperature or to strong magnetic fields Also never eject a disk while the drive is operating the disk drive light is on SD 1 Disk File Types The SD 1 disk storage system has been designed to allow maximum flexibility in sav...

Страница 198: ...which require different settings for MIDI mode MIDI base channel master tuning etc SEQUENCER OS The computer program which controls the SD I sequencer the sequencer Operating System or 0 5 is contained in RAM random access memory and can be updated from disk as upgrades become available The disk that came with your SD 1 contains the current Sequencer O S Sequencer upgrades will be available from y...

Страница 199: ...that file to be displayed in This gives you a high degree of control over how your disk files are organized and displayed SD 1 Disk Functions The SD 1 s disk functions are all handled from the Storage page Press the Storage button to get to this page then press the soft button beneath DISK When you select DISK from the Storage page the display shows the disk storage menu ED From here you select wh...

Страница 200: ...nu appears as shown earlier Press FORMAT The display shows FORMAT DISK YES RLL DISK FILES WILL BE ERASED HD Press YES to proceed Pressing NO will return you to the Disk Storage page with no harm done While the SD 1 is formatting the disk the display reads FORMATTTNG DISK The formatting process takes about 80 seconds When the formatting is done the display reads DISK FORMATTED SUCCESSFULLY and then...

Страница 201: ... QUIT Insert the destination disk the copy and press OK If the destination disk is not formatted the SD I will format it before proceeding After a moment the SD I will ask INSERT SOURCE DISK Insert the write protected source disk the original and press OK The SD 1 will load the data from the source disk into the sequencer memory and then save it to the destination disk asking you to insert the app...

Страница 202: ...ears Press SAVE The Save File display appears as shown above The file type is underlined Select the file type you want to save from among the available types 1 PROGRAM 1 PRESET 1 SEQ SONG 6 PROGRAMS 10 PRESETS 30 SEQJSONGS 30 PROGRAMS 20 PRESETS 60 SEQ SONGS 60 PROGRAMS SYSTEM SET UP Select a source bank if applicable For the file types 6 PROGRAMS 30 PROGRAMS 10 PRESETS and 30 SEQ SONGS you will s...

Страница 203: ...ion marks space dash and plus Period slash and star are only available using the data entry slider or up and down arrows Cursor Cursor Left Right Each octave of black keys repeats the same 5 characters found on the bottom octave OR 1 it 6 1 1 7 8 9Al lDEF q i tH IJKL 1 1 t i N OP l t i RI I IILYZ 1 Saving Internal Programs along with Sequencer Data When you save a 30 SEQ SONG or 60 SEQ SONG file t...

Страница 204: ...k 0 and going up from there However you can specify a particular file bank for the file to be placed in Press Storage and select DISK then SAVE The Save File display appears Select the desired file type and then press YES Name the file with the name of your choice Now you can press the bank buttons 0 9 to see the file banks which show all the files of that type on the disk six at a time For exampl...

Страница 205: ... SYS EX DATA 6 PROGRAMS 10 PRESETS 30 SEQJSONGS SYSTEM SET UP 30 PROGRAMS 20 PRESETS 60 SEQ SONGS SEQUENCER OS 60 PROGRAMS Press the soft button above the file name and use the data entry controls to find the file you want Or you can use the File Banks to quickly locate the file without scrolling see below Select a destination bank if applicable For the file types 6 PROGRAMS 30 PROGRAMS 10 PRESETS...

Страница 206: ...ed into either the lower half of the sequencer memory Banks 0 4 or the upper half Banks 5 9 as specified before pressing YES 60 SEQ1SONGS file replaces the entire sequencer memory Banks 0 9 If 30 or programs were saved in a 30 SEQ SONGS or 60 SEQ SONGS file along with the sequencer data a P will flash on the upper line of the display when the file is displayed on the DISK LOAD page When you answer...

Страница 207: ...press YES the Size of the file in Blocks and the File Type Only files of the type selected will be shown in the Name field or in the file banks To Delete a file from disk Insert the disk containing the file to be deleted into the disk drive Press Storage to go to the Storage page Press DISK The Disk Storage menu appears Press DELETE The Delete File page appears as shown above The file type is unde...

Страница 208: ...place all of the internal RAM data with copies of the internal ROM data Be careful to make sure that you have first saved your internal RAM data before reinitializing Refer to the instructions about reinitializing the SD 1 for more information From the STORAGE page Press the soft button for MIDI SYS EX The display reads This page is used for selecting which type of data to transmit via MIDI system...

Страница 209: ...elected sequence or song as a system exclusive message TRACKS Transmits all information about the 12 tracks and the effect in the current sequence or song not including recorded track data as a system exclusive message This message can be understood by a VFX VFXSD as a MULTI Sent message If received by a SD 1 it will change the effect and reconfigure the tracks of the current sequence or song ALL ...

Страница 210: ...This page lets you select the type of data to be transferred to or from the cartridge PROGRAMS To Copy Program Banks from Internal to Cartridge From the CARTRIDGE SELECT TYPE page Press the soft button for PROGRAMS The display reads I 1 This page lets you decide on the direction i e the source and destination for the data transfer of the type you have selected From the CARTRIDGE COPY PROGRAM BANKS...

Страница 211: ...nsfer of the ten program banks from the storage cartridge to SD 1 s internal program memory This will replace all of the internal programs with the 60 programs from the cartridge and the old internal programs will be lost Selecting NO will abort the command and return you to the Storage page PRESETS To Copy Presets from Cartridge to Internal CARTRIDGE SELECT TYPE PROGRAMS PRESETS BOTH CZNI From th...

Страница 212: ...the command and return you to the Storage page To Copy Presets from Internal to Cartridge From the CARTRIDGE SELECT TYPE page Press the soft button for PRESETS Then from the CARTRIDGE COPY PRESETS page press the soft button for INT TO CART The display reads COPY PRESETS YES FROM INTERNAL TO CARTRIDGE NO CM MI Respond YES if you want to copy the 20 presets from the SD I s internal memory to the sto...

Страница 213: ...he display reads 1 1 YES H0 CONUERT PRESET PROGRAMS When you are copying BOTH Presets and Programs from IN T to CART you will be prompted to decide whether you would like to have the program numbers in the presets converted as the transfer is taking place This conversion makes the presets which previously used internal programs now use the same programs from the cartridge ROM programs are not affe...

Страница 214: ...O INT The display reads MI MI M1 As with the case of copying both programs and presets from internal to cartridge if you select YES you will be prompted to decide about converting the programs in the presets When you are copying both Presets and Programs from CART to INT and you respond YES to CONVERT PRESET PROGRAMS the SD 1 will change the presets to use the INT Programs which will be the same a...

Страница 215: ...nderstand the data it receives if the purpose is to store it for later reloading into the original system just as it s not necessary for a file cabinet to understand the pieces of paper you file there The SD 1 can receive any MIDI System Exclusive message up to 96k bytes 288k with the memory expansion installed and save it to disk without having the slightest notion what it means or what type of d...

Страница 216: ...currently in memory will be lost It s not too late however to quit and preserve the sequencer memory intact Pressing NO at this point will return you to the Storage page without erasing the sequencer memory allowing you to save it to disk before proceeding Press YES to proceed The following screen appears sat SYS EX REC STRTUS WRITING SIZE 0 SRUE SEND EXIT The SD 1 will now record into its memory ...

Страница 217: ... the same name already on the disk the SD 1 will ask DELETE OLD VERSION Press YES to save the file replacing the one on the disk This is for updating files to which you have made changes Or press NO to abort the procedure After the file is saved the SD 1 returns to the SAVE FILE page so that you can save the a backup copy of the data to a different disk if you wish Press NO or any other front pane...

Страница 218: ...Press the soft button above the file name and use the data entry controls to find the file you want to transmit Or use the File Banks to quickly locate the file without scrolling as detailed earlier in this section Press YES If there is not enough free sequencer memory to hold the Sys Ex data the display shows SEQUENCER DATA WILL BE ERASED If you have sequencer data in memory which hasn t been sav...

Страница 219: ...ffer Incoming MIDI Sys Ex messages will be recorded and added to the data already in the buffer memory Pressing SAVE will always take you to the SAVE FILE page where you can name and save to disk the data in the buffer memory This allows a number of useful applications You can for example load a Sys Ex file from disk then transmit to the SD I an additional message or messages adding that data to t...

Страница 220: ... version of the Sequencer OS on the disk cannot be loaded either because the OS ROMs in the system require a more recent disk version or because the disk version requires more recent OS ROMs DISK COMMAND NOT COMPLETED appears when you respond NO to DELETE OLD VERSION when saving files NO FREE DISK FILES indicated that there are no free directory entries in which to save the file NO SYS EX DATA TO ...

Страница 221: ...incorrect Probably indicates a bad disk sector The file may be unusable DISK ERROR BAD DISK OS during a file operation the CRC of the Disk OS Program Control Block was incorrect Probably indicates a bad disk sector The disk may be unusable DISK ERROR BAD DIRECTORY during a file operation the CRC of the Directory blocks was incorrect Probably indicates a bad disk sector The disk may be unusable DIS...

Страница 222: ...top level song editing page Pressing the button twice will display the Song Step Editor If you press the Edit Song button when a sequence is selected the display will respond SONG NOT SELECTED and will not allow you onto this page The following functions can be selected from the Edit Song page INFO Provides information about the song and lets you adjust the tempo ERASE Erase and undefine the song ...

Страница 223: ...Total Song Time This shows you the total time of the song in minutes seconds and hundredths of a second It is readout only you cannot directly change it However when you change the Song Tempo Offset above you will see the time readout change accordingly ERASE The Erase command will erase the currently selected song and leave its location undefined First make sure the Song you want to erase is sele...

Страница 224: ...to fill the gap STEP While this field is selected the step number can be edited using the data entry slider or the up and down arrows allowing you to move up and down through the song and view each step SEQ Selects the sequence to be used for the current song step An empty song step will show SEQ BLANK To put a sequence into an empty song step thus defining the step simply underline this field and...

Страница 225: ...elect a group of 6 positions which control the transposition of tracks for the current song step Repeated presses of the soft button will scroll across the set of 6 tracks and allow each track to be transposed or left untransposed normal individually A T indicates that the track will be transposed and an N indicates that the track will play at normal pitch Editing Song Steps Using the Song Step Ed...

Страница 226: ...hange anything in an existing Song Step To change any of the variables sequence name number of reps track mute or transpose status within a Song Step which has already been created simply go to that step as described above select the thing you want to edit and change it To Insert a step anywhere in the song Press STEP and go to the step before which you want to insert the step That is if you want ...

Страница 227: ...ify will be appended or tacked on to the the end of the currently selected sequence Make sure the sequence onto which you want to append another is selected Press Edit Seq Press APPEND The display shows APPEND SEQ SEQUENCE 12 YES ONTO SEQ SEQUENCE 12 BARS 000 NO Use the data entry controls to select the sequence which will be appended to the current sequence The default source is the current seque...

Страница 228: ... the total time of the sequence in minutes seconds and hundredths of a second It is readout only you cannot directly change it However when you change the tempo above you will see the time readout change accordingly ERASE The Erase command will delete the currently selected sequence from memory and leave its location undefined BLANK First make sure the sequence you want to erase is selected Then P...

Страница 229: ...unction lets you add any number of bars to the sequence up to a total sequence length of 999 bars It consists of two steps 1 you specify at which bar you want to start adding bars and then 2 you select how many bars you want to add To ADD Bars to the selected sequence Make sure the sequence to which you want to add bars is selected Press the Edit Seq and press LENGTH Press ADD BARS the display sho...

Страница 230: ...h bar you want to begin removing bars This can be any Bar within the Sequence Bars will be deleted from the beginning of the Bar you select here Press the soft button above the number of bars Use the data entry controls to select how many bars you want to delete Press YES to complete the command or press NO to cancel Sequence Bank Utilities A new way to select sequences has been added to certain s...

Страница 231: ... you remove or copy to another track any range of notes controllers program changes etc MERGE Merge or combine the data from one track with another Edit Track Range Page Setting the Time and Key Range Within almost all track editing functions you will find a parameter labeled RANGE Pressing the soft button below RANGE takes you to a special sub page where you can define the time and key range over...

Страница 232: ...used by the Autopunch function They are interactive changing the IN or OUT times in either location will cause them to be changed in the other Track Edit Functions Press the Edit Track button The display shows EDIT TRACK 01 SHIFT QUANT I ZE ERASE COPY MORE SHIFT Shift Track by Clocks This command will cause all the events in the track to be moved ahead or back in time by a specified number of cloc...

Страница 233: ...ntize a specific range rather than the entire track press RANGE and set the time and or key range on the Edit Track Range page as shown earlier in this section If not leave it set to RANGE ALL Press YES to execute the edit command or press NO to cancel After editing the SD I returns with the Play Keep page where you can audition the results of the edit before deciding whether to keep it or not ERA...

Страница 234: ...is section If not leave it set to RANGE ALL Press YES to execute the copy command or press NO to cancel After editing the SD 1 returns with the Play Keep page where you can audition the results of the edit before deciding whether to keep it or not The Copy Track function behaves differently depending on whether or not there is already recorded data on the destination track If the destination track...

Страница 235: ...tave amount Range is 4 to 4 octaves Press the soft button above the transpose amount again to move the underline to the semitone amount and adjust that Range is 12 to 12 semitones If you wish to transpose a specific range rather than the entire track press RANGE and set the time and or key range on the Edit Track Range page as shown earlier in this section If not leave it set to RANGE ALL Press YE...

Страница 236: ...et to RANGE ALL Press YES to execute the Scale command or press NO to cancel After editing the SD I returns with the Play Keep page where you can audition the results of the edit before deciding whether to keep it or not EVENT LIST The Event List function provides you with an extremely powerful tool for viewing and editing each event in the track Every key event controller change and program chang...

Страница 237: ...On Key Events the display looks like EVENT KEY C4 115 The three segments represent Event Type Key Number and Velocity On Poly Key Pressure Events the display shows EVENT KPS C4 115 The three segments represent Event Type Key Number and pressure Value For all other Event types the display shows for example EVENT MOD 124 where the two segments represent the Event Type and the Value Time locations wi...

Страница 238: ...on the other Event List pages In song mode the display shows Step Rep Bar Beat Clock For example Step 1 Rep 2 Bar 4 Beat 3 Clock 76 would appear as START TIME 01 02 004 03 76 DURATION For Key Events only you can change the length of the event the time between when the key is struck and it is released From the Event Edit sub page press the soft button below DURATION The display shows Bar Beat Clock...

Страница 239: ...the Play Keep page where you can audition the new track and the original before deciding to either keep the new track keep the old track or return to the Event Editor to edit some more The display shows Press KEEP ORIGINAL to exit to the Edit Track page leaving the track as it was before you began editing Press KEEP NEW to save the changes you have made to the track in Event List mode replacing th...

Страница 240: ...RESSURE Channel mono Pressure CNTL 7 VOLUME Volume Pedal CNTL 64 SUSTN Sustain Pedal CNTL 66 SOSTN Sostenuto Pedal CNTL 70 PSEL Patch Selects buttons CNTL 71 TIMER Timbre Controller CNTL 72 RELS Release Controller CNTL XX XCNTL Ext Controller M1XDWN VOLUME Mixdown Volume MIXDOWN PAN Mixdown Pan KEY PRESSURE Poly Key Pressure PITCH BEND Pitch Bend Wheel PROGRAM CING Program Changes KEY EVENTS Notes...

Страница 241: ...e source sequence is not altered or erased by this process Make sure the track you want to merge the source track is selected Press Edit Track twice or press MORE from the Edit Track page then select MERGE The display shows Destination Track I MERGE TRACK 1 INTO TRACK L YES IN SEQ SEQUENCE 32 HO Destination Sequence Press the soft button above the destination track and use the data entry controls ...

Страница 242: ... channel or mode The drum machine should now sync to the SD 1 s clock Pressing Play or Slop Cant will Start Stop and Continue the drum machine assuming it receives those commands To Sync the SD 1 to a Drum Machine Connect the MIDI Out of the drum machine to the MIDI In of the SD I Set the SD I to sync to MIDI clocks On the Seq Control page select CLOCK MIDI Set the drum machine to not send channel...

Страница 243: ...he SONG SEL parameter on the MIDI Control sub page The SD I transmits and receives MIDI Song Selects in Sequence Mode as well as Song Mode depending again on the setting on the SONG SEL parameter This allows you to select any SD 1 sequencer location from a remote sequencer computer or drum machine and vice versa They are set up as follows MIDI Song Selects 00 59 will select SD I Sequencer location...

Страница 244: ...gain the SD 1 will ask you SAVE CHANGES TO SEQ NAME Answer YES Notice when you select the new sequence that all the external instruments connected to the SD 1 change to the proper program for that sequence each track sent out a program change on its MIDI channel when the sequence was selected Now select the second sequence again Each external instrument again changes back to the proper program Not...

Страница 245: ...4 05 06 Select any track and set it to receive on the MIDI Channel you wish Now as long the SD 1 is in MULTI Mode incoming MIDI information on that channel will be received by that track Incoming MIDI program changes will change the program on the track Incoming MIDI volume messages will adjust the level of the track Press Tracks 7 Z2 and do the same for the 6 tracks there If as is often the case ...

Страница 246: ...ll 12 Tracks to receive Tracks that you leave in the UNDEFINED state will not receive any MIDI data Just define as many tracks as you need Or set some tracks to EXT on the Performance MIDI page Tracks set to EXT will not respond to incoming Arm data Using the SD 1 with an External MIDI Sequencer For optimal results when using it with an external multi track sequencer the SD 1 should be set up as d...

Страница 247: ...letting each string send pitch bends independently which is the only way to truly recreate guitar technique on a synthesizer Some earlier guitar synths do not support MONO mode You will have to consult the manual of your particular model to see if it does If you have a guitar synth which only sends in POLY Mode i e sends all six strings on the same MIDI Channel you should use the SD 1 in POLY Mode...

Страница 248: ...annel assignments are not automatic You must set the tracks to six consecutive channels Now you re ready to play A few things to bear in mind Notes played on each string will play only the corresponding track Each string track combination is totally independent You can change the program for each track manually from the SD 1 s front panel using the Replace Program function or by sending Program Ch...

Страница 249: ...Chart on the next page for a summary of the SD 1 MIDI implementation If you are writing a computer program to communicate with the SD 1 via MIDI or otherwise require a copy of the full SD 1 MIDI Specification it is available free of charge by writing to ENSONIQ Corp MIDI Specification Desk 155 Great Valley Parkway Malvern PA 19355 Include in your written request your name and address and indicate ...

Страница 250: ...Parameter 72 Release Parameter 100 Registered Param Select 101 Registered Param Select 1 95 1 Mod Wheel 4 Foot 7 Volume 10 Pan 70 Momentary Patch Select 71 Timbre Parameter 72 Release Parameter 100 Registered Param Select 101 Registered Param Select programmable Prog Change True 0 127 0 119 123 127 System Exclusive Q _ 0 System Song Pos Common Song Sel Tune 0 0 X 0 0 X System Clock Real Time Comma...

Страница 251: ... Song 12 9 Track 12 9 13 Countoff 5 6 14 18 19 30 Creating a New Sequence 5 1 7 12 17 Current Event Type 12 17 Cutoff Frequency 1 9 4 27 6 7 8 4 7 20 22 31 CV Pedal 1 5 12 4 4 5 44 6 9 Delete 11 5 9 10 13 23 26 12 3 5 9 17 9 2 10 Bars 12 6 8 9 S tep 12 5 Detune Amount 4 13 30 Diffusion 4 10 13 14 Digital Sequencing 5 2 Disk Capacity 11 I 3 Drive 5 3 11 1 3 6 8 11 13 22 26 File Types 11 2 Functions...

Страница 252: ...e 8 25 Scale Amount 8 24 Splits 2 I1 Tracking 8 4 6 Layering Programs 5 1 9 Sounds 2 7 LPO Amount 8 8 Depth 1 9 8 7 Leve1 8 7 28 Wave 8 4 Waveshapes 8 30 Loading Sys Ex Data 11 1 22 24 Looping 5 16 18 Low Battery 1 1 12 Low Frequency Decay 4 10 13 Low Pass 4 3 27 8 20 22 Merge 12 9 10 21 Merge Track 12 9 MIDI Channe1 2 4 3 1 11 12 5 5 16 17 32 34 6 6 8 Connections 1 1 24 13 6 5 32 34 Guitar Contro...

Страница 253: ...4 16 25 Re initialize 1 11 11 14 Record Mode 5 6 14 15 18 22 30 32 35 36 42 6 2 Record Source 5 16 Recording a Sequence 5 2 21 29 MIDI Tracks 5 34 Program Change 5 35 Song Tracks 5 40 Release 1 8 2 7 3 1 7 8 13 4 12 5 2 9 17 20 22 35 36 6 2 7 5 9 8 4 19 31 33 35 36 11 13 12 15 16 20 Restrike 7 8 Reverb Mix 4 11 16 17 20 29 Rolloff Curves 8 20 Save Changes 5 1 19 23 13 3 4 Saving System Exclusive D...

Страница 254: ...phony 7 1 System Exclusive 6 6 11 Wave 11 1 3 5 14 16 21 Class 8 9 12 15 16 25 List 8 10 Name 8 10 11 9 11 Tap Tempo 5 14 What is a Sequence Temperature Guidelines 1 1 2 5 1 5 What is a Song 5 1 5 Tempo 5 14 15 23 24 27 XCTRL 30 6 7 12 1 2 6 7 8 4 7 12 16 Time Signature 5 12 18 24 12 8 Track Pan 5 37 Range 3 5 12 1 4 10 15 20 Status 5 17 36 6 9 10 Volume 5 1 9 38 6 9 Transport controls 5 1 5 Trans...

Страница 255: ...be located away from heat sources such as radiators heat registers or other products that produce heat 8 The product should be connected to a power supply only of the type described in the operating instructions or as marked on the product 9 This product may be equipped with a polarized line plug one blade wider than the other This is a safety feature If you are unable to insert the plug into the ...

Страница 256: ...Part 9310010001 Price 9 95 US Model4MM 70 knsonra THE TECHNOLOGY THAT PERFORMS ...

Отзывы: