background image

Quick Start Guide

www.ensembledesigns.com

Page 7

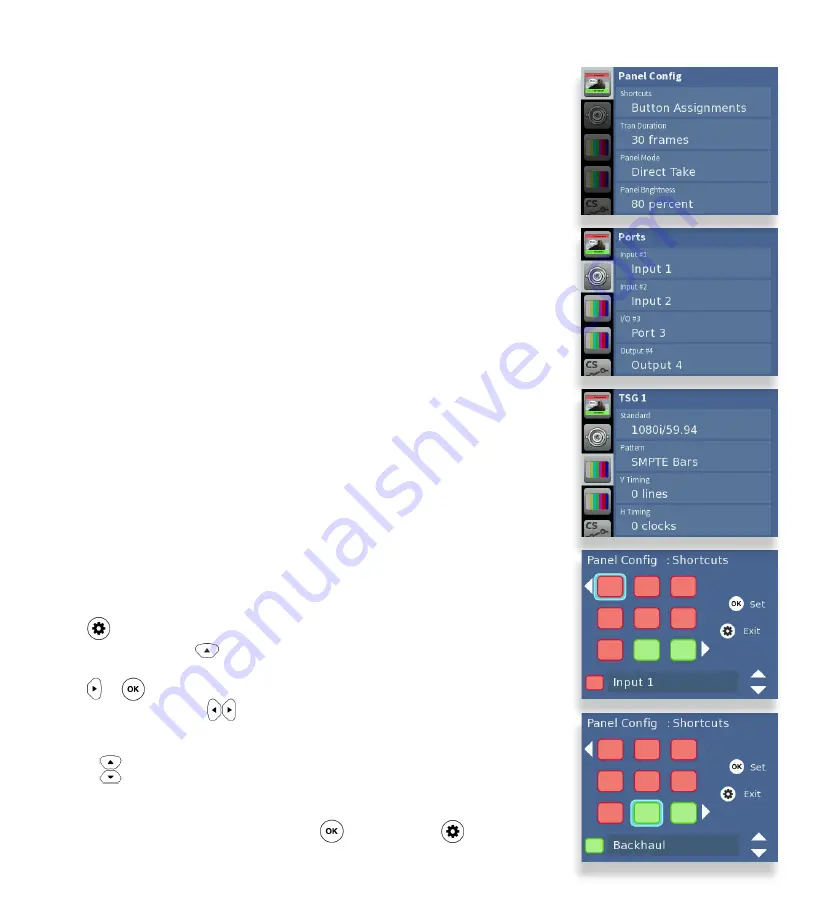
Assigning Shortcut Buttons

Assign Sources and Destinations to the nine shortcut buttons in order to streamline 
router operation. You can have any combination of Source buttons and  
Destination buttons. 

Press           to get to the configuration menus. 

Panel Config 

is the first configuration 

menu. If needed, use the          arrow to navigate to 

Panel Config

.

Press        or           twice to select 

Shortcuts

 and then go to the Shortcuts Button 

Assignments map. Use the             arrows to select the shortcut button you want to 
configure. 

Use the          arrows to select a Source or Destination to assign to the selected shortcut 
button. A button can also be unassigned.

After you’ve finished assigning shortcuts, press           to save, or press           to cancel. 

Front Panel Router Configuration Menus

Panel Config


Ports
 

TSG1


TSG2
Clean Switch 1


Clean Switch 2
Timing & Genlock


Network

Assign shortcut buttons, adjust mix transition durations, select 

preset/take or direct take mode, adjust panel brightness, 

number of audio meters, meter reference level, peak display, 

disable live video 
Name Sources and Destinations, define ports as inputs or 

outputs as needed 
Select a test signal, choose its standard, adjust test signal 

output timing, configure slate, enable audio groups, select tone 

frequency 
Same as test signal generator 1, but for the 2nd TSG 
Set the clean switch’s standard and assign it to an output, adjust 

vertical and horizontal timing, enable audio groups, choose 

audio source settings, audio type (embedded or AES), split 

mode settings, SD > HD Pillar Box settings, HD > SD Letter Box 

settings. 430-X, 430, 410-H and 410 units only 
Same as Clean Switch 1, but for the 2nd Clean Switch 
Select between external and internal reference, get info about 

reference status and the system frame rate (determined by 

TSG1) 
Change the router’s IP address and other network settings 

Содержание BrightEye NXT 410

Страница 1: ...BrightEye NXT Routers Clean and Quiet Video and Audio Routing Switchers Models 430 X 430 415 410 H 410 Quick Start Guide ...

Страница 2: ...BrightEye NXT 430 X 430 415 410 H 410 Compact Routers Page 2 Front Panel Controls ...

Страница 3: ...Quick Start Guide www ensembledesigns com Page 3 Models 410 H and 410 Rear Connectors ...

Страница 4: ...BrightEye NXT 430 X 430 415 410 H 410 Compact Routers Page 4 Models 430 X 430 and 415 Rear Connectors ...

Страница 5: ...tion I O 6 Unassigned I O 7 Unassigned I O 8 Unassigned I O 9 Unassigned I O 10 Unassigned I O 11 Unassigned SFP I O 12 13 Unassigned SFP I O 14 15 Unassigned TSG 1 Source TSG 2 Source CS 1 Unassigned 430 430 X CS 2 Unassigned 430 430 X Connect Reference If Needed The BrightEye NXT locks to house reference or to its own internal precision standard Select Internal or External from the Timing Genloc...

Страница 6: ...ake button again to return to Preset Take mode Mix Transition Panel Mode For destinations that are going through a Clean Switch you can mix transitions from the front panel using configurable transition durations Switch between Mix mode and Cut mode by double tapping the assigned destination shortcut button Adjust the transition duration through the Panel Config menu Front Panel Navigation Press t...

Страница 7: ...witch 1 Clean Switch 2 Timing Genlock Network Assign shortcut buttons adjust mix transition durations select preset take or direct take mode adjust panel brightness number of audio meters meter reference level peak display disable live video Name Sources and Destinations define ports as inputs or outputs as needed Select a test signal choose its standard adjust test signal output timing configure ...

Страница 8: ...n Press or to go to Ports Configuration Use the arrows to select the port s assignment Available choices reflect the type of port you are working with Press to set your new port configuration selection or press to cancel your selection Naming Ports From Ports Configuration press to enter the Port Name menu Then press to go to the front panel keyboard menu Use the and arrows to highlight the letter...

Страница 9: ...When gray the cross point is not active When finished press to exit Adjusting Audio Levels When the signal is output through a Clean Switch you can adjust audio levels on a per input and per channel basis The BrightEye NXT compact routers can apply gain or attenuation from 12 0 dB to 70 dB When the Clean Switch is in Mix mode the audio output will properly mix between the adjusted settings of one ...

Страница 10: ...ean Switch to use Press to confirm your new clean switch standard or press to cancel Clean Switching on Models 430 and 410 The BrightEye NXT 430 and 410 have two clean switches that are useful when switching between asynchronous sources or taking a router output directly to air To switch cleanly between different sources the sources and the clean switch must share the same format and standard For ...

Страница 11: ...th respect to the genlock reference If you are using embedded audio enable the appropriate audio groups Setting the Clean Switch and U D C Conversion Output Standard While in the Clean Switch menu press to navigate to the Standard menu Press to select it Use the arrows to select the standard you want the Clean Switch to use Press to confirm your new clean switch standard or press to cancel Assigni...

Страница 12: ...XT as received from the factory it will have the self assigned static IP address of 192 168 1 101 To change the BrightEye NXT s IP address and network settings use the Network menu Note that the router supports only manual settings DHCP is not supported Setting the IP Address Press and use the arrow to navigate to the Network menu Press or to highlight the Address submenu Press or to enter the Net...

Страница 13: ...Needed window displays Enter the name you want to use to refer to this web control point for example NXT 430 Admin Click Request Control Point The message Not Authorized displays Select Settings from the upper left part of the browser window The Settings window displays The Control Point you just requested will now be shown Set the profile to Factory Default or another profile if you have one set ...

Страница 14: ...Source Click Take or Mix Your chosen Source is routed to the Destination you selected Click Direct to toggle the Direct Take mode on or off Sometimes called a hot take a direct take lets you select a Destination and then immediately Take simply by selecting a Source Gang allows one Source to be routed to multiple Destinations When Gang is on select all of the Destinations you want to use then sele...

Страница 15: ...ttings Menu Profiles The web browser Settings menus provide complete control of the router including a software update interface network settings timing and automation control Of special interest is the Profiles menu which allows you to define which Sources and Destinations can be accessed from a Control Point other than the router itself Control Points include computers tablets smart phones autom...

Страница 16: ...e or contact us at 1 530 478 1830 or service ensembledesigns com All Ensemble Designs products have a 5 year warranty Avenue and BrightEye products are designed and built in California at Ensemble Designs Come visit us Factory Reset To reset your BrightEye NXT Router to factory settings press and hold both the and the while powering up the unit Wait for the arrows to turn red and blink three times...

Отзывы: