~41~
5.
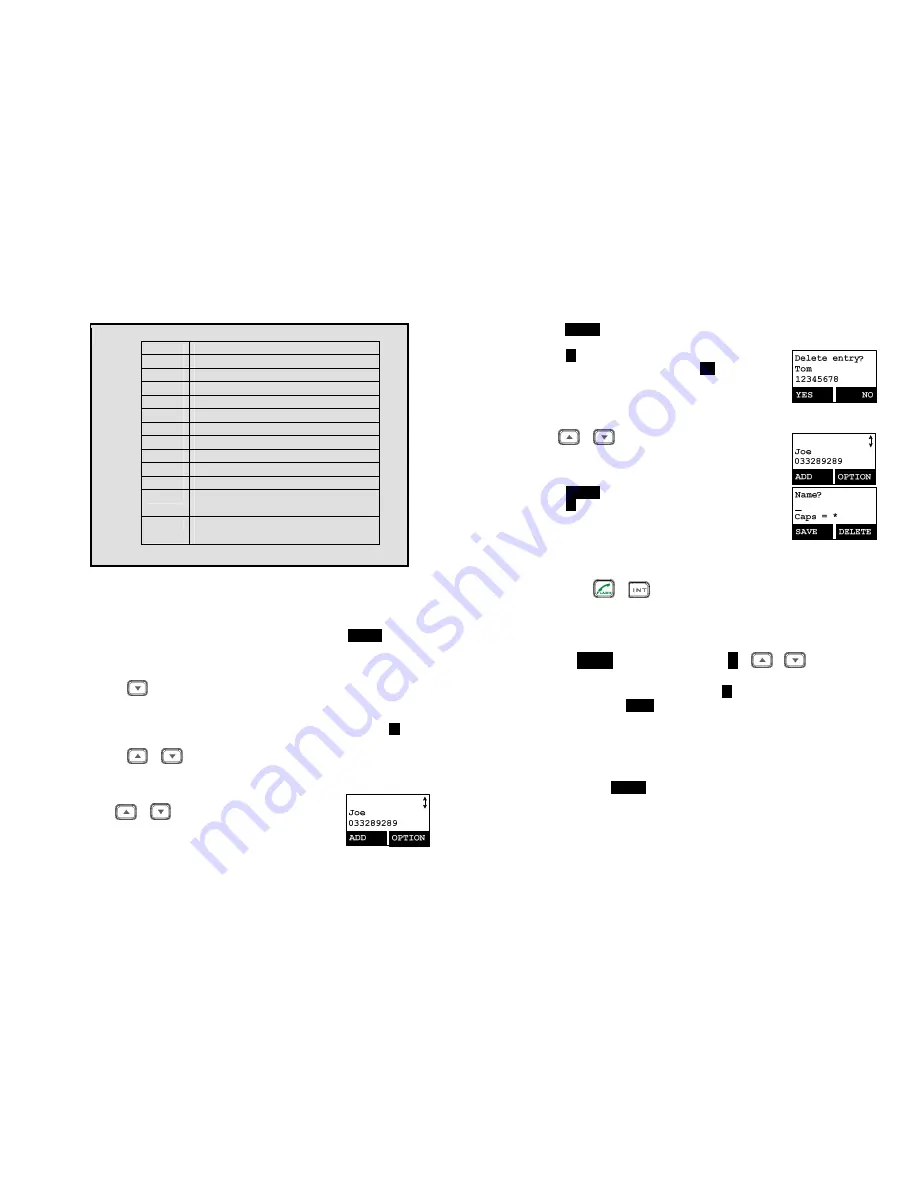
Character Table:
Key
Characters and Orders
1
‘ + , . * ( ) & 1
2
A B C 2
3
D E F 3
4
G H I 4
5
J K L 5
6
M N O 6
7
P Q R S 7
8
T U V 8
9
W X Y Z 9
0
0
*
Caps – when in character editing.
*
– when in number editing.
#
Space &
#
– when in character editing
# & P (Pause) – when in number editing
4. The entries are alphabetically sorted and stored as a list in an ascending order
(A to Z) from the top of the list.
5. The first line of LCD display shows name and the 2
nd
line shows the phone
number. If the phone number is longer than 16 digits, press
OPTION
(Right)
soft key and select Option 3 “View Number” to view the complete number.
6. To search for a record:
a. Use
scrolling key to enter Phone Book mode.
b. Press a key that corresponds to the first character of the name you are
looking for.
c.
For example, if you are looking for “EnGenius”, press the number
3
key
once.
d. Use
or
scrolling key to locate the exact record you are looking
for.
7. To erase a phonebook entry:
a. Use
or
scrolling key or the alphabetical search
method to locate the record to be erased or edited.
~42~
b. Press
OPTION
(Right) soft key to enter the option menu.
c. Press
1
to erase the intended phone entry.
d. LCD will show “Delete entry?” Press
YES
(Left) soft key to
confirm your change.
8. To edit a phonebook entry:
a. Use
or
scrolling key or the alphabetical search
method to locate the record to be erased or edited.
b. Press
OPTION
(Right) soft key to enter option menu.
c. Press
2
to edit the intended phone entry.
9.
Dial from display:
a.
Press
or
to dial the phone number or Handset ID displayed.
10. To transfer the phonebook to another handset:
To transfer phonebook, both parties have to enter the phonebook transfer
mode first by following below:
a. Press
OPTION
right soft key followed by
5
or
or
scrolling key to
transfer while handset is in phonebook mode.
b. For the phone doing the sending, press
1
to enter sending mode.
i.
Either press
TX ALL
(left softkey) to transfer all phonebook entries to
another handset(s)
Note: if you want to transfer all entries from an handset but the entry
is not from beginning (entry #1), it will only transfer the
remaining entries. For example, if you are have 10 entries, and
you start at entry #5, then it only transfers #5 through #10.
ii.
Or press
TX ONE
(right softkey) to transfer just one entry to another
handset(s).
Note: you will need to at the desired entry before going to the TX
ONE option for that particular entry to be transferred.
iii.
Press the 2-digit handset ID or group ID, then select all phonebook
entries or one entry to be transferred.


