background image

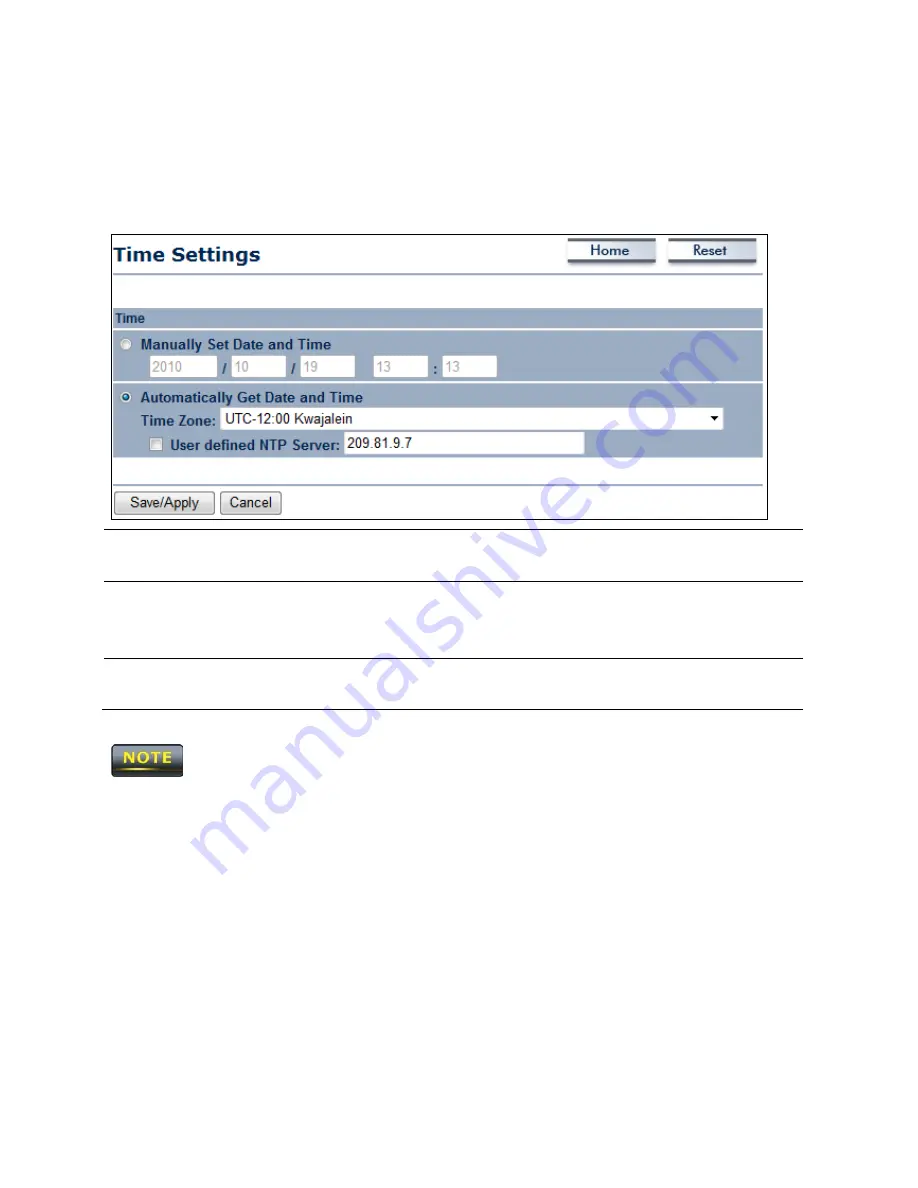
11.6 Time Settings 

Click the 

Time Settings

 link under the 

Management

 menu to configure the ENH200 system 

time. You can enter the time manually or, to ensure accuracy, synchronize the ENH200 with 

Network Time Protocol (NTP) server. 


Manually Set Date and 

Time 

Manually specify the date and time. 

Automatically Get 

Date and Time 

Select a time zone from the drop-down list and check whether 

you want to enter the IP address of an NTP server or use the 

default NTP server. 

Save/Apply / Cancel 

Click 

Save/Apply

 to apply the changes or 

Cancel

 to return 

previous settings. 


Clicking 

Save/Apply

 changes the setting immediately. You cannot undo the action. 


Содержание ENH200

Страница 1: ...Long Range Wireless N Client Bridge Access Point Model ENH200 User Manual Version 1 0 ...

Страница 2: ...000 20 4 5 CONFIGURING AN APPLE MACINTOSH COMPUTER 22 CHAPTER 5 INTRODUCING THE WEB CONFIGURATOR 23 5 1 LOGGING IN TO THE WEB CONFIGURATOR 23 CHAPTER 6 STATUS 25 6 1 SAVE LOAD 25 6 2 MAIN 26 6 3 WIRELESS CLIENT LIST 27 6 4 SYSTEM LOG 28 6 5 CONNECTION STATUS 29 6 6 DHCP CLIENT TABLE 30 CHAPTER 7 SYSTEM 31 7 1 CHANGING OPERATING MODES 31 CHAPTER 8 WIRELESS CONFIGURATION 33 8 1 WIRELESS SETTINGS 33 ...

Страница 3: ...int to Point Tunneling Protocol 65 10 2 LAN SETTINGS ROUTER MODE 67 10 3 VPN PASS THROUGH 68 10 4 PORT FORWARDING 69 10 5 DMZ 71 CHAPTER 11 MANAGEMENT SETTINGS 72 11 1 ADMINISTRATION 72 11 2 MANAGEMENT VLAN 74 11 3 SNMP SETTINGS 75 11 4 BACKUP RESTORE SETTINGS 76 11 5 FIRMWARE UPGRADE 77 11 6 TIME SETTINGS 78 11 7 LOG 79 11 8 DIAGNOSTICS 80 CHAPTER 12 NETWORK CONFIGURATION EXAMPLES 81 12 1 ACCESS ...

Страница 4: ...MODE 89 13 5 CLIENT ROUTER MODE 90 13 6 RADIUS CONNECTIONS 90 APPENDIX A TROUBLESHOOTING 92 A 1 PROBLEM SOLVING 92 A 2 CONTACTING TECHNICAL SUPPORT 93 APPENDIX B SPECIFICATIONS 94 APPENDIX C GLOSSARY 95 APPENDIX D FCC INTERFERENCE STATEMENT 100 ...

Страница 5: ...h wireless local area networks WLANs This document provides the information you need to install and configure your Access Point bridge Convention This publication uses these conventions symbols to convey instructions and information and highlight special message Caution This symbol represents the important message on incorrect device operation that might damage the device Note This symbol represen...

Страница 6: ..._______________________________________________ Figures in this document may use the following generic icons EHN device WLAN signal Client computer laptop Internet Client computer desktop PoE injector Power adapter ...

Страница 7: ... MPEG video streaming High output power up to 26 dBm delivers superior range and coverage Fully Interoperable with IEEE 802 11b IEEE 802 11g IEEE 802 11n compliant devices Multi function capabilities enable users to use different modes in various environments Point to point and point to multipoint wireless connectivity enable data transfers between two or more buildings Channel bandwidth selection...

Страница 8: ...ss to real time information such as doctors and nurses point of sale employees mobile workers and warehouse personnel can access the data they need and increase productivity without having to look for a place to plug into the network Frequently changed environments WLANs are well suited for showrooms meeting rooms retail stores and manufacturing sites where workplaces are rearranged frequently Wir...

Страница 9: ...ct your place of purchase immediately Keep all packing materials in case you need to return the ENH200 The ENH200 must be returned with its original packing materials Use only the power adapter supplied with your ENH200 Using a different power adapter can damage the ENH200 1 3 System Requirement To install the ENH200 you need an Ethernet cable and a computer equipped with An Ethernet interface One...

Страница 10: ...ce allows the ENH200 to be powered using the supplied PoE injector The Reset button can be used to reboot the ENH200 and return the device to its default factory configuration erasing any overrides you may have made to the device s default settings The Reset button is recessed to prevent accidental resets To reboot the ENH200 use a flat object such as a pencil to press the Reset button for approxi...

Страница 11: ... direct or near line of sight with the Base Station antenna The antenna should be aligned to face the general direction of the Base Station 3 2 Installing the ENH200 To install the ENH200 use the following procedure to mount the device on a pole and refer to the figure below 1 The bottom of the ENH200 is a movable cover Grab the cover and pull it back hard to remove the cover 2 Insert a standard E...

Страница 12: ...mast strap through the middle hole of the ENH200 Use a screwdriver to unlock the pole mounting ring putting it through the ENH200 7 Mount the EOA200 securely to the pole by locking the strap tightly This completes the installation procedure ...

Страница 13: ...N ENH200 is connected to the network but not sending or receiving data Blink ENH200 is sending or receiving data WLAN Green Access Point or Client Bridge Mode OFF ENH200 radio is off and the device is not sending or receiving data over the wireless LAN ON ENH200 radio is on and the device is not sending or receiving data over the wireless LAN Blink ENH200 radio is on and the device is sending or r...

Страница 14: ...guring Your Computer for TCP IP To configure the ENH200 use a computer that is configured for TCP IP This chapter describes how to configure the TCP IP settings on a computer that will be used to configure the ENH200 ...

Страница 15: ...ft Windows 7 1 In the Start menu search box type ncpa cpl 2 When the Network Connections List appears right click the Local Area Connection icon and click Properties 3 In the Networking tab click either Internet Protocol Version 4 TCP IPv4 or Internet Protocol Version 6 TCP IPv6 and then click Properties ...

Страница 16: ...4 In the properties dialog box click Obtain an IP address automatically to configure your computer for DHCP ...

Страница 17: ...ure in section 4 4 1 On the Windows taskbar click Start click Control Panel and then select the Network and Internet icon 2 Click View Networks Status and tasks and then click Management Networks Connections 3 Right click the Local Area Connection icon and click Properties 4 Click Continue The Local Area Connection Properties dialog box appears 5 In the Local Area Connection Properties dialog box ...

Страница 18: ...l Version 4 Properties dialog box click Obtain an IP address automatically to configure your computer for DHCP 7 Click the OK button to save your changes and close the dialog box 8 Click the OK button again to save your changes ...

Страница 19: ...erform the procedure in section 4 4 1 On the Windows taskbar click Start click Control Panel and then click Network and Internet Connections 2 Click the Network Connections icon 3 Click Local Area Connection for the Ethernet adapter connected to the ENH200 The Local Area Connection Status dialog box appears 4 In the Local Area Connection Status dialog box click the Properties button The Local Area...

Страница 20: ...s dialog box 7 Click the OK button again to save your changes 8 Restart your computer 4 4 Configuring Microsoft Windows 2000 Use the following procedure to configure your computer if your computer has Microsoft Windows 2000 installed 1 On the Windows taskbar click Start point to Settings and then click Control Panel 2 In the Control Panel window double click the Network and Dial up Connections ico...

Страница 21: ...alog box verify that Internet Protocol TCP IP is checked Then select Internet Protocol TCP IP and click the Properties button 6 Click Obtain an IP address automatically to configure your computer for DHCP 7 Click the OK button to save this change and close the Local Area Connection Properties dialog box 8 Click OK button again to save these new changes 9 Restart your computer ...

Страница 22: ...ou see may differ slightly from the following However you should still be able to use this procedure as a guide to configuring your Apple Macintosh for TCP IP 1 Pull down the Apple Menu click System Preferences and select Network 2 Verify that the NIC connected to the ENH200 is selected in the Show field 3 In the Configure field on the TCP IP tab select Using DHCP 4 Click Apply Now to apply your s...

Страница 23: ...riate for your operating system use that computer s Web browser to log in to the ENH200 Web Configurator 1 Launch your Web browser 2 In the browser address bar type 192 168 1 1 and press the Enter key If you changed the ENH200 LAN IP address enter the correct IP address 3 When the Windows Security window appears type admin as the username in the top field and type admin as the password in the bott...

Страница 24: ...formation see page 72 Back up the configuration and be sure you know how to restore it Restoring an earlier working configuration can be useful if the ENH200 becomes unstable or crashes If you forget your password you will have to reset the ENH200 to its factory default settings and lose any customized override settings you configured However if you back up an earlier configuration you will not ha...

Страница 25: ...ng options Main Wireless Client List System Log Connection Status The following sections describe these options 6 1 Save Load This page lets you save and apply the settings shown under Unsaved changes list or cancel the unsaved changes and revert to the previous settings that were in effect ...

Страница 26: ...ion such as operating mode system up time firmware version serial number kernel version and application version The LAN Settings section shows Local Area Network setting such as the LAN IP address subnet mask and MAC address The Current Wireless Settings section shows wireless information such as frequency and channel Since the ENH200 supports multiple SSIDs information about each SSID such as its...

Страница 27: ... Wireless Client List link under the Status drop down menu displays the list of clients associated to the ENH200 along with the MAC addresses and signal strength for each client Clicking the Refresh button updates refreshes the client list ...

Страница 28: ...s records events of possible interest in its internal memory To view the logged information click the System Log link under the Status drop down menu If there is not enough internal memory to log all events older events are deleted from the log ...

Страница 29: ...ion Status link under the Status drop down menu displays the current status of the network The information shown includes network type SSID BSSID connection status wireless mode current channel security data rate noise level and signal strength ...

Страница 30: ...ent List link under the Status drop down menu displays the clients that are associated to the ENH200 through DHCP The MAC addresses and signal strength for each client are also shown Clicking the Refresh button updates refreshes the client list ...

Страница 31: ... to System Operation mode Device Name Enter a name for the device The name you type appears in SNMP management This name is not the SSID and is not broadcast to other devices Country Region Select a Country Region to conform to local regulations Operation Mode Use the radio button to select an operating mode To use Access Point mode with WDS select Access Point here and then enable the WDS functio...

Страница 32: ...Clicking Accept does not apply the changes To apply them use Status Save Load see section 4 1 ...

Страница 33: ...iate operating mode see Chapter 7 8 1 Wireless Settings This section describes basic wireless settings For more information see Chapter 12 8 1 1 Access Point Mode The ENH200 supports Access Point Mode In this mode users with a wireless client device within range can connect to the ENH200 to access the WLAN The following figure shows an example of an ENH200 operating in Access Point Mode The sectio...

Страница 34: ...Channel Frequency Select the channel and frequency appropriate for your country s regulation Auto Check this option to enable auto channel selection AP Detection AP Detection can select the best channel to use by scanning nearby areas for Access Points Current Profile Configure up to four different SSIDs If many client devices will be accessing the network you can arrange the devices into SSID gro...

Страница 35: ...icate with different VID by Selecting the radio button Accept Cancel Click Accept to confirm the changes or Cancel to cancel and return previous settings Clicking Accept does not apply the changes To apply them use Status Save Load see section 4 1 ...

Страница 36: ...hide the SSID from clients If checked the SSID will not appear in the site survey Station Separation Click the appropriate radio button to allow or prevent communication between client devices Wireless Security See the Wireless Security section Save Cancel Click Save to accept the changes or Cancel to cancel and return previous settings ...

Страница 37: ...l machines As a result DHCP information generated by the server will reach all client computers as though the clients resided on one physical network The following figure shows an example of an ENH200 communicating with an Access Point Wireless Router such as the EnGenius EOA7530 operating in Client Bridge Mode The sections that follow the figure below describe how to configure your ENH200 for Cli...

Страница 38: ...o establish a connection Prefer BSSID Enter the MAC address if known If you select an Access Point in the Site Survey this field is completed automatically WDS Client Click the appropriate radio button to enable or disable WDS Client Wireless Security See section 8 2 for information Accept Cancel Click Accept to confirm the changes or Cancel to cancel and return previous settings Clicking Accept d...

Страница 39: ...Points To connect to an Access Point click the Access Point s BSSID Wireless Security See the Wireless Security section Refresh Click Refresh to scan again If the Access Point has been configured to suppress its SSID the SSID section will be blank and must be completed manually ...

Страница 40: ...tive restricted or physically impossible The following figure shows an example of three ENH200 configured for WDS Bridge Mode communicating with each other In this configuration the ENH200 device on the left side of the figure behaves as a standard bridge that forwards traffic between the WDS links links that connect to other ENH200 WDS bridges The sections that follow the figure below describe ho...

Страница 41: ... Extension Channel Select upper or lower channel Your selection may affect the Auto channel function Channel Frequency Select the channel and frequency appropriate for your country s regulation Accept Cancel Click Accept to confirm the changes or Cancel to cancel and return previous settings Clicking Accept does not apply the changes To apply them use Status Save Load see section 4 1 ...

Страница 42: ... the changes or Cancel to cancel and return previous settings 1 Clicking Accept does not apply the changes To apply them use Status Save Load see section 4 1 2 The Access Point to which you want to extend wireless connectivity must enter the ENH200 s MAC address into its configuration For more information refer to the documentation for the Access Point Not all Access Point supports this feature ...

Страница 43: ...tions that have the SSID can be connected The ENH200 also provides wireless LAN 64 128 152 bit WEP encryption security WPA WPA2 and WPA PSK WPA2 PSK authentication as well as TKIP AES encryption security It also supports VPN pass through for sensitive data secure transmission The following figure shows an example of an ENH200 communicating with a Wireless ISP WISP Access Point in Client Router Mod...

Страница 44: ...nts You can select a discovered Access Point to establish a connection Prefer BSSID Enter the MAC address if known If you select an Access Point in the Site Survey this field is completed automatically Wireless Security See section 10 2 Accept Cancel Click Accept to confirm the changes or Cancel to cancel and return previous settings Clicking Accept does not apply the changes To apply them use Sta...

Страница 45: ...y Access Points To connect to an Access Point click the Access Point s BSSID Wireless Security See the Wireless Security section Refresh Click Refresh to scan again If the Access Point has been configured to suppress its SSID the SSID section must be completed manually ...

Страница 46: ... Level of WEP encryption applied to all WEP keys Choices are Select a 64 128 152 bit password lengths Default Key Specify which of the four WEP keys the ENH200 uses as its default Key1 Specify a password for security key index No 1 For security each typed character is masked by a dot Key2 Specify a password for security key index No 2 For security each typed character is masked by a dot Key3 Speci...

Страница 47: ... the encryption type Both uses TKIP and AES TKIP automatic encryption with WPA PSK requires passphrase AES automatic encryption with WPA2 PSK requires passphrase Passphrase Specify the security password For security each typed character is masked by a dot Group Key Update Interval Specify how often in seconds the group key changes 802 11n does not allow WEP WPA PSK WPA PSK TKIP security mode The c...

Страница 48: ... encryption with WPA PSK requires passphrase AES automatic encryption with WPA2 PSK requires passphrase Passphrase Specify the security password For security each typed character is masked by a dot Group Key Update Interval Specify how often in seconds the group key changes 802 11n does not allow WEP WPA PSK WPA PSK TKIP security mode The connection mode will change from 802 11n to 802 11g ...

Страница 49: ...quires passphrase AES automatic encryption with WPA2 PSK requires passphrase Passphrase Specify the security password For security each typed character is masked by a dot Group Key Update Interval Specify how often in seconds the group key changes WPA PSK Mixed can allow multiple security modes at the same time 802 11n does not allow WEP WPA PSK WPA PSK TKIP security mode The connection mode will ...

Страница 50: ...th WPA2 PSK Radius Server Specify the IP address of the RADIUS server Radius Port Specify the port number that your RADIUS server uses for authentication Default port is 1812 Radius Secret Specify RADIUS secret furnished by the RADIUS server Group Key Update Interval Specify how often in seconds the group key changes 802 11n does not allow WEP WPA PSK WPA PSK TKIP security mode The connection mode...

Страница 51: ...n with WPA2 PSK Radius Server Specify the IP address of the RADIUS server Radius Port Specify the port number that your RADIUS server uses for authentication Default port is 1812 Radius Secret Specify RADIUS secret furnished by the RADIUS server Group Key Update Interval Specify how often in seconds the group key changes 802 11n does not allow WEP WPA PSK WPA PSK TKIP security mode The date rate w...

Страница 52: ...on with WPA2 PSK Radius Server Specify the IP address of the RADIUS server Radius Port Specify the port number that your RADIUS server uses for authentication Default port is 1812 Radius Secret Specify RADIUS secret furnished by the RADIUS server Group Key Update Interval Specify how often in seconds the group key changes 802 11n does not allow WEP WPA PSK WPA PSK TKIP security mode The connection...

Страница 53: ...m connecting to the device RTS CTS Threshold Specify the threshold package size for RTC CTS A small number causes RTS CTS packets to be sent more often and consumes more bandwidth Distance Specify the distance between Access Points and clients Longer distances may drop high speed connections Antenna Selection Specify the internal antenna type Short GI Sets the time that the receiver waits for RF r...

Страница 54: ...ved Quality of Service Incoming Traffic Limit Specify the wireless transmission speed used for downloading Outgoing Traffic Limit Specify the wireless transmission speed used for uploading Accept Cancel Click Accept to confirm the changes or Cancel to cancel and return previous settings 1 Changing Wireless Advanced Settings may adversely affect wireless performance Please accept all default settin...

Страница 55: ...0 The default setting is Disable Wireless MAC Filters 0 ACL Mode Determines whether network access is granted or denied to clients whose MAC addresses appear in the MAC Address table on this page Choices are Disable Deny MAC in the list or Allow MAC in the list MAC Address Filter Enter the MAC address of the device Add Click Add to add the MAC address to the MAC Address table Apply Click Apply to ...

Страница 56: ...int s MAC address to which you want to extend the wireless area Mode Select Disable or Enable from the drop down list Accept Cancel Click Accept to confirm the changes or Cancel to cancel and return previous settings Clicking Accept does not apply the changes To apply them use Status Save Load see section 4 1 The Access Point to which you want to extend wireless connectivity must enter the ENH200 ...

Страница 57: ... Address field or be obtained automatically when the ENH200 connects to a device that has a DHCP server IP Address Enter the IP address of the ENH200 IP Suet Mask Enter the ENH200 subnet mask Default Gateway Enter the ENH200 default gateway Primary DNS Enter the ENH200 primary DNS Secondary DNS Enter the ENH200 secondary DNS Accept Cancel Click Accept to confirm the changes or Cancel to cancel and...

Страница 58: ...ket for a long period of time it is assumed to be dead Bridge Forward Delay Specify Bridge Forward Delay in seconds Forwarding delay time is the time spent in each of the Listening and Learning states before the Forwarding state is entered This delay is provided so that when a new bridge comes onto a busy network it looks at some traffic before participating Priority Specify the Priority number Sm...

Страница 59: ...es the ENH200 WAN settings There are four types of WAN connections Static IP DHCP PPPoE PPTP Please contact your ISP to find out which settings you should choose 10 1 1 Static IP Select Static IP for your WAN connection if your ISP provided information about which IP address subnet mask default gateway primary DNS and secondary DNS to use ...

Страница 60: ...ctions IP Address Enter the WAN port IP address IP Subnet Mask Enter the WAN IP subnet mask Gateway IP Address Enter the WAN gateway IP address Primary DNS Enter the primary DNS IP address Secondary DNS Enter the secondary DNS IP address Discard Ping on WAN Check to Enable to recognize pings on the ENH200 WAN interface or Disable to block pings on the ENH200 WAN interface Note Pinging IP addresses...

Страница 61: ...DHCP connection Account Name Enter the account name provided by your ISP Domain Name Enter the domain name provided by your ISP MTU Specify the Maximum Transmit Unit size It is recommended you accept the default setting of Auto Otherwise packets will be fragmented downstream if the MTU is set too high or too low which impacts network performance In extreme cases an MTU setting that is too low can ...

Страница 62: ... recognize pings on the ENH200 WAN interface or Disable to block pings on the ENH200 WAN interface Note Pinging IP addresses is a common method used by hackers to test whether the IP address is valid Blocking pings provides some extra security from hackers Accept Cancel Click Accept to confirm the changes or Cancel to cancel and return previous settings Clicking Accept does not apply the changes T...

Страница 63: ...ervices Remove your PPPoE software from your computer as it is not needed and will not work with your ENH200 Internet Connection Type Select PPPoE to begin configuration of the PPPoE connection MTU Specify the Maximum Transmit Unit size It is recommended you accept the default setting of Auto Otherwise packets will be fragmented downstream if the MTU is set too high or too low which impacts networ...

Страница 64: ...edial period once the internet lose connection Get Automatically From ISP Select whether to obtain the DNS automatically from the DHCP server Use These DNS Servers Click the radio button to set up the Primary DNS and Secondary DNS servers manually Discard Ping on WAN Check to Enable to recognize pings on the ENH200 WAN interface or Disable to block pings on the ENH200 WAN interface Note Pinging IP...

Страница 65: ...your ISP uses a Point to Point Tunneling Protocol PPTP connection You will need to provide the IP address subnet mask default gateway optional DNS optional server IP username and password provided by your ISP Internet Connection Type Select PPTP to begin configuration of the PPTP connection ...

Страница 66: ... minutes you want that period of inactivity to last Keep Alive If you want the ENH200 to periodically check your Internet connection select this option Then specify how often you want the ENH200 to check the Internet connection If the connection is down the ENH200 automatically re establishes your connection Get Automatically From ISP Obtains the DNS automatically from DHCP server Use These DNS Se...

Страница 67: ...the first three octets specified here must be the same as the first three octets in End IP Address Ending IP Address Specify the ending IP address range for the pool of allocated for private IP addresses The ending IP address must be on the same subnet as the starting IP address that is the first three octets specified here must be the same as the first three octets in Start IP Address WINS Server...

Страница 68: ...thout interruption PPTP Pass Through Check this option to enable PPTP pass through mode L2TP Pass Through Check this option to enable L2TP pass through mode IPSec Pass Through Check this option to enable IPSec pass through mode Accept Cancel Click Accept to confirm the changes or Cancel to cancel and return previous settings Clicking Accept does not apply the changes To apply them use Status Save ...

Страница 69: ... network the ENH200 can forward those requests to computers equipped to handle the requests If for example you set the port number 80 HTTP to be forwarded to IP address 192 168 1 2 all HTTP requests from outside users are forwarded to 192 168 1 2 Add Entry Click Add Entry to add port forwarding rules Accept Click Accept to confirm the changes Clicking Accept does not apply the changes To apply the...

Страница 70: ...ort number Ending Port Enter an ending port number All ports numbers between the starting and ending ports will forward users to the IP address specified in the IP Address field IP Address Enter the IP address of the server computer on the LAN network where users will be redirected Save Cancel Click Save to apply the changes or Cancel to return previous settings ...

Страница 71: ... access Adding a client to the DMZ may expose that computer to a variety of security risks so use this option as a last resort DMZ Hosting Enables or disables the ENH200 DMZ function DMZ Address Enter an IP address of the computer that will have unlimited Internet access Accept Cancel Click Accept to confirm the changes or Cancel to cancel and return previous settings Clicking Accept does not appl...

Страница 72: ...admin and the default password is admin Changing these settings protects the ENH200 configuration settings from being accessed by unauthorized users Name Enter a new username for logging in to the Web Configurator Password Enter a new password for logging in to the Web Configurator Confirm Password Re enter the new password for confirmation Remote Management Enable or disable remote management Rem...

Страница 73: ... IP address 8080 to access the ENH200 Web Configurator Save Apply Cancel Click Save Apply to apply the changes or Cancel to return previous settings Clicking Save Apply changes the settings immediately You cannot undo the action ...

Страница 74: ...nagement VLAN ID If your network includes VLANs and if tagged packets need to pass through the Access Point enter the VLAN ID Otherwise click No VLAN tag Accept Cancel Click Accept to confirm the changes or Cancel to cancel and return previous settings 1 If you reconfigure the Management VLAN ID you may lose your connection to the ENH200 Verify that the DHCP server supports the reconfigured VLAN I...

Страница 75: ...H200 SNMP function Contact Enter the contact details of the device Location Enter the location of the device Community Name Enter the password for accessing the SNMP community for read only access Community Name Enter the password for accessing the SNMP community for read and write access Trap Destination IP Address Enter the IP address where SNMP traps are to be sent Trap Destination Community Na...

Страница 76: ...ured with the same settings This page also lets you return the ENH200 to its factory default settings If you perform this procedure any changes made to the ENH200 default settings will be lost Save A Copy of Current Settings Click Backup to save the current configured settings Restore Saved Settings from a File To restore settings that have been previously backed up click Browse select the file an...

Страница 77: ... device To perform this procedure downloaded the appropriate firmware from your vendor The firmware upgrade procedure can take few minutes Do not power off the ENH200 during the firmware upgrade as it can cause the device to crash or become unusable The ENH200 restarts automatically after the upgrade completes ...

Страница 78: ...TP server Manually Set Date and Time Manually specify the date and time Automatically Get Date and Time Select a time zone from the drop down list and check whether you want to enter the IP address of an NTP server or use the default NTP server Save Apply Cancel Click Save Apply to apply the changes or Cancel to return previous settings Clicking Save Apply changes the setting immediately You canno...

Страница 79: ...n a report needs to be sent to the technical support department for debugging purposes Syslog Enable or disable the ENH200syslog function Log Server IP Address Enter the IP address of the log server Local Log Enable or disable the local log service Save Apply Cancel Click Save Apply to apply the changes or Cancel to return previous settings Clicking Save Apply changes the settings immediately You ...

Страница 80: ... IP Enter the IP address you would like to search Ping Packet Size Enter the packet size of each ping Number of Pings Enter the number of times you want to ping Start Ping Click Start Ping to begin pinging Traceroute Target Enter an IP address or domain name you want to trace Start Traceroute Click Start Traceroute to begin the trace route operation ...

Страница 81: ...oint Step1 Log in to the Web Configurator with your browser by entering the default IP address 192 168 1 1 Step2 Select your country or region s regulation Step3 Use site survey to scan channels available in nearby areas Step4 Select channel with less interferences Step5 Specify the SSID for your broadcast SSID and you can also configure multiple SSID at the same time Step6 Verify the VLAN identif...

Страница 82: ...r so the Wireless Client IP address must be configured manually using the same Local Area Network subnet 12 2 Client Bridge Mode Client Bridge Mode functions like a wireless dongle It must connect to an Access Point AP Router to join the network Refer to Chapter 13 to check the Access Point s configuration Client Bridge Step1 Log in to the Web Configurator with the default IP address 192 168 1 1 S...

Страница 83: ... Point with which you want to associate Step6 Set up the authentication settings that match the Access Point s settings Step7 Click Apply to save all changes The Client Bridge IP settings must match the Access Point s subnet ...

Страница 84: ...192 168 1 1 Step2 Select your country or region s regulation Step3 For Operation Mode select WDS Bridge from System Properties Step4 Select the channel you want to use Step5 Set up the authentication settings Step6 Set up WDS Link Settings Step7 Specify the MAC address of the Access Point with which you want to connect Step8 Click Apply to save all changes Each WDS bridge device must use the same ...

Страница 85: ...tep2 Select your country or region s regulation Step3 For Operation Mode select Client Router from System Properties Step4 Change your Local Area Network setting to Obtain an IP Address Automatically Step5 Use site survey to scan Access Points that are available in nearby areas Step6 Select the Access Point with you want to associate Step7 Set up authentication settings that match the Access Point...

Страница 86: ...uild a WLAN around your ENH200 using he device s operating modes 13 1 Access Point Mode In Access Point Mode ENH200 behaves likes a central connection for stations or clients that support IEEE 802 11b g n networks Stations and client must be configured to use the same SSID and security password to associate with the ENH200 The ENH200 supports four SSIDs at the same time for secure guest access ...

Страница 87: ...ireless connections to the ENH200 using WDS technology In this mode configure the MAC addresses in both Access Points to enlarge the wireless area by enabling WDS Link settings WDS supports eight AP MAC addresses Not every Access Point device supports WDS in Access Point Mode As a result to use WDS we recommend you use the ENH200 ...

Страница 88: ...ssly and allows users to surf the Internet whenever they want In this mode use the ENH200 Site Survey to scan for Access Points within range Then configure the ENH200 SSID and security password accordingly to associate with the Access Point In this configuration the station has a wired Ethernet connection to the ENH200 LAN port ...

Страница 89: ...h each other The best solution is to use the ENH200 to wirelessly connect two wired LANs as shown in the following figure WDS Bridge Mode can establish 16 WDS links creating a star like network WDS Bridge Mode is unlike Access Point Access Points linked by WDS are using the same frequency channel more Access Points connected together may lower throughput Please be aware to avoid loop in your wirel...

Страница 90: ... devices installed at different locations communicate with each other wirelessly In this configuration one ENH200 is configured for Access Point Mode and connected to a RADIUS server via a switch while the other ENH200 is configured for Client Bridge Mode The RADIUS server uses an authentication scheme such as PAP or CHAP to verify a user s identification along with optionally other information re...

Страница 91: ......

Страница 92: ...o a PoE switch The ENH200 uses a proprietary PoE injector and will not work with standard 802 3af compliant PoE switches What is the default IP address of the ENH200 The default IP address is 192 168 1 1 I plugged the PoE to the second Ethernet port on the back of ENH200 but the unit is not on how come You need to plug the Ethernet cable connect to PoE injector to the main LAN port The secondary E...

Страница 93: ...device Before you contact your local EnGenius office please prepare the following information y Product model name and serial number y The place where you purchased the product y Warranty information y The date when you received the product y A brief description about the issue and the attempts you tried to resolve it To contact EnGenius Customer Service office in the United States please use eith...

Страница 94: ...de SSID in beacons MAC address filtering up to 50 field Wireless STA Client connected list Power Requirements Active Ethernet Power over Ethernet Proprietary PoE design Power Adapter 24VAC 0 6A Antenna Internal Directional 10dBi Package Contents Wireless Long Range 11N CB AP ENH200 PoE Injector EPE 24R Power Adaptor CD with User s Manual QIG Mounting Set Special screw set Certifications FCC CE IC ...

Страница 95: ...n a WLAN that act as a central transmitter and receiver of WLAN radio signals Ad Hoc Network A short term WLAN framework created between two or more WLAN adapters without going through an Access Point An ad hoc network lets computers send data directly to and from one another For an ad hoc network to work each computer on the network needs a WLAN card installed configured for Ad Hoc mode Antenna A...

Страница 96: ...d of sending passwords over the wire Collision Interference resulting from two network devices sending data at the same time The network detects the collision of the two transmitted packets and discards both of them Coverage The region within which a paging receiver can reliably receive the transmission of paging signals Coverage Area The geographical area that can be served by a mobile communicat...

Страница 97: ... A computer system or other device that acts as a translator between two systems that use different communication protocols data formatting structures languages and or architecture HT mode In the 802 11n system two new formats called High Throughput HT are defined for the Physical Layer Mixed Mode and Green Field If a system runs 40 HT two adjacent 20 MHz channels are used The larger 40 MHz bandwi...

Страница 98: ...networking methods used to provide bandwidth for real time multimedia applications Remote Authentication Dial In User Service RADIUS Networking protocol that provides centralized authentication authorization and accounting management for computers to connect and use a network service Because of its broad support and ubiquitous nature the RADIUS protocol is often used by ISPs and enterprises to man...

Страница 99: ...ernal RADIUS database WPA uses Temporal Key Integrity Protocol TKIP Message Integrity Check MIC and IEEE 802 1x to encrypt data See also WPA PSK WPA Pre Shared Key Wi Fi MultiMedia WMM Part of the IEEE 802 11e QoS enhancement to the Wi Fi standard that ensures quality of service for multimedia applications in WLANs Wireless Client Supplicants Software that runs on an operating system instructing t...

Страница 100: ...ving antenna Increase the separation between the equipment and receiver Connect the equipment into an outlet on a circuit different from that to which the receiver is connected Consult the dealer or an experienced radio TV technician for help FCC Caution Any changes or modifications not expressly approved by the party responsible for compliance could void the user s authority to operate this equip...

Отзывы: