background image

- 8 -

Intel Installa�on

Step 2

LGA1150/1151/1155/1156/1366

EN

DE

FR

IT

ES

PL

TW

CN

ID

JP

KR

RU

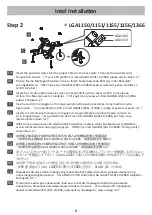
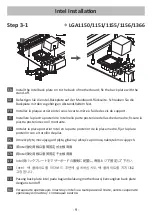
Insert the posi�on screws into the proper holes on the back plate. Then use the washers to fix 

the posi�on screws. 

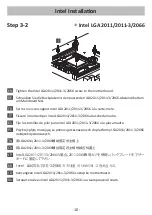
 If your CPU pla�orm is Intel LGA2011/2011-3/2066, please skip to step 3-2

Drehen Sie die Montageschrauben in die zu Ihrem Sockel passende Bohrung in der Backplate 

wie abgebildet an.

Wenn Sie einen LGA2011/2011-3/2066-Sockel verwenden, gehen Sie bi�e zu 

Schri� 3-2 über 

Insérez les vis de posi�on dans les trous correspondant à votre socket du CPU sur la plaque 

arrière. Puis fixez-les avec les rondelles.

 S’il s’agit d’un processeur Intel LGA2011/2011-3/2066, 

passez à l'étape 3-2 

Inserire le vi� di montaggio nel foro appropriato nella piastra posteriore come mostrato nella 

figura so�o. 

 Se la pia�aforma CPU è Intel LGA2011/2011-3/2066, si prega di passare al punto 3-2 

Inserte los tornillos de montaje en el agujero correspondiente en la placa trasera como se ve 

en la imagen abajo.

 Si su plataforma de CPU es Intel LGA2011/2011-3/2066, por favor vaya 

directamente al paso 3-2

Włóż śruby pozycjonujące do odpowiednich otworów na płycie tylnej. Następnie użyj podkładek 

w celu zamocowania śrub pozycjonujących.

Pla�ormy Intel LGA2011/2011-3/2066: Proszę przejść 

do punktu 3-2 


在背板上依系統

CPU

腳位所標示的孔位插入定位螺絲並套上墊圈固定

《如果您的主機板是

Intel LGA2011/2011-3/2066

請直接跳至步驟

3-2

》 

在背板上根据系统

CPU

脚位所标示的孔位插入定位螺丝并套上垫圈固定

《如果您的主板是

Intel LGA2011/2011-3/2066

请直接跳至步骤

3-2

ポジションスクリューをバックプレートの適切なネジ穴に挿入し、ワッシャーを使用してポジション

スクリューを固定して下さい。 

《 Intel LGA2011/2011-3/2066をお使いの方はステップ3-2に進んで

ください》

브라켓


구멍에


알맞은


나사를


삽입


와셔를


사용하여


나사를


고정하세요

CPU

 플랫폼이 

Intel LGA2011/2011-3/2066 인경우, Step3-2로 가세요》 

Masukkan sekrup ke dalam lubang yang tepat pada back plate. Kemudian gunakan washers/ring 

untuk mengencangkan sekrup. 

 Jika Pla�orm CPU Anda Intel LGA LGA2011/2011-3/2066, lanjutkan 

ke langkah 3-2 


Установите винты для крепежной пластины в соответствующие отверстия для вашего 

процессора. Установите промежуточные стойки на винты. 

 Если ваша CPU платформа 

является Intel LGA2011/2011-3/2066, пожалуйста, перейдите к шагу номер 3-2 

K

C

D

LGA1366
LGA115X

Содержание LIQMAX III ELC-LMT120-HF

Страница 1: ......

Страница 2: ...1 Index 2 3 4 5 7 17 Limited Warranty Warranty Support informa on for Australia Speci ca on Part List Intel Installa on AMD Installa on...

Страница 3: ...shipping charges prepaid and if inspec on reveals that the product is defec ve Please present the proof of purchase for reques ng RMA Charges for removing or installing the product are excluded under...

Страница 4: ...s own op on and at no charge if during the warranty perod it is returned to nearest ENERMAX Technology Corpora on subsidiary agent with all shipping charges prepaid and bearing a return merchandize au...

Страница 5: ...ght W O fan Warranty Cold Plate Pump Radiator Tube Bracket Fan ELC LMT120 HF Copper Ceramic Bearing 50 000 hrs 3100 rpm 10 12 V 0 18 A 154 x 120 x 27 mm Aluminum Rubber 400 mm 690 g Intel LGA 2066 201...

Страница 6: ...L Intel Clip x 1 M AMD Clip x 1 Cooler x 1 Fan x 1 Back Plate x 1 Posi on Screw x 4 Square Spacer x 1 Stand o x 4 Case Screw x 8 Fan Screw x 8 Intel LGA 2011 2066 Screw x 4 Thermal Grease x 1 Bracket...

Страница 7: ...6 Intel Installa on...

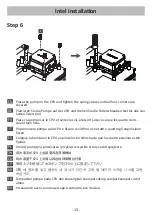
Страница 8: ...the chassis Schrauben Sie den L er und den Radiator am Geh use fest Fixez le ven lateur et le radiateur sur le ch ssis Fissare la ventola e il radiatore al case Fijar el ven lador y el radiador a la c...

Страница 9: ...to nella piastra posteriore come mostrato nella gura so o Se la pia aforma CPU Intel LGA2011 2011 3 2066 si prega di passare al punto 3 2 Inserte los tornillos de montaje en el agujero correspondiente...

Страница 10: ...Intel sous la carte m re l aide des vis du support Installare la piastra posteriore Intel nella parte posteriore della scheda madre ssare la piastra posteriore con il montante Instalar la placa poster...

Страница 11: ...support Intel LGA2011 2011 3 2066 la carte m re Fissare i montan per Intel LGA2011 2011 3 2066 alla scheda madre Fije los tornillos de pilar para Intel LGA2011 2011 3 2066 a la placa madre Przykr p y...

Страница 12: ...er CPU Ober che Appliquez une couche uniforme de p te thermique sur la surface du CPU Applicare in modo uniforme la pasta termica sulla super cie della CPU Aplicar de forma uniforme la pasta t rmica e...

Страница 13: ...En ernen Sie die Schutzfolie von der K hlpla e der Pumpe Re rez le lm protecteur de la plaque froide Rimuovere la pellicola di protezione dalla piastra di ra reddamento Quite la pel cula de protecci...

Страница 14: ...iert sind Placez la pompe sur le CPU et serrez les vis ressort jusqu ce que les quatre coins soient bien x s Posizionare la pompa sulla CPU e ssare le vi no a che tu e qua ro gli angoli siano ssa Colo...

Страница 15: ...onne ore di alimentazione della pompa alla scheda madre Avviso se notate che il socket PWM o il socket per la ventola della CPU non forniscono un tensione su ciente per alimentare la pompa si prega di...

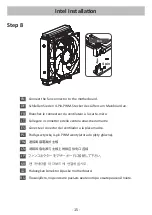
Страница 16: ...oard Schlie en Sie den 4 Pin PWM Stecker des L ers am Mainboard an Branchez le connecteur du ven lateur la carte m re Collegare il conne ore della ventola alla scheda madre Conecte el conector del ven...

Страница 17: ...16 AMD Installa on...

Страница 18: ...he chassis Schrauben Sie den L er und den Radiator am Geh use fest Fixez le ven lateur et le radiateur sur le ch ssis Fissare la ventola e il radiatore al case Fijar el ven lador y el radiador a la ca...

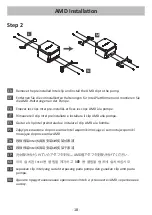
Страница 19: ...e Enlevez les clips Intel pr install s et xez les clips AMD la pompe Rimuovere il clip Intel preinstallato e installare il clip AMD alla pompa Quitar el clip Intel preinstalado e instalar el clip AMD...

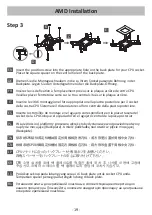
Страница 20: ...u sur la plaque arri re Inserire le vi di montaggio nel foro appropriato nella piastra posteriore per il socket della vostra CPU Sistemare il distanziatore sul foro centrale della piastra posteriore I...

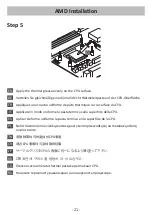
Страница 21: ...la plaque arri re AMD sous la carte m re l aide des vis du support Installare la piastra posteriore AMD nella parte posteriore della scheda madre ssare la piastra posteriore con il montante Instalar...

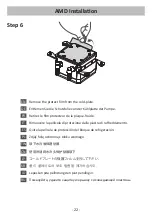
Страница 22: ...r CPU Ober che Appliquez une couche uniforme de p te thermique sur la surface du CPU Applicare in modo uniforme la pasta termica sulla super cie della CPU Aplicar de forma uniforme la pasta t rmica en...

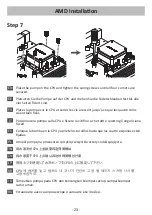
Страница 23: ...En ernen Sie die Schutzfolie von der K hlpla e der Pumpe Re rez le lm protecteur de la plaque froide Rimuovere la pellicola di protezione dalla piastra di ra reddamento Quite la pel cula de protecci n...

Страница 24: ...rt sind Placez la pompe sur le CPU et serrez les vis ressort jusqu ce que les quatre coins soient bien x s Posizionare la pompa sulla CPU e ssare le vi no a che tu e qua ro gli angoli siano ssa Coloqu...

Страница 25: ...nne ore di alimentazione della pompa alla scheda madre Avviso se notate che il socket PWM o il socket per la ventola della CPU non forniscono un tensione su ciente per alimentare la pompa si prega di...

Страница 26: ...ard Schlie en Sie den 4 Pin PWM Stecker des L ers am Mainboard an Branchez le connecteur du ven lateur la carte m re Collegare il conne ore della ventola alla scheda madre Conecte el conector del ven...

Страница 27: ...avec la fonc on RGB branchez le c ble RGB Sync 4 broches la carte m re Se la scheda madre SUPPORTA la funzione RGB Collegare il cavo RGB Sync alla scheda madre Si la placa base SOPORTA la funci n RGB...

Страница 28: ...Sep 2019 2019 ENERMAX TECHNOLOGY CORPORATION All right reserved Speci ca ons are subject to change without prior no ce Some trademarks may be claimed as the property of others...

Отзывы: