Ener-G+ LT3050CL Скачать руководство пользователя страница 33

M a n U e l   D ’ i n s t r U c t i o n s

P a g e   3 3

www.EnErgplus.com

6.1 

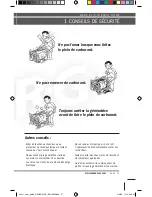
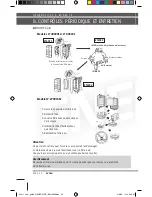
Toujours effectuer une mise à la terre afin d’éviter une décharge électrique.
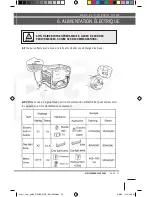
6.2 

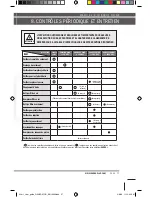
Référez-vous à ce graphique pour la consommation d’électricité (peut varier selon 

les appareils, à titre de référence seulement).

Attention

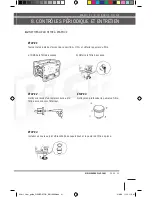
AFin d’AideR votRe généRAtRiCe à LivReR de bonneS 
peRFoRmAnCeS, Suivez CeS ReCommAndAtionS :

6. aliMentation électriqUe

02m1_User_guide_GENERATOR_EBI10869.indd   33

4/8/08   11:12:52 AM

Содержание LT3050CL

Страница 1: ...GENERATORS G N RATRICES LT3050CL LY2700YAM LT6550CLE 02m1_User_guide_GENERATOR_EBI10869 indd 1 4 8 08 11 11 40 AM...

Страница 2: ...g a s o l i n e g e n e r a t o r s 02m1_User_guide_GENERATOR_EBI10869 indd 2 4 8 08 11 11 42 AM...

Страница 3: ...roduction 6 3 Specifications 7 4 Inspection before operation 8 5 Starting the generator 11 6 Electric connecting 12 7 Stopping the generator 15 8 Regular inspection and maintenance 16 9 Storage of gen...

Страница 4: ...erator indoor or in a poor ventilated area Do not operate the generator under wet climate rain or snow Never connect to house power circuit if commercial power supply is not cut Keep at least 1m 3 ft...

Страница 5: ...le the engine is running or still hot Do not touch the generator when either it or your hands are wet avoiding short circuit or electric shock Never permit anyone to operate the generator without prop...

Страница 6: ...r 12 Oil gauge Dipstick 13 Starter switch 14 AC protector 15 1 2 3 4 5 6 7 8 9 10 11 12 13 14 15 16 17 Fuel gauge 1 Fuel tank cap 2 Fuel tank 3 Oil gauge dipstick 4 Oil drais plug 5 Recoil starter 6 A...

Страница 7: ...5 3600 6 5 3600 13 3600 Displacement 171 cc 163 cc 389 cc Starting system electric Fuel Tank capacity 13 L 15 L 25 L Dry weight 41 Kg 44 5 Kg 82 Kg Noise level Db 70 at 7m 78 at 7m 84 at 7m Fuel cont...

Страница 8: ...place STEP 1 Turn out the oil filter gauge dipstick and clean it with a clean cloth STEP 3 In the case that the oil level is below the lower mark of the dipstick refill the oil to the upper mark STEP...

Страница 9: ...on before operation 4 2 Fuel STEP 1 Open the fuel tank cap STEP 3 Refuel up to the shoulder of the fuel filter STEP 2 Check the fuel level and refuel if necessary STEP 4 Reinstall the fuel tank cap 02...

Страница 10: ...urn the engine switch to ON position STEP 5 Pull the starter handle until resistance is felt then pull it out swiftly from original position 5 1 Starting the Generator STEP 6 Once the generator starts...

Страница 11: ...nerator to prevent electric shocks 6 2 Refer some appliance for electric consumption CAUTION To keep the generator in the best running and electric condition please obey the followings 6 ELECTRIC CONN...

Страница 12: ...with the highest current first CAUTION Do not connect the generator to a home power circuit If this connection is necessary be sure that a skilled electrician does the job improper connection between...

Страница 13: ...ur Do not allow the free ends of the cable to touch each other if this occurs there will be a short circuit that will damage the battery When a large capacity battery is charged excessive current flow...

Страница 14: ...er heavy load otherwise damages will result 7 Stopping the generator 7 1 Switch off all loads 7 2 Turn OFF the generator Circuit Breaker 7 2 Turn off the engine switch 7 3 Turn off the fuel cock NOTE...

Страница 15: ...Check fuel injection pump Check fuel injection nozzle Check fuel pipe Replace if necessary Adjust valve clearance for intake and exhaust valves 1st time Lap intake and exhaust valves Replace piston r...

Страница 16: ...n plug with seal washer STEP 4 Turn the engine switch to ON position STEP 5 Reinstall the dipstick Recommended Engine Oil 4 stroke gasoline engine oil SF SF from API Service Classification or SAE 10W3...

Страница 17: ...ning STEP 2 Dismantle the spark plug STEP 3 Clean away carbon sediment STEP 4 Measure the electrodes clearance STEP 5 Reinstall the cleaned spark plug and cap or replace with new spark plug 0 7 0 8 mm...

Страница 18: ...l LT 3050CL LT 6550CL Model LY 2700YAM Open the air filter cover 1 Dispart the filter element 2 Wash the sponge with kerosene or gasoline 3 then dry it Soak the sponge in engine oil then squeeze 4 the...

Страница 19: ...antle the fuel filter cup STEP 2 Clean the fuel filter with air blow from inside STEP 3 Clean the fuel filter cup thoroughly STEP 4 Mount a new rubber ring and the filter cup securely 8 4 fuel Filter...

Страница 20: ...the fuel in the cup STEP 2 Turn on the fuel cock drain off the fuel in the fuel tank STEP 3 Reinstall the fuel filter cup with a new O Ring STEP 4 Loosen the carburetor s drain plug and drain off the...

Страница 21: ...m 10 Troubleshooting 10 1 Starting failure STEP 1 Is the engine switch at ON position STEP 2 Is the oil level too low STEP 3 Is there enough fuel STEP 4 Check the spark plug OK Maintenace 02m1_User_gu...

Страница 22: ...ERG 10 Troubleshooting 10 2 Appliance does not work STEP 1 Check the appliance device STEP 2 Is the BREAKER on ON position STEP 3 Is the AC protector reset on ON position OK Maintenace 02m1_User_guide...

Страница 23: ...hquake theft misuse or abuse connection to other products not recommended for interconnection by the manufacturer of the product C Damages caused by mishandling alteration accident impact being droppe...

Страница 24: ...e Purchased From Achet de Address Adresse Tel T l Email Courriel City Ville Prov Postal Code Code Postal Warranty must be active within 30 days of purchase La garantie doit tre enregistr e dans les 30...

Страница 25: ...antes 28 3 Sp cifications techniques 29 4 Pr paration avant le d marrage 30 5 D marrage de la g n ratrice 33 6 Alimentation lectrique 34 7 Arr ter la g n ratrice 37 8 Contr les p riodiques et entretie...

Страница 26: ...it sans une a ration ad quate Ne pas utiliser sous la pluie ou lorsqu il neige Ne jamais brancher au circuit du b timent si la connection commerciale n est pas coup e Garder au moins 1 m tre 3 pi tout...

Страница 27: ...il est encore chaud Ne pas toucher la g n ratrice si elle ou vos mains sont mouill es Vous pourriez causer un court circuit ou subir une d charge lectrique Ne laissez pas n importe qui s en servir L...

Страница 28: ...teur 12 Jauge huile 13 Interrupteur du moteur 14 Protecteur AC 15 Jauge essence 1 Bouchon de r servoir 2 R servoir essence 3 Jauge huile 4 Bouchon de vidange d huile 5 D marreur 6 Filtre air 7 Starter...

Страница 29: ...3600 6 5 3600 13 3600 Cylindr e 171 cc 163 cc 389 cc Syst me de d marrage lectrique R servoir essence 13 L 15 L 25 L Poids vide 41 Kg 44 5 Kg 82 Kg Bruit Db 70 7m 78 7m 84 7m Temps continu de carbura...

Страница 30: ...d marrage tape 1 Sortez en tournant la jauge huile et essuyez la avec un linge propre TAPE 3 Si le niveau d huile est trop bas ajouter l huile recommand jusqu son plein niveau TAPE 2 Ins rez la jauge...

Страница 31: ...e d marrage 4 2 FAIRE LE PLEIN D ESSENCE TAPE 1 Ouvrir le r servoir d essence TAPE 3 Remplir d essence jusqu au coude du filtre essence TAPE 2 V rifier le niveau de l essence Ajouter si n cessaire TAP...

Страница 32: ...ON TAPE 5 Tirer l g rement sur la poign e de d marrage jusqu ce qu une r sistante soit ressentie Ensuite tirer rapidement sur la poign e Ne pas rel cher d un coup sec 5 1 D marrage de la g n ratrice T...

Страница 33: ...charge lectrique 6 2 R f rez vous ce graphique pour la consommation d lectricit peut varier selon les appareils titre de r f rence seulement Attention Afin d aider votre g n ratrice livrer de bonnes p...

Страница 34: ...es appareils en m me temps Attention Ne pas brancher la g n ratrice l alimentation du b timent Quand cette connexion est n cessaire assurez vous qu un lectricien certifi puisse effectuer le travail Un...

Страница 35: ...subvenir Ne laissez pas les bouts des c bles se toucher Des dommages importants pourraient subvenir Lors de la charge d une batterie grande capacit un coulement de courant excessif d pend de la d cha...

Страница 36: ...OTE En situation d urgence seulement teignez le commutateur principal Attention Ne jamais teindre la g n ratrice lorsque la r volution du moteur est rapide et d livrant une charge des appareils Des do...

Страница 37: ...cer V rifier pompe injection V rifier bec injection V rifier tuyau carburant Replace if necessary Ajustement des soupapes Premi re fois Remplacer les anneaux de piston V rifier fluide de batterie Mens...

Страница 38: ...endant que le moteur est encore chaud TAPE 3 Replacer le bouchon de vidange d huile TAPE 4 Tourner l interupteur du moteur la position ON TAPE 5 Replacer la jauge Huile recommand e Huile pour moteur 4...

Страница 39: ...ttoyage de la bougie TAPE 2 Retirer la bougie TAPE 3 Nettoyer les r sidus de carbone TAPE 4 Mesurer la distance de l lectrode TAPE 5 Replacer la bougie nettoy e ou remplacer si n cessaire 0 7 0 8 mm C...

Страница 40: ...e l essence pendant que vous fumez ou proximit d une flamme nue Mod les LT 3050CL LT 6550CL Mod le LY 2700YAM Ouvrir le couvercle du filtre air 1 Retirer le filtre 2 Laver le filtre avec du k ros ne o...

Страница 41: ...u filtre TAPE 2 Nettoyer l aide d un compresseur air le filtre essence vers l int rieur TAPE 3 Nettoyer en profondeur le panier du filtre TAPE 4 Installer un nouveau joint d tanch it en caoutchouc et...

Страница 42: ...ourner la robineterie d essence la position ON et vidanger l essence du r servoir TAPE 3 Installer un nouveau joint d tan ch it en caoutchouc et le panier du filtre en place TAPE 4 D visser le bouchon...

Страница 43: ...10 D pannage 10 1 Ne d marre pas TAPE 1 L interrupteur est bien la position ON TAPE 2 Le niveau d huile est il trop bas TAPE 3 Le r servoir d essence est il vide TAPE 4 V rifiez la bougie OK R parate...

Страница 44: ...S APPAREILS NE FONCTIONNENT TOUJOURS PAS TAPE 1 V rifier le dispositif de l appareil TAPE 2 Le disjoncteur est il en position ON TAPE 3 Le bouton de protection reset AC est il en position ON OK R para...

Страница 45: ...abus ou les raccordements des produits auxquels le raccordement est d conseill par le fabricant du produit susmentionn C Les dommages caus s par une manipulation abusive une modification un accident u...

Страница 46: ...G n r a t i c e s e s s e n c e PAGE 4 6 ENERG notes 02m1_User_guide_GENERATOR_EBI10869 indd 46 4 8 08 11 13 21 AM...

Страница 47: ...M a n u e l d i n s t r u c t i o n s PAGE 4 7 www energplus com notes 02m1_User_guide_GENERATOR_EBI10869 indd 47 4 8 08 11 13 21 AM...

Страница 48: ...energplus com E X T E N S I O N 2 1 2 info ebiweb ca 1 866 967 7333 450 967 7333 02m1_User_guide_GENERATOR_EBI10869 indd 48 4 8 08 11 13 23 AM...

Отзывы: