background image


17 


3.2.1


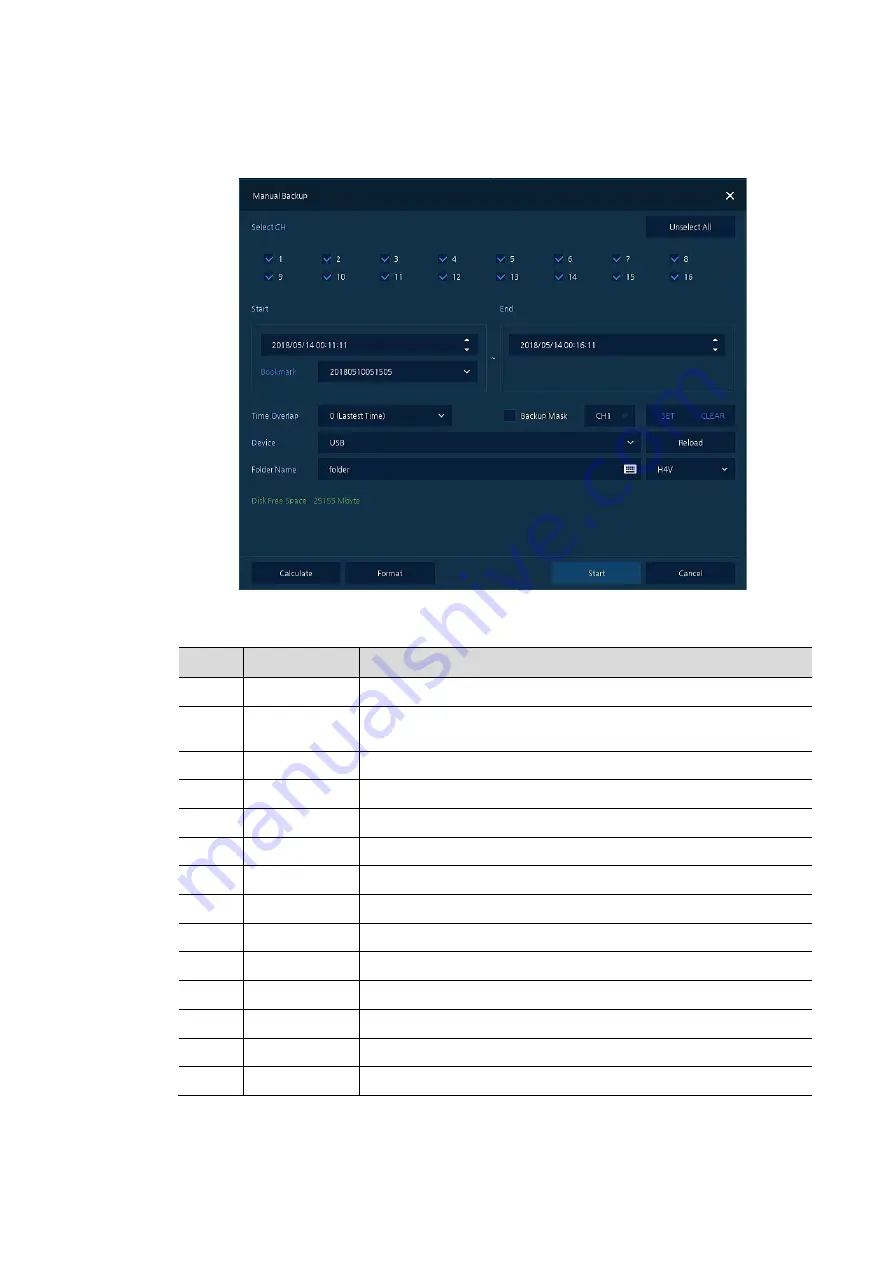
Backup 

The device provides a back-up function of live screen. 


Figure 3-5 Backup 

Table 3-4 Backup Item and Description 

No. 

Item 

Description 

Select CH 

Selecting a channel users want to back-up. 

Select All/ 

Unselect All 

Select or clear all channels. 

Start 

Setting back-up start time (Bookmark: bookmark list). 

End 

Setting back-up ending time (Bookmark: bookmark list). 

Time Overlap  Selecting time if there are two recorded data in the same time. 

Backup Mask  User can mask selected area. It works H4V format only. 

Device 

Selecting the device to save back-up files. 

Reload 

Opening the device information. 

Folder Name 

Entering a folder name to save back-up files. 

10 

File format 

Selecting a file format to back-up. 

11 

Calculate 

Calculating data capacity to back-up. 

12 

Format 

Formatting the device to back-up. 

13 

Start 

Starting back-up. 

14 

Cancel 

Closing the backup screen. 

Содержание IER-28N080005A

Страница 1: ...EN User Manual Network Video Recorder H 265 HDMI VGA PoE w o HDD IER 28R040005A IER 28N080005A IER 28N160005A...

Страница 2: ...user to the presence of dangerous voltage within the products enclosure that may be ofsufficientmagnitudetoconstituteariskofelectricshock to persons The exclamation point within an equilateral triangl...

Страница 3: ...f not installed and used in accordance with the in struction manual may cause harmful interference to radio communications Operation of this equipment in a residential area is likely to cause harmful...

Страница 4: ...rom the apparatus 11 Only use attachments accessories specified by the manufacturer 12 Use only with the cart stand tripod bracket or table specified by the manufacturer or sold with the apparatus Whe...

Страница 5: ...4 4 Time Date 12 2 4 5 Easy Installation Wizard 12 3 Live Screen Configuration 13 Icons in Live screen 14 3 1 Live Launcher menu 16 3 2 3 2 1 Backup 17 Quick menu 19 3 3 3 3 1 PTZ Control 20 3 3 2 Cam...

Страница 6: ...dule 57 4 5 2 Stream 60 EVENT 64 4 6 4 6 1 System Disk 64 4 6 2 Alarm In 66 4 6 3 Motion 69 4 6 4 Video Loss Setup 71 4 6 5 Notification 72 NETWORK 74 4 7 4 7 1 Basic WAN Port 74 4 7 2 DVRNS DDNS 76 4...

Страница 7: ...transmitting video and audio using a network The device features include the following Convenient UI from user s viewpoint IP camera input 4 8 16 channels Providing H 264 and H 265 compression Up to...

Страница 8: ...ide 8 HDD fixing screw NVR Description 1 2 Each part is listed in the below Figure 1 1 Name and Connection of each front section Table 1 2 Name and Function of each front section No Name Function 1 Po...

Страница 9: ...camera input port IEEE802 3at PoE support 2 Network Network connector 3 Audio In Audio input port 4 Audio Out Audio output port 5 VGA VGA output port 6 HDMI HDMI output port 7 USB 3 0 USB 3 0 port is...

Страница 10: ...installing a device connect rear of the device with each port on the basis of below connection map Figure 2 1 Connection map The device starts first like below sequences 1 Installing HDD 2 Connecting...

Страница 11: ...rear section of the unit 1 Place the unit in a stable flat surface 2 Make a room between front rear sides of the device not to break connectors Warning Do NOT install the device too close to the wall...

Страница 12: ...8 7 Connect a network port 8 Connect an alarm and RS485 device 9 Connect USB port for data back up 10 Supply the main power after completion Power Switch...

Страница 13: ...esented 3 In Log in screen enter the ID Password and press OK Note Default ID Password is admin admin Attention Please change password after login due to security Click to see the MAC address Note If...

Страница 14: ...rd users want 2 With keyboard UI set the ID and Password and press OK Note Default ID Password is admin admin Change the password for security Max character length is 16 3 Press the Save button to sav...

Страница 15: ...taneous use of equipment set ID with difference Note As for using many NVRs set ID with difference HDMI VGA Set resolution of a monitor connected to the device Note Video is not displayed through VGA...

Страница 16: ...ng with time server System Time Not for synchronizing with network time server set the device time otherwise applying for Daylight saving time select DST Time Zone Select time zone for the system bein...

Страница 17: ...enu 2 Live screen Show live video of connected cameras 3 Launcher menu Launcher menu is located in the corner of below screen See 3 2 Live Launcher to display detailed information about the launcher m...

Страница 18: ...een icon and its description No Icon Description 1 CH1 CAM1 Channel numbers and camera titles 2 A camera with PTZ function 3 PTZ control function in process 4 Recording in alarm event mode 5 Recording...

Страница 19: ...15 Note Chosen live screen is marked as a blue frame mouse located live screen is marked as yellow one Figure 3 3 Chosen live screen channel...

Страница 20: ...le 6 Selecting partition mode to mark in live screen single screen 4 9 and 16 partition 7 Stopping or replaying selected live screen images toggle 8 Audio on or mute chosen live screen toggle 9 Instan...

Страница 21: ...ending time Bookmark bookmark list 5 Time Overlap Selecting time if there are two recorded data in the same time 6 Backup Mask User can mask selected area It works H4V format only 7 Device Selecting t...

Страница 22: ...sk Item and Description No Item Description 1 Select CH Select the channel to set the privacy zone 2 Privacy Mask Enable Select whether to use the Privacy Mask 3 Mask Zone Apply all or only the select...

Страница 23: ...n off a sound speaker 6 PTZ Control Controlling PTZ function This menu is shown when PTZ camera connected 7 Stop Alarm Stopping monitoring alarm output and event 8 Text Overlay POS text overlayed on t...

Страница 24: ...There are 3 dewarping mode as 180 Panoramic 360 Panoramic and Dual panoramic view 3 3 1 PTZ Control The location of images may be moved to monitor with PTZ ball Note PTZ Control menu can be displayed...

Страница 25: ...ol Quick menu Table 3 8 PTZ Control Item and Description in Quick menu No Item Description 1 Preset Go Run selected Preset number 2 Preset Save Save specific positions of the camera at most 255 settin...

Страница 26: ...Assign Selecting the channel windows manually 5 Model Show detected camera model number 6 IP Show detected camera IP address 7 Status Show connection status 8 Priority Select IP Address or Zero conf...

Страница 27: ...e Select connection mode as Onvif or RTSP 2 ID PWD Enter ID and password of IP camera 3 Onvif URL Enter camera IP address 4 RTSP URL Enter Primary and Secondary RTSP IP address and URL 5 Onvif Port En...

Страница 28: ...tarting time of system log to search 2 End Setting ending time of system log to search 3 Log Type Selecting log types Network Record Setup Disk Backup and System 4 Select All Unselect All Selecting or...

Страница 29: ...Status screen Figure 3 13 Status Event in Quick menu Table 3 12 Status Event Item and Description in Quick menu No Item Description 1 Temporary fixing or releasing an event list toggle 2 Refresh Delet...

Страница 30: ...tap in Status screen Figure 3 14 Status Record in Quick menu Table 3 13 Status Record Item and Description in Quick menu No Item Description 1 Record time Marking recorded period 2 Record list Display...

Страница 31: ...Status screen Figure 3 15 Status Disk in Quick menu Table 3 14 Status Disk Item and Description in Quick menu No Item Description 1 Disk Info Display disk temperature and S M A R T information 2 Rec I...

Страница 32: ...le to click Setup in Quick menu by clicking the right button of the mouse Table 4 1 Setup menu Item and Description No Item Description 1 SYSTEM Setting the system environment 2 CAMERA Setting the cam...

Страница 33: ...Factory Default CAMERA Basic Basic Title Covert Audio In Out Advanced Advanced Video Stream VA Registration Registration DEVICE Display Display OSD Sequence Disk Setup iSCSI PTZ PTZ Serial Device Ser...

Страница 34: ...P2P Notification Server Notification Server Notification Message General buttons in Setup menu 4 1 This section depicts General buttons in Setup menu Figure 4 2 General buttons in Setup menu Table 4...

Страница 35: ...4 2 1 System Set and upgrade the basic items of the system System System Set the basic items in the System Figure 4 3 SYSTEM System System Table 4 4 SYSTEM System System Item and Description No Name F...

Страница 36: ...of the system Figure 4 4 SYSTEM System F W Upgrade Table 4 5 SYSTEM System F W Upgrade Item and Description No Name Function 1 Current Version Displaying the present firmware version 2 Device Connect...

Страница 37: ...be created and user can select the list from search and backup menu Time overlap list can be created up to 20 lists a day 2 DST Start Set the starting date of summer time 3 DST End Set the ending dat...

Страница 38: ...system Figure 4 6 SYSTEM Time Date Holiday Table 4 7 SYSTEM Time Date Holiday Item and Description No Name Function 1 Year Select years to set holidays 2 Delete selected holidays 3 Add Holiday Add hol...

Страница 39: ...Table 4 8 SYSTEM Time Date Holiday Add Holiday Item and Description No Name Function 1 Name Enter the holiday name 2 Date Display chosen date 3 Type Select the holiday types e g Selecting Relative and...

Страница 40: ...o not display live video if log it out 6 ADUP Archive Dual User Permission Two users should access to search playback and back up The user should have administrator permission 7 Auto Login When a user...

Страница 41: ...RMISSION Select items to permit access 3 Select channels to permit access Press Add User button then Add User screen displays Figure 4 10 SYSTEM Account User Add User Table 4 11 SYSTEM Account User Ad...

Страница 42: ...tor with USB USB Displays the USB device connected Refresh button Re recognize the device 2 Import Apply information saved in USB to the device Import Config with network setup The network setting inf...

Страница 43: ...M Config Factory Default Table 4 13 SYSTEM Config Factory Default Item and Description No Name Function 1 Select All Unselect All Select deselect all items to be defaulted 2 Default Item Select desele...

Страница 44: ...igure 4 13 CAMERA Basic Basic Table 4 14 CAMERA Basic Basic Item and Description No Name Function 1 CH Display the channel name 2 Title Enter the camera name of relevant channels 3 Covert Select image...

Страница 45: ...ys Figure 4 14 CAMERA Basic Basic Copy Covert Setup Table 4 15 CAMERA Basic Basic Copy Covert Setup Item and Description No Name Function 1 From Select a channel converted setting 2 To Select a channe...

Страница 46: ...AMERA Basic Audio In Out Item and Description No Name Function 1 No Display channels of audio 2 Use Select deselect whether to use audio 3 Assign Select channels to be assigned audio 4 Record Select d...

Страница 47: ...4 17 CAMERA Advanced Item and Description No Name Function 1 CH Display channels 2 Video Setup camera image such as Color White Balance WDR AE and etc 3 Stream Setup camera stream such as Resolution F...

Страница 48: ...Name Function 1 Camera Registration Register IP Camera See 3 3 2 Camera Registration to display detailed information about the camera registration 2 Registration list Displays the status of the curre...

Страница 49: ...Connect Register the IP cameras based on the information from the list Note The contents of the IP camera list are written in the following order Channel number IP address ID Password Device service...

Страница 50: ...ce 1024x768 1280x720 1920x1080 and 3840x2160 2 Event Popup Set duration of event popup screen Screen go back to original layout after duration time 3 Monitor Relay Switch Select whether to use monitor...

Страница 51: ...able 4 21 DEVICE Display OSD Item and Description No Name Function 1 Camera Name Select the way to display camera in live screen Off CH Title CH 2 Live Bar Select the way to display the live bar Alway...

Страница 52: ...e below table All Full and Quad 3 Sequence List Display the sequence list based on division selected value 4 Add Sequence Add items to be included in the play sequence 5 NO Automatically controvert sc...

Страница 53: ...Sequence Add Sequence Table 4 23 DEVICE Display Sequence Add Sequence Item and Description No Name Function 1 Dwell Time Select time to play 3 sec 5 sec 10 sec 15 sec and 30 sec 2 Division Select the...

Страница 54: ...us disk status 3 Rec Info Display saved disk information in disc list Start Recording Time starting time for saving information in the disk End Recording Time ending time to stop saving information in...

Страница 55: ...e 4 24 DEVICE Disk iSCSI Table 4 25 DEVICE Disk iSCSI Item and Description No Name Function 1 Select Display iSCSI device number Up to 6 devices support 2 Target Node Name Display registered IQN iSCSI...

Страница 56: ...ication 4 User Name Enter user name of CHAP authentication 5 Password Enter password of CHAP authentication 6 Add Click to register the discovered iSCSI storage User can add iSCSI one by one If record...

Страница 57: ...Setup Apply setting history to all or selected channels in the same way 2 CH Display channels 3 ID Select camera ID connected to relevant channels 1 255 4 Protocol Select protocol of camera connected...

Страница 58: ...al Device Table 4 28 DEVICE Serial Device Serial Device Item and Description No Name Function 1 USB to Serial Set communication transmission value of USB device 2 RS 485 Set communication transmission...

Страница 59: ...her to use text function 2 CH Select camera channels to connect with the text input device 3 Protocol Select protocol to correspond with the text input device 4 ID Port Select ID and port no to corres...

Страница 60: ...DEVICE TEXT TEXT Copy to TEXT Setup Table 4 30 DEVICE TEXT TEXT Copy to TEXT Setup Item and Description No Name Function 1 From Select channels set 2 To Select the device to be copied 3 Select All Un...

Страница 61: ...CORD Schedule Schedule Table 4 31 RECORD Schedule Schedule Item and Description No Name Function 1 CH Select channels to set schedules 2 Schedule Type Selection Select the types of schedules 3 Schedul...

Страница 62: ...C A Record on event recording mode when alarm occurs during consecutive mode recording M A Record on event recording mode when only alarm and motion sensitive event occur C M A Record on event record...

Страница 63: ...59 7 Copy Schedule Setup screen displays 8 Select channels to be copied 9 Select channels to apply copied content 10 Copy the schedule by pressing Apply 11 Press Save to save the schedule...

Страница 64: ...e Function 1 CH Display channels 2 Resolution Framerate Bitrate Show camera main stream setup status 3 Continuous Select recording stream in case of Continuous mode 4 Event Select recording stream in...

Страница 65: ...Stream Copy Stream Setup Table 4 33 RECORD Stream Main Stream Copy Stream Setup Item and Description No Name Function 1 From Select the channel set 2 To Select the device to be copied 3 Select All Uns...

Страница 66: ...ream Sub Stream Table 4 34 RECORD Stream Sub Stream Item and Description No Name Function 1 CH Display channels 2 Resolution Framerate Bitrate Show camera second stream setup status 3 Pre Alarm Start...

Страница 67: ...Panic Item and Description No Name Function 1 Panic Record Select deselect to use immediate recording function 2 CH Display channels 3 Resolution Frame rate Quality Panic recording stream follows the...

Страница 68: ...System Disk System Table 4 36 Event System Disk System Item and Description No Name Function 1 System Restart Select deselect whether to use system restart event 2 Notification Select deselect whethe...

Страница 69: ...eep Select deselect whether to use buzzer sound in case of event 3 Alarm out Select to end alarm time null Relay1 Keep 5 sec 10 sec 20 sec 30 sec 1 min 10 min 30 min and 1 hour 4 Notification Select d...

Страница 70: ...use alarm in the sensor 3 Type Select sensor types N O N C NET 4 Beep Select use time of buzzer sound null 5 sec 10 sec 20 sec 30 sec 1 min 10 min 30 min and 1 hour 5 Alarm Set alarm output 6 Group R...

Страница 71: ...x Dwell Time Selecting alarm duration Keep 5 sec 10 sec 20 sec 30 sec 1 min 10 min 30 min and 1 hour 2 Group Recording Select deselect whether to use Group Recording 3 Simultaneous recording camera ch...

Страница 72: ...e 2 Schedule Type Selection Select the types of schedules 3 Schedule Table Display the schedule users set 4 Drag Field Display the area dragged with a mouse 5 Copy to Alarm Schedule Copy the schedule...

Страница 73: ...lect use time of buzzer null 5 sec 10 sec 20 sec 30 sec 1 min 10 min 30 min and 1 hour 6 Alarm Set alarm output 7 Group Rec Select the camera to record simultaneously 8 Noti Set email notices 9 Preset...

Страница 74: ...pe Selection Select the types of schedules 3 Schedule Table Display the schedule users set 4 Drag Field Display the area dragged with a mouse 5 Copy to Motion Schedule Copy the motion detection schedu...

Страница 75: ...n and 1 hour 4 Alarm Set alarm output 5 Group Rec Select the camera to record simultaneously 6 Noti Set email notices 7 Preset Set preset of PTZ camera 8 Copy to Video Loss Setup Copy the Video Loss s...

Страница 76: ...No Name Function 1 Periodic Notification Select deselect whether to use periodical alarms 2 Summary Send the save or event information Record sending the save information Event sending the event infor...

Страница 77: ...pe Selection Select the types of notification None E mail Push Mobile E mail Push FTP FTP E mail FTP Push FTP E mail Push 2 Schedule Table Display the schedule users set 3 Drag Field Display the area...

Страница 78: ...3 MAC Address Display the MAC Address 4 DNS Select manual and enter DNS otherwise choose automatic function 5 Port TCP RTSP Enter TCP and RTSP port Default is 9350 6 Port Web Enter Web port Default i...

Страница 79: ...PoE Ports Figure 4 46 NETWORK Basic PoE Ports Table 4 47 NETWORK Basic PoE Ports Item and Description No Name Function 1 DHCP Server Select whether to enable DHCP server 2 IP Address Subnet Mask Gatew...

Страница 80: ...cription No Name Function 1 DVRNS Register DVRNS account ID Enter DVRNS ID default MAC address of the unit Password Enter DVRNS password Register Register DVRNS account 2 Dashboard Add delete Dashboar...

Страница 81: ...ess in networking Figure 4 48 NETWORK DVRNS DDNS DDNS Table 4 49 NETWORK DVRNS DDNS DDNS Item and Description No Name Function 1 DDNS Site Select DDNS site 2 Host Name Enter the host name 3 User Name...

Страница 82: ...rver gmail com hotmail com aol com naver com daum com 2 Address Port Enter server address and port number 3 Image Attach Select deselect whether to attach JPG image 4 Authentication Select deselect us...

Страница 83: ...TP Server Select whether to use FTP 2 Address URL Port Enter server address and port 3 ID Password Enter ID Password of server 4 Upload Path Enter upload directory 5 Create Folder Enter desired folder...

Страница 84: ...stration Table 4 52 NETWORK Warp Registration No Name Function 1 Use Warp Select whether to use Warp Registered devices can be selected in the Warp of a Quick menu 2 Warp device list Shows registered...

Страница 85: ...button to search for a new device 3 Name Enter the device name It is entered automatically when selected in the device list 4 Address Enter the device address It is entered automatically when selecte...

Страница 86: ...ng QR code scan Figure 4 53 NETWORK P2P P2P Table 4 54 NETWORK P2P P2P No Name Function 1 P2P Registration Click button to check up registration status 2 P2P QR Code Scan QR code using mobile app to c...

Страница 87: ...tion 1 Notification Server Select deselect to use Notification server 2 Type Select TCP or UDP Protocol 3 IP Enter the server IP address or host name 4 Port Enter the server port 5 Test Send a test me...

Страница 88: ...able 4 56 NETWORK Notification Server Notification Message No Name Function 1 Deleted registered notification message 2 Add Notification message edit window pop up 3 CH Camera channel 4 Event Display...

Страница 89: ...57 NETWORK Notification Server Notification Message Add Message No Name Function 1 CH Select the channel to add a message 2 Event Select the event type motion alarm video loss 3 Message Create a messa...

Страница 90: ...function searches recorded data as Time Event Thumbnail Smart Search Text and VCA Search Time Recording data is searched by date and time Figure 5 2 Search Time Table 5 2 Search Time Item and Descrip...

Страница 91: ...o search 5 Event Type Selecting the types of event immediate recording motion Alarm In Video Loss and bookmark 6 Search Searching the event 7 Event List Displaying event list searched 8 Thumbnail Fiel...

Страница 92: ...hange of specific area Figure 5 5 Search Smart Search Table 5 5 Search Smart Search Item and Description No Item Description 1 CH Selecting channels to search 2 Area Setup Select area to search motion...

Страница 93: ...time to search 4 End Setting ending time to search 5 Keyword Entering keyword to search 6 Case Sensitive Searching items in case sensitive 7 Whole Word Searching items that include all words 8 Search...

Страница 94: ...em Description 1 Select CH Selecting channels to search 2 Start End Set start time and end time 3 Event Type Selecting VCA event type 4 Search Search VCA event 5 Event List Displaying event list searc...

Страница 95: ...the videos 7 Play forward step 8 Play fast forward 2 64x 9 Go to last section of the video 10 Moving to previous next partition screens 11 Selecting the partition mode to mark in the screen 12 Audio...

Страница 96: ...4channels or all channels 5 Show time line by 1hour or 24hours toggle Click mouse right button to open quick menu in the playback mode Figure 5 10 Playback Quick menu Table 5 10 Playback Quick menu No...

Страница 97: ...tel CoreTM 2 Duo E7200 2 53GHz or higher RAM 2GB or higher 1 5GB or higher VGA ATI RadeonTM HD 3650 or NVIDIA GeForce 8400GS or higher 1280x1024 32bpp or Higher Multi Monitor ATI RadeonTM HD 2400 or N...

Страница 98: ...nload Java The way to download is shown as follows In case of selecting Viewer Internet Explorer 1 Click Viewer 2 When Java download screen opens download and install JAVA 3 Live images may be monitor...

Страница 99: ...ownloaded Click Keep button 2 Click webviewer_chrome jnlp 3 When Java download screen opens download and install JAVA 4 Live images may be monitored In case of selecting Setup Users can set the menu i...

Страница 100: ...96 Figure 6 1 Setup screen...

Страница 101: ...grammed data from the dome cameras To enter the Keyboard menu press and hold CTRL and press MENU expressed as CTRL MENU in the manual You will see the following menu Keyboard Setup for USB MAIN MENU C...

Страница 102: ...s disconnected and reconnected you must also disconnect and reconnect the USB either from the Keyboard Controller or DVR NVR side Keyboard Setup for RS485 SET USB Off and Dome1 DVR5 in keyboard menu M...

Страница 103: ...select by turning the Joystick clockwise This will also function as Enter Display Mode Change the display mode to different split screen PTZ Control PTZ camera s connected channel show icon In the PTZ...

Страница 104: ...nu Press again menu move to Time Event Thumbnail Smart Search Text VCA Click cancel in the recorder menu or press to exit search menu Play Go to Playback mode During playback pause the video Joystick...

Страница 105: ...ons or menu error status etc Enter Completes entering data for the password or title PTZ Enter or exit PTZ mode Menu Open PTZ quick menu Enter Enter button under quick menu or pop up menu Channel Chan...

Страница 106: ...M A Panic Continuous C Motion M Alarm A C M C A M A C M A Panic Continuous C Motion M Alarm A C M C A M A C M A Panic Pre Alarm 1 5sec 1 5sec 1 5sec Post Alarm 5sec 1hour 5sec 1hour 5sec 1hour PLAYBA...

Страница 107: ...P Camera 1 RCA 16 IP Camera Audio Out 1 RCA 1 HDMI 1 RCA 1 HDMI 1 RCA 1 HDMI Alarm In 4 Input Terminal block 8 Input Terminal block 16 Input Terminal block Alarm Out 1 Output Terminal block 1 Output T...

Страница 108: ...ibution through special ised trade channels only VIDEOR E Hartig GmbH Carl Zeiss Stra e 8 63322 R dermark Germany Tel 49 0 6074 888 0 Fax 49 0 6074 888 100 www videor com www eneo security com Technic...

Отзывы: