

35895-Pagoda_PIR-WB 20160720
Endon Lighting, LS9 0SE
Assembly/ User Instructions Continued
• We recommend that you use H05RN-F specification cable (not supplied) which is an outdoor grade, rubber
sheathed cable. The mains supply cable must have a minimum cross sectional area of 1.0mm²
• Cables must be protected using suitable conduit or plastic trunking.
You have correctly identified the wires.
The connections are tight.
No loose strands have been left out of the connection block.
Existing fittings must be completely removed before installation
of a new product. Before removing the existing fitting,
carefully
note the position of each set of wires
.
• Remove mounting box (A) from the product by removing dome
nuts (C) and washers (D). Pull terminal block off of retaining
pegs. Carefully pierce a small hole in the rubber gasket in the
centre of the mounting box to allow the cable to pass through.
• Thread the cable through the hole, ensuring the drain hole is at
the base of the mounting box.
• Fix the mounting box to the wall using the screws and plugs
supplied (B). Ensure the wall is capable of holding the weight of
the product. Take care to avoid damaging any concealed wiring
and pipes. The correct fixings should be used for brick or cavity
walls.
Having correctly identified the wiring from your existing light
fitting, pull the wire through the hole and connect to the
connection block inside the product in the following way:
A
B
C
D
Gasket
Drain hole
Front view of
mounting box
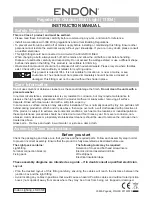
1. This fitting contains two sensors. The first is a Lux sensor and the second is a PIR.
2. The Lux sensor turns on the LEDs when the ambient light level reaches a pre-determined point. When
ambient light levels rise above this then
the LEDs switch off. This sensor is not
adjustable.
3. The PIR sensor has a detection
range of up to 8m as shown in the left
diagram. This can be altered by turning
the ‘sens’ screw.
4. By turning the ‘time’ screw, the time
can be altered between 5 seconds to 5
minutes duration.
5. You may need to make further
adjustments to achieve your ideal light
level setting.
• Fit the product back on to the mounting box and refit washers (D) and dome
nuts (C), tighten dome nuts to secure.
• Using the supplied hexagonal key, undo the screw on the underside of the cone
shaped lid. Lift off the lid to access the lamp housing. Once the lamp is changed review the above process
to refit the lid.
• Replace fuse or circuit breaker and switch on. Your light is now ready for use.
Detection range can be adjusted
by turning 'SENS' screw
Duration the bulb stays on is
adjustable by turning 'TIME' screw
sens
time
PIR & LUX
Sensor
1.8 - 2.5
Meters
8M
4M
Installation
Wiring
Check that...
Commissioning
PIR Operation


