background image

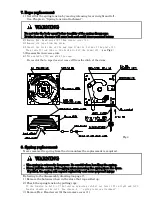
7. Rope replacement 

1)


Get rid of the spring tension by moving releasing lever in right and left.


  See Chapter 4 

‘’

Spring tension attachment

‘’

2)

 Remove Hex. Head screw (6) then remove cover (1). 


3)

 Remove old rope from the drum.


4)

 Insert the lock tube of the new rope from the A side of the plate (1). 

Then install lock tube to the hook ditch of the drum (13).

see Fig.4


5) Reassemble in reverse order. 


6)

 Turn spindle (13) and wind the rope.


  Be careful that a rope does not come off from the ditch of the drum. 


Fig.4 


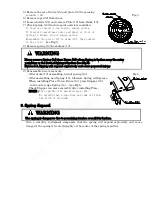
8. Spring replacement 


Never remove the spring from the drum unless the replacement is required. 

    Referring to the disassembly drawing (on page 7), 

1)


Remove the balancer when in the state that rope rolled up. 


2) Check the spring tension by pulling rope. 

If the tension is left, of the tension by moving ratchet set lever (2) in right and left.


    Tension should not be left. See clause 4 

‘’

spring tension attachment

’’


    3) Remove Hex. Head screw (6) then remove cover (1). 


WARNING 

Do not take the body apart before tensility of the spring disappears. 
It take it apart, the rope will snap back and could cause personal injury.


WARNING 


The spring is extremely dangerous. Be careful when handling the spring.


Never pull the center of the spring when removing the spring from the drum.


If pulled, the spring will expand explosively and cause personal injury.


Copied 

digital 

data 

from 

http://www.endo-kogyo.co.jp/

Содержание BS3N

Страница 1: ...ANCER BS3W BS3N BS5W BS5N BS7W BS7N ENDO KOGYO CO LTD BM 10121c WARNING Read this manual before use Keep this manual available Issued on April 2016 C o p i e d d i g i t a l d a t a f r o m h t t p w...

Страница 2: ...e copies of this manual in whole or in part outside of this purpose without receiving prior consent from Endo Kogyo Co Ltd The customer is also prohibited from translating or modifying the content of...

Страница 3: ...pment Please read these messages and follow these instructions carefully CAUTION indicates a hazardous situation which if not avoided could result in minor or moderate injury damage or destruction of...

Страница 4: ...e damage caused by use of non genuine parts 3 Failure damage caused by fire earthquake natural disaster or other unexpected incident 4 Incident caused by fall shock negligence or by inadequate storage...

Страница 5: ...3 Drawing 1 4 Spring tension attachment 2 5 Safety instructions on use 2 6 Inspections 4 7 Rope replacement 5 8 Spring replacement 5 9 Spring disposal 6 10 Parts list 7 C o p i e d d i g i t a l d a...

Страница 6: ...range of rope Never alter the balancer Periodically inspect the balancer 2 Specifications Model Capacity range kg Stroke m Type of rope Mass kg BS3W 1 5 3 0 1 3 Wire rope With thimble Approx 2 3 BS5W...

Страница 7: ...it to the opposite direction the spring will break Please confirm indication of main body the direction of two sides is not same Decrease the spring tension by moving releasing lever in right and left...

Страница 8: ...ver place hands feet etc under suspended loads or movable range of rope Never alter the balancer CAUTION Always use within maximum spring tension Always adjust the spring tension before use Do not ext...

Страница 9: ...hostile environments Items to be inspected Wire rope type Is there any broken wire deformation or kink in wire Allowable number of broken wires in 1 pitch 13 Is there any part of wire rope worn beyon...

Страница 10: ...to the disassembly drawing on page 7 1 Remove the balancer when in the state that rope rolled up 2 Check the spring tension by pulling rope If the tension is left of the tension by moving ratchet set...

Страница 11: ...stalling Plate 15 on Drum 13 place Stopper 16 in the outer edge Spring 14 see Fig 6 Check Stopper can move smoothly after installing Plate NOTE Turn spindle 13 and wind rope 22 Be careful that a rope...

Страница 12: ...aining ring P2B301333 Bracket P2B402102 Hex socket button bolt P2B402092 Plate KA10220410 Screw P2B402093 Bushing P2B301336 Ratchet wheel P2B402034 Washer P2B301337 Spindle P2B100163 Drum P2B300089 Sp...

Страница 13: ...g washer P2B301342 Name plate P2B301418 Name plate P2B301343 Name plate P2B301419 Name plate P2B301344 Name plate P2B301420 Name plate P2B301347 Label P2B301348 Label NOTE When placing an order clearl...

Страница 14: ......

Отзывы: